Interview and knocking, advanced stepping stone, design with mode, code more reasonable
Explanation and application of Javascript Design Pattern System (exercise code)
-
Chapter 2 object oriented
- 2-1 build development environment
- 2-2 what is object-oriented
- 2-3 object oriented inheritance
- 2-4 object oriented encapsulation
- 2-5 object oriented polymorphism
- 2-6 object oriented - application examples
- 2-7 object oriented summary
- 2-8 UML class diagram 1 - Introduction
- 2-9 UML class diagram 2-relation
- 2-10 summary
- Chapter 3 design principles
- Chapter 4 factory mode
- Chapter 5 single case mode
- Chapter 6 adapter mode
- Chapter 7 decorator mode
- Chapter 8 agency mode
- Chapter 9 appearance mode
- Chapter 10 observer model
- Chapter 11 iterator mode
- Chapter 12 state mode
-
Chapter 13 other design modes
- 13-1 overview of other design modes
- 13-2 prototype mode
- 13-3 bridge mode
- 13-4 combination mode
- 13-5 enjoy yuan mode
- 13-6 strategic model
- 13-7 template method mode and responsibility company mode
- 13-8 command mode
- 13-9 memorandum mode
- 13-10 intermediary model
- 13-11 visitor mode and interpreter mode
- 13-12 about interview and daily use
-
Chapter 14 comprehensive application
- 14-1 integrated application - Introduction and demonstration
- 14-2 integrated application UML class diagram analysis
- 14-3 integrated application drawing UML class diagram
- 14-4 integrated application code base environment
- 14-5 comprehensive application - Implementation of List component
- 14-6 comprehensive application implement item & cart
- 14-7 integrated application state mode to realize shopping cart operation
- 14-8 integrated application - realize shopping cart list and discount
- 14-9 comprehensive application implementation log
- 14-10 comprehensive application summary
- Chapter 15 course summary
Chapter 2 object oriented
2-1 build development environment
npm init
npm i webpack webpack-cli --save-dev
//add webapck.dev.config.js file
module.exports = {
  entry: './src/index.js',
  output: {
    path: __dirname,
    filename: './release/bundle.js'
  }
}
# package.json
"dev": "webpack --config ./webpack.dev.config.js --mode development"
npm i webpack-dev-server html-webpack-plugin -D
// webapck.dev.config.js
const path = require('path')
const HtmlWebpackPlugin = require('html-webpack-plugin')

module.exports = {
  entry: './src/index.js',
  output: {
    path: __dirname,
    filename: './release/bundle.js'
  },

  plugins: [
    new HtmlWebpackPlugin({
      template: './index.html'
    })
  ],

  devServer: {
    contentBase: path.join(__dirname, './release'), // Set root
    open: true,  // Open browser automatically
    port: 9000
  }
}
"dev": "webpack-dev-server --config ./webpack.dev.config.js --mode development"
Support Babel NPM I Babel core Babel loader Babel Polyfill Babel preset es2015 Babel preset latest-d
Add babel configuration file.babelrc
{
    "presets": ["es2015", "latest"],
    "plugins": []
}
Modify again webpack.config.js
// New module
module: {
  rules: [{
    test: /\.js?$/,  // What documents are we going to check
    exclude: /(node_modules)/,  // Which files to skip
    loader: 'babel-loader'  // loader used
  }]
},
2-2 what is object-oriented
2-3 object oriented inheritance
2-4 object oriented encapsulation
2-5 object oriented polymorphism
2-6 object oriented - application examples
2-7 object oriented summary
2-8 UML class diagram 1 - Introduction
2-9 UML class diagram 2-relation
2-10 summary
Chapter 3 design principles
3-1 design principles - Introduction
- That is, according to which idea or standard to realize the function
- The functions are the same, which can be realized by different design schemes
- With the increase of demand, the role of design can be reflected
3-2 design principles - what is design
-
Design criteria:
- Small is beauty
- 2 let each program do only one thing
- 3 rapid prototyping
- 4. High efficiency and portability
- 5 store data in plain text
- 6. Make full use of software leverage (software reuse)
- 7 use shell scripts to improve leverage and portability
- 8 avoid mandatory user interface
- 9 let every program be called a filter
-
Small rules:
- Allow users to customize the environment
- Make the operating system kernel as small and lightweight as possible
- Use lowercase letters and keep them as short as possible
- Silence is gold
- The sum of parts is greater than the whole
- Looking for 90% solution
originate from: UNIX/LINUX design idea
3-3 design principles - 5 principles
Five design principles of solid
- S - single responsibility principle
- O - open and closed principle
- L - Richter's principle of substitution
- I - Interface independence principle
- D - principle of Dependence Inversion
Principle of single responsibility
- One program does one thing well
- If the function is too complex, it is split, and each part remains independent
Open and closed principle
- Closed to expansion development and modification
- When adding requirements, expand new code instead of modifying existing code
- This is the ultimate goal of software design
Richter's principle of substitution
- Subclass can cover parent class
- Where the parent class can appear, the child class can appear
- Less use in JS (weak type & less use of inheritance)
Principle of interface independence
- Keep the interface single and independent, avoid "fat interface"
- There is no interface (except typescript) in JS, which is seldom used
- Similar to the single responsibility principle, the interface is more concerned here
Principle of Dependence Inversion
- Interface oriented programming, which depends on abstraction rather than concrete
- The user only pays attention to the interface but not the implementation of the concrete class
- Less used in JS
Summary of design principles
- There are many manifestations of so, detailed introduction
- LID is less reflected, but its intention should be understood
Using Promise to explain S-O
function loadImg(src) {
  var promise = new Promise(function(resolve, reject) {
    var img = document.createElement('img')
    img.onload = function () {
      resolve(img)
    }
    img.onerror = function () {
      reject('Image load failed')
    }
    img.src = src
  })
  return promise
}

var src = 'https://www.imooc.com/static/img/index/logo.png'
var result = loadImg(src)

result.then(function (img) {
  console.log('img.width', img.width)
  return img
}).then(function (img) {
  console.log('img.height', img.height)
}).catch(function (err) {
  console.error(err)
})
- Single responsibility principle: Logic in each then only does one thing well
- Open and closed principle: if new demand is added, expand then
- Closed to expansion development and modification
3-4 demonstration with promise
It's 3-3 code
3-5 introduction to design mode
From design to pattern
What is design? Design is design, pattern is pattern, the two are separated.
How to learn design patterns?
- Understand the reason and intention of each design
- Experience its real use scenarios through classic applications
- Think more when coding and try to imitate
3-6 introduction of 23 design modes
In fact, there are three types of design patterns:
- Creation type
- Combined type
- Behavioral type
These 23 design patterns are scattered among the three types.
Creation type
- Factory mode (factory method mode, abstract factory mode, builder mode)
- Factory pattern is about how to face object, how to create object and how to generate
- Singleton mode
- The singleton mode is to say what to do if there is only one specified object in this system, and the second one appears
- Prototype mode
- Prototype mode is about how to generate another new object by copying an existing object
Structural type
- Adapter mode
- Decorator mode
- proxy pattern
- Appearance mode
- Bridge mode
- Combination mode
- Enjoy yuan mode
Behavioral type
- Strategic model
- Template method pattern
- Observer mode
- Iterator mode
- Responsibility chain mode
- Command mode
- Memo mode
- State mode
- Visitor mode
- Intermediary mode
- Interpreter mode
How to explain the design mode
- Introduction and examples (easy to understand examples in life)
- Draw UML class diagram and write demo code
- Combined with classic application scenarios, explain how the design pattern is used
3-7 interview 1
- When taking a taxi, you can take a special or express train. Any car has a license plate number and name
- Analysis: public parent class (license plate number and name) shall be designed, and there are two sub classes (special car and express car) under the parent class
- Different car prices are different, 1 yuan per kilometer for express, 2 yuan per kilometer for special car
- Analysis: there are different prices in the subclass
- Display vehicle information at the beginning of the trip
- Driving has something to do with the car, but it doesn't matter whether it's a special or an express. So we need to rely on abstract programming, so the journey is only related to the car, not to specific cars, that is to say, no matter what car has driving information
- So we need to create another "journey" class, which refers to a certain attribute of the car, through which we can get the information of the car (license plate number, name, unit price)
- At the end of the trip, display the taxi amount (assuming the trip is 5 km)
- "Amount" belongs to the itinerary. I bought 10000 cars and lost them. There's no trip amount
UML class diagram

class Car {
  constructor(number, name) {
    this.number = number
    this.name = name
  }
}

class Kuaiche extends Car {
  constructor(number, name) {
    super(number, name)
    this.Price = 1
  }
}

class Zhuanche extends Car {
  constructor(number, name) {
    super(number, name)
    this.Price = 2
  }
}

class Trip {
  constructor(car) {
    this.car = car
  }

  start() {
    console.log(`Journey start, name: ${this.car.name},license plate number: ${this.car.Price}`)
  }

  end() {
    console.log(`End of trip, price: ${this.car.Price * 5}`)
  }
}

let car = new Kuaiche('101', 'Jetta')
let trip = new Trip(car)
trip.start()
trip.end()
3-8 interview questions 2
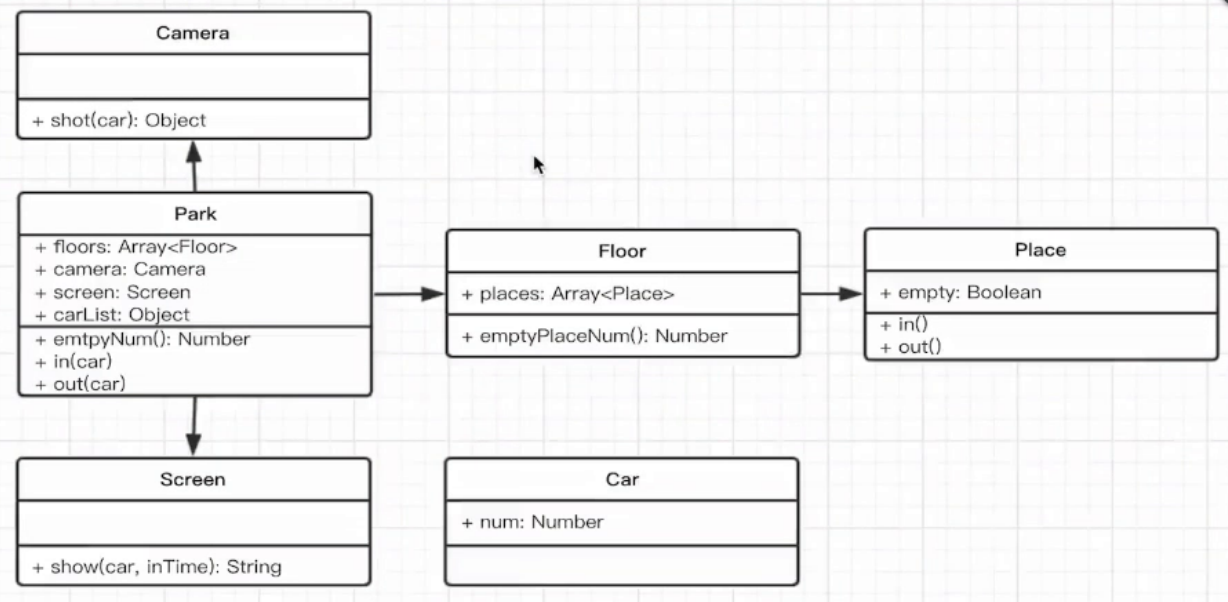
- A parking lot, divided into three floors, with 100 parking spaces on each floor
- Analysis: three classes: parking lot, each floor, parking space, three classes
- Each parking space can monitor the entry and exit of vehicles
- Resolution: we need to define a method or attribute for the parking space class to monitor the vehicle entering and leaving. The monitoring method needs to change a state of the parking space class, and the parking space is not empty
- Display the number of empty spaces on each floor before vehicles enter
- Analysis: before the vehicle enters, it must face the parking lot class, so this information should be released in the parking lot class, so we add a method to dynamically calculate and display the empty parking spaces of each layer (each layer is an instance of a class), so the method to display the empty parking spaces in the layer class must be added, and finally it will be displayed after the parking lot class accumulates
- When the vehicle enters, the camera can recognize the license plate number and time
- Analysis: we need to add the class of camera. This class has a way to recognize the license plate number and record the driving in time. That is to say, the camera class inputs the car instance and outputs the license plate number and time. This license plate number and time need to be saved in the parking lot class. For the parking lot class, we need to add the attribute of the vehicle list
- When the vehicle comes out, the exit display shows the license plate number and the parking time
- Analysis: we also need to add the display class, get the license plate number and the recorded driving in time through the display, and then subtract the event from the current time to get the parking time
// vehicle
class Car {
    constructor(num) {
        this.num = num
    }
}

// Entrance camera
class Camera {
    shot(car) {
        return {
            num: car.num,
            inTime: Date.now()
        }
    }
}

// Exit display
class Screen {
    show(car, inTime) {
        console.log('license plate number', car.num)
        console.log('Parking Duration', Date.now() - inTime)
    }
}

// Parking lot
class Park {
    constructor(floors) {
        this.floors = floors || []
        this.camera = new Camera()
        this.screen = new Screen()
        this.carList = {}
    }
    in(car) {
        // Get camera information: number time
        const info = this.camera.shot(car)
        // Park in a parking space
        const i = parseInt(Math.random() * 100 % 100)
        const place = this.floors[0].places[i]
        place.in()
        info.place = place
        // Record information
        this.carList[car.num] = info
    }
    out(car) {
        // pick up information
        const info = this.carList[car.num]
        const place = info.place
        place.out()

        // Display time
        this.screen.show(car, info.inTime)

        // Delete information store
        delete this.carList[car.num]
    }
    emptyNum() {
        return this.floors.map(floor => {
            return `${floor.index} Layer and ${floor.emptyPlaceNum()} Parking spaces`
        }).join('\n')
    }
}

// layer
class Floor {
    constructor(index, places) {
        this.index = index
        this.places = places || []
    }
    emptyPlaceNum() {
        let num = 0
        this.places.forEach(p => {
            if (p.empty) {
                num = num + 1
            }
        })
        return num
    }
}

// parking lot
class Place {
    constructor() {
        this.empty = true
    }
    in() {
        this.empty = false
    }
    out() {
        this.empty = true
    }
}

// Test code------------------------------
// Initialize parking
const floors = []
for (let i = 0; i < 3; i++) {
    const places = []
    for (let j = 0; j < 100; j++) {
        places[j] = new Place()
    }
    floors[i] = new Floor(i + 1, places)
}
const park = new Park(floors)

// Initialize vehicle
const car1 = new Car('A1')
const car2 = new Car('A2')
const car3 = new Car('A3')

console.log('First car in')
console.log(park.emptyNum())
park.in(car1)
console.log('Second car in')
console.log(park.emptyNum())
park.in(car2)
console.log('The first car left')
park.out(car1)
console.log('The second car leaves')
park.out(car2)

console.log('Third car in')
console.log(park.emptyNum())
park.in(car3)
console.log('The third car leaves')
park.out(car3)
3-9 summary
Chapter 4 factory mode
principle
- Encapsulate the new operation separately
- When new is encountered, consider whether factory mode should be used
Example
- You go to buy hamburgers, order and take the meals directly, but you don't make them by yourself
- Stores should "package" hamburgers and give them directly to customers
/**
 * For example of factory mode, the logic is as follows:
 *
 * --------------------------    ----------------|
 * |       Creator          |    |  Product      |
 * |------------------------|    |---------------|
 * |                        |    | + name:String |
 * |------------------------| -> |---------------|
 * | + create(name):Product |    | + init()      |
 * --------------------------    | + fn1()       |
 *                               | + fn2()       |
 *                               ----------------|
 */

class Product {
    constructor(name) {
        this.name = name;
    }

    init() {
        console.log("init", this.name);
    }

    fn1() {
        console.log("fn1", this.name);
    }

    fn2() {
        console.log("fn2", this.name);
    }
}

class Creator {
    create(name) {
        return new Product(name);
    }
}

// test
const creator = new Creator();
const p1 = creator.create("test1");
const p2 = creator.create("test2");

p1.init();
p2.init();
p1.fn1();
p2.fn1();
p1.fn2();
p2.fn2();
scene
- jQuery - $('div')
- React.createElement
- vue asynchronous component
React.createElement

React.createElement The advantage of using factory mode: if we don't use createElement to encapsulate new VNode(tag,attrs, children), when generating VNode samples, we still let the user verify each attribute parameter, and the display is unreasonable. Moreover, after using factory mode, the user has no relationship with how the internal constructor changes.
vue asynchronous component

The pattern of creating components after Vue asynchronous loading components
Using factory pattern to isolate factory internal constructors from users
Verification of design principles
- Separation of constructor and creator
- Conform to the principle of opening and closing
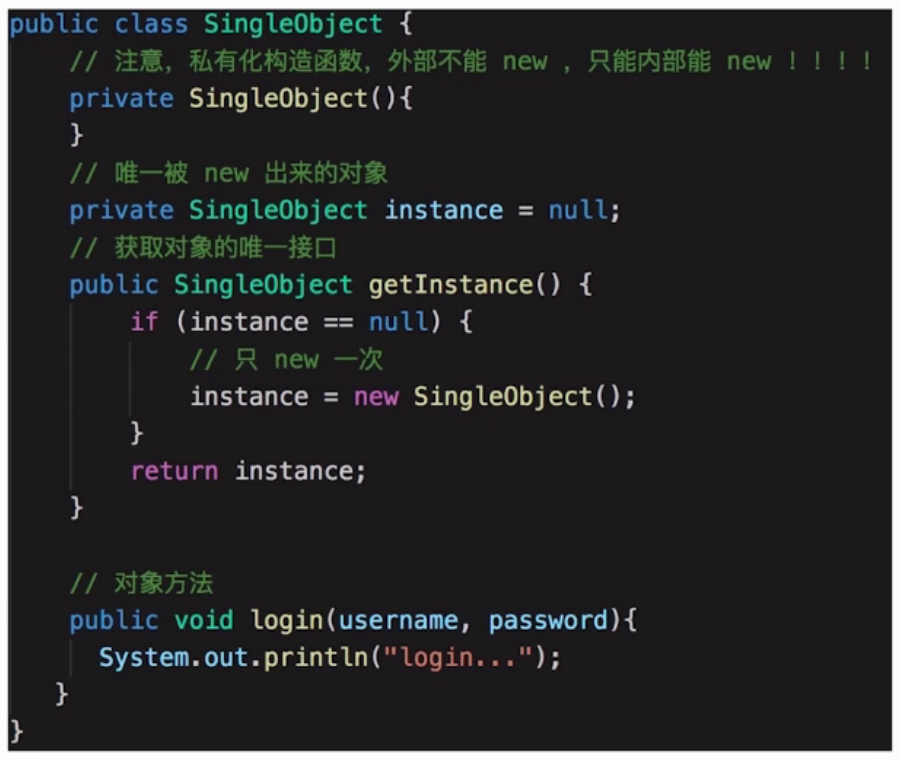
Chapter 5 single case mode
- Only used in the system
- A class has only one instance
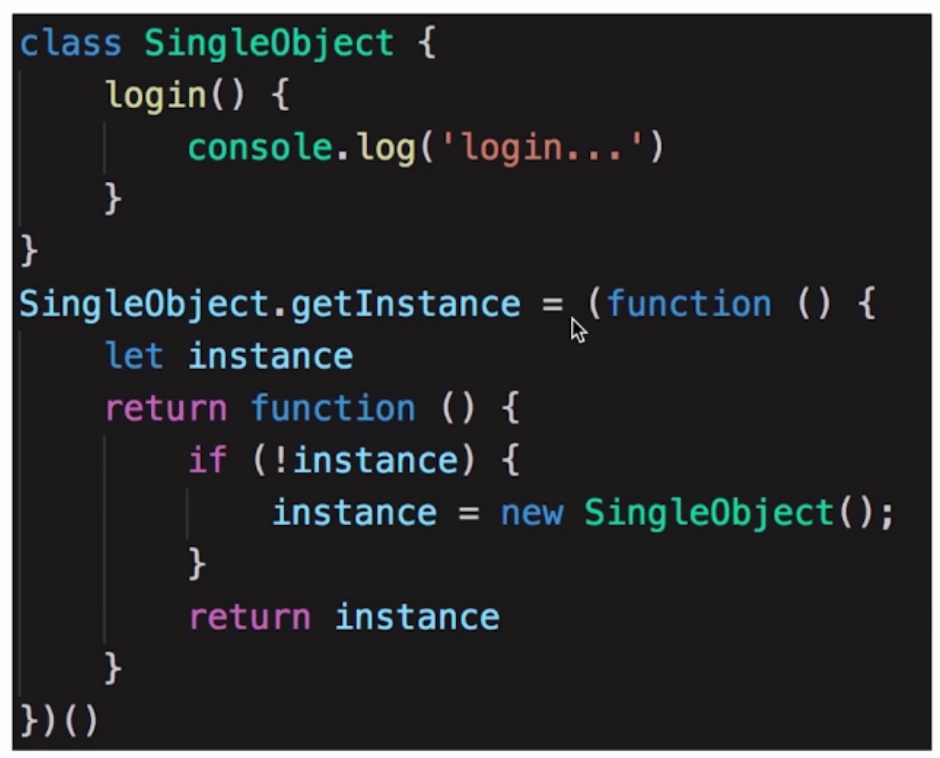
/**
 * Singleton mode
 */

class SingleObject {
    login() {
        console.log("login...");
    }
}

// Create a static self executing method
SingleObject.getInstance = (function() {
    let instance;
    return function() {
        if (!instance) {
            instance = new SingleObject();
        }

        return instance;
    }
})()


// test
let obj1 = SingleObject.getInstance();
obj1.login();
let obj2 = SingleObject.getInstance();
obj2.login();

console.log(obj1 === obj2);
Example
- Login box
class  LoginForm() {

    constructor() {

        this.state  =  'hide'

    }

    hide() {

        if(this.state  ===  'hide'){

            console.log('Hidden')

            return

        }

        this.state  ==  'hide'

        consoel.log('Hide success')

    }

    show() {

        if(this.state  ===  'show'){

            console.log('Already displayed')

            return

        }

        this.state  ===  'show'

        console.log('Show success')

    }

}

LoginForm.instance  = (function(){

    let  instance

    return  function(){

    if(!instance){
        instance  =  new  LoginForm()
    }

    return  instance

}

})()

let  login1  =  LoginForm.instance()

login1.hide()

let  login2  =  LoginForm.instance()

login2.hide()
- Shopping Cart
- Stores in vuex and redux
jQuery always has one
Verification of design principles
- Conform to the principle of single responsibility, only instantiate the unique object
- There is no specific principle of opening and closing, but it will never violate the principle of opening and closing
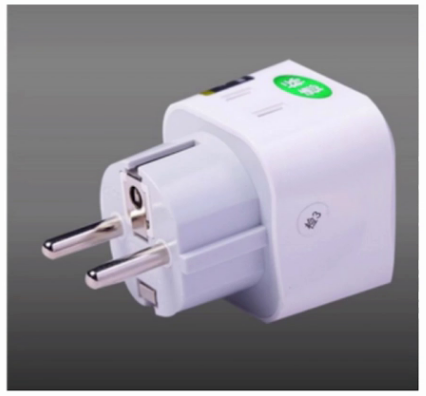
Chapter 6 adapter mode
- Incompatible with user on interface format
- Add an adapter interface in the middle

/**
 * Adapter mode
 */

class Adapter {
    specificRequest() {
        return "Old interface content"
    }
}

class Target {
    constructor() {
        this.adapter = new Adapter();
    }

    request() {
        let info = this.adapter.specificRequest();
        return `${info} - handle... - New interface content`;
    }
}

// test
let target = new Target();
const r = target.request();
console.log(r);
scene
- Encapsulate old interfaces
- Vue's computed
Verification of design principles
- Separate excuses from users
- Conform to the principle of opening and closing
Chapter 7 decorator mode
- Add new features to objects
- Do not change its original structure and function
- Separate the existing object and the decorator, which exist independently
/**
 * Decorator mode
 */

class Circle {
    draw() {
        console.log("Draw a circle");
    }
}

class Decorator {
    constructor(circle) {
        this.circle = circle;
    }

    draw() {
        this.circle.draw();
        this.setRedBorder(this.circle);
    }

    setRedBorder(circle) {
        console.log("Set red border");
    }
}

// test
let c = new Circle();
c.draw();

let d = new Decorator(c);
d.draw();
Chapter 8 agency mode
8-1 agent mode - Introduction and demonstration
- Consumer does not have access to the target object
- Add agent in the middle, and do authorization and control through agent
- The proxy class is separated from the target class, separating the target class and the user
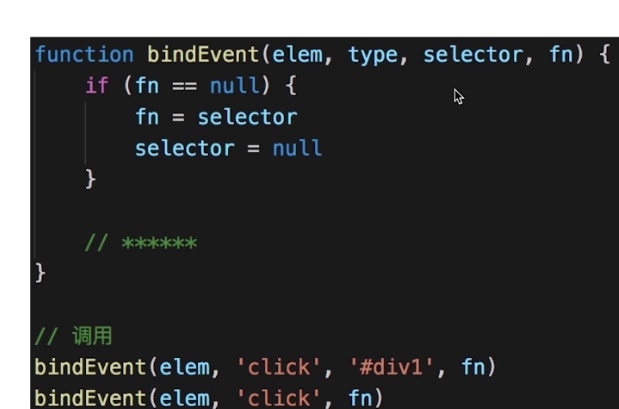
8-2 proxy mode - scenario 1 (event proxy and jq proxy)
8-3 agent mode - scenario 2 (star agent)
/**
 * proxy pattern
 */

class ReadImg {
    constructor(filename) {
        this.filename = filename;
        this.loadFromDisk();
    }

    loadFromDisk() {
        console.log("Load data from hard disk" + this.filename);
    }

    display() {
        console.log("Display data" + this.filename);
    }
}

class ProxyImg {
    constructor(filename) {
        this.realImg = new ReadImg(filename);
    }

    display() {
        this.realImg.display();
    }
}


// test
let proxyImg = new ProxyImg("1.png");
proxyImg.display();


// =================================

/**
 * Proxy class using ES6 syntax to demonstrate an example of proxy pattern, star broker
 */

let star = {
    name: "Zhang xx",
    age : 25,
    phone: "138123456789"
}

let agent = new Proxy(star, {
    get: function(target, key) {
        if (key === "phone") {
            return "agent phone: 13555555555";
        }
        else if (key === "price") {
            return 150000;
        }
        return target[key];
    },
    set: function(target, key, val) {
        if (key === "customPrice") {
            if (val < 10000) {
                throw new Error("The price is too low");
            } else {
                target[key] = val;
                return true;
            }
        }
    }
})

// test
console.log(agent.name);
console.log(agent.phone);
console.log(agent.age);
console.log(agent.price);

agent.customPrice = 120000; // OK
console.log(agent.customPrice);

agent.customPrice = 1000; // Error
console.log(agent.customPrice);
8-4 agent & Adapter & Decoration mode comparison
- Agent mode VS adapter mode
- Adapter mode: provide a different interface (such as different versions of plug)
- Agent mode: as like as two peas
- Agent mode VS decorator mode
- Decorator mode: extended function, the original function remains unchanged and can be used directly
- Agent mode: display the original function, but after restriction or castration
Chapter 9 appearance mode
9-1 appearance mode
- Provides a high-level interface for a set of interfaces in a subsystem
- Users use high-level interface
- It does not conform to the principle of single responsibility and the principle of open and closed, so it should be used carefully and not abused
Chapter 10 observer model
10-1 observer mode - Introduction and demonstration
- Publish and subscribe
- One to many
- The separation of subject and observer is not active triggering but passive monitoring, and the two are decoupled
10-2 observer mode - scenario 1jquery
10-3 observer mode - scene 2NodeJs custom event
/**
 * Observer pattern, an example of using nodejs's events module
 */

const EventEmitter = require("events").EventEmitter;

// =========Basic usage of EventEmitter=============
const emitter1 = new EventEmitter();

// Listen for some events
emitter1.on("some", info => {
    console.log("fn1", info);
})

// Listen for some events
emitter1.on("some", info => {
    console.log("fn2", info);
})

// Trigger some event
emitter1.emit("some", "xxxx");

// =============================================

// Use inheritance to implement EventEmitter
class Dog extends EventEmitter {
    constructor(name) {
        super();
        this.name = name;
    }
}

let dog = new Dog("dog");
dog.on("bark", function() {
    console.log(this.name, " barked-1");
})

dog.on("bark", function() {
    console.log(this.name, " barked-2");
})

setInterval(() => {
    dog.emit("bark")
}, 1000);
10-4 observer mode - other scenarios
/**
 * Observer mode
 */

// Subject, save state, trigger all observer objects after state change
class Subject {
    constructor() {
        this.state = 0;
        this.observers = [];
    }

    getState() {
        return this.state;
    }

    setState(state) {
        this.state = state;
        this.notifyAllObservers();
    }

    notifyAllObservers() {
        this.observers.forEach(observer => {
            observer.update();
        })
    }

    attach(observer) {
        this.observers.push(observer);
    }
}

// Observer
class Observer {
    constructor(name, subject) {
        this.name = name;
        this.subject = subject;
        this.subject.attach(this);
    }

    update() {
        console.log(`${this.name} update! state is: ${this.subject.state}`);
    }
}


// test
let s = new Subject();
let o1 = new Observer("o1", s);
let o2 = new Observer("o2", s);
let o3 = new Observer("o3", s);
let o4 = new Observer("o4", s);

s.setState(1);
s.setState(2);
Chapter 11 iterator mode
11-1 iterator pattern - Introduction
- Sequential access to a collection
- The user does not need to know the internal structure of the collection (encapsulation)
- Iterator object separated from target object
- Iterators separate the consumer from the target object
11-2 iterator pattern - Demo
11-3 iterator mode - scenario 1(ES6 Iterator)
11-4 iterator mode - scenario 2
11-5 iterator pattern - code demonstration and summary
/**
 * Iterator mode
 */

class Iterator {
    constructor(container) {
        this.list = container.list;
        this.index = 0;
    }

    next() {
        if (this.hasNext()) {
            return this.list[this.index++];
        }
        return null;
    }

    hasNext() {
        if (this.index >= this.list.length) {
            return false;
        }
        return true;
    }
}

class Container {
    constructor(list) {
        this.list = list;
    }

    // Generate ergodic
    getIterator() {
        return new Iterator(this);
    }
}


// test
const arr = [1, 2, 3, 4, 5];
let container = new Container(arr);
let it = container.getIterator();
while(it.hasNext()) {
    console.log(it.next());
}

// =============Generation using ES6's iterator=============
function each(data) {
    // Generate ergodic
    let it = data[Symbol.iterator]();

    let item;
    do {
        // The traverser generates iterative content, including the value and done attributes,
        // The done property replaces the custom hasNext() method,
        // false means there is still data, and true means the iteration has been completed
        item = it.next();
        if (!item.done) {
            console.log(item.value);
        }
    } while (!item.done);
}

// The Iterator of ES6 has been encapsulated in the syntax for...of, which can be used directly
function each2(data) {
    for (const item of data) {
        console.log(item);
    }
}


// test
const arr2 = [10, 20, 30, 40, 50, 60];
let m = new Map();
m.set("a", 100);
m.set("b", 200);
m.set("c", 300);

each(arr2);
each(m);

each2(arr2);
each2(m);
Chapter 12 state mode
12-1 state mode - Introduction and demonstration
- Allows an object to change its behavior when its internal state changes, and the object appears to modify its class
/**
 * State mode
 */

// Simulate traffic light status
class State {
    constructor(color) {
        this.color = color;
    }

    handle(context) {
        console.log(`Switch to ${this.color} `);
        context.setState(this);
    }
}

// subject
class Context {
    constructor() {
        this.state = null;
    }

    getState() {
        return this.state;
    }

    setState(state) {
        this.state = state;
    }
}


// test
let context = new Context();
let green = new State("green light");
let yellow = new State("Yellow light");
let red = new State("red light");

// Green light on
green.handle(context);
console.log(context.getState());
// Yellow light on
yellow.handle(context);
console.log(context.getState());
// Red light on
red.handle(context);
console.log(context.getState());
12-2 state mode - scenario 1 (finite state machine)
12-3 state mode - scenario 2 (write a promise)
import * as fs from "fs";
import * as StateMachine  from 'javascript-state-machine';
import * as request from 'request';


// promise state: resolve(pending => fullfilled), reject(pending => rejected)
const fsm = new StateMachine({
  init: 'pending',
  transitions: [
    {
      name: 'resolve',
      form: 'pending',
      to: 'fullfilled'
    }, {
      name: 'reject',
      from: 'pending',
      to: 'rejected'
    }
  ],
  methods: {
    onResolve: function(state, data, data1) {
      // sate current state machine instance; data fsm.resolve(xxx) parameters passed
      // console.log(state, data)
      data.succFnList.forEach(fn => fn(data1));
    },
    onReject: function(state, data) {
      data.failFnList.forEach(fn => fn());
    }
  },

});


class MyPromise {

  succFnList: any[];
  failFnList: any[];

  constructor(fn) {
    this.succFnList = [];
    this.failFnList = [];

    fn((data) => {
      // resolve function
      fsm.resolve(this, data);
    },
    () => {
      // reject function
      fsm.reject(this);
    });
  }

  then(succFn, failFn) {
    this.succFnList.push(succFn);
    this.failFnList.push(failFn);
  }

}


function downloadImg(src) {
  const promise = new MyPromise(function(resolve, reject) {
    request(src, function(error, response, body) {
      if (error) {
        reject();
      }
      resolve(body);
    })
  });

  return promise;
}

const imgSrc = 'https://www.npmjs.com/package/javascript-state-machine';

const imgPromise = downloadImg(imgSrc);
imgPromise.then(function(data) {
  console.log(fsm.state)
  fs.writeFileSync('./test.html', data)
}, function(error) {
  console.log(error);
});
Chapter 13 other design modes
13-1 overview of other design modes
13-2 prototype mode
- Prototype mode refers to using prototype instances to point to the kind of objects created, and creating new objects by copying these prototypes.
/**
 * Prototype mode
 * prototype It can be understood as a kind of underlying principle of class in ES6, but class is the basis of implementing object-oriented, not serving a certain pattern
 */

// Create a prototype
let prototype = {
    getName: function() {
        return this.first + " " + this.last;
    },

    say: function() {
        console.log("Hello!");
    }
}

// Create x based on Prototype
let x = Object.create(prototype);
x.first = "A";
x.last = "B";
console.log(x.getName());
x.say();

// Create y based on Prototype
let y = Object.create(prototype);
y.first = "C";
y.last = "D";
console.log(y.getName());
y.say();
13-3 bridge mode
- The Bridge pattern separates the abstract from its implementation so that they can all change independently.
/**
 * Bridge mode
 */

class Color {
    constructor(name) {
        this.name = name;
    }
}

class Shape {
    constructor(name, color) {
        this.name = name;
        this.color = color;
    }

    draw() {
        console.log(`use ${this.color.name}Color painted a ${this.name}`);
    }
}


// test
let red = new Color("red");
let yellow = new Color("yellow");
let circle = new Shape("circle", red);
circle.draw();

let triangle = new Shape("triangle", yellow);
triangle.draw();
13-4 combination mode
- Combine objects into a tree structure to represent the overall part hierarchy.
- Through the multi-state representation of objects, users can use single object and composite object consistently.
class TrainOrder {
    create () {
        console.log('Create ticket order')
    }
}
class HotelOrder {
    create () {
        console.log('Create hotel order')
    }
}

class TotalOrder {
    constructor () {
        this.orderList = []
    }
    addOrder (order) {
        this.orderList.push(order)
        return this
    }
    create () {
        this.orderList.forEach(item => {
            item.create()
        })
        return this
    }
}
// You can buy tickets on the ticket website and book rooms at the same time
let train = new TrainOrder()
let hotel = new HotelOrder()
let total = new TotalOrder()
total.addOrder(train).addOrder(hotel).create()
13-5 enjoy yuan mode
- Sharing technology is used to effectively support the reuse of a large number of fine-grained objects. The system only uses a small number of objects, and these objects are very similar, the state change is very small, and the object can be reused many times. Because the shareware pattern requires that the objects that can be shared must be fine-grained objects, it is also called lightweight pattern, which is an object structure pattern
let examCarNum = 0         // Total number of driving test vehicles
/* Driving test object */
class ExamCar {
    constructor(carType) {
        examCarNum++
        this.carId = examCarNum
        this.carType = carType ? 'Manual gear' : 'automatic transmission'
        this.usingState = false    // Is it in use
    }

    /* Test in this car */
    examine(candidateId) {
        return new Promise((resolve => {
            this.usingState = true
            console.log(`examinee- ${ candidateId } Start at ${ this.carType }Driving test car- ${ this.carId } Take the exam`)
            setTimeout(() => {
                this.usingState = false
                console.log(`%c examinee- ${ candidateId } stay ${ this.carType }Driving test car- ${ this.carId } End of last exam`, 'color:#f40')
                resolve()                       // The exam will be finished in 0-2 seconds
            }, Math.random() * 2000)
        }))
    }
}

/* Manual vehicle object pool */
ManualExamCarPool = {
    _pool: [],                  // Driving test object pool
    _candidateQueue: [],        // Candidate queue

    /* List of registered candidates' ID */
    registCandidates(candidateList) {
        candidateList.forEach(candidateId => this.registCandidate(candidateId))
    },

    /* Registered manual candidates */
    registCandidate(candidateId) {
        const examCar = this.getManualExamCar()    // Find an unoccupied manual driving test car
        if (examCar) {
            examCar.examine(candidateId)           // Start the test. Let the next candidate in the queue start the test
              .then(() => {
                  const nextCandidateId = this._candidateQueue.length && this._candidateQueue.shift()
                  nextCandidateId && this.registCandidate(nextCandidateId)
              })
        } else this._candidateQueue.push(candidateId)
    },

    /* Register manual */
    initManualExamCar(manualExamCarNum) {
        for (let i = 1; i <= manualExamCarNum; i++) {
            this._pool.push(new ExamCar(true))
        }
    },

    /* Obtain the manual gear vehicle whose status is not occupied */
    getManualExamCar() {
        return this._pool.find(car => !car.usingState)
    }
}

ManualExamCarPool.initManualExamCar(3)          // There are three driving test cars in total
ManualExamCarPool.registCandidates([1, 2, 3, 4, 5, 6, 7, 8, 9, 10])  // 10 examinees come to the exam
13-6 strategic model
- Define a series of algorithms, encapsulate them one by one, and make them interchangeable
/**
 * Strategic model
 */

// In general, no policy mode is used
class User {
    constructor(type) {
        this.type = type;
    }

    buy() {
        if (this.type === "ordinary") {
            console.log("Purchase by ordinary users");
        } else if (this.type === "member") {
            console.log("Member user purchase");
        } else if (this.type === "vip") {
            console.log("Senior member purchase");
        }
    }
}

// use
let u1 = new User("ordinary");
u1.buy();
let u2 = new User("member");
u2.buy();
let u3 = new User("vip");
u3.buy();


// ================Use policy mode to adjust===================
class OrdinaryUser {
    buy() {
        console.log("Purchase by ordinary users");
    }
}

class MemberUser {
    buy() {
        console.log("Member user purchase");
    }
}

class VipUser {
    buy() {
        console.log("Advanced member user purchase");
    }
}


// test
let ou = new OrdinaryUser();
ou.buy();
let mu = new MemberUser();
mu.buy();
let vu = new VipUser();
vu.buy();
13-7 template method mode and responsibility company mode
/**
 * Responsibility chain mode
 */

class Action {
    constructor(name) {
        this.name = name;
        this.nextAction = null;
    }

    setNextAction(action) {
        this.nextAction = action;
    }

    handle() {
        console.log(`${this.name} Action performed`);
        if (this.nextAction) {
            this.nextAction.handle();
        }
    }
}


// test
let a1 = new Action("group leader");
let a2 = new Action("manager");
let a3 = new Action("chief inspector");
a1.setNextAction(a2);
a2.setNextAction(a3);
a1.handle();
13-8 command mode
- Encapsulate a request into an object, so that you can use different requests to parameterize the client, queue the request or record the request log, which can provide command revocation and recovery functions.
/**
 * Command mode
 */

class Receiver {
    exec() {
        console.log("implement");
    }
}

class Command {
    constructor(receiver) {
        this.receiver = receiver;
    }

    cmd() {
        console.log("Trigger command");
        this.receiver.exec();
    }
}

class Invoker {
    constructor(command) {
        this.command = command;
    }

    invoke() {
        console.log("start");
        this.command.cmd();
    }
}


// test
let soldier = new Receiver();
let trumpeter = new Command(soldier);
let general = new Invoker(trumpeter);
general.invoke();
13-9 memorandum mode
- Without destroying encapsulation, capture the internal state of an object and save the state outside the object. In this way, the object can be restored to the saved state later.
/**
 * Memo mode
 */

// Notes
class Memento {
    constructor(content) {
        this.content = content;
    }

    getContent() {
        return this.content;
    }
}

// Notes list
class CareTaker {
    constructor() {
        this.list = [];
    }

    add(memento) {
        this.list.push(memento);
    }

    get(index) {
        return this.list[index];
    }
}

// editor
class Editor {
    constructor() {
        this.content = null;
    }

    setContent(content) {
        this.content = content;
    }

    getContent() {
        return this.content;
    }

    saveContentToMemento() {
        return new Memento(this.content);
    }

    getContentFromMemento(memento) {
        this.content = memento.getContent();
    }
}


// test
let editor = new Editor();
let careTaker = new CareTaker();

editor.setContent("111");
editor.setContent("222");
careTaker.add(editor.saveContentToMemento()); // backups
editor.setContent("333");
careTaker.add(editor.saveContentToMemento()); // backups
editor.setContent("444");

console.log(editor.getContent());
editor.getContentFromMemento(careTaker.get(1)); // revoke
console.log(editor.getContent());
editor.getContentFromMemento(careTaker.get(0)); // revoke
console.log(editor.getContent());
13-10 intermediary model
- Decouple objects from each other. After adding a mediator object, all related objects communicate through the mediator object instead of referring to each other, so when an object changes, you only need to notify the mediator object. Mediators make objects loosely coupled and can independently change their interactions. tertium quid
The pattern makes the mesh many to many relationship become a relatively simple one to many relationship (similar to the observer pattern, but one-way, managed by the mediator)
/**
 * Intermediary model
 */

class A {
    constructor() {
        this.number = 0;
    }

    setNumber(num, m) {
        this.number = num;
        if (m) {
            m.setB();
        }
    }
}

class B {
    constructor() {
        this.number = 0;
    }

    setNumber(num, m) {
        this.number = num;
        if (m) {
            m.setA();
        }
    }
}

class Mediator {
    constructor(a, b) {
        this.a = a;
        this.b = b;
    }

    setA() {
        let number = this.b.number;
        this.a.setNumber(number / 100);
    }

    setB() {
        let number = this.a.number;
        this.b.setNumber(number * 100);
    }
}


// test
let a = new A();
let b = new B();
let m = new Mediator(a, b);
a.setNumber(100, m);
console.log(a.number, b.number);
b.setNumber(100, m);
console.log(a.number, b.number);
13-11 visitor mode and interpreter mode
- Visitor pattern: given a language, define a representation of its grammar, and define an interpreter that uses that representation to interpret sentences in the language.
class Context {
    constructor() {
      this._list = []; // Store terminator expression
      this._sum = 0; // Store non terminal expression (operation result)
    }

    get sum() {
      return this._sum;
    }
    set sum(newValue) {
      this._sum = newValue;
    }
    add(expression) {
      this._list.push(expression);
    }
    get list() {
      return [...this._list];
    }
  }

  class PlusExpression {
    interpret(context) {
      if (!(context instanceof Context)) {
        throw new Error("TypeError");
      }
      context.sum = ++context.sum;
    }
  }
  class MinusExpression {
    interpret(context) {
      if (!(context instanceof Context)) {
        throw new Error("TypeError");
      }
      context.sum = --context.sum;
    }
  }

  /** Here is the test code**/
  const context = new Context();

  // Add in turn: add add add subtract expression
  context.add(new PlusExpression());
  context.add(new PlusExpression());
  context.add(new MinusExpression());

  // Execute in sequence: add + add + subtract expression
  context.list.forEach(expression => expression.interpret(context));
  console.log(context.sum);