jQuery Plug-in Development Model
In the process of software development, we need certain design patterns to guide the development. With patterns, we can better organize our code, and learn a lot of good practices from the patterns summarized by the predecessors.
According to the description of jQuery Advanced Programming, there are three main ways to develop jQuery plug-ins:
-
Extend jQuery by $. extend()
-
Add a new method to jQuery through $.fn
-
Create a component factory using jQuery UI through $. widget()
Usually, we use the second method to develop simple plug-ins. Simplicity is relative to the third method. The third way is to develop higher-level jQuery components. The components developed in this mode have many built-in features of jQuery, such as the automatic storage of plug-in status information, various common methods of plug-in, etc. It is very intimate. Let's not go into details here.
The first way is too simple, just adding a static method to the jQuery namespace or understanding it as jQuery. So when we call a function added through $. extend(), we call it directly through the $symbol ($. myfunction()) without having to select the DOM element ($(' example').myfunction()). See the example below.
$.extend({
    sayHello: function(name) {
        console.log('Hello,' + (name ? name : 'Dude') + '!');
    }
})
$.sayHello(); //call
$.sayHello('Wayou'); //Call with parameter
Operation results:

In the code above, a sayHello function is added to jQuery through $. extend(), and then invoked directly through $. At this point, you can assume that we have completed a simple jQuery plug-in.
But as you can see, it's more convenient to define some auxiliary methods in this way. For example, a custom console that outputs information in a specific format can be called by jQuery anywhere in the program after defining it once.
$.extend({
    log: function(message) {
        var now = new Date(),
            y = now.getFullYear(),
            m = now.getMonth() + 1, //!JavaScript Mid-month begins at 0.
            d = now.getDate(),
            h = now.getHours(),
            min = now.getMinutes(),
            s = now.getSeconds(),
            time = y + '/' + m + '/' + d + ' ' + h + ':' + min + ':' + s;
        console.log(time + ' My App: ' + message);
    }
})
$.log('initializing...'); //call

However, this approach does not take advantage of jQuery's powerful selector. To handle DOM elements and better apply plug-ins to the selected elements, a second development approach is needed. Most of the plug-ins you see or use are developed in this way.
Plug-in development
Let's look at the second way of jQuery plug-in development.
Basic method
Let's first look at its basic format:
$.fn.pluginName = function() {
    //your code goes here
}
Basically, add a method to $. fn, which is the name of our plug-in. Then our plug-in code expands in this method.
For example, if we change the color of all links on the page to red, we can write this plug-in as follows:
$.fn.myPlugin = function() {
    //In here,this Refers to the use of jQuery Selected elements
    //example :$('a'),be this=$('a')
    this.css('color', 'red');
}
Inside the function defined by the plug-in name, this refers to the elements selected by the jQuery selector when we call the plug-in, generally a collection of jQuery types. For example, $('a') returns a collection of all a tags on the page, and this collection is already a jQuery wrapper type, which means that other methods of jQuery can be invoked directly when operating on it without the need to wrap it in dollar symbols.
So in the plug-in code above, we call jQuery's css() method on this, which is equivalent to calling $('a').css().
It's important to understand what this means in this place. So you can see why we can directly commercialize jQuery methods and when this refers to different places, we need to repackage with jQuery to invoke them, as we will see below. Initial learning is easy to be hallucinated by this value, but it is not difficult to understand.
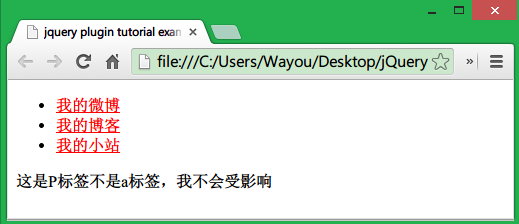
Now you can go to the page and try our code. Put a few links on the page. After calling the plug-in, the link font becomes red.
<ul>
    <li>
        <a href="http://www.webo.com/liuwayong">My micro-blog</a>
    </li>
    <li>
        <a href="http://http://www.cnblogs.com/Wayou/">My blog</a>
    </li>
    <li>
        <a href="http://wayouliu.duapp.com/">My little station</a>
    </li>
</ul>
<p>This is p Label is not a Label, I won't be affected</p>
<script src="jquery-1.11.0.min.js"></script>
<script src="jquery.myplugin.js"></script>
<script type="text/javascript">
    $(function(){
        $('a').myPlugin();
    })
</script>
Operation results:

Next, instead of dealing with a collection, each specific element is processed in the plug-in code, so that we can operate on each element accordingly.
We already know that this refers to the collection returned by the jQuery selector, so we can handle each element in the aggregation by calling the. each() method of jQuery. But at this point, it's important to note that within the each method, this refers to a common DOM element. If we need to call the method of jQuery, we need to repackage it with $.
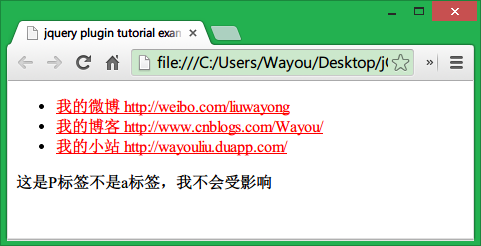
For example, now we want to display the real address of the link in each link. First, we traverse all a tags through each link, then get the value of href attribute and add it to the link text.
After the change, our plug-in code is:
$.fn.myPlugin = function() {
    //In here,this Refers to the use of jQuery Selected elements
    this.css('color', 'red');
    this.each(function() {
        //Operating on each element
        $(this).append(' ' + $(this).attr('href'));
    }))
}
The calling code is the same. We call the plug-in by selecting all a tags on the page.
Operation results:

Now you can write a simple jQuery plug-in. Is it not that difficult?
Now we begin an important part of jQuery plug-in writing, parameter reception.
Support Chain Call
We all know that jQuery's often elegant feature is that it supports chain invocation, and that other methods can be invoked continuously after choosing DOM elements.
To keep the plug-in from breaking this chain call, just return it.
$.fn.myPlugin = function() {
    //In here,this Refers to the use of jQuery Selected elements
    this.css('color', 'red');
    return this.each(function() {
        //Operating on each element
        $(this).append(' ' + $(this).attr('href'));
    }))
}
Let plug-ins receive parameters
A powerful plug-in can be customized by users at will, which requires us to provide a comprehensive consideration when writing plug-ins and try to provide appropriate parameters.
For example, now we don't want the link to be red. We let the user of the plug-in define what color to display. It's very convenient to do this by simply passing in a parameter when the user calls. At the same time, we receive it in the code of the plug-in. On the other hand, in order to be flexible, users can not pass parameters, the plug-in will give the default values of parameters.
In dealing with the acceptance of plug-in parameters, the extension method of jQuery is usually used, as mentioned above, but that is when a single object is passed to the extension method, the object will be merged into jQuery, so we can call the method contained in the new merged object on jQuery, as in the example above. When more than one parameter is passed to the extend method, it merges all parameter objects into the first one. At the same time, if the object has the same name attribute, the latter will override the former when merging.
Using this, we can define an object in the plug-in that holds the default values of plug-in parameters, merge the received parameter objects into the default objects, and finally realize that the parameters specified by the user use the specified values, while the unspecified parameters use the default values of the plug-in.
For the convenience of demonstration, a parameter fontSize is specified to allow font size to be set when calling the plug-in.
$.fn.myPlugin = function(options) {
    var defaults = {
        'color': 'red',
        'fontSize': '12px'
    };
    var settings = $.extend(defaults, options);
    return this.css({
        'color': settings.color,
        'fontSize': settings.fontSize
    });
}
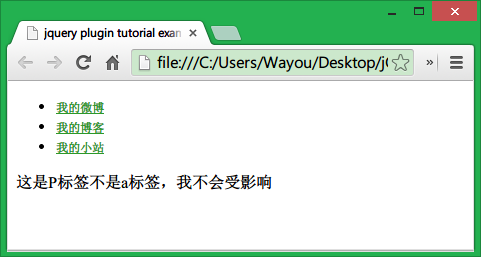
Now, when we call it, we specify the color, the font size is not specified, and we will use the default value of 12px in the plug-in.
$('a').myPlugin({
    'color': '#2C9929'
});
Operation results:

Specify both color and font size:
$('a').myPlugin({
    'color': '#2C9929',
    'fontSize': '20px'
});

Protect default parameters
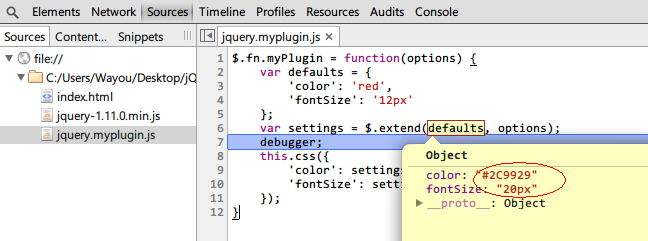
Notice that the value of defaults changes when the above code calls extension, which is not good because it is a plug-in because some things should remain the same, and if you use these defaults in subsequent code, when you access it again, it has been changed by the parameters passed in by the user.

A good idea is to take a new empty object as the first parameter of $. extend, followed by defaults and user-passed parameter objects. The advantage of this is that all values are merged into the empty object, protecting the default values in the plug-in.
$.fn.myPlugin = function(options) {
    var defaults = {
        'color': 'red',
        'fontSize': '12px'
    };
    var settings = $.extend({},defaults, options);//Take an empty object as the first parameter
    return this.css({
        'color': settings.color,
        'fontSize': settings.fontSize
    });
}
At this point, after the plug-in can accept and process parameters, it can write more robust and flexible plug-ins. If you want to write a complex plug-in, the amount of code will be very large. How to organize the code has become a problem that needs to be faced. Without a good way to organize the code, the whole feeling will be chaotic, but also difficult to maintain. Therefore, packaging all the method attributes of the plug-in on an object and using object-oriented thinking to develop it will undoubtedly make the work easy and easy. Many.
Object-Oriented Plug-in Development
//Definition Beautifier Constructive function
var Beautifier = function(ele, opt) {
    this.$element = ele,
    this.defaults = {
        'color': 'red',
        'fontSize': '12px',
        'textDecoration':'none'
    },
    this.options = $.extend({}, this.defaults, opt)
}
//Definition Beautifier Method
Beautifier.prototype = {
    beautify: function() {
        return this.$element.css({
            'color': this.options.color,
            'fontSize': this.options.fontSize,
            'textDecoration': this.options.textDecoration
        });
    }
}
//Use in plug-ins Beautifier object
$.fn.myPlugin = function(options) {
    //Establish Beautifier Entity
    var beautifier = new Beautifier(this, options);
    //Call its method
    return beautifier.beautify();
}
Call method:
$(function() {
    $('a').myPlugin({
        'color': '#2C9929',
        'fontSize': '20px'
    });
})
Specifies a call to text with underscores (our new feature in Beautifier objects, default no underscores, as in the example above):
$(function() {
    $('a').myPlugin({
        'color': '#2C9929',
        'fontSize': '20px',
        'textDecoration': 'underline'
    });
})
On Namespaces
Wrap your code with self-calling anonymous functions
(function() {
    //Definition Beautifier Constructive function
    var Beautifier = function(ele, opt) {
        this.$element = ele,
        this.defaults = {
            'color': 'red',
            'fontSize': '12px',
            'textDecoration': 'none'
        },
        this.options = $.extend({}, this.defaults, opt)
    }
    //Definition Beautifier Method
    Beautifier.prototype = {
        beautify: function() {
            return this.$element.css({
                'color': this.options.color,
                'fontSize': this.options.fontSize,
                'textDecoration': this.options.textDecoration
            });
        }
    }
    //Use in plug-ins Beautifier object
    $.fn.myPlugin = function(options) {
        //Establish Beautifier Entity
        var beautifier = new Beautifier(this, options);
        //Call its method
        return beautifier.beautify();
    }
})();
Pass system variables as variables into the plug-in
;(function($,window,document,undefined){
    //Our code.
    //blah blah blah...
})(jQuery,window,document);
As for the undefined, it's a little interesting that we didn't pass this parameter in order to get the undefined that hasn't been modified, but we received it when we received it, because it hasn't actually been transmitted, so the location of the undefined received is the real undefined. Is it a little hack flavor, worth a careful understanding of the technology, of course, I did not invent, are from the experience of predecessors to learn.
So at last our plug-in became like this:
;(function($, window, document,undefined) {
    //Definition Beautifier Constructive function
    var Beautifier = function(ele, opt) {
        this.$element = ele,
        this.defaults = {
            'color': 'red',
            'fontSize': '12px',
            'textDecoration': 'none'
        },
        this.options = $.extend({}, this.defaults, opt)
    }
    //Definition Beautifier Method
    Beautifier.prototype = {
        beautify: function() {
            return this.$element.css({
                'color': this.options.color,
                'fontSize': this.options.fontSize,
                'textDecoration': this.options.textDecoration
            });
        }
    }
    //Use in plug-ins Beautifier object
    $.fn.myPlugin = function(options) {
        //Establish Beautifier Entity
        var beautifier = new Beautifier(this, options);
        //Call its method
        return beautifier.beautify();
    }
})(jQuery, window, document);
A secure, well-structured, well-organized plug-in is written.
Reference resources:
jQuery Learning Center's article on plug-in development: http://learn.jquery.com/plugins/
jQuery Official Plug-in Center: http://plugins.jquery.com/
jQuery Official Plug-in Publishing Guide: http://plugins.jquery.com/docs/publish/
Reprint address: http://www.cnblogs.com/Wayou/p/jquery_plugin_tutorial.html