
- hapi framework, using Official Web In short, Hapi is a rich framework for building applications and services that enables developers to focus on writing reusable application logic rather than spending time building infrastructure.
- In my own words, it is a node service infrastructure like express, koa.
- This blog was read in the gold digging Brochure hapi-based Guidelines for Backend Development of Node.js Applets And after the practice, record the practice process and the pit trampled.Interested readers can support reading the original digging brochure.
Joi Data Check
1. Install joi
More Check Rules Reference Documentation: https://www.npmjs.com/package...
npm i @hapi/joi
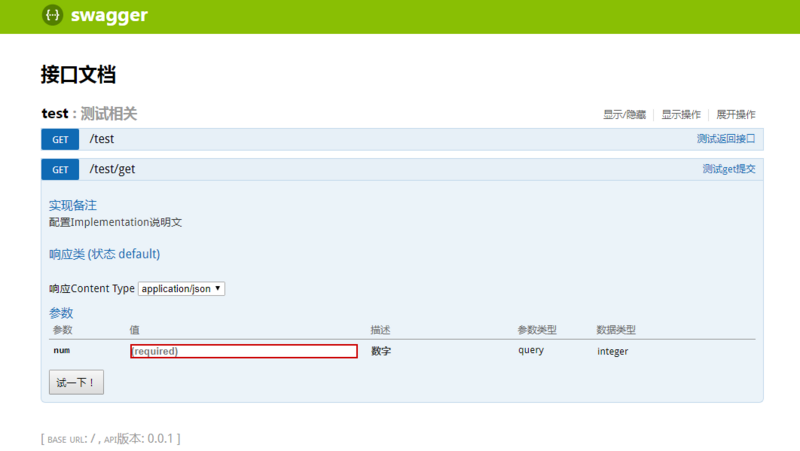
2. Cooperate with swagger
Simply config the routing configuration check information, such as. /routes/test.js, to add an additional test interface
{
    method: "GET",
    path: `/${GROUP_NAME}/get`,
    handler: (request, h) => {
      return { data: request.query };
    },
    config: {
      tags: ["api", GROUP_NAME],
      description: "test get Submit",
      notes: "To configure Implementation Explanatory Text",
      validate: {
        query: {
          num: Joi.number()
            .integer()
            .required()
            .description("number")
            .error(new Error("num Parameter error"))
        }
      }
    }
  },
3.swagger interface documentation
Use of Sequence
1. Installation
This case links to the mysql database, so install mysq2
npm i sequelize-cli -D
npm i sequelize
npm i mysql2
2. Catalogs and files used
├── config                       # Project Configuration Directory
|   ├── config.js                # Configuration of database connections (distinguishing development/production environments)
|   ├── index.js                 # Expose some configuration information for app.js to use
├── models                       # Database model
|   ├── index.js                 # Template code for database connection
├── migrations                   # Directory for data migration
├── seeders                      # Data Filled Directory
├── .env                         # To configure
3.env Configuration Database Information
Note that you need to create a corresponding database in your local mysql, such as hapi_db
# Domain Name Configuration Information
HOST = 127.0.0.1
PORT = 3303
# MySQL Database Connection Configuration Information
MYSQL_HOST = 127.0.0.1
MYSQL_PORT = 3306
MYSQL_DB_NAME = hapi_db
MYSQL_USERNAME = root
MYSQL_PASSWORD = 123456
4. Exposing data information used by entry files
New. /config/index.js
const { env } = process;
module.exports = {
  host: env.HOST,
  port: env.PORT
};
5. Mode model Use
New. /config/config.js for data information used by the database model model to be created in the background
// Dynamically load database configuration information based on the environment
// The content of this page is mainly for database connections (.. /models/index.js)
if (process.env.NODE_ENV == "production") {
  require("env2")("./.env.prod");
} else {
  require("env2")("./.env");
}
const { env } = process;
module.exports = {
  development: {
    username: env.MYSQL_USERNAME,
    password: env.MYSQL_PASSWORD,
    database: env.MYSQL_DB_NAME,
    host: env.MYSQL_HOST,
    port: env.MYSQL_PORT,
    dialect: "mysql",
    operatorsAliases: false
  },
  production: {
    username: env.MYSQL_USERNAME,
    password: env.MYSQL_PASSWORD,
    database: env.MYSQL_DB_NAME,
    host: env.MYSQL_HOST,
    port: env.MYSQL_PORT,
    dialect: "mysql",
    operatorsAliases: false
  }
};
Use sequelize Create Table
1. Creation of database
sequelize provides commands to create databases, but you will need to modify the database format to utf-8 yourself at the end, so it's still convenient to create databases directly by hand
2.migration creates tables
Create a commodity table shops
The following commands will automatically create. /migration/2019XXXXXXX-create-shops-table.js
It's possible to create tables and fill in data directly in mysql, but migration is used here to create records such as creation and modification of tables, which will provide a basis for future queries.Create logs for analog records.
./node_modules/.bin/sequelize migration:create --name create-shops-table
xxxx-crate.shops.table.js
"use strict";

module.exports = {
  up: (queryInterface, Sequelize) => {
    return queryInterface.createTable("shops", {
      id: {
        type: Sequelize.INTEGER,
        autoIncrement: true,
        primaryKey: true
      },
      name: {
        type: Sequelize.STRING,
        allowNull: false
      },
      thumb_url: Sequelize.STRING,
      created_at: Sequelize.DATE,
      updated_at: Sequelize.DATE
    });
  },

  down: (queryInterface, Sequelize) => {face.dropTable("shops");
  }
};
3. Create tables in the mysql database
Execute commands in the project root directory
./node_modules/.bin/sequelize db:migrate
Successfully created sample

Possible error scenario 1:

Solution: Check that config/config.js is configured correctly and comment out operatorsAliases: false
Possible error scenario 2:

Solution: mysql database has no password set, comment out the configuration file (config/config.js)password: env.MYSQL_PASSWORD,
Database Table Successful Plugin

Populating table data with Sequelize
1. Execute commands in the project root directory:
Will automatically create/seeders/2019XXXX-init-shops.js
./node_modules/.bin/sequelize seed:create --name init-shops
2. Write the data to be populated xxx-init-shops.js
"use strict";
/**
 * Initialize store data
 * If there are created_at and updated_at fields in the database table, they will be maintained by Sequelize by default
 */
const timestamps = {
  created_at: new Date().toLocaleString(),// To solve the jet lag problem, use toLocaleString()
  updated_at: new Date().toLocaleString()
};
module.exports = {
  up: (queryInterface, Sequelize) => {
    return queryInterface.bulkInsert(
      "shops",
      [
        { id: 1, name: "Shop 1", thumb_url: "1.png", ...timestamps },
        { id: 2, name: "Shop 2", thumb_url: "2.png", ...timestamps },
        { id: 3, name: "Shop 3", thumb_url: "3.png", ...timestamps },
        { id: 4, name: "Shop 4", thumb_url: "4.png", ...timestamps }
      ],
      {}
    );
  },
  down: (queryInterface, Sequelize) => {
    // Delete shop table id 1,2,3,4 data
    const { Op } = Sequelize;
    return queryInterface.bulkDelete(
      "shops",
      { id: { [Op.in]: [1, 2, 3, 4] } },
      {}
    );
  }
};
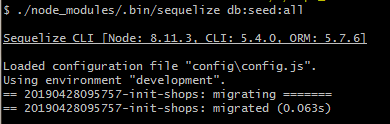
3. Perform Filling
./node_modules/.bin/sequelize db:seed:all
Execution effects and data results

directory structure
To date, the directory structure and files are as follows:
