When using a third-party jni library or not intending to open source, method one does not apply.This implements a method of separating jni dynamic libraries from application engineering.
Once you open Android Studio, the menu Tools -> Android -> SDK Manager, select Install ndk in the image below, skip this step if it is already installed. 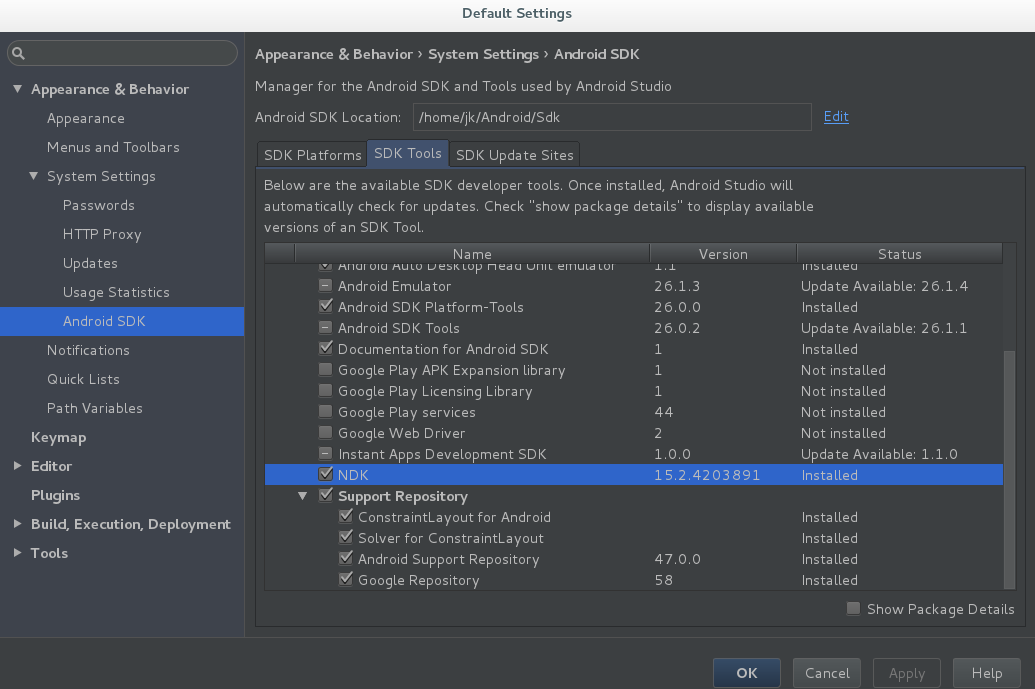
When the Ndk installation is complete, it will be installed in the'~/Android/Sdk/ndk-bundle/'directory by default.
Second, because the tools in NDK are required to compile jni dynamic libraries, add the directory of NDK to the system environment PATH to use the tools in ndk.
First determine the absolute path of the ndk, such as My In "/home/jk/Android/Sdk/ndk-bundle/"
Modify the'~/.bash_profile'file by adding a line to it with the content'export PATH=/home/jk/Android/Sdk/ndk-bundle/:$PATH'
When complete, log off the system and log on again so that the system environment variable takes effect.
Third, write the code of the jni library.
A Hello.java source file is written under the directory "com/jk/", which contains:
package com.jk;

public  class Hello {
       public native int getStringLen(String str); //Return string length
       public native int add(int a, int b);  //Additive function
}
Execute "javah com.jk.Hello" in terminal to generate jni header file "com_jk_Hello.h"
Then the functions in the header file are implemented in a c file.
/* com_jk_Hello.c */
#include <jni.h>
#include <string.h>
#include "com_jk_Hello.h"

JNIEXPORT jint JNICALL Java_com_jk_Hello_getStringLen
  (JNIEnv *env, jobject obj, jstring str)
{
    const char *data = (*env)->GetStringUTFChars(env, str, 0);
    return strlen(data);
}

JNIEXPORT jint JNICALL Java_com_jk_Hello_add
  (JNIEnv *env, jobject obj, jint a, jint b)
{
    return a+b;
}
4. Compile jni code.Compiling jni on Android requires calling the tools provided by ndk and writing an Android.mk file to describe the compilation target.
/* Android.mk */

LOCAL_PATH := $(call my-dir)
include $(CLEAR_VARS)
LOCAL_LDLIBS := -L$(SYSROOT)/usr/lib -llog
LOCAL_PRELINK_MODULE := false
LOCAL_MODULE := myjni
LOCAL_SRC_FILES := com_jk_Hello.c
include $(BUILD_SHARED_LIBRARY)
The compiled dynamic library is named libmyjni.so
You also need to write an App.mk application project that describes jni.
/* App.mk */

APP_BUILD_SCRIPT := Android.mk
Once the above two files are written, you can execute the compile command on the terminal:
ndk-build NDK_PROJECT_PATH=. NDK_APPLICATION_MK=App.mkOnce the command is executed, the compiled jni dynamic libraries are located in the libs directory of the current directory, and the compiled jni dynamic libraries have versions of several platforms, each with a subdirectory named after the platform.
Fifth, use jni dynamic libraries in Android projects.
After creating an Android project, copy the entire directory of libs compiled in step 4 into the app subdirectory of the Android project source directory, replacing the libs directory inside.
Then you can see the jni dynamic libraries in Android Studio's Switch to Project Project Project Resource window, switch in the following interface: 
Viewed dynamic libraries, as shown in the following figure: 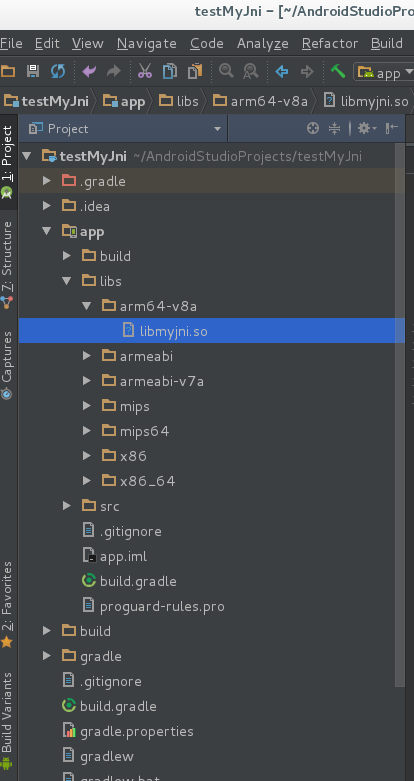
Next, write the java class that calls jni.
First create a new package. The package name must match what you did in step 3.I have to create a "com.jk" package in which to create the Hello.java source file, as shown in the following figure: 
The contents of the Hello.java source file:
/* Hello.java */

package com.jk;

public class Hello {
        static {
            System.loadLibrary("myjni");
        }

        public native int getStringLen(String str); //Return string length
        public native int add(int a, int b);  //Additive function
}
Next, you need to modify the build.gradle file in the project app directory so that the project packages our jni dynamic libraries into the final generated apk of the project. Add the following from line 20 of the file:
    sourceSets.main {
        jni.srcDirs = []
        jniLibs.srcDir 'libs'
    }

    task nativeLibsToJar(type: Zip, description: "create a jar archive of the native libs") {
        destinationDir file("$projectDir/libs")
        baseName "libmyjni"
        extension "jar"
        from fileTree(dir: "libs", include: "**/*.so")
        into "lib"
    }
Finally, you can invoke the jni dynamic library functionality in your project, such as when the Activity window is created:
/* MainAcitivty.java */

package com.example.jk.testmyjni;

import android.support.v7.app.AppCompatActivity;
import android.os.Bundle;

import com.jk.Hello;

public class MainActivity extends AppCompatActivity {

    @Override
    protected void onCreate(Bundle savedInstanceState) {
        super.onCreate(savedInstanceState);
        setContentView(R.layout.activity_main);

    //Calling jni dynamic library functions
        Hello h = new Hello();
        System.out.printf("strlen = %d\n", h.getStringLen("hello_world"));
        System.out.printf("33 + 44 = %d\n", h.add(33, 44));
    }
}