1, Introduction to DevOps
The word DevOps comes from the combination of Development and Operations. It attaches great importance to the communication and cooperation between software developers and operation and maintenance personnel, and makes software construction, testing and release more fast, frequent and reliable through automated processes. DevOps actually includes three parts: Development, testing and operation and maintenance. In other words, DevOps hopes to open up the IT tool chain during the delivery of software products, so that all teams can reduce time loss and work together more efficiently.
(1) Continuous integration
Continuous integration is a practical way to advance integration to the development cycle. Let build, test, and integrate code changes happen repeatedly.
Generally speaking, continuous integration emphasizes that developers immediately build and (unit) test after submitting new code. According to the test results, we can determine whether the new code and the original code can be correctly integrated.

(2) Continuous delivery
Continuous delivery means that every time you modify, integrate, and build code, you also test the code in a similar production environment.
On the basis of continuous integration, continuous delivery deploys the integrated code to "production like environments" closer to the real running environment. For example, after completing the unit test, we can deploy the code to the Staging environment connected to the database for more tests. If the code is OK, you can continue to deploy to the production environment.
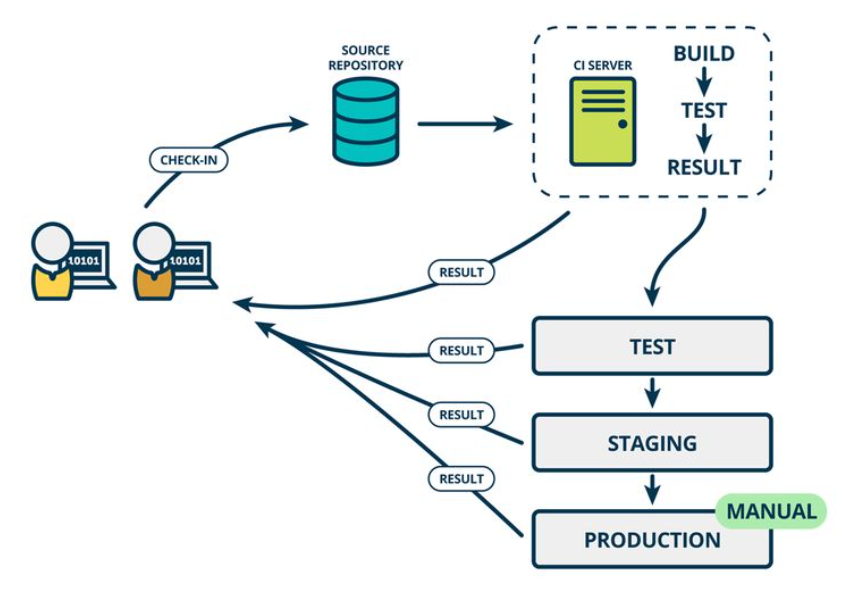
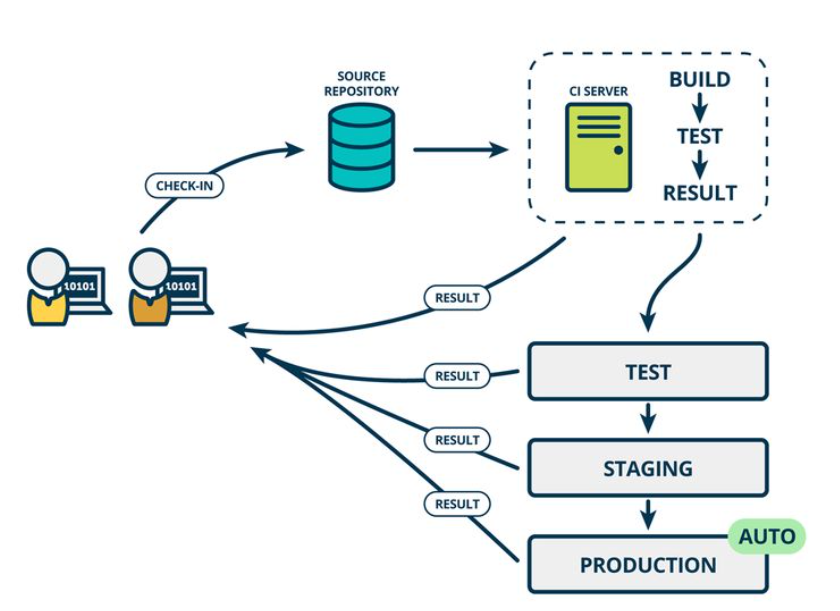
(3) Continuous deployment
Continuous delivery means that after continuous delivery, the code without problems on the tester is deployed to the real server. Again, based on automation.
2, Jenkins
(1) Introduction
Jenkins is a powerful application that allows continuous integration and continuous delivery of projects. Available free of charge, you can handle any type of build or continuous integration.
It can continuously and automatically build / test software projects. And monitor the software development process, quickly locate and deal with problems, so as to improve the development efficiency.
(2) Installation
Installation configuration: memory no less than 256M, disk no less than 1G, JDK version no less than 8
There are three installation methods: yum installation, war package installation and docker installation.
① , yum install
1. Turn off the firewall (pay attention to the security group in the virtual machine)
Note: it can also be opened. You need to open the access port of Jenkins. The same applies to security groups
2. Install JDK
Suggestion: it is recommended to select the compressed package and jdk8 version when installing JDK. The specific reasons are explained in the subsequent configuration.
You can install using yum or a compressed package, but there will be too many soft connections in yum installation, and eventually there will be problems in the global variables.
< 1> Install using Yum or up2date

Code set


[root@jenkins ~]# yum install jdk-1.8.0-openjdk -y
< 2> Package installation
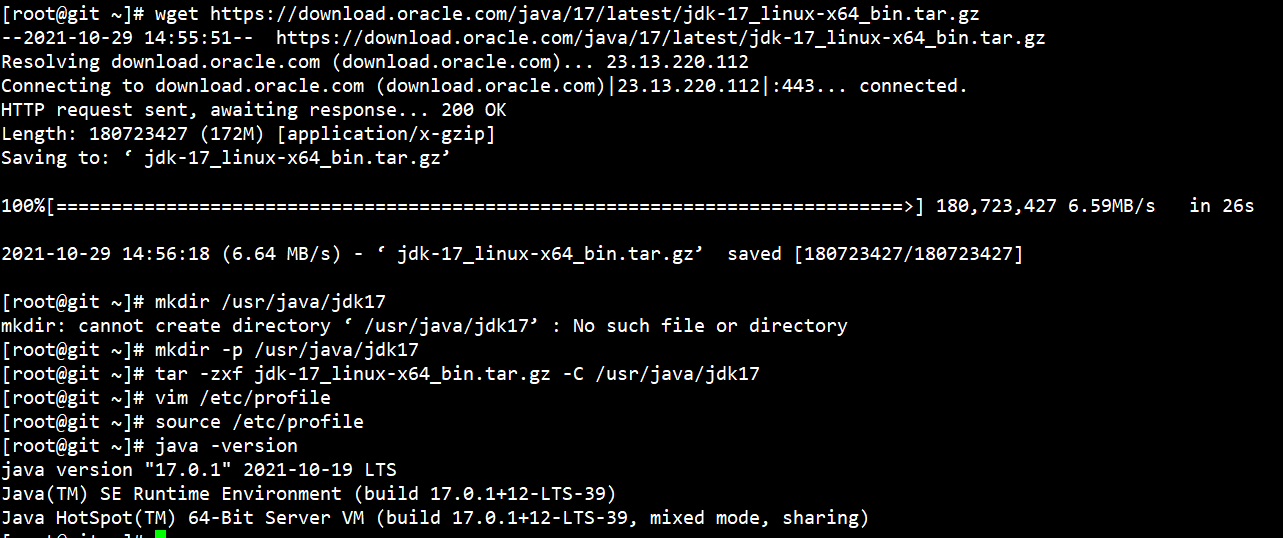
Download installation package
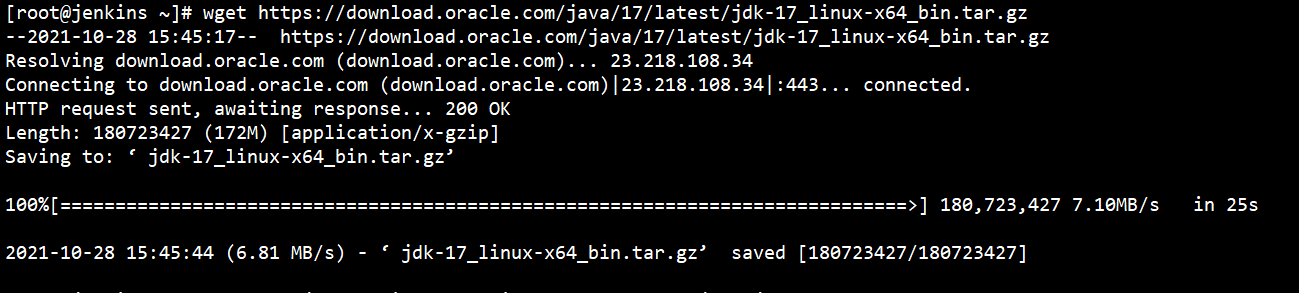
Unzip and perform subsequent operations

jdk installed successfully

Code set

[root@jenkins ~]# wget https://download.oracle.com/java/17/latest/jdk-17_linux-x64_bin.tar.gz

[root@jenkins ~]# mkdir -p /usr/java/jdk17
[root@jenkins ~]# tar -zxf jdk-17_linux-x64_bin.tar.gz -C /usr/java/jdk17
[root@jenkins ~]# vim /etc/profile
export JAVA_HOME=/usr/java/jdk17/jdk-17.0.1
export PATH=$PATH:$JAVA_HOME/bin
[root@jenkins ~]# source /etc/profile


[root@jenkins java]# java -version
java version "17.0.1" 2021-10-19 LTS
Java(TM) SE Runtime Environment (build 17.0.1+12-LTS-39)
Java HotSpot(TM) 64-Bit Server VM (build 17.0.1+12-LTS-39, mixed mode, sharing)
3. Install Jenkins
Add jenkins source
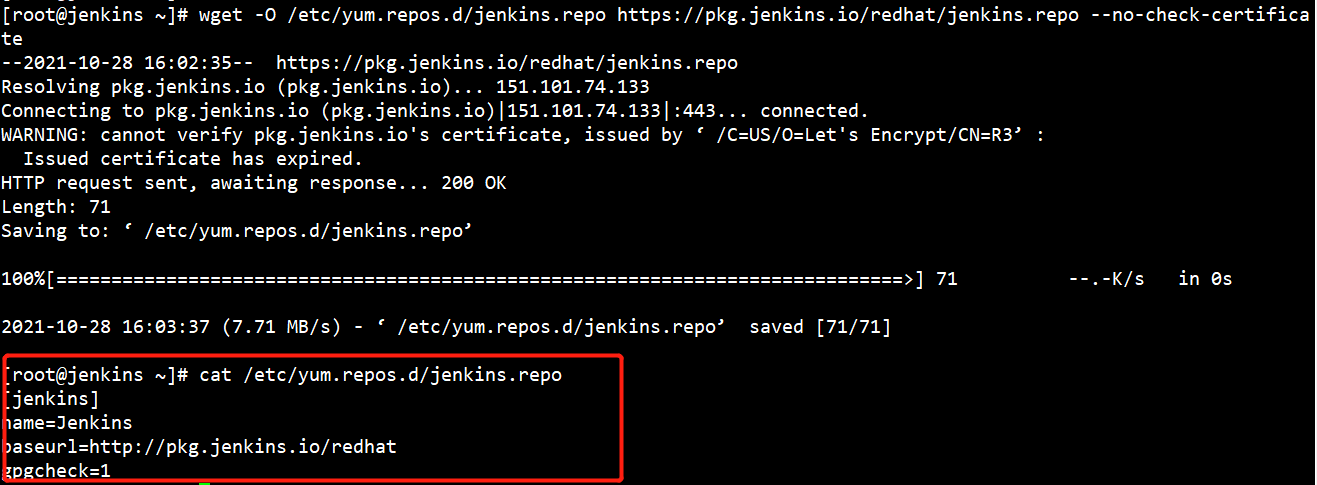
Import public key
 Install jenkins using yum or up2date

Start:
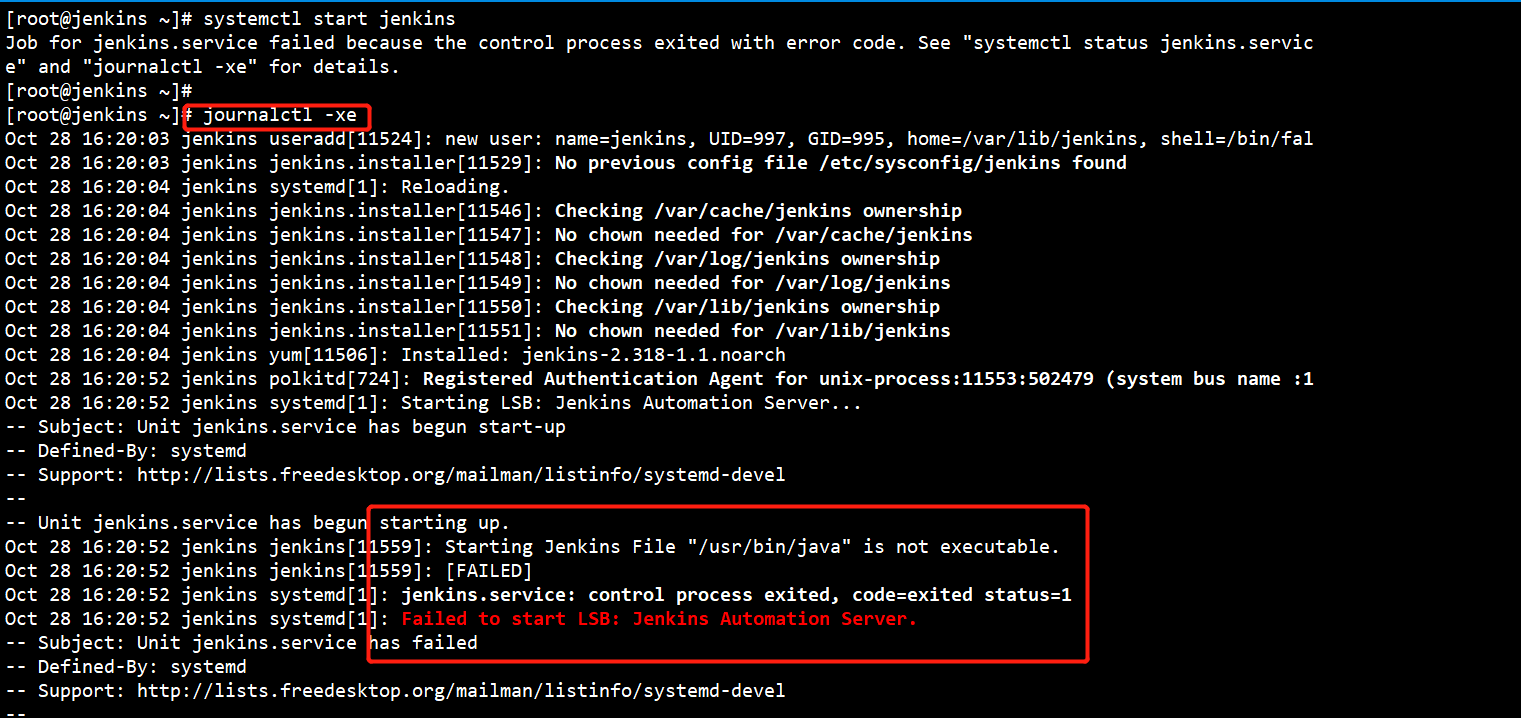
An error occurred:
Oct 28 16:20:52 jenkins jenkins[11559]: Starting Jenkins File "/usr/bin/java" is not executable.
Oct 28 16:20:52 jenkins jenkins[11559]: [FAILED]
Oct 28 16:20:52 jenkins systemd[1]: jenkins.service: control process exited, code=exited status=1
Oct 28 16:20:52 jenkins systemd[1]: Failed to start LSB: Jenkins Automation Server.
Solution:

Start and set it to start automatically
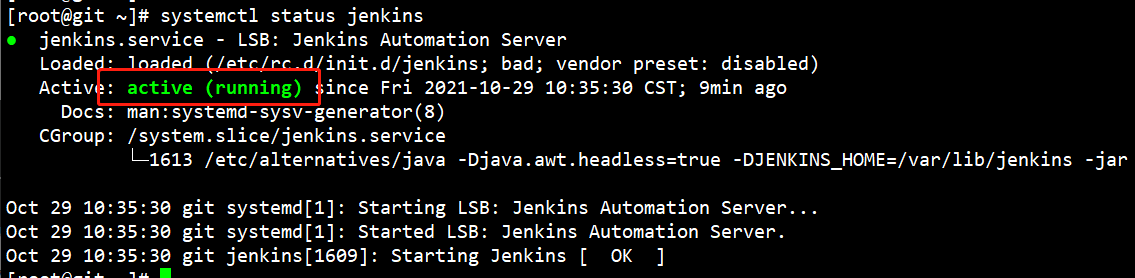
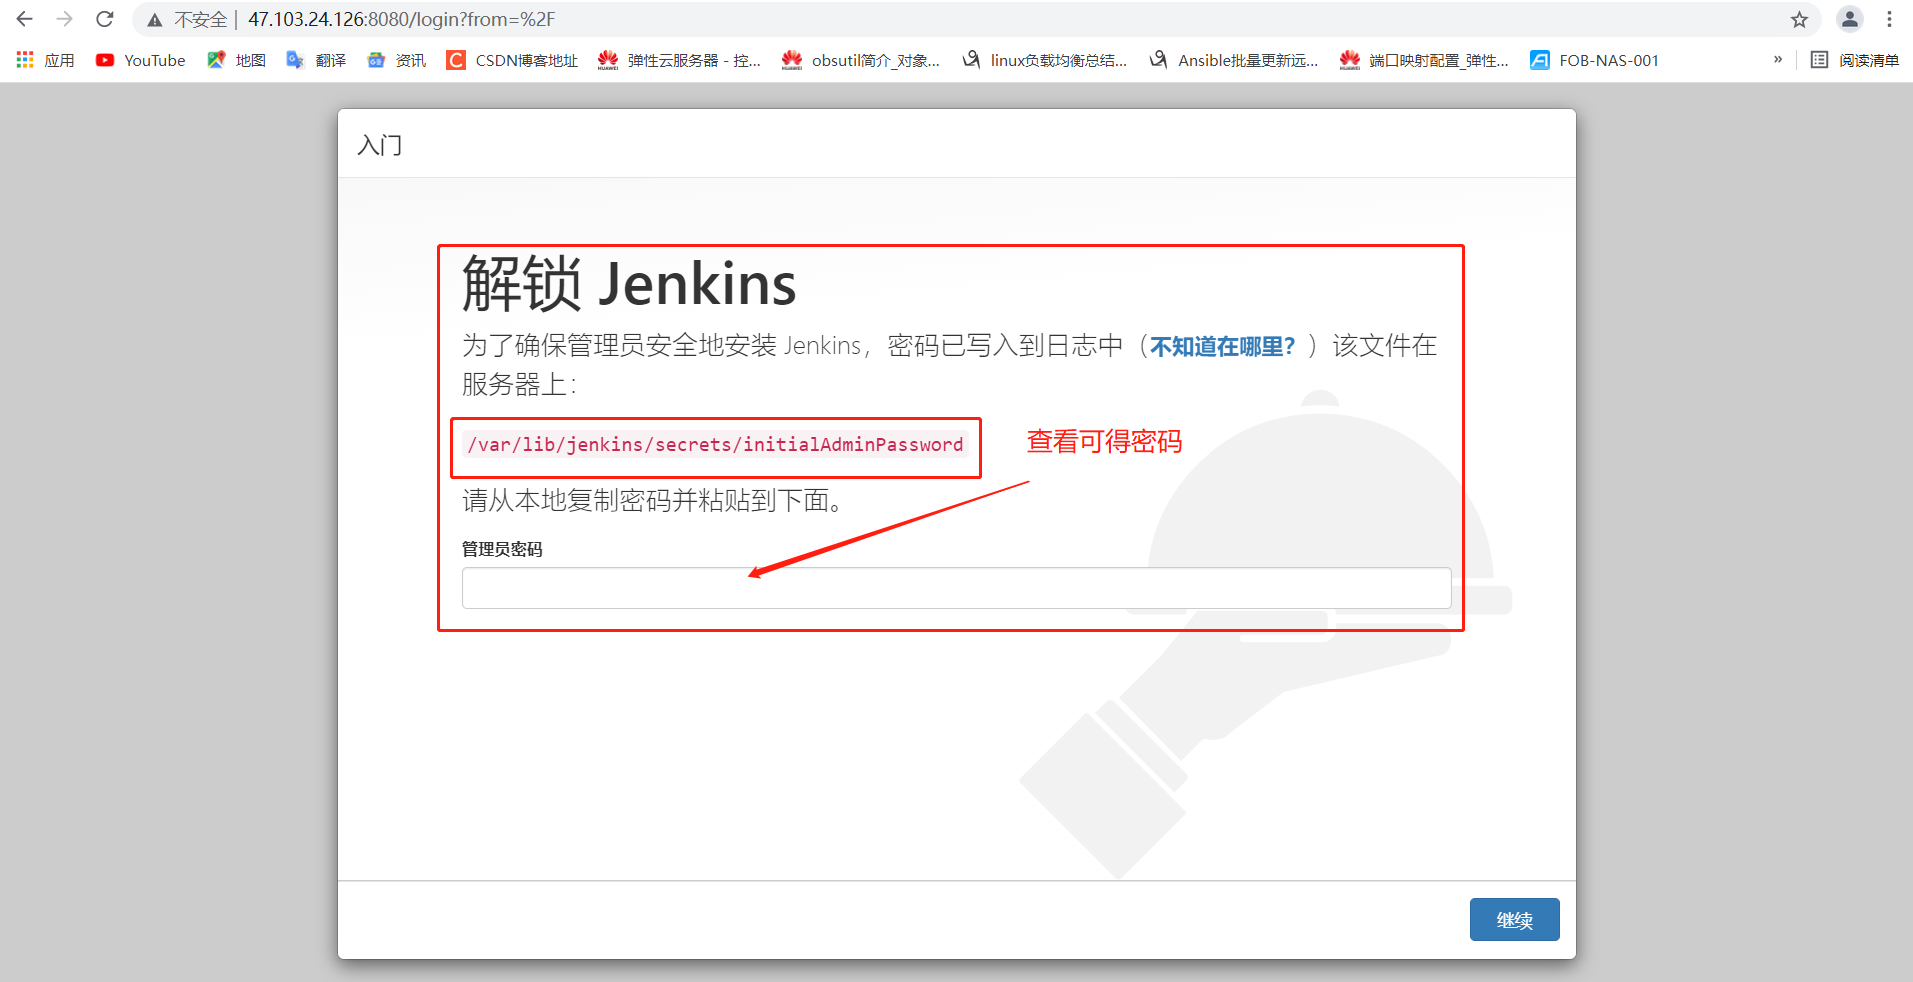
Code set

[root@jenkins ~]# wget -O /etc/yum.repos.d/jenkins.repo https://pkg.jenkins.io/redhat/jenkins.repo --no-check-certifica

[root@jenkins ~]# rpm --import https://pkg.jenkins.io/redhat-stable/jenkins.io.key

[root@jenkins ~]# yum makecache && yum install jenkins

[root@jenkins ~]# systemctl start jenkins
[root@jenkins ~]# systemctl status jenkins
[root@jenkins ~]# /sbin/chkconfig on
Accessible http://ip:8080
② . war package installation
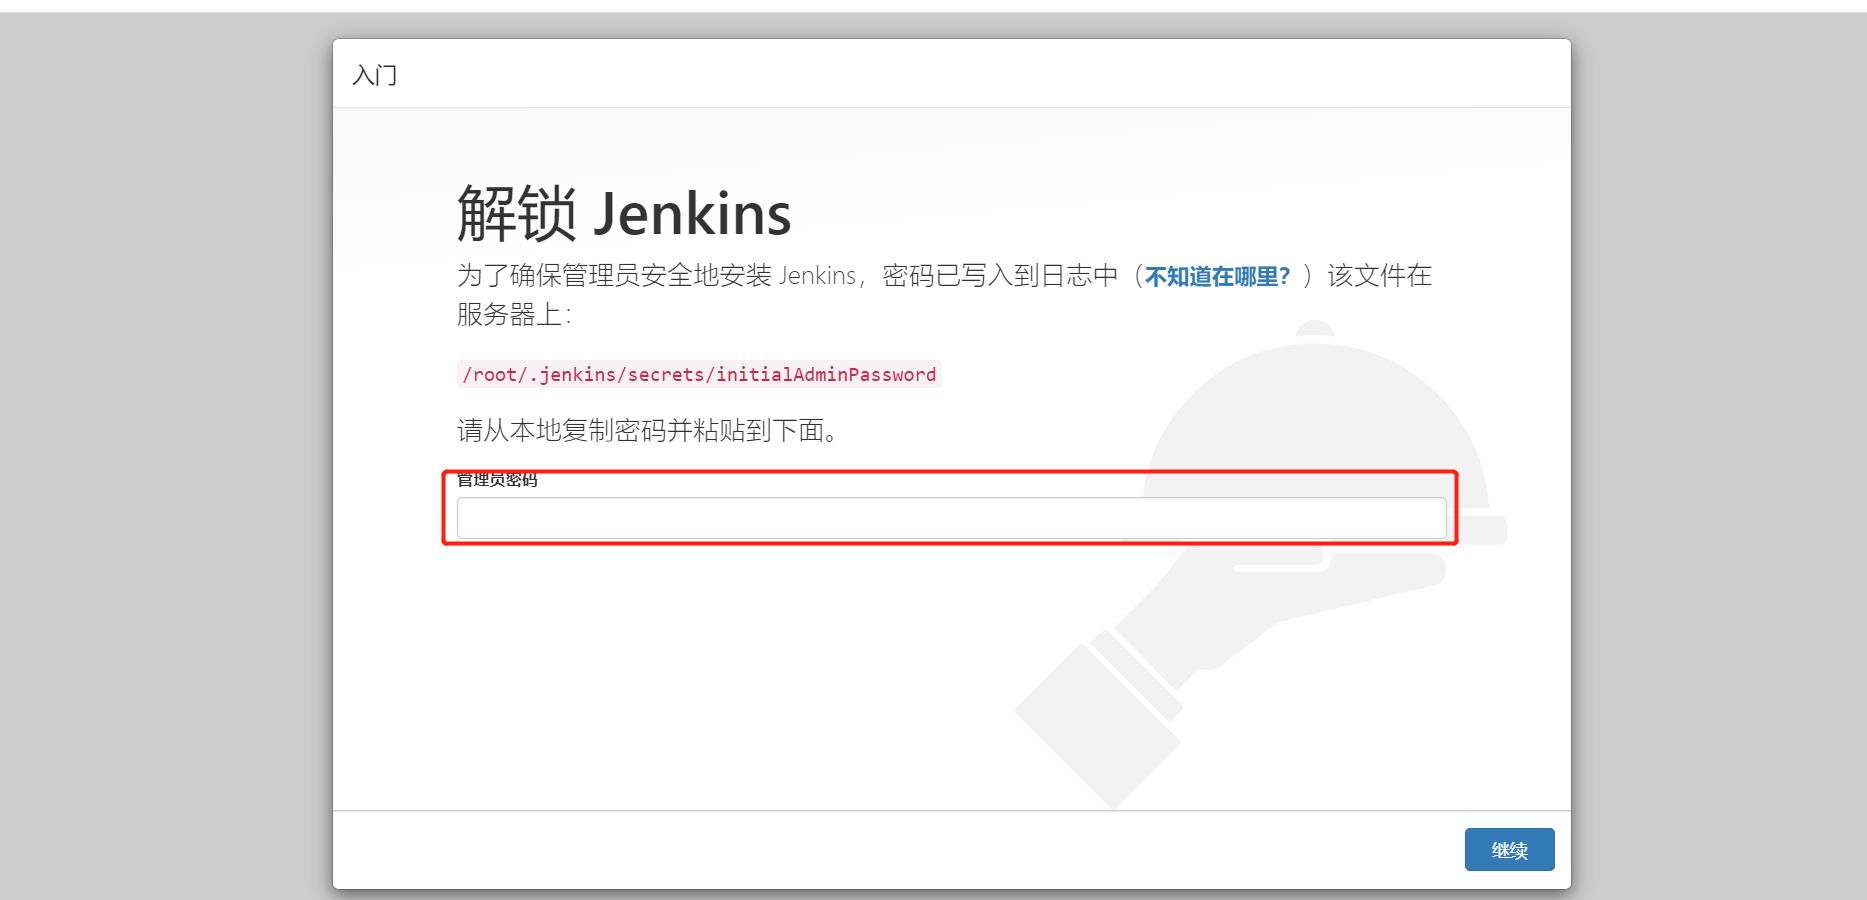
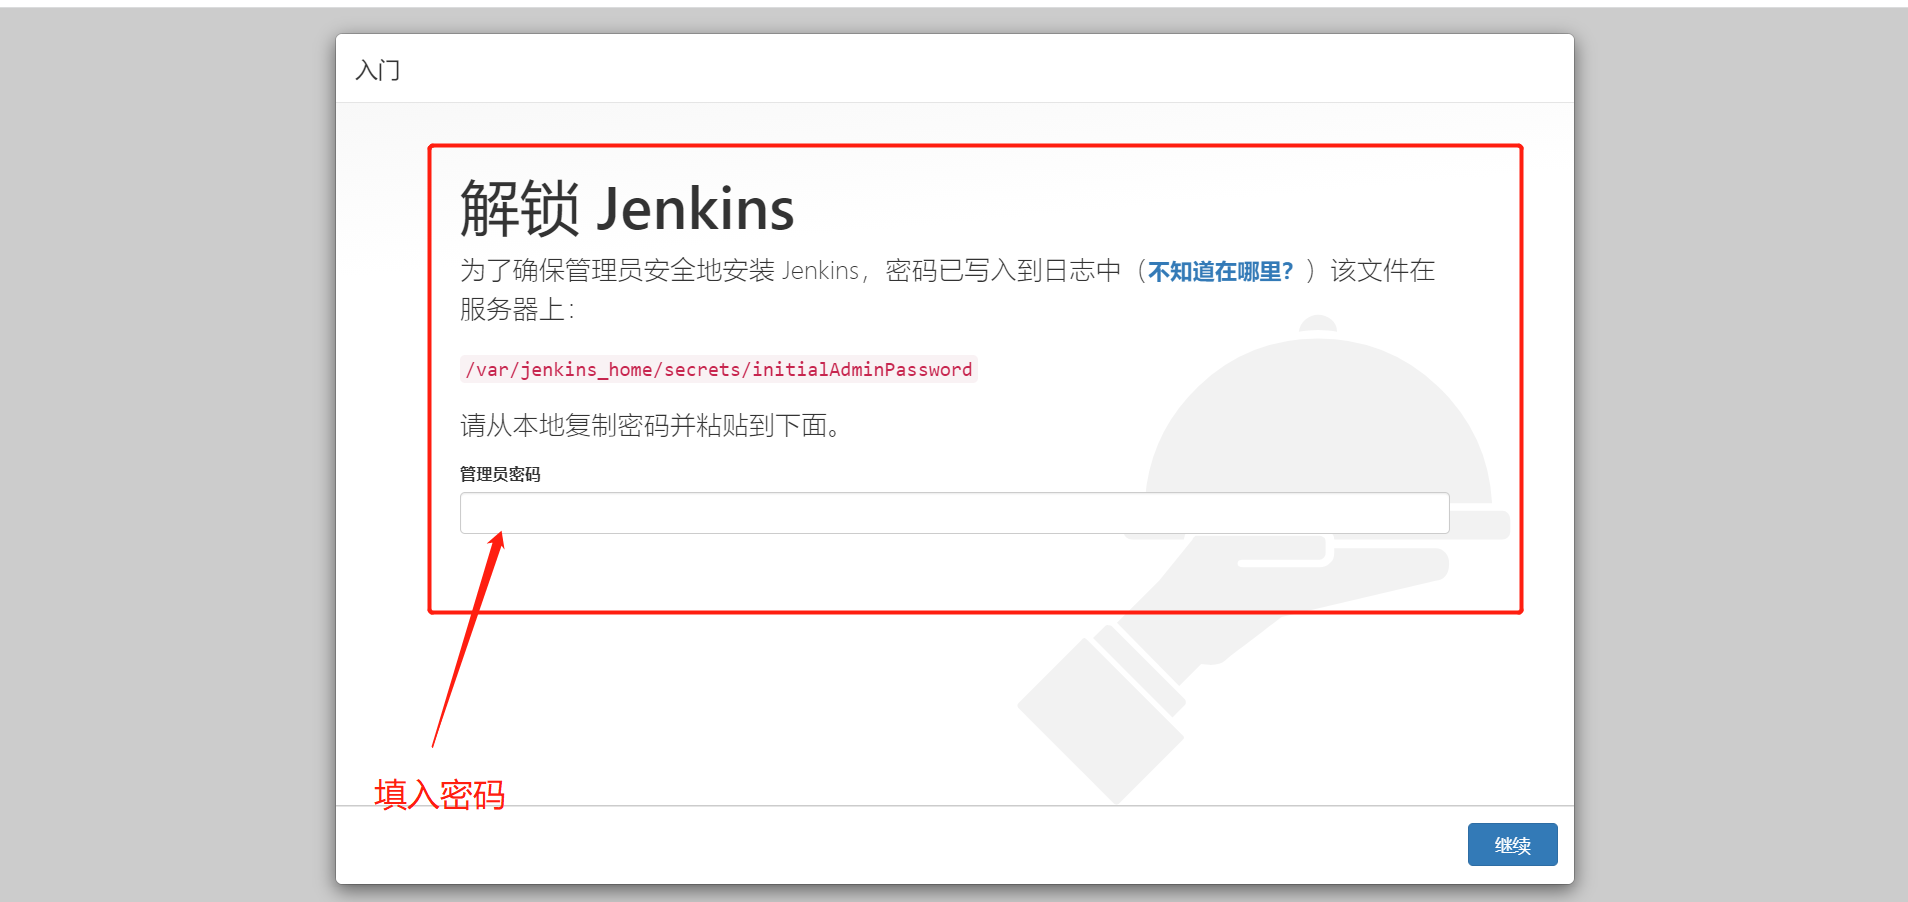
Command set

[root@git ~]# yum install -y java-1.8.0-openjdk && mkdir -p /usr/local/jenkins

[root@git ~]# wget -c -O /usr/local/jenkins/jenkins.war http://mirrors.jenkins.io/war-stable/latest/jenkins.war

[root@git ~]# java -jar /usr/local/jenkins/jenkins.war


View password
[root@git ~]# cat /root/.jenkins/secrets/initialAdminPassword
Accessible http://ip:8080 :
③ . docker installation
Command set:

#Download and start docker
[root@git ~]# yum install docker -y && systemctl start docker

[root@git ~]# curl -sSL https://get.daocloud.io/daotools/set_mirroe.sh | sh -s && systemctl restart docker

#View mirror
[root@git ~]# docker search jenkins

#Pull image
[root@git ~]# docker pull jenkins/jenkins:lts

#Allow container
[root@git ~]# docker run -d -p 8080:8080 jenkins/jenkins:lts
82c7fed508827b2be07036beecac0b54ad9b8d1593b53f6e310d08d3fd47ee78

#Enter container
[root@git ~]# docker ps -a
CONTAINER ID        IMAGE                 COMMAND                  CREATED              STATUS              PORTS                               NAMES
82c7fed50882        jenkins/jenkins:lts   "/sbin/tini -- /us..."   About a minute ago   Up About a minute   0.0.0.0:8080->8080/tcp, 50000/tcp   sad_lumiere
[root@git ~]# docker exec -it 82c7fed50882 /bin/bash


#View password
jenkins@82c7fed50882:~/secrets$ ls
filepath-filters.d		 org.jenkinsci.main.modules.instance_identity.InstanceIdentity.KEY
initialAdminPassword		 slave-to-master-security-kill-switch
jenkins.model.Jenkins.crumbSalt  whitelisted-callables.d
master.key
jenkins@82c7fed50882:~/secrets$ cat initialAdminPassword
ebf738ddb6394b87ae6a98fxxxxxxxxx
Accessible http://ip:8080
(3) Disposition
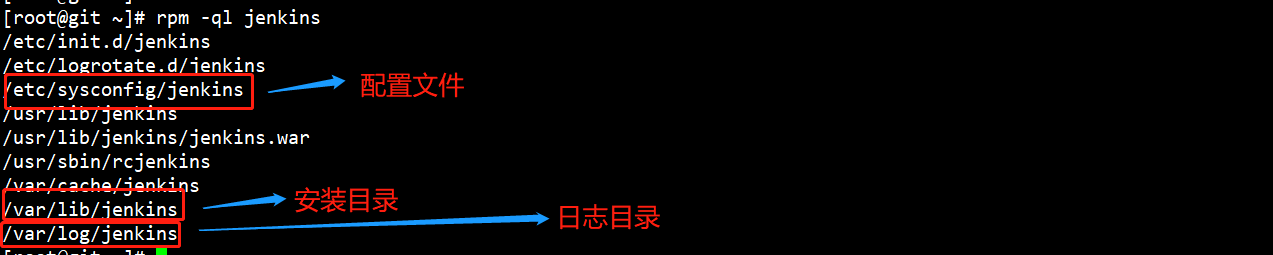
① . view the installation directory
② . the first operation after entering
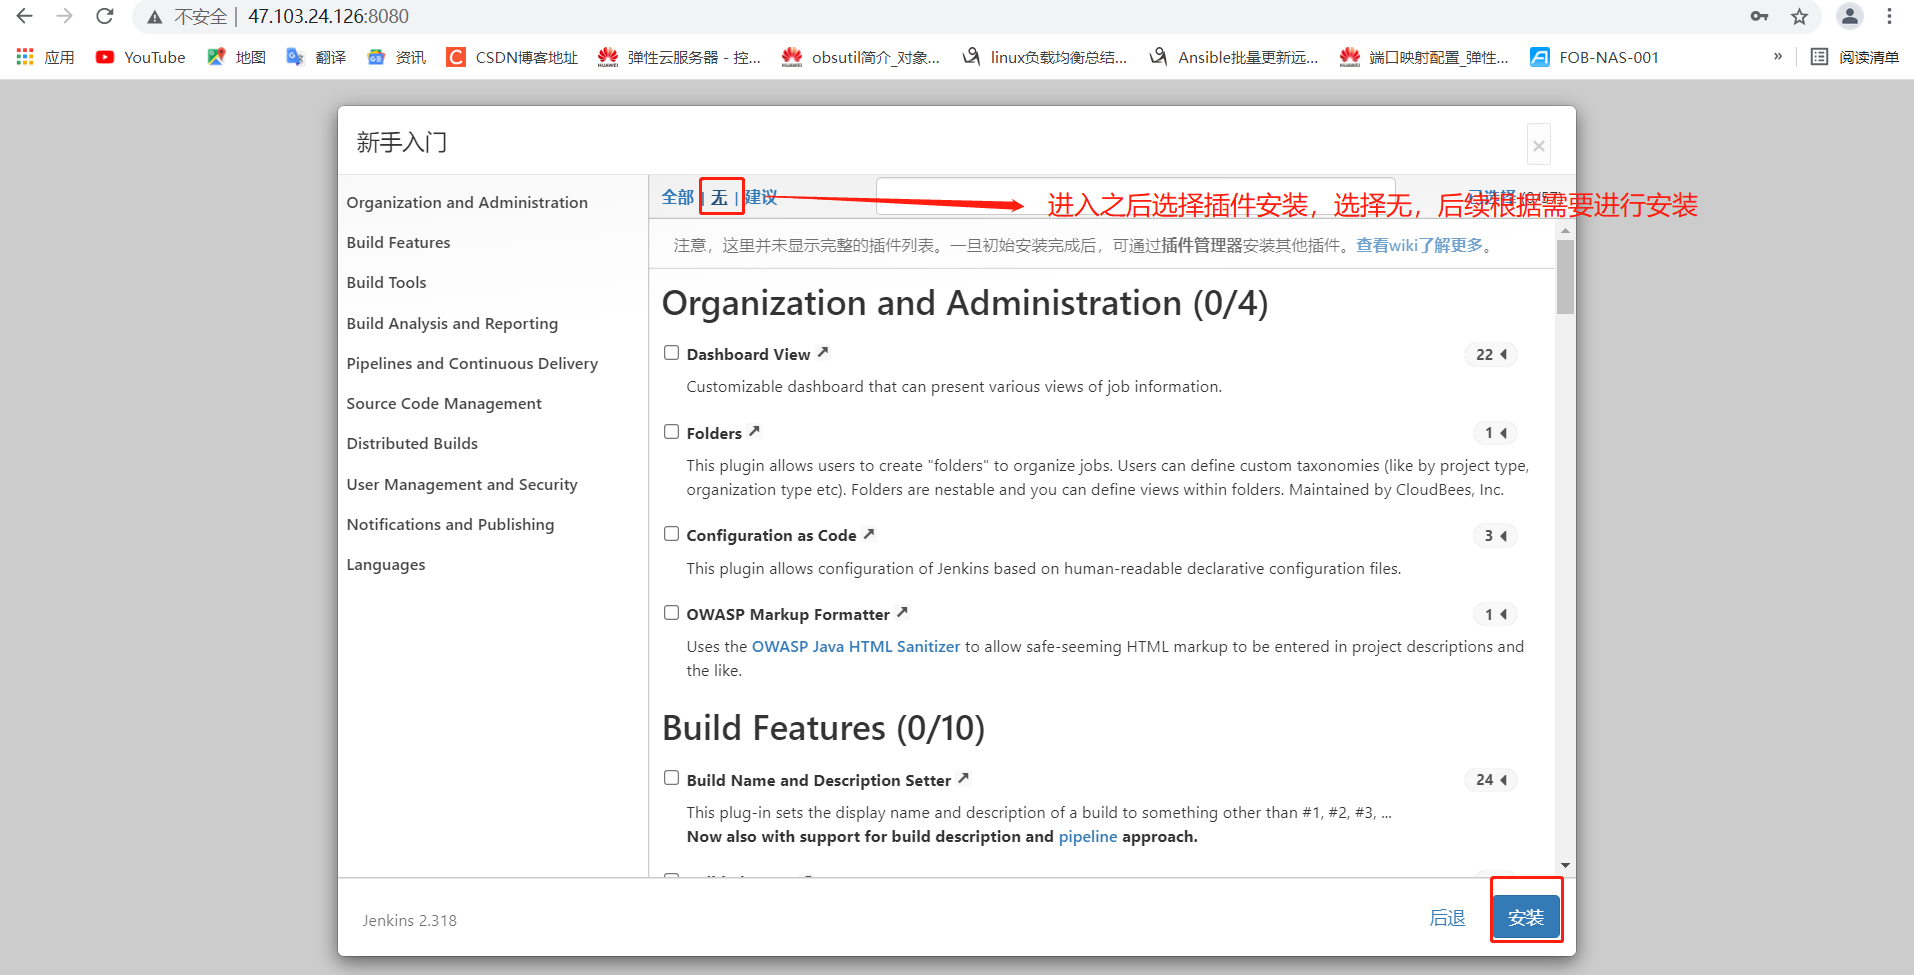
Select plug-in installation
Because the Jenkins plug-in needs to be downloaded from the default official website, the speed is very slow and will fail, so we skip the plug-in installation for the time being
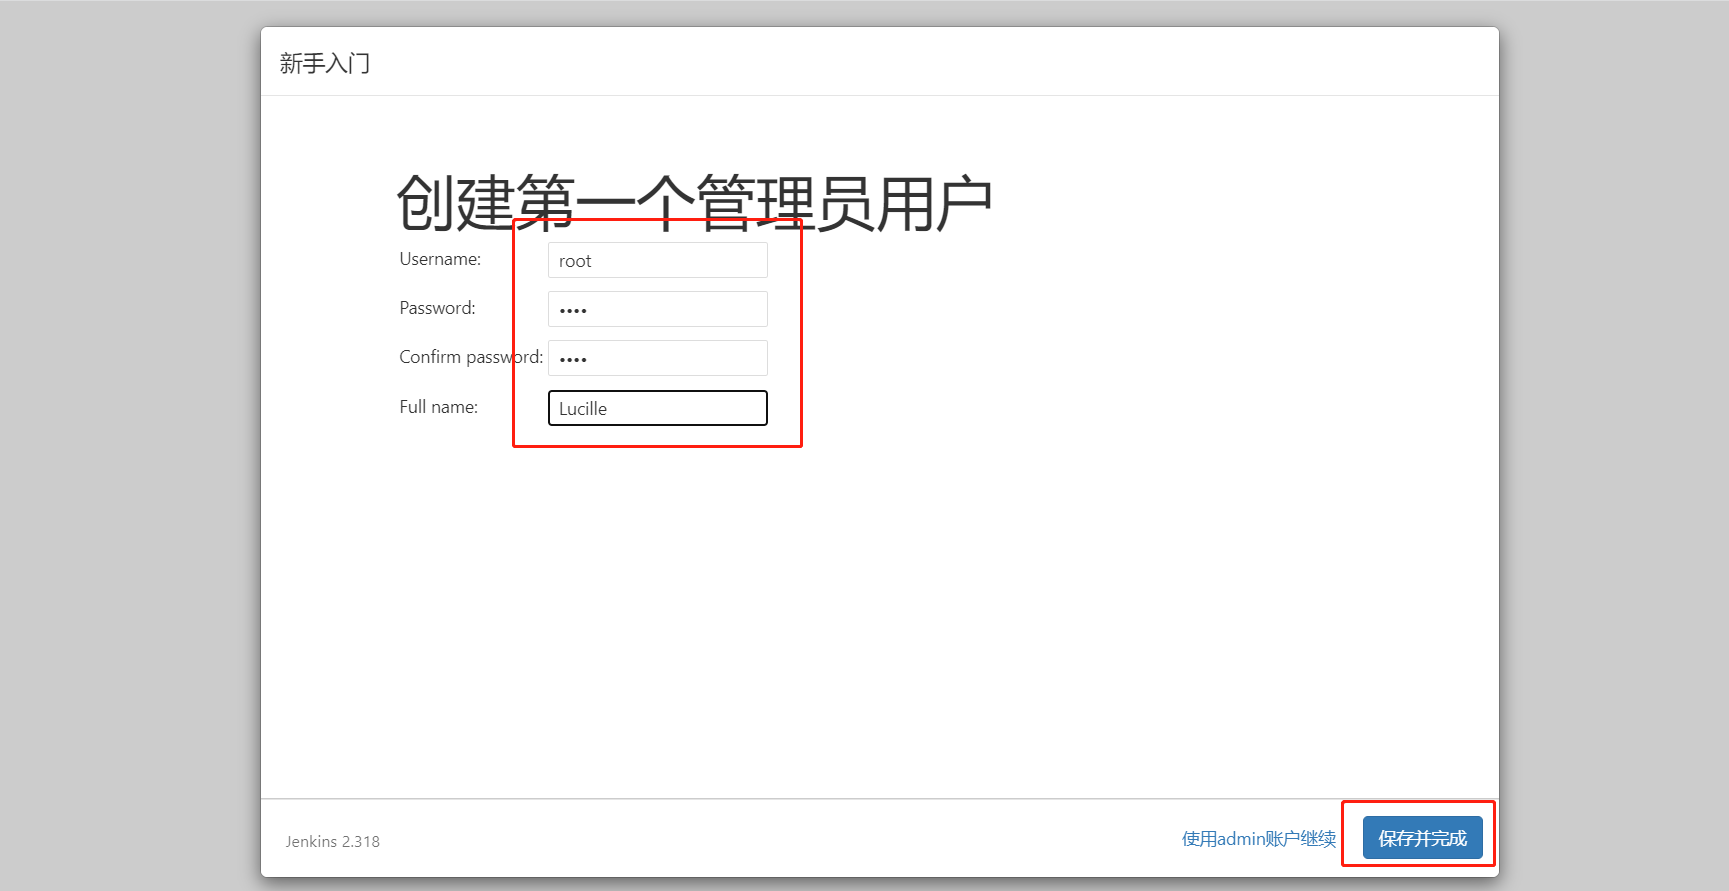
Create a user to log in
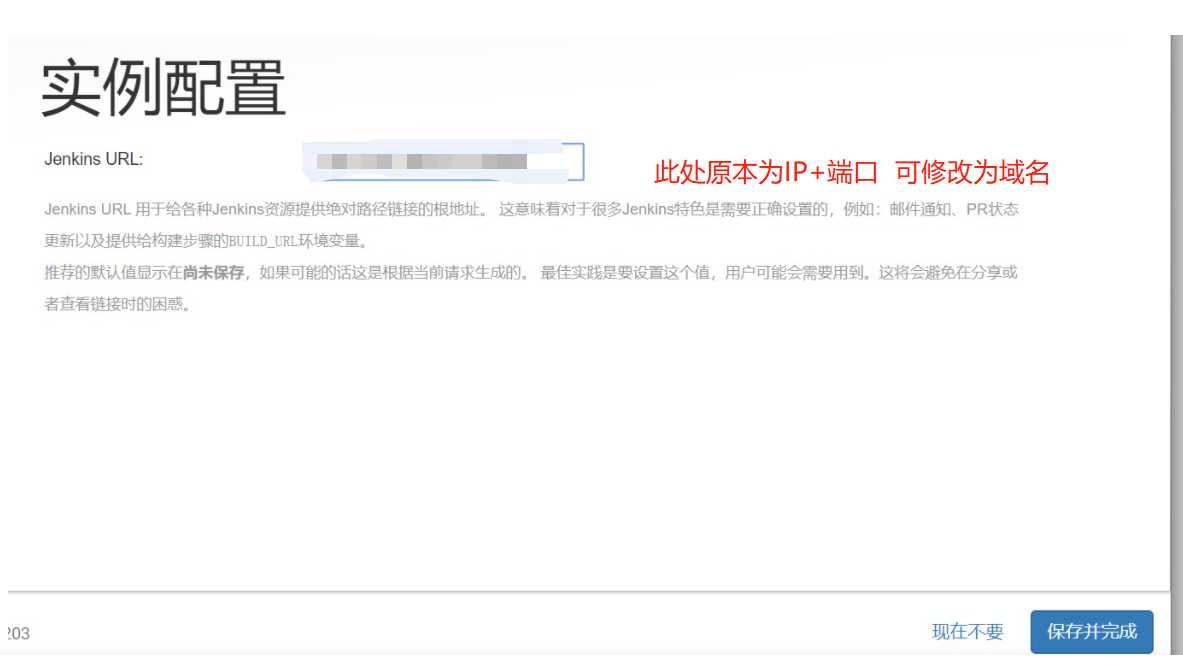
Configure access URL
③ . replace official sources with domestic sources and accelerate
Server side operation

[root@git ~]# sed -i 's/http:\/\/updates.jenkinsci.org\/download/https:\/\/mirrors.tuna.tsinghua.edu.cn\/jenkins/g' /var/lib/jenkins/updates/default.json && sed -i 's/http:\/\/www.google.com/https:\/\/www.baidu.com/g' /var/lib/jenkins/updates/default.json
Operation on Web page
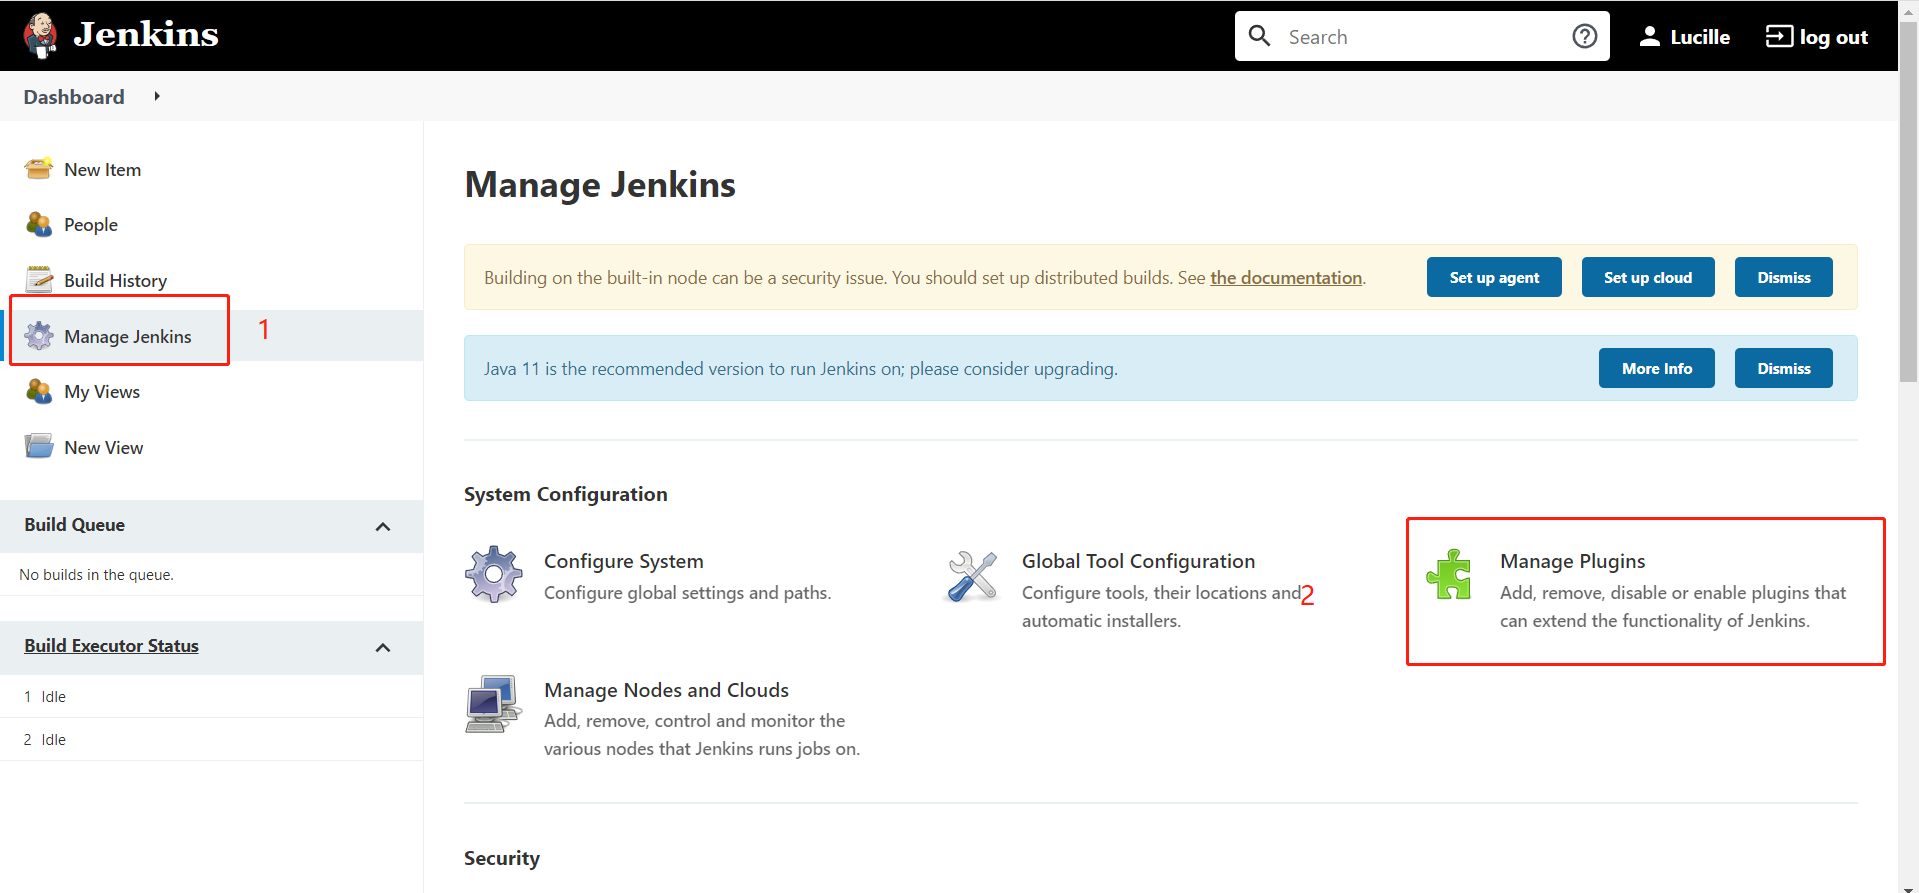
Jenkins->Manage Jenkins->Manage Plugins The operation is as follows:
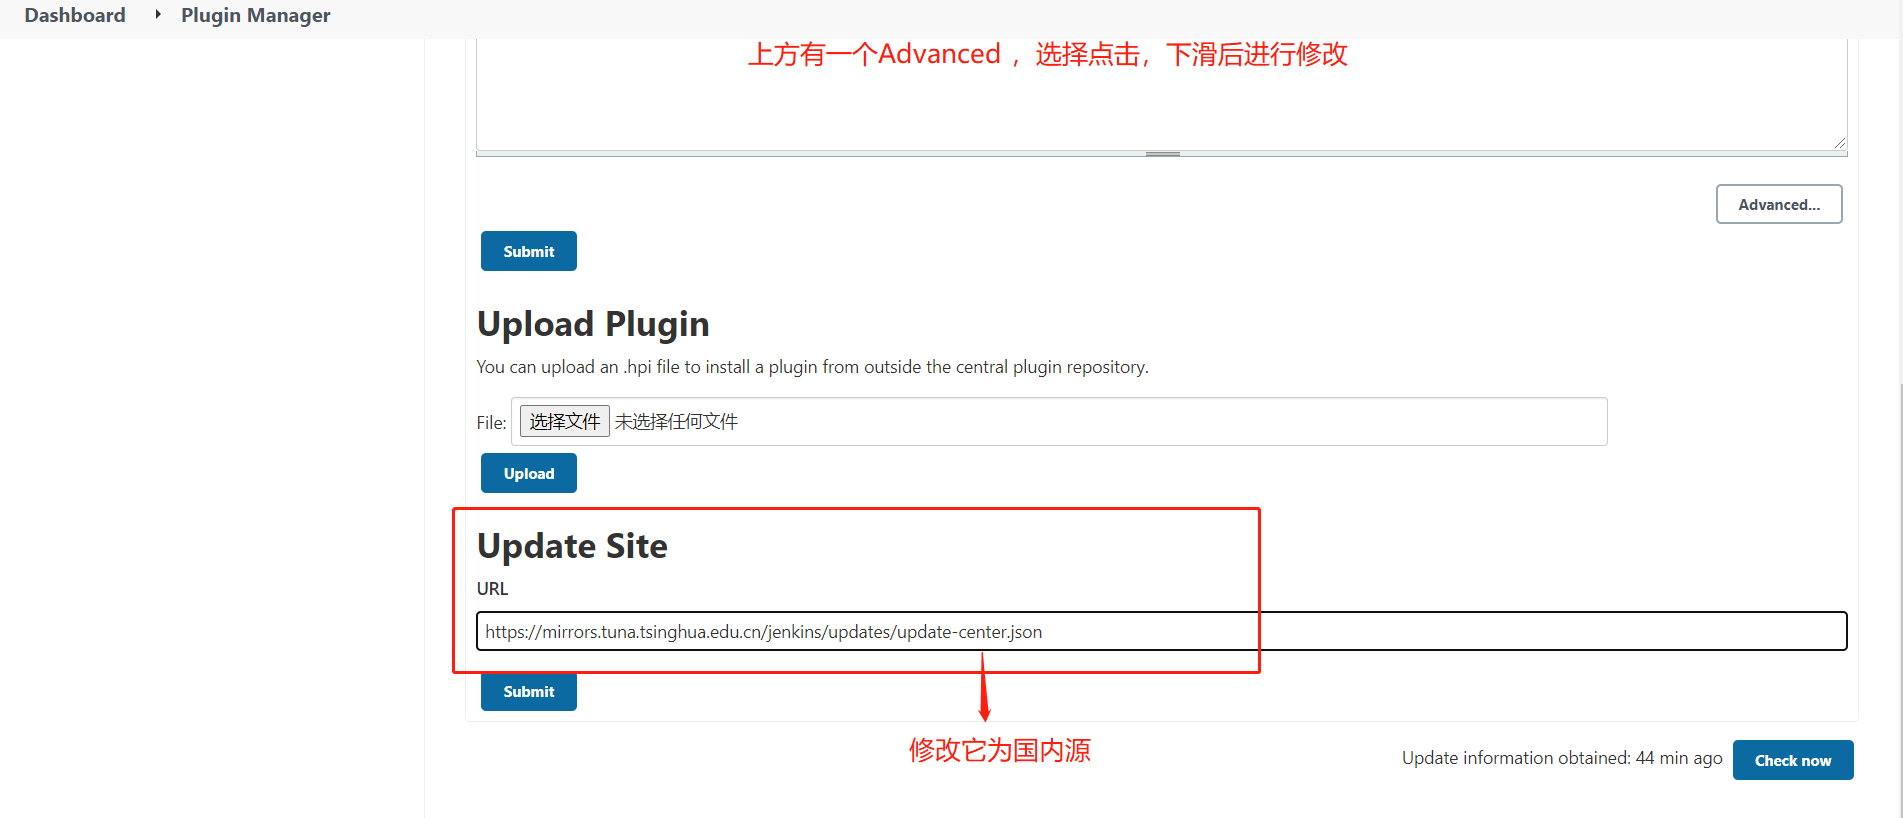
After modification, use submit to save and restart. The restart method is in ⑤.
④ , Sinicization
Jenkins - > Manage Jenkins - > Manage plugins, click Available and search "Chinese"
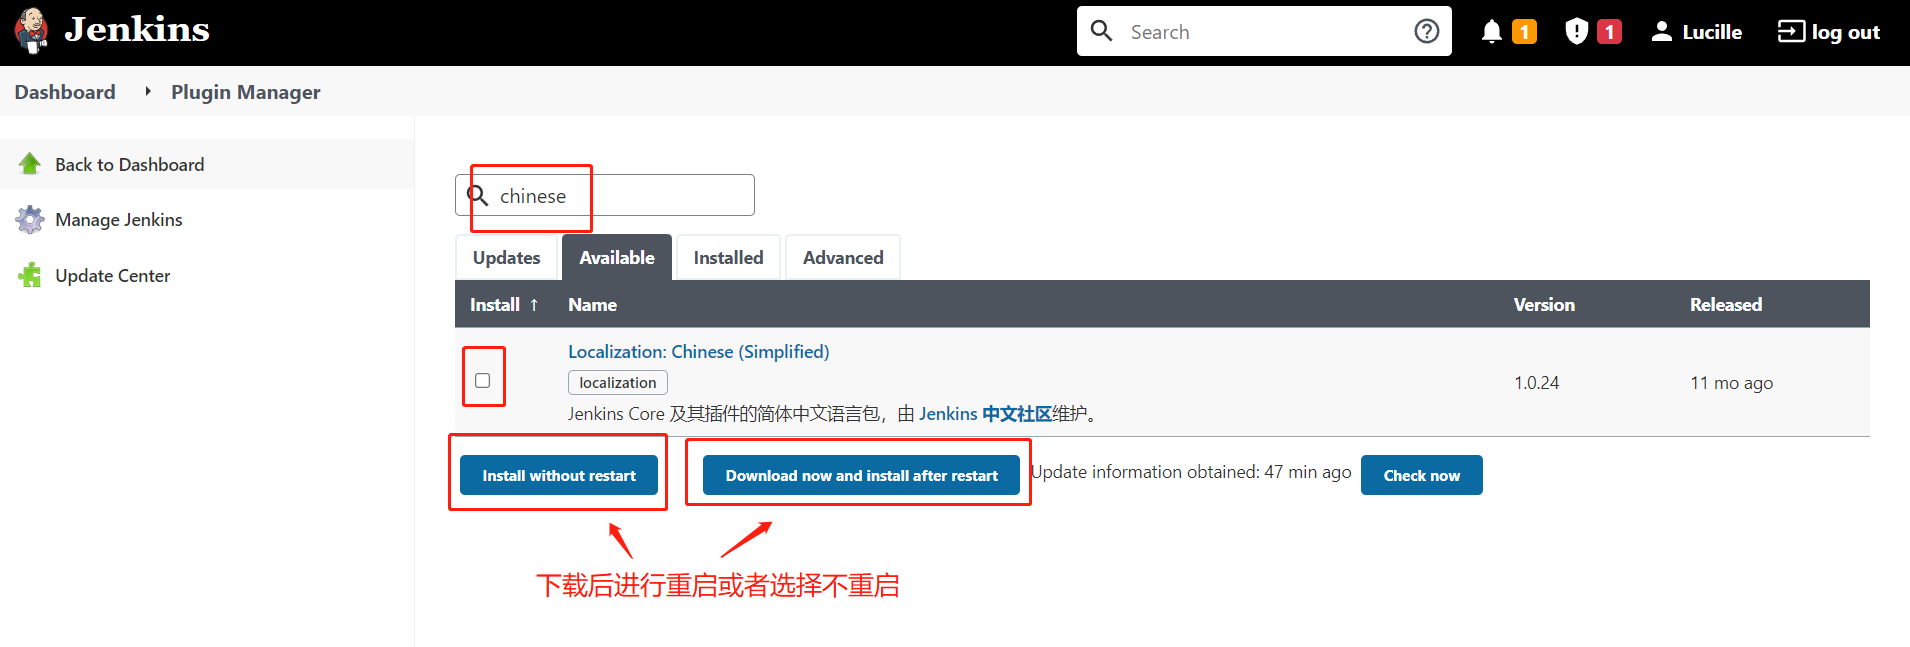
Download succeeded
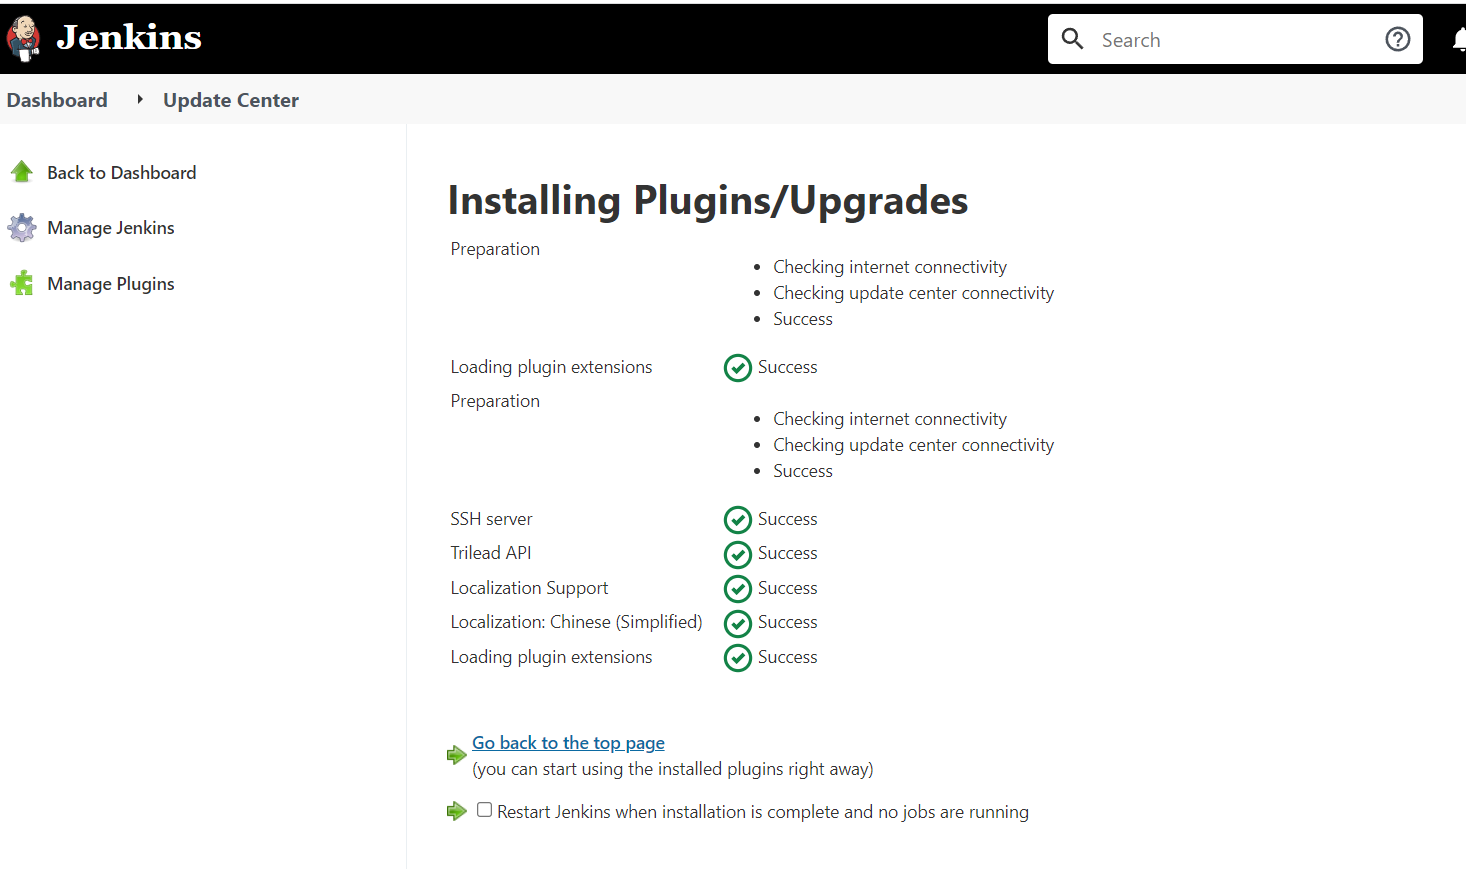
⑤ , restart
After configuring domestic sources and localization, you need to restart. For example, localization can be restarted directly, but others cannot.
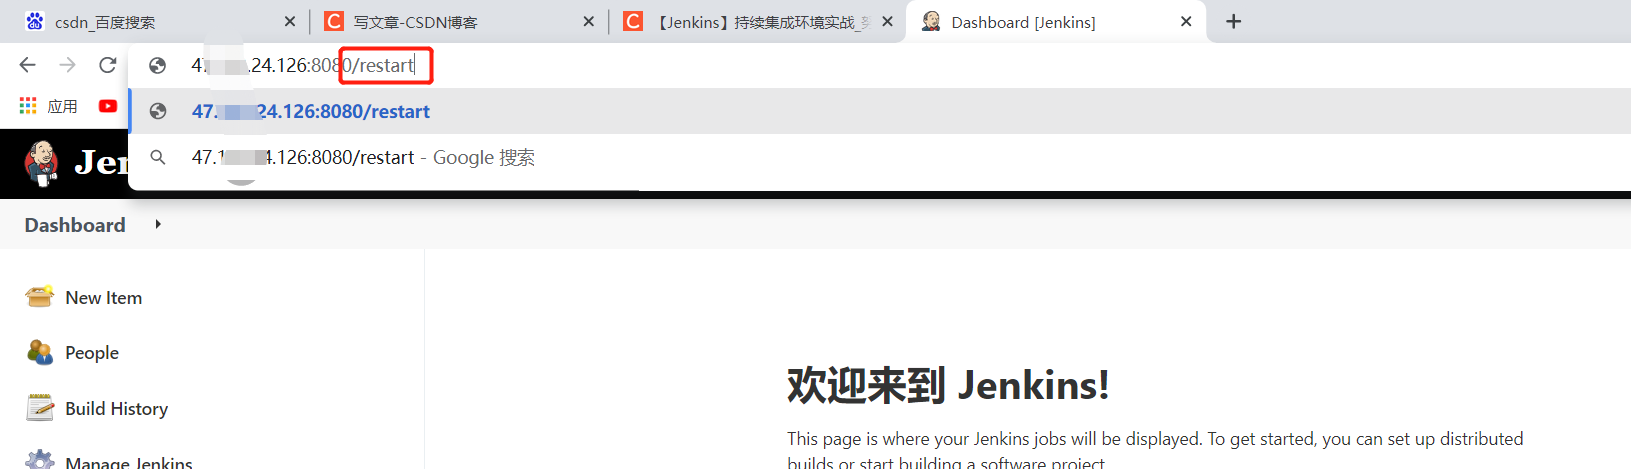
Restart method 1: restart the server

Restart method 2: restart the web side
⑥ . user authority management
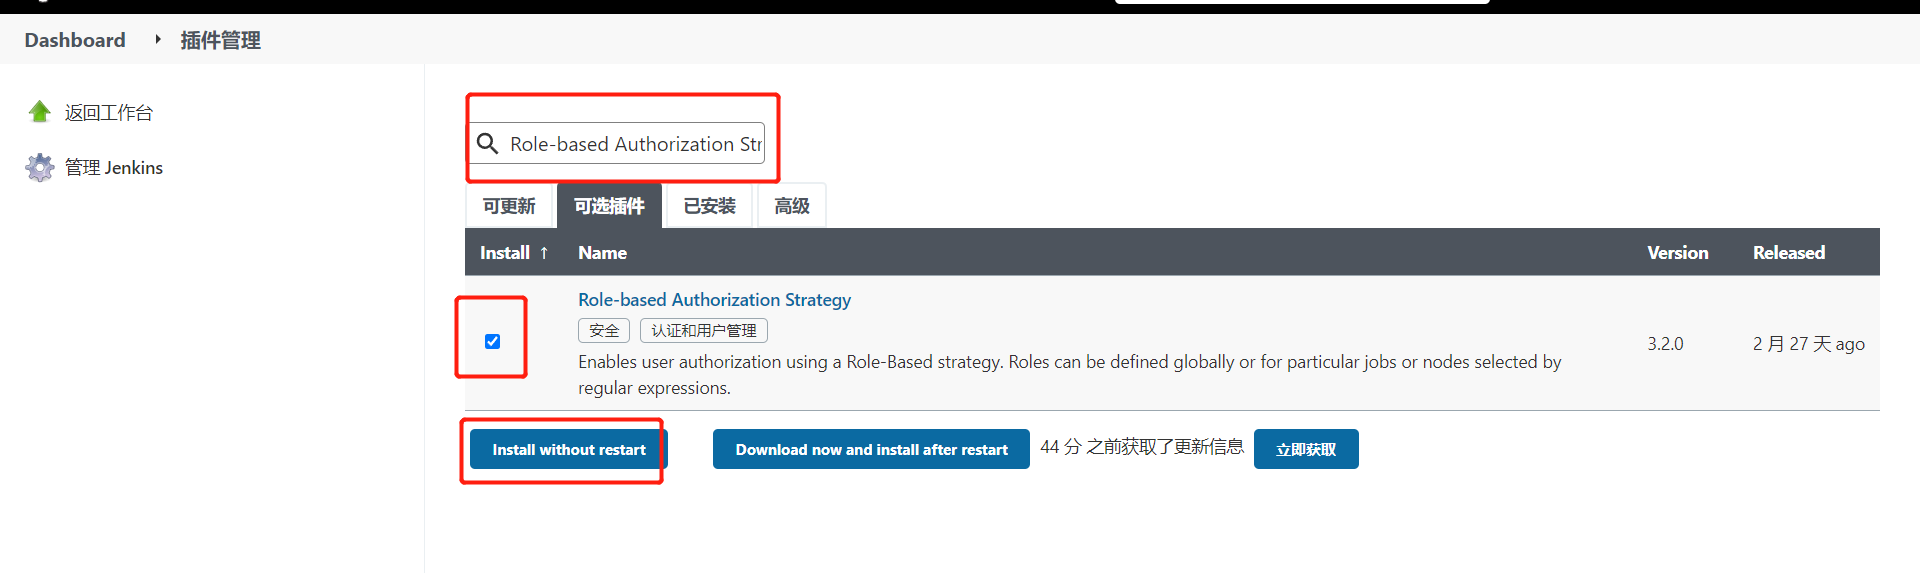
We can use the Role-based Authorization Strategy plug-in to manage Jenkins user permissions. Install the role based authorization strategy plug-in
System management --- plug in management --- optional plug-ins --- enter role based authorization strategy --- to select and install
Configure after downloading
System management - global security configuration - authorization policy - select and save
 The following is an experiment to verify or demonstrate user rights management.
1. Create role
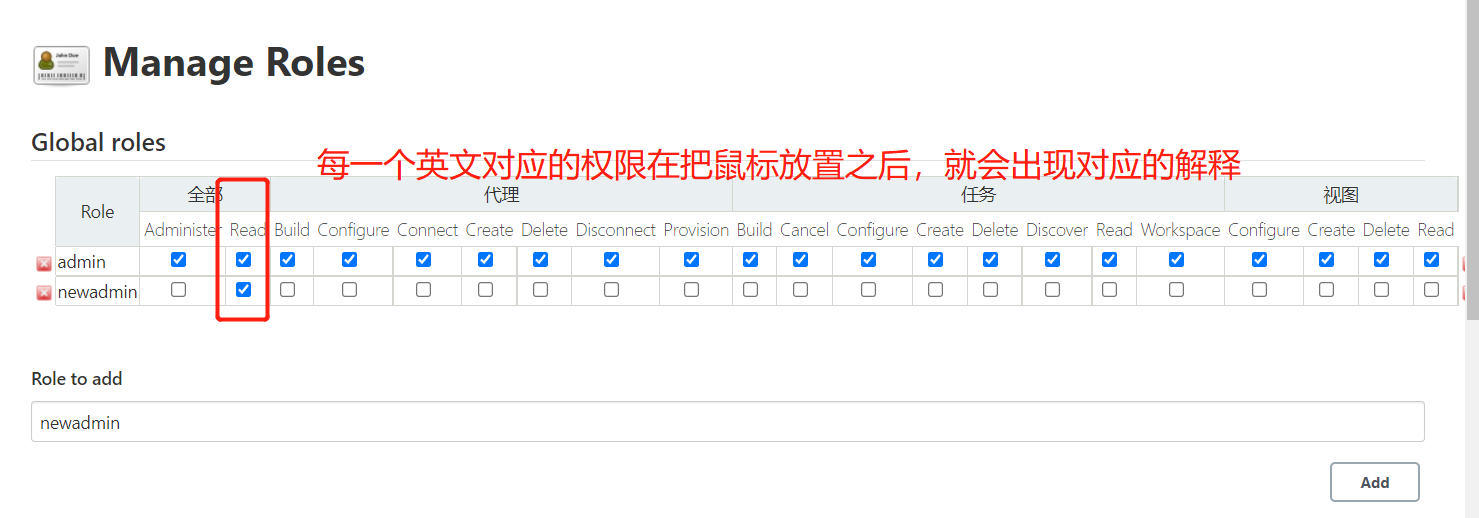
System management - > manage and assign roles
   Knowledge development:

    Global roles: Administrators or senior project managers can create some that can operate on the global, with permissions similar to admin . The new user can modify its permissions xi

    Item roles : Project users can operate on the project

    Node roles: Node related permissions
Role addition:
newadmin: this role is a global role. This role needs to bind the Read permission under Overall in order to bind the most basic Jenkins access permission to all users. Note: if this role is not bound to subsequent users, an error will be reported: the user name is missing the Overall/Read permission
Project1: this role is a project role. Bind "project1. *" with regular expression, which means that only projects beginning with itcast can be operated.
Project2: this role is a project role. Bind "project2. *" with regular expression, which means that only projects beginning with itcast can be operated.
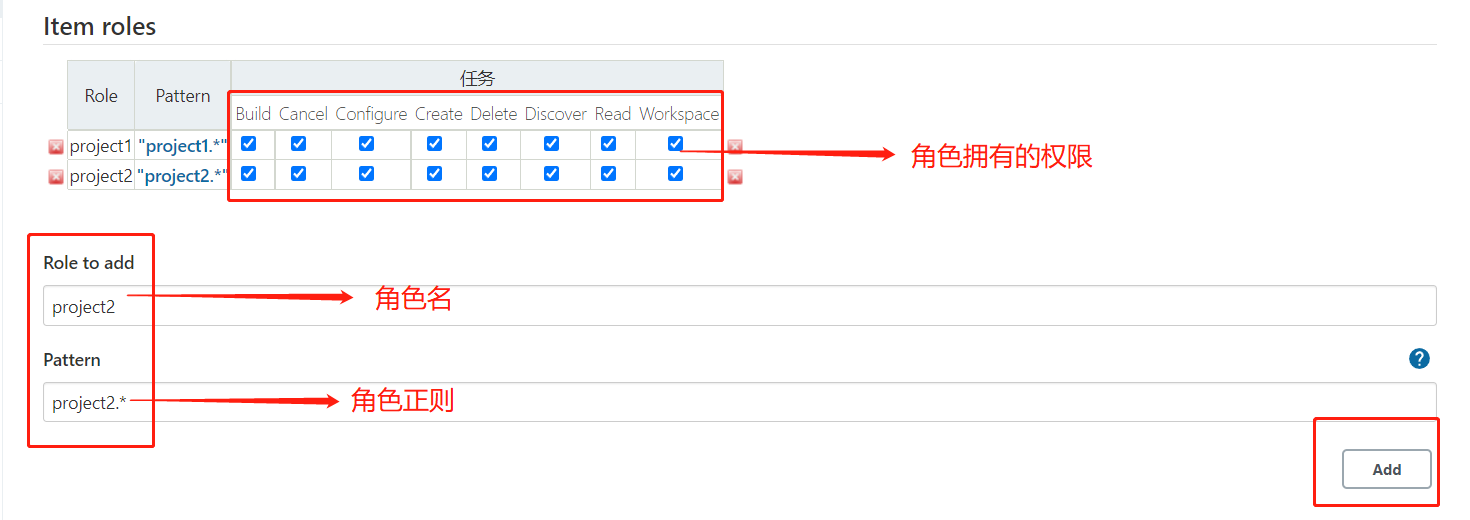
Remember to save!!!!
2. Create user
System management - manage user - create new user
 3. Assign roles to users
System management - Manage and Assign Roles
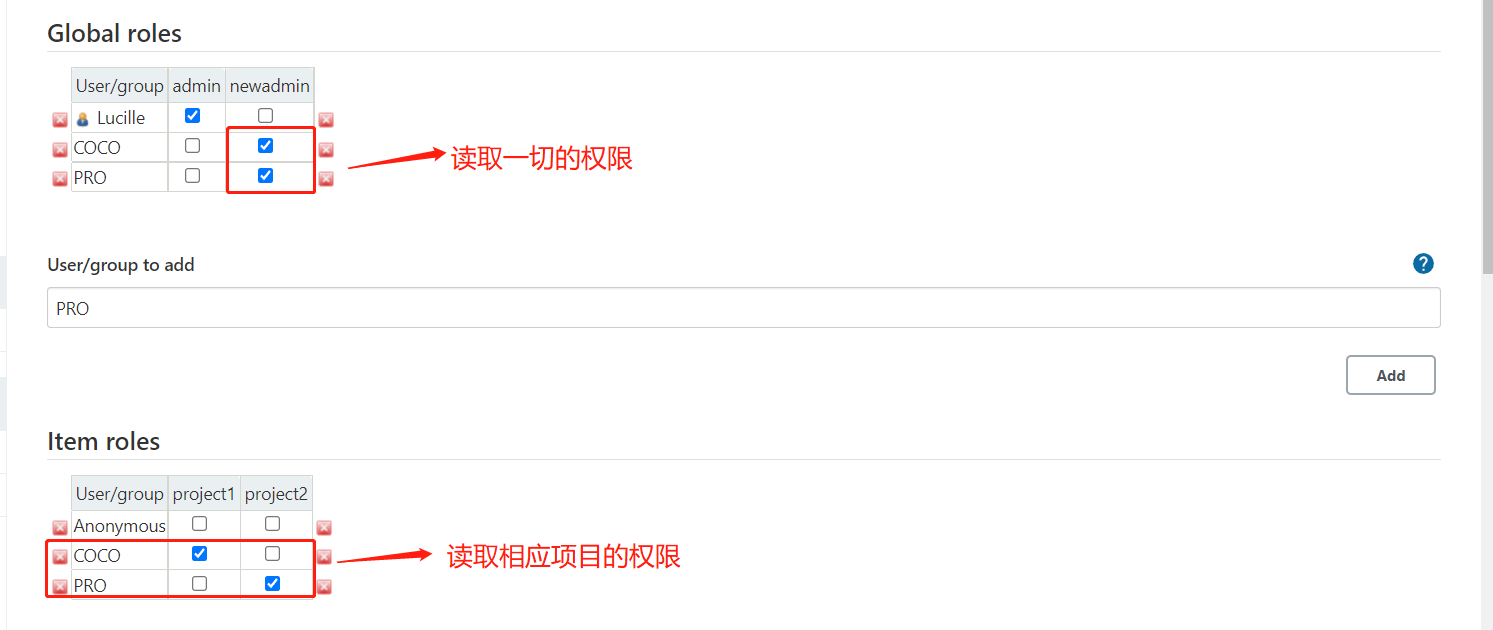
Remember to save!!!
4. Verify
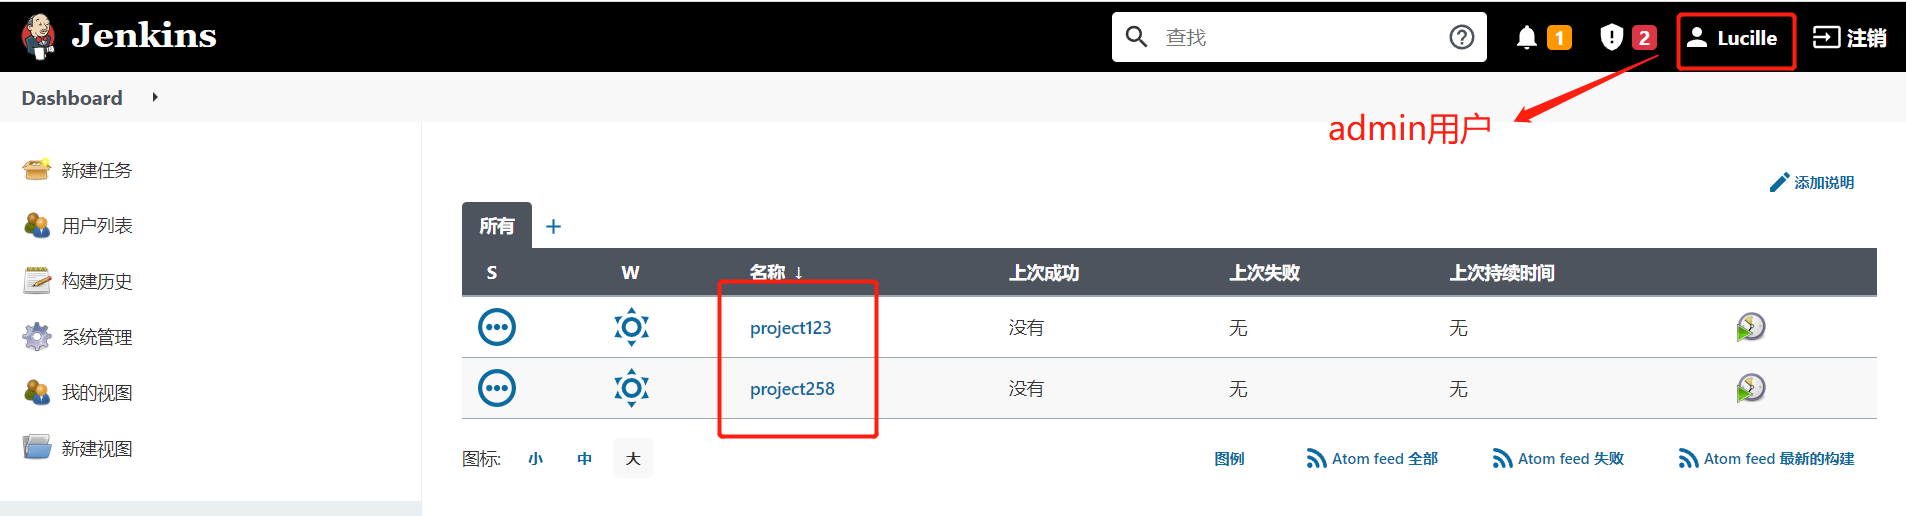
Create two new projects project123 and project258 using the admin account
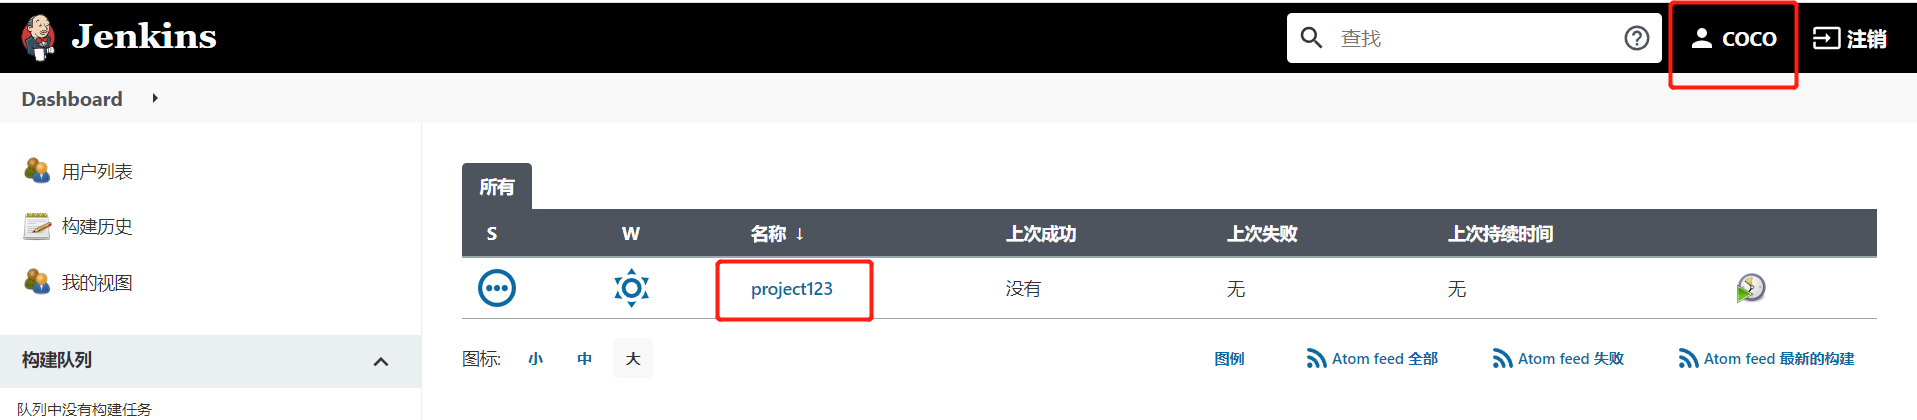
Log in to the COCO user, and you can only see projects starting with project1
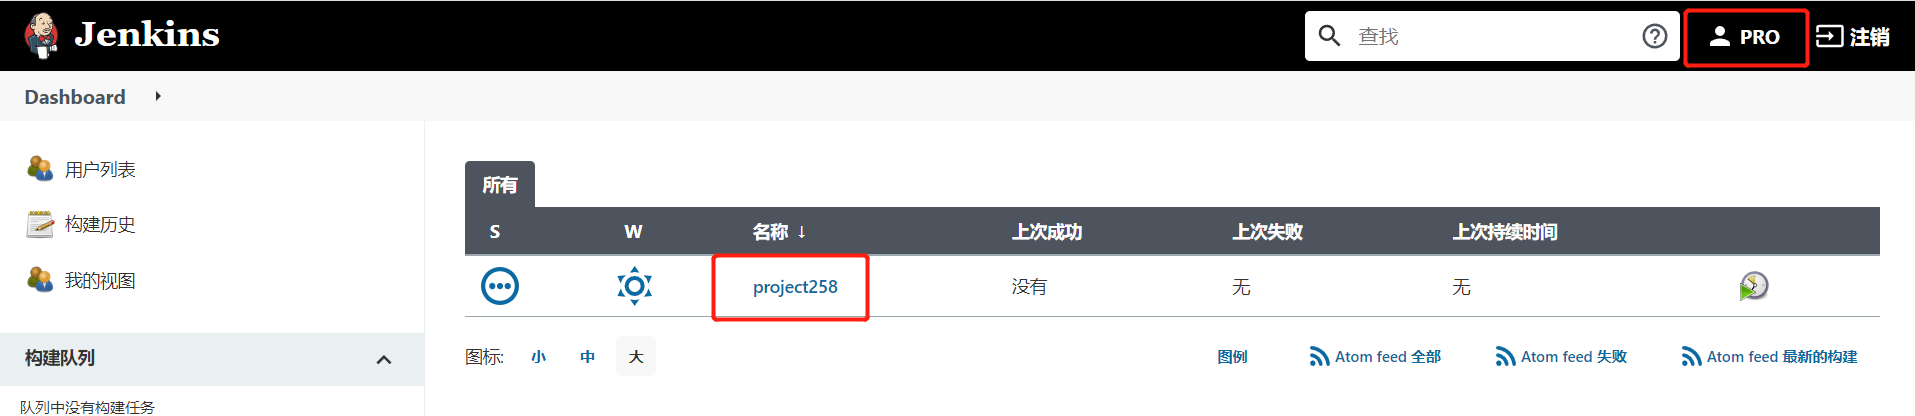
 When you log in to the PRO user, you can only see projects starting with project2
⑦ , git and maven installation and configuration
1. Install git
Installation dependency

Install git

Verify that the installation was successful
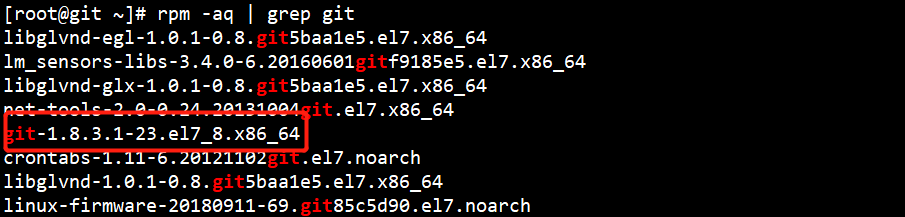

Command set
#Installation dependency
yum install curl-devel expat-devel gettext-devel openssl-devel zlib-devel perl-devel -y

#Install git
yum install git -y

#Verify that the installation was successful
[root@git ~]# git --version
git version 1.8.3.1
Associated git in jenkins
Download git from plug-ins (the same way as other plug-ins)
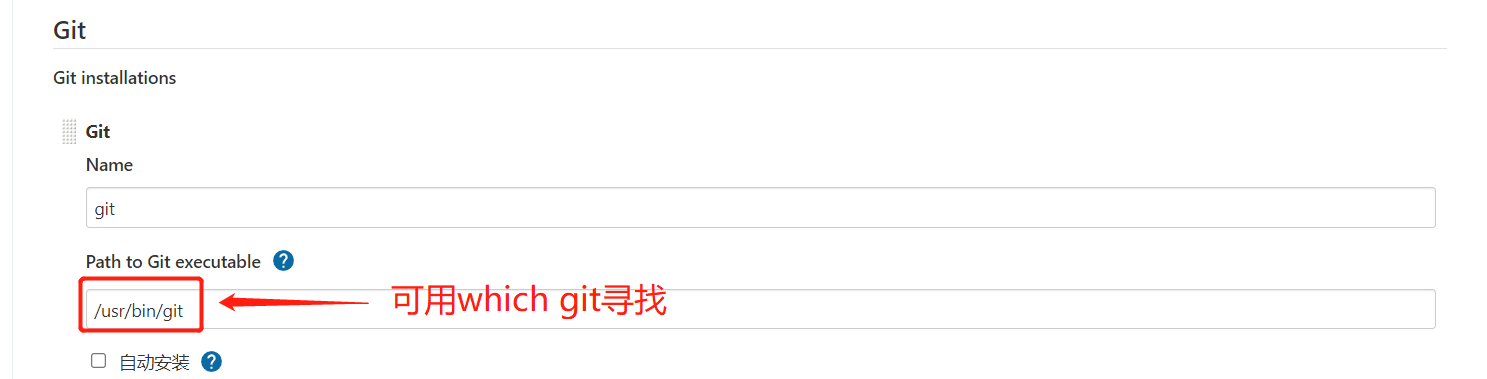
Remember to save!!!!
2. Installing maven
Download installation package
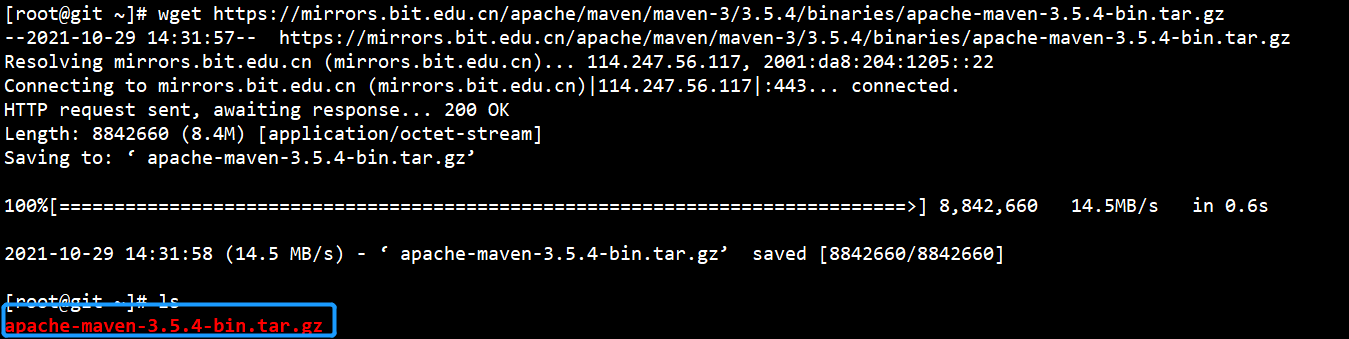
Installation succeeded!
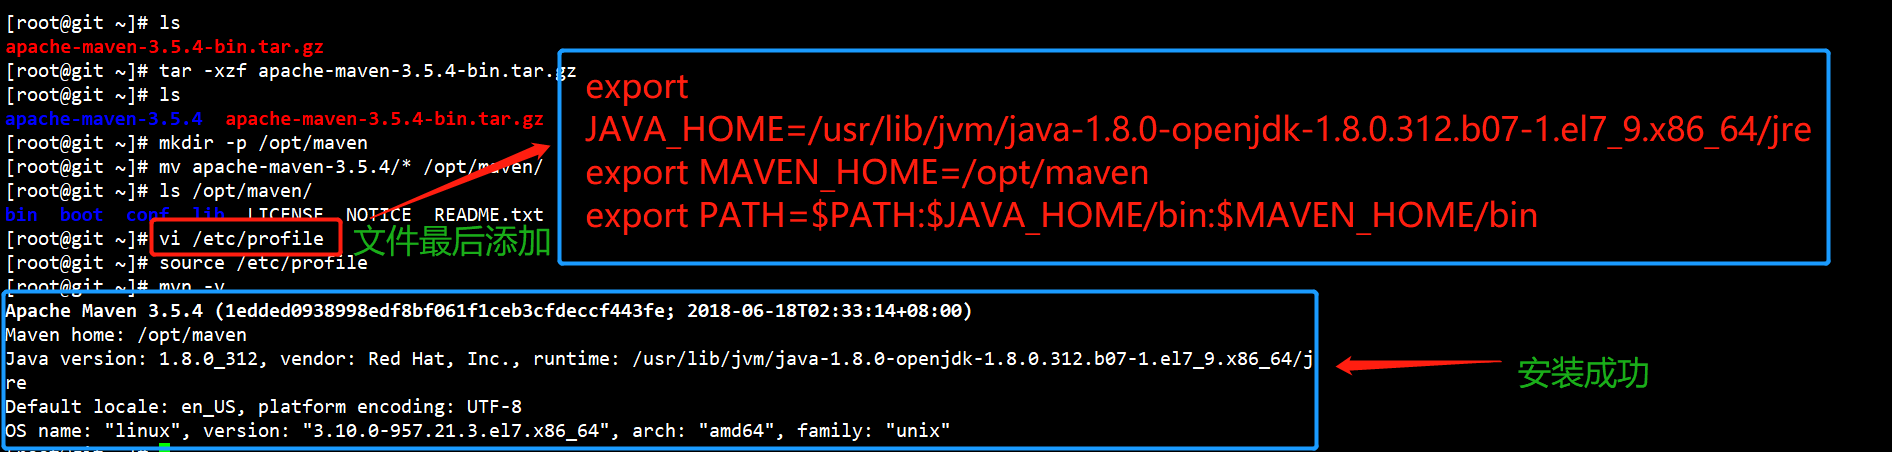
Command set
#Download installation package
wget https://mirrors.bit.edu.cn/apache/maven/maven-3/3.5.4/binaries/apache-maven-3.5.4-bin.tar.gz


#Create installation directory and install
[root@git ~]# tar -xzf apache-maven-3.5.4-bin.tar.gz
[root@git ~]# ls
apache-maven-3.5.4  apache-maven-3.5.4-bin.tar.gz
[root@git ~]# mkdir -p /opt/maven
[root@git ~]# mv apache-maven-3.5.4/* /opt/maven/
[root@git ~]# ls /opt/maven/
bin  boot  conf  lib  LICENSE  NOTICE  README.txt
[root@git ~]# vi /etc/profile
export JAVA_HOME=/usr/lib/jvm/java-1.8.0-openjdk-1.8.0.312.b07-1.el7_9.x86_64/jre #Install the jdk using yum or up2date. Use which java to find it
export MAVEN_HOME=/opt/maven
export PATH=$PATH:$JAVA_HOME/bin:$MAVEN_HOME/bin
[root@git ~]# source /etc/profile

#Verify success
[root@git ~]# mvn -v
Apache Maven 3.5.4 (1edded0938998edf8bf061f1ceb3cfdeccf443fe; 2018-06-18T02:33:14+08:00)
Maven home: /opt/maven
Java version: 1.8.0_312, vendor: Red Hat, Inc., runtime: /usr/lib/jvm/java-1.8.0-openjdk-1.8.0.312.b07-1.el7_9.x86_64/jre
Default locale: en_US, platform encoding: UTF-8
OS name: "linux", version: "3.10.0-957.21.3.el7.x86_64", arch: "amd64", family: "unix"
Associated maven in jenkins
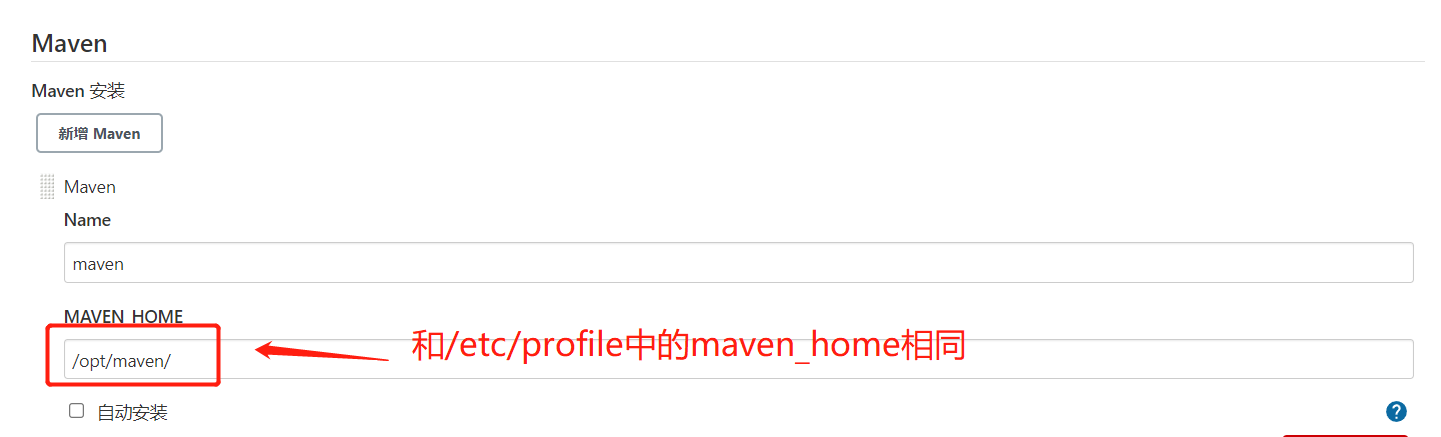
Remember to save!!!!
⑧, A pit about jdk
System management - global tool configuration - JDK configuration
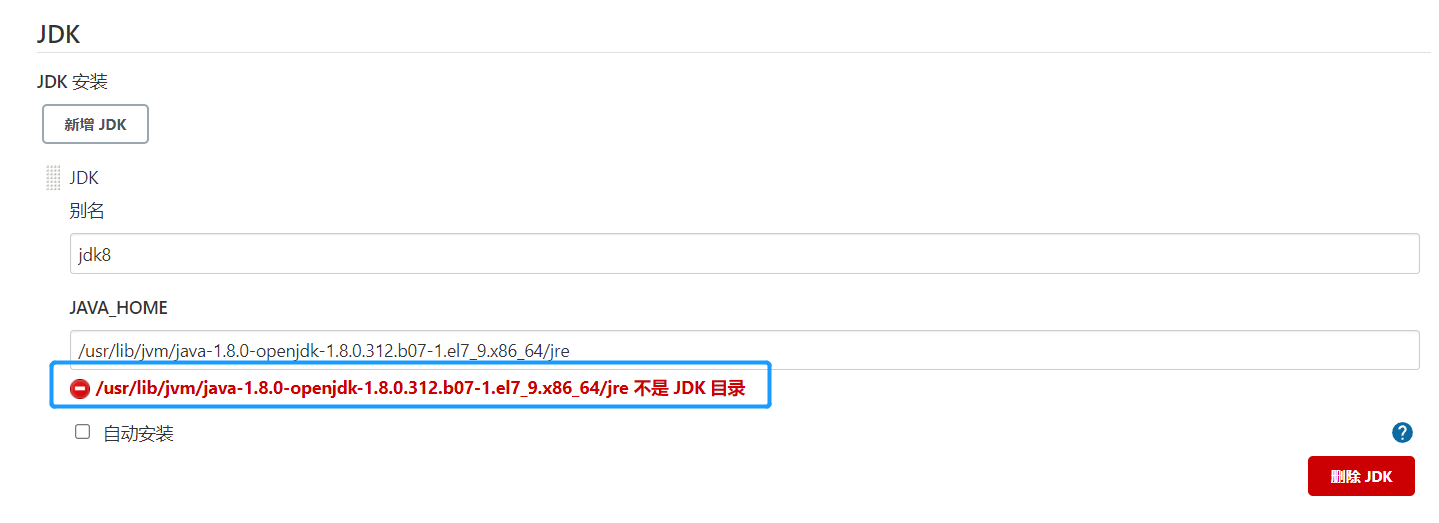
The above problem occurs because the jdk is installed using yum, but in the configuration, it is not the jdk directory, which is actually the jdk directory.
Solution: delete the jdk installed by yum and reinstall the jdk using the compressed package. (this is a pit. No solution has been found yet. Please give me some advice!)
After reinstallation

Remember to save!!!!
⑨ . voucher management
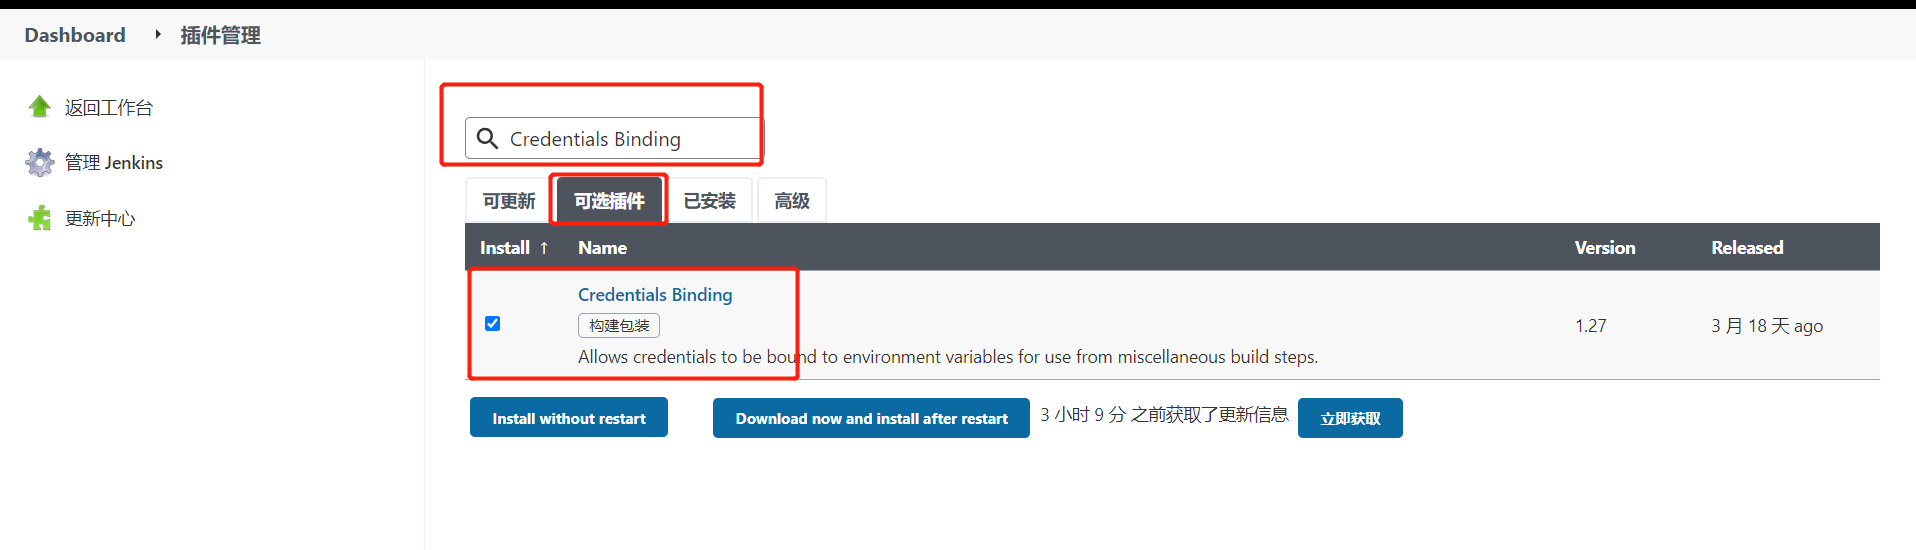
Credentials can be used to store database passwords, Gitlab password information and Docker private warehouse passwords that need ciphertext protection, so that Jenkins can interact with these third-party applications. You need to install the Credentials Binding plug-in to achieve the above functions.
System management --- plug in management --- optional plug-ins --- enter Credentials Binding --- select and install
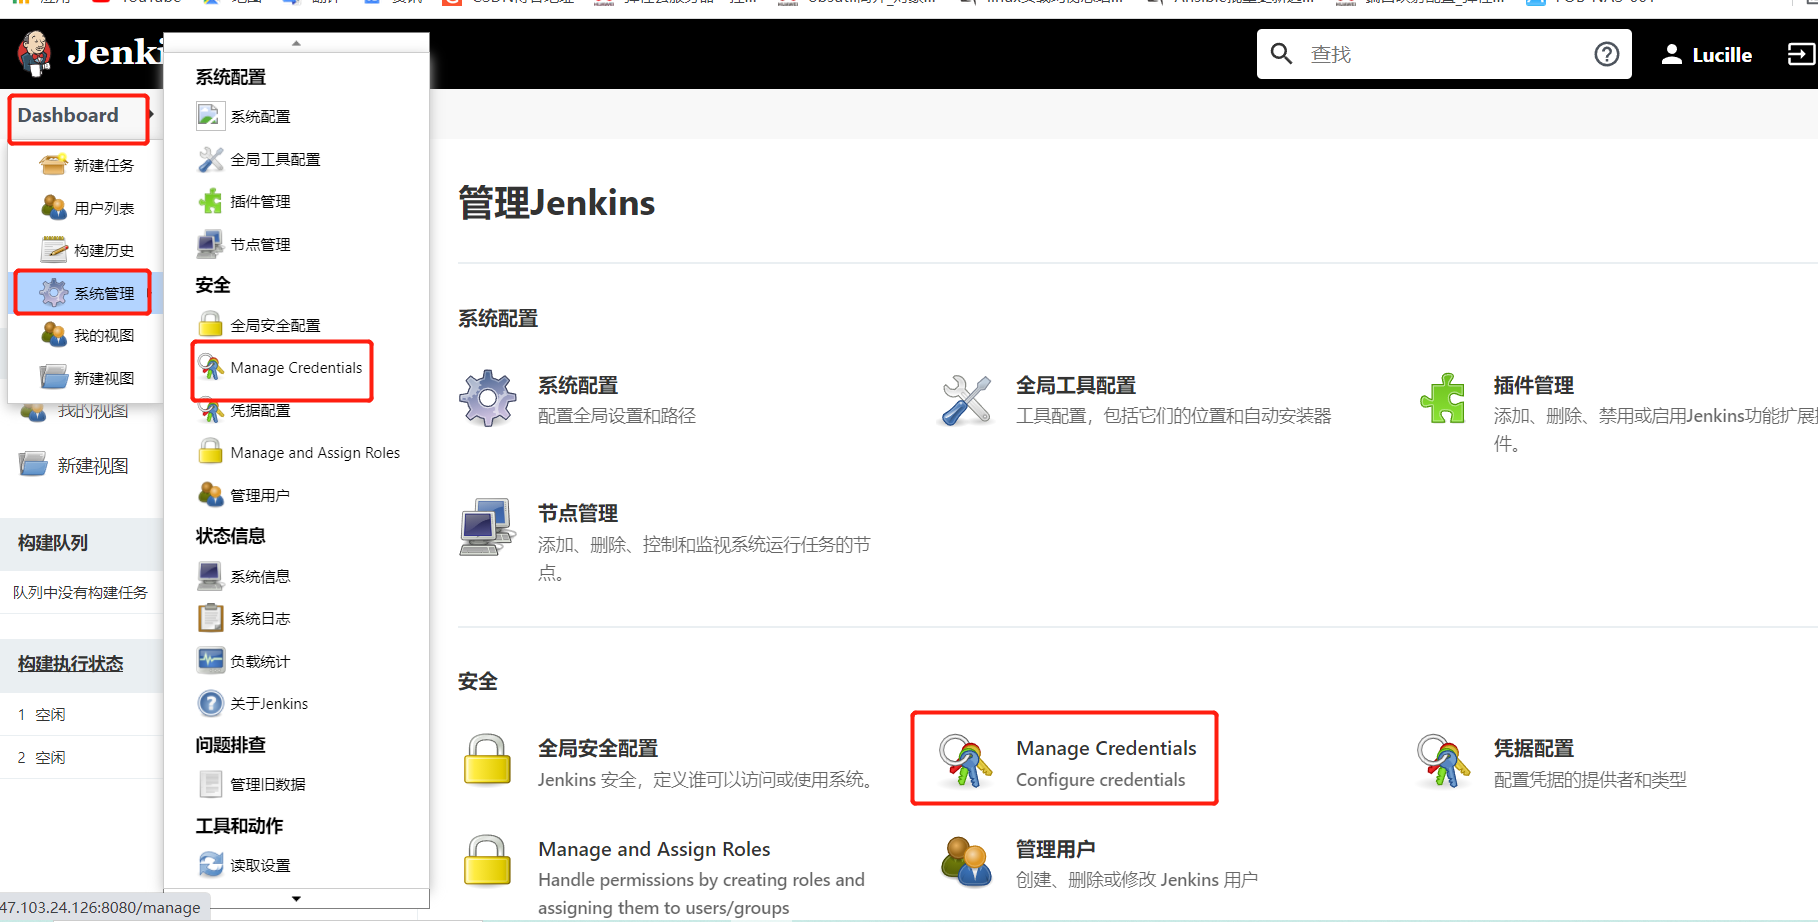
After installation, you can add credentials. The specific opening location is as follows:
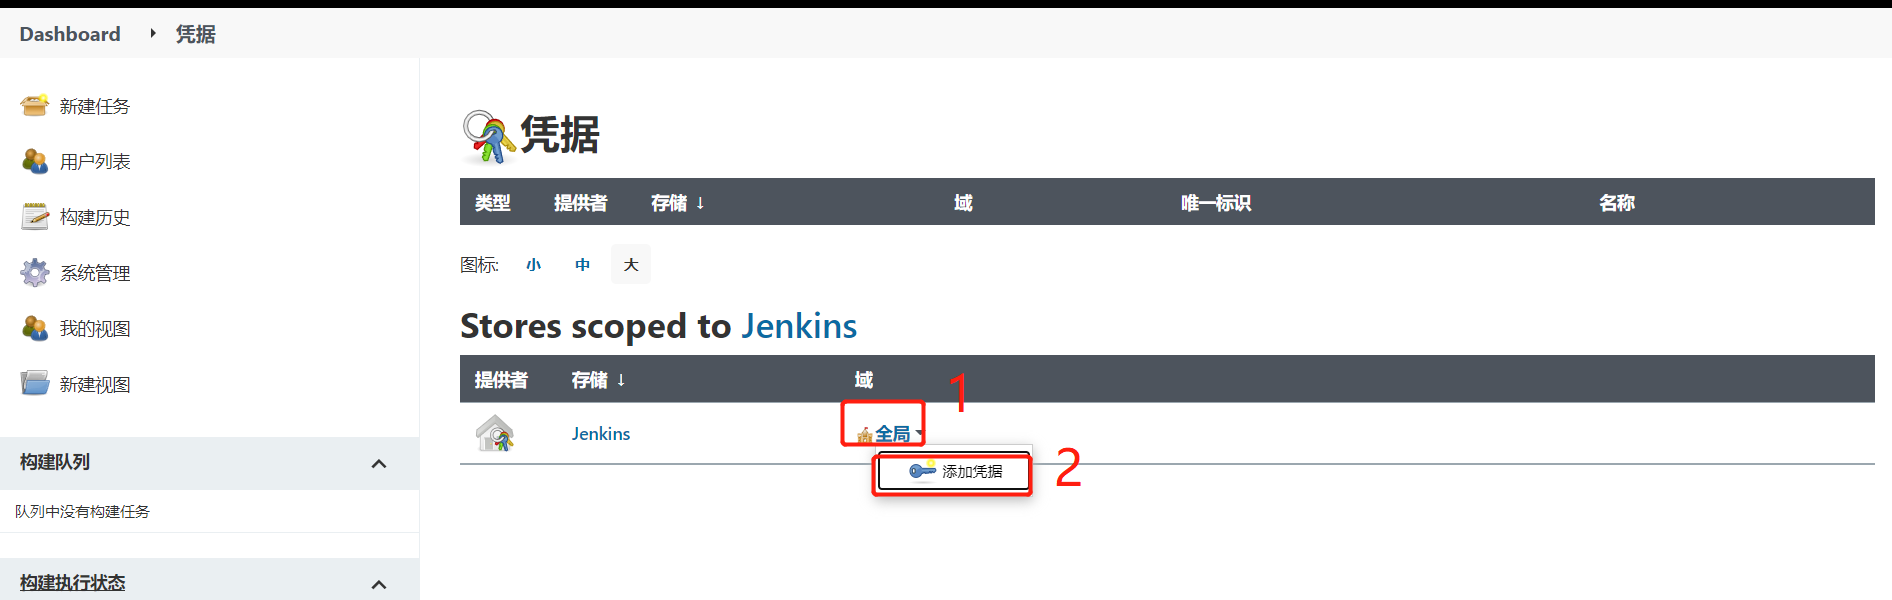
Add voucher
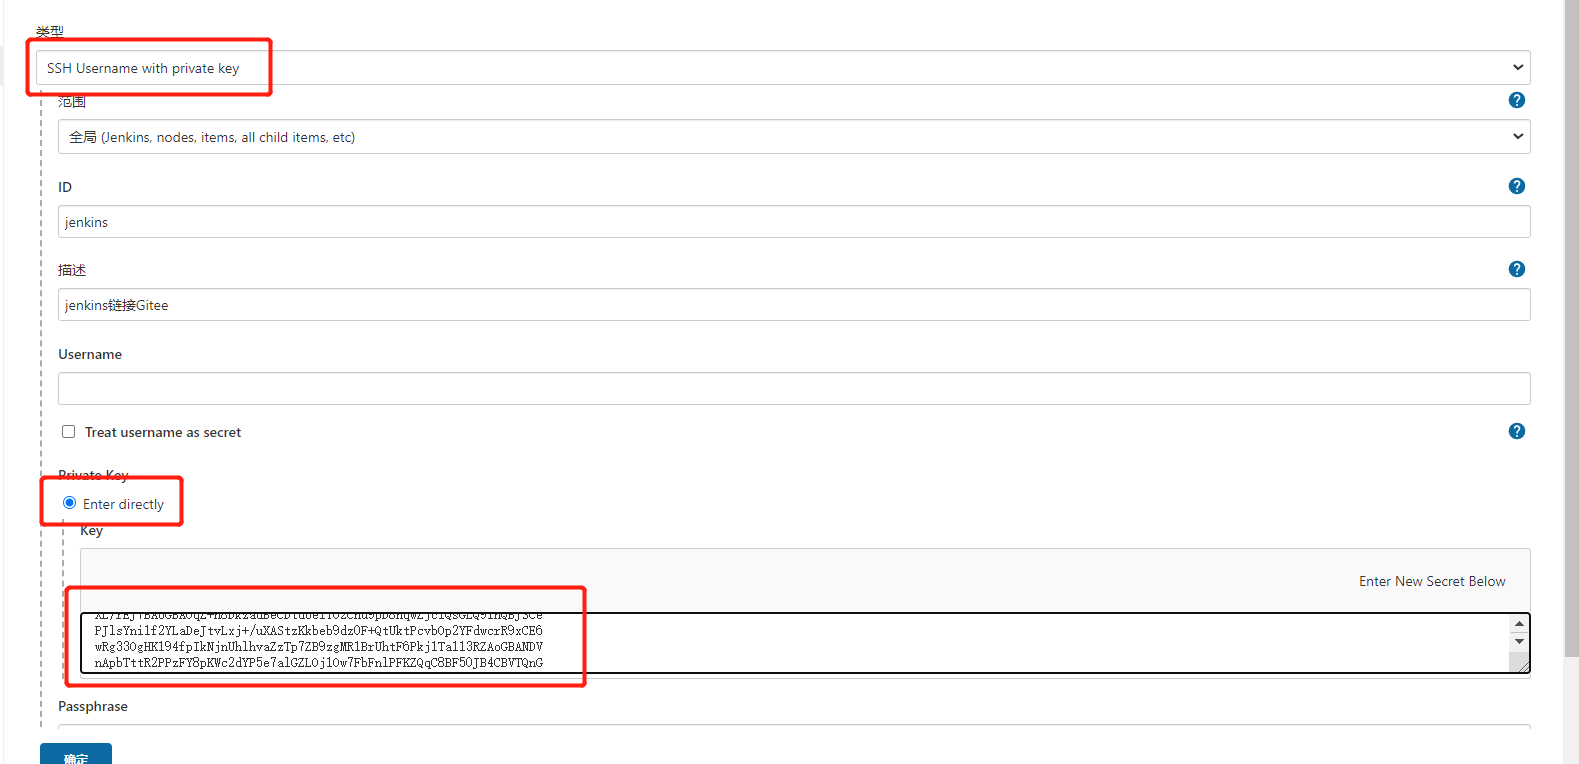
Here is an example connected to Gitee
First, the SSH key is generated on the host hosting jenkins
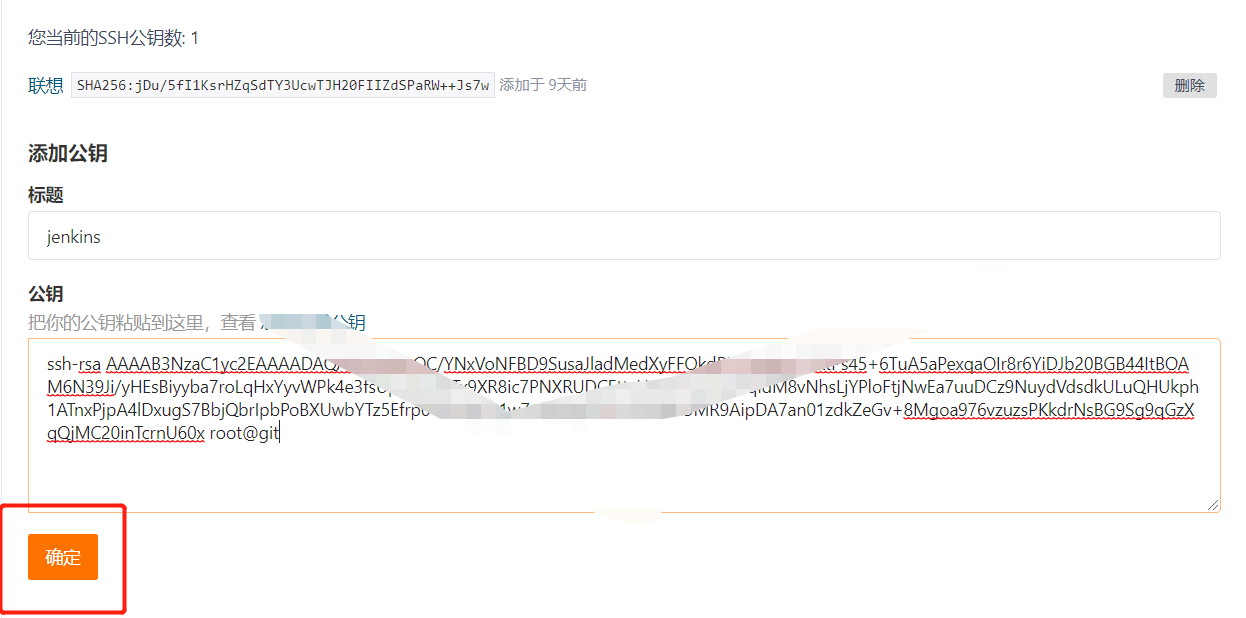
 Put the generated public key in Gitee
Personal home page -- personal settings -- SSH public key
Add credentials in Jenkins and configure the private key
 Test available
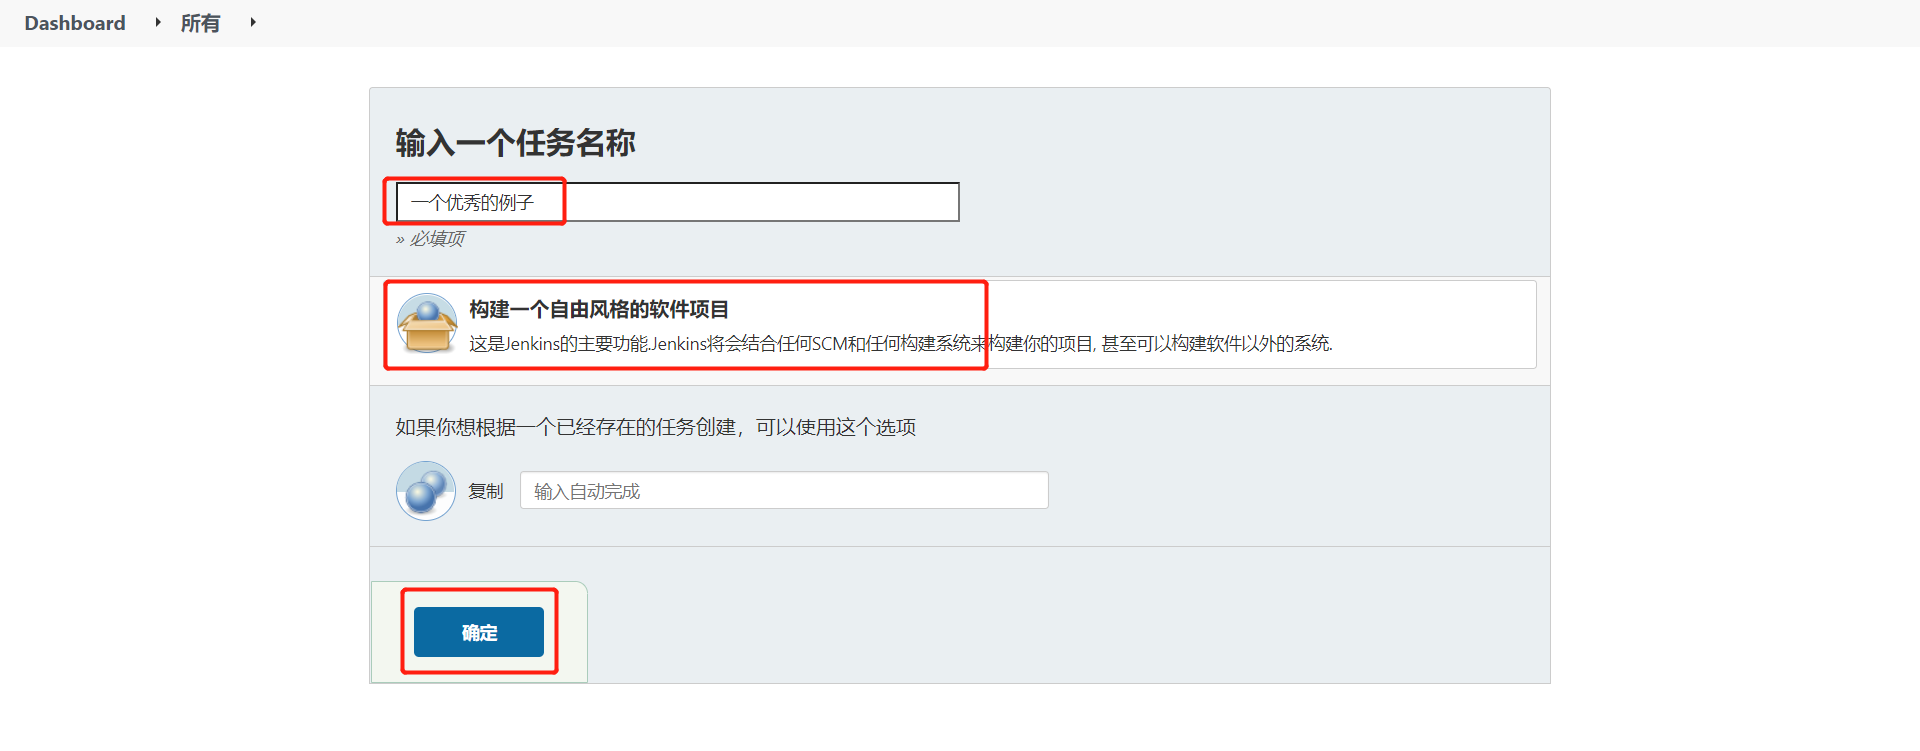
Create a new task and pull Gitee's data. Can it be built successfully!
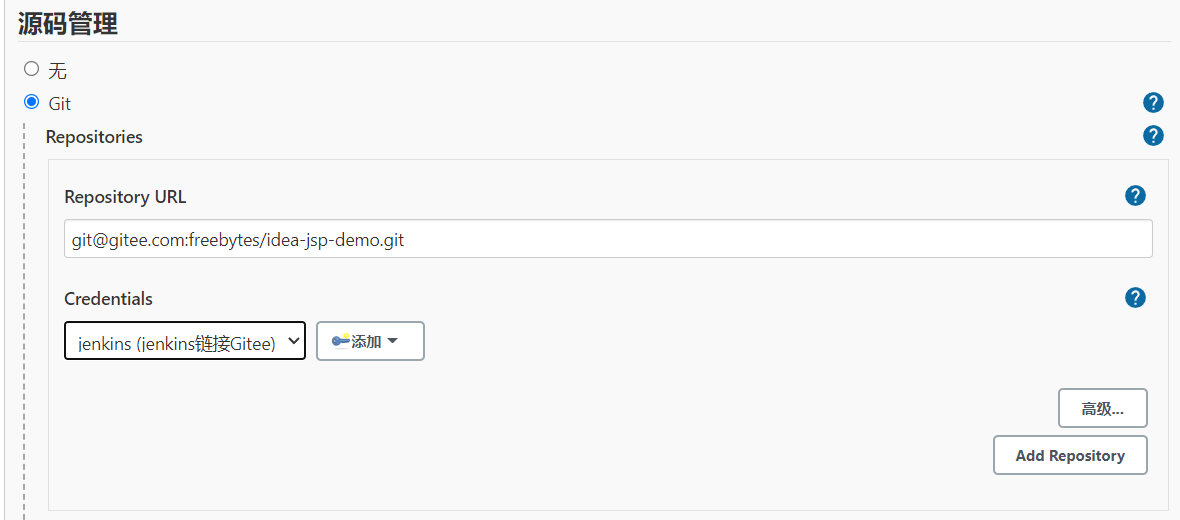
New task -- "enter task name --" build a free style software project -- "source code management"
No voucher selected
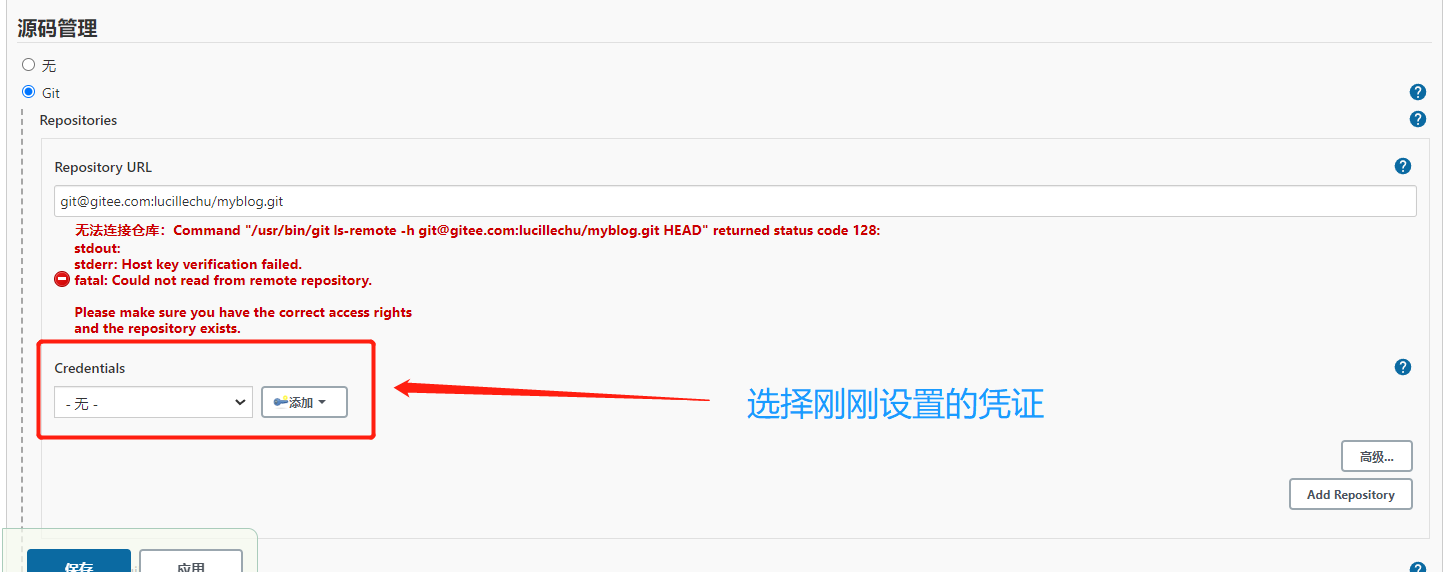
Select voucher
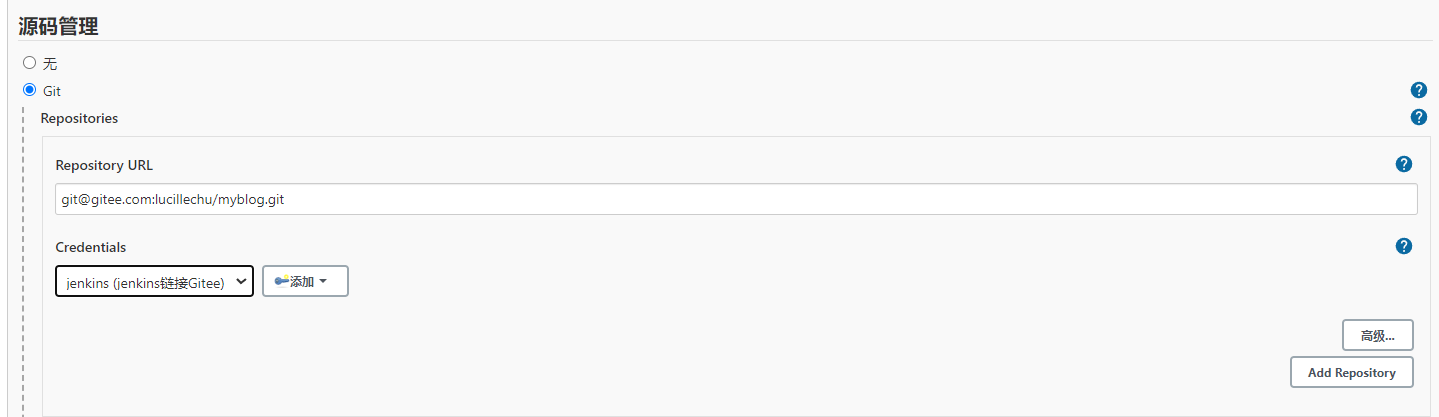
View console output:
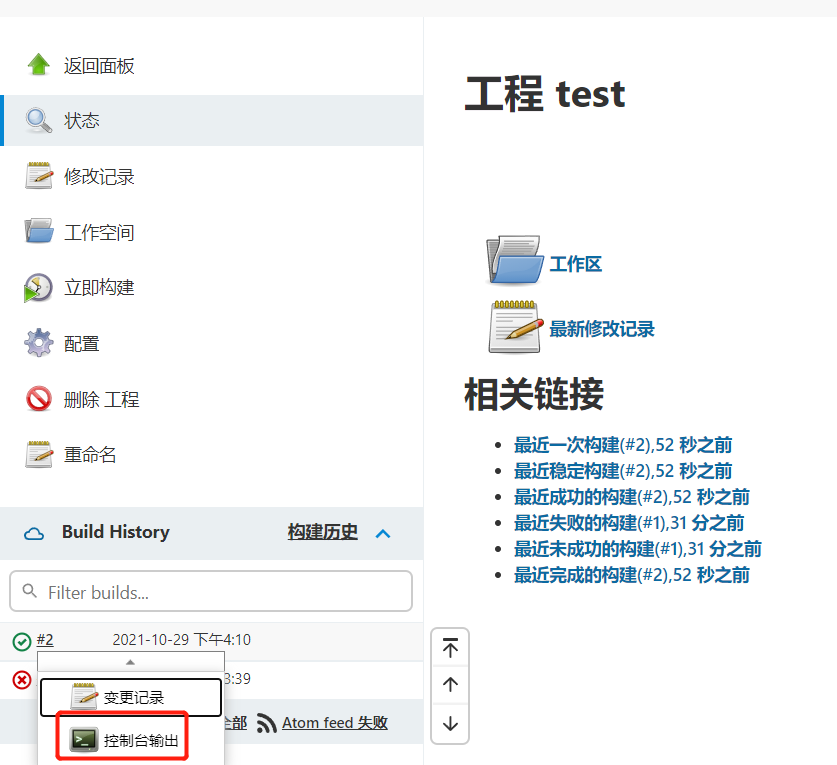
Build pull code now, success!!!
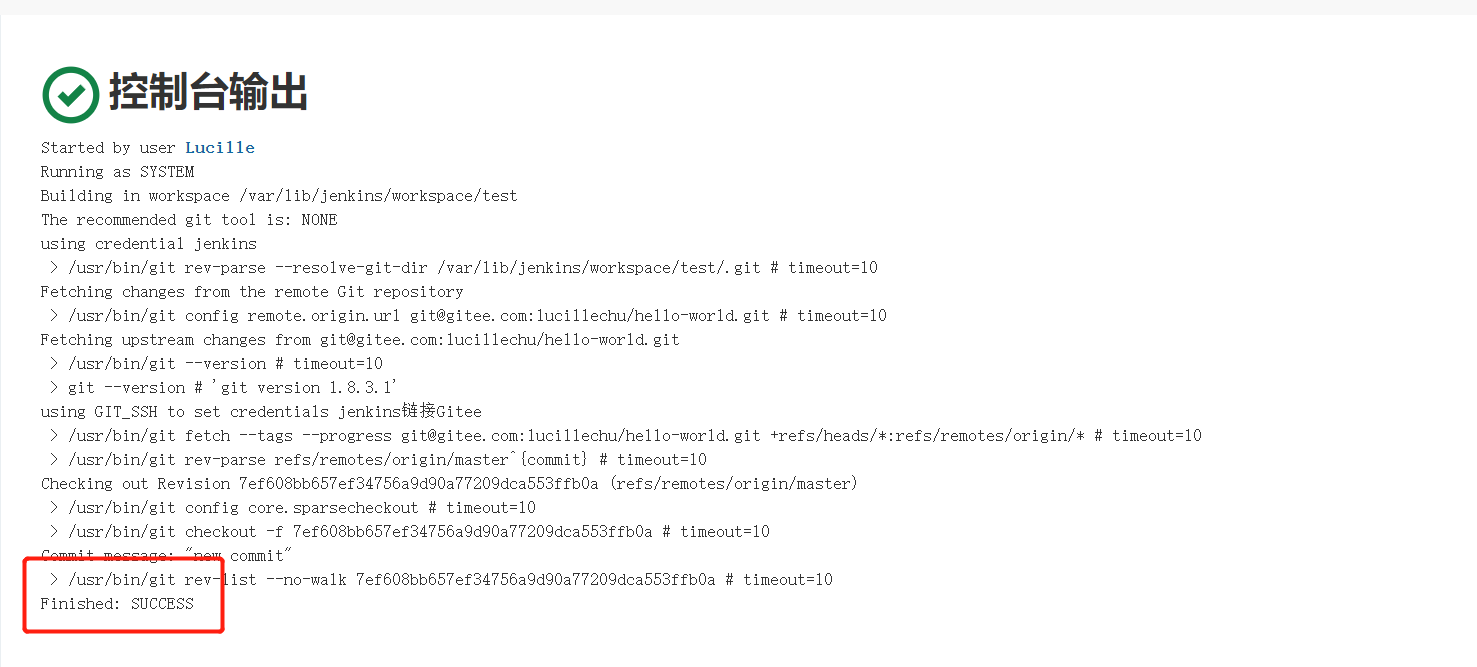
Voucher configuration succeeded!!
⑩ Another pit, about the jdk version
Because jdk17 was used before, maybe because the version was too advanced or the version was unstable, the restart failed after git/maven was configured. So I changed to jdk8 version later. At present, this version is the most stable. I didn't find the specific reason. The prompt said that it was because some vouchers were not handled properly!
(4) Deploy a freestyle project
① Introduction to architecture
The following is an example of jenkins deployment. The specific architecture diagram will be shown in the figure below
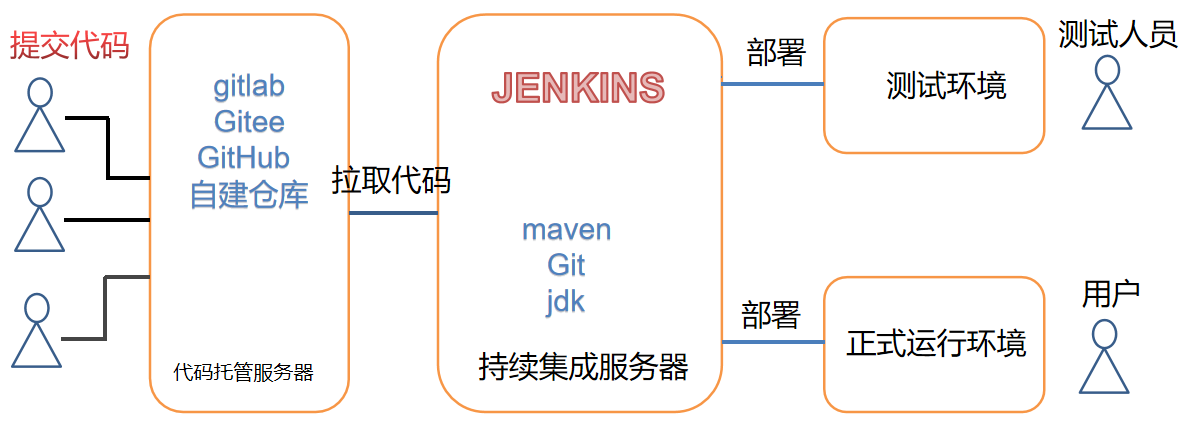
1. The developer submits the code to the code hosting server,
2. As a continuous integration tool, Jenkins pulls the code into Jenkins and compiles and packages the code using jdk, maven, git, etc.
3. Finally, deploy the generated jar package to the test environment. After the test environment has no problems, deploy it to the formal running environment.
② . construction of tomcat server
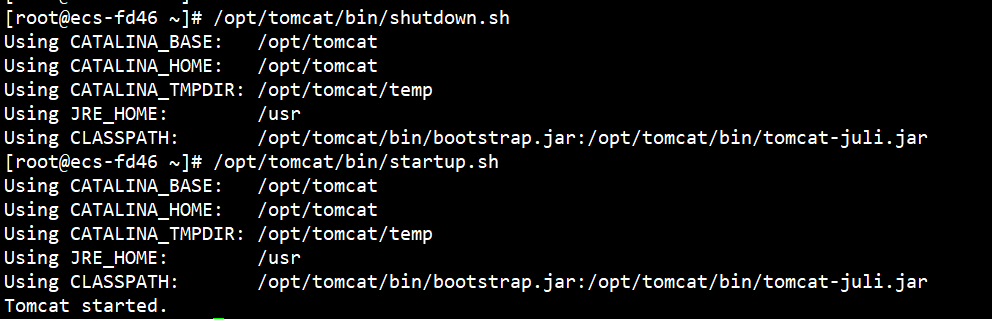
1. Install tomcat
Note: the server closes the firewall or opens port 8080
Command set
[root@ecs-fd46 ~]# yum install java-1.8.0-openjdk* -y
[root@ecs-fd46 ~]# tar -xzvf apache-tomcat-8.0.36.tar.gz
[root@ecs-fd46 ~]# mv /root/apache-tomcat-8.0.36/* /opt/tomcat/
[root@ecs-fd46 ~]# /opt/tomcat/bin/startup.sh
Using CATALINA_BASE:   /opt/tomcat
Using CATALINA_HOME:   /opt/tomcat
Using CATALINA_TMPDIR: /opt/tomcat/temp
Using JRE_HOME:        /usr
Using CLASSPATH:       /opt/tomcat/bin/bootstrap.jar:/opt/tomcat/bin/tomcat-juli.jar
Tomcat started.
Installation succeeded!
2. Configure tomcat user permissions
The subsequent Jenkins deployment project to Tomcat server requires Tomcat users, so modify the following configuration of Tomcat and add users and permissions.
Command set
[root@ecs-fd46 ~]# vim /opt/tomcat/conf/tomcat-users.xml #Insert between < Tomcat users > < / Tomcat users >
<role rolename="tomcat"/>
   <role rolename="role1"/>
   <role rolename="manager-script"/>
   <role rolename="manager-gui"/>
   <role rolename="manager-status"/>
   <role rolename="admin-gui"/>
   <role rolename="admin-script"/>
   <user username="tomcat" password="tomcat" roles="manager-gui,manager-script,tomcat,admin-gui,admin-script"/>
With this setting, the user and password are: tomcat.
Note: in order to log in to Tomcat for the user just configured, the following configuration needs to be modified
vi /opt/tomcat/webapps/manager/META-INF/context.xml
Comment out the code as shown in the figure below:
Restart
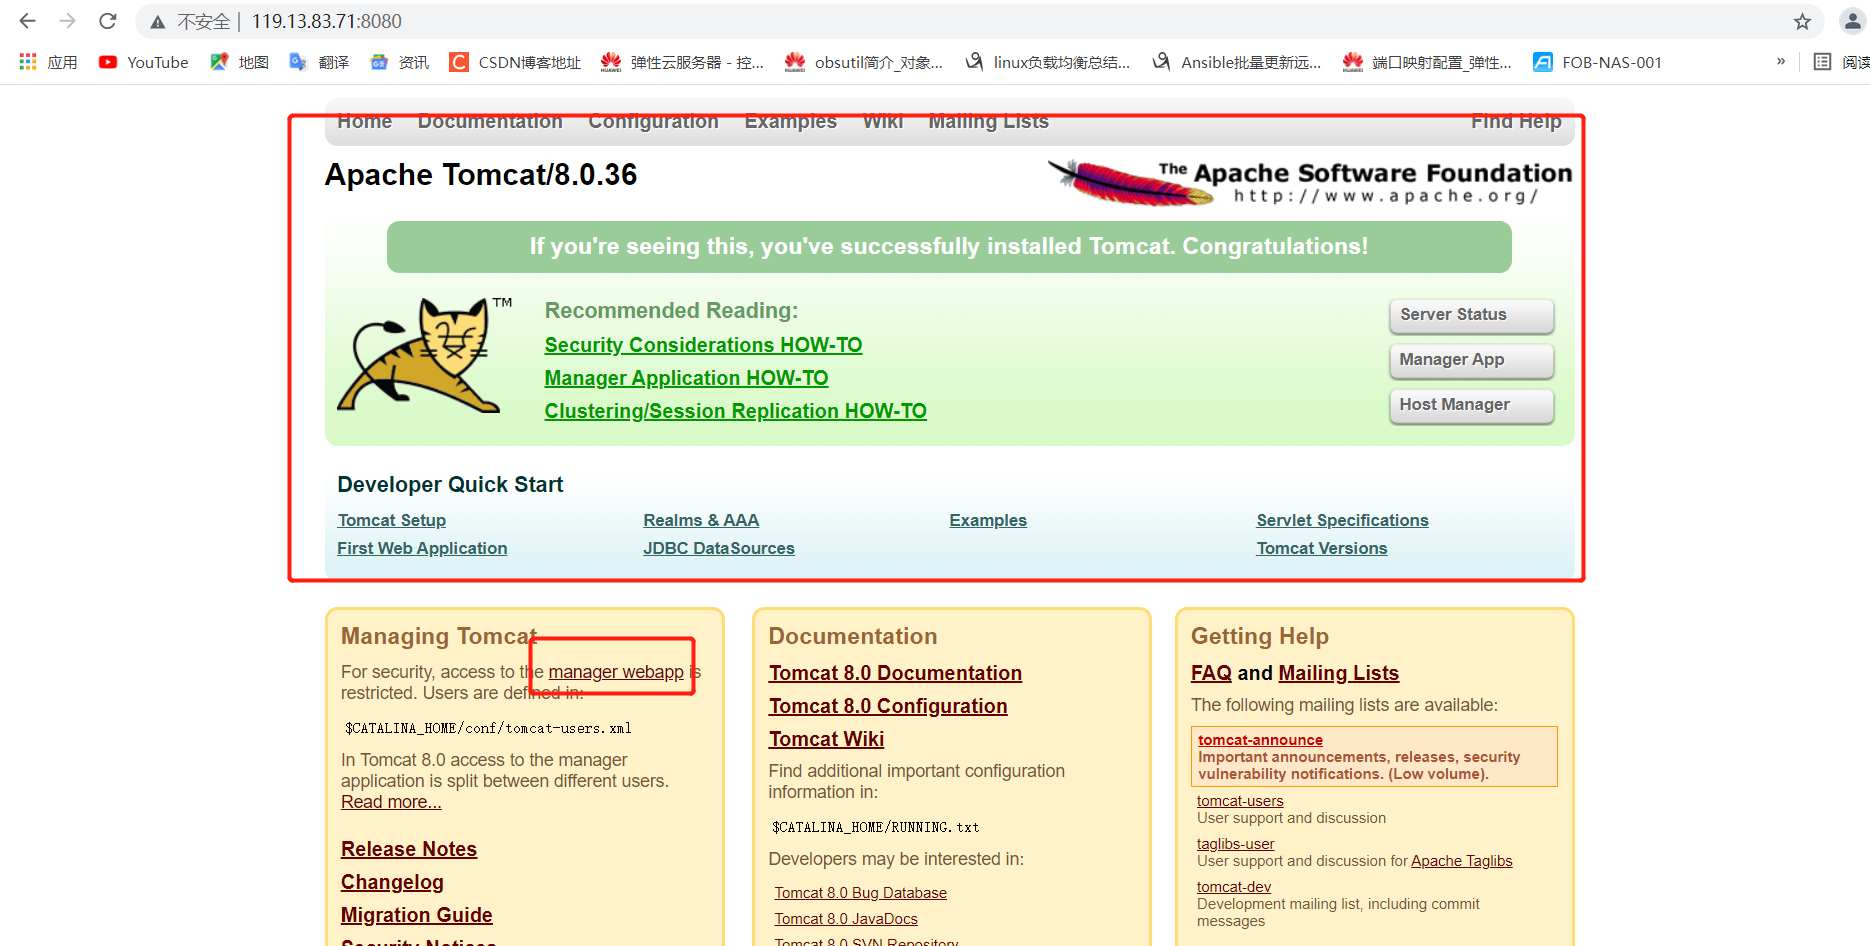
Refresh and click manager webapp
Enter tomcat/tomcat
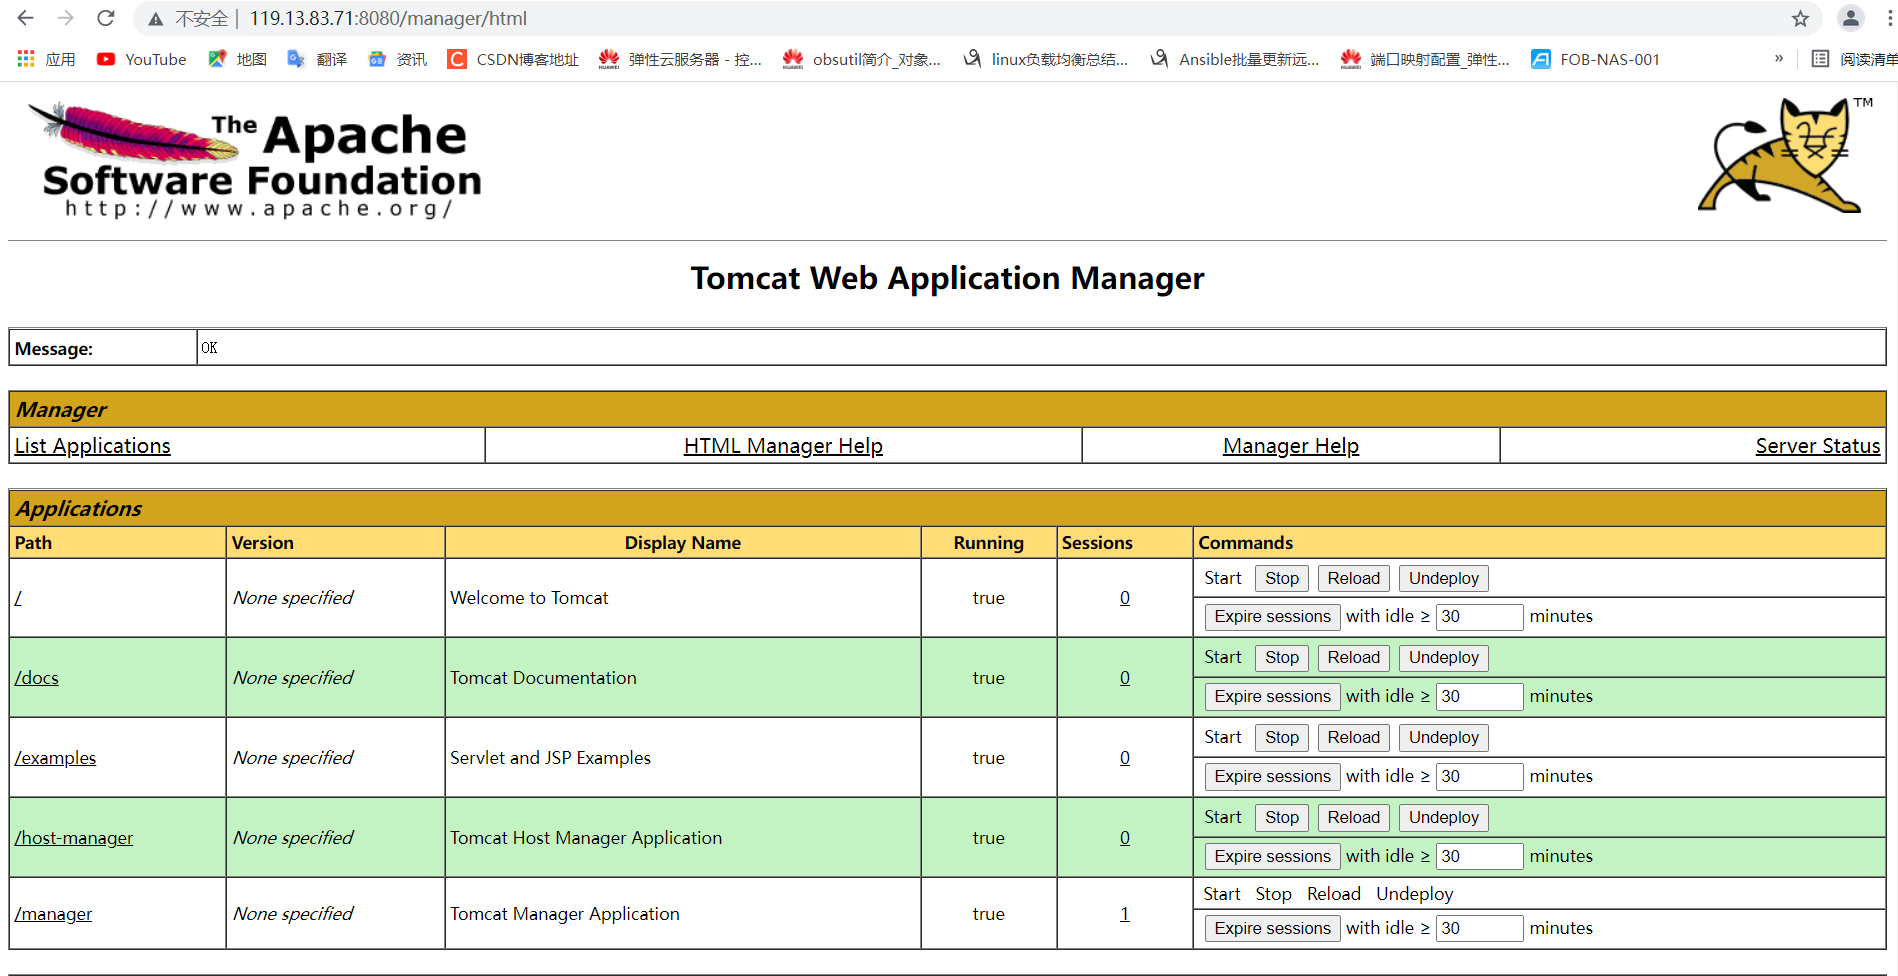
tomcat deployment succeeded!!!
③ Build on jenkins and deploy to tomcat
The following is an example to build a free style project and deploy it to tomcat project. Specific steps: pull code - > compile - > package - > deploy
Take an excellent project on Gitee as an example:
website: An excellent example
git:git@gitee.com:freebytes/idea-jsp-demo.git
A hint:
Variables need to be configured in jenkins. System management - system configuration - global properties
 Otherwise, the packaging command will not be found during the construction process!
1. Create project
2. Configuration source code management
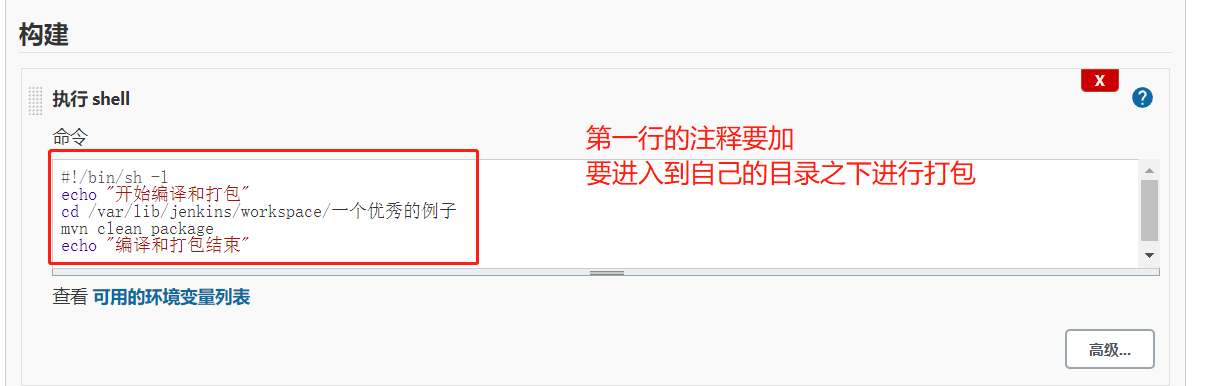
 3. Compile package
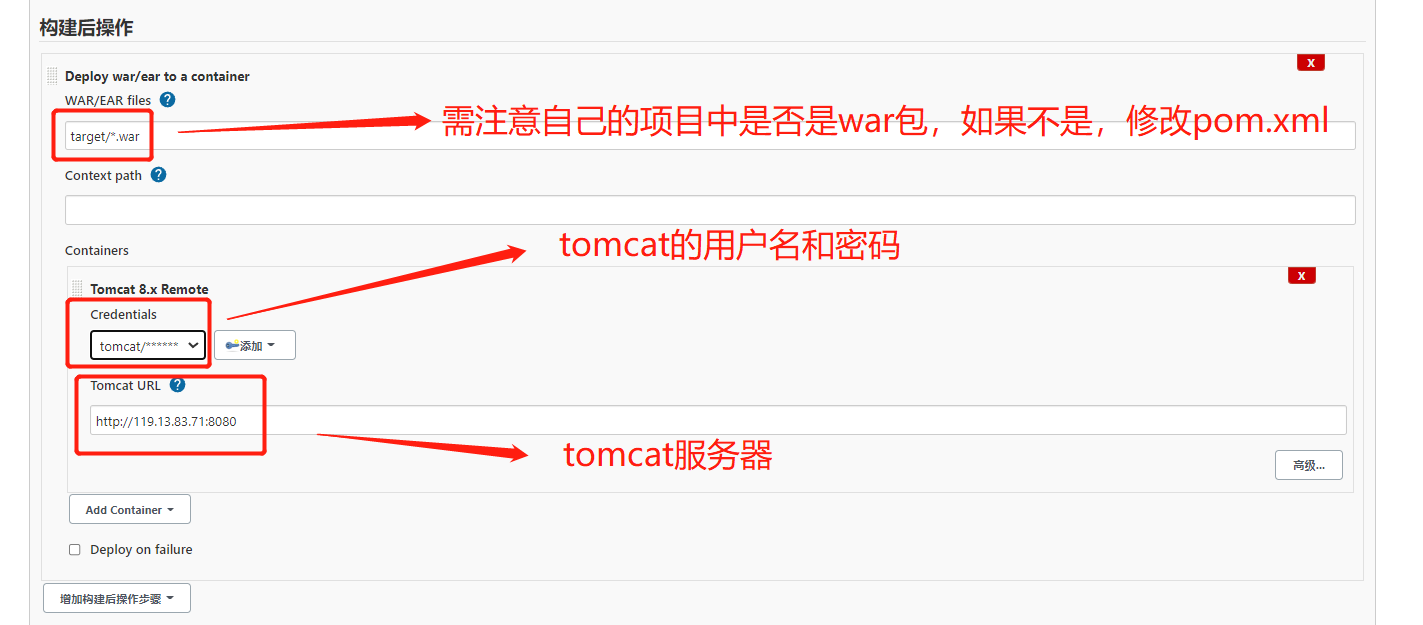
 4. Deployment after configuration
Install the Deploy to container plug-in
Jenkins itself cannot realize the function of remote deployment to Tomcat, so it needs to install the Deploy to container plug-in. The plug-in update is the same as the previous steps.
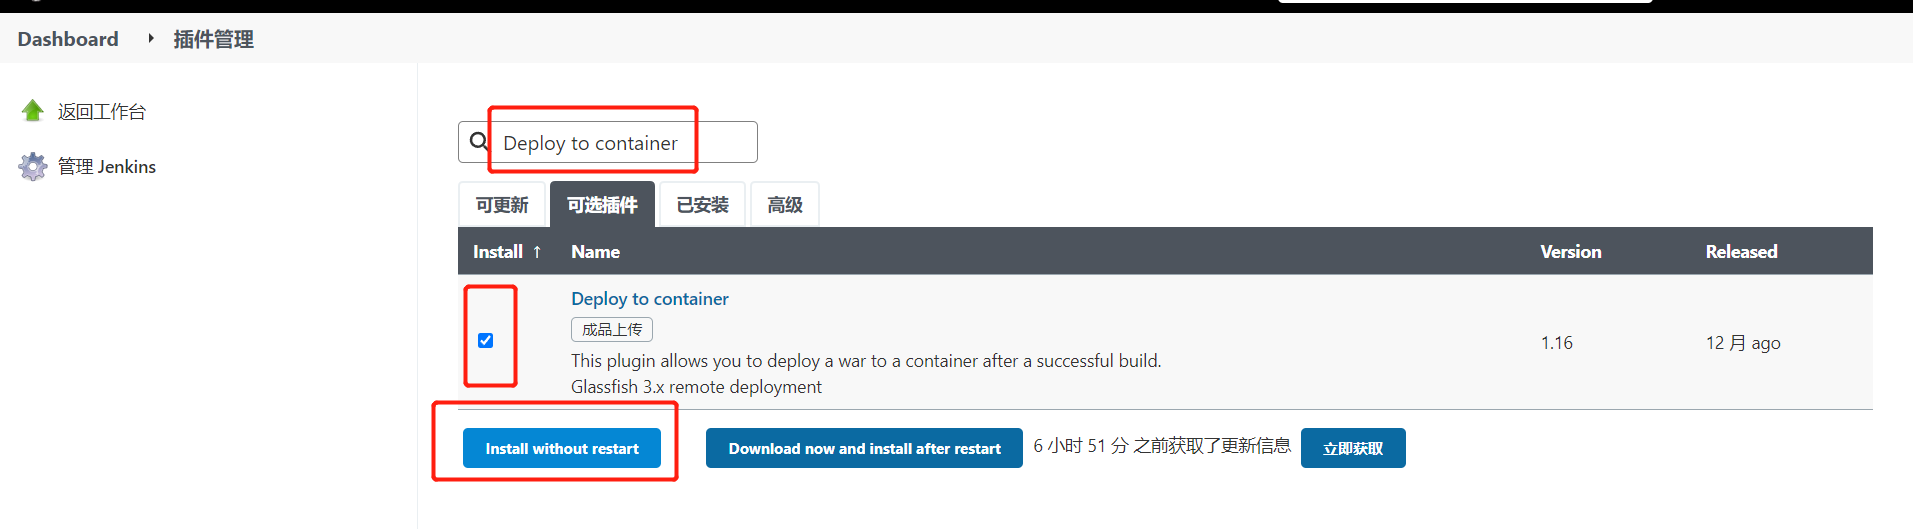
5. Add deployment
6. Click "build now"

Build successful
7. Access succeeded!!!
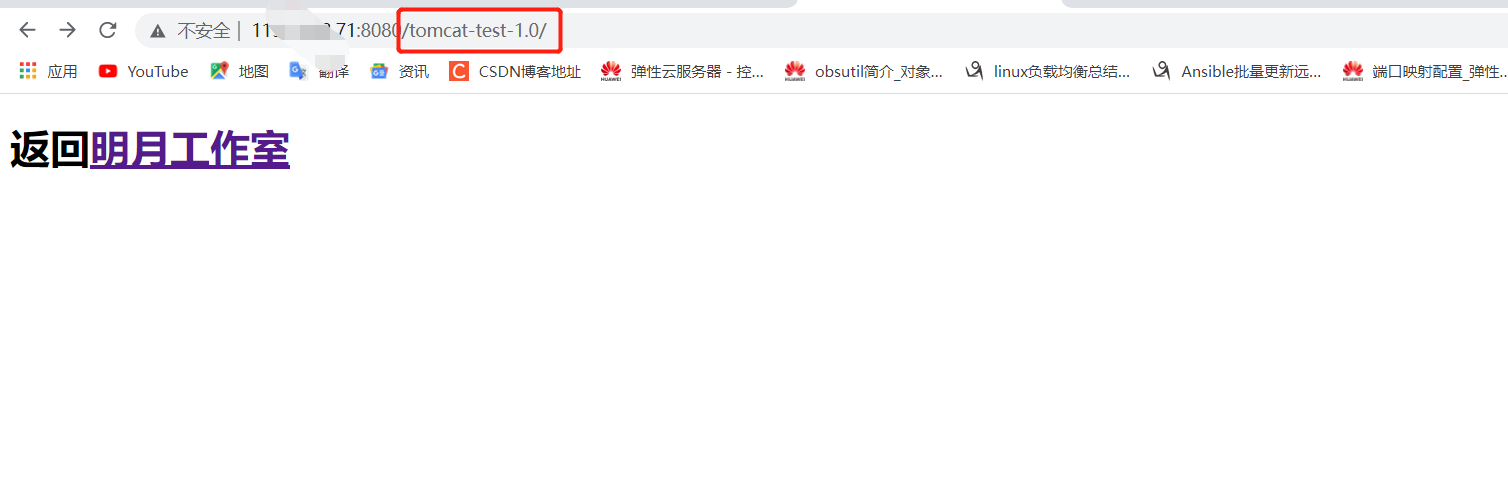
So far, a simple free style software project has been built!