1. Building Development Environment
1.1 Install Java Development Kit (JDK)
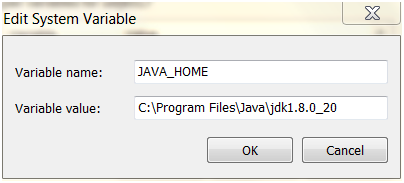
Set the environment variable'JAVA_HOME'
1.2 Install Apache Maven
1. Get the latest version from http://maven.apache.org/download.cgi Then unzip it to the directory you want to install
2. Setting the environment variable M2_HOME
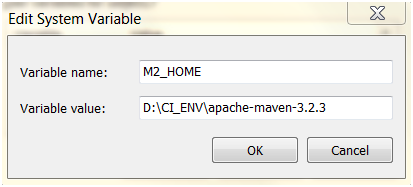
3. Set the environment variable M2 and set it to "% M2_HOME% bin"
4. Add% M2% to PATH environment variable

6. Add the following contents to the file of% USERPROFILE%m2settings.xml (USERPROFILE for user name paths such as C:Documents and Settings):
If the. m2 folder does not exist, you need to create it yourself
Copy/Paste to settings.xml:
<settings>

  <localRepository>d:\SW\localRepository\</localRepository>

  <pluginGroups>
    <pluginGroup>org.jenkins-ci.tools</pluginGroup>
  </pluginGroups>

  <profiles>
    <!-- Give access to Jenkins plugins -->
    <profile>
      <id>jenkins</id>
      <activation>
        <activeByDefault>true</activeByDefault> <!-- change this to false, if you don't like to have it on per default -->
      </activation>
      <repositories>
        <repository>
          <id>repo.jenkins-ci.org</id>
          <url>http://repo.jenkins-ci.org/public/</url>
        </repository>
      </repositories>
      <pluginRepositories>
        <pluginRepository>
          <id>repo.jenkins-ci.org</id>
          <url>http://repo.jenkins-ci.org/public/</url>
        </pluginRepository>
      </pluginRepositories>
    </profile>
  </profiles>
  <mirrors>
    <mirror>
      <id>repo.jenkins-ci.org</id>
      <url>http://repo.jenkins-ci.org/public/</url>
      <mirrorOf>m.g.o-public</mirrorOf>
    </mirror>
  </mirrors>

</settings>
1.3 Install Integrated Development Environment (IDE)
http://www.eclipse.org/downloads/
2. Development of Jenkins Plugin Based on Eclipse
2.1 Maven Projects
The core of every Maven project is pom.xml, which contains all the information needed to build the project. This file is usually very large and difficult to understand. Usually we don't need to understand it completely.
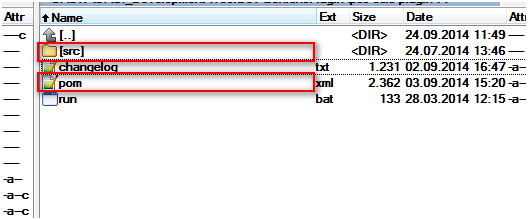
When you download a Maven project, it contains at least the pom.xml and src folders.
Details about Maven:
Build Lifecycle:
http://maven.apache.org/guides/introduction/introduction-to-the-lifecycle.html
POM Reference:
http://maven.apache.org/pom.html
2.2 Import Maven to Eclipise
In order to use Maven engineering in Eclipse, we need to be able to guide it first, but Eclipse does not support Maven. Here are two ways
1. Install Eclipse plugin m2e (Maven 2 Eclipse)
2. Use the method recommended by Jenkins wiki
Here we use the second method. The steps are as follows.
1. Open commandprompt and switch to the path where pom.xml is located
2. Use the following commands to generate the Eclipse project
mvn -DdownloadSources=true -DdownloadJavadocs=true -DoutputDirectory=target/eclipse-classes eclipse:eclipse
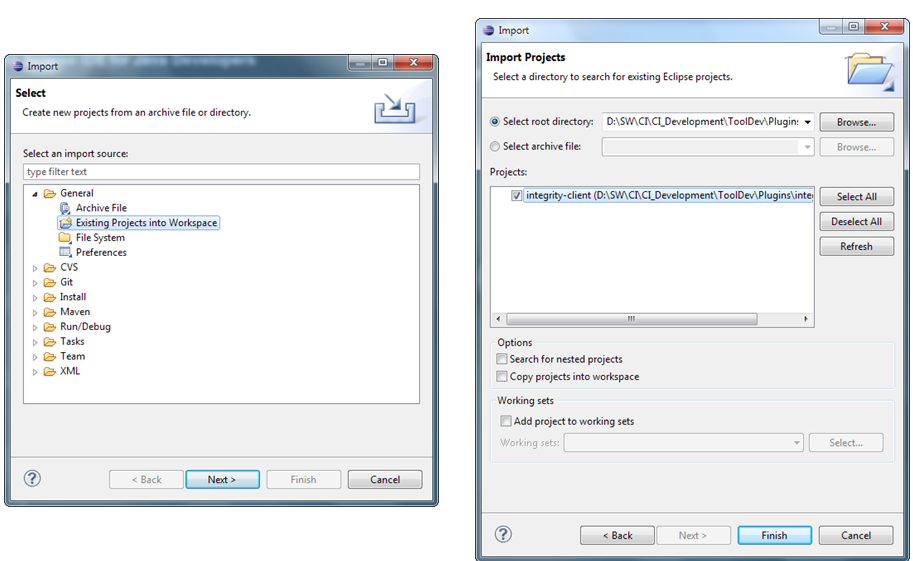
3. Import project to eclipse
4. Setting the system variable M2_REPO
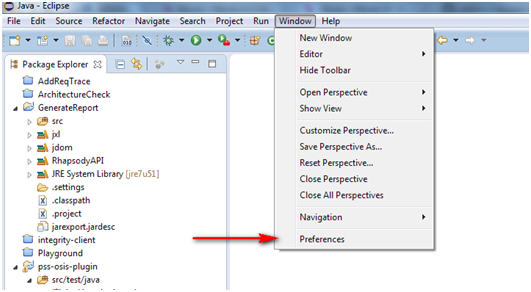
Java > Build Path > Classpath Variables
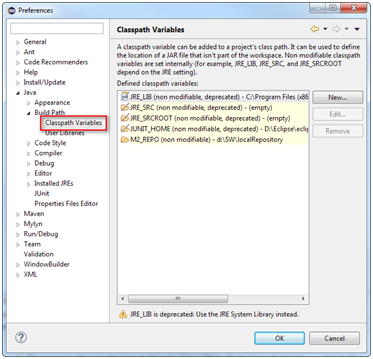
5. Click the New button, and then define the M2_REPO variable, which is the download path of the software library (see 1.2, step 6)

2.3 Compile and run plugin
In the directory of pom.xml, execute the mvn package, and the compiled result < plugin-name >.hpi will be output in the target folder.
Clean Project: mvn clean package
2.4 Debugging plugin using Eclipse
Run the following two commands to turn on Jenkins debugging mode, which allows Eclipse to connect to remote debugging session
set MAVEN_OPTS=-Xdebug -Xrunjdwp:transport=dt_socket,server=y,address=8000,suspend=n
mvn hpi:run
We need to create Remote Java Application in Eclipse
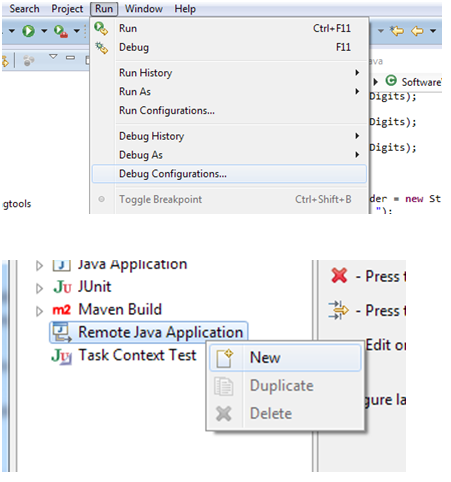
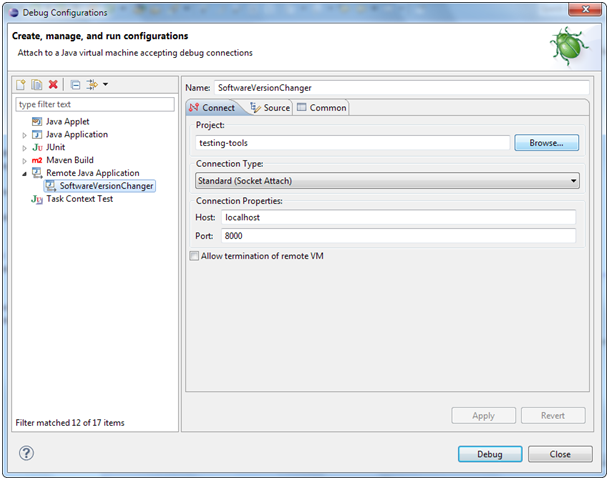
Give an example:
set MAVEN_OPTS=-Xdebug-Xrunjdwp:transport=dt_socket,server=y,address=8000,suspend=n
set JENKINS_HOME=d:\sw\ci\Jenkins
mvn hpi:run
3. Create Plugin
3.1 Using skeleton generator
The easiest way to do this is to use skeleton generator to create it and then extend it.
http://plugin-generator.jenkins-ci.org/
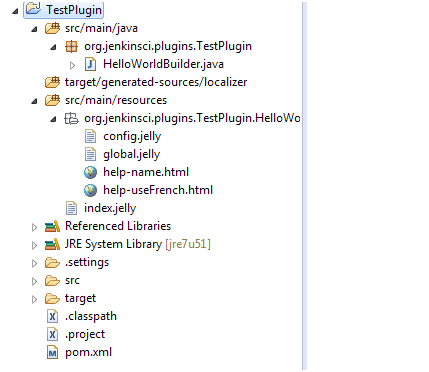
3.2 Extension point
You must ensure that plugin implements an extension point
The HelloWorldBuilder class implements the Builder extension point. So we can find it in Build Step, and if we implement SCM extension points, we can find it in Build Triggers.
More extension points:
https://wiki.jenkins-ci.org/display/JENKINS/Extension+points
3.3 Source Code Analysis
public class HelloWorldBuilder extends Builder {
    private final String name;

    // Fields in config.jelly must match the parameter names in the "DataBoundConstructor"
    @DataBoundConstructor
    public HelloWorldBuilder(String name) {
        this.name = name;
    }
    /**
    * We'll use this from the <tt>config.jelly</tt>.
    */
    public String getName() {
        return name;
    }

    @Override
    public boolean perform(AbstractBuild build, Launcher launcher, BuildListener listener) {
    // This is where you 'build' the project.
    // Since this is a dummy, we just say 'hello world' and call that a build.
    // This also shows how you can consult the global configuration of the builder
        if (getDescriptor().getUseFrench())
            listener.getLogger().println("Bonjour, "+name+"!");
        else
            listener.getLogger().println("Hello, "+name+"!");

        return true;
    }

    // Overridden for better type safety.
    // If your plugin doesn't really define any property on Descriptor,
    // you don't have to do this.

    @Override
    public DescriptorImpl getDescriptor() {
        return (DescriptorImpl)super.getDescriptor();
    }

    /**
    * Descriptor for {@link HelloWorldBuilder}. Used as a singleton.
    * The class is marked as public so that it can be accessed from views.
    *
    * <p>
    * See <tt>src/main/resources/hudson/plugins/hello_world/HelloWorldBuilder/*.jelly</tt>
    * for the actual HTML fragment for the configuration screen.
    */

    @Extension // This indicates to Jenkins that this is an implementation of an extension point.
    public static final class DescriptorImpl extends BuildStepDescriptor<Builder> {
    /**
    * To persist global configuration information,
    * simply store it in a field and call save().
    *
    * <p>
    * If you don't want fields to be persisted, use <tt>transient</tt>.
    */
        private boolean useFrench;
    /**
    * Performs on-the-fly validation of the form field 'name'.
    *
    * @param value
    * This parameter receives the value that the user has typed.
    * @return
    * Indicates the outcome of the validation. This is sent to the browser.
    */
        public FormValidation doCheckName(@QueryParameter String value)
            throws IOException, ServletException {
            if (value.length() == 0)
                return FormValidation.error("Please set a name");
            if (value.length() < 4)
                return FormValidation.warning("Isn't the name too short?");
            return FormValidation.ok();
        }
        public boolean isApplicable(Class<? extends AbstractProject> aClass) {
    // Indicates that this builder can be used with all kinds of project types
            return true;
        }
    /**
    * This human readable name is used in the configuration screen.
    */
        public String getDisplayName() {
            return "Say hello world";
        }

        @Override
        public boolean configure(StaplerRequest req, JSONObject formData) throws FormException {
        // To persist global configuration information,
        // set that to properties and call save().
            useFrench = formData.getBoolean("useFrench");
        // ^Can also use req.bindJSON(this, formData);
        // (easier when there are many fields; need set* methods for this, like setUseFrench)
            save();
            return super.configure(req,formData);
        }

        /**
        * This method returns true if the global configuration says we should speak French.
        *
        * The method name is bit awkward because global.jelly calls this method to determine
        * the initial state of the checkbox by the naming convention.
        */

        public boolean getUseFrench() {
            return useFrench;
        }
    }
}
The constructor in the HelloWorldBuilder class is declared using @DataBoundConstructor. The constructor assigns variables.
The performance overloaded function in the HelloWorldBuilder class. The execution of the build is customized by implementing the performance method. The performance function is run every time the compilation is executed. It has three parameters:
The Build parameter describes a build of the current task, through which some important model objects can be accessed, such as the object of the current project, the workspace of the workspace construction, and the results of the current build steps of Result.
The Launcher parameter is used to start the build.
BuildListener is used to check the status of the build process (start, fail, succeed.) by which it can send some console information to jenkins during the build process.
The return value of the perform ance method tells jenkins whether the current step is successful or not, and if it fails, jenkins will abandon the next step.
3.4 View Profile
Jenkins uses Jelly page rendering technology, an XML-based server-side page rendering engine that converts Jelly-based XML tags into corresponding Html tags and outputs them to the client. The information of the model object is passed to the page through Jexl expression (equivalent to JSTL of Jsp). The jelly file is suffixed with. jelly. In hudson, the full name of the class is used to find the corresponding jelly page file of the model class, such as the class named src/main/java/com/jysong/jenkins/HelloWorldBuilder.java. The corresponding page file should exist under the src/main/resources/com/jysong/jenkins/HelloWorldBuilder directory.
In addition, hudson uses a fixed naming method to determine whether a page file belongs to a local configuration or a global configuration: config.jelly provides a local configuration; global.jelly provides a global configuration. config.jelly is the configuration of a job, and global.jelly is the system configuration of jenkins.
There are three kinds of views: 1, global. jelly 2, Job configuration (config.jelly), and help (help - field name). html.
1. Detailed global configuration
global.jelly is the global configuration page.
<j:jelly xmlns:j="jelly:core" xmlns:st="jelly:stapler" xmlns:d="jelly:define" xmlns:l="/lib/layout" xmlns:t="/lib/hudson" xmlns:f="/lib/form">
<f:section title="Hello World Builder">
   <f:entry title="French" field="useFrench"  description="Check if we should say hello in French">
   <f:checkbox />
   </f:entry>
</f:section>
</j:jelly>
The title is the title, indicating the content to be displayed. To call the method getUseFrench() of the inner class of DescriptorImpl, the field field field removes the method get and lowercase the first letter to find the corresponding method. Description will display description information. f:checkbox is the check box control.
Each time the global configuration is saved, jenkins calls the descriptor object and its configuration method, which can be implemented and customized.
In the configure method in DescriptorImpl, the global configuration can be manipulated. The save method is used to persist the configuration provided by the current Descriptor (through the get ** method). In order for the save to work properly, it is necessary to provide the get method of the configuration item.
2. Detailed Local Configuration
The content of config.jelly will be included in the configuration of the extended functionality. The configuration content under the HelloWorldBuilder folder is:

Where entry represents the html form field for interaction, title will be the value of the form field label and the content to be displayed in the interface. Field represents the parameters in the constructor of HelloWorldBuilder. If there are multiple fields, there will be multiple corresponding parameters. textbox represents a simple rendering of an input text, and the input value is assigned to name.
See more UI content
https://wiki.jenkins-ci.org/display/JENKINS/UI+Samples+Plugin