1, Jenkins basic overview
1.1 what is Jenkins
Jenkins is an open source continuous integration tool that provides a friendly operation interface. It is developed by JAVA.
Jenkins is a scheduling platform that does not handle anything and calls third-party plug-ins to complete all work.
Jenkins is an open source CI & CD software leader, providing more than 1000 plug-ins to support construction, deployment and automation to meet the needs of any project.
1.2 why Jenkins
jenkins can integrate all kinds of open source software to realize the scheduling of different functions.
1.3 Jenkins installation
Official download
The warehouse installation can be configured according to the official website, or the rpm package can be downloaded and installed directly from the source of Tsinghua University.
1.3.1 adjust the system language environment
[root@jenkins ~]# setenforce 0
[root@jenkins ~]# systemctl stop firewalld
[root@jenkins ~]# systemctl disable firewalld

# Set the language to avoid incomplete Jenkins Sinicization in the later stage (restart the server after setting)
[root@jenkins ~]# localectl set-locale
LANG=en_US.UTF-8
[root@jenkins ~]# localectl status
1.3.2 installing JDK
[root@jenkins ~]# yum install java-11-openjdk-devel -y
[root@jenkins ~]# java --version
openjdk 11.0.12 2021-07-20 LTS
OpenJDK Runtime Environment 18.9 (build 11.0.12+7-LTS)
OpenJDK 64-Bit Server VM 18.9 (build 11.0.12+7-LTS, mixed mode, sharing)
1.3.3 installing Jenkins
[root@jenkins ~]# yum localinstall -y https://mirror.tuna.tsinghua.edu.cn/jenkins/redhat/jenkins-2.303-1.1.noarch.rpm
1.3.4 Jenkins structure analysis
[root@jenkins ~]# rpm -ql jenkins
/etc/init.d/jenkins  #Start stop document
/etc/logrotate.d/jenkins # Log segmentation file
/etc/sysconfig/jenkins  # configuration file
/usr/lib/jenkins  # JENKINS_HOME
/usr/lib/jenkins/jenkins.war
/usr/sbin/rcjenkins # Soft link, link to start stop file
/var/cache/jenkins
/var/lib/jenkins
/var/log/jenkins # Log directory
1.3.5 configuring Jenkins
[root@jenkins ~]# vim /etc/sysconfig/jenkins
JENKINS_USER="root" # Run Jenkins as a user to avoid insufficient permissions in the later stage
JENKINS_PORT="80" # If jenkins listens on port 80, the running identity must be root
1.3.6 start Jenkins
[root@jenkins ~]# systemctl start jenkins
[root@jenkins ~]# systemctl enable jenkins
1.3.7 unlock jenkins before accessing
1. When you access Jenkins through the browser for the first time, the system will ask you to unlock it with the automatically generated password.
2. After unlocking Jenkins, you can install any number of plug-ins as part of your initial steps.
1) If you are not sure which plug-ins are required, select "install recommended plug-ins" (this process may take a few minutes or tens of minutes)
2) You can also skip plug-in installation. Later, you can install or delete plug-ins through Jenkins' Manage Plugins page.
3. Create an administrator user of Jenkins. Then click Save to finish.
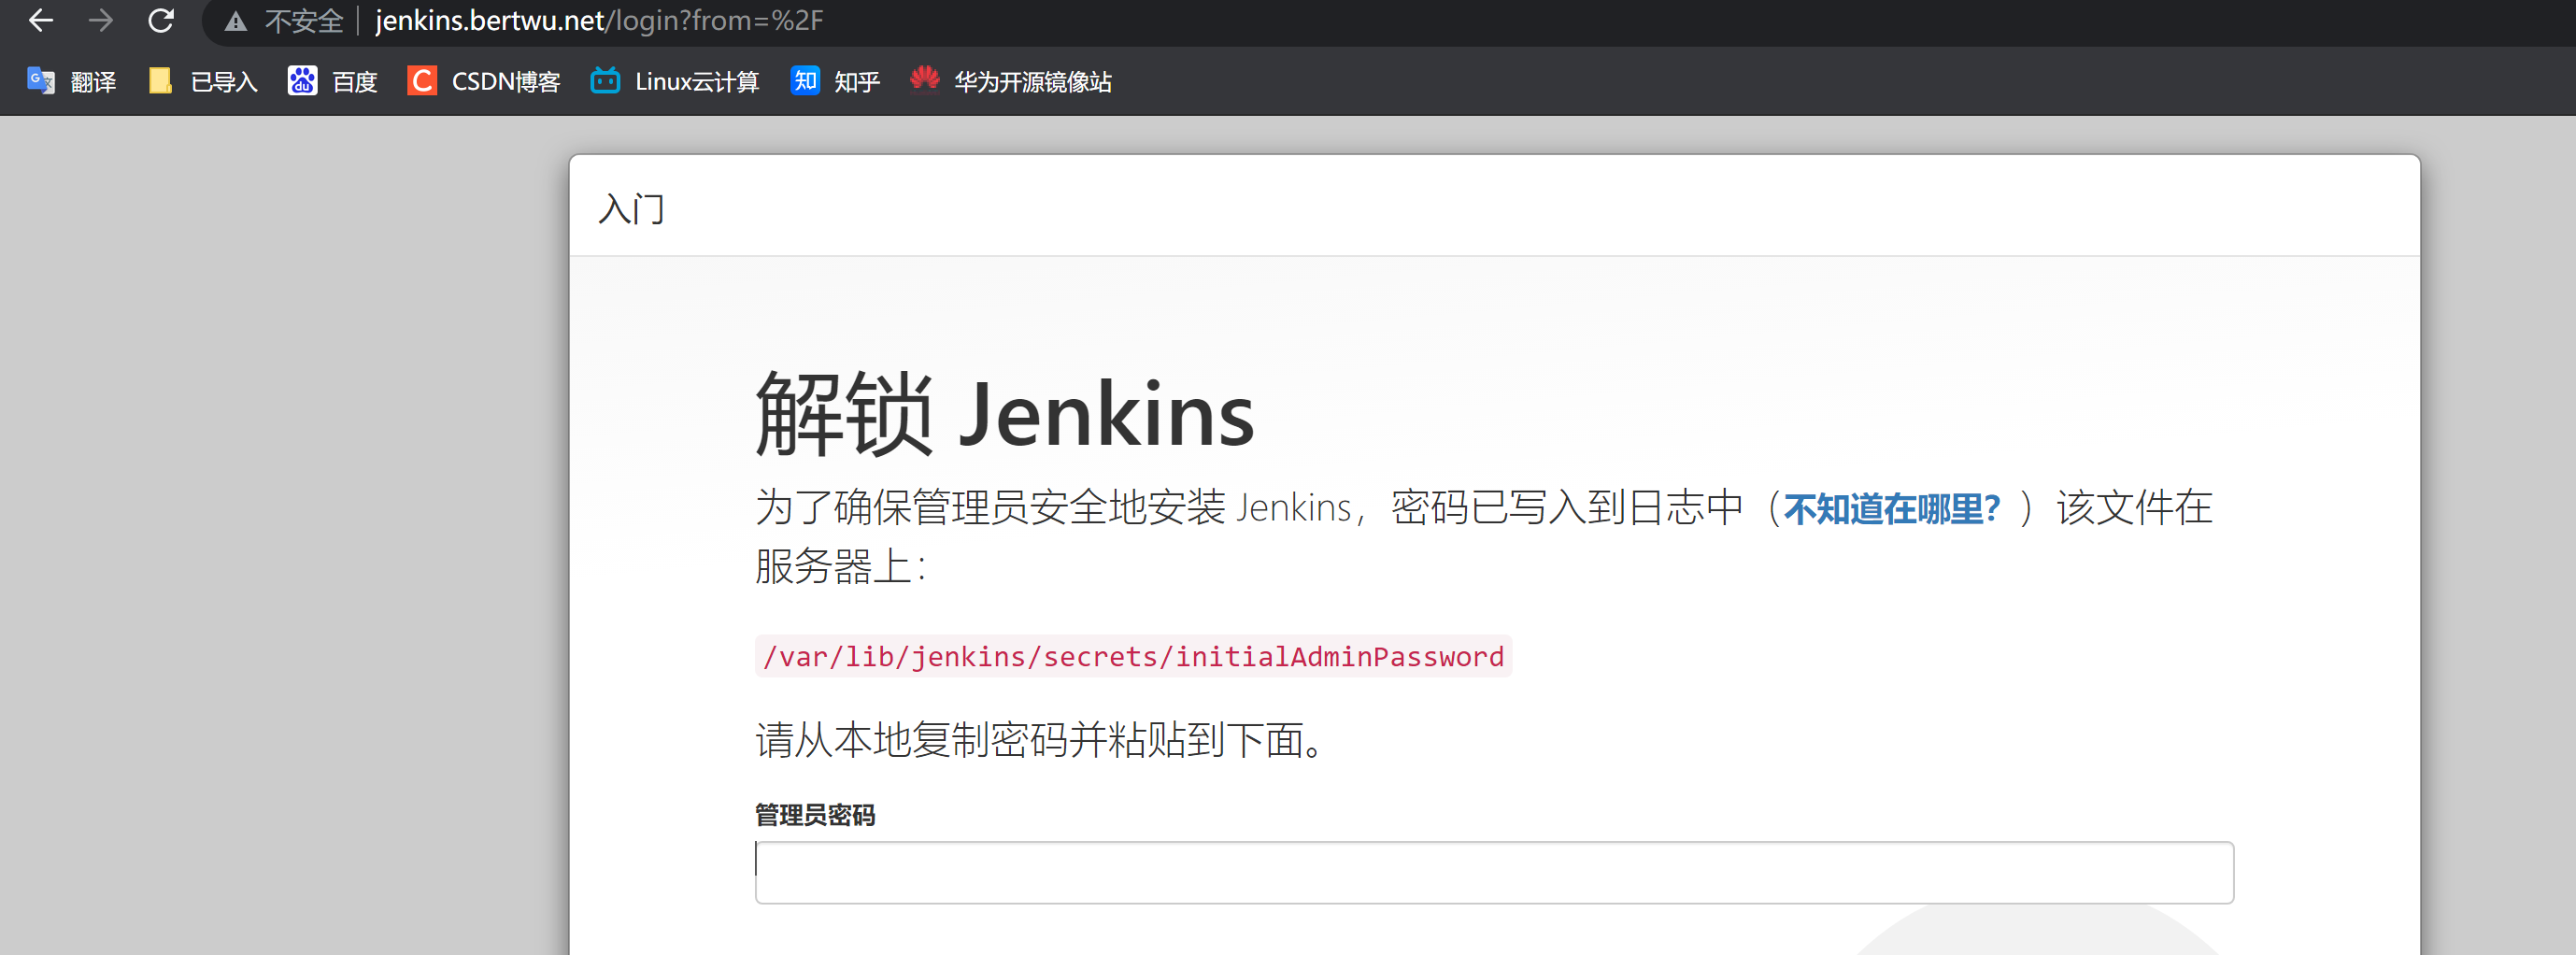
[root@jenkins jenkins]# cat /var/lib/jenkins/secrets/initialAdminPassword
60d158c95780437ca8a65dc3c16c4150
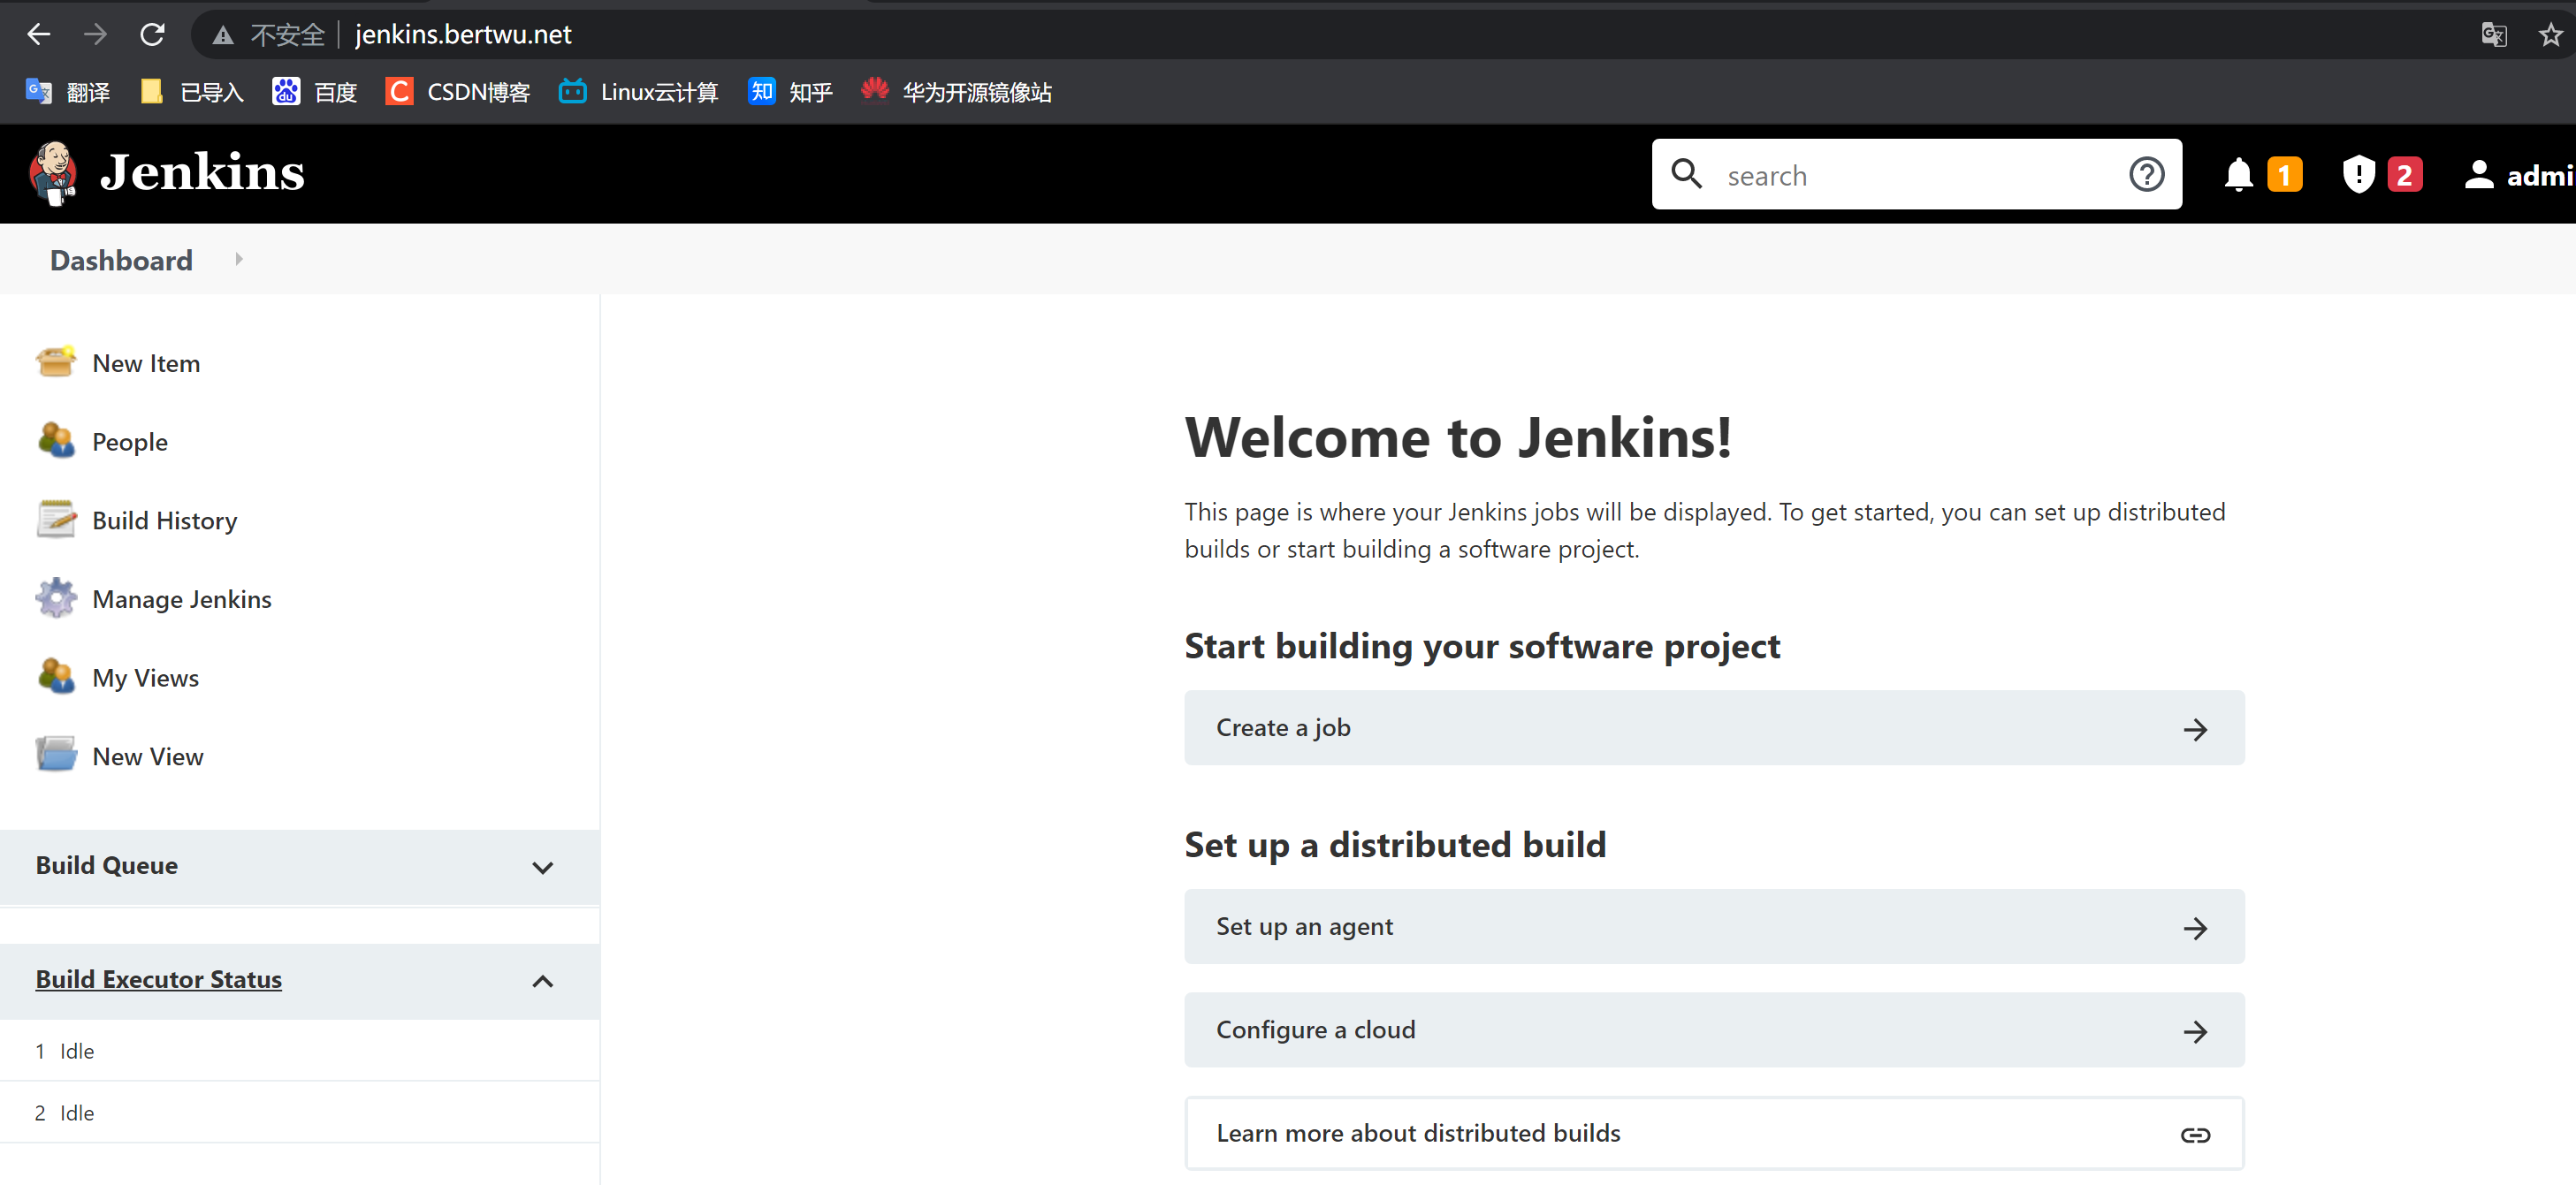
After unlocking, use the admin user to continue the operation, then click admin configure in the background to modify the admin user password, and then log in to jenkins again with the admin + new password.
1.4 optimizing Jenkins
The plug-in management in jenkins system management is very important, because all the work of jenkins is done by plug-ins.
However, the jenkins plug-in is downloaded from abroad by default, and the speed will be very slow, so the download address needs to be changed to the domestic download address before installing the plug-in:
1. Modify jenkins "download Plug-in" address as domestic image source;
sed -i 's#http://www.google.com/#https://www.baidu.com/#g' /var/lib/jenkins/updates/default.json

sed -i 's#updates.jenkins.io/download#mirror.tuna.tsinghua.edu.cn/jenkins#g' /var/lib/jenkins/updates/default.json
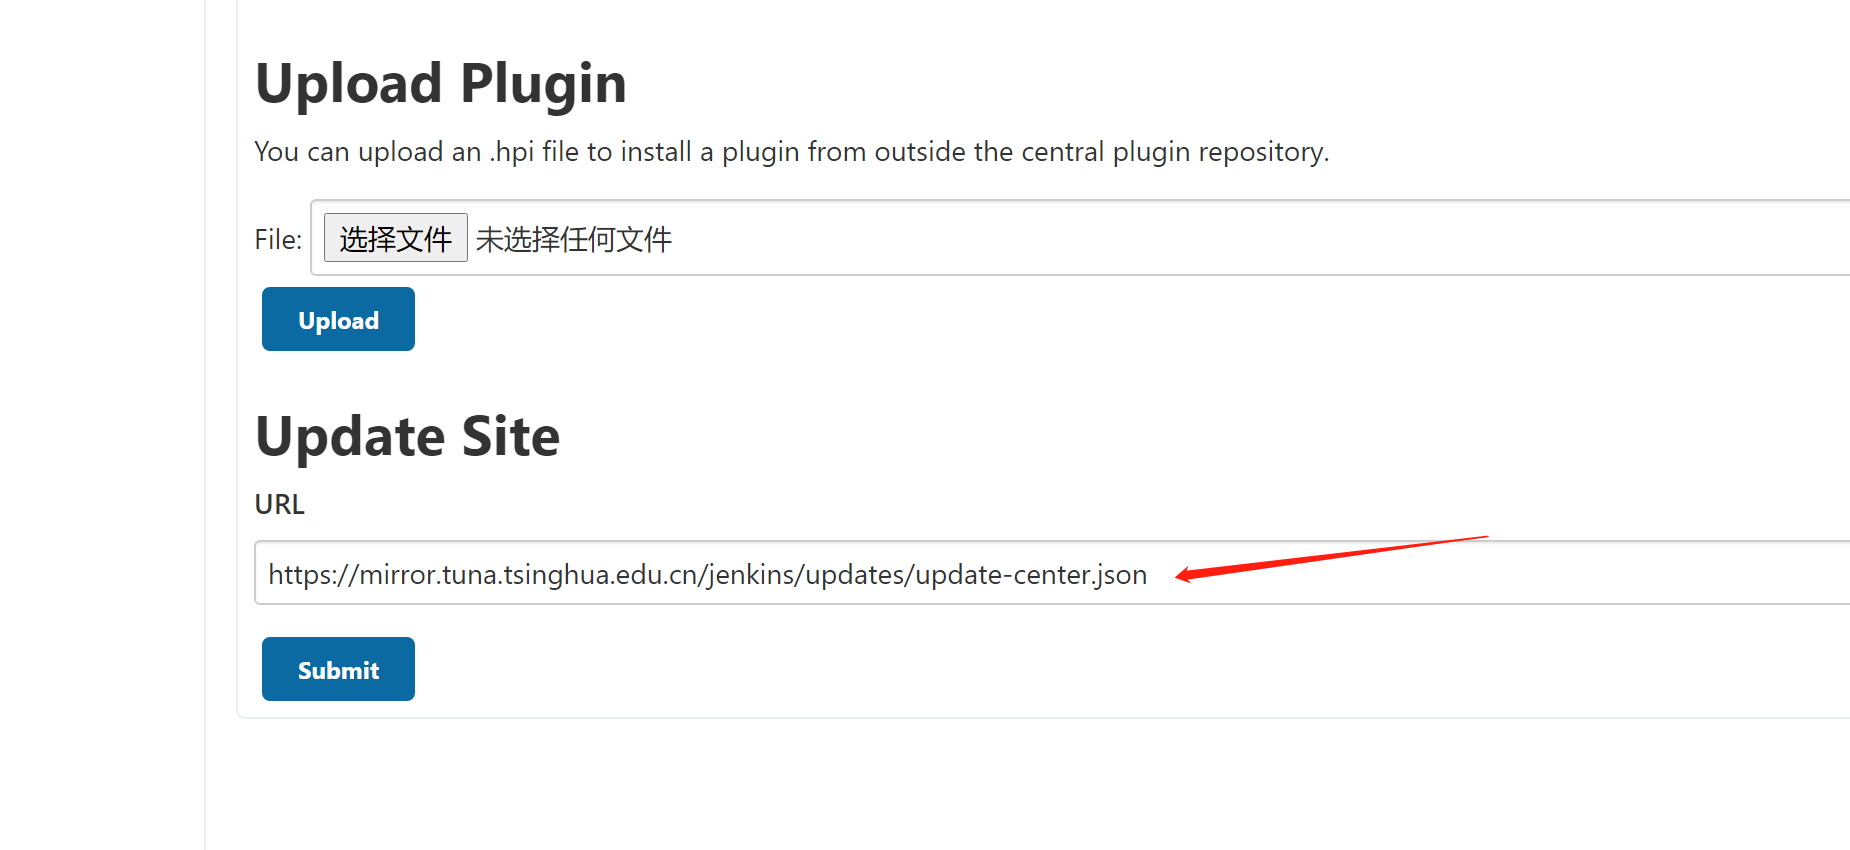
2. Modify the Url address of "jenkins" plug-in upgrade site; select system management -- > plug-in management – > advanced – > upgrade site
Manage Jenkins----> Manage Plugins------->Advanced
2, Jenkins plug-in management
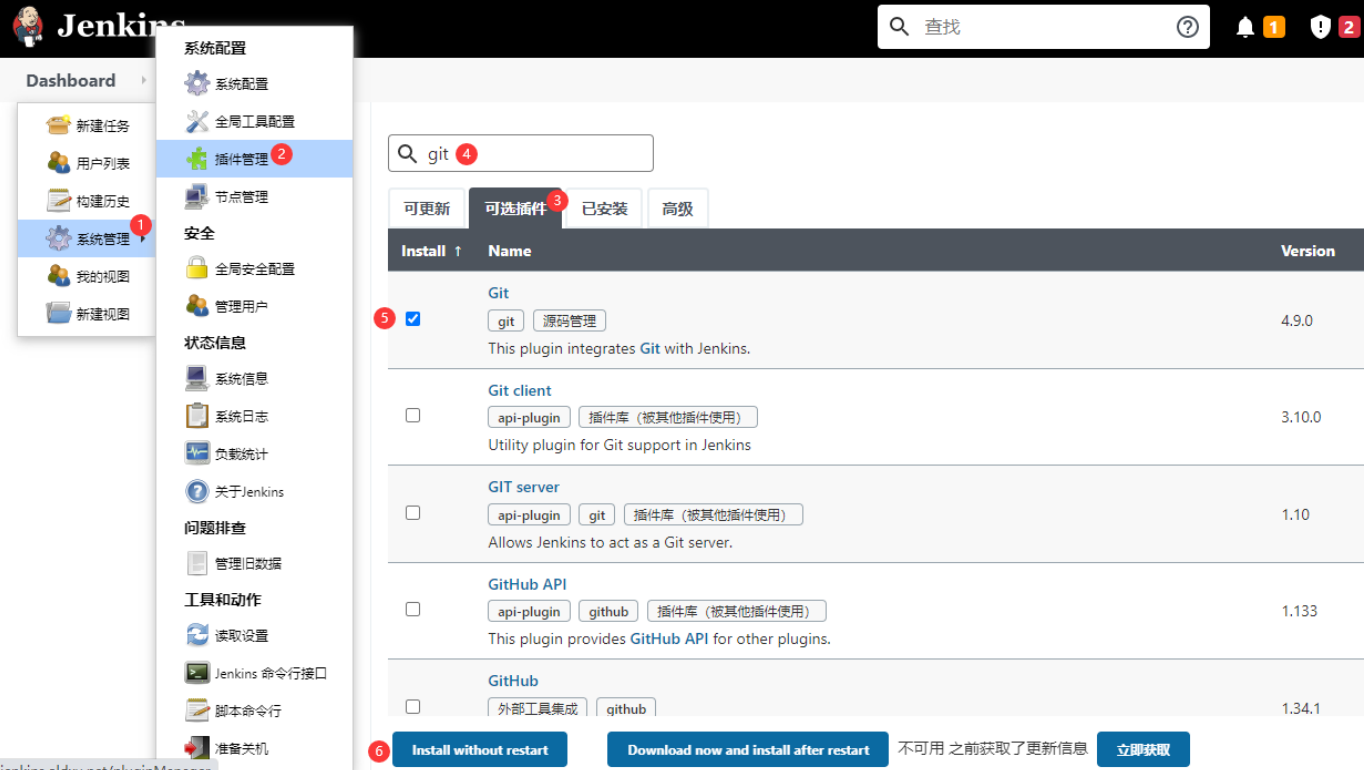
In plug-in management, {updatable | optional plug-ins | installed} daily plug-in installation is completed on this interface.
Plug ins can be installed online, manually uploaded and offline
2.1 networking installation plug-ins
2.2 manually upload plug-ins
Install the plug-in by uploading a. hpi file on the page.
1. On Jenkins official website https://plugins.jenkins.io/ Download the plug-in. (the plug-in ends with. hpi), or go to the source of Tsinghua University to download the plug-in.
2. Install the downloaded plug-ins by uploading system settings - > plug-in management - > Advanced - > upload plug-ins
2.3 offline installation of plug-ins
Save the plug-ins of the previous Jenkins server, import them into the server (install offline), and finally restart Jenkins
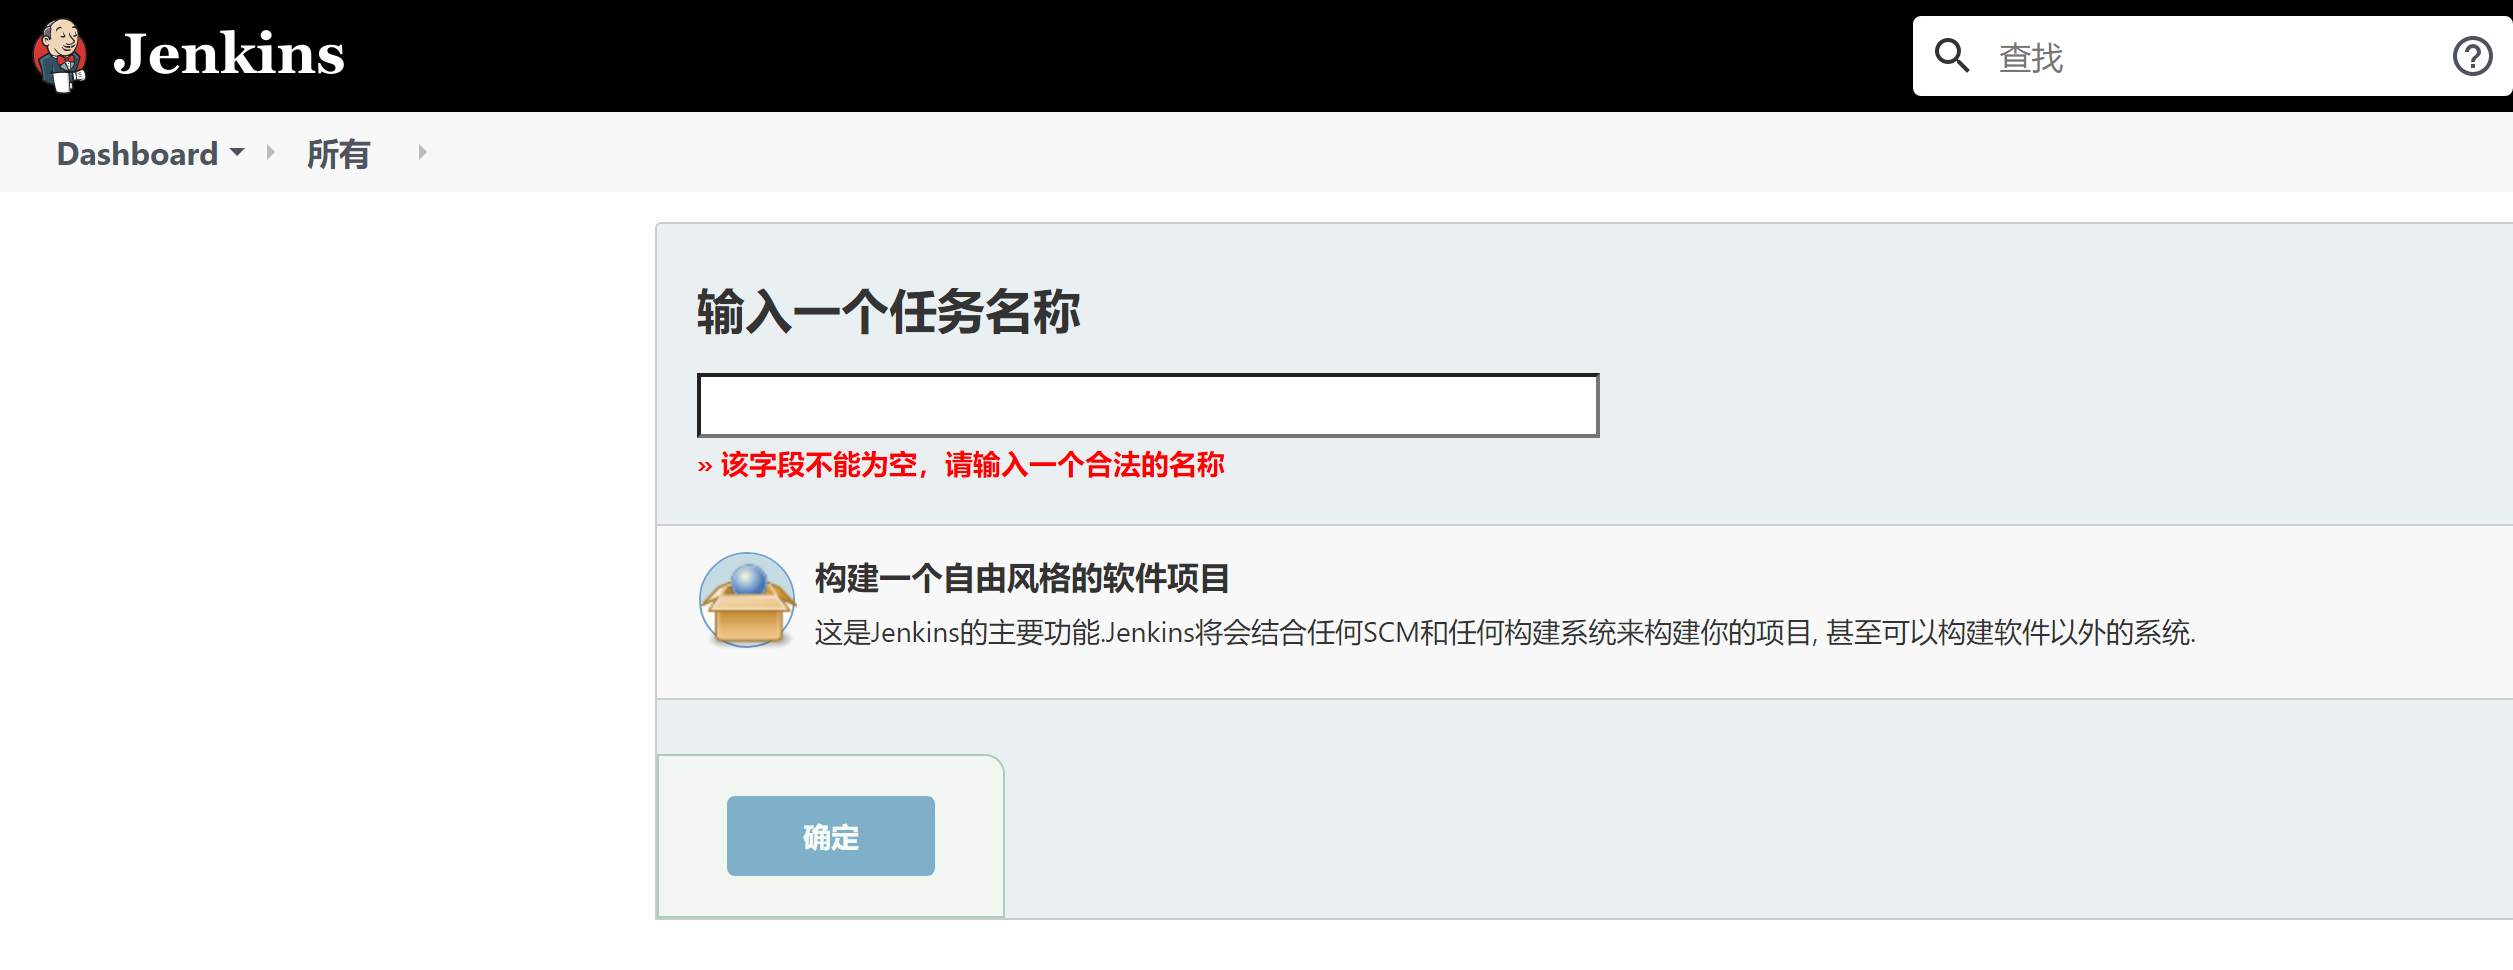
The new task interface before installing any plug-ins is as follows:
[root@jenkins ~]# ls
anaconda-ks.cfg  jenkins_plugins_2021-10-19.tar.gz
[root@jenkins ~]# tar xf jenkins_plugins_2021-10-19.tar.gz -C /var/lib/jenkins/plugins/

[root@jenkins ~]# systemctl restart jenkins.service
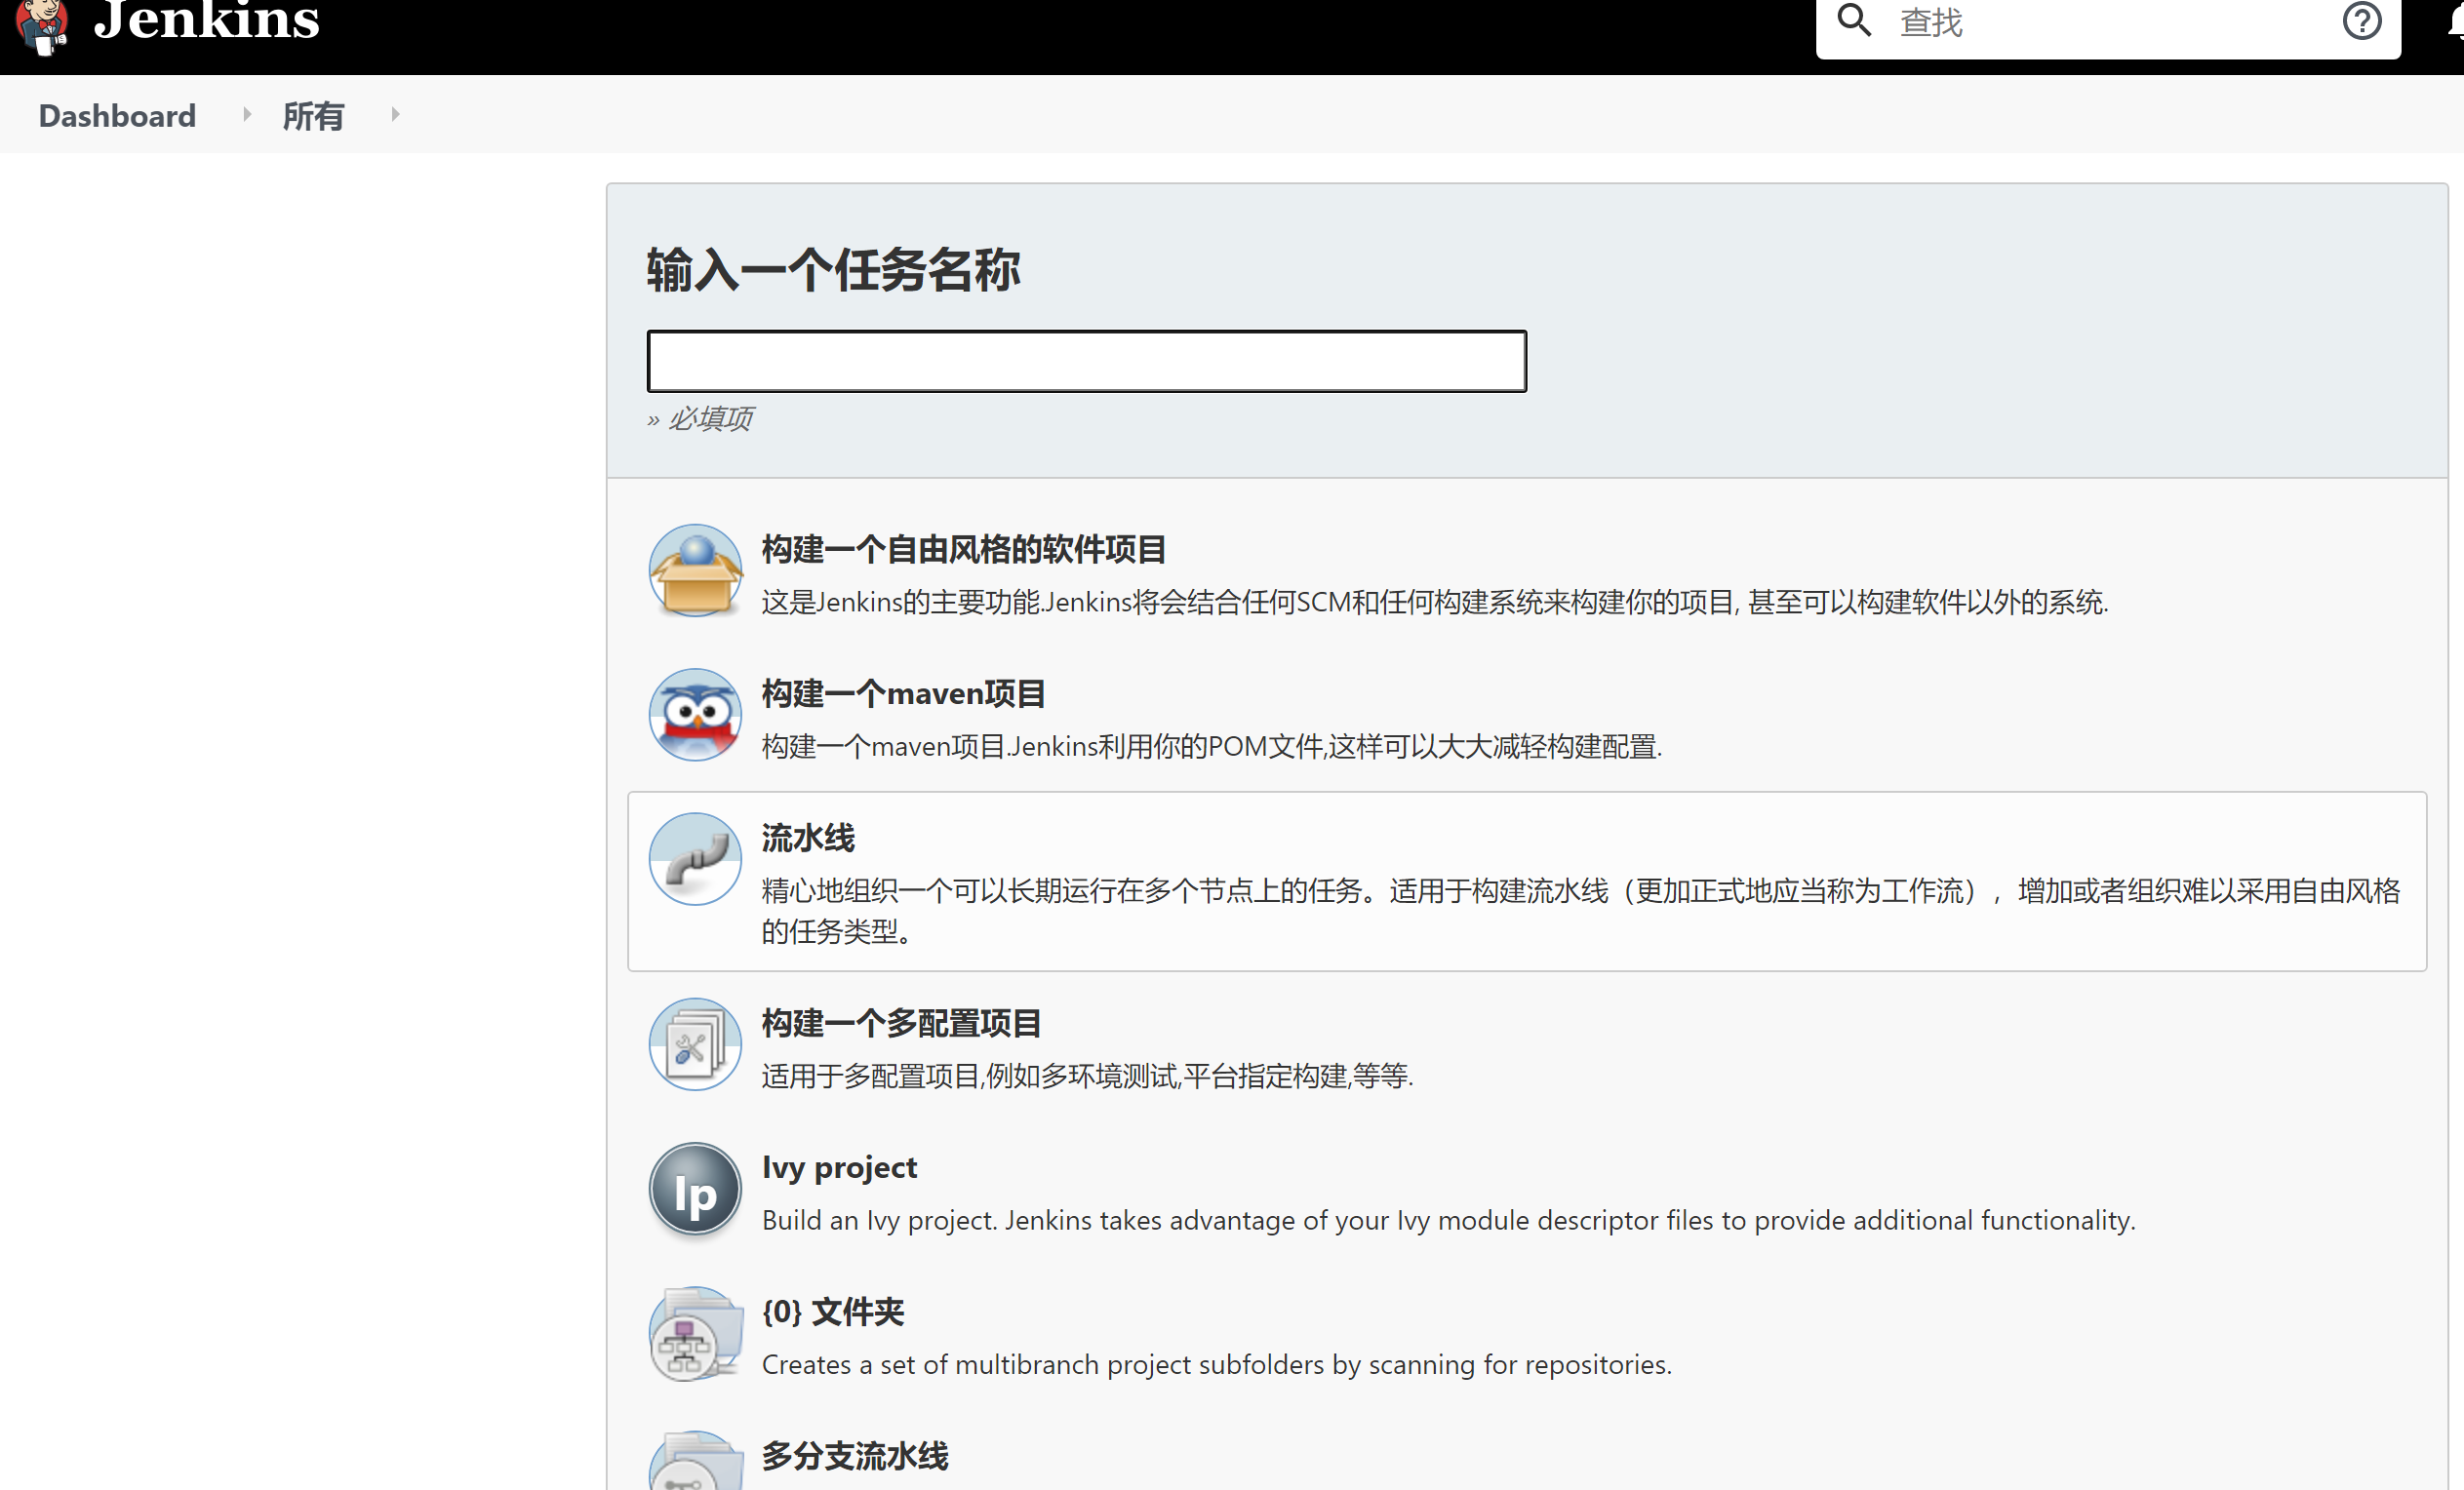
After the plug-in is installed offline, the new task interface is as follows:
3, Jenkins create project
1. Create a new project
New task
1,Enter task name: freestyle-demo
2,Choose a free style software project
3,Description: describe the role of the task

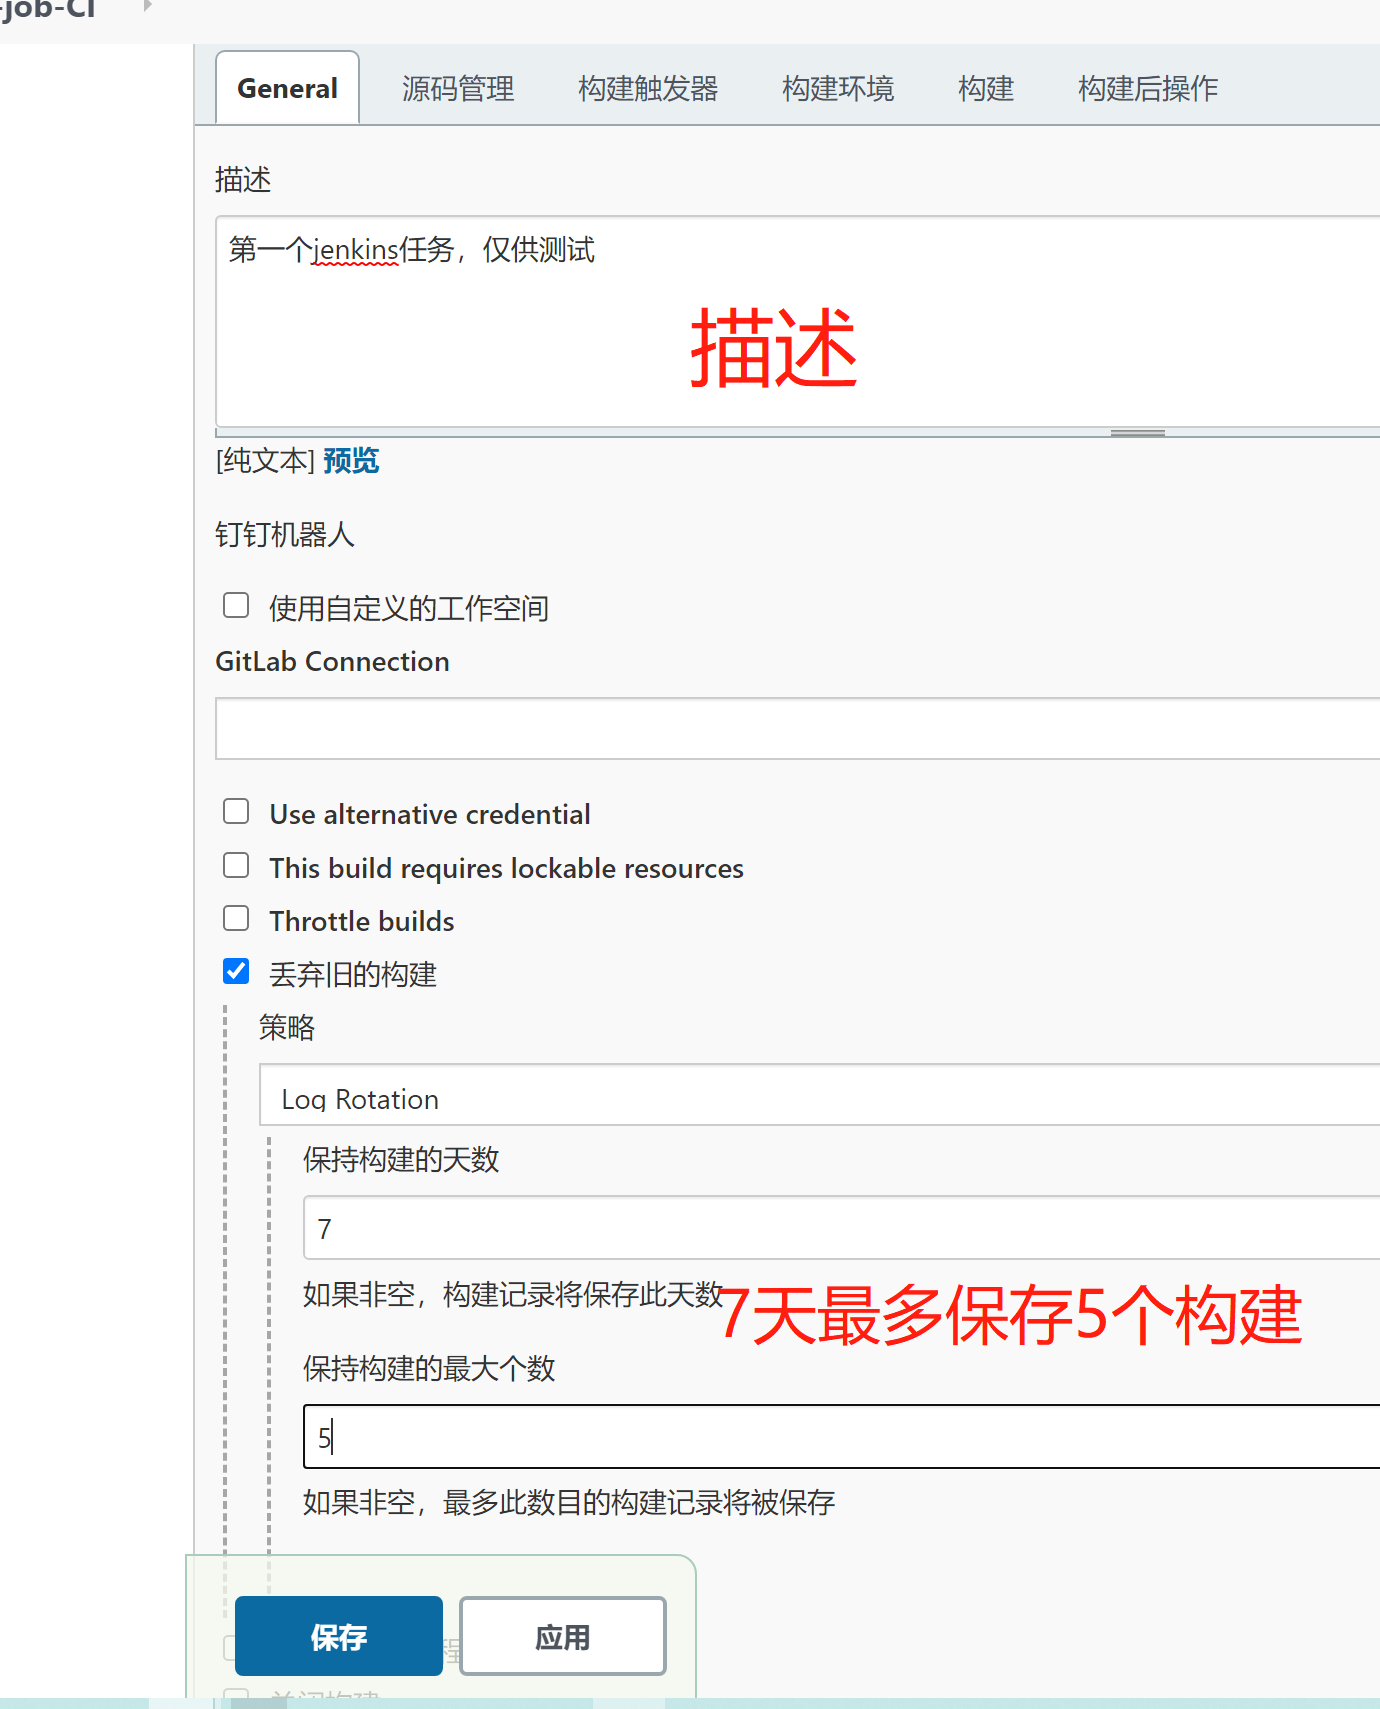
2. Set and discard the old build
Discard the old build: how long will the built product be retained
 Condition 1: days to keep building: the maximum number of days to keep the products built by the current project;
Condition 2: maintain the maximum number of builds: the maximum number of build products retained in the current project, and the excess will be deleted automatically;
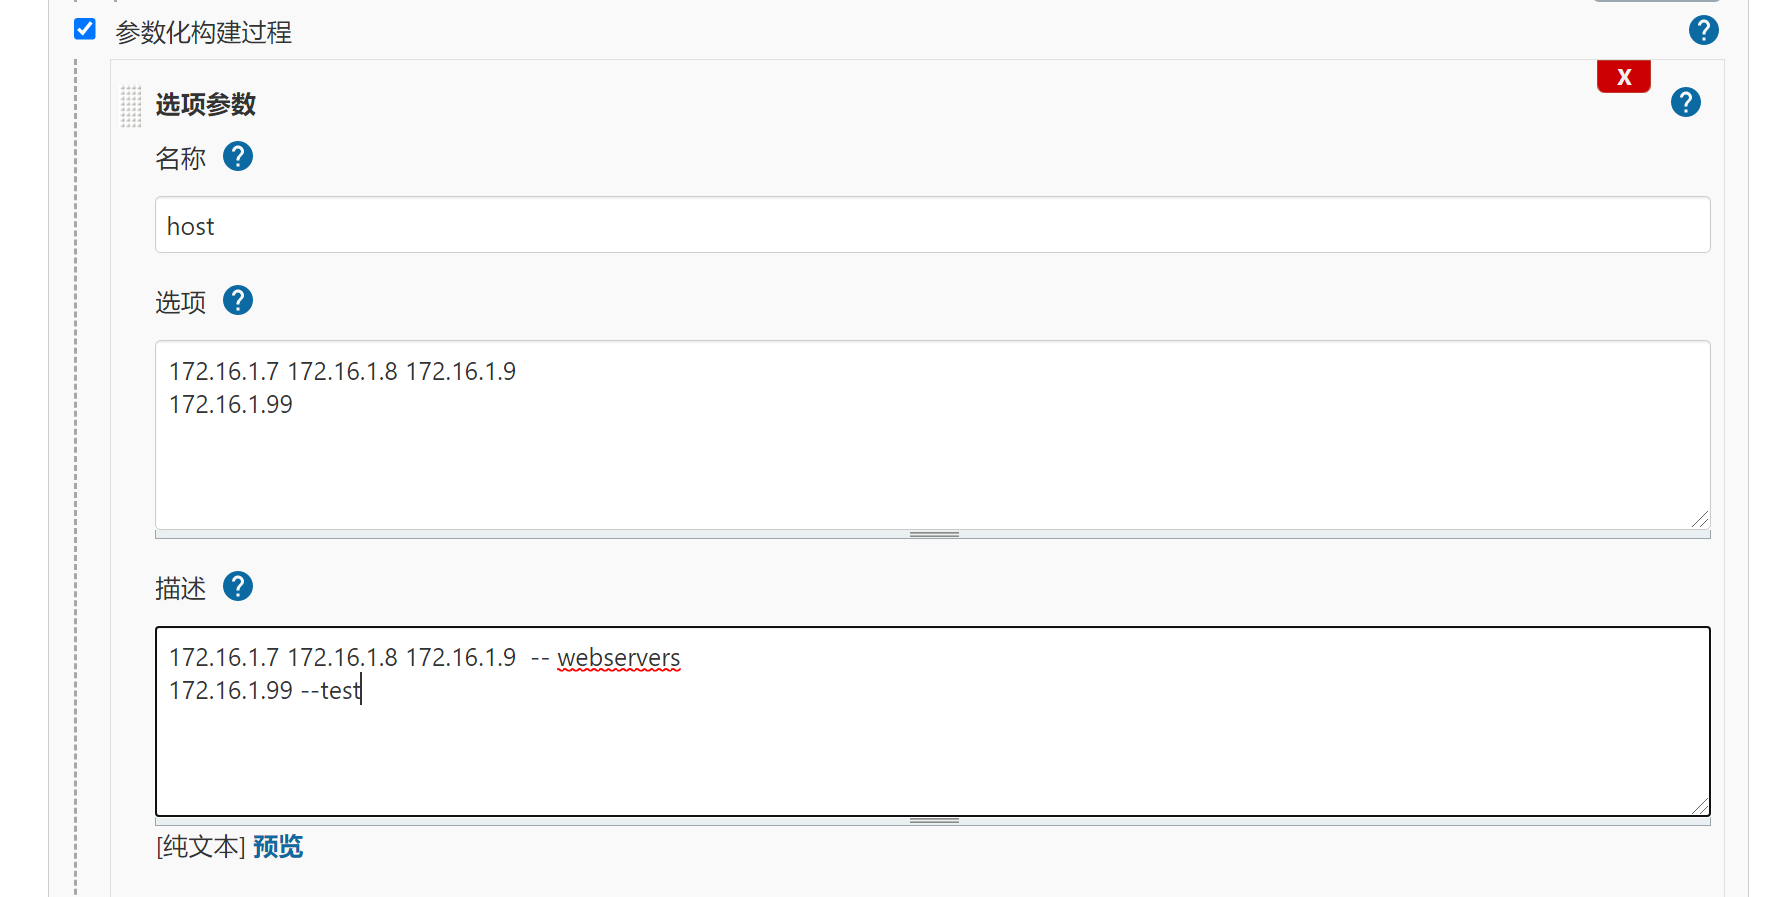
3. Parametric construction process
Parametric Construction: parameters can be passed during task execution, which is consistent with script location parameters in Shell
IV. Jenkins integrated Gitlab
The reason why jenkins needs to integrate gitlab is that we need to capture the code on gitlab to prepare for subsequent publishing websites;
Because jenkins is only a scheduling platform, all the plug-ins related to gitlab need to be installed to complete the corresponding integration.
1. The simulation development team creates a project through gitlab, and then submits the code; Code download
2. Create a new freestyle project named monitor deploy
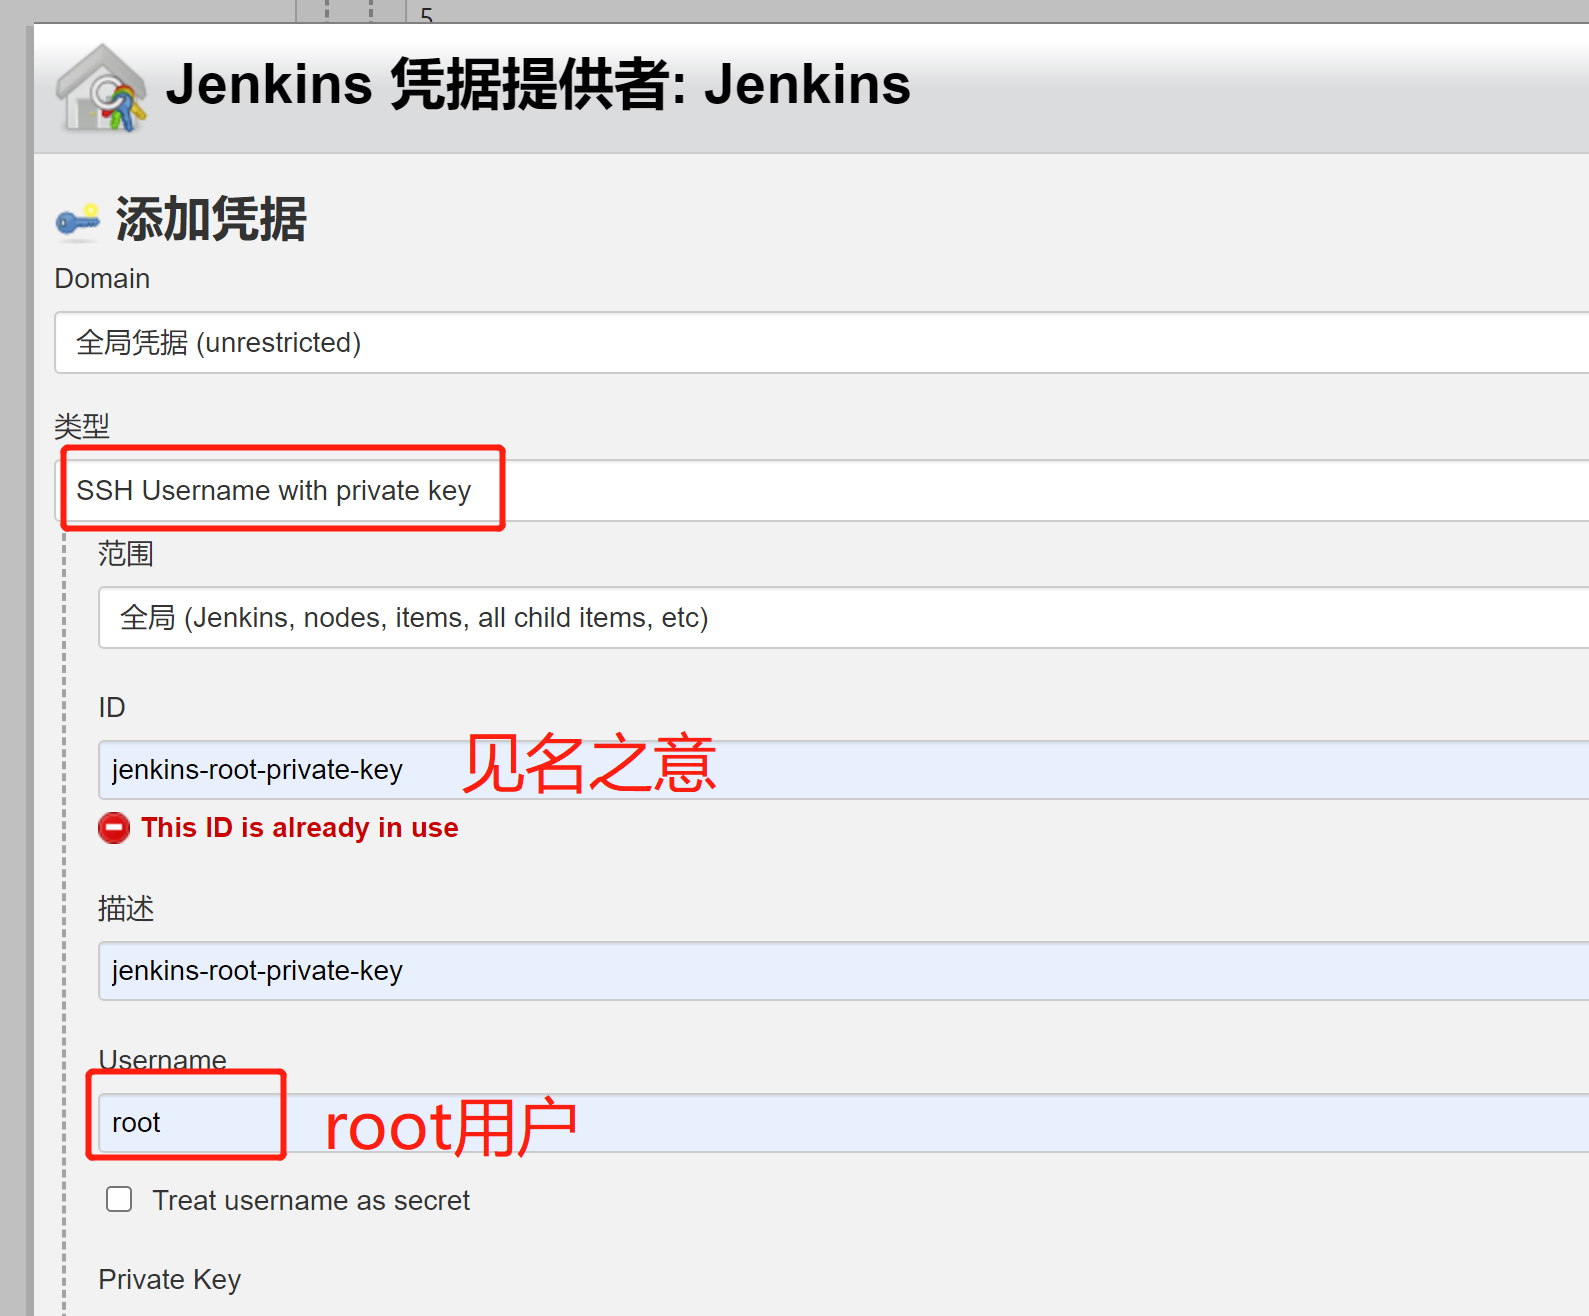
3. Fill in the gitlab project address in jenkins (the domain name needs to be resolved). Since it is an ssh protocol, you need to add authentication credentials;
- 3.1 if Jenkins needs to access gitlab project, it needs to establish trust with gitlab; first log in to Jenkins to generate a pair of secret keys;
- 3.2 add the public key generated by Jenkins server to the user corresponding to gitlab;
- 3.3 then continue to operate Jenkins and add the root user's private key to the Jenkins server. So far, the "public key encryption and private key decryption" has been completed. At this time, Jenkins can normally access the gitlab project.
4. Select the corresponding credentials and check again whether there is an error message. If not, click save.
5. Finally, click build, and then check whether there is an error prompt in the output information of the build.
6. After successful construction, the code will be downloaded to the Jenkins server local / var/log/jenkins/workspace directory.
5.2 Jenkins integrated Shell
Build – > add build steps – > select execute shell command
jenkins pushes code to the web cluster. First, the jenkins server should be secret free from the web cluster.

WORKSPACE is the system parameter and the directory where the current project is located. The code pulled from gitlab happens to be placed in this directory.
Build and execute:

#The files generated after construction will be stored in / var/lib/jenkins/workspace/jenkins_project_name directory
5.3 Jenkins integration Ansibl
1. Install ansible on Jenkins server
[root@jenkins ~]# yum install ansible -y
2. Configure ssh encryption free (which host ansibl wants to operate, which host is encryption free)
[root@jenkins ~]# ssh-copy-id -i ~/.ssh/id_rsa.pub root@172.16.1.5
[root@jenkins ~]# ssh-copy-id -i ~/.ssh/id_rsa.pub root@172.16.1.6
[root@jenkins ~]# ssh-copy-id -i ~/.ssh/id_rsa.pub root@172.16.1.7
[root@jenkins ~]# ssh-copy-id -i ~/.ssh/id_rsa.pub root@172.16.1.8
[root@jenkins ~]# ssh-copy-id -i ~/.ssh/id_rsa.pub root@172.16.1.9
[root@jenkins ~]# ssh-copy-id -i ~/.ssh/id_rsa.pub root@172.16.1.99
3. Configure inventory host manifest file
[root@jenkins ~]# cat /etc/ansible/hosts
[webservers]
172.16.1.7
172.16.1.8
172.16.1.9

[lbservers]
172.16.1.5
172.16.1.6

[test]
172.16.1.99
root@jenkins roles]# cat test.yml
- hosts: "{{ host }}"
  tasks:
    - name: Test Shell Command
      shell:
        cmd: ls
      register: system_cmd

    - name: Debug System Command
      debug:
        msg: "{{ system_cmd }}"

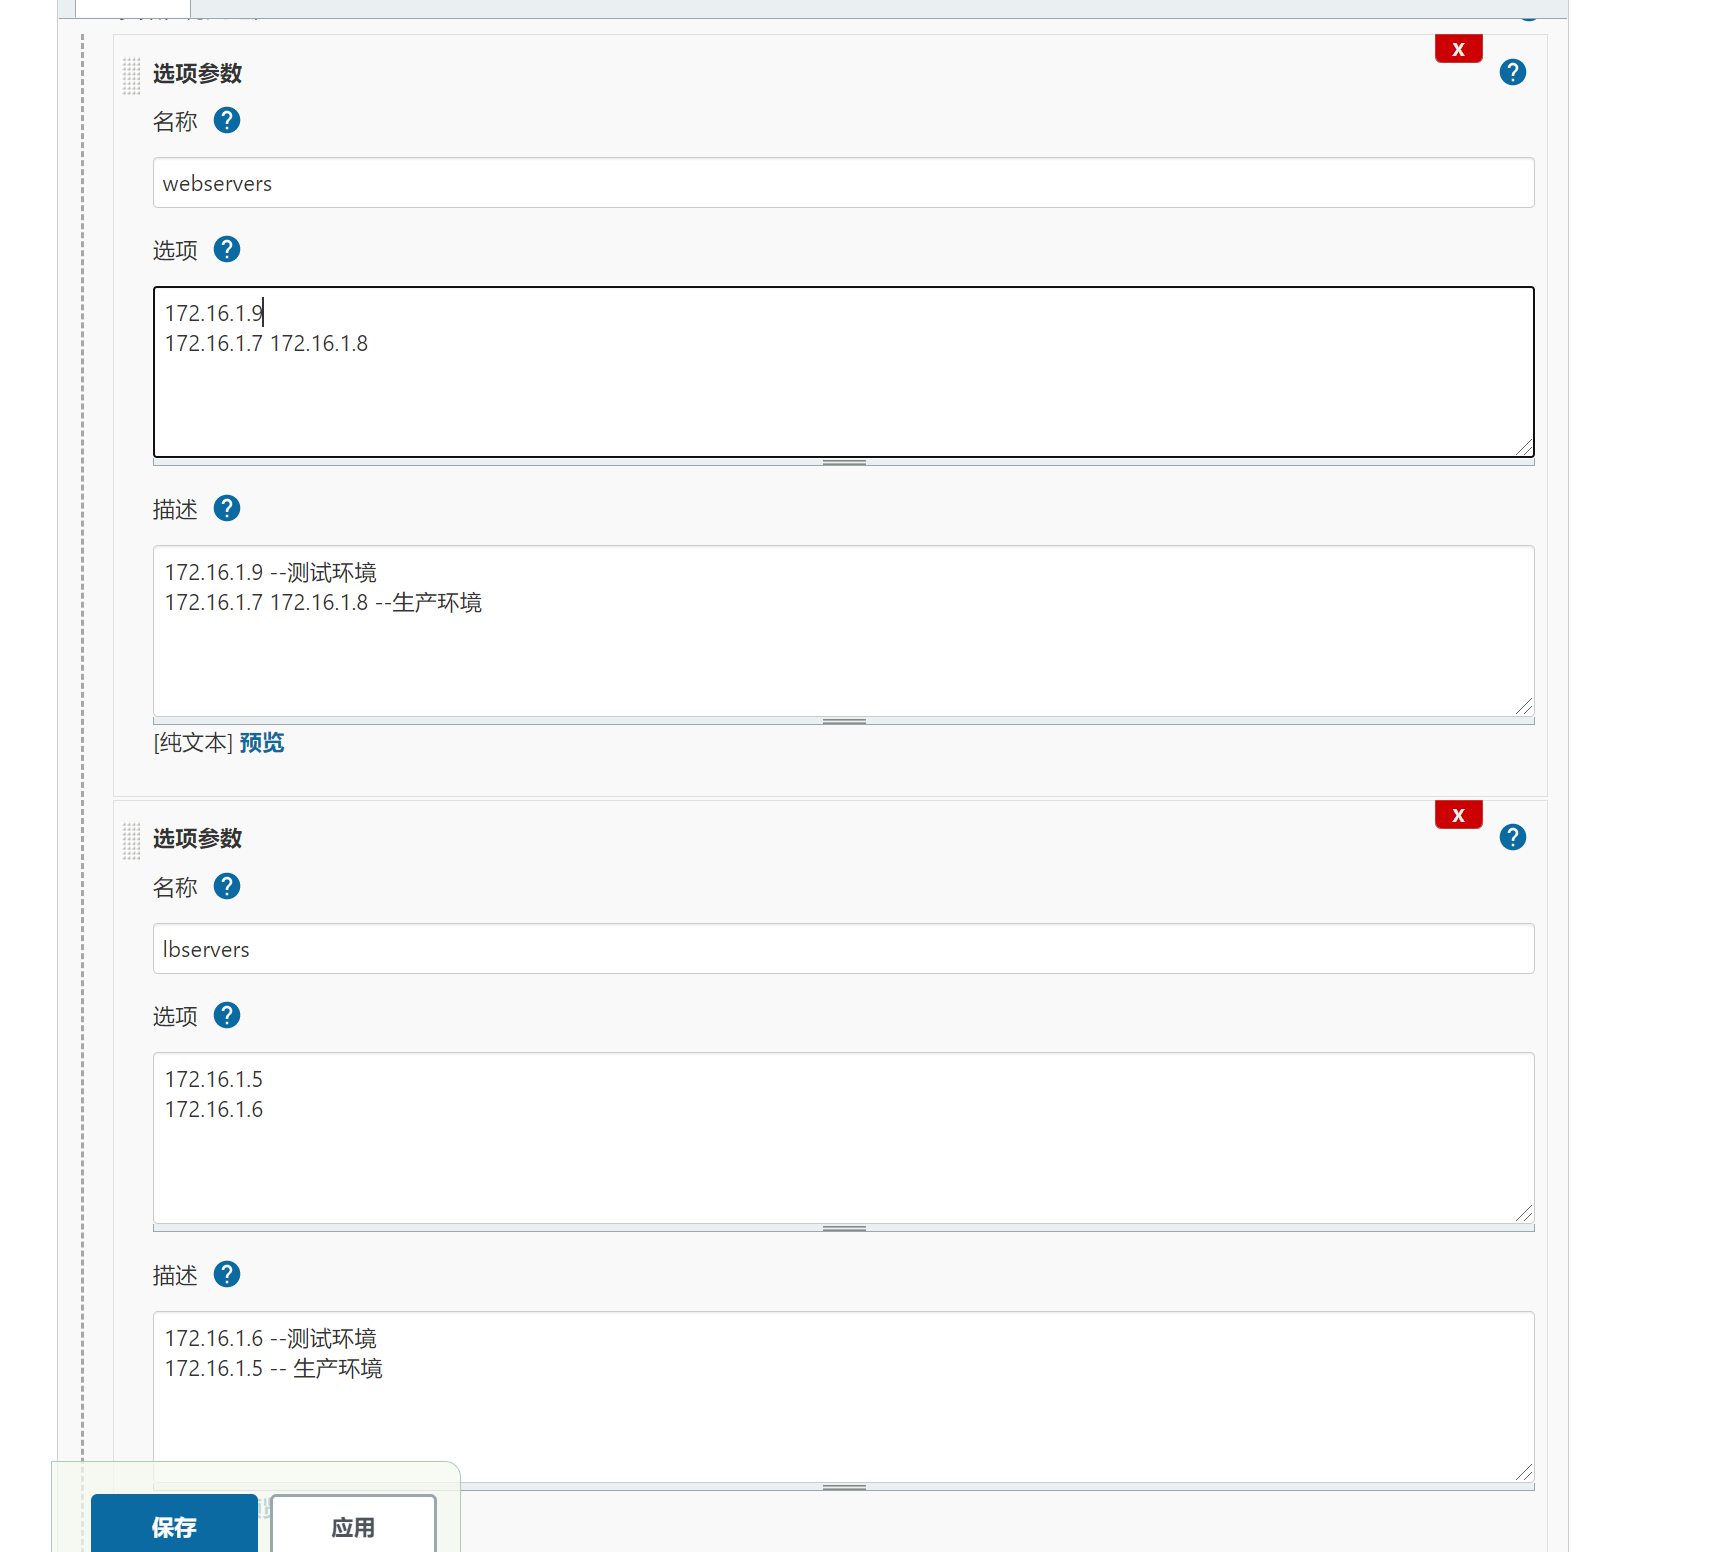
In this case, select parametric construction and select the option parameters:

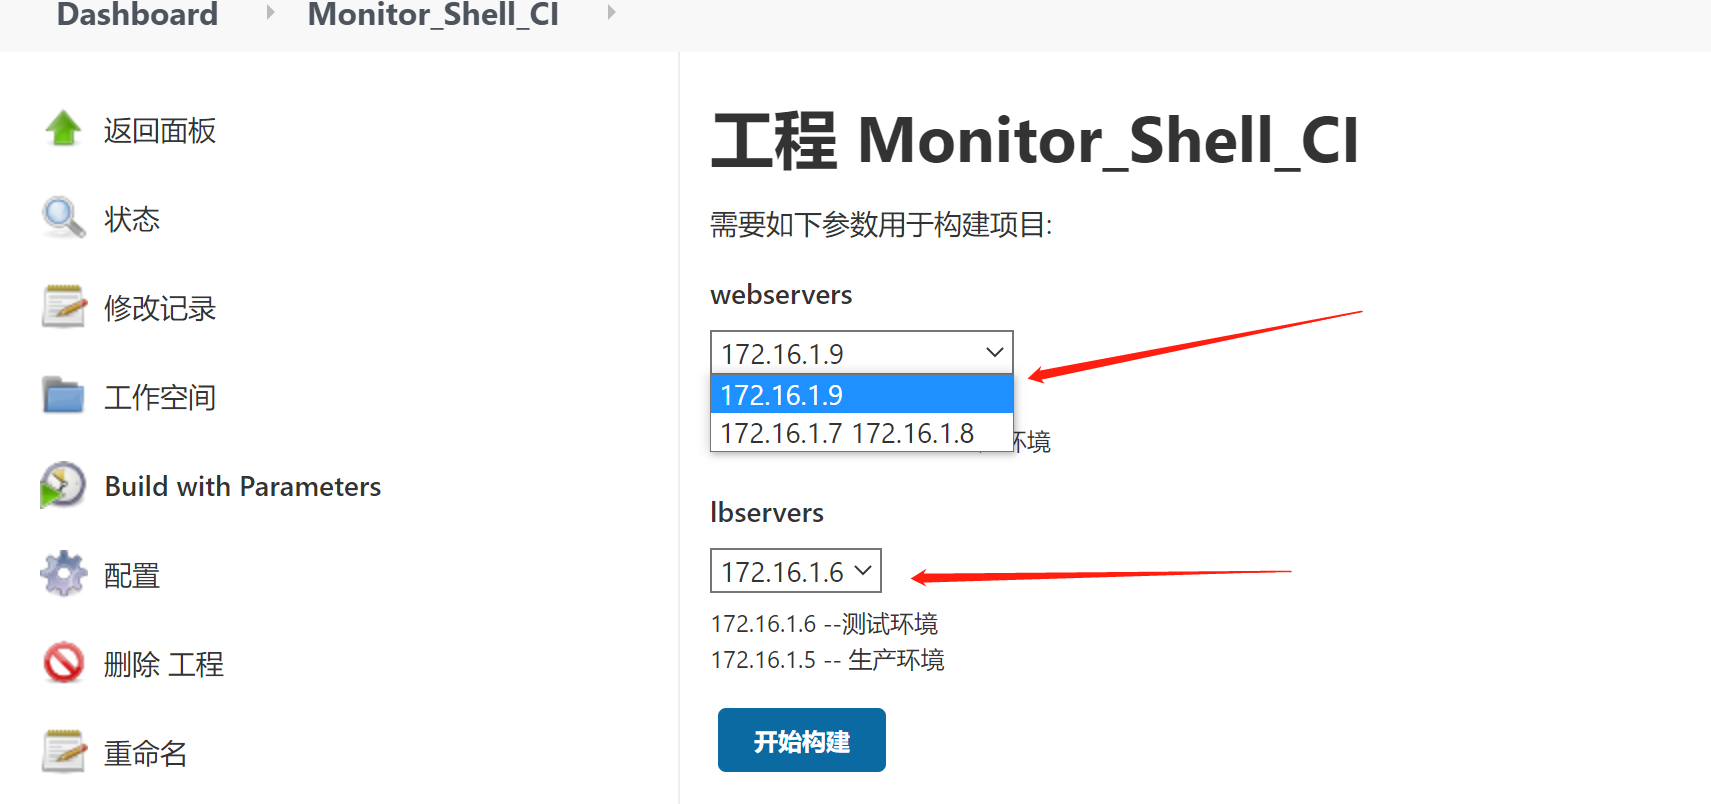
Then the front end can transfer parameters in this way:

6, Jenkins implements CI
6.1 CI architecture diagram
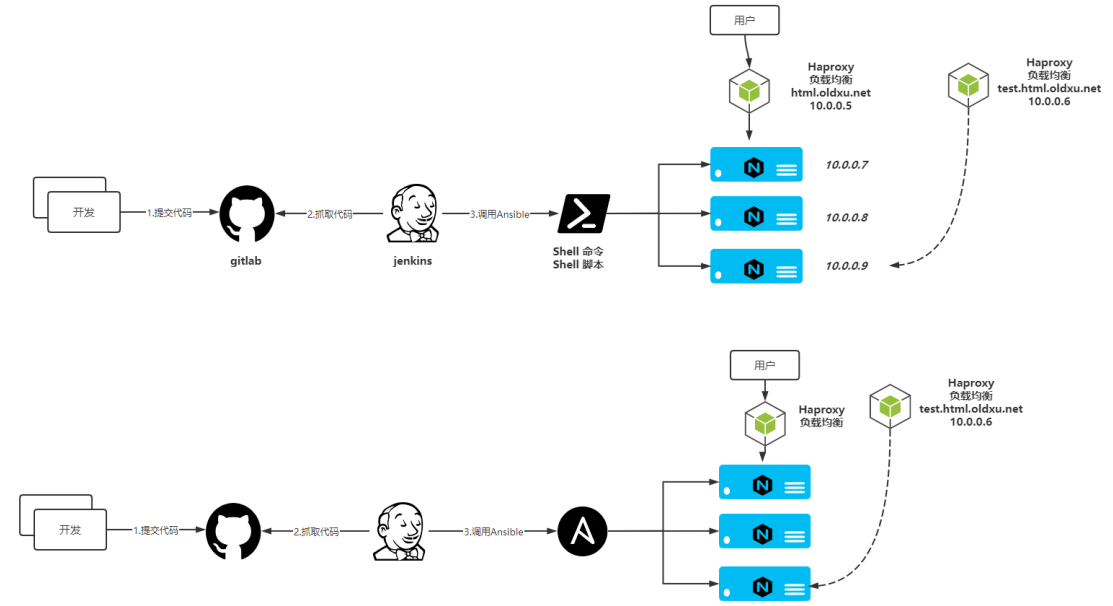
6.2 Jenkins' overall idea of realizing CI
1. Build a web cluster architecture environment;
2. Submit code for simulation development to gitlab
3. Simulate the operation and maintenance pull code and push it to the web server group;
4. Write the manually published operation as a Shell or Ansible script, which is called by Jenkins;
6.3 manually implement CI process
1. The installation on haproxy on LB is actually automatically deployed by ansible when building a web cluster.
2. nginx installation and configuration on Web servers
# haproxy installation
[root@proxy01 ~]# yum install socat -y
[root@proxy01 ~]# wget https://cdn.xuliangwei.com/haproxy22.rpm.tar.gz
[root@proxy01 ~]# tar xf
haproxy22.rpm.tar.gz
[root@proxy01 ~]# yum localinstall haproxy/*.rpm -y
3. Pull the code from the warehouse and enter the warehouse
[root@jenkins ~]# git clone git@gitlab.bertwu.com:dev/monitor.git
[root@jenkins ~]# cd monitor/
4. Use tar command to package code with time stamp;
[root@jenkins monitor]# tar czf /opt/monitor_$(date +%F).tar.gz ./*
5. Push the packaged code to the target cluster using scp;
[root@jenkins monitor]# scp /opt/monitor_2021-10-21.tar.gz 172.16.1.7:/opt
6. Operate load balancing to remove nodes, and multiple load balancing needs cyclic operation;
[root@jenkins ~]# ssh root@172.16.1.5 "echo 'disable server web_cluster/172.16.1.7' | socat stdio /var/lib/haproxy/stats"
7. Create a corresponding directory remotely to store code
[root@jenkins opt]# ssh root@172.16.1.7 "mkdir /opt/monitor_$(date +%F)"
[root@jenkins opt]# ssh root@172.16.1.8 "mkdir /opt/monitor_$(date +%F)"
8. Unzip the code to the corresponding directory, and the extracted code is a pile of scattered code
[root@jenkins opt]# ssh root@172.16.1.7 "tar xf /opt/monitor_2021-10-21.tar.gz -C /opt/monitor_$(date +%F)"
[root@jenkins opt]# ssh root@172.16.1.8 "tar xf /opt/monitor_2021-10-21.tar.gz -C /opt/monitor_$(date +%F)"
9. Delete the old soft connection and create a new soft connection
[root@jenkins opt]# ssh root@172.16.1.7 "rm -rf /opt/web"
[root@jenkins opt]# ssh root@172.16.1.7 "ln -s /opt/monitor_$(date +%F) /opt/web"
10. Add nodes to load balancing and provide external services
ssh root@172.16.1.5 "echo 'enable server web_cluster/172.16.1.7' | socat stdio /var/lib/haproxy/stats"
11. Repeat steps 5-10 for other hosts in other web servers
As you can see, manual deployment is very troublesome and needs to be built automatically with the help of jenkins shell
7, jenkins shell (front-end parameter passing)
Add construction steps for jenkins's project and select execute Shell;
1. Create a new project monitor on jinlins_ Shell_ CI,
The idea of automatic publishing script is as follows
# 1. Enter the code directory and package the code;
# 2. Push the code to the target cluster node;
# 3. Remove the node from load balancing;
# 4. Unzip the code, create a soft connection, and test the site availability;
# 5. Join the node to load balancing and provide external services;
# 6. It needs to be written by function to make the script more specialized
script
[root@jenkins scripts]# cat deploy_html.sh
#!/usr/bin/bash
Date=$(date +%F_%H_%M)
web_dir=/opt
#webservers="172.16.1.7 172.16.1.8"
#lbservers="172.16.1.5"
web_name=web

#Lock
if [ -f /tmp/lock ];then
	echo "The script is executing, please do not execute it again"
	exit
fi

# chains

touch /tmp/lock


test="172.16.1.9"
testlbserbers="172.16.1.6"
#1. Enter the project for packaging

cd ${WORKSPACE} && \
tar czf $web_dir/monitor_$Date.tar.gz ./*


#2. Push the packaged code to the target cluster

for host in $webservers
do
    scp $web_dir/monitor_$Date.tar.gz $host:$web_dir
done

# Offline node
lbservers_disable (){
	for lb_host in $lbservers
	do
		ssh root@$lb_host "echo 'disable server web_cluster/$1' | socat stdio /var/lib/haproxy/stats"
	done
}

# Online node
lbservers_enable (){
	for lb_host in $lbservers
	do
		ssh root@$lbservers "echo 'enable server web_cluster/$1' | socat stdio /var/lib/haproxy/stats"
	done
}


for host in $webservers
do
  #Offline node
	lbservers_disable $host

  # Create directory
	ssh root@$host "mkdir $web_dir/monitor_$Date"
  # Unzip the code to the corresponding directory
	ssh root@$host "tar xf $web_dir/monitor_$Date.tar.gz -C $web_dir/monitor_$Date"

  # Delete the old soft connection and create a new soft connection
	ssh root@$host "rm -rf $web_dir/$web_name && ln -s $web_dir/monitor_$Date $web_dir/$web_name"

  # Online node
	lbservers_enable $host

	sleep 5

done

#Unlock
rm -rf /tmp/lock
Parameter setting:
Front end transmission parameter display
8, Jenkins calls Ansible
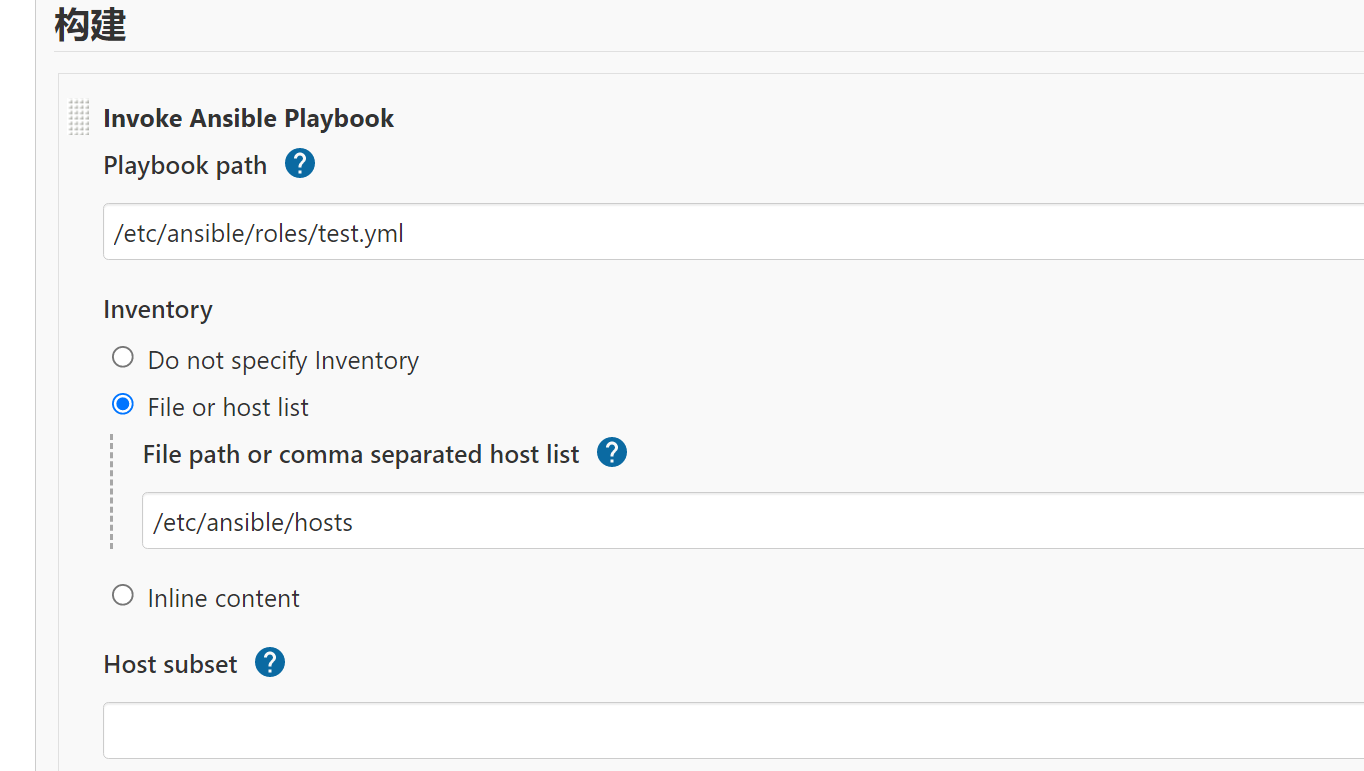
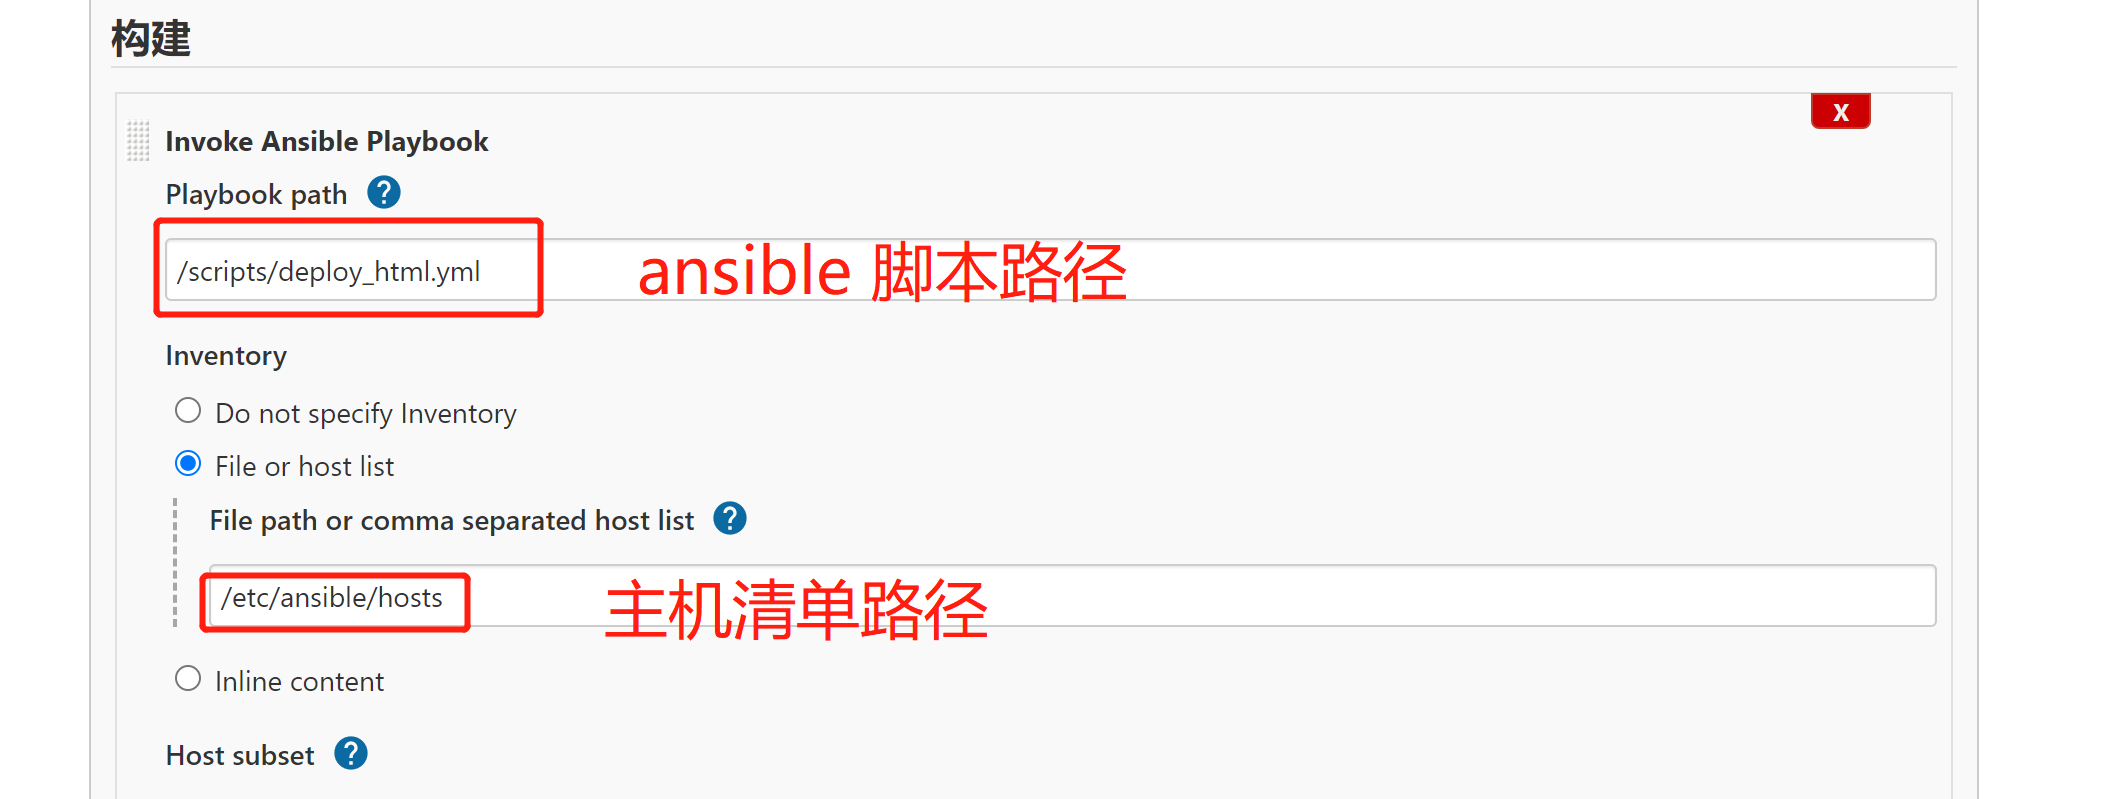
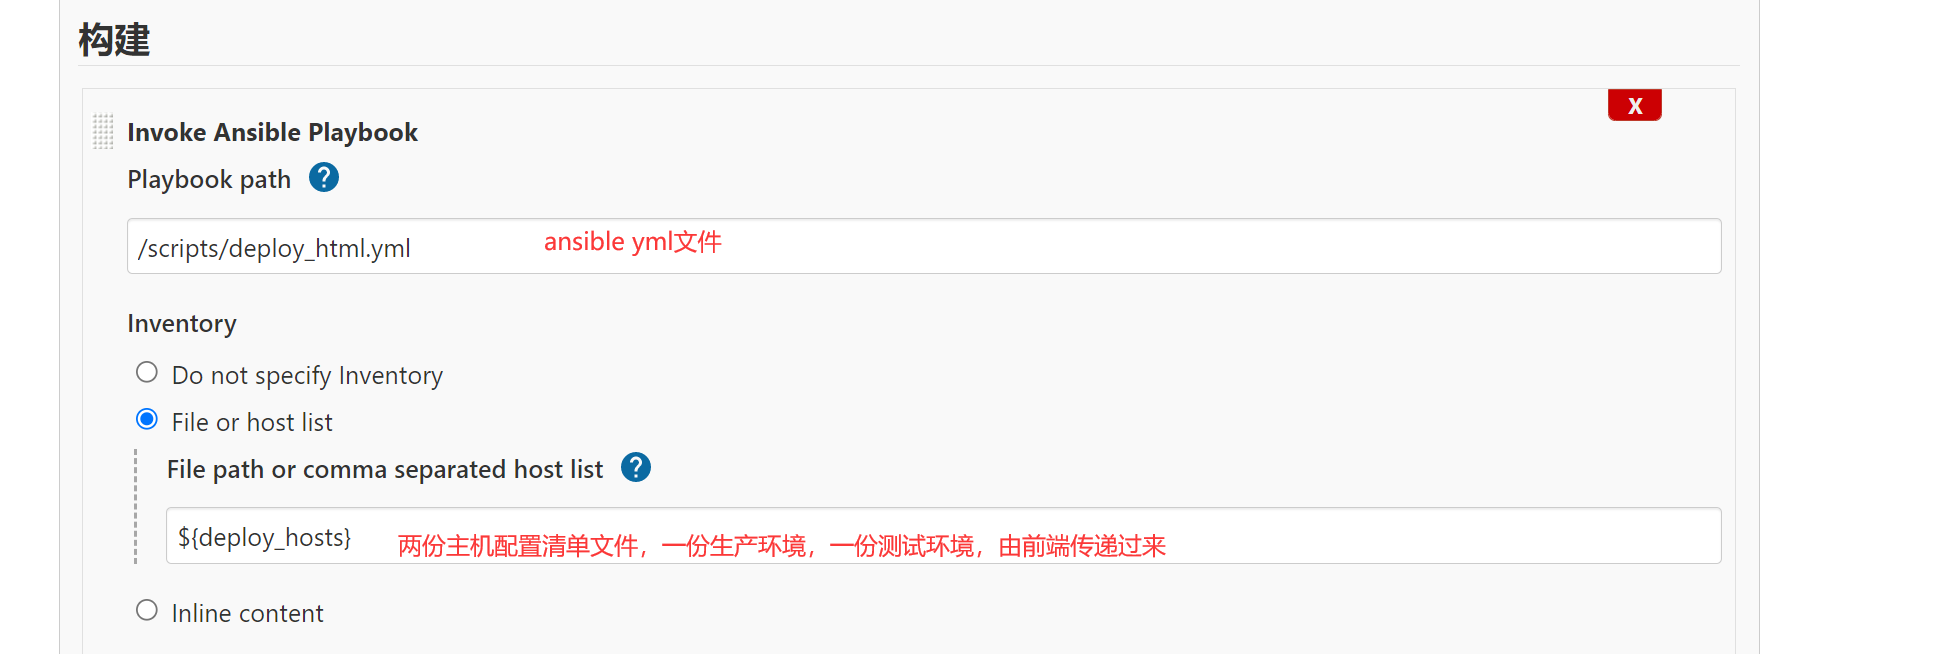
Create a project named monitor ansible Ci, and select Invoke Ansible Playbook during the construction phase
Playbook path: /scripts/deploy_html.yml, file absolute path Inventory: File or host list
(/ etc/ansible/hosts), host manifest file path
The overall idea of automatic deployment through Ansible;
1. Set the time variable, set the WorkSpace variable, and delegate it to the Jenkins node for execution;
2. Package the code and delegate it to the Jenkins node for execution;
3. When the web node code needs to be updated, go offline first and delegate the task to Haproxy
4. Close nginx on the web side
5. Create a site directory for the web node and push the code to the corresponding directory;
6. Delete the soft connection and re create the soft connection;
7. Restart nginx
8. Add load balancing
[root@jenkins ~]# cat /scripts/deploy_html.yml
- hosts: "{{ deploy_webcluster }}"
  serial: 1
  vars:
    - web_dir: /opt
    - web_name: monitor
    - backend_name: web_cluster
    - service_port: 80

  tasks:
    - name: set system time variable
      shell:
        cmd: "date +%F:%H:%M"
      register: system_date
      delegate_to: "127.0.0.1"

    # Set jenkins workspace variable
    - name: set jenkins workspace
      shell:
        cmd: echo ${WORKSPACE}
      register: workspace
      delegate_to: "127.0.0.1"

    # Packaging code
    - name: archive web code
      archive:
        path: "{{ workspace.stdout }}/*"
        dest: "{{ web_dir }}/{{ web_name }}.tar.gz"
      delegate_to: "127.0.0.1"


    # Offline node
    - name: stop haproxy webcluster pool node
      haproxy:
        socket: /var/lib/haproxy/stats
        backend: "backend_name"
        state: disabled
        host: "{{ inventory_hostname }}"
      delegate_to: "{{ item }}"
      loop: "{{ groups['lbservers']}}"

   # Create site directory
    - name: create web sit directory
      file:
        path: "{{ web_dir}}/{{ web_name }}_{{ system_date.stdout }}"
        state: directory

   # Turn off nginx service
    - name: stop nginx server
      systemd:
        name: nginx
        state: stopped

   # Check whether nginx is closed and whether the port is alive
    - name: check port state
      wait_for:
        port: "{{ service_port }}"
        state: stopped

   # Unzip the code to the remote
    - name: unarchive code to remote
      unarchive:
        src: "{{ web_dir }}/{{ web_name }}.tar.gz"
        dest: "{{ web_dir}}/{{ web_name }}_{{ system_date.stdout }}"

   # Delete soft connection
    - name: delete old webserver link
      file:
        path: "{{ web_dir}}/web"
        state: absent

   # Create a new soft connection
    - name: create new webserver link
      file:
        src: "{{ web_dir}}/{{ web_name }}_{{ system_date.stdout }}"
        dest: "{{ web_dir }}/web"
        state: link

  # Start nginx service
    - name: start nginx server
      systemd:
        name: nginx
        state: started

   # Check whether nginx has been started and whether the port is alive
    - name: check port state
      wait_for:
        port: "{{ service_port }}"
        state: started


   # Online node
    - name: start haproxy webcluster pool node
      haproxy:
        socket: /var/lib/haproxy/stats
        backend: "backend_name"
        state: enabled
        host: "{{ inventory_hostname }}"
      delegate_to: "{{ item }}" # Delegate to load balancing node
      loop: "{{ groups['lbservers']}}"
8.1 Jenkins calls Ansible to pass parameters
1. The hosts defined in the playbook are write dead, which is not flexible enough. I hope to make it more flexible by passing parameters
[root@jenkins scripts]# vim
/scripts/deploy_html.yml
- hosts: "{{ deploy_webcluster }}" # Change to variable
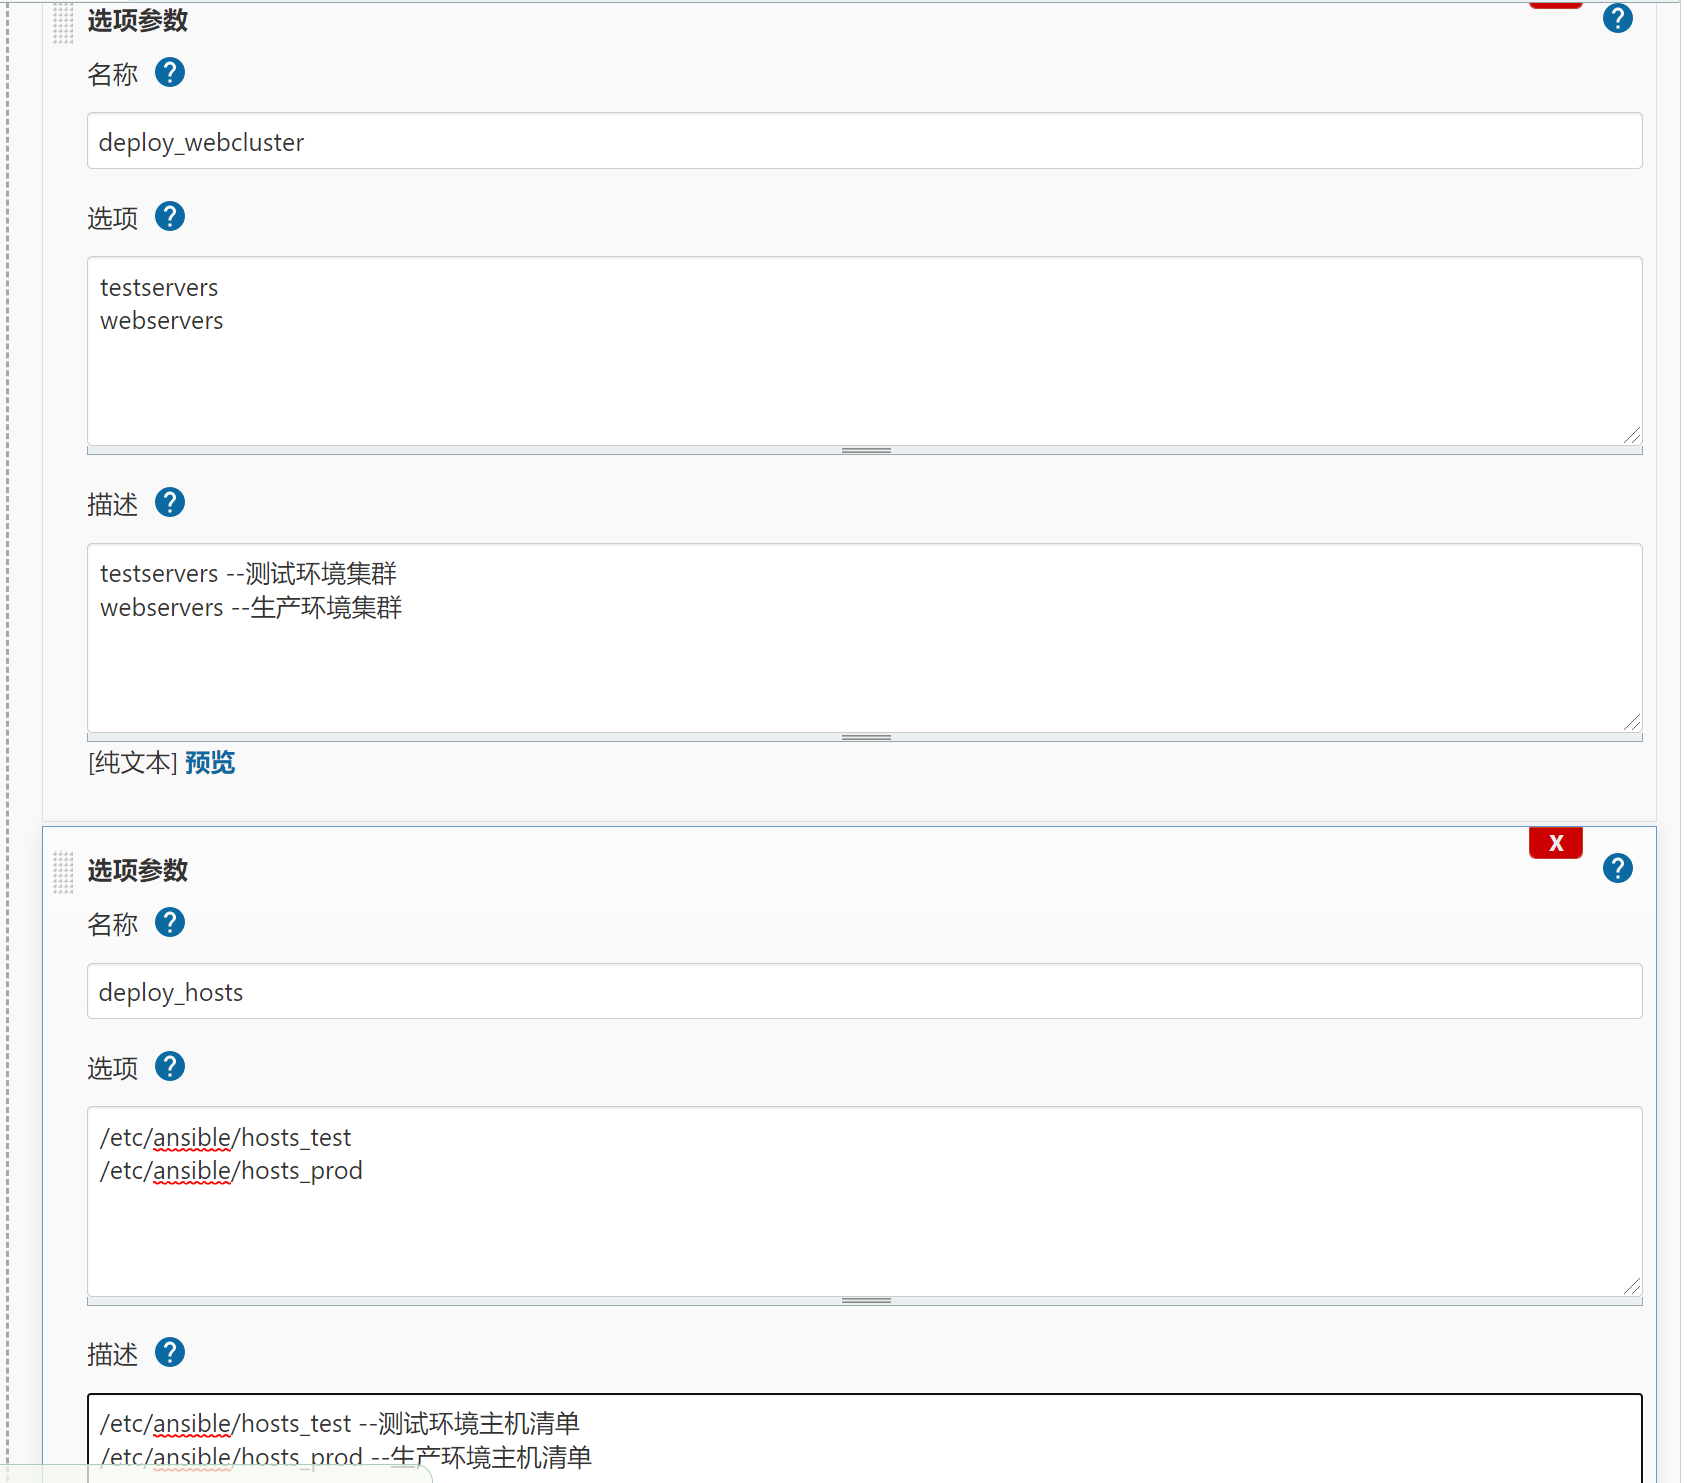
2. Configure the external parameter of Ansible in Jenkins. value is a variable and needs to be passed when Jenkins is executed;
3. Configure Jenkins' parametric build. These parameters will be exposed to the build task as environment variables

9, Jenkins automatic CI
9.1 timing construction
Build regularly, and how often to execute it every other time; Whether the code is updated or not, it will be executed when the time comes; Functions similar to scheduled tasks

Execute every 5 minutes. No matter whether the code is modified or not, the code will be pulled and deployed again at the specified time
9.2 SCM polling
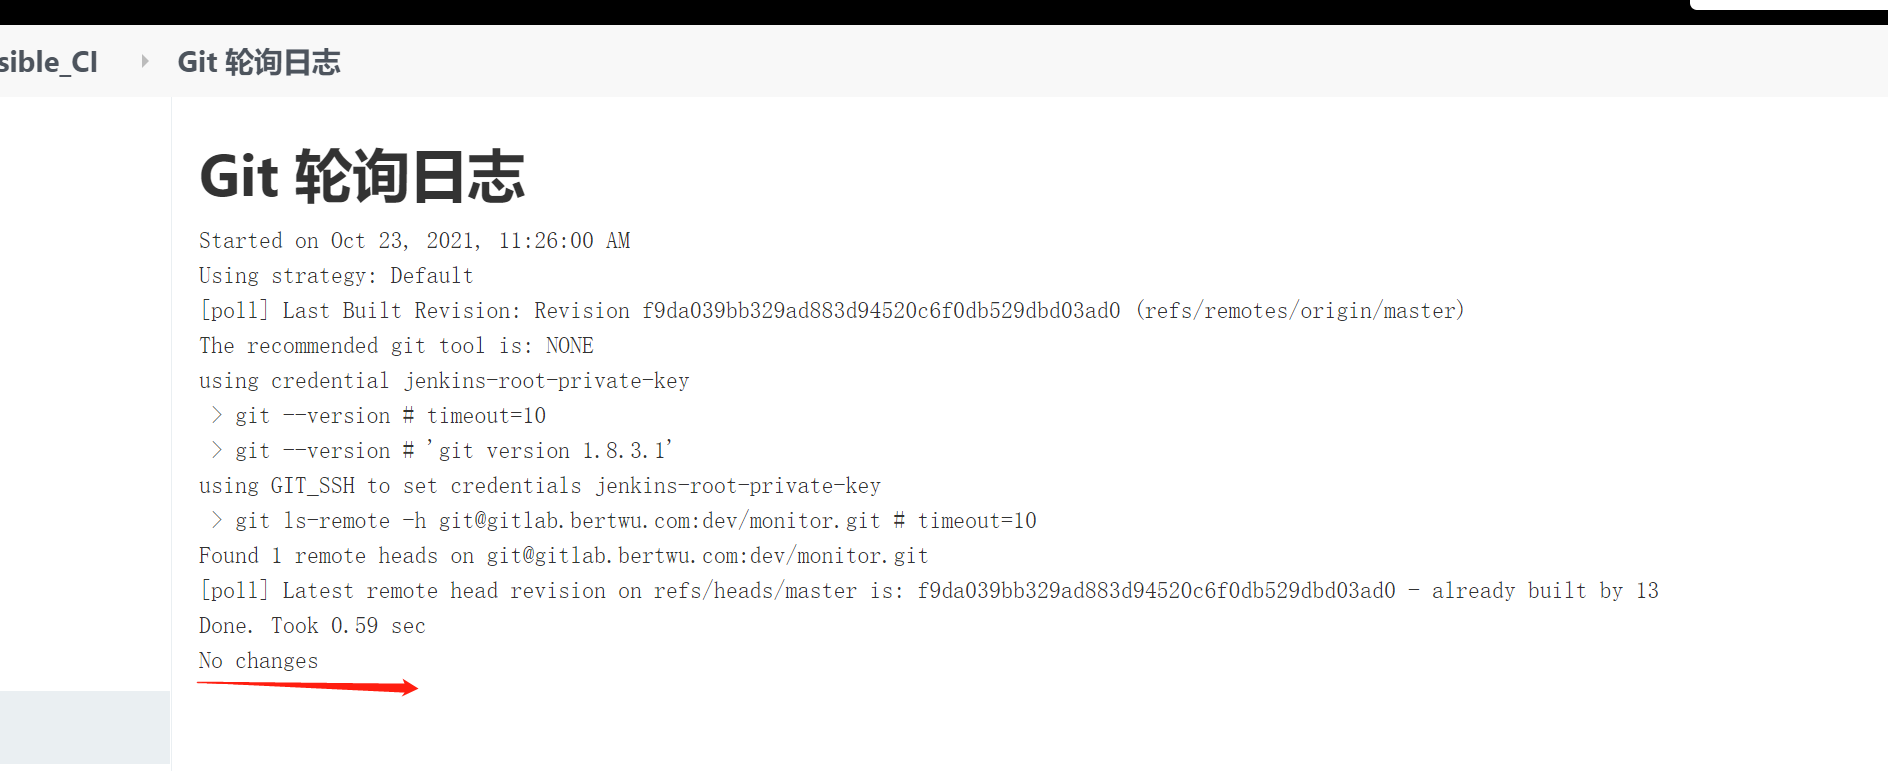
SCM polling: check whether the code is updated every minute. When it is checked that the code is changed, the build will be triggered, otherwise it will not be executed;

Poll every minute.
9.3 Webhook
webhook is to deploy the code to the target cluster service node as soon as the code is developed and submitted;
Jenkins and Gitlab triggers need to be configured
9.3.1 configuring Jenkins
- Click the corresponding item in jenkins to find the build trigger;
- Configure the project address notified by jenkins;
- Find the advanced, then find the Secret token, and click Generate to Generate the token;
In this way, Jenkins can be called through an external program to trigger the action construction project


9.3.2 configuring Gitlab triggers
1. Configure gitlab, management center – > settings – > network settings – > outgoing requests – > allow hooks and services to access the local network (check)
2. Find the corresponding project to realize automatic publishing, and click settings – > integration – > link – > which project address to notify jenkins
Token – > the token token generated by Jenkins for the project

10, Jenkins implements CI based on CommitID
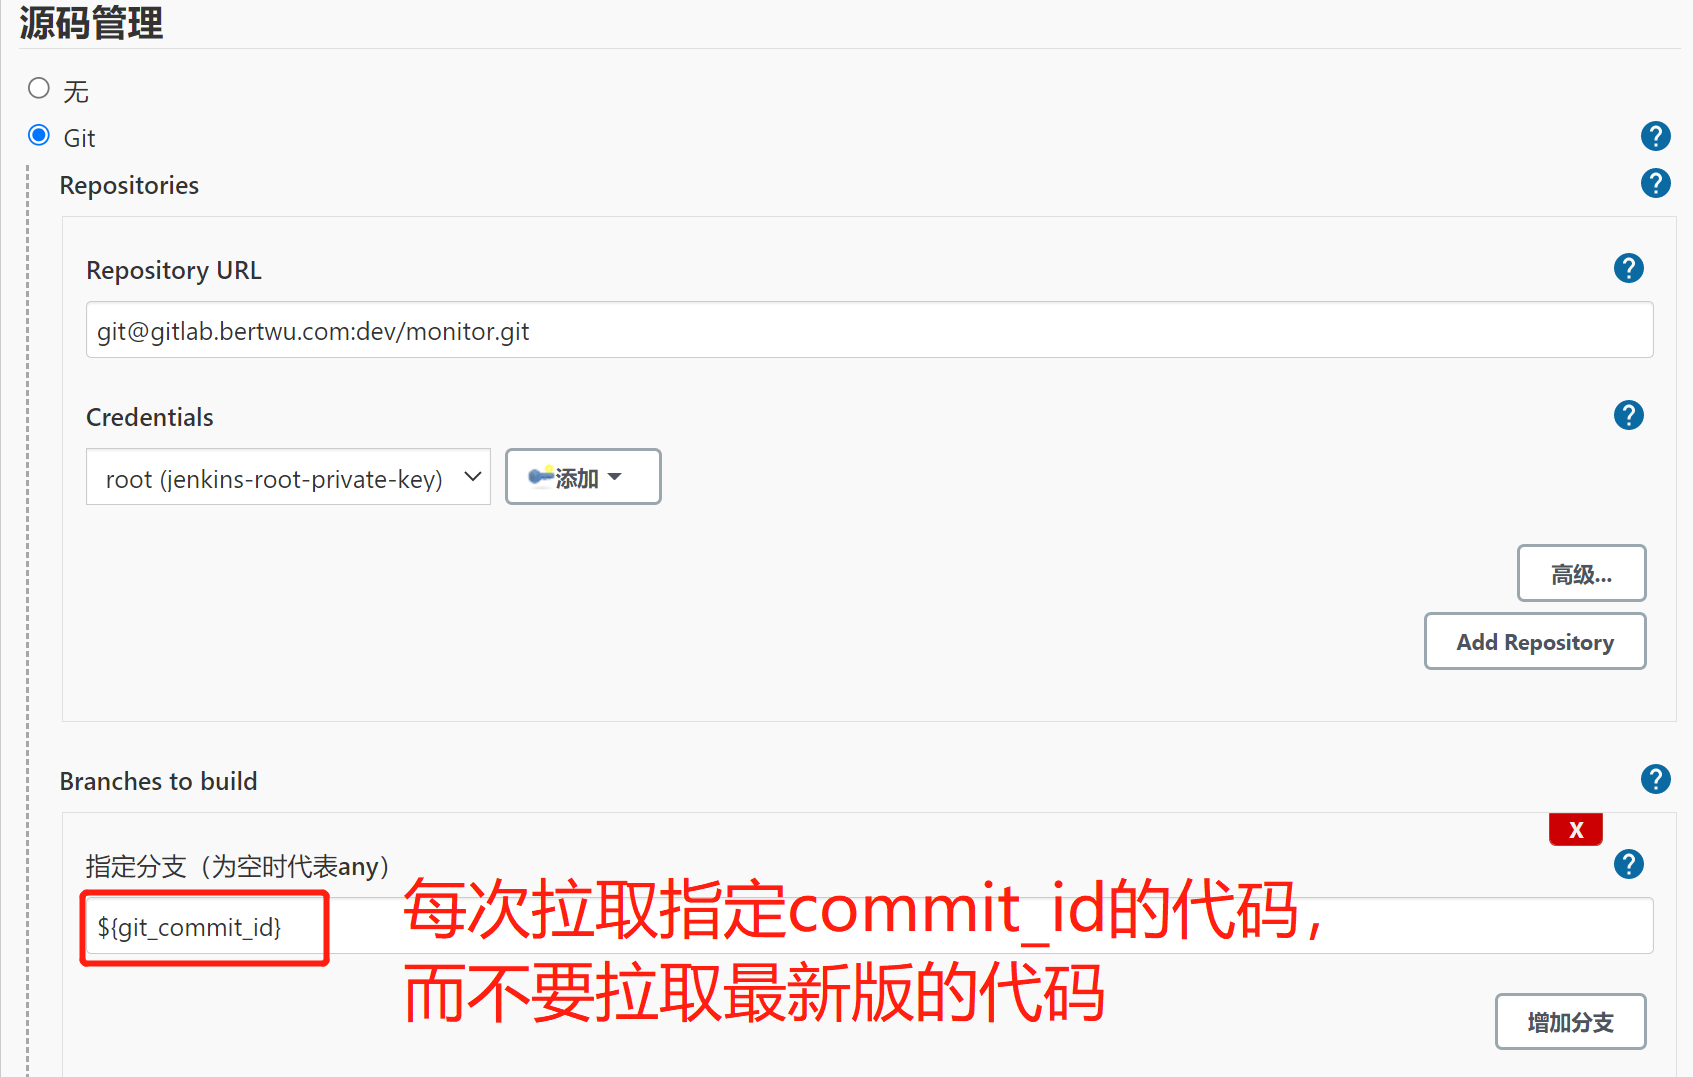
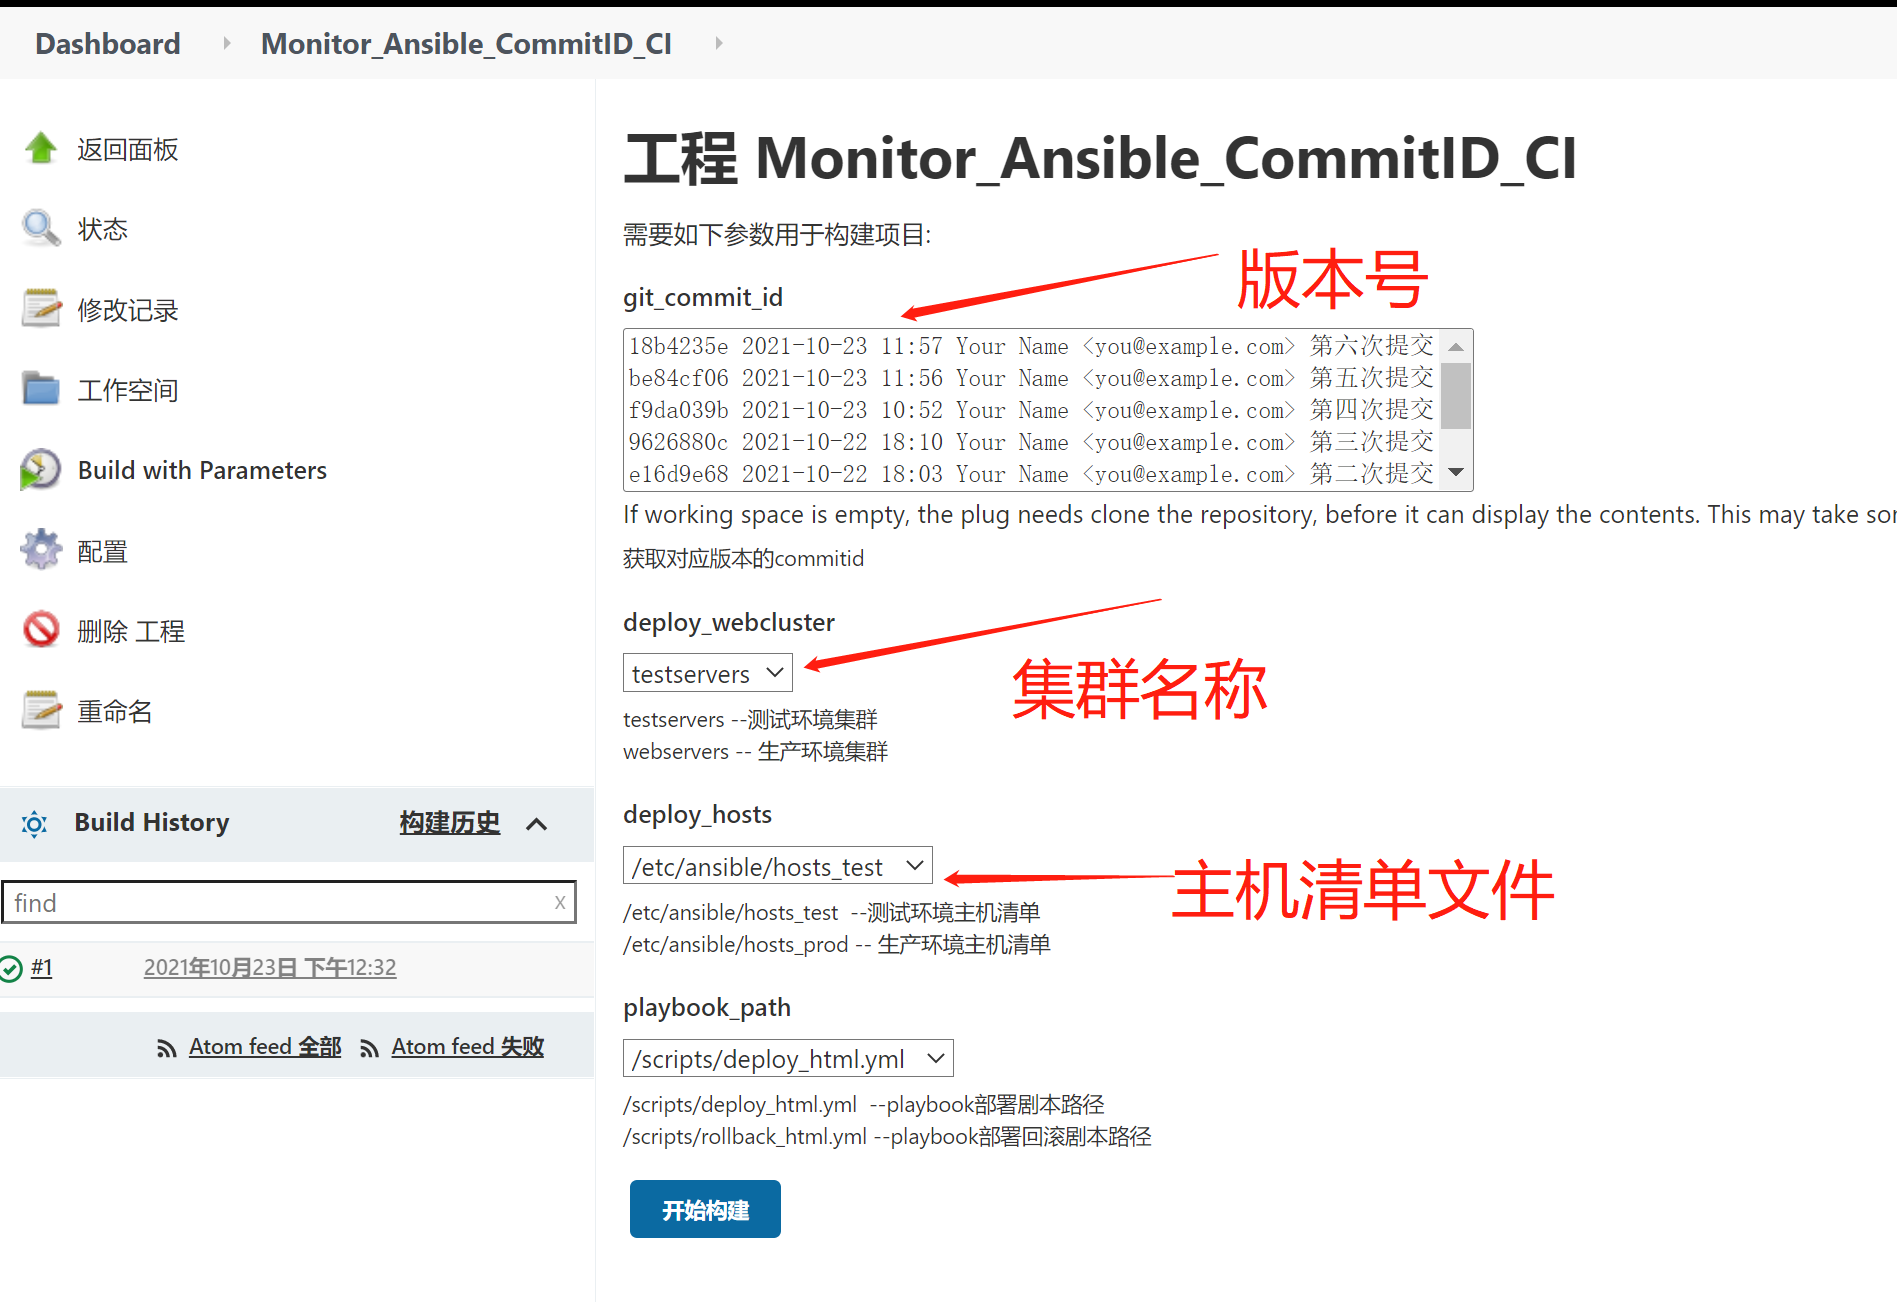
By default, the code is obtained based on the latest version, but only the timestamp can not distinguish the corresponding version of the code. For example, when the particle density of the published code is very small, the code is updated multiple times per minute, so we can not accurately obtain each version, so we can implement the code publishing strategy based on git commitID, Ensure that each code submission and release is unique.
10.1 Jenkins configuration
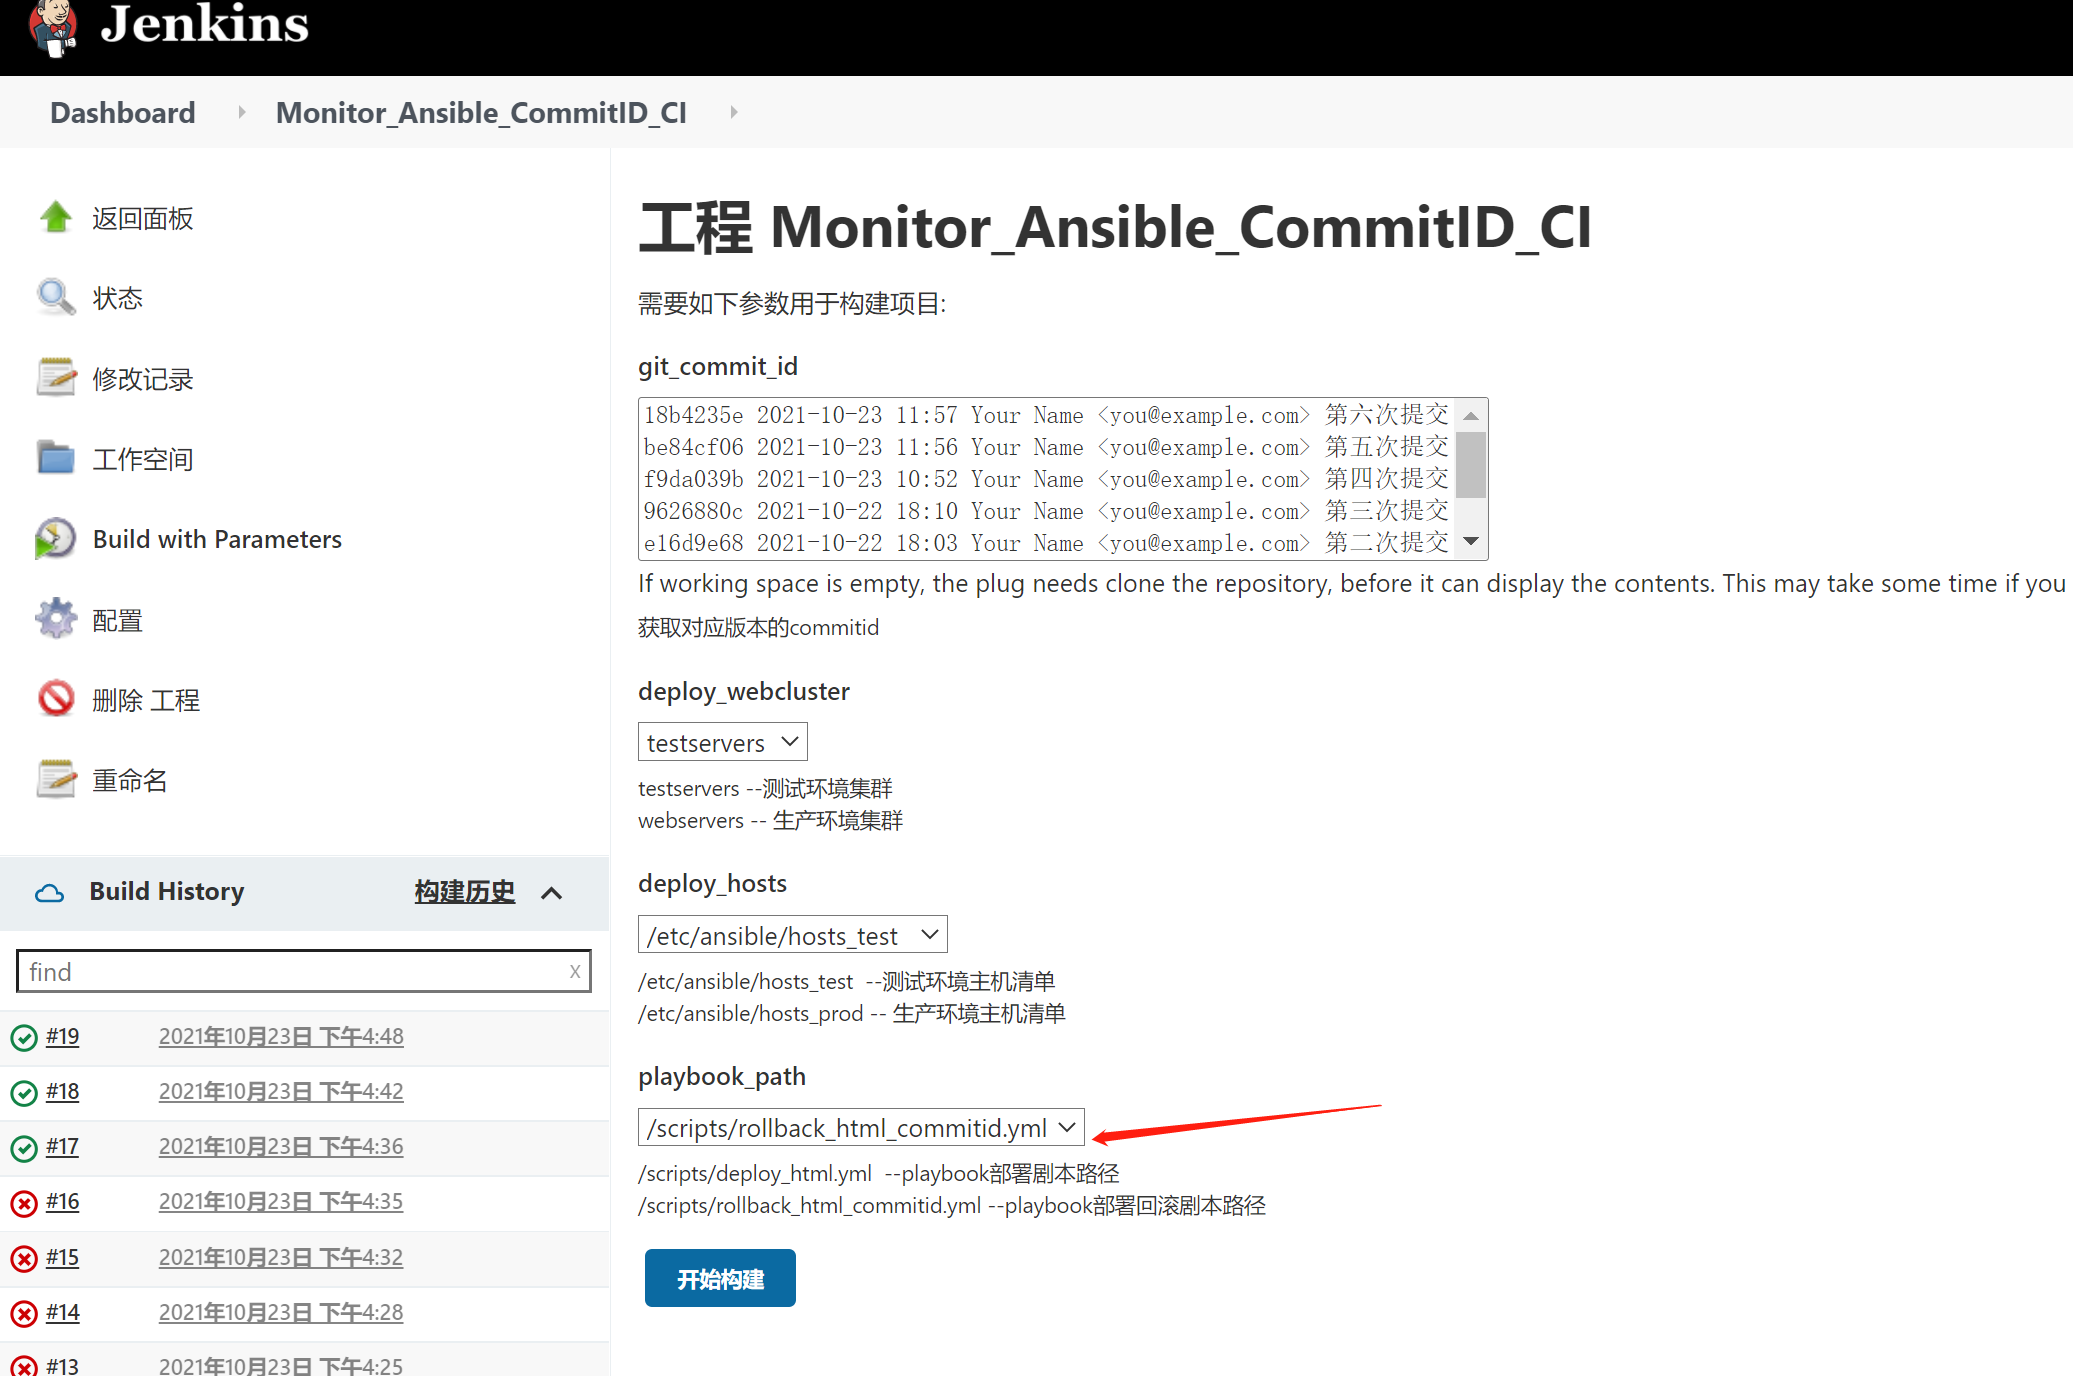
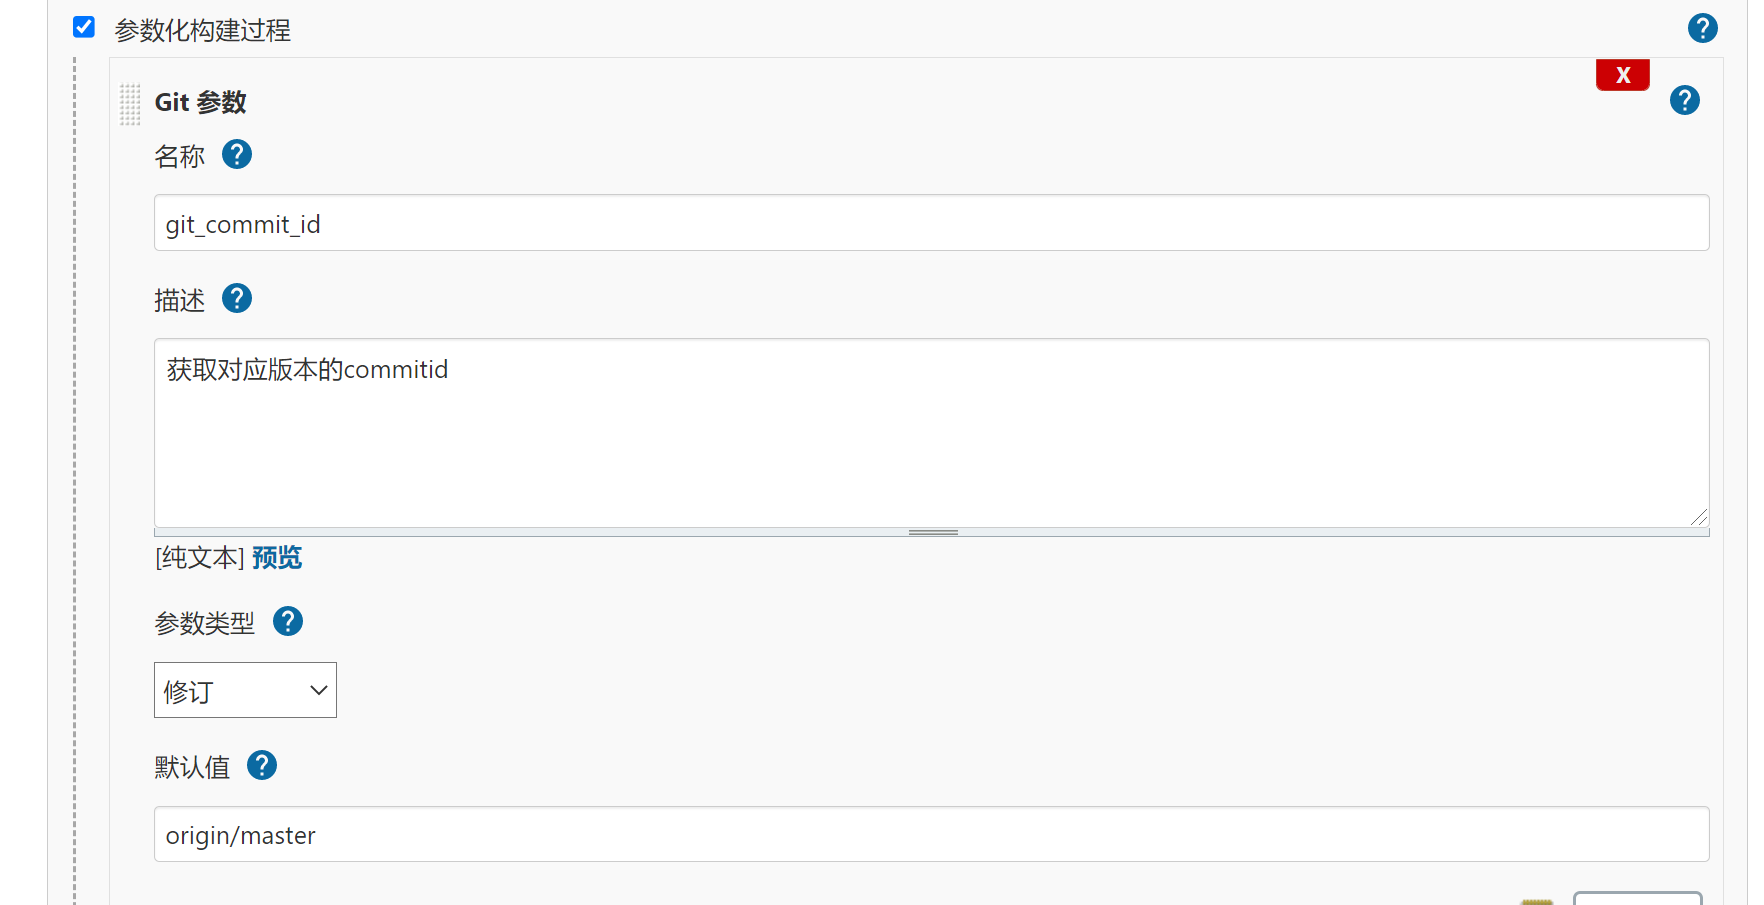
1. Create a new project, monitor ansible commit Ci, and then add git parameter transmission method to Jenkins front-end
10.2 CI script
[root@jenkins scripts]# cat deploy_html_commitid.yml
- hosts: "{{ deploy_webcluster }}"
  serial: 1
  vars:
    - web_dir: /opt
    - web_name: monitor
    - backend_name: web_cluster
    - service_port: 80

  tasks:
    - name: set system time variable
      shell:
        cmd: "date +%F:%H:%M"
      register: system_date
      delegate_to: "127.0.0.1"

    # Set jenkins workspace variable
    - name: set jenkins workspace
      shell:
        cmd: echo ${WORKSPACE}
      register: workspace
      delegate_to: "127.0.0.1"

    # Get the commitid, and use the shell to get any environment variables at the front end
    - name: get commit id
      shell:
        cmd: "echo ${git_commit_id} | cut -c 1-8" # Get the first 8 bits
      register: commit_id
      delegate_to: "127.0.0.1"


    # Packaging code
    - name: archive web code
      archive:
        path: "{{ workspace.stdout }}/*"
        dest: "{{ web_dir }}/{{ web_name }}_{{ commit_id.stdout}}.tar.gz"
      delegate_to: "127.0.0.1"


    # Offline node
    - name: stop haproxy webcluster pool node
      haproxy:
        socket: /var/lib/haproxy/stats
        backend: "backend_name"
        state: disabled
        host: "{{ inventory_hostname }}"
      delegate_to: "{{ item }}"
      loop: "{{ groups['lbservers']}}"

   # Create site directory
    - name: create web sit directory
      file:
        path: "{{ web_dir}}/{{ web_name }}_{{ system_date.stdout }}_{{ commit_id.stdout }}"
        state: directory

   # Turn off nginx service
    - name: stop nginx server
      systemd:
        name: nginx
        state: stopped

   # Check whether nginx is closed and whether the port is alive
    - name: check port state
      wait_for:
        port: "{{ service_port }}"
        state: stopped

   # Unzip the code to the remote
    - name: unarchive code to remote
      unarchive:
        src: "{{ web_dir }}/{{ web_name }}_{{ commit_id.stdout }}.tar.gz"
        dest: "{{ web_dir}}/{{ web_name }}_{{ system_date.stdout }}_{{ commit_id.stdout }}"

   # Delete soft connection
    - name: delete old webserver link
      file:
        path: "{{ web_dir}}/web"
        state: absent

   # Create a new soft connection
    - name: create new webserver link
      file:
        src: "{{ web_dir}}/{{ web_name }}_{{ system_date.stdout }}_{{ commit_id.stdout }}"
        dest: "{{ web_dir }}/web"
        state: link

  # Start nginx service
    - name: start nginx server
      systemd:
        name: nginx
        state: started

   # Check whether nginx has been started and whether the port is alive
    - name: check port state
      wait_for:
        port: "{{ service_port }}"
        state: started


   # Online node
    - name: start haproxy webcluster pool node
      haproxy:
        socket: /var/lib/haproxy/stats
        backend: "backend_name"
        state: enabled
        host: "{{ inventory_hostname }}"
      delegate_to: "{{ item }}" # Delegate to load balancing node
      loop: "{{ groups['lbservers']}}"
10.3 rollback based on CommitID
There may be some unknown bugs when updating the new version. In order not to affect the normal use of users, you need to return the code to the last available version first; Therefore, we need the fast fallback function of our code;
10.3.1 rollback idea
1. Remove nodes from load balancing;
2. Log in to the target cluster service node;
3. Delete the soft link and rebuild the soft link (you can quickly locate the software package previously pushed to the web host according to the commitid passed by the front end);
4. Reload the service and join the cluster service;
10.4 script based rollback
Pseudo code:
commitid=$(echo ${git_commit_id} | cut -c 1-8)

for host in webservers
do

  ssh root@$host "old_name=$(find /opt -type d -name "*${commitid}") && \
                  rm -rf /opt/web && \
                  ln -s ${old_name} /opt/web"
done
10.5 Jenkins and Ansilbe implement rollback based on CommitID
[root@jenkins scripts]# cat rollback_html_commitid.yml
- hosts: "{{ deploy_webcluster }}"
  serial: 1
  vars:
    - web_dir: /opt
    - web_name: monitor
    - backend_name: web_cluster
    - service_port: 80

  tasks:
    # Get committed
    - name: get commit id
      shell:
        cmd: "echo ${git_commit_id} | cut -c 1-8" # Get the first 8 bits
      register: commit_id
      delegate_to: 127.0.0.1


    # Offline node
    - name: stop haproxy webcluster pool node
      haproxy:
        socket: /var/lib/haproxy/stats
        backend: "backend_name"
        state: disabled
        host: "{{ inventory_hostname }}"
      delegate_to: "{{ item }}"
      loop: "{{ groups['lbservers']}}"


   # Turn off nginx service
    - name: stop nginx server
      systemd:
        name: nginx
        state: stopped

   # Check whether nginx is closed and whether the port is alive
    - name: check port state
      wait_for:
        port: "{{ service_port }}"
        state: stopped


   # Delete soft connection
    - name: delete old webserver link
      file:
        path: "{{ web_dir}}/web"
        state: absent

   # Get the file path corresponding to the previous version of commitid
    - name: find old version
      find:
        paths: "{{ web_dir }}"
        patterns: "*{{ commit_id.stdout }}*"
        file_type: directory
      register: old_version_dir

   # Get the absolute path corresponding to the old version)
    - name: get absolute path about old_version_dir
      debug:
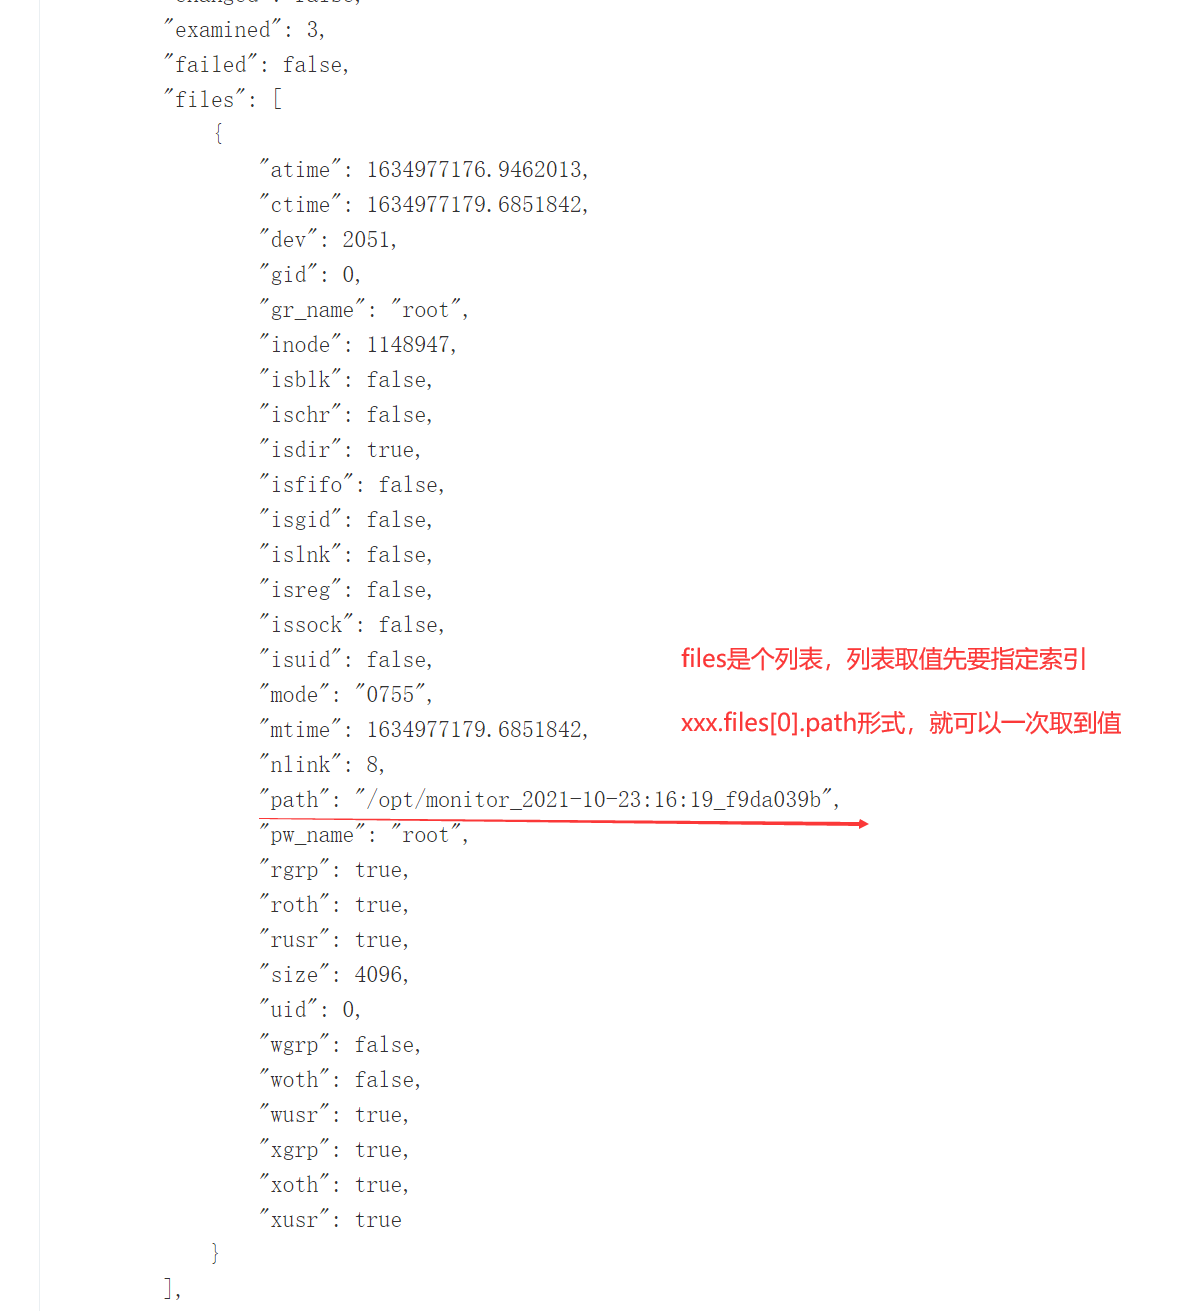
        msg: "{{ old_version_dir.files[0].path  }}"
      register: web_absolute_path_commitid


   # Create a new soft connection
    - name: create new webserver link
      file:
        src: "{{ web_absolute_path_commitid.msg }}"
        dest: "{{ web_dir }}/web"
        state: link


  # Start nginx service
    - name: start nginx server
      systemd:
        name: nginx
        state: started

   # Check whether nginx has been started and whether the port is alive
    - name: check port state
      wait_for:
        port: "{{ service_port }}"
        state: started


   # Online node
    - name: start haproxy webcluster pool node
      haproxy:
        socket: /var/lib/haproxy/stats
        backend: "backend_name"
        state: enabled
        host: "{{ inventory_hostname }}"
      delegate_to: "{{ item }}" # Delegate to load balancing node
      loop: "{{ groups['lbservers']}}"
