- home page
- special column
- java
- Article details
JDK growth 19: ReenranctLock (2) AQS underlying principle of locking into the team
 Luxuriant Published 16 minutes ago
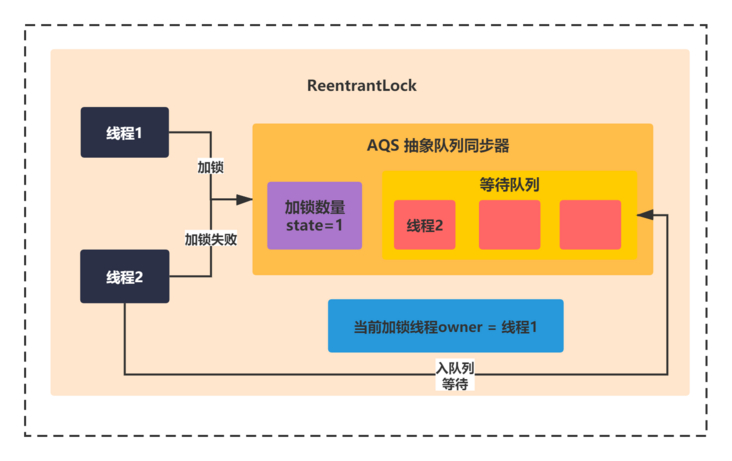
In the previous section, you should have learned about the three AQS based widgets state, owner and queue at the bottom of ReentrantLock. We also learned about the process of locking and modifying the owner and state of the next thread 1. Remember? After locking successfully, the status is as shown in the following figure:
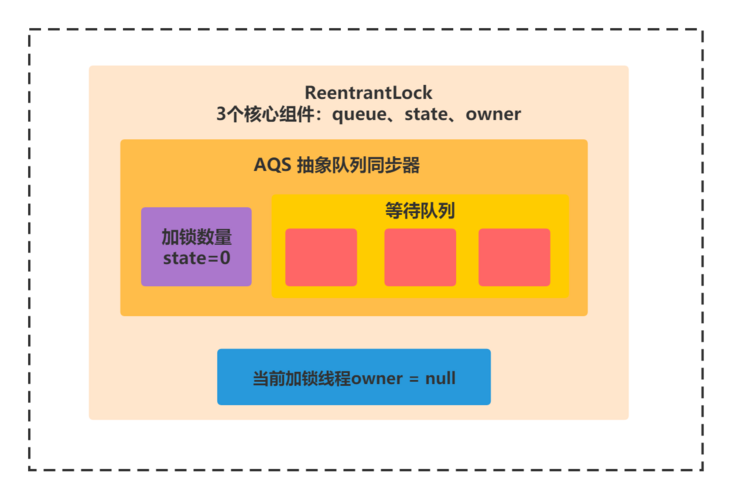
When locking for the first time, only two small components, owner and state, are used, and the waiting queue is not involved. So in this section, let's continue to take a look. If there is the next thread - thread 2, what will happen if this buddy comes to lock it?
Another thread that understands AQS directly from the JDK source code level is also used to lock the queue logic
<div class="output_wrapper" id="output_wrapper_id" style="width:fit-content;font-size: 16px; color: rgb(62, 62, 62); line-height: 1.6; word-spacing: 0px; letter-spacing: 0px; font-family: 'Helvetica Neue', Helvetica, 'Hiragino Sans GB', 'Microsoft YaHei', Arial, sans-serif;"><h3 id="hdddd" style= "width:fit-content; line-height: inherit; margin: 1.5em 0px; font-weight: bold; font-size: 1.3em; margin-bottom: 2em; margin-right: 5px; padding: 8px 15px; letter-spacing: 2px; background-image: linear-gradient(to right bottom, rgb(43,48,70), rgb(43,48,70)); background-color: rgb(63, 81, 181); color: rgb(255, 255, 255); border-left: 10px solid rgb(255,204,0); border-radius: 5px; text-shadow: rgb(102, 102, 102) 1px 1px 1px; box-shadow: rgb(102, 102, 102) 1px 1px 2px; "><span style="font-size: inherit; color: inherit; line-height: inherit; margin: 0px; padding: 0px; "> understand another thread of AQS directly from the JDK source code level and lock the queue logic < / span > < / H3 > < / div >
When thread 2 performs locking, it is assumed that thread 1 has not released the lock, that is, thread 2 performs locking based on the state of the above figure. Similarly, it will go to the following code of lock method:
 static final class NonfairSync extends Sync {
   final void lock() {
     if (compareAndSetState(0, 1))
       setExclusiveOwnerThread(Thread.currentThread());
     else
       acquire(1);
   }


   protected final boolean tryAcquire(int acquires) {
     return nonfairTryAcquire(acquires);
   }
  }
If thread 2 lock s, when compareAndSetState(0,1) is executed, because the state is already 1, the CAS operation will certainly fail and be included in the else logic. The following code can be found in the parent AQS of NonFairSync:
public final void acquire(int arg) {
  if (!tryAcquire(arg) &&
    acquireQueued(addWaiter(Node.EXCLUSIVE), arg))
    selfInterrupt();
 }


// Then, the tryAcquire implemented by NonFairSync will be called:

  protected final boolean tryAcquire(int acquires) {
    return nonfairTryAcquire(acquires);
  }


final boolean nonfairTryAcquire(int acquires) {
    final Thread current = Thread.currentThread();
    int c = getState();
    if (c == 0) {
     if (compareAndSetState(0, acquires)) {
        setExclusiveOwnerThread(current);
        return true;
      }
    }

    else if (current == getExclusiveOwnerThread()) {
      int nextc = c + acquires;
      if (nextc < 0) // overflow
        throw new Error("Maximum lock count exceeded");
      setState(nextc);
      return true;
    }
    return false;
  }
The tryAcquire method above actually calls a nonfairTryAcquire method, which is called a method of unfair access from the name (we will talk about unfair locks later).
But when you look at the context of this method, you will find that state is 1, the first if is not satisfied, the owner is thread 1, the current is thread 2, and the second if is not satisfied. The result directly returns false.
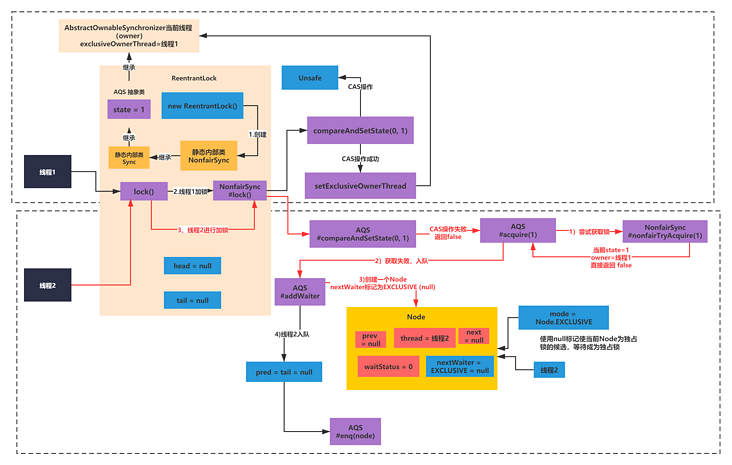
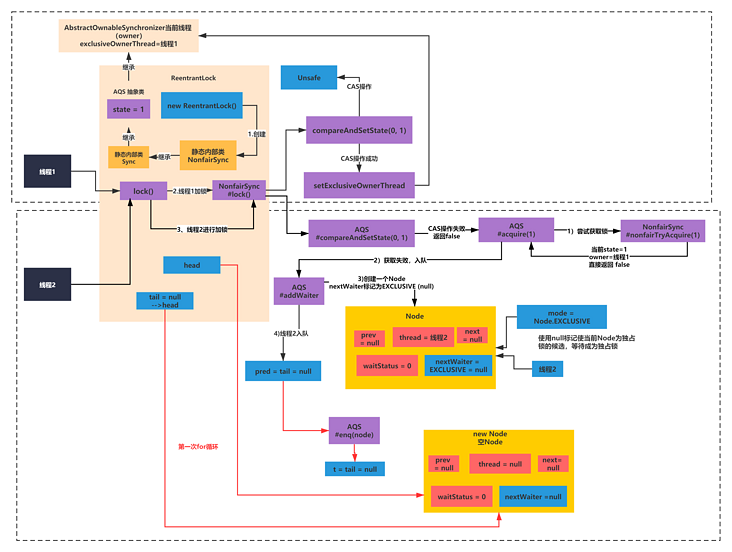
So here you will find that thread 2 is locked. Up to now, it will be executed as shown in step 3 below:
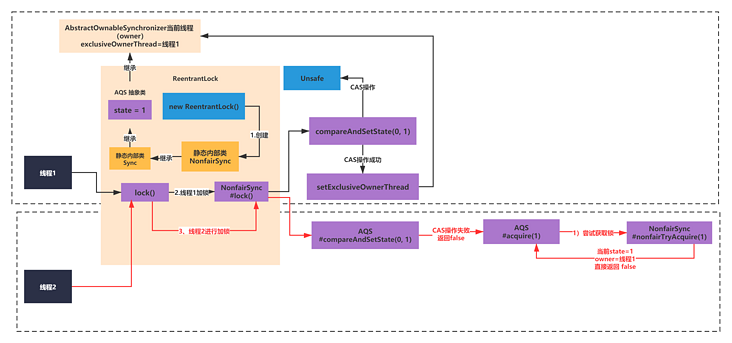
Then, since tryAcquire returns false, it will enter & & the following method to call addWaiter(Node.EXCLUSIVE).
public final void acquire(int arg) {
 if (!tryAcquire(arg) &&
   acquireQueued(addWaiter(Node.EXCLUSIVE), arg))
   selfInterrupt();
}
From the name of addWaiter, you can guess with a mask. In fact, this method means adding to the waiting queue to wait. Let's take a look at the following:
  private Node addWaiter(Node mode) {
   Node node = new Node(Thread.currentThread(), mode);
   // Try the fast path of enq; backup to full enq on failure
   Node pred = tail;
   if (pred != null) {
     node.prev = pred;
     if (compareAndSetTail(pred, node)) {
       pred.next = node;
       return node;
     }
   }

   enq(node);
   return node;
  }
First, a Node mode is passed in, which is Node.EXCLUSIVE. From the name, it means an exclusive Node.
You can see this Node.EXCLUSIVE:
static final class Node {
  /** Marker to indicate a node is waiting in shared mode */
  static final Node SHARED = new Node();
  /** Marker to indicate a node is waiting in exclusive mode */
  static final Node EXCLUSIVE = null;


  /** waitStatus value to indicate thread has cancelled */
  static final int CANCELLED = 1;

  /** waitStatus value to indicate successor's thread needs unparking */
  static final int SIGNAL  = -1;

  /** waitStatus value to indicate thread is waiting on condition */
  static final int CONDITION = -2;

  /**
   * waitStatus value to indicate the next acquireShared should
   * unconditionally propagate
   */
  static final int PROPAGATE = -3;

}
Sure enough, you can see that there are a bunch of static variables in the Node. null, empty Node, 1, 1, - 2, - 3 represent the role types of some nodes.
Next, look at the addWaitder method:
  private Node addWaiter(Node mode) {
   Node node = new Node(Thread.currentThread(), mode);
     //Omit the following code
   return node;

  }
What does this new Node do? You can see the Node's construction method and member variables:
volatile Node prev;
volatile Node next;
volatile int waitStatus;
volatile Thread thread;
Node nextWaiter;
Node(Thread thread, Node mode) { // Used by addWaiter
this.nextWaiter = mode;
this.thread = thread;
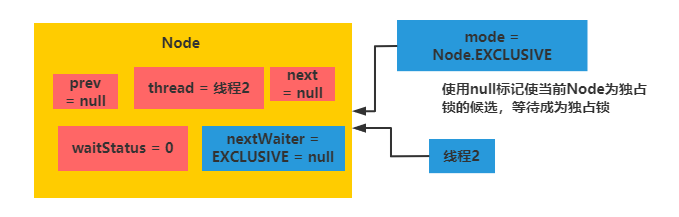
}In addition to next, prev and thread, which represent the front and back pointers of the two-way linked list and the corresponding data elements, there are two variables nextWaiter and waitStatus. You can guess from the name, which means waiting node and waiting status.
Thread = thread 2 and mode= EXCLUSIVE = null are passed in here. In fact, nextWaiter is more like a tag, indicating an exclusive node. Or thread 2 is waiting for an exclusive lock. The created node is shown in the following figure:
Then, after the node is created by addwaiter, continue to execute the code. The pred pointer points to the tail, but the default tail is null, so the enq(node) method is called directly. It seems that enqueue means queue. The code is as follows:
 private Node addWaiter(Node mode) {

  Node node = new Node(Thread.currentThread(), mode);
  // Try the fast path of enq; backup to full enq on failure
  Node pred = tail;
  if (pred != null) {
    node.prev = pred;
    if (compareAndSetTail(pred, node)) {
      pred.next = node;
      return node;
    }
  }

  enq(node);
  return node;

 }
The following results will be obtained:
Essence of AQS: why is it called asynchronous queue synchronizer?
<div class="output_ wrapper" id="output_ wrapper_ id" style="width:fit-content; font-size: 16px; color: rgb(62, 62, 62); line-height: 1.6; word-spacing: 0px; letter-spacing: 0px; font-family: 'Helvetica Neue', Helvetica, 'Hiragino Sans GB', 'Microsoft YaHei', Arial, sans-serif; "><h3 id="hdddd" style="width:fit-content; line-height: inherit; margin: 1.5em 0px; font-weight: bold; font-size: 1.3em; margin-bottom: 2em; margin-right: 5px; padding: 8px 15px; letter-spacing: 2px; background-image: linear-gradient(to right bottom, rgb(43,48,70), rgb(43,48,70)); background-color: rgb(63, 81, 181); color: rgb(255, 255, 255); border-left: 10px solid rgb(255,204,0); border-radius: 5px; text-shadow: rgb(102, 102, 102) 1px 1px 1px; box-shadow: rgb(102, 102, 102) 1px 1px 2px; "><span style="font-size: inherit; color: inherit; line-height: inherit; margin: 0px; padding: 0px; "> essence of AQS: why is it called asynchronous queue synchronizer? < / span > < / H3 > < / div >
Next, we need to analyze the enq(node) joining method:
private Node enq(final Node node) {
  for (;;) {
    Node t = tail;
    if (t == null) { // Must initialize
      if (compareAndSetHead(new Node()))
       tail = head;
    } else {
      node.prev = t;
      if (compareAndSetTail(t, node)) {
        t.next = node;
        return t;
      }
    }
  }
 }
From the context, it is a classic for loop + CAS spin operation. You can follow the idea of code execution:
1) First for loop
First, t points to tail. Since tail is null, t must be null at first. Enter the first if.
Then, through CAS operation compareAndSetHead, point the head to a new Node. After success, point the tail to the head.
private final boolean compareAndSetHead(Node update) {
 return unsafe.compareAndSwapObject(this, headOffset, null, update);
}
Therefore, the following results will be obtained:
2) Second for loop
  private Node enq(final Node node) {
   for (;;) {
     Node t = tail;
     if (t == null) { // Must initialize
       if (compareAndSetHead(new Node()))
         tail = head;
     } else {
       node.prev = t;
       if (compareAndSetTail(t, node)) {
         t.next = node;
         return t;
       }
     }
   }
  }
At this point, the tail and head of ReentrantLock point to the empty new Node().
Then, t = tail. T is not empty at this time. Go to else logic and use the prev of the input node node to point to the empty node pointed to by T.
Then, point the tail to the input node node through CAS operation compareAndSetTail.
  private final boolean compareAndSetTail(Node expect, Node update) {
   return unsafe.compareAndSwapObject(this, tailOffset, expect, update);
  }
Finally, the next of t also points to the input node.
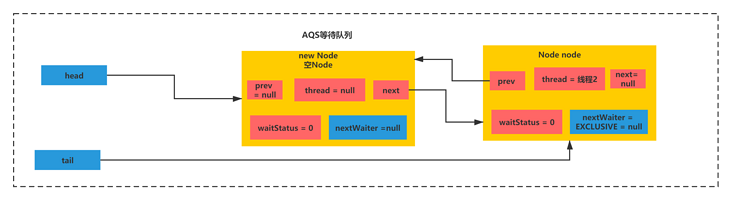
That is, as shown in the figure below:

From the above figure, we can see that the node of thread 2 is connected with the empty node to form a two-way linked list. You should know that the two-way linked list can also be used as a queue. Therefore, you can queue the node here.
This is actually the essence of AQS, the role of waiting queue components.
When thread 2 waits in the queue, you can simplify the flow chart here, and you can get the following figure:
How to use AQS to asynchronously queue up and block waiting when locking fails?
<div class="output_wrapper" id="output_wrapper_id" style="width:fit-content;font-size: 16px; color: rgb(62, 62, 62); line-height: 1.6; word-spacing: 0px; letter-spacing: 0px; font-family: 'Helvetica Neue', Helvetica, 'Hiragino Sans GB', 'Microsoft YaHei', Arial, sans-serif;"><h3 id="hdddd" style= "width:fit-content; line-height: inherit; margin: 1.5em 0px; font-weight: bold; font-size: 1.3em; margin-bottom: 2em; margin-right: 5px; padding: 8px 15px; letter-spacing: 2px; background-image: linear-gradient(to right bottom, rgb(43,48,70), rgb(43,48,70)); background-color: rgb(63, 81, 181); color: rgb(255, 255, 255); border-left: 10px solid rgb(255,204,0); border-radius: 5px; text-shadow: rgb(102, 102, 102) 1px 1px 1px; box-shadow: rgb(102, 102, 102) 1px 1px 2px; "><span style="font-size: inherit; color: inherit; line-height: inherit; margin: 0px; padding: 0px; "> how to asynchronously queue up and block waiting with AQS when locking fails? < / span > < / H3 > < / div >
After joining the queue, is it over? No, you still need to modify the state of thread 2 and suspend it. Now that you are in the queue, don't occupy CPU resources, right?
Let's see how:
  public final void acquire(int arg) {
   if (!tryAcquire(arg) &&
     acquireQueued(addWaiter(Node.EXCLUSIVE), arg))
     selfInterrupt();
  }
After executing addWaiter, the returned node is node, that is, the waiting node corresponding to thread 2, and arg is 1. Then we enter the acquirequeueueueueueueueued method:
final boolean acquireQueued(final Node node, int arg) {
   boolean failed = true;
   try {
     boolean interrupted = false;
     for (;;) {
       final Node p = node.predecessor();
       if (p == head && tryAcquire(arg)) {
         setHead(node);
         p.next = null; // help GC
         failed = false;
         return interrupted;
       }

       if (shouldParkAfterFailedAcquire(p, node) &&
         parkAndCheckInterrupt())
         interrupted = true;
     }
   } finally {
     if (failed)
       cancelAcquire(node);
   }
  }
The current waiting queue is as follows:
The core context of this method is an infinite for loop with two if.
Then let's look at the details:
1) First For cycle:
First, use an auxiliary pointer p to point to the previous node of the node. The node.predecessor is actually p=node.prev. The code is as follows:
final Node predecessor() throws NullPointerException {
     Node p = prev;
     if (p == null)
       throw new NullPointerException();
     else
       return p;
   }
Since head equals p, try to acquire the lock again, tryAcquire(arg). Assuming that thread 1 has not released the lock, tryAcquire(arg) will certainly fail and return false, so the first if is not true. (if the acquisition is successful, this if will actually remove thread 2 from the queue.)
Then, execute the second if judgment. First, call the shouldParkAfterFailedAcquire method. The first parameter is passed into p, which is an empty node, and the second parameter is passed into node, which is the node corresponding to thread 2.
  private static boolean shouldParkAfterFailedAcquire(Node pred, Node node) {
   int ws = pred.waitStatus;
   if (ws == Node.SIGNAL)
     /*
      * This node has already set status asking a release
      * to signal it, so it can safely park.
      */
     return true;

   if (ws > 0) {
     /*
        * Predecessor was cancelled. Skip over predecessors and
      * indicate retry.
      */
     do {
       node.prev = pred = pred.prev;
     } while (pred.waitStatus > 0);
     pred.next = node;
   } else {
     /*
      * waitStatus must be 0 or PROPAGATE. Indicate that we
      * need a signal, but don't park yet. Caller will need to
      * retry to make sure it cannot acquire before parking.
      */
     compareAndSetWaitStatus(pred, ws, Node.SIGNAL);
   }
   return false;
  }
The first parameter is passed into p, which is an empty node. The second parameter is passed into node, which is the node corresponding to thread 2.
The waitStatus of both nodes is 0. Therefore, after the above code, the last else will be executed.
The waitStatus status (ws) of an empty Node will be changed from 0 to Node.SIGNAL(-1) through CAS operation, as shown in the following figure:

Then shouldParkAfterFailedAcquire will directly return false, and the first condition is false. The next for loop will be carried out directly.
 final boolean acquireQueued(final Node node, int arg) {
  boolean failed = true;
  try {
    boolean interrupted = false;
    for (;;) {
      final Node p = node.predecessor();
      if (p == head && tryAcquire(arg)) {
        setHead(node);
        p.next = null; // help GC
        failed = false;
        return interrupted;
      }

      if (shouldParkAfterFailedAcquire(p, node) &&
        parkAndCheckInterrupt())
        interrupted = true;
    }
  } finally {
    if (failed)
      cancelAcquire(node);
  }
 }
2) Second For cycle
Assuming that thread 1 still does not release the lock, the above for loop will still enter the following method, but the pred, that is, the watiStatus of the empty Node, has been changed to SIGNAL (- 1), so it will return true.
private static boolean shouldParkAfterFailedAcquire(Node pred, Node node) {
   int ws = pred.waitStatus;
   if (ws == Node.SIGNAL)
     /*
      * This node has already set status asking a release
      * to signal it, so it can safely park.
      */
     return true;

   if (ws > 0) {
     /*
        * Predecessor was cancelled. Skip over predecessors and
      * indicate retry.
      */
     do {
       node.prev = pred = pred.prev;
     } while (pred.waitStatus > 0);
       pred.next = node;
     } else {

     /*
      * waitStatus must be 0 or PROPAGATE. Indicate that we
      * need a signal, but don't park yet. Caller will need to
      * retry to make sure it cannot acquire before parking.
      */
     compareAndSetWaitStatus(pred, ws, Node.SIGNAL);
   }
   return false;

  }
Next, if the first condition is that ture will judge the second condition parkAndCheckInterrupt
  if (shouldParkAfterFailedAcquire(p, node) &&
         parkAndCheckInterrupt())
         interrupted = true;
parkAndCheckInterrupt this method is called suspend by name and checks whether the thread is interrupted. The code is as follows
  private final boolean parkAndCheckInterrupt() {
   LockSupport.park(this);
   return Thread.interrupted();
  }
You can see that his core calls a tool class LockSupport.park(this);
 public static void park(Object blocker) {
  Thread t = Thread.currentThread();
  setBlocker(t, blocker);
  UNSAFE.park(false, 0L);
  setBlocker(t, null);
 }
This bottom layer is implemented through UNSAFE C + + code, so we won't look at it. You just know that this park operation will suspend the thread and enter the waiting state. Remember the state diagram of the thread before?
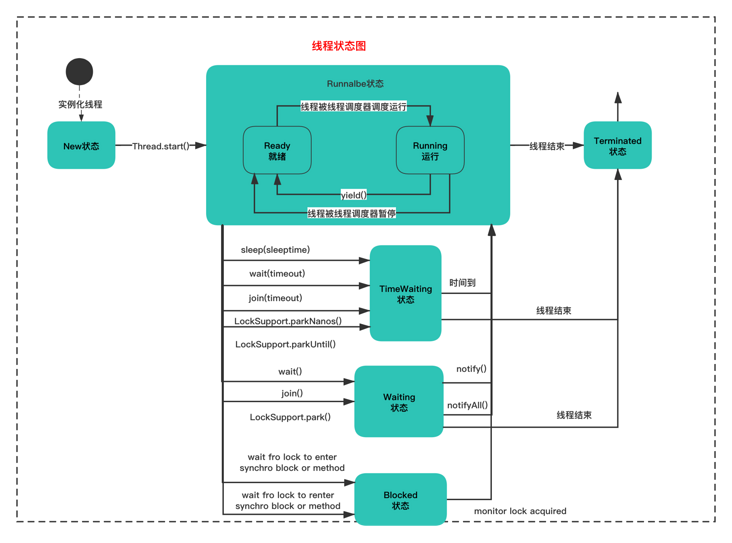
The park operation will suspend the thread and enter the Waiting state. That is, if thread 2 fails to lock, it will eventually join the queue and wait.
In today's section, I'll explain the logic of joining the queue in AQS. If a thread fails to obtain a lock, how to join the queue? How to hang? I believe you know it very well. You can use the third thread to try to completely illustrate the AQS queue waiting mechanism. After learning, if you can draw this diagram, you really understand the basic principle of AQS .
Summary & Thinking
<div class="output_ wrapper" id="output_ wrapper_ id" style="width:fit-content; font-size: 16px; color: rgb(62, 62, 62); line-height: 1.6; word-spacing: 0px; letter-spacing: 0px; font-family: 'Helvetica Neue', Helvetica, 'Hiragino Sans GB', 'Microsoft YaHei', Arial, sans-serif; "><h3 id="hdddd" style="width:fit-content; line-height: inherit; margin: 1.5em 0px; font-weight: bold; font-size: 1.3em; margin-bottom: 2em; margin-right: 5px; padding: 8px 15px; letter-spacing: 2px; background-image: linear-gradient(to right bottom, rgb(43,48,70), rgb(43,48,70)); background-color: rgb(63, 81, 181); color: rgb(255, 255, 255); border-left: 10px solid rgb(255,204,0); border-radius: 5px; text-shadow: rgb(102, 102, 102) 1px 1px 1px; box-shadow: rgb(102, 102, 102) 1px 1px 2px; "><span style="font-size: inherit; color: inherit; line-height: inherit; margin: 0px; padding: 0px; "> summary & Thinking < / span > < / H3 > < / div >
Although the queue entry logic looks complex, you can abstract that the design of the queue is based on: CAS operation + Node state + thread tag control.
You can think more about the key ideas and key points without worrying about the details. For example, think more about why the state is designed to use the Condition alone? Or....
These thoughts are the most important!
In the next section, we'll look at how to wake up the elements in the queue if thread 1 releases the lock. When waking up, if there is a local thread to lock, it can jump the queue!? so in the next section, we'll also introduce what fair and unfair locks are.
This article is composed of blog one article multi posting platform OpenWrite release!
 java
java