Single layer graph slide verification code of selenium and PIL
How to crack the slide verification code
There are various mechanisms of anti climbing on the market, among which the sliding verification code is divided into two-layer graph and single-layer graph:
1. The style code in JS can be modified in the console, the image with sliding gap and the complete image can be obtained by modifying the display attribute, the color comparison between the two images can be carried out to determine the sliding distance, and the landing can be realized by simulating the track of human activity verification code;
2. Single layer graph does not have complete graph, so it is more difficult than double layer graph. The biggest difficulty lies in the calculation of distance and sliding track
preparation in advance
Before we start, we need to prepare:
- Download the required class package: pilot (inheriting PIL), Selenium, time
- Install browser debugging tools (this article uses chrome driver)
Chrome driver debugging download address: link: http://npm.taobao.org/mirrors/chromedriver/
- Prepare debugging tools. The tools used in this article are jupyter notebook, which can be pycharm
Code operation
Imported classes and packages:
from collections import Counter
from PIL import Image
from selenium import webdriver
import time
from selenium.webdriver.common.action_chains import ActionChains
- First of all, the method is encapsulated by creating a class to facilitate subsequent calls
class JDlogin():
    def __init__(self):#Define function, link login page
        self.driver = driver = webdriver.Chrome()#Start debugging tool
        self.driver.get('https://passport.jd.com/new/login.aspx')#Get the JD landing page
        time.sleep(2)
- After that, the image is acquired through selenium, and then delivered to PIL for image processing
	def get_picture(self):#Get pictures
		#Click "account login" through xpath search button
        self.driver.find_element_by_xpath('.//div[@class="login-tab login-tab-r"]/a').click()
        time.sleep(1)
        #Location account input box
        self.driver.find_element_by_xpath('.//input[@id="loginname"]').send_keys('Your JD Account number')
        time.sleep(1)
        #Location password input box
        self.driver.find_element_by_xpath('.//input[@id="nloginpwd"]').send_keys('Your JD Password')
        time.sleep(1)
        #Locate the login button and click it. The verification code image will be displayed
        self.driver.find_element_by_xpath('.//div[@class="login-btn"]/a').click()
        time.sleep(1)
        #Modify the JS hidden slider and take a screenshot to get the verification code picture, and save it to the current directory, named slice.png (the same is true for the double-layer graph, but the ClassName and xpath need to be changed)
        js = 'document.getElementsByClassName("JDJRV-smallimg")[0].style.display="none"'
        self.driver.execute_script(js)
        slice_path = './slice.png'
        self.driver.find_element_by_xpath('.//div[@class="JDJRV-bigimg"]').screenshot(slice_path)
        time.sleep(1)
        #Restore JS changes after 1 second stop, and return to the original state of the page (or the double-layer diagram)
        js = 'document.getElementsByClassName("JDJRV-smallimg")[0].style.display="block"'
        self.driver.execute_script(js)
Effect after hiding slider: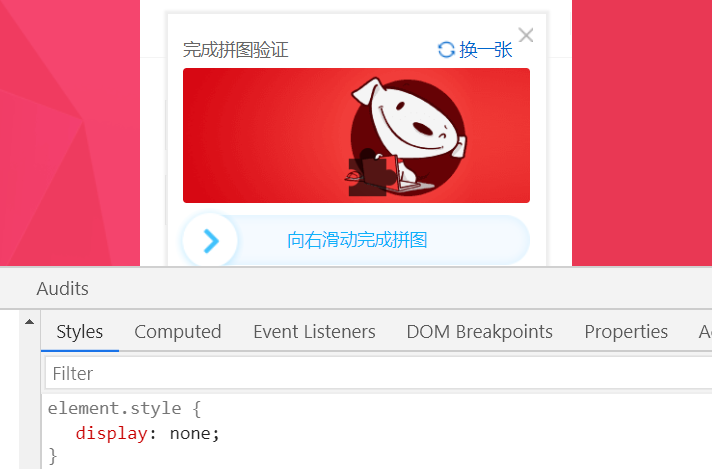
- Process the obtained verification code image (graying, binarization, noise reduction)
The double-layer graph can directly compare two pictures, while the single-layer graph needs to process and then compare itself. This paper is a single-layer graph example
 	def shape(self, w, h, image):  # Binary, change all points to 0 or 255
        tem = 0
        for x in range(w):
            for y in range(h):
                tem += image.getpixel((x, y))
        pixel_ave = tem / w / h * 0.7
        for x in range(w):
            for y in range(h):
                p = image.getpixel((x, y))
                if p < pixel_ave:
                    image.putpixel((x, y), 0)
                else:
                    image.putpixel((x, y), 255)
        return image

    def reducenoise(self, image):#Noise reduction treatment
        w, h = image.size
        for x in range(0, 40):  # Handle leftmost
            for y in range(h):
                image2 = image.putpixel((x, y), 255)
        return image

    def make_picture(self):  # Processing pictures, graying and two value, noise reduction
        im = Image.open('slice.png')
        im2 = im.convert("L")
        w, h = im2.size
        im3 = self.shape(w, h, im2)
        im4 = self.reducenoise(im3)
        return im3
Effect after image processing: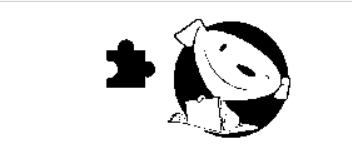
- Calculate the distance from the left edge of the verification image to the left edge of the notch (that is, the drag distance of the slider)
    def get_juli(self, image):  # Calculate distance
        w, h = image.size
        ls = []
        for i in range(31, w - 31):#Place the slider at the left most of the picture, and the notch coordinate x cannot be less than 31
            for j in range(10, h):
                if image.getpixel((i, j)) < 100:
                    count = 0
                    for k in range(i, i + 31):
                        if image.getpixel((k, j)) < 100:
                            count += 1
                        else:
                            break
                    if count > 27: ls.append(i)

        return Counter(ls).most_common(1)[0][0]
- Design drag track (the most difficult point)
We need to design the rules of dragging the slider to simulate human operation, so as to avoid the verification of the computer
When I design, I have a success rate of 1 / 3-1 / 5, but the success rate is different every day, and the machine is also learning. I recommend you to design together, which can be commented at the bottom of this article
    def get_track(self, distance):  # Design drag track
        ls = [1]
        while 1:
            i = ls[-1] * 2
            ls.append(i)
            if sum(ls) > distance * 0.7:
                break

        ls.append(int(distance - sum(ls)))

        return ls
- Execute the instruction of dragging the slider through selenium to realize the verification login
    def drog_btn(self, track):  # Drag slider
    	#Positioning slider
        ele = self.driver.find_element_by_xpath('.//div[@class="JDJRV-slide-inner JDJRV-slide-btn"]')
        #Design drag action chain (click and hold)
        ActionChains(self.driver).click_and_hold(ele).perform()
        #According to the design track, realize the slider drag
        for i in track:
            ActionChains(self.driver).move_by_offset(i, 0).perform()
		#Sleep for 0.25 seconds, disguise the judgment process of adults
        time.sleep(0.25)
        #Release the slider, similar to releasing the mouse
        ActionChains(self.driver).release().perform()
        time.sleep(2)
- Judge whether it is successful or not. If it fails, try again (alas, the verification code is not so easy to crack. JD is also a powerful company. It must be very strong in anti climbing. It always needs experiments.)
    def check(self):#Try again
        self.get_picture()
        image = self.make_picture()
        distance = self.get_juli(image)
        track = self.get_track(distance)
        self.drog_btn(track)
- Execution code:
if __name__ == '__main__':
    login = JDlogin()
    login.get_picture()
    image = login.make_picture()
    distance = login.get_juli(image)
    track = login.get_track(distance)
    login.drog_btn(track)
    time_int = 0
    while time_int < 5:
        input("Need to try again")
        login.driver.refresh()
        login.check()
        time_int += 1
Successfully verified the picture of landing:
Disclaimer: This article is only for technology sharing, pure personal hobby, not engaged in any business behavior and illegal behavior, and also hope that people who learn from it will mainly learn from it and abide by the law. If JD causes any loss, I will not be responsible for it. I just try to be lazy, log in without hands, and don't do any illegal acts. If someone causes your company's loss due to the code in this article, JD is required to find the murderer by itself, which has nothing to do with me ~ O.O