response.sendRedirect() to achieve redirection (page jump)
In some cases, a Servlet class may not be able to do all the work for a client's request. At this point, you can use request redirection to do this.
Request redirection refers to the fact that the Web server may not be able to access the Web resources pointed to by the current request URL due to some restrictions after receiving the client's request. Instead, it specifies a new resource path for the client to re-send the request.
To achieve request redirection, the HttpServletResponse interface defines a sendRedirect() method, which generates 302 response codes and Location response headers to notify clients to re-access the URL specified in the Location response header. The complete syntax of the sendRedirect() method is as follows:
public void sendRedirect(java.lang.String location) throws java.io.IOException
 In the above method code, the parameter location can use relative URLs, and the Web server automatically translates the relative URLs into absolute URLs and regenerates them into Location header fields.

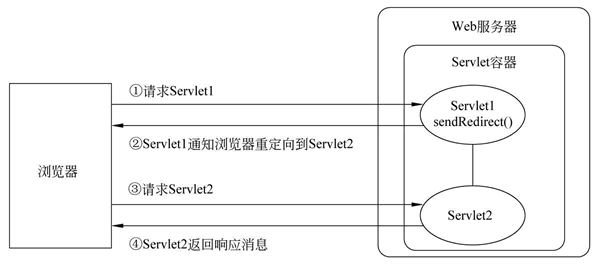
The sendRedirect() method works as shown in Figure 1.

In Figure 1, when the client accesses Servlet1, because the sendRedirect() method is called in Servlet1 to redirect the request to Servlet2, the browser immediately sends the request to Servlet2 after receiving the response message from Servlet1. After the request is processed by Servlet2, the response message is sent back to the client Liu. View and display.
The use of sendRedirect() method is explained step by step through a user login case.
1) Create page files
Create a login.html page for user login and welcome.html page for successful login under the WebContent directory of the servletDemo02 project, as shown below after editing.
login.html file
<!DOCTYPE HTML>
<html>
<head>
<meta charset="UTF-8">
<title>User login</title>
</head>
<body>
    <!-- Submit form content to servletDemo02 Under engineering LoginServlet -->
    <form action="/servletDemo02/LoginServlet" method="POST">
        //User name: <input type="text" name="username"><br/>
        //Cipher & nbsp; & nbsp; & nbsp; code: < input type = "password" name = "password"/> < br />
        <br/>
        <input type="submit" value="Sign in"/>
    </form>
</body>
</html>
welcome.html file
<!DOCTYPE HTML>
<html>
<head>
<meta charset="UTF-8">
<title>Welcome page</title>
</head>
<body>
    //Welcome, landing success!
</body>
</html>
2) Create Servlet
Create a Servlet class named LoginServlet in the com.mengma.response package of the servletDemo02 project to process user login requests, as shown below.
package com.mengma.servlet;

import java.io.IOException;

import javax.servlet.ServletException;
import javax.servlet.http.HttpServlet;
import javax.servlet.http.HttpServletRequest;
import javax.servlet.http.HttpServletResponse;

public class LoginServlet extends HttpServlet {

    public void doGet(HttpServletRequest request, HttpServletResponse response)throws ServletException, IOException {
        response.setContentType("text/html;charset=utf-8");
        // Getting username and password by getParameter() method of HttpServletRequest object
        String username = request.getParameter("username");
        String password = request.getParameter("password");
        // Assume that the user name and password are admin and 123456, respectively.
        if ("admin".equals(username) && ("123456").equals(password)) {
            // If the username and password are correct, redirect to welcome.html
            response.sendRedirect("/servletDemo02/welcome.html");
        } else {
            // If the username and password are incorrect, redirect to login.html
            response.sendRedirect("/servletDemo02/login.html");
        }
    }

    public void doPost(HttpServletRequest request, HttpServletResponse response)throws ServletException, IOException {
        doGet(request, response);
    }
}
In the above code, the user name and password are obtained by getParameter() method, and then the user name and password entered in the form are judged to be the specified "admin" and "123456". If so, the request is redirected to welcome.html page, otherwise redirected to login.html page.
3) Run the project and view the results
Start the Tomcat server and enter the address http://localhost:8080/servletDemo02/login.html in the browser's address bar to access login.html. The browser's display results are shown in Figure 2.
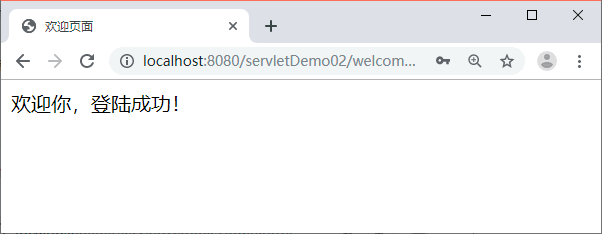
Fill in the user name "admin" and password "123456" in the interface shown in Figure 2, and click the "Log in" button. The browser's display results are shown in Figure 3.
As you can see from Figure 3, when the user name and password are entered correctly, the browser jumps to the welcome.html page. However, if the user name or password is entered incorrectly, it will jump to the login page shown in Figure 2.