catalogue
Related concepts of monitoring mechanism
2, Listen to the lifecycle of domain objects
1. Create a listener and implement the listener interface
3. Start the project and view the servletContext object creation information
4. Close the project and view the destruction information of ServletContext object
6. Set listening timeout information
7. Restart the project and view the results
III Listening for property changes of domain objects
1. Load the JDBC driver of the corresponding database and initialize it
2. Establish a Connection between JDBC and database
3. Create a Statement or PreparedStatement interface to execute SQL statements
4. Use Statement Execute SQL Statement
5. Operate ResultSet result set
6. Close the connection and release resources
2. Create the project environment and import the database driver
1, Listener introduction
Listener introduction
What is a listener
Listeners in Java Web are used to listen to common web objects HttpServletRequest, httpsession and ServletContext
Function of listener
1. Listen for the creation and destruction of web objects
2. Listen for attribute changes of web objects
3. Listen for session binding javaBean operations
Related concepts of monitoring mechanism
1. Event - one thing
2. Event source - the source of this event
3. Register listening - bind the listener to the event. When the event occurs, the listener can know and handle it.
4. Listener - an object that handles and listens to something
Introduction to web listener
1. Introduction to Java Web listener
1. Listener that listens to the creation and destruction of web objects
1.ServletContextListener
2.HttpSessionListener
3.ServletRequestListener
2. Listen for web object attribute changes
1.ServletContextAttributeListener
2.HttpSessionAttributeListener
3.ServletRequestAttributeListener
3. Listen to session binding javaBean
1.HttpSessionBindingListener
2.HttpSessionActivationListener
2. Steps for creating Java Web listener
1. Create a class to implement the specified listener interface
2. Rewrite the methods in the interface
3. Configure listening in the web.xml file
3. Demonstrate the creation and destruction of listening objects
1. Creation and destruction of ServletContext object
Creation and destruction analysis of ServletContext object: the ServletContext object is created when the server is turned on. Destroy on server shutdown.
2. Creation and destruction of httpsession object
1. Creation and destruction analysis of httpsession object:
1.session object creation: it depends on whether there is jsessinid in the request. If so, an existing session object may be obtained. If not, a new session object will be created
2. Destroy session:
1. The default timeout is 30 minutes
2. Shut down the server
3.invalidate() method
4. Setmaxinactivitinterval (int interval) timeout can be set
4. Creation and destruction of HttpServletRequest object
1. Creation and destruction analysis of HttpServletRequest object: the request object is created when the request is sent and destroyed when the response is generated
5. Monitoring steps:
1. Create a class to implement the specified listener interface
2. Rewrite the methods in the interface
3. Register the listener in the web.xml file.
2, Listen to the lifecycle of domain objects
To listen to the life cycle of Servlet domain objects, you need to implement 3.ServletContextListener,HttpSessionLister and ServletRequestListener interfaces corresponding to the domain
Implementation steps
1. Create a listener and implement the listener interface
package cn.itcast.chapter08.listener;
import javax.servlet.*;
import javax.servlet.http.*;
public class MyListener implements
     ServletContextListener, HttpSessionListener,ServletRequestListener {
	public void contextInitialized(ServletContextEvent arg0) {
		System.out.println("ServletContext Object was created");
	}
	public void contextDestroyed(ServletContextEvent arg0) {
		System.out.println("ServletContext The object was destroyed");
	}
	public void requestInitialized(ServletRequestEvent arg0) {
		System.out.println("ServletRequest Object was created");
	}
	public void requestDestroyed(ServletRequestEvent arg0) {
		System.out.println("ServletRequest The object was destroyed");
	}
	public void sessionCreated(HttpSessionEvent arg0) {
		System.out.println("HttpSession Object was created");
	}
	public void sessionDestroyed(HttpSessionEvent arg0) {
		System.out.println("HttpSession The object was destroyed");
	}
}
2. Add listener information

A complete Servlet event Listener includes Listener class and < Listener > configuration information, while multiple listeners can be configured in a web.xml. Multiple listeners of the same type can also be configured. When triggered, the server will execute the corresponding methods of each Listener in sequence.
3. Start the project and view the servletContext object creation information

4. Close the project and view the destruction information of ServletContext object

5. Create test page
View the running effect of httpsessionlister and ServletRequestListener listeners, and create myjsp.jsp
<%@ page language="java" contentType="text/html; charset=utf-8"
    pageEncoding="utf-8"%>
<html>
<head>
<title>this is MyJsp.jsp page</title>
</head>
<body>
    This is a test listener page
</body>
</html>
6. Set listening timeout information

The timeout specified by the < session timeout > tag must be an integer. If this integer is 0 or negative, the session will never timeout; If this number is a positive integer, the session in the project will time out after the specified minutes.
7. Restart the project and view the results
 zai
zai
Refresh again
When you visit the myjsp.jsp page again, the information about the creation and destruction of the ServletRequest object will be output again in the console window, but a new HttpSession object will not be created. This is because the Web container will create a new ServletRequest object for each access request, and no new HttpSession object will be created for subsequent accesses of the same browser during the session.
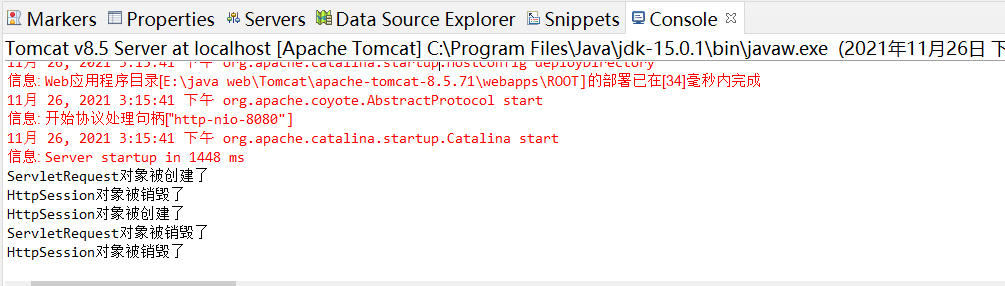
The HttpSession object was destroyed, and the Web server called the sessionDestroyed() method of the listener object.
III Listening for property changes of domain objects
Implementation steps
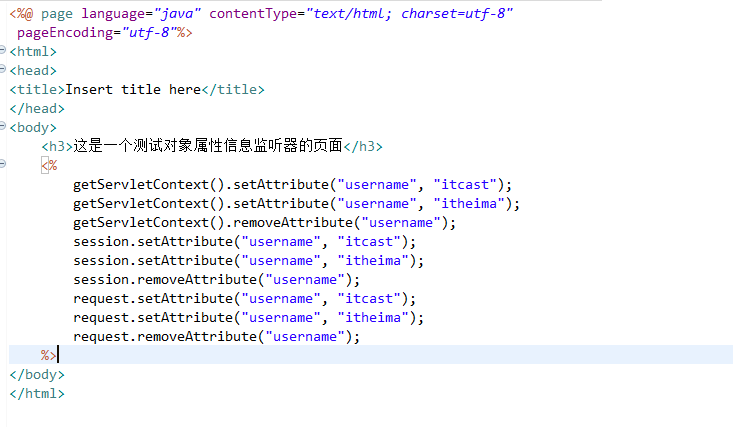
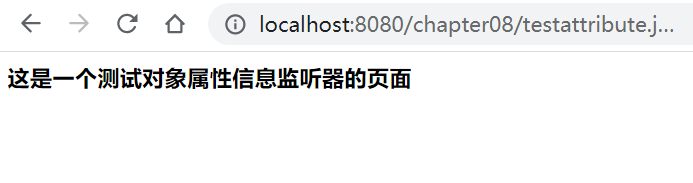
1. Create test page
Observe the role of object attribute listeners in each object domain
2. Create listener
Implement all methods of the interface
package cn.itcast.chapter08.listener;
import javax.servlet.*;
import javax.servlet.http.*;
public class MyAttributeListener implements ServletContextAttributeListener,
		HttpSessionAttributeListener, ServletRequestAttributeListener {
	public void attributeAdded(ServletContextAttributeEvent sae) {
		String name = sae.getName();
		System.out.println("ServletContext Add attribute:" + name + "="
				+ sae.getServletContext().getAttribute(name));
	}
	public void attributeRemoved(ServletContextAttributeEvent sae) {
		String name = sae.getName();
		System.out.println("ServletContext Remove Attribute : " + name);
	}
	public void attributeReplaced(ServletContextAttributeEvent sae) {
		String name = sae.getName();
		System.out.println("ServletContext Replace attribute:" + name + "="
				+ sae.getServletContext().getAttribute(name));
	}
	public void attributeAdded(HttpSessionBindingEvent hbe) {
		String name = hbe.getName();
		System.out.println("HttpSession Add attribute:" + name + "="
				+ hbe.getSession().getAttribute(name));
	}
	public void attributeRemoved(HttpSessionBindingEvent hbe) {
		String name = hbe.getName();
		System.out.println("HttpSession Remove Attribute : " + name);
	}
	public void attributeReplaced(HttpSessionBindingEvent hbe) {
		String name = hbe.getName();
		System.out.println("HttpSession Replace attribute:" + name + "="
				+ hbe.getSession().getAttribute(name));
	}
	public void attributeAdded(ServletRequestAttributeEvent sra) {
		String name = sra.getName();
		System.out.println("ServletRequest Add attribute:" + name + "="
				+ sra.getServletRequest().getAttribute(name));
	}
	public void attributeRemoved(ServletRequestAttributeEvent sra) {
		String name = sra.getName();
		System.out.println("ServletRequest Remove Attribute : " + name);
	}
	public void attributeReplaced(ServletRequestAttributeEvent sra) {
		String name = sra.getName();
		System.out.println("ServletRequest Replace attribute:" + name + "="
				+ sra.getServletRequest().getAttribute(name));
	}
}
3. Add listening information

4. Start the project and view the results
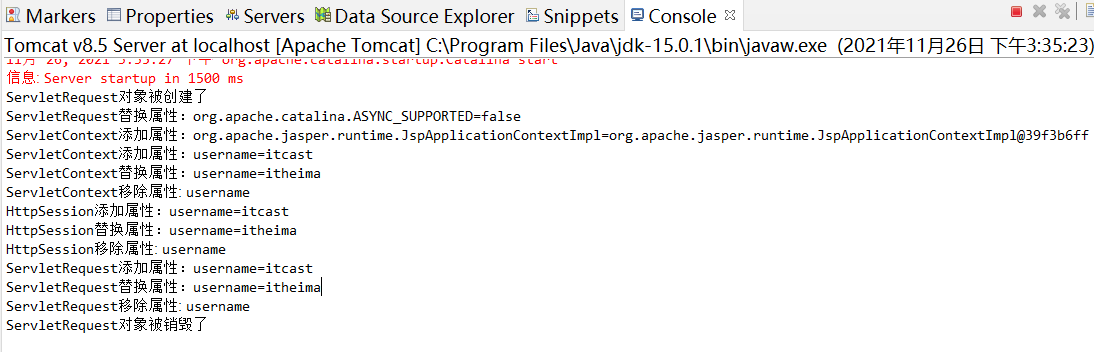
As you can see, in ServletContext, HttpSession and ServletRequest In 3 domain objects
The operations of adding, replacing and deleting the username attribute value are completed respectively.
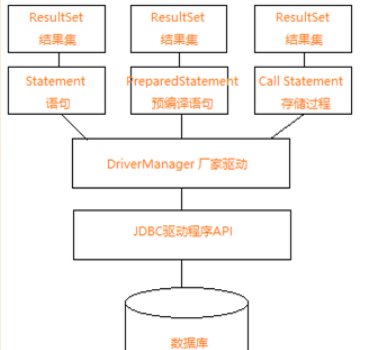
4, JDBC
1. What is JDBC
The full name of JDBC is java database connection (Java) Database Connectivity), which is a set of Java for executing SQL statements API. The application program can connect to the relational database through this set of APIs, and use SQL statements to complete the operations of querying, updating, adding and deleting the data in the database.
2.JDBC programming steps
1. Load the JDBC driver of the corresponding database and initialize it
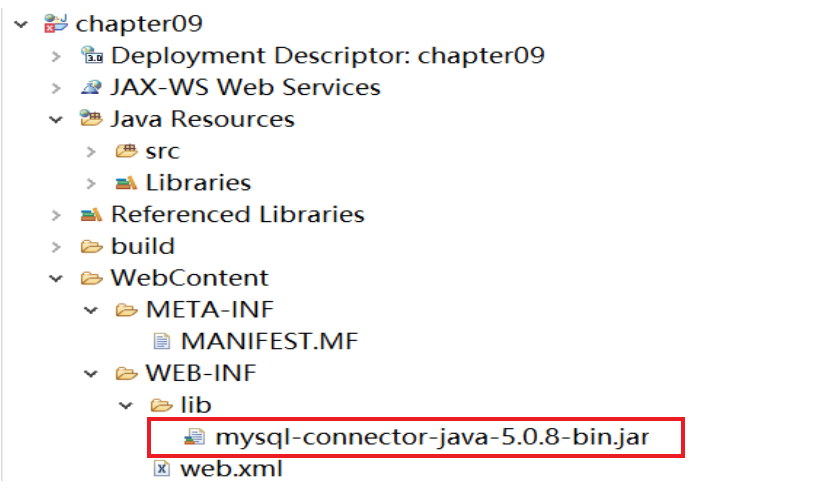
- Import special jar packages (different databases need different jar packages)
Access to MySQL database requires third-party classes, which are compressed in a. Jar file. The mysql-connector-java-5.0.8-bin.jar package can be downloaded from the Internet or found in the MySQL installation directory. Usually, after downloading the jar package, put it in the lib directory of the project
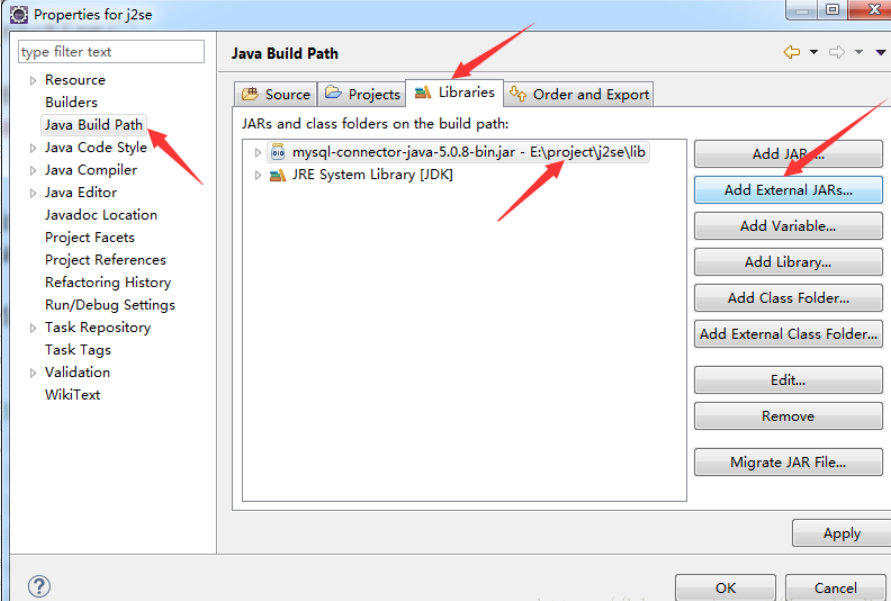
Package guide steps: right click Project - > Property - > java build path - > Libaries - > add external jars
If the package import operation in the above steps is not completed, ClassNotFoundException will be thrown later
- Initialization drive
Initialize the driver class com.mysql.jdbc.Driver, which is in mysql-connector-java-5.0.8-bin.jar. If you use oracle database, the driver class will be different.
Note: Class.forName needs to capture ClassNotFoundException
try {
        Class.forName("com.mysql.jdbc.Driver");
        } catch (ClassNotFoundException e) {
            e.printStackTrace();
}
Class.forName loads this class into the JVM. When loading, it will execute the static initialization block to complete the initialization of the driver.
2. Establish a Connection between JDBC and database
Here, you need to provide the IP address of the database server: 127.0.0.1 (this is the local computer. If you connect to the database on other computers, you need to fill in the corresponding IP address)
Database port number: 3306 (mysql dedicated port number)
Database name test (fill in according to the name in your own database)
Coding method UTF-8
Account root
Password root (if you do not use the default account and password when creating the database, please fill in your own account and password)
Connection c = DriverManager.getConnection("jdbc:mysql://127.0.0.1:3306/test?characterEncoding=UTF-8", "root", "root");
//(string url,string user,string pwd)
//jdbc:mysql://hostname:port/databasename
//(hostname can be localhost or 127.0.0.1)
Connection is an interface to connect and return calls to a specific database. It needs to import packets when it is used, and it must be closed at the end of the program. The getConnection method also needs to catch SQLException.
	public static void main(String[] args) throws SQLException {
		Connection conn = null;
		PreparedStatement  preStmt = null;
			try {
	             // Load database driver
				Class.forName("com.mysql.jdbc.Driver");
				String url = "jdbc:mysql://localhost:3306/jdbc";
				String username = "root";
				String password = "root";
            } catch (ClassNotFoundException e) {
				e.printStackTrace();

			} catch (SQLException e) {
				e.printStackTrace();
			}
					conn = null;
	}
3. Create a Statement or PreparedStatement interface to execute SQL statements
- Using the Statement interface
Obtain the Statement object through the Connection object. There are three ways to create a Statement through the Connection object.
- createStatement(): creates a basic Statement object.
- prepareStatement(): Create a PreparedStatement object.
- prepareCall(): creates a CallableStatement object.
Basic Statement
statement stmt=conn.createStatement();
After the Statement interface is created, you can execute SQL statements to complete the addition, deletion, modification and query of the database. Among them, addition, deletion and modification can be completed only by changing the content of SQL Statement, but the query is slightly complex. String splicing is used in the Statement, which has the disadvantages of complex syntax and easy to make mistakes. The details are introduced in the comparison below. Therefore, the Statement is rarely used in the actual process, so the detailed code is given in the PreparedStatement.
String splicing SQL statements are very cumbersome. There are many mixed single quotation marks and double quotation marks in the middle, which is very error prone.
Statement s = conn.createStatement();
// Prepare sql statements
// Note: use single quotation marks for string '
String sql = "insert into t_courses values(null,"+"'mathematics')";
//There are many problems in using string splicing in statement
s.execute(sql);
System.out.println("Insert statement executed successfully");
- Using the PreparedStatement interface
Like statements, preparedstatements are also used to execute sql statements. Unlike creating statements, preparedstatements need to be created based on sql statements. In addition, you can also specify the corresponding value by setting parameters, instead of using string splicing like Statement.
be careful:
When using PreparedStatement, its SQL statement no longer adopts string splicing, but adopts placeholder. The "?" here serves as a placeholder. This method not only avoids the tedious task of splicing strings in statement, but also improves performance. Every time the SQL statement is the same, the java class will not be compiled again, which can significantly improve performance.
String sql = "update t_course set course_name =? where course_id=?";
Statement s = conn.createStatement();
// Prepare sql statements
// Note: use single quotation marks for string '
String sql = "INSERT INTO users(name,password,email,birthday)"
						+ "VALUES(?,?,?,?)";
//There are many problems in using string splicing in statement
s.execute(sql);
System.out.println("Insert statement executed successfully");
Later, you need to use the set method of pstmt created by the PreparedStatement interface to assign a value to the placeholder. Note that the parameter index here starts with 1.
preStmt = conn.prepareStatement(sql);
				preStmt.setString(1, "zl");
				preStmt.setString(2, "123456");
				preStmt.setString(3, "zl@sina.com");
				preStmt.setString(4, "1789-12-23");
				preStmt.executeUpdate();
pstmt.executeUpdate() is used for addition, deletion and modification; Statement to commit SQL statements
4. Use Statement Execute SQL Statement
All statements There are three methods to execute SQL statements.
- execute(): any SQL statement can be executed.
- executeQuery(): usually execute a query statement and return the ResultSet object representing the result set after execution.
- executeUpdate(): mainly used to execute DML and DDL statements. Execute DML statements, such as During INSERT, UPDATE or DELETE, the number of rows affected by SQL statement is returned, and 0 is returned when executing DDL statement.
with The executeQuery() method is used as an example as follows.
//Execute the SQL statement to get the result set
ResultSetResultSet rs = stmt.executeQuery (sql);
5. Operate ResultSet result set
If the executed SQL statement is a query statement, the execution result will return a ResultSet object with
The result of the SQL statement query. The program can retrieve the query results by operating the ResultSet object.
6. Close the connection and release resources
After each database operation, close the database connection and release resources, including closing ResultSet and Statement
And Connection.
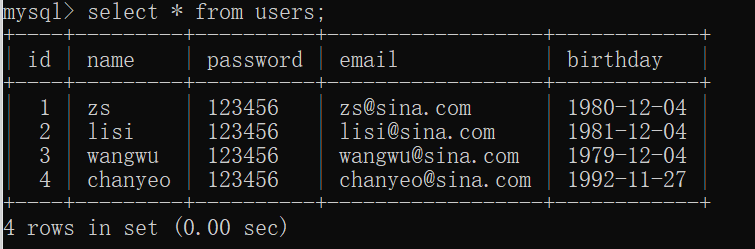
So far, the general implementation steps of JDBC program have been explained. Next, follow the steps explained above to demonstrate
Use of JDBC. The program reads data from the users table and prints the results on the console,
Specific steps
1. Build database environment
Create a database named jdbc in MySQL, and then create a users table in the database
The SQL statements for databases and tables are as follows.
CREATE DATABASE jdbc;
USE jdbc;
CREATE TABLE users (
        id INT PRIMARY KEY AUTO INCREMENT,name VARCHAR(40),
        password VARCHAR(40),
        email VARCHAR(60),
        birthday DATE
)CHARACTER SET utf8 COLLATE utf8_general_ci;
After the database and table are created successfully, insert three pieces of data into the users table. The inserted SQL statements are as follows.
INSERT INTO users (NAME,PASSWORD, email,birthday)VALUES('zs','123456', 'zs0sina.com', '1980-12-04');
INSERT INTO users(NAME,PASSWORD,email,birthday)
VALUES('lisi', '123456', 'lisi0sina.com','1981-12-04');INSERT INTO users (NAME,PASSWORD,email,birthday)
VALUES('wangwu','123456', 'wangwu@sina.com','1979-12-04'); 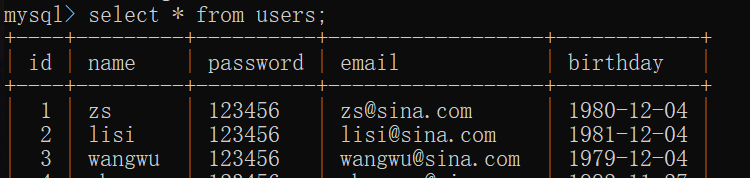
2. Create the project environment and import the database driver
Import the downloaded MySQL database driver file
3. Write JDBC program
Create Example01 to read the users table in the database and output the results to the console
package cn.itcast.jdbc.example;
import java.sql.Connection;
import java.sql.DriverManager;
import java.sql.ResultSet;
import java.sql.SQLException;
import java.sql.Statement;
import java.sql.Date;
public class Example01 {
	public static void main(String[] args) throws SQLException {
		Statement stmt = null;
		ResultSet rs = null;
		Connection conn = null;
		try {
			// 1. Driver of registration database
			Class.forName("com.mysql.jdbc.Driver");
			// 2. Get database connection through DriverManager
			String url = "jdbc:mysql://localhost:3306/jdbc";
			String username = "root";
			String password = "root";
			conn = DriverManager.getConnection (url, username,
		     			password);
			// 3. Obtain the Statement object through the Connection object
			 stmt = conn.createStatement();
			// 4. Use Statement to execute SQL Statement.
			String sql = "select * from users";
			rs = stmt.executeQuery(sql);
			// 5. Operate ResultSet result set
			System.out.println("id | name   | password | email  | birthday");
			while (rs.next()) {
				int id = rs.getInt("id"); // Gets the value of the specified field from the column name
				String name = rs.getString("name");
				String psw = rs.getString("password");
				String email = rs.getString("email");
				Date birthday = rs.getDate("birthday");
				System.out.println(id + " | " + name + " | " + psw + " | " + email
							+ " | " + birthday);
			}
		} catch (ClassNotFoundException e) {
			e.printStackTrace();
		} finally{
			// 6. Recycle database resources
			if(rs!=null) {
				try {
					rs.close();
				} catch (SQLException e) {
					e.printStackTrace();
				}
				rs = null;
			}
			if(stmt!=null) {
				try {
					stmt.close();
				} catch (SQLException e) {
					e.printStackTrace();
				}
				stmt = null;
			}
			if(conn!=null) {
				try {
					conn.close();
				} catch (SQLException e) {
					e.printStackTrace();
				}
				conn = null;
			}
		}
	}
}
First register the MySQL database driver, obtain a Connection object through the DriverManager, and then create a Statement object using the Connection object. The Statement object executes SQL statements through the executeQuery() method and returns the result set ResultSet. Next, the final query result is obtained by traversing the ResultSet. Finally, the Connection is closed and the database resources are recycled.
After the program is executed successfully, the print result of the console is shown in the figure

be careful:
- Register driver
Although use DriverManager.registerDriver(new com.mysql.jdbc.Driver()) method can also complete the annotation
But this method will cause the database Driver to be registered twice. This is because the source code of the Driver class has been completed in the static code block
Database driven registration. Therefore, in order to avoid repeated registration of database drivers, you only need to use Class.forName() in the program
Method to load the driver class.
Because database resources are very valuable and the number of concurrent access connections allowed by the database is limited, when database resources are used
- Release resources
After that, be sure to release resources. In order to ensure the release of resources, in Java programs, the final operations that must be performed should be placed in finally In a code block.
Create the class of Example02, use the PreparedStatement object in the class to insert data into the database, and store the precompiled information in the PreparedStatement object to improve the efficiency of data access
package cn.itcast.jdbc.example;
import java.sql.Connection;
import java.sql.DriverManager;
import java.sql.PreparedStatement ;
import java.sql.SQLException;
public class Example02 {
	public static void main(String[] args) throws SQLException {
		Connection conn = null;
		PreparedStatement  preStmt = null;
			try {
	             // Load database driver
				Class.forName("com.mysql.jdbc.Driver");
				String url = "jdbc:mysql://localhost:3306/jdbc";
				String username = "root";
				String password = "root";
	             // Create a Connection object for the application to connect to the database
				conn = DriverManager.getConnection(url, username, password);
				// Executed SQL statement
				String sql = "INSERT INTO users(name,password,email,birthday)"
						+ "VALUES(?,?,?,?)";
	             // Create a PreparedStatement object that executes SQL statements
				preStmt = conn.prepareStatement(sql);
				preStmt.setString(1, "zl");
				preStmt.setString(2, "123456");
				preStmt.setString(3, "zl@sina.com");
				preStmt.setString(4, "1789-12-23");
				preStmt.executeUpdate();
			} catch (ClassNotFoundException e) {
				e.printStackTrace();
			} finally {    // Release resources
				if (preStmt != null) {
					try {
						preStmt.close();
					} catch (SQLException e) {
						e.printStackTrace();
					}
					preStmt = null;
				}
				if (conn != null) {
					try {
						conn.close();
					} catch (SQLException e) {
						e.printStackTrace();
					}
					conn = null;
				}
			}
		}
	}
First, the PreparedStatement object is generated through the prepareStatement() method of the Connection object, then the setXxx() method of the PreparedStatement object is invoked, and the parameters in the SQL statement are assigned. Finally, the SQL statement is executed by adjusting the executeUpdate() method.
After the file runs successfully, a piece of data will be inserted into the users table. Enter the MySQL database and use the SELECT sentence to view the users table. The query results are shown in 9-5.