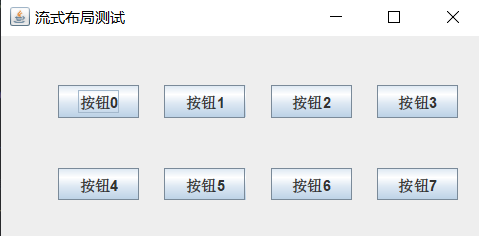
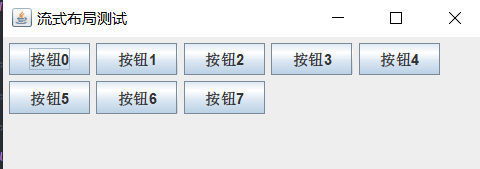
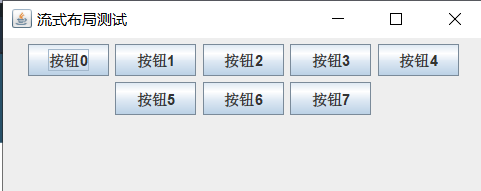
FlowLayout layout manager
Layout features
- Locate the components line by line, from left to right in the line, and wrap when one line is full.
- The default alignment is centered.
- Without changing the size of the component, the component is displayed according to the original size of the component.
- FlowLayout is the default layout manager for the Panel class.
explain
Different component spacing can be set in the construction method, and the line spacing is the alignment.
-
JPanel panel=new JPanel(new FlowLayout(FlowLayout.RIGHT,20,40));
Right aligned, horizontal spacing between components is 20 pixels, and numerical spacing is 40 pixels
-
JPanel panel=new JPanel(new FlowLayout(FlowLayout.LEFT));
Left aligned, horizontal and vertical spacing is the default (default) 5
-
JPanel panel=new JPanel(new FlowLayout());
The default mode is centered alignment, and the horizontal and vertical spacing values are the default value of 5
Code display
import javax.swing.*;
import java.awt.*;

public class TestFlowLayout extends JFrame {
    /**First define 8 buttons to test*/
    JButton[] jButtons=new JButton[8];
    /**There are many methods to define layout, and the most common method is shown here*/
    JPanel panel=new JPanel(new FlowLayout());
    public TestFlowLayout(){
        for (int i=0;i<jButtons.length;i++){
            jButtons[i]=new JButton("Button"+i);
            panel.add(jButtons[i]);
        }
        this.add(panel);
        this.setTitle("Streaming layout test");
        this.setSize(400,300);
        this.setDefaultCloseOperation(WindowConstants.EXIT_ON_CLOSE);
        this.setVisible(true);
        }
       public static void main(String[] args){
        new TestFlowLayout();
       }
    }
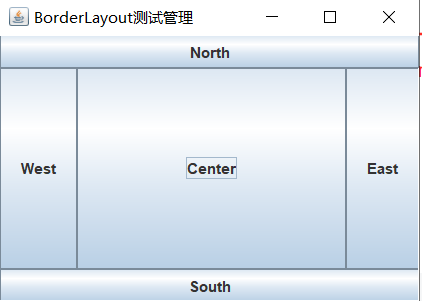
BorderLayout layout manager
Layout features
- BorderLayout divides the whole container layout into five areas: Southeast, northwest, middle and middle. Component intelligence is added to the specified area.
- If the adding part is not specified, it will be added to the Center area by default.
- Only one can be added to each area. If more than one is added, the previous components will be abandoned.
- BorderLayout is the default layout manager for the Frame class.
explain
Code display
import javax.swing.*;
import java.awt.*;

public class TestBorderLayout {

    public static void main(String[] args) {
        JFrame jf = new JFrame("BorderLayout Test management");
        jf.setSize(350, 250);
        jf.setDefaultCloseOperation(WindowConstants.EXIT_ON_CLOSE);
        // Create a content container and specify a boundary layout to use
        JPanel panel = new JPanel(new java.awt.BorderLayout());
        JButton btnN = new JButton("North");
        JButton btnS = new JButton("South");
        JButton btnW = new JButton("West");
        JButton btnE = new JButton("East");
        JButton btnC = new JButton("Center");
        // Add the 5 buttons to the 5 directions in the container. Note that the following must be capitalized
        panel.add(btnN, java.awt.BorderLayout.NORTH);
        panel.add(btnS, java.awt.BorderLayout.SOUTH);
        panel.add(btnW, java.awt.BorderLayout.WEST);
        panel.add(btnE, java.awt.BorderLayout.EAST);
        panel.add(btnC, java.awt.BorderLayout.CENTER);
        jf.setContentPane(panel);
        jf.setLocationRelativeTo(null);
        jf.setVisible(true);
    }

}
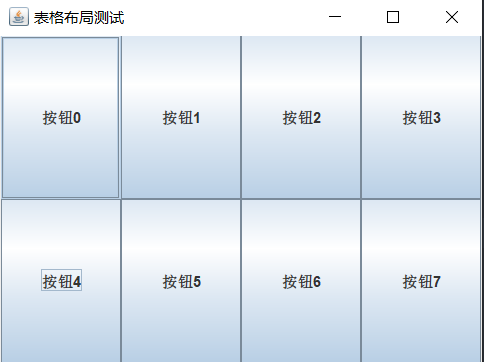
GridLayout layout manager
Layout features
- The GridLayout layout manager divides the layout into regular rectangular networks, and each cell area is the same size.
- The component is added to each cell. Fill a row from left to right and wrap it from top to bottom.
- Specify the number of rows and columns to split in the GridLayout constructor.
explain
Code display
import javax.swing.*;
import java.awt.*;

public class TestGridLayout extends JFrame {
    /**First define 8 buttons to test*/
    JButton[] jButtons=new JButton[8];
    /**There are many methods to define layout, and the most common method is shown here*/
    JPanel panel=new JPanel(new GridLayout(2,4));
    public TestGridLayout(){
        for (int i=0;i<jButtons.length;i++){
            jButtons[i]=new JButton("Button"+i);
            panel.add(jButtons[i]);
        }
        this.add(panel);
        this.setTitle("Table layout test");
        this.setSize(400,300);
        this.setDefaultCloseOperation(WindowConstants.EXIT_ON_CLOSE);
        this.setVisible(true);
    }
    public static void main(String[] args){
        new TestGridLayout();
    }
}
Other layout management instructions
| Layout name | explain | be careful |
|---|---|---|
| CardLayout | It can help users deal with two or more members sharing the same display space, just like a stack of cards stacked together. | Only one component can be displayed in a card, so you can use container nesting to display multiple components |
| GridBagLayout | The most flexible and complex layout manager, the space occupied by each component can be different and flexibly specified | |
| Absolute layout | technological process:
| |
Other layout code examples
CardLayout code
import javax.swing.*;
import java.awt.*;
import java.awt.event.ActionEvent;
import java.awt.event.ActionListener;
public class TestCardLayout {
    public static void main(String[] args) {
        JFrame jf = new JFrame("Card layout");
        jf.setDefaultCloseOperation(WindowConstants.EXIT_ON_CLOSE);
        jf.setSize(300, 200);
        // Create a card layout with 10 horizontal and vertical spaces between cards
        final java.awt.CardLayout layout = new java.awt.CardLayout(10, 10);
        // Create a content panel container and specify a layout manager
        final JPanel panel = new JPanel(layout);
        JButton btn01 = new JButton("ha-ha");
        JButton btn02 = new JButton("hey");
        JButton btn03 = new JButton("Hoo hoo");
        panel.add(btn01, "btn01");
        panel.add(btn02, "btn02");
        panel.add(btn03, "btn03");
        // Show second first
        layout.show(panel, "btn02");
        jf.setContentPane(panel);
        jf.setLocationRelativeTo(null);
        jf.setVisible(true);
        // Switch to display the next one every 2 seconds
        new Timer(2000, new ActionListener() {
            @Override
            public void actionPerformed(ActionEvent e) {
                layout.next(panel);
            }
        }).start();
    }

}
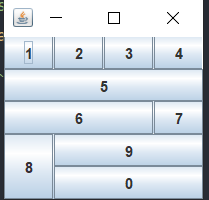
GridBagLayout layout code
import javax.swing.*;
import java.awt.*;

public class GridBagLayout {

    public static void main(String[] args) {
        JFrame jf = new JFrame("Test window");
        jf.setDefaultCloseOperation(WindowConstants.EXIT_ON_CLOSE);
        java.awt.GridBagLayout gridBag = new java.awt.GridBagLayout();
        GridBagConstraints c = null;                    // constraint
        JPanel panel = new JPanel(gridBag);
        JButton btn01 = new JButton("1");
        JButton btn02 = new JButton("2");
        JButton btn03 = new JButton("3");
        JButton btn04 = new JButton("4");
        JButton btn05 = new JButton("5");
        JButton btn06 = new JButton("6");
        JButton btn07 = new JButton("7");
        JButton btn08 = new JButton("8");
        JButton btn09 = new JButton("9");
        JButton btn10 = new JButton("0");
        /* Add components and constraints to layout manager */
        // Button01
        c = new GridBagConstraints();
        gridBag.addLayoutComponent(btn01, c); // Only a copy of c is used internally
        // Button02
        c = new GridBagConstraints();
        gridBag.addLayoutComponent(btn02, c);
        // Button03
        c = new GridBagConstraints();
        gridBag.addLayoutComponent(btn03, c);
        // Button04 the display area occupies the remaining space of the current line (line feed), and the component fills the display area
        c = new GridBagConstraints();
        c.gridwidth = GridBagConstraints.REMAINDER;
        c.fill = GridBagConstraints.BOTH;
        gridBag.addLayoutComponent(btn04, c);
        // Button05 the display area has only one line (line feed), and the component fills the display area
        c = new GridBagConstraints();
        c.gridwidth = GridBagConstraints.REMAINDER;
        c.fill = GridBagConstraints.BOTH;
        gridBag.addLayoutComponent(btn05, c);
        // The Button06 display area occupies the second cell of the current component (manual line wrapping is required after the next component), and the component fills the display area
        c = new GridBagConstraints();
        c.gridwidth = GridBagConstraints.RELATIVE;
        c.fill = GridBagConstraints.BOTH;
        gridBag.addLayoutComponent(btn06, c);
        // Button07 is placed in the last cell of the current row (line feed)
        c = new GridBagConstraints();
        c.gridwidth = GridBagConstraints.REMAINDER;
        gridBag.addLayoutComponent(btn07, c);
        // The Button08 display area occupies two columns, and the component fills the display area
        c = new GridBagConstraints();
        c.gridheight = 2;
        c.fill = GridBagConstraints.BOTH;
        gridBag.addLayoutComponent(btn08, c);
        // The Button09 display area occupies the remaining space of the current line (line feed), and the component fills the display area
        c = new GridBagConstraints();
        c.gridwidth = GridBagConstraints.REMAINDER;
        c.fill = GridBagConstraints.BOTH;
        gridBag.addLayoutComponent(btn09, c);
        // The Button10 display area occupies the remaining space of the current line (line feed), and the component fills the display area
        c = new GridBagConstraints();
        c.gridwidth = GridBagConstraints.REMAINDER;
        c.fill = GridBagConstraints.BOTH;
        gridBag.addLayoutComponent(btn10, c);
        /* Add component to content panel */
        panel.add(btn01);
        panel.add(btn02);
        panel.add(btn03);
        panel.add(btn04);
        panel.add(btn05);
        panel.add(btn06);
        panel.add(btn07);
        panel.add(btn08);
        panel.add(btn09);
        panel.add(btn10);
        jf.setContentPane(panel);
        //Auto resize
        jf.pack();
        jf.setLocationRelativeTo(null);
        jf.setVisible(true);
    }

}