DOM of JavaScript
JavaScript mainly includes three parts: ECMAScript, DOM and BOM.
1.1 DOM overview
Through HTML DOM, all elements of HTML documents are accessed using JavaScript.
When a web page is loaded, the browser creates a Document Object Model for the page.
The HTML DOM model is constructed as a tree of objects: 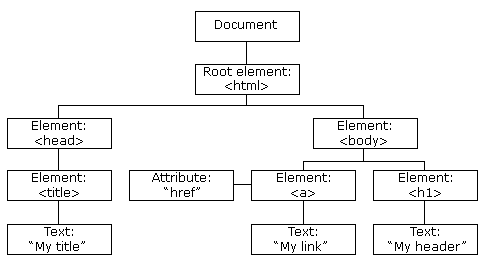
Through the programmable object model, JavaScript has gained enough capability to create dynamic HTML.
- JavaScript can change all HTML elements in a page.
- JavaScript can change all HTML attributes in a page.
- JavaScript can change all CSS styles in a page.
- JavaScript can respond to all events on the page.
1.2 get HTML elements
Usually, through JavaScript, you need to manipulate HTML elements.
To do this, you must first find the element. There are three ways to do this:
- Find HTML elements by id
- Find HTML elements by tag name
- Find HTML elements by class name
4.2.1 id finds HTML elements
The easiest way to find HTML elements in DOM is by using the id of the element.
This example looks for the id= "intro" element:
var x=document.getElementById("intro");
If the element is found, the method returns the element as an object (in x).
If the element is not found, x will contain null.
1.2.2 Label Name Finds HTML Elements
This example finds the element id="main", and then finds all p elements in the element id="main":
var x=document.getElementById("main");
var y=x.getElementsByTagName("p");
Class 1.2.3 Names Find HTML Elements
In this example, the getElementsByClassName function is used to find the element of class= "intro":
var x=document.getElementsByClassName("intro");
1.3 modify HTML
HTML DOM allows JavaScript to change the content of HTML elements.
1.3.1 Change HTML Content
The simplest way to modify HTML content is to use innerHTML attributes.
To change the content of HTML elements, use this grammar:
document.getElementById(id).innerHTML="abcd";
document.getElementById(id).innerText="xxxx";
This example changes the content of the p element:
<html>
    <body>
    <p id="p1">Hello World!</p>
    <script>
    document.getElementById("p1").innerHTML="abcd";
    </script>
    </body>
    </html>
Operation results: 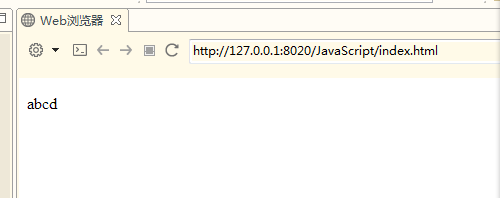
1.3.2 Changing HTML Attributes
To change the attributes of HTML elements, use this grammar:
document.getElementById(id).attribute = new attribute value
This example changes the src attribute of the img element:
    <!DOCTYPE html>
    <html>
    <body>
    <img id="image" src="1.gif">
    <script>
    document.getElementById("image").src="2.jpg";
    </script>
    </body>
    </html>
1.4 modify the CSS style.
Change the HTML style:
To change the style of HTML elements, use this grammar:
document.getElementById(id).style.property = new style
The following example changes the style of the p element:
<!DOCTYPE html>
<html>
<head>
<meta charset="utf-8">
</head>
<body>
<p id="p1">Hello World!</p>
<p id="p2">Hello World!</p>
<script>
document.getElementById("p2").style.color="blue";
document.getElementById("p2").style.fontFamily="Arial";
document.getElementById("p2").style.fontSize="larger";
</script>
<p>The above paragraph is modified by script.</p>
</body>
</html>
The results are as follows: 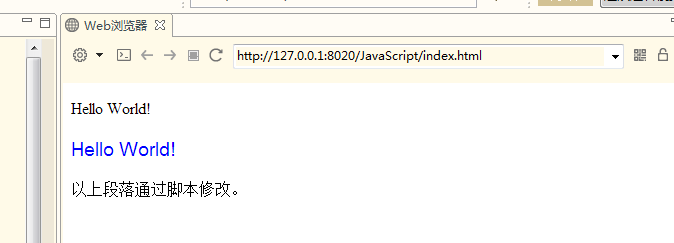
1.5 element operation
1.5.1 Create new elements
To add a new element to the HTML DOM, you must first create the element (element node), and then append the element to an existing element.
<div id="div1">
<p id="p1">This is a paragraph.</p>
<p id="p2">This is another paragraph.</p>
</div>

<script>
var para=document.createElement("p");
var node=document.createTextNode("This is a new paragraph.");
para.appendChild(node);

var element=document.getElementById("div1");
element.appendChild(para);
</script>
Examples show that:
This code creates a new < p > element:

var para=document.createElement("p");

To add text to the < p > element, you must first create a text node. This code creates a text node:

var node=document.createTextNode("This is a new paragraph. "";

Then the text node must be appended to the <p> element:

para.appendChild(node);

Finally, this new element must be added to an existing element.

This code finds an existing element:

var element=document.getElementById("div1");

The following code adds new elements after existing elements:

element.appendChild(para);
1.5.2 Delete existing HTML elements
The following code demonstrates how to delete elements:
    <div id="div1">
    <p id="p1">This is a paragraph.</p>
    <p id="p2">This is another paragraph.</p>
    </div>
    <script>
    var parent=document.getElementById("div1");
    var child=document.getElementById("p1");
    parent.removeChild(child);
    </script>
Examples show that:
This HTML document contains div elements with two child nodes (two p elements):
    <div id="div1">

    <p id="p1"> This is a paragraph. </p>

    <p id="p2"> This is another paragraph. </p>

    </div>
Find the element with id="div1":
var parent=document.getElementById("div1");
Find the P element of id="p1":
var child=document.getElementById("p1");
Delete child elements from parent elements:
parent.removeChild(child);
It would be great if you could delete an element without referring to the parent element. But unfortunately. DOM needs to be clear about the elements you need to delete, as well as its parent elements.
This is a common solution: find the child element you want to delete, and then use its parentNode attribute to find the parent element:
var child=document.getElementById("p1");
child.parentNode.removeChild(child);
1.6 DOM incident
HTML DOM allows us to execute code by triggering events.
For example, the following events:
- The element is clicked.
- Page loading is complete.
- The input box has been modified.
In the following chapters, you will learn more about events.
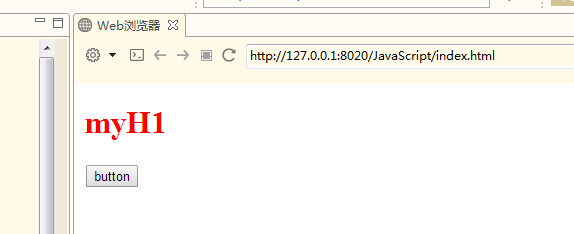
This example changes the style of HTML elements with id="id1", when the user clicks the button:
<!DOCTYPE html>
<html>
<body>

<h1 id="id1">myH1</h1>
<button type="button"
onclick="document.getElementById('id1').style.color='red'">
button</button>

</body>
</html>
Before clicking: 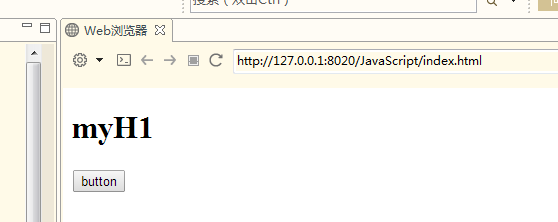
After clicking:
HTML DOM enables JavaScript to respond to HTML events.
Examples of HTML events:
- When the user clicks the mouse
- When the page is loaded
- When the image is loaded
- When the mouse moves over the element
- When the input field is changed
- When submitting an HTML form
- When the user triggers the button
In this case, when the user clicks on the h1 element, the content changes:
    <!DOCTYPE html>
    <html>
    <body>
    <h1 onclick="this.innerHTML='Ooops!'">Click text!</h1>
    </body>
    </html>
This example calls a function from the event handler:
    <!DOCTYPE html>
    <html>
    <head>
    <script>
    function changetext(id)
    {
        id.innerHTML="Ooops!";
    }
    </script>
    </head>
    <body>
    <h1 onclick="changetext(this)">Click text!</h1>
    </body>
    </html>
To assign events to HTML elements, you can use event attributes.
< button onclick = "displayDate ()"> click here </button>
HTML DOM allows you to use JavaScript to assign events to HTML elements:
<script>
document.getElementById("myBtn").onclick=function(){displayDate()};
</script>
Introduction of events
The onload and onunload events are triggered when the user enters or leaves the page.
The onload event can be used to detect the visitor's browser type and version, and load the correct version of the page based on this information.
onload and onunload events can be used to process cookie s.
<body onload="checkCookies()">
onchange events are often used in conjunction with validation of input fields.
Here is an example of how to use onchange. When the user changes the content of the input field, the upperCase() function is called.
<input type="text" id="fname" onchange="upperCase()">
The onmouseover and onmouseout events can be used to trigger functions when the user's mouse moves over an HTML element or moves out an element.
    <!DOCTYPE html>
    <html>
    <head>
    <meta charset="utf-8">
    </head>
    <body>
    <div onmouseover="mOver(this)" onmouseout="mOut(this)" style="background-color:#D94A38;width:120px;height:20px;padding:40px;">Mouse Over Me</div>
    <script>
    function mOver(obj){
        obj.innerHTML="Thank You"
    }
    function mOut(obj){
        obj.innerHTML="Mouse Over Me"
    }
    </script>

    </body>
    </html>
onmousedown, onmouseup and onclick constitute all parts of the mouse click event. The onmousedown event is triggered when the mouse button is clicked, the onmouseup event is triggered when the mouse button is released, and the onclick event is triggered when the mouse click is completed.
    <!DOCTYPE html>
    <html>
    <head>
    <meta charset="utf-8">
    </head>
    <head>
    <script>
    function lighton(){
        document.getElementById('myimage').src="bulbon.gif";
    }
    function lightoff(){
        document.getElementById('myimage').src="bulboff.gif";
    }
    </script>
    </head>

    <body>
    <img id="myimage" onmousedown="lighton()" onmouseup="lightoff()" src="bulboff.gif" width="100" height="180" />
    <p>If you click on the mouse lamp, it will always be on.!</p>
    </body>
    </html>
1.7 EventListener
addEventListener() method
Trigger a listening event when the user clicks a button:
document.getElementById("myBtn").addEventListener("click", displayDate);
The addEventListener() method is used to add event handles to the specified element.
The event handle added by the addEventListener() method does not override the existing event handle.
You can add multiple event handles to an element.
You can add multiple event handles of the same type to the same element, such as two "click" events.
You can add event listeners to any DOM object, not just HTML elements. For example: window object.
The addEventListener() method makes it easier to control events (bubbling and capture).
When you use the addEventListener() method, JavaScript is separated from HTML tags and is more readable. Event listeners can also be added when HTML tags are not controlled.
You can use the removeEventListener() method to remove event listeners.
Syntax:
element.addEventListener(event, function, useCapture);
The first parameter is the type of event (such as "click" or "mousedown"). Remove on
The second parameter is the function that is called after the event is triggered.
The third parameter is a Boolean value to describe whether an event is bubbling or capturing. This parameter is optional.
Note: Do not use the "on" prefix. For example, use "click" instead of "onclick".
"Hello World!" pops up when the user clicks on the element:
element.addEventListener("click", myFunction);

function myFunction() {
    alert ("Hello World!");
}
The addEventListener() method allows multiple events to be added to the same element without overwriting existing events:
element.addEventListener("click", myFunction);
element.addEventListener("click", mySecondFunction);
Event bubbles or event capture?
There are two ways to pass events: bubbling and capturing.

Event passing defines the order in which element events are triggered. If you insert the < p > element into the < div > element and the user clicks on the < p > element, which element's "click" event is triggered first?

In * bubbles * events of internal elements are triggered first and then external elements, i.e. < p > click events of elements are triggered first, and then click events of < div > elements are triggered.

In * capture * events of external elements are triggered first, and then events of internal elements are triggered. That is, click events of < div > elements are triggered first, and then click events of < p > elements are triggered.
The addEventListener() method specifies the "useCapture" parameter to set the delivery type:
addEventListener(event, function, useCapture);
The default value is false, that is, bubbles are passed, and when true, events are passed using capture.
document.getElementById("myDiv").addEventListener("click", myFunction, true);
The removeEventListener() method removes the event handle added by the addEventListener() method:
element.removeEventListener("mousemove", myFunction);
BOM of JavaScript
Browser Object Model (BOM) enables JavaScript to "talk" to browsers.
Browser Object Model (BOM): There is no formal standard yet.
Because modern browsers have (almost) implemented the same methods and attributes for JavaScript interactivity, they are often considered as BOM methods and attributes.
2.1 window
All browsers support Windows objects. It represents the browser window.
All JavaScript global objects, functions, and variables automatically become members of window s objects.
Global variables are attributes of window s objects.
Global functions are the methods of window s objects.
Even the document of HTML DOM is one of the attributes of window objects:
window.document.getElementById("header");
Same as this:
document.getElementById("header");
2.1.1 window size
There are three ways to determine the size of the browser window.
For Internet Explorer, Chrome, Firefox, Opera and Safari:
- window.innerHeight - Internal height of browser windows (excluding scrollbars, menu bars, toolbars)
- window.innerWidth - Internal width of browser windows (excluding scrollbars, menu bars, toolbars)
For Internet Explorer 8, 7, 6, 5:
- document.documentElement.clientHeight
- document.documentElement.clientWidth
perhaps
- document.body.clientHeight
- document.body.clientWidth
Practical JavaScript solutions (covering all browsers):
var w=window.innerWidth||document.documentElement.clientWidth||document.body.clientWidth;
var h=window.innerHeight||document.documentElement.clientHeight||document.body.clientHeight;
2.1.2 window method
- window.open() - Open a new window
- window.close() - Close the current window
2.1.3 Screen
- Available Width: The screen.availWidth attribute returns the width of the visitor's screen, subtracting interface features, such as window taskbar, in pixels.
Returns the available width of your screen:
document.write("Available width: " + screen.availWidth);
The output of the above code is as follows:
Available width: 1920
- Available Height: The screen.availHeight attribute returns the height of the visitor's screen, subtracting interface features, such as window taskbar, in pixels.
Returns the usable height of your screen:
document.write("Available height: " + screen.availHeight);
The above code will output:
Available height: 1040
2.1.4 Location
The window.location object is used to get the address (URL) of the current page and redirect the browser to a new page.
The window.location object can be written without the prefix window. Some examples:
Some examples:
- The location.href attribute returns the URL of the current page.
- location.hostname returns the domain name of the web host
- location.pathname returns the path and file name of the current page
- location.port returns the port of the web host (80 or 443)
- location.protocol returns the web protocol used (http://or https://)
The location.href attribute returns the URL of the current page.
Code:
document.write(location.href);
The output of the above code is as follows:
http://www.xxx.com/js/my.htmlThe location.pathname attribute returns the path name of the URL.
Code:
document.write(location.pathname);
The output of the above code is as follows:
/js/my.html
The location.assign() method loads the new document.
Load a new document:
    <html>
    <head>
    <script>
    function newDoc()
      {
      window.location.assign("http://www.baidu.com/")
      }
    </script>
    </head>
    <body>

    <input type="button" value="Load new document" onclick="newDoc()">

    </body>
    </html>
2.1.5 History
The window.history object contains the history of the browser.
The window.history object can be written without the prefix window.
In order to protect user privacy, JavaScript's access to this object is restricted.
Some methods:
- history.back() - the same as clicking the back button in the browser
<html>
    <head>
    <script>
    function goBack()
      {
      window.history.back()
      }
    </script>
    </head>
    <body>

    <input type="button" value="Back" onclick="goBack()">

    </body>
</html>- history.forward() - the same as clicking the button in the browser to move forward
    <html>
    <head>
    <script>
    function goForward()
      {
      window.history.forward()
      }
    </script>
    </head>
    <body>

    <input type="button" value="Forward" onclick="goForward()">

    </body>
    </html>
2.1.6 Navigator
The window.navigator object can be written without the prefix window.
    <div id="example"></div>
    <script>
    txt = "<p>Browser code: " + navigator.appCodeName + "</p>";
    txt+= "<p>Browser name: " + navigator.appName + "</p>";
    txt+= "<p>Browser version: " + navigator.appVersion + "</p>";
    txt+= "<p>Enable Cookies: " + navigator.cookieEnabled + "</p>";
    txt+= "<p>hardware platform: " + navigator.platform + "</p>";
    txt+= "<p>user agent: " + navigator.userAgent + "</p>";
    txt+= "<p>User agent language: " + navigator.systemLanguage + "</p>";
    document.getElementById("example").innerHTML=txt;
    </script>
Section 3 JavaScript Timing
3.1 Date objects
    var d=new Date();
    document.write(d);
    document.write("<br/>")
    document.write("Particular year:"+(d.getYear()+1900));
    document.write("<br/>")
    document.write("Particular year:"+d.getFullYear());
    document.write("<br/>");
    document.write("Month:"+(d.getMonth()+1))
    document.write("<br/>");
    document.write("date:"+d.getDate());
    document.write("<br/>");
    document.write("hour:"+d.getHours());
    document.write("<br/>");
    document.write("Minute:"+d.getMinutes());
    document.write("<br/>");
    document.write("second:"+d.getSeconds());
3.2 JavaScript Timing Function
setInterval() Periodic Execution Function
The specified code is executed continuously at a specified number of milliseconds:
"hello" pops up every three seconds:
setInterval(function(){alert("Hello")},3000);
The example shows how to use the setInterval() method, but popping up every three seconds is not good for the user experience.
The following example shows the current time. The setInterval() method sets the code to execute once a second, just like a watch.
    var myVar=setInterval(function(){myTimer()},1000);

    function myTimer()
    {
    var d=new Date();
    var t=d.toLocaleTimeString();
    document.getElementById("demo").innerHTML=t;
    }
The clearInterval() method is used to stop the function code executed by the setInterval() method.
Code:
    <p id="demo"></p>
    <button onclick="myStopFunction()">Stop time</button>

    <script>
    var myVar=setInterval(function(){myTimer()},1000);
    function myTimer()
    {
    var d=new Date();
    var t=d.toLocaleTimeString();
    document.getElementById("demo").innerHTML=t;
    }
    function myStopFunction()
    {
    clearInterval(myVar);
    }
    </script>
setTimeout() Delayed Execution Function
Delays the execution of the specified function only once.
window.setTimeout("javascript function", milliseconds);
The first parameter is a string containing JavaScript statements. This statement may be such as "alert('5 seconds!') or a call to a function, such as alert Msg ()".
The second parameter indicates how many milliseconds from the current time to execute the first parameter.
Tip: 1000 milliseconds equals one second.
Wait three seconds, then pop up "Hello":
setTimeout(function(){alert("Hello")},3000);
The clearTimeout() method is used to stop the function code executing the setTimeout() method.
 var myVar;

    function myFunction()
    {
    myVar=setTimeout(function(){alert("Hello")},3000);
    }

    function myStopFunction()
    {
    clearTimeout(myVar);
    }
Using setTimeout to implement cycle execution
    <script type="text/javascript">

                var num=0;
                var id=0;
                function show(){
                    document.write(id+"Study hard<br/>");
                    num++;
                    if(num!=10){
                        id=setTimeout(show,1000);
                    }


                }

                id=setTimeout(show,1000);

    </script>