Original address: http://www.work100.net/training/monolithic-frameworks-example.html
More tutorials: Beam cloud - free course
Comprehensive example
| Serial number | Chapter in text | video |
|---|---|---|
| 1 | Summary | - |
| 2 | Create project | - |
| 3 | Use AdminLTE template | - |
| 4 | Create landing page | - |
| 5 | Login function implementation | - |
| 6 | Enhance user experience | - |
| 7 | Example source | - |
Please refer to the navigation above for reading
1. overview
In this section Java monomer application "The course makes a phased summary and practices the knowledge through a comprehensive case.
Our courses in the following stages are:
For the continuity of the follow-up courses, our integrated example will build a simple IoT management background project IoT admin to realize the user login function.
The learning process should follow the practice and make notes!
2. Create project
2.1. Build project structure
Create project folder
Open the project structure of the previous chapters through IntelliJ IDEA, and add a new project folder IOT admin
Create POM
Add a pom.xml file with the following contents:
<?xml version="1.0" encoding="UTF-8"?>
<project xmlns="http://maven.apache.org/POM/4.0.0"
         xmlns:xsi="http://www.w3.org/2001/XMLSchema-instance"
         xsi:schemaLocation="http://maven.apache.org/POM/4.0.0 http://maven.apache.org/xsd/maven-4.0.0.xsd">
    <modelVersion>4.0.0</modelVersion>

    <groupId>net.work100.training.stage2</groupId>
    <artifactId>iot-admin</artifactId>
    <version>1.0.0-SNAPSHOT</version>
    <packaging>war</packaging>

    <dependencies>
        <dependency>
            <groupId>org.springframework</groupId>
            <artifactId>spring-context</artifactId>
            <version>5.2.3.RELEASE</version>
        </dependency>
        <dependency>
            <groupId>javax.servlet</groupId>
            <artifactId>javax.servlet-api</artifactId>
            <version>4.0.1</version>
        </dependency>
        <dependency>
            <groupId>junit</groupId>
            <artifactId>junit</artifactId>
            <version>4.12</version>
            <scope>test</scope>
        </dependency>
        <dependency>
            <groupId>org.slf4j</groupId>
            <artifactId>slf4j-log4j12</artifactId>
            <version>1.7.25</version>
        </dependency>
    </dependencies>
</project>
pom.xml is then hosted to Maven.
Perfect Maven structure
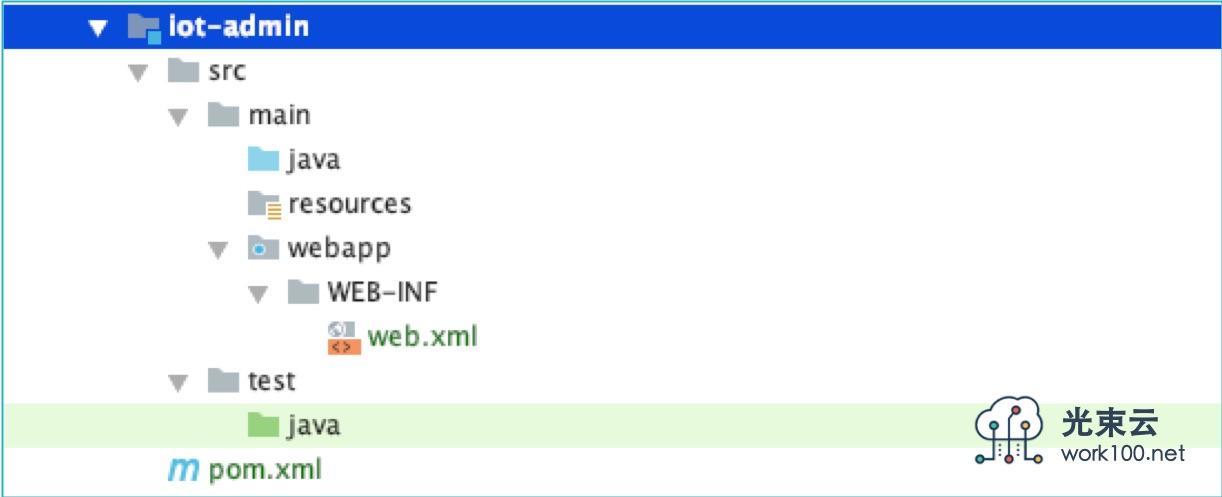
Improve the directory structure of the following table:
| Directory or file | Explain |
|---|---|
| pom.xml | POM file |
| src/main/java | Source folder |
| src/main/resources | Resource folder |
| src/main/webapp | Site folder |
| src/main/webapp/WEB-INF | Site configuration folder |
| src/main/webapp/WEB-INF/web.xml | Site profile |
| src/test/java | Test source folder |
The project structure is as follows:
Improve the src/main/webapp/WEB-INF/web.xml file as follows:
<?xml version="1.0" encoding="UTF-8"?>
<web-app xmlns="http://xmlns.jcp.org/xml/ns/javaee"
         xmlns:xsi="http://www.w3.org/2001/XMLSchema-instance"
         xsi:schemaLocation="http://xmlns.jcp.org/xml/ns/javaee http://xmlns.jcp.org/xml/ns/javaee/web-app_4_0.xsd"
         version="4.0">

</web-app>
Improve the project structure
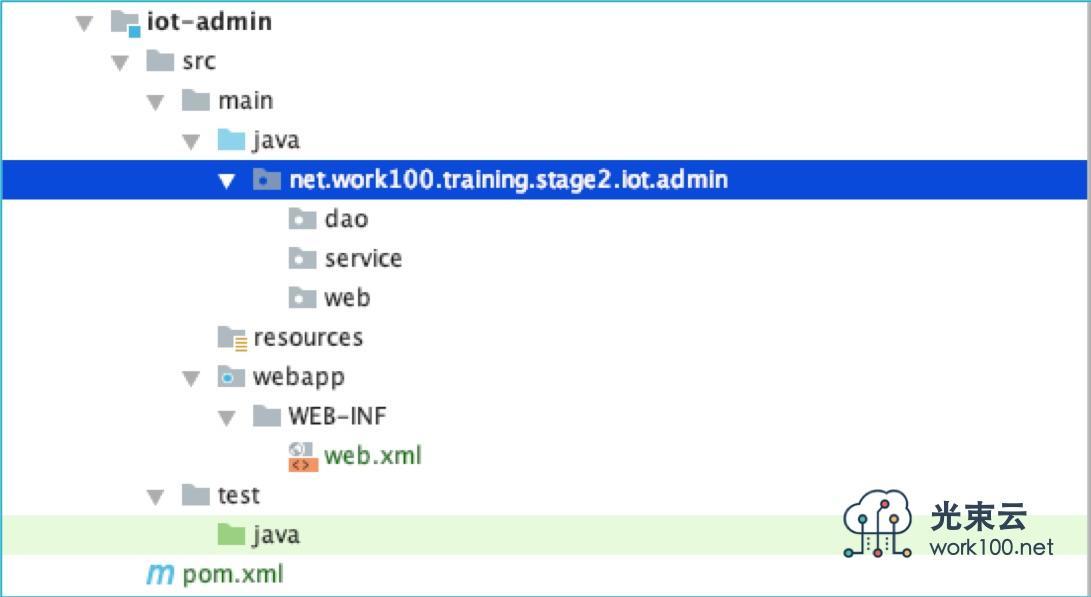
Combined with the three-tier architecture and MVC architecture, the class package structure of the project is built under src/main/java, as shown in the following table:
| Class package | Explain |
|---|---|
| net.work100.training.stage2.iot.admin | General package of the project |
| net.work100.training.stage2.iot.admin.dao | Data access layer |
| net.work100.training.stage2.iot.admin.service | Service layer |
| net.work100.training.stage2.iot.admin.web | Web level |
The project structure is as follows:
Configure Spring and Log4j
Add spring-context.xml and log4j.properties files under src/main/resources:
The code of spring context.xml is as follows:
<?xml version="1.0" encoding="UTF-8"?>
<beans xmlns="http://www.springframework.org/schema/beans"
       xmlns:xsi="http://www.w3.org/2001/XMLSchema-instance"
       xsi:schemaLocation="
       http://www.springframework.org/schema/beans http://www.springframework.org/schema/beans/spring-beans.xsd">

</beans>
The log4j.properties code is as follows:
log4j.rootLogger=INFO, console, file

log4j.appender.console=org.apache.log4j.ConsoleAppender
log4j.appender.console.layout=org.apache.log4j.PatternLayout
log4j.appender.console.layout.ConversionPattern=%d %p [%c] - %m%n

log4j.appender.file=org.apache.log4j.DailyRollingFileAppender
log4j.appender.file.File=logs/log.log
log4j.appender.file.layout=org.apache.log4j.PatternLayout
log4j.appender.A3.MaxFileSize=1024KB
log4j.appender.A3.MaxBackupIndex=10
log4j.appender.file.layout.ConversionPattern=%d %p [%c] - %m%n
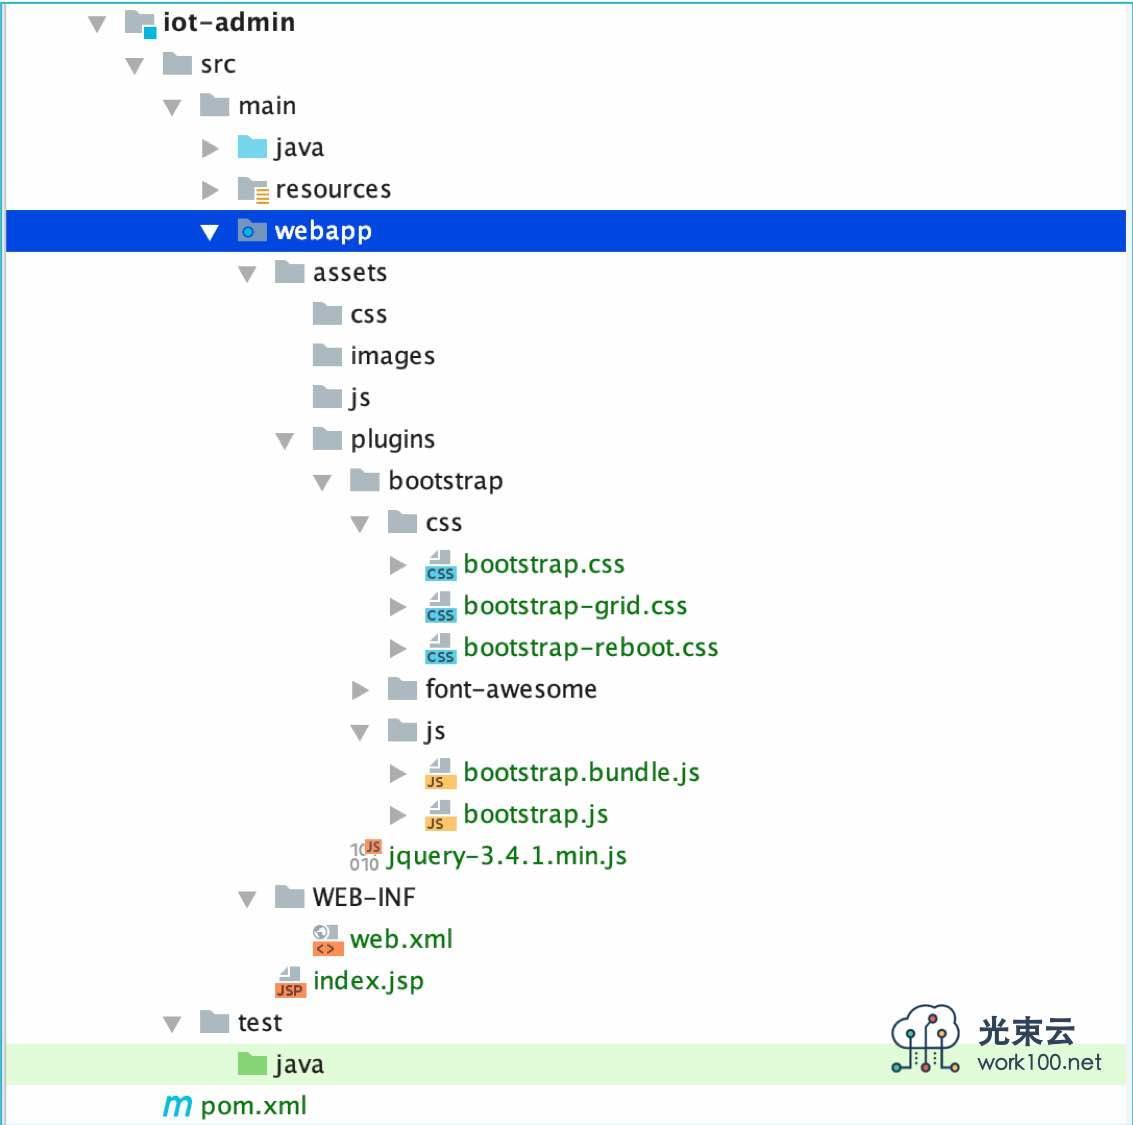
Building the front-end framework
Reference Bootstrap - environment building - Example To build the directory structure of Bootstrap:
| Catalog | Explain |
|---|---|
| src/main/webapp/assets/ | Static resource file directory |
| src/main/webapp/assets/css/ | custom style |
| src/main/webapp/assets/images/ | Custom picture |
| src/main/webapp/assets/js/ | Custom JS |
| src/main/webapp/assets/plugins/ | Plug-in unit |
| src/main/webapp/assets/plugins/bootstrap/ | Bootstrap plug in |
| src/main/webapp/assets/plugins/bootstrap/css/ | Bootstrap style sheet file |
| src/main/webapp/assets/plugins/bootstrap/font-awesome/ | Third party fonts |
| src/main/webapp/assets/plugins/bootstrap/js/ | Bootstrap JS file |
| src/main/webapp/assets/plugins/bootstrap/jquery-3.4.1.min.js | jQuery |
Create a new index.jsp file under src/main/webapp. The code is as follows:
<%@ page contentType="text/html;charset=UTF-8" language="java" %>
<html>
<head>
    <title>IoT-Admin</title>
</head>
<body>
    Hello IoT-Admin
</body>
</html>
The project structure is as follows:
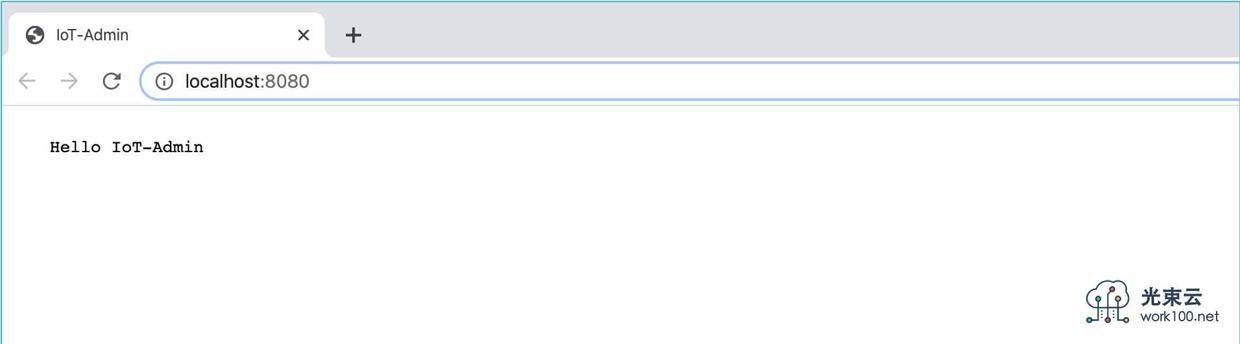
Configure Tomcat
Reference resources Architecture Pattern Practice The Tomcat configuration mode described in configures the running environment and runs the verification effect:
3. Use AdminLTE template
3.1. Download AdminLTE
AdminLTE is a Bootstrap based back-end template engine. The latest version is built on Bootstrap 4. It is highly customizable and easy to use. It is suitable for a variety of screen resolutions from small mobile devices to large desktops.
The official website address is< https://adminlte.io/> ;, admin lt e is open source software, you can go to< https://github.com/ColorlibHQ/AdminLTE> ; get the source code.
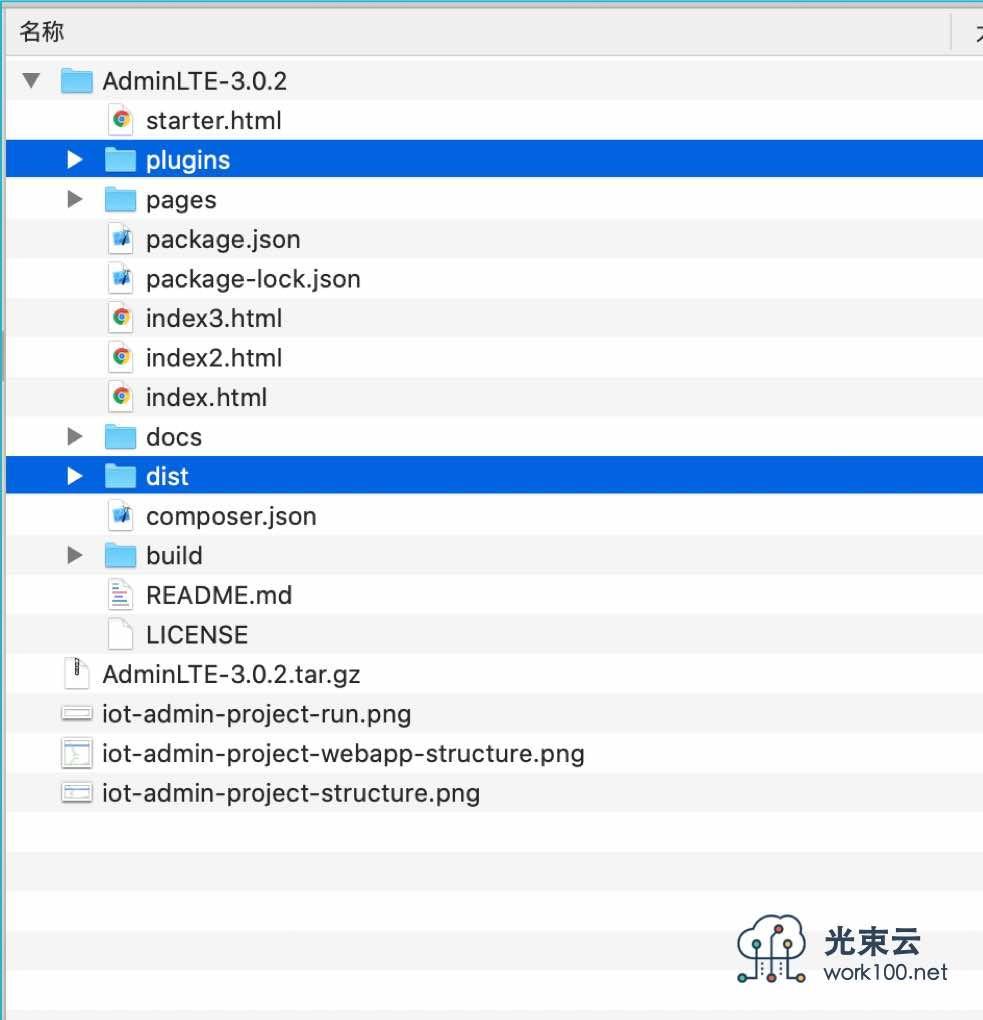
This example will use AdminLTE-3.0.2 for demonstration. The source package has been uploaded to QQ group. Please click Portal home page Add QQ group below to get.
After downloading AdminLTE, extract it. The folder structure is as follows:
Open and run the file index.html in the directory with a browser. The effect is as follows:
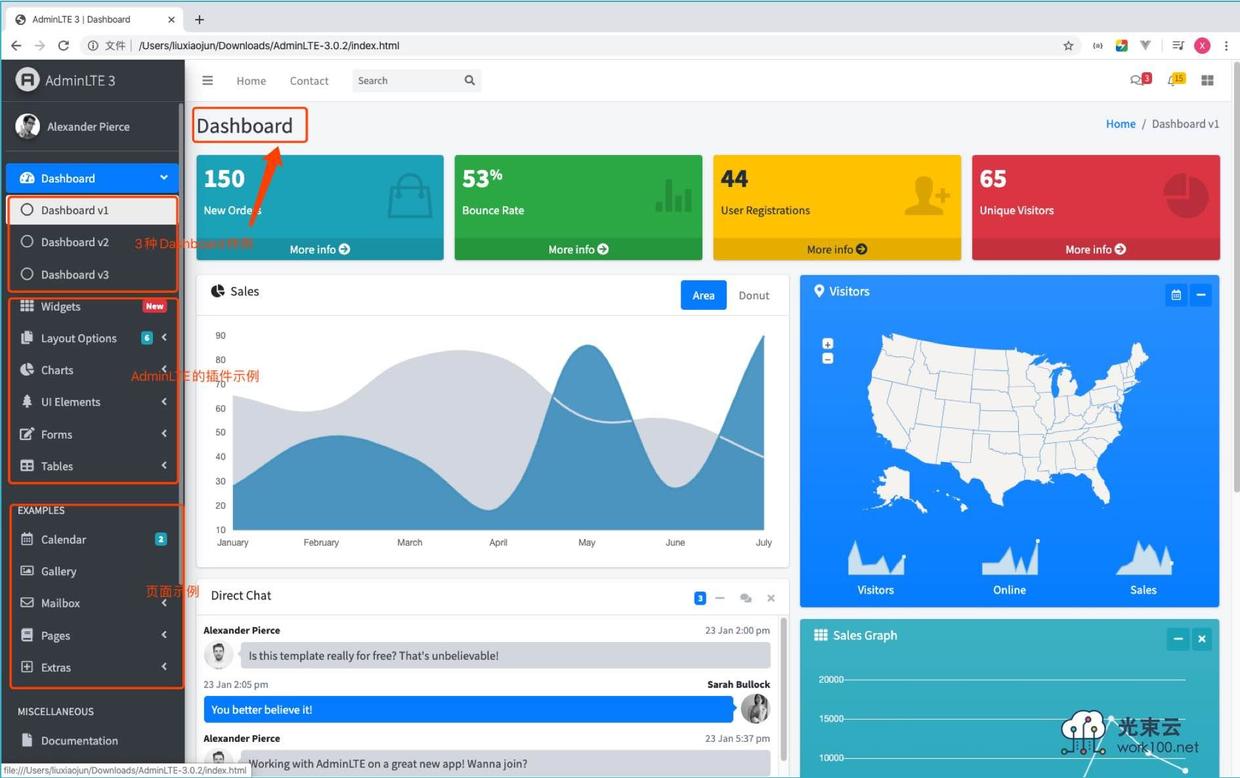
Please browse the display effect of each page in detail before using the AdminLTE framework, and learn how to use AdminLTE by referring to the HTML source code.
3.2. Reconstruction project
Because AdminLTE-3.0.2 is built on Bootstrap 4, let's reconstruct our project next.
First, delete the following directories in the project:
- src/main/webapp/assets/plugins
- src/main/webapp/assets/css
- src/main/webapp/assets/images
- src/main/webapp/assets/js
Then, copy the folder under AdminLTE-3.0.2 to the project. The corresponding location is:
| AdminLTE-3.0.2 directory | Contents in the project |
|---|---|
| AdminLTE-3.0.2/plugins | src/main/webapp/assets/plugins |
| AdminLTE-3.0.2/dist/css | src/main/webapp/assets/css |
| AdminLTE-3.0.2/dist/images | src/main/webapp/assets/images |
| AdminLTE-3.0.2/dist/js | src/main/webapp/assets/js |
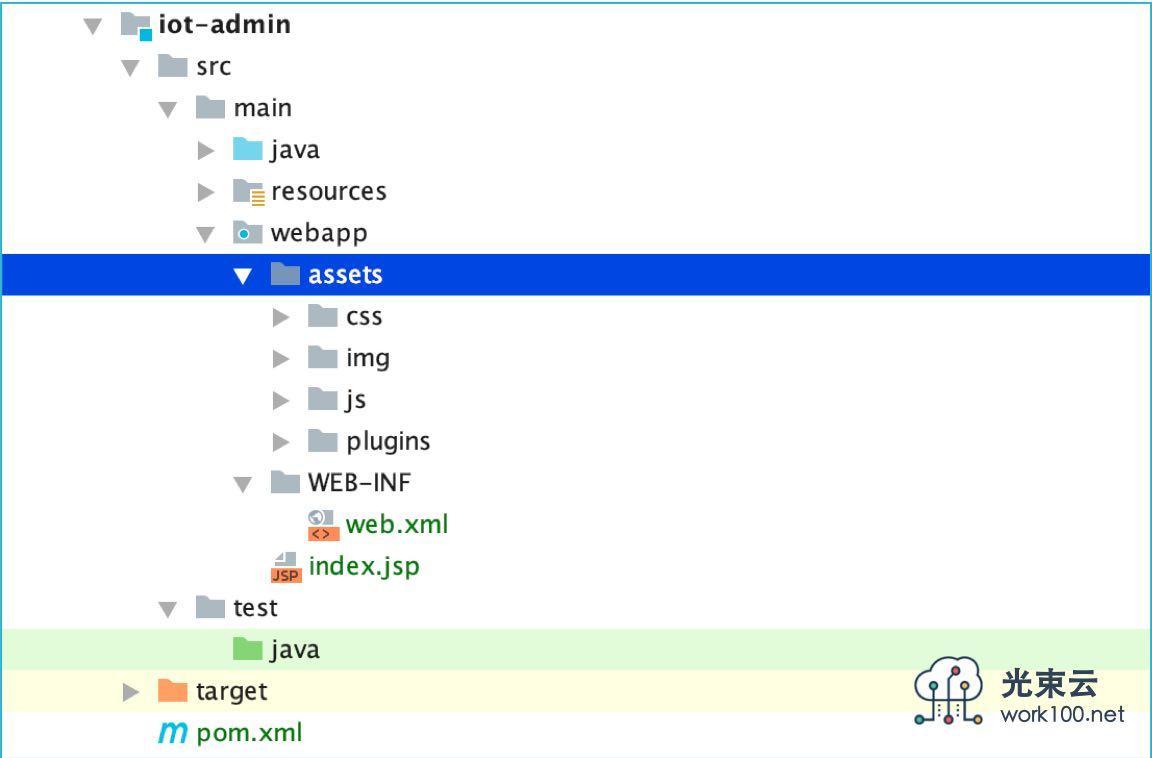
The directory structure after reconstruction is as follows:
4. Create landing page
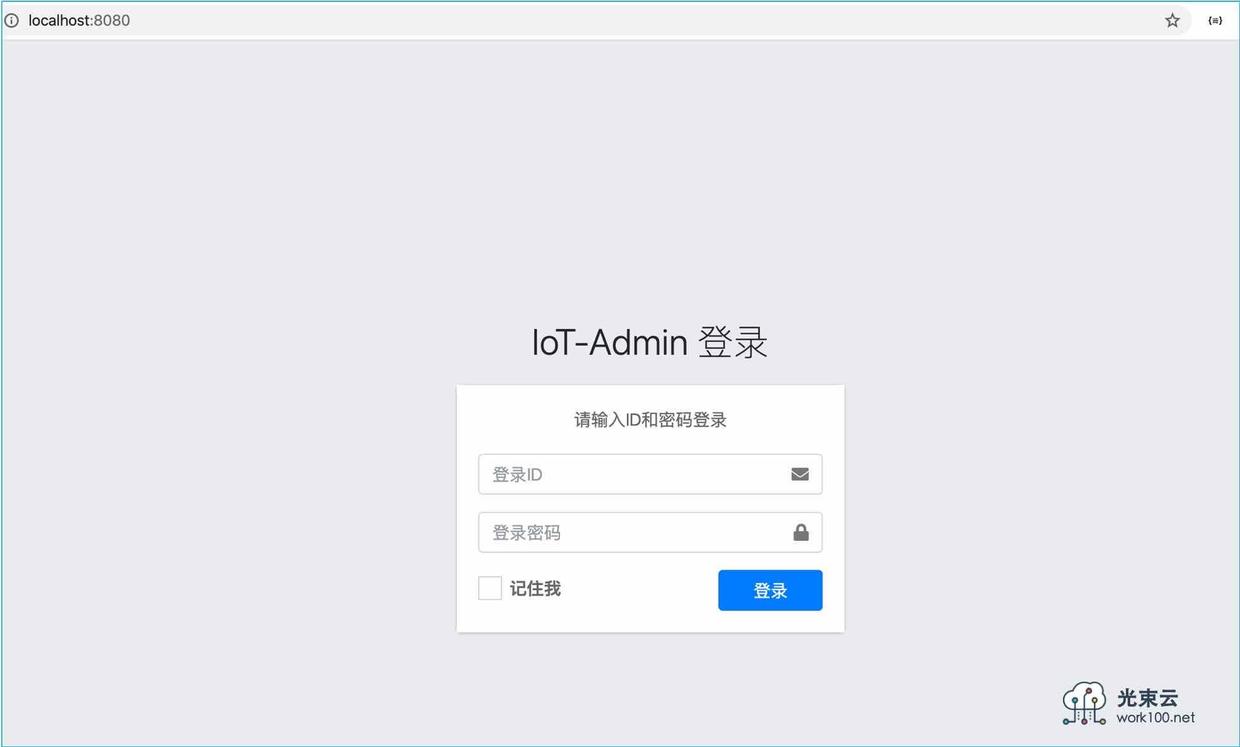
We refer to the AdminLTE-3.0.2/pages/examples/login.html source code example to build a login page for the IOT Amin project.
Refactor the index.jsp page. The code is as follows:
<%@ page contentType="text/html;charset=UTF-8" language="java" %>
<!DOCTYPE html>
<html>
<head>
    <meta charset="utf-8">
    <meta http-equiv="X-UA-Compatible" content="IE=edge">
    <title>IoT-Admin</title>
    <!-- Tell the browser to be responsive to screen width -->
    <meta name="viewport" content="width=device-width, initial-scale=1">

    <!-- Font Awesome -->
    <link rel="stylesheet" href="assets/plugins/fontawesome-free/css/all.min.css">
    <!-- icheck bootstrap -->
    <link rel="stylesheet" href="assets/plugins/icheck-bootstrap/icheck-bootstrap.min.css">
    <!-- Theme style -->
    <link rel="stylesheet" href="assets/css/adminlte.min.css">
</head>
<body class="hold-transition login-page">
<div class="login-box">
    <div class="login-logo">
        IoT-Admin Sign in
    </div>
    <!-- /.login-logo -->
    <div class="card">
        <div class="card-body login-card-body">
            <p class="login-box-msg">Please input ID And password login</p>

            <form action="/login" method="post">
                <div class="input-group mb-3">
                    <input name="loginId" type="text" class="form-control" placeholder="Sign in ID">
                    <div class="input-group-append">
                        <div class="input-group-text">
                            <span class="fas fa-user"></span>
                        </div>
                    </div>
                </div>
                <div class="input-group mb-3">
                    <input name="loginPwd" type="password" class="form-control" placeholder="Login password">
                    <div class="input-group-append">
                        <div class="input-group-text">
                            <span class="fas fa-lock"></span>
                        </div>
                    </div>
                </div>
                <div class="row">
                    <div class="col-8">
                        <div class="icheck-primary">
                            <input type="checkbox" id="remember">
                            <label for="remember">
                                Remember me
                            </label>
                        </div>
                    </div>
                    <!-- /.col -->
                    <div class="col-4">
                        <button type="submit" class="btn btn-primary btn-block">Sign in</button>
                    </div>
                    <!-- /.col -->
                </div>
            </form>
        </div>
        <!-- /.login-card-body -->
    </div>
</div>
<!-- /.login-box -->

<!-- jQuery -->
<script src="assets/plugins/jquery/jquery.min.js"></script>
<!-- Bootstrap 4 -->
<script src="assets/plugins/bootstrap/js/bootstrap.bundle.min.js"></script>
<!-- AdminLTE App -->
<script src="assets/js/adminlte.min.js"></script>

</body>
</html>
Run Tomcat and start the project. The effect is as follows:
5. Implementation of login function
Backend code implementation and Architecture Pattern Practice The way described in the chapter is similar. We modify the implementation code.
5.1. Create User class
Create a new package entity under the package net.work100.training.stage2.iot.admin, and then add a User class under it
The User.java file code is as follows:
package net.work100.training.stage2.iot.admin.entity;

import java.io.Serializable;

/**
 * <p>Title: User</p>
 * <p>Description: </p>
 *
 * @author liuxiaojun
 * @date 2020-02-13 13:21
 * ------------------- History -------------------
 * <date>      <author>       <desc>
 * 2020-02-13   liuxiaojun     Initial creation
 * -----------------------------------------------
 */
public class User implements Serializable {
    private String userName;
    private String loginId;
    private String loginPwd;

    public String getUserName() {
        return userName;
    }

    public void setUserName(String userName) {
        this.userName = userName;
    }

    public String getLoginId() {
        return loginId;
    }

    public void setLoginId(String loginId) {
        this.loginId = loginId;
    }

    public String getLoginPwd() {
        return loginPwd;
    }

    public void setLoginPwd(String loginPwd) {
        this.loginPwd = loginPwd;
    }

    @Override
    public String toString() {
        return "User{" +
                "userName='" + userName + '\'' +
                ", loginId='" + loginId + '\'' +
                '}';
    }
}
5.2. Create UserDao interface and implement UserDaoImpl
Create a new interface UserDao under package net.work100.training.stage2.iot.admin.dao
The code of UserDao.java file is as follows:
package net.work100.training.stage2.iot.admin.dao;

import net.work100.training.stage2.iot.admin.entity.User;

/**
 * <p>Title: UserDao</p>
 * <p>Description: </p>
 *
 * @author liuxiaojun
 * @date 2020-02-13 13:16
 * ------------------- History -------------------
 * <date>      <author>       <desc>
 * 2020-02-13   liuxiaojun     Initial creation
 * -----------------------------------------------
 */
public interface UserDao {
    /**
     * Get user information according to ID and password
     *
     * @param loginId  Login ID
     * @param loginPwd Login password
     * @return
     */
    User getUser(String loginId, String loginPwd);
}
Add a new class package impl under package net.work100.training.stage2.iot.admin.dao, and then create a new class UserDaoImpl under the impl package
The file code of UserDaoImpl.java is as follows:
package net.work100.training.stage2.iot.admin.dao.impl;

import net.work100.training.stage2.iot.admin.dao.UserDao;
import net.work100.training.stage2.iot.admin.entity.User;
import org.slf4j.Logger;
import org.slf4j.LoggerFactory;

/**
 * <p>Title: UserDaoImpl</p>
 * <p>Description: </p>
 *
 * @author liuxiaojun
 * @date 2020-02-13 13:23
 * ------------------- History -------------------
 * <date>      <author>       <desc>
 * 2020-02-13   liuxiaojun     Initial creation
 * -----------------------------------------------
 */
public class UserDaoImpl implements UserDao {

    private static final Logger logger = LoggerFactory.getLogger(UserDaoImpl.class);

    public User getUser(String loginId, String loginPwd) {
        logger.debug("Calling method getUser(loginId:{}, loginPwd:{})", loginId, loginPwd);

        // Query user information according to loginId
        User user = getUserByLoginId(loginId);
        if (user != null) {
            // Verify that loginPwd is correct (case sensitive)
            if (user.getLoginPwd().equals(loginPwd)) {
                return user;
            }
        }
        return null;
    }

    /**
     * Get simulated user data
     *
     * @param loginId Login ID
     * @return
     */
    private User getUserByLoginId(String loginId) {
        // Simulate user data existing in DB
        User dbUser = new User();
        dbUser.setUserName("Xiaojun");
        dbUser.setLoginId("admin");
        dbUser.setLoginPwd("admin");

        // Determine whether there is a loginId user (ignore case)
        if (dbUser.getLoginId().equalsIgnoreCase(loginId)) {
            logger.info("Match upper user:{}", dbUser);
            return dbUser;
        }
        logger.warn("No users matched, will return null");
        return null;
    }
}
5.3. Create UserService interface and implement UserServiceImpl
Create a new interface UserService under the package net.work100.training.stage2.iot.admin.service
The file code of UserService.java is as follows:
package net.work100.training.stage2.iot.admin.service;

import net.work100.training.stage2.iot.admin.entity.User;

/**
 * <p>Title: UserService</p>
 * <p>Description: </p>
 *
 * @author liuxiaojun
 * @date 2020-02-13 13:25
 * ------------------- History -------------------
 * <date>      <author>       <desc>
 * 2020-02-13   liuxiaojun     Initial creation
 * -----------------------------------------------
 */
public interface UserService {
    /**
     * validate logon
     *
     * @param loginId  Login ID
     * @param loginPwd Login password
     * @return
     */
    User login(String loginId, String loginPwd);
}
Add a class package impl under the package net.work100.training.stage2.iot.admin.service, and then create a class UserServiceImpl under the impl package
The file code of UserServiceImpl.java is as follows:
package net.work100.training.stage2.iot.admin.service.impl;

import net.work100.training.stage2.iot.admin.dao.UserDao;
import net.work100.training.stage2.iot.admin.dao.impl.UserDaoImpl;
import net.work100.training.stage2.iot.admin.entity.User;
import net.work100.training.stage2.iot.admin.service.UserService;

/**
 * <p>Title: UserServiceImpl</p>
 * <p>Description: </p>
 *
 * @author liuxiaojun
 * @date 2020-02-13 13:26
 * ------------------- History -------------------
 * <date>      <author>       <desc>
 * 2020-02-13   liuxiaojun     Initial creation
 * -----------------------------------------------
 */
public class UserServiceImpl implements UserService {

    private UserDao userDao = new UserDaoImpl();

    public User login(String loginId, String loginPwd) {
        return userDao.getUser(loginId, loginPwd);
    }
}
5.4. Create LoginController
Implement Servlet
Add a new class controller under the package net.work100.training.stage2.iot.admin.web, and then create a new class LoginController under the controller package
The code of LoginController.java file is as follows:
package net.work100.training.stage2.iot.admin.web.controller;

import net.work100.training.stage2.iot.admin.entity.User;
import net.work100.training.stage2.iot.admin.service.UserService;
import net.work100.training.stage2.iot.admin.service.impl.UserServiceImpl;

import javax.servlet.ServletException;
import javax.servlet.http.HttpServlet;
import javax.servlet.http.HttpServletRequest;
import javax.servlet.http.HttpServletResponse;
import java.io.IOException;

/**
 * <p>Title: LoginController</p>
 * <p>Description: </p>
 *
 * @author liuxiaojun
 * @date 2020-02-13 13:28
 * ------------------- History -------------------
 * <date>      <author>       <desc>
 * 2020-02-13   liuxiaojun     Initial creation
 * -----------------------------------------------
 */
public class LoginController extends HttpServlet {

    private UserService userService = new UserServiceImpl();

    @Override
    protected void doGet(HttpServletRequest req, HttpServletResponse resp) throws ServletException, IOException {
        User user = userService.login("admin", "admin");
        System.out.println("--------------doGet test(begin)-----------------");
        System.out.println(user);
        System.out.println("--------------doGet test(end)-----------------");
    }

    @Override
    protected void doPost(HttpServletRequest req, HttpServletResponse resp) throws ServletException, IOException {
        String loginId = req.getParameter("loginId");
        String loginPwd = req.getParameter("loginPwd");

        User user = userService.login(loginId, loginPwd);

        // Login successfully
        if (user != null) {
            // Redirect to home page
            resp.sendRedirect("/main.jsp");
        }
        // Login failed
        else {
            // Jump back to landing page
            req.getRequestDispatcher("/index.jsp").forward(req, resp);
        }
    }
}
Configure Servlet mapping
Modify the src/main/webapp/WEB-INF/web.xml file as follows:
<?xml version="1.0" encoding="UTF-8"?>
<web-app xmlns="http://xmlns.jcp.org/xml/ns/javaee"
         xmlns:xsi="http://www.w3.org/2001/XMLSchema-instance"
         xsi:schemaLocation="http://xmlns.jcp.org/xml/ns/javaee http://xmlns.jcp.org/xml/ns/javaee/web-app_4_0.xsd"
         version="4.0">

    <servlet>
        <servlet-name>loginController</servlet-name>
        <servlet-class>net.work100.training.stage2.iot.admin.web.controller.LoginController</servlet-class>
    </servlet>
    <servlet-mapping>
        <servlet-name>loginController</servlet-name>
        <url-pattern>/login</url-pattern>
    </servlet-mapping>
</web-app>
Display page main.jsp after new login
In order to simulate the effect of login verification, we create a new file main.jsp under the folder src/main/webapp /. After successful login, we will jump to this page. The code is as follows:
<%@ page contentType="text/html;charset=UTF-8" language="java" %>
<html>
<head>
    <title>home page</title>
</head>
<body>
//This is the home page
</body>
</html>
5.5. operation
Start Tomcat for login verification, and enter the following correct login data in the form:
| Name | value |
|---|---|
| User name | admin |
| Password | admin |
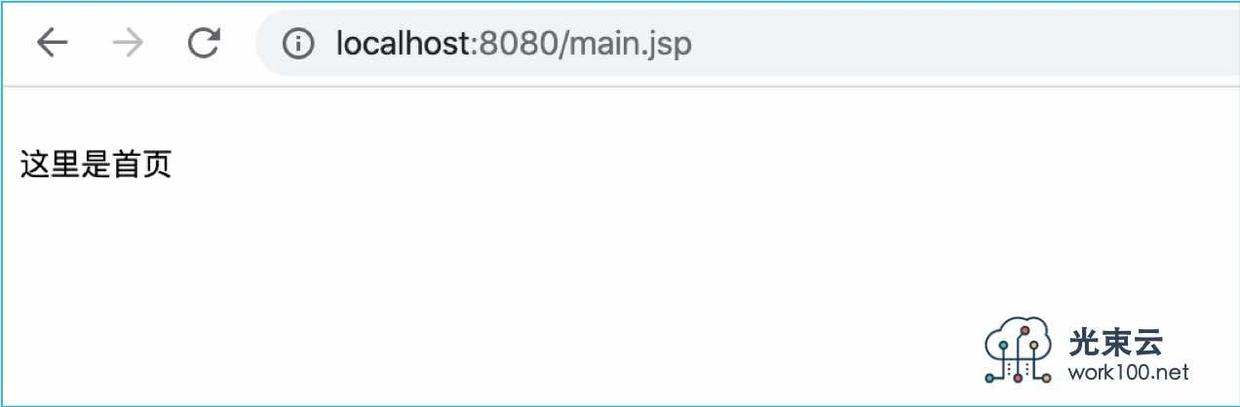
The page will jump to main.jsp, as shown below:
When entering the wrong login data, return to the login page.
5.6. Using Spring IoC
New SpringContext class
Create a new class package net.work100.training.stage2.iot.admin.commons.context, and then create the SpringContext class under it
The code of SpringContext.java is as follows:
package net.work100.training.stage2.iot.admin.commons.context;

import org.springframework.context.ApplicationContext;
import org.springframework.context.support.ClassPathXmlApplicationContext;

/**
 * <p>Title: SpringContext</p>
 * <p>Description: </p>
 *
 * @author liuxiaojun
 * @date 2020-02-13 14:31
 * ------------------- History -------------------
 * <date>      <author>       <desc>
 * 2020-02-13   liuxiaojun     Initial creation
 * -----------------------------------------------
 */
public final class SpringContext {

    public Object getBean(String beanId) {
        ApplicationContext context = new ClassPathXmlApplicationContext("spring-context.xml");
        return context.getBean(beanId);
    }

}
Configure spring-context.xml
Modify the Src / main / resources / spring context.xml file as follows:
<?xml version="1.0" encoding="UTF-8"?>
<beans xmlns="http://www.springframework.org/schema/beans"
       xmlns:xsi="http://www.w3.org/2001/XMLSchema-instance"
       xsi:schemaLocation="
       http://www.springframework.org/schema/beans http://www.springframework.org/schema/beans/spring-beans.xsd">

    <!-- DAO -->
    <bean id="userDao" class="net.work100.training.stage2.iot.admin.dao.impl.UserDaoImpl" />

    <!-- Service -->
    <bean id="userService" class="net.work100.training.stage2.iot.admin.service.impl.UserServiceImpl" />
</beans>
Modify UserServiceImpl
Modify the UserServiceImpl.java code as follows:
package net.work100.training.stage2.iot.admin.service.impl;

import net.work100.training.stage2.iot.admin.commons.context.SpringContext;
import net.work100.training.stage2.iot.admin.dao.UserDao;
import net.work100.training.stage2.iot.admin.entity.User;
import net.work100.training.stage2.iot.admin.service.UserService;

/**
 * <p>Title: UserServiceImpl</p>
 * <p>Description: </p>
 *
 * @author liuxiaojun
 * @date 2020-02-13 13:26
 * ------------------- History -------------------
 * <date>      <author>       <desc>
 * 2020-02-13   liuxiaojun     Initial creation
 * -----------------------------------------------
 */
public class UserServiceImpl implements UserService {

    private SpringContext context = new SpringContext();

    public User login(String loginId, String loginPwd) {
        UserDao userDao = (UserDao) context.getBean("userDao");
        return userDao.getUser(loginId, loginPwd);
    }
}
Modify LoginController
Modify the LoginController.java code as follows:
package net.work100.training.stage2.iot.admin.web.controller;

import net.work100.training.stage2.iot.admin.commons.context.SpringContext;
import net.work100.training.stage2.iot.admin.entity.User;
import net.work100.training.stage2.iot.admin.service.UserService;

import javax.servlet.ServletException;
import javax.servlet.http.HttpServlet;
import javax.servlet.http.HttpServletRequest;
import javax.servlet.http.HttpServletResponse;
import java.io.IOException;

/**
 * <p>Title: LoginController</p>
 * <p>Description: </p>
 *
 * @author liuxiaojun
 * @date 2020-02-13 13:28
 * ------------------- History -------------------
 * <date>      <author>       <desc>
 * 2020-02-13   liuxiaojun     Initial creation
 * -----------------------------------------------
 */
public class LoginController extends HttpServlet {

    private SpringContext context = new SpringContext();

    @Override
    protected void doGet(HttpServletRequest req, HttpServletResponse resp) throws ServletException, IOException {
        UserService userService = (UserService) context.getBean("userService");
        User user = userService.login("admin", "admin");
        System.out.println("--------------doGet test(begin)-----------------");
        System.out.println(user);
        System.out.println("--------------doGet test(end)-----------------");
    }

    @Override
    protected void doPost(HttpServletRequest req, HttpServletResponse resp) throws ServletException, IOException {
        UserService userService = (UserService) context.getBean("userService");
        String loginId = req.getParameter("loginId");
        String loginPwd = req.getParameter("loginPwd");

        User user = userService.login(loginId, loginPwd);

        // Login successfully
        if (user != null) {
            // Redirect to home page
            resp.sendRedirect("/main.jsp");
        }
        // Login failed
        else {
            // Jump back to landing page
            req.getRequestDispatcher("/index.jsp").forward(req, resp);
        }
    }
}
Rerun
Restart Tomcat to verify the running effect.
6. Improve user experience
Authentication fails when the user enters the wrong ID or password, and the page jumps back to the login page.
From the perspective of user experience, we need to give users a prompt message to inform them that the login verification failed. Let's implement this function.
6.1. Transformation of LoginController
Add the error message req.setAttribute("message", "login ID or login password error") after the login verification fails, and the complete code is as follows:
package net.work100.training.stage2.iot.admin.web.controller;

import net.work100.training.stage2.iot.admin.commons.context.SpringContext;
import net.work100.training.stage2.iot.admin.entity.User;
import net.work100.training.stage2.iot.admin.service.UserService;

import javax.servlet.ServletException;
import javax.servlet.http.HttpServlet;
import javax.servlet.http.HttpServletRequest;
import javax.servlet.http.HttpServletResponse;
import java.io.IOException;

/**
 * <p>Title: LoginController</p>
 * <p>Description: </p>
 * <p>Url: http://www.work100.net/training/monolithic-frameworks-example.html</p>
 *
 * @author liuxiaojun
 * @date 2020-02-13 13:28
 * ------------------- History -------------------
 * <date>      <author>       <desc>
 * 2020-02-13   liuxiaojun     Initial creation
 * -----------------------------------------------
 */
public class LoginController extends HttpServlet {

    private SpringContext context = new SpringContext();

    @Override
    protected void doGet(HttpServletRequest req, HttpServletResponse resp) throws ServletException, IOException {
        UserService userService = (UserService) context.getBean("userService");
        User user = userService.login("admin", "admin");
        System.out.println("--------------doGet test(begin)-----------------");
        System.out.println(user);
        System.out.println("--------------doGet test(end)-----------------");
    }

    @Override
    protected void doPost(HttpServletRequest req, HttpServletResponse resp) throws ServletException, IOException {
        UserService userService = (UserService) context.getBean("userService");
        String loginId = req.getParameter("loginId");
        String loginPwd = req.getParameter("loginPwd");

        User user = userService.login(loginId, loginPwd);

        // Login successfully
        if (user != null) {
            // Redirect to home page
            resp.sendRedirect("/main.jsp");
        }
        // Login failed
        else {
            // Jump back to landing page
            req.setAttribute("message", "Sign in ID Or wrong login password");
            req.getRequestDispatcher("/index.jsp").forward(req, resp);
        }
    }
}
6.2. Transform index.jsp
Introduce JSTL dependency
We will use JSTL expressions here, so we need to introduce dependency in pom.xml file first:
<dependency>
    <groupId>javax.servlet</groupId>
    <artifactId>jstl</artifactId>
    <version>1.2</version>
</dependency>
Add taglib instruction
Add the following code to the index.jsp file header:
<%@ taglib prefix="c" uri="http://java.sun.com/jsp/jstl/core" %>
Add error prompt
Add the following code above the form form in the index.jsp file:
<c:if test="${message != null}">
<div class="alert alert-danger alert-dismissible">
<button type="button" class="close" data-dismiss="alert" aria-hidden="true">×</button>
${message}
</div>
</c:if>The complete index.jsp file code is as follows:
<%@ page contentType="text/html;charset=UTF-8" language="java" %>
<%@ taglib prefix="c" uri="http://java.sun.com/jsp/jstl/core" %>
<!DOCTYPE html>
<html>
<head>
<meta charset="utf-8">
<meta http-equiv="X-UA-Compatible" content="IE=edge">
<title>IoT-Admin</title>
<!-- Tell the browser to be responsive to screen width -->
<meta name="viewport" content="width=device-width, initial-scale=1">
<!-- Font Awesome -->
<link rel="stylesheet" href="assets/plugins/fontawesome-free/css/all.min.css">
<!-- icheck bootstrap -->
<link rel="stylesheet" href="assets/plugins/icheck-bootstrap/icheck-bootstrap.min.css">
<!-- Theme style -->
<link rel="stylesheet" href="assets/css/adminlte.min.css">
</head>
<body class="hold-transition login-page">
<div class="login-box">
<div class="login-logo">
IoT-Admin Sign in
</div>
<!-- /.login-logo -->
<div class="card">
<div class="card-body login-card-body">
<p class="login-box-msg">Please input ID And password login</p>
<c:if test="${message != null}">
<div class="alert alert-danger alert-dismissible">
<button type="button" class="close" data-dismiss="alert" aria-hidden="true">×</button>
${message}
</div>
</c:if>
<form action="/login" method="post">
<div class="input-group mb-3">
<input name="loginId" type="text" class="form-control" placeholder="Sign in ID">
<div class="input-group-append">
<div class="input-group-text">
<span class="fas fa-user"></span>
</div>
</div>
</div>
<div class="input-group mb-3">
<input name="loginPwd" type="password" class="form-control" placeholder="Login password">
<div class="input-group-append">
<div class="input-group-text">
<span class="fas fa-lock"></span>
</div>
</div>
</div>
<div class="row">
<div class="col-8">
<div class="icheck-primary">
<input type="checkbox" id="remember">
<label for="remember">
Remember me
</label>
</div>
</div>
<!-- /.col -->
<div class="col-4">
<button type="submit" class="btn btn-primary btn-block">Sign in</button>
</div>
<!-- /.col -->
</div>
</form>
</div>
<!-- /.login-card-body -->
</div>
</div>
<!-- /.login-box -->
<!-- jQuery -->
<script src="assets/plugins/jquery/jquery.min.js"></script>
<!-- Bootstrap 4 -->
<script src="assets/plugins/bootstrap/js/bootstrap.bundle.min.js"></script>
<!-- AdminLTE App -->
<script src="assets/js/adminlte.min.js"></script>
</body>
</html>6.3. Verification effect
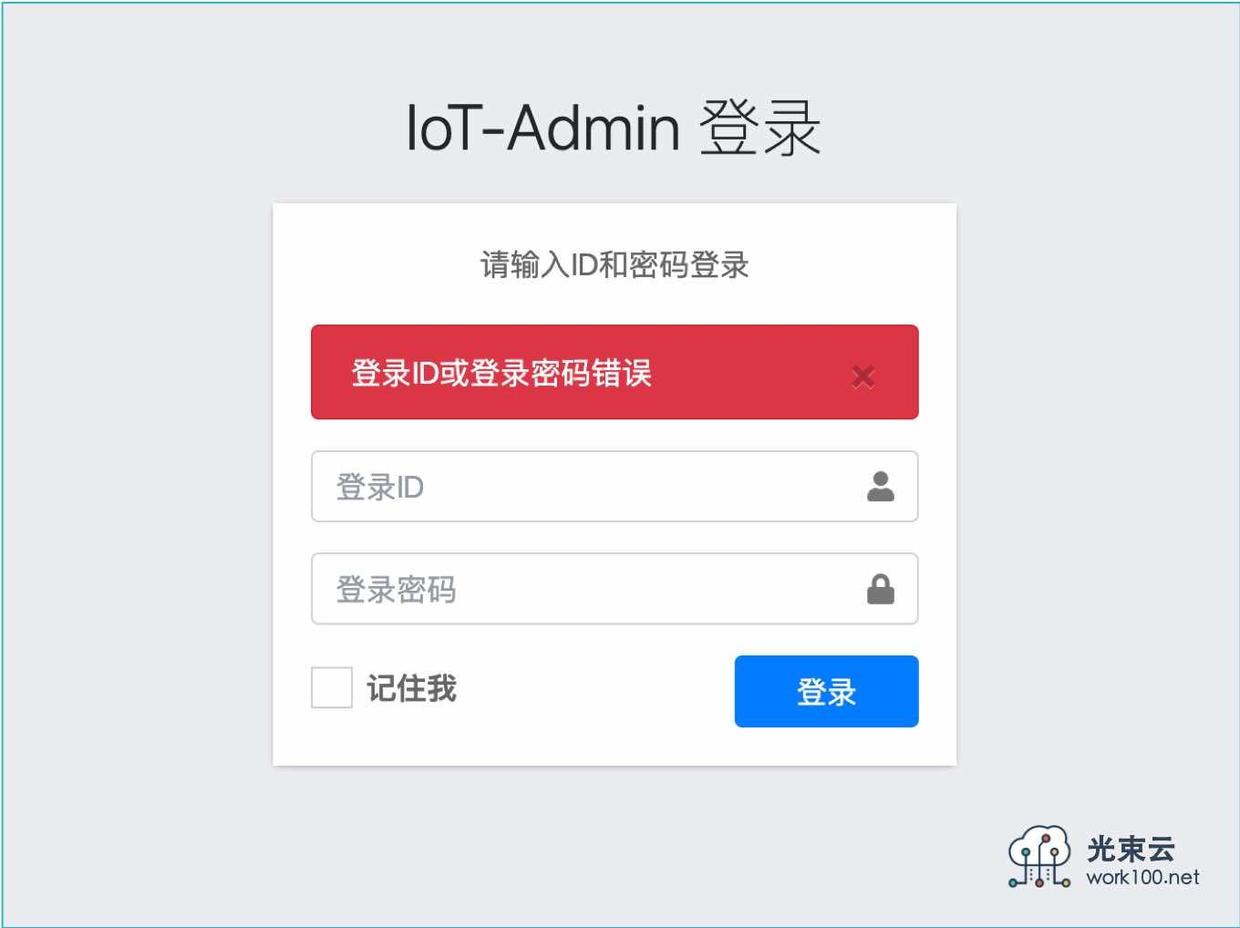
Run Tomcat and input the wrong login data. The page effect is as follows:
7. Instance source code
The instance source code has been hosted to the following address:
- <https://github.com/work100-net/training-stage2/tree/master/iot-admin>
- <https://gitee.com/work100-net/training-stage2/tree/master/iot-admin>
Last article: Log4j
Next article: Spring Web
If you are interested in the content of the course, you can scan the code to pay attention to our official account or QQ group, and pay attention to our curriculum updates in time.