Project introduction
Business description
File upload based on Spring Cloud Alibaba solution
Initial architecture design
The front end and back end are separated, and the service design is based on the spring cloud alibaba solution

Initial architecture design, subsequent addition of Gateway project and authentication project
Project creation and initialization
engineering structure
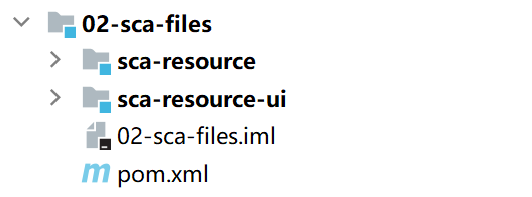
Create parent project
Create parent project
Create file service project
Process file upload
Create client service project
Used to define some static pages, such as file upload page
Parent project initialization
Add dependent version management
spring-boot-dependencies
spring-cloud-dependencies
spring-cloud-alibaba-dependencies
Be careful not to forget:
<type>pom</type>
<scope>import</scope>
Add dependent lombok and set
<scope>provided</scope>
Set compiled version
<properties>
        <maven.compiler.source>8</maven.compiler.source>
        <maven.compiler.target>8</maven.compiler.target>
</properties>
or
	<build>
        <plugins>
            <plugin>
                <groupId>org.apache.maven.plugins</groupId>
                <artifactId>maven-compiler-plugin</artifactId>
                <version>3.8.1</version>
                <configuration>
                    <source>8</source>
                    <target>8</target>
                </configuration>
            </plugin>
        </plugins>
    </build>
File resource service implementation
Add project dependency
Add dependency in SCA resource
Spring Boot Web Service (built-in Tomcat) spring boot starter Web
Nacos Discovery spring cloud starter Alibaba Nacos Discovery
Nacos Config (configuration center) spring cloud starter Alibaba Nacos Config
Sentinel spring cloud starter Alibaba Sentinel
Spring Boot monitor Spring Boot starter actuator
Service initialization configuration
Create bootstrap.yml (it will be written to the configuration center later, so bootstrap.yml)
server:
  port: 8881
spring:
  application:
    name: sca-resource
  resources: #Define the path to the upload resource, localhost:8881/app.png
    static-locations: file:d:/uploads  #Static resource path (resources originally stored in the resources/static directory can be stored in this directory)
  cloud:
    nacos:
      discovery:
        server-addr: localhost:8848
      config:
        server-addr: localhost:8848
        file-extension: yml
#The configuration here is self-defined, and it will be read through @ Value annotation in some related classes later
jt:
  resource:
      path: d:/uploads  #The root directory where the design upload file is stored (to be written to the configuration file later)
      host: http://localhost:8881 / # define the access server corresponding to the uploaded file
Build project startup class
Create a startup class. Start to detect whether the configuration is incorrect
Controller logic implementation
Define the Controller object that handles the upload request
package com.jt.resource.controller;

import lombok.extern.slf4j.Slf4j;
import org.springframework.beans.factory.annotation.Value;
import org.springframework.web.bind.annotation.PostMapping;
import org.springframework.web.bind.annotation.RequestMapping;
import org.springframework.web.bind.annotation.RestController;
import org.springframework.web.multipart.MultipartFile;

import java.io.File;
import java.io.IOException;
import java.time.LocalDate;
import java.time.format.DateTimeFormatter;
import java.util.UUID;

@Slf4j
//@CrossOrigin / / used to handle cross domain transactions at the controller level
@RefreshScope// //If the value of the attribute comes from the configuration center, and the content of the configuration center changes, the attribute value also changes, you need to add this annotation. Recreate object
@RestController
@RequestMapping("/resource")
public class ResourceController {
      //When @ Slf4J is added to the class, you don't have to create the following log objects yourself
//    private static final Logger log=
//            LoggerFactory.getLogger(ResourceController.class);

     @Value("${jt.resource.path:g:/uploads}")
     private String resourcePath;//="d:/uploads/";
     @Value("${jt.resource.host:http://localhost:8881/}")
     private String resourceHost;//="http://localhost:8881/";
		/**
     * This method is used to process the file upload request
     * @param uploadFile Receive the file data to be uploaded (the parameter name must be the same as the name submitted by the client)
     * @return After the file is uploaded, the actual storage path on the server can access the file based on http protocol
     */
     @PostMapping("/upload/")//The request method for file upload must be post. get upload will lead to 405. The request method of the server is different from that of the client
     public String uploadFile(MultipartFile uploadFile) throws IOException {
         //1. Create a storage directory for files (stored according to the structure of month, year and day)
        //1.1 get the string corresponding to the current date
        //1.1.1 mode 1
        //SimpleDateFormat sdf=new SimpleDateFormat("yyyy/MM/dd");
        //String dateStr=sdf.format(new Date());
        //1.1.2 method 2 (based on the date API provided in jdk8)

        String dateStr =
                DateTimeFormatter.ofPattern("yyyy/MM/dd")
                        .format(LocalDate.now());
        log.debug("date dir is {}",dateStr);

        //1.2 creating file directory objects
        File uploadDir=
                new File(resourcePath,dateStr);//g:/uplods/2021/09/24
        if(!uploadDir.exists())
                uploadDir.mkdirs();

        //2. Give the file a new name (the file prefix is generated randomly, and the file suffix cannot be changed)
        //2.1 get the original file name
        String originalFilename =
                uploadFile.getOriginalFilename();
        //2.2 build file prefix
        String filePrefix=
                UUID.randomUUID().toString();
        //2.2 get the file suffix xxx.png
        String fileSuffix=
        originalFilename.substring(
                originalFilename.lastIndexOf("."));
        //2.3 building a new file name
        String newFileName=filePrefix+fileSuffix;

        //3. Upload files to the specified directory
        //What does the underlying transferTo method do? (file copy)
        //Read the contents of uploadFile based on inputStream
        //Write the read content to a new file based on OutputStream
        uploadFile.transferTo(new File(uploadDir,newFileName));

        //4. Return the path to the file that can be accessed through the http protocol
        //String accessPath="http://localhost:8881/2021/09/24/xx.png";
        String accessPath=resourceHost+dateStr+"/"+newFileName;
        log.info("access path is {}", accessPath);

        return accessPath;
     }
}
Cross domain configuration implementation
package com.zlq.config;

import org.springframework.boot.web.servlet.FilterRegistrationBean;
import org.springframework.context.annotation.Bean;
import org.springframework.context.annotation.Configuration;
import org.springframework.core.Ordered;
import org.springframework.web.cors.CorsConfiguration;
import org.springframework.web.cors.UrlBasedCorsConfigurationSource;
import org.springframework.web.filter.CorsFilter;

@Configuration
public class CorsFilterConfig {
    @Bean
    public FilterRegistrationBean<CorsFilter> filterFilterRegistrationBean(){
        CorsConfiguration config=new CorsConfiguration();
        config.addAllowedHeader("*");
        config.addAllowedMethod("*");
        config.addAllowedOrigin("*");
        config.setAllowCredentials(true);
        UrlBasedCorsConfigurationSource configSource=new UrlBasedCorsConfigurationSource();
        configSource.registerCorsConfiguration("/**", config);
        FilterRegistrationBean<CorsFilter> fBean =new FilterRegistrationBean<>(new CorsFilter(configSource));
        fBean.setOrder(Ordered.HIGHEST_PRECEDENCE);
        return null;
    }
    //Scheme 2 realizes cross domain configuration based on filter level
    @Configuration
    public class CorsFilterConfig2 {
        @Bean
        public FilterRegistrationBean<CorsFilter> filterFilterRegistrationBean(){
            //1. Configure this filter (cross domain settings - url,method)
            //Create Url based core configuration service
            UrlBasedCorsConfigurationSource configService = new UrlBasedCorsConfigurationSource();
            //Set core configuration
            CorsConfiguration config = new CorsConfiguration();
            //Which request headers are allowed to cross domains
            config.addAllowedHeader("*");
            //Which method types are allowed to cross domain get post delete put
            config.addAllowedMethod("*");
            // Which request sources (IP: ports) are allowed to cross domains
            config.addAllowedOrigin("*");
            //Whether to allow carrying cookie s across domains
            config.setAllowCredentials(true);
            //2. Register the filter and set its priority
            //Configuration service. Configure core service (configuration path, configuration content)
            configService.registerCorsConfiguration("/****", config);
            //Filter Bean registration
            FilterRegistrationBean fBean = new FilterRegistrationBean(
                    new CorsFilter(configService)
            );
            //Set its highest priority
            fBean.setOrder(Ordered.LOWEST_PRECEDENCE);
            return fBean;
        }
    }
}
Client engineering logic implementation
The client project is designed based on the spring boot project. When the project goes online, its static resources can be directly put into a static resource directory
Add dependency
web dependency
spring-boot-starter-web
Build project startup class
Build startup class
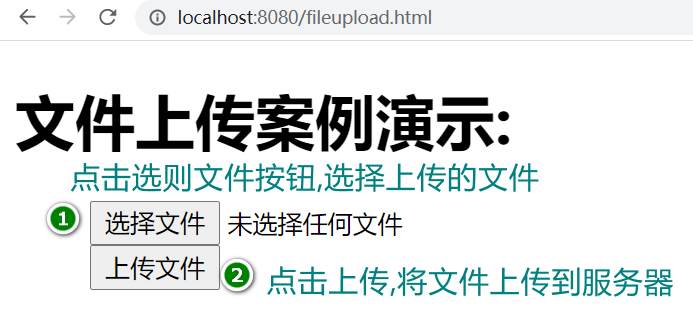
Create file upload page
In the resource.static directory, create the fileupload.html static file
<!DOCTYPE html>
<html lang="en">
<head>
    <meta charset="UTF-8">
    <title>File upload demo</title>
    <script src="https://unpkg.com/axios/dist/axios.min.js"></script>
</head>
<body>
<form id="fileForm" method="post" enctype="multipart/form-data" onsubmit="return doUpload()">
    <div>
        <label>Upload file
            <input id="uploadFile" type="file" name="uploadFile">
        </label>
    </div>
    <button type="submit">Upload file</button>
</form>
</body>
<script>
    //Form submission event for jquery code
    function doUpload(){
    debugger  //Front end debug
        //Get all pictures selected by the user (get array)
        let files=document.getElementById("uploadFile").files;
        if(files.length>0){
            //Get the unique picture selected by the user (take it out of the array)
            let file=files[0];
            //Start uploading this picture
            //Since there are many uploaded codes, you do not want to interfere with other codes here, so define a method call
            upload(file);
        }
        //Block form submission effect
        return false;
    };
    // Method of uploading file to server
    function upload(file){
        //Define a form
        let form=new FormData();
        //Add file to form
        form.append("uploadFile",file);
        //Asynchronous commit
        let url="http://localhost:8881/resource/upload/";
        axios.post(url,form)
             .then(function (response){
                 alert("upload ok")
                 console.log(response.data);
             })
             .catch(function (e){//Execute catch code block on failure
                 console.log(e);
         })
    }
</script>
</html>
Start service access test
- nacos service registration and configuration management
- SCA resource provides file upload function
- SCA resource UI client, which provides access to static resources
- Browser access
Engineering practice of API gateway
summary
API gateway is the entrance for external resources to access the internal resources of the service, so the file upload request should first request the gateway service, and then be forwarded by the gateway service to the specific resource service.
Service invocation architecture

Project structure design
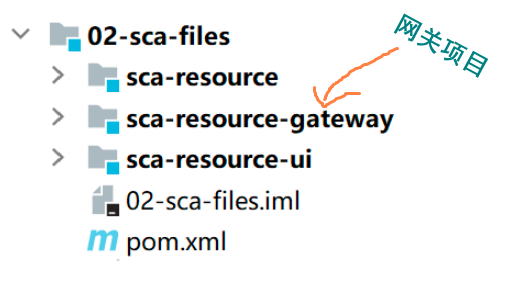
Create Gateway project and initialization
-
Create project
-
Add dependency
gateway
spring-cloud-starter-gateway
nacos registration discovery
spring-cloud-starter-alibaba-nacos-discovery
nacos configuration
spring-cloud-starter-alibaba-nacos-config -
Create the configuration file bootstrap.yml
server:
  port: 9000
spring:
  application:
    name: sca-resource-gateway
  cloud:
    nacos:
      discovery:
        server-addr: localhost:8848
      config:
        server-addr: localhost:8848
        file-extension: yml
    gateway:
      discovery:
        locator:
          enabled: true
      routes:
        - id: router01
          uri: lb://sca-resource
          predicates:
            - Path=/sca/resource/upload/**
          filters:
            - StripPrefix=1
- Create a startup class and start detection
Gateway cross domain configuration
When accessing the gateway based on Ajax Technology (axios), you need to note out the server's gateway at the gateway level
Note: the gateway uses netty and webflex with different packages
package com.jt.config;

import org.springframework.context.annotation.Bean;
import org.springframework.web.cors.CorsConfiguration;
import org.springframework.web.cors.reactive.CorsWebFilter;
import org.springframework.web.cors.reactive.UrlBasedCorsConfigurationSource;

@Configuration
public class CorsFilterConfig {
    @Bean
    public CorsWebFilter corsWebFilter(){
        //1. Build a cross domain configuration based on url
        UrlBasedCorsConfigurationSource source= new UrlBasedCorsConfigurationSource();
        //2. Cross domain configuration
        CorsConfiguration config=new CorsConfiguration();
        //2.1 allow all IP: ports to cross domain
        config.addAllowedOrigin("*");
        //2.2 allow all request headers to cross domains
        config.addAllowedHeader("*");
        //2.3 allow all request methods to cross domains: get,post
        config.addAllowedMethod("*");
        //2.4 it is allowed to carry valid cookie s across domains
        config.setAllowCredentials(true);
        source.registerCorsConfiguration("/**",config);
        return new CorsWebFilter(source);
    }
}
For cross domain configuration of Spring Gateway project, in addition to the java code of the gateway, you can also configure the cross domain configuration of the configuration file
spring:
  cloud:
    gateway:
      globalcors: #Cross domain configuration
        corsConfigurations:
          '[/**]':
            allowedOrigins: "*"
            allowedHeaders: "*"
            allowedMethods: "*"
            allowCredentials: true
Start the project for service access
- Open the Gateway, Resource server and client engineering service (UI), and modify the access server path in html
- Upload test note: visit the client web page
AOP mode operation logging
Page description
When the file upload business is implemented, add the operation of logging.
Add project dependency
Add AOP dependency to server
spring-boot-starter-aop
Create pointcut annotations
Define annotation
package com.jt.resource.annotation;

import java.lang.annotation.ElementType;
import java.lang.annotation.Retention;
import java.lang.annotation.RetentionPolicy;
import java.lang.annotation.Target;

@Retention(RetentionPolicy.RUNTIME)
@Target(ElementType.METHOD)
public @interface RequiredLog {
    String value() default "";
}
Define pointcut methods
Describe the target method. This method is the connection point
@RequiredLog("upload file")
@PostMapping("/upload/")
public String uploadFile(MultipartFile uploadFile) throws IOException {...}
Define log operation facet
Facet encapsulation PointCut and extended business logic facet = PointCut + Advice preparation: the technology of combining facet with main code
package com.jt.resource.aspect;

import lombok.extern.slf4j.Slf4j;
import org.aspectj.lang.ProceedingJoinPoint;
import org.aspectj.lang.annotation.Around;
import org.aspectj.lang.annotation.Aspect;
import org.aspectj.lang.annotation.Pointcut;
import org.springframework.stereotype.Component;
@Slf4j
@Aspect
@Component
public class LogAspect {
    //Define pointcuts
    @Pointcut("@annotation(com.jt.resource.annotation.RequiredLog)")
    public void doLog(){}//Icing on the cake (annotation description method)

    //Define extended business logic
    @Around("doLog()")
    //@Around("@annotation(com.jt.resource.annotation.RequiredLog)")
    public Object doAround(ProceedingJoinPoint joinPoint) throws Throwable {
        log.debug("Before {}",System.currentTimeMillis());
        Object result=joinPoint.proceed();//Execution chain (other aspects, target method - Jin)
        log.debug("After {}",System.currentTimeMillis());
        return result;//Execution result of target method (pointcut method)
    }
}
Analysis of AOP logging principle
bottom
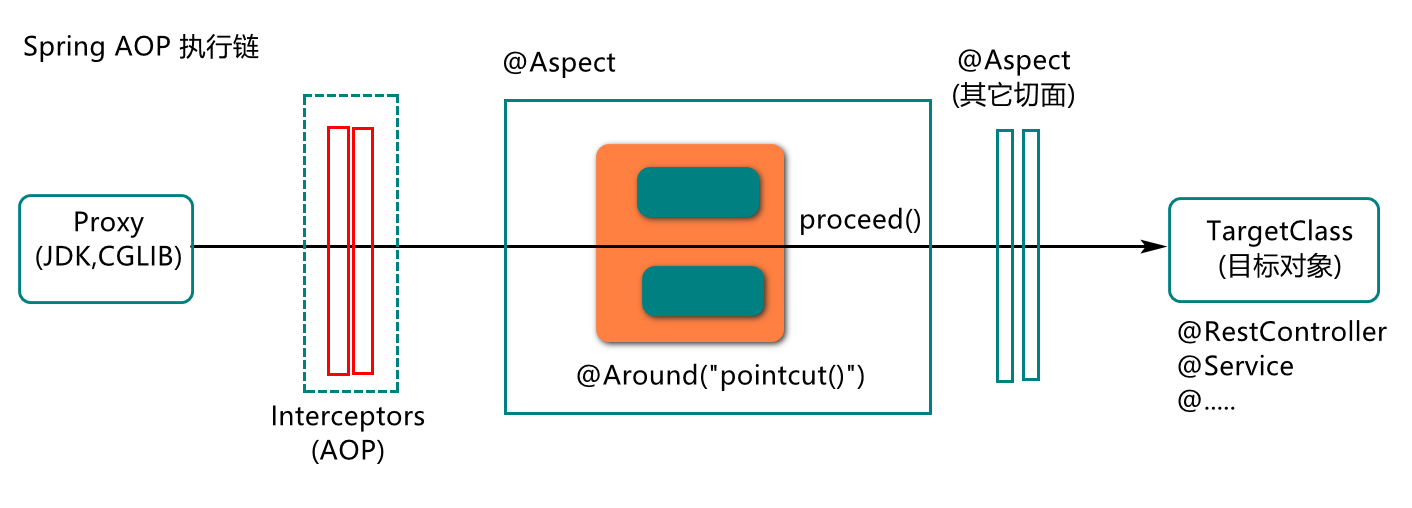
After defining AOP cut plane. The system starts, loads and analyzes the classes described by the @ Aspect annotation, creates a proxy object based on the pointcut description as the target type object, and creates an execution chain inside the proxy object, which contains interceptors (encapsulating pointcut information), notifications (Around,...), target objects, etc. when we request target object resources, Resources are called directly in the order of the execution chain.