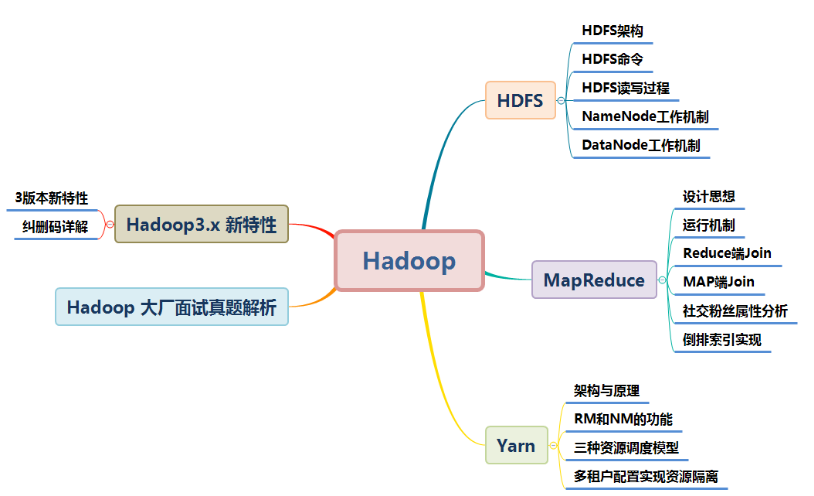
This document is compiled with reference to the official website of Hadoop and many other materials. For neat typesetting and comfortable reading, blurred and unclear pictures and black-and-white pictures are redrawn into high-definition color pictures.
At present, Hadoop 2. X is widely used in enterprises, so this article focuses on Hadoop 2. X and will explain the new contents of Hadoop 3. X!
1, HDFS
1. HDFS overview
In the Hadoop distributed system framework, the primary basic function is the file system. In Hadoop, the abstract class file system is used to represent our file system. There are many sub implementation classes under this abstract class. Which one to use depends on our specific implementation class. In our actual work, the most used is HDFS (distributed file system) And the local file system.
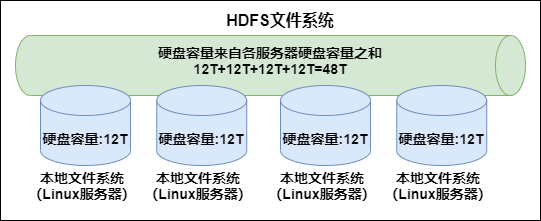
In the modern enterprise environment, single machine capacity is often unable to store a large amount of data, so it needs to be stored across machines. The unified management of file systems distributed on clusters is called distributed file system.
HDFS (Hadoop Distributed File System) is a sub project of Hadoop project. It is one of the core components of Hadoop. Hadoop is very suitable for storing large data (such as TB and PB). It uses HDFS as the storage system. HDFS uses multiple computers to store files and provides a unified access interface. It uses a distributed file system like accessing an ordinary file system.
2. HDFS architecture
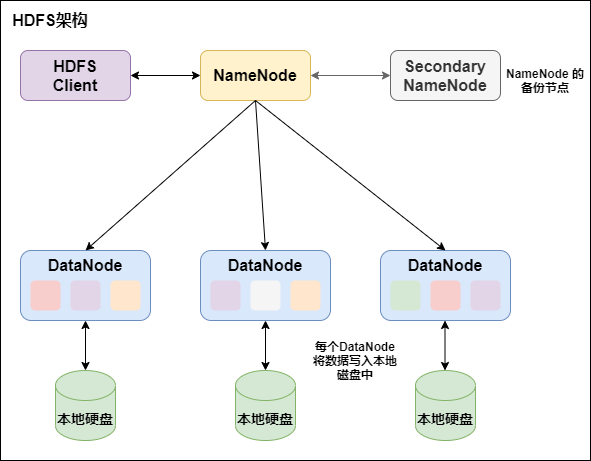
HDFS is a master / slave architecture, which consists of three parts: NameNode and DataNode as well as SecondaryNamenode:
-
NameNode is responsible for managing the metadata of the entire file system and the data block information corresponding to each path (file).
-
DataNode is responsible for managing the file data blocks of users. Each data block can store multiple copies on multiple datanodes. The default is 3.
-
The Secondary NameNode is an auxiliary background program used to monitor the status of HDFS and obtain snapshots of HDFS metadata at regular intervals. The main function is to assist the NameNode in managing metadata information.
3. Characteristics of HDFS
Firstly, it is a file system, which is used to store files and locate files through a unified namespace directory tree;
Secondly, it is distributed, and many servers cooperate to realize its functions. The servers in the cluster have their own roles.
1. master/slave architecture (master-slave architecture)
HDFS adopts master/slave architecture. Generally, an HDFS cluster consists of a namenode and a certain number of datanodes. Namenode is the master node of HDFS cluster and Datanode is the slave node of HDFS cluster. The two roles perform their respective duties and jointly coordinate and complete distributed file storage services.
2. Block storage
Files in HDFS are physically stored in blocks. The size of blocks can be specified through configuration parameters. The default size is 128M in Hadoop 2. X.
3. NameSpace
HDFS supports traditional hierarchical file organization. Users or applications can create directories and then save files in these directories. The file system namespace hierarchy is similar to most existing file systems: users can create, delete, move, or rename files.
Namenode is responsible for maintaining the file system namespace. Any changes to the file system namespace or attributes will be recorded by namenode.
HDFS will provide a unified abstract directory tree for the client. The client accesses files through paths, such as: hdfs://namenode:port/dir-a/dir-b/dir-c/file.data.
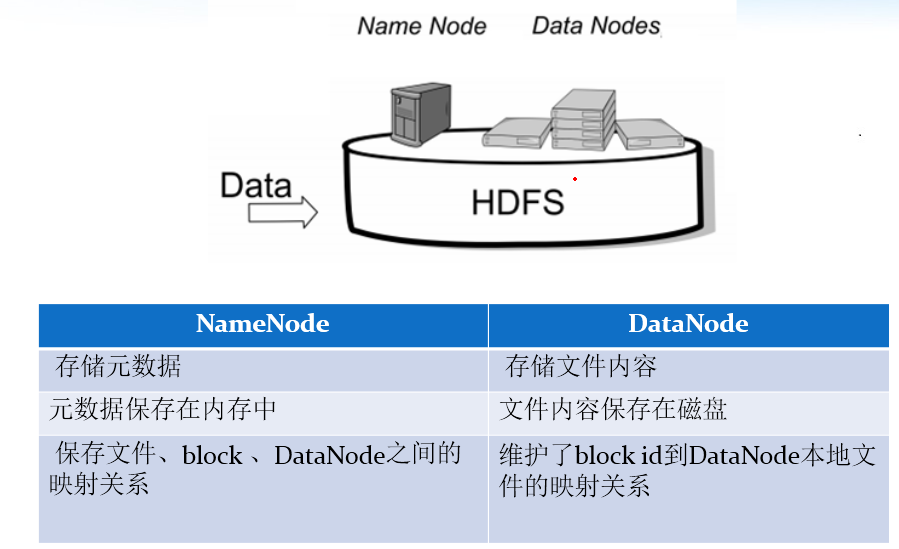
4. NameNode metadata management
We call the directory structure and file block location information metadata. NameNode is responsible for maintaining the directory tree structure of the entire HDFS file system and the block block information corresponding to each file (block id and DataNode server).
5. DataNode data storage
The specific storage management of each block of the file is undertaken by the DataNode node. Each block can be on multiple datanodes. DataNode needs to regularly report its own block information to NameNode. Store multiple copies (the number of copies can also be set through the parameter dfs.replication, which is 3 by default)
6. Replication mechanism
For fault tolerance, all blocks of the file will have copies. The block size and copy factor of each file are configurable. The application can specify the number of copies of a file. The copy factor can be specified when the file is created or changed later.
7. Write once and read many times
HDFS is designed to adapt to the scenario of one write and multiple reads, and does not support file modification.
Because of this, HDFS is suitable for the underlying storage service for big data analysis, but not for network disk and other applications, because it is inconvenient to modify, has large delay, high network overhead and high cost.
4. HDFS command line usage
If the hadoop environment variable is not configured, execute the following command in the bin directory under the hadoop installation directory. If the hadoop environment variable is configured, execute it in any directory
help
format:  hdfs dfs -help Operation command
 effect: View the parameter information of an operation command
ls
Format: hdfs dfs -ls  URI
 Function: similar to Linux of ls Command, displaying a list of files
lsr
format  :   hdfs  dfs -lsr URI
 effect  : Recursive execution in the whole directory ls, And UNIX Medium ls-R similar
mkdir
Format: hdfs  dfs  -mkdir [-p] <paths>
effect :   with<paths>Medium URI As a parameter, create a directory. use-p Parameter to recursively create a directory
put
Format: hdfs dfs -put <localsrc >  ... <dst>
Function: to convert a single source file src Or multiple source files srcs Copy from local file system to target file system(<dst>Corresponding path). You can also read input from standard input and write it to the target file system
hdfs dfs -put /rooot/bigdata.txt /dir1
moveFromLocal
Format: hdfs  dfs -moveFromLocal  <localsrc>   <dst>
effect:  and put The command is similar, but the source file localsrc After copying, it is deleted
hdfs dfs -moveFromLocal /root/bigdata.txt /
copyFromLocal
format:  hdfs dfs -copyFromLocal <localsrc> ... <dst>
effect: Copy files from local file system to hdfs Path to
appendToFile
format: hdfs dfs -appendToFile <localsrc> ... <dst>
effect: Append one or more files to hdfs In the specified file.You can also read input from the command line.
hdfs dfs -appendToFile a.xml b.xml /big.xml
moveToLocal
stay hadoop 2.6.4 Version testing has not implemented this method
 Format: hadoop  dfs  -moveToLocal [-crc] <src> <dst>
Role: cut local files to HDFS
get
format   hdfs dfs  -get [-ignorecrc ]  [-crc]  <src> <localdst>

Function: copy files to the local file system. CRC The file that failed the verification passed-ignorecrc Option copy. Documents and CRC The verification can pass-CRC Option copy
hdfs dfs -get /bigdata.txt /export/servers
getmerge
format: hdfs dfs -getmerge <src> <localdst>
effect: Merge and download multiple files, such as hdfs Directory of /aaa/There are multiple files under:log.1, log.2,log.3,...
copyToLocal
format:  hdfs dfs -copyToLocal <src> ... <localdst>
effect:  from hdfs Copy Local
mv
Format: hdfs  dfs -mv URI   <dest>
Function: will hdfs The file on is moved from the original path to the target path (the file is deleted after the move). This command cannot cross the file system
hdfs dfs -mv /dir1/bigdata.txt /dir2
rm
Format: hdfs dfs -rm [-r] [-skipTrash] URI [URI . . . ]
Function: delete the file specified by the parameter. There can be multiple parameters. This command deletes only files and non empty directories.
If specified-skipTrash Option, if the recycle bin is available, this option will skip the recycle bin and directly delete the file;
Otherwise, when the recycle bin is available HDFS Shell Executing this command in will temporarily put the file in the recycle bin.
hdfs dfs -rm -r /dir1
cp
format: hdfs  dfs  -cp URI [URI ...] <dest>
Function: copy files to the destination path. If<dest>  If it is a directory, you can copy multiple files to the directory.
-f
 Option will overwrite the target if it already exists.
-p
 Options retain file attributes (timestamp, ownership, license ACL,XAttr).
hdfs dfs -cp /dir1/a.txt /dir2/bigdata.txt
cat
hdfs dfs  -cat  URI [uri  ...]
Function: output the file content indicated by the parameter to stdout
hdfs dfs -cat /bigdata.txt
tail
format: hdfs dfs -tail path
 effect: Displays the end of a file
text
format:hdfs dfs -text path
 effect: Print the contents of a file as characters
chmod
format:hdfs  dfs  -chmod  [-R]  URI[URI  ...]
Function: change file permissions. If used  -R Option, the entire directory can be executed recursively. The user using this command must be the user of the file or super user.
hdfs dfs -chmod -R 777 /bigdata.txt
chown
format:  hdfs  dfs  -chmod  [-R]  URI[URI ...]
Role: change the user and user group of the file. If you use  -R Option, the entire directory can be executed recursively. The user using this command must be the user of the file or super user.
hdfs dfs -chown -R hadoop:hadoop /bigdata.txt
df
format: hdfs dfs  -df  -h  path
 effect: Statistics of free space information of file system
du
format: hdfs dfs -du -s -h path
 effect: Statistics folder size information
count
format: hdfs dfs -count path
 effect: Count the number of file nodes in a specified directory
setrep
format:  hdfs dfs -setrep num filePath
 effect: set up hdfs Number of copies of files in
 be careful: Even if the setting exceeds datanode Number of,The maximum number of copies can only be and datanode The number of is consistent
expunge (use with caution)
format:  hdfs dfs  -expunge
 effect: empty hdfs Trash
5. Advanced commands for HDFS
5.1 HDFS file quota configuration
In the environment where many people share HDFS, configuration setting is very important. Especially in the environment where Hadoop processes a large amount of data, if there is no quota management, it is easy to run out of space and make others unable to access. The quota setting of HDFS is for the directory rather than for the account. Each account can operate only one directory, and then set and configure the directory.
The quota configuration of HDFS files allows us to limit the number of files or the total content of files uploaded in a directory by the number of files or file size, so as to limit the maximum number of files allowed by each user, such as Baidu online disk.
hdfs dfs -count -q -h /user/root/dir1 #View quota information
result:

5.1.1 quantity limit
hdfs dfs  -mkdir -p /user/root/dir    #Create hdfs folder
hdfs dfsadmin -setQuota 2  dir      # Set a maximum of two files to be uploaded under this folder. It is found that only one file can be uploaded
hdfs dfsadmin -clrQuota /user/root/dir # Clear file limit
5.1.2 space size limit
When setting the space quota, the set space must be at least block_size * 3
hdfs dfsadmin -setSpaceQuota 4k /user/root/dir   # Limit space size 4KB
hdfs dfs -put  /root/a.txt  /user/root/dir
Commands to generate files of any size:
dd if=/dev/zero of=1.txt bs=1M count=2 #Generate 2M file
Clear space quota limit
hdfs dfsadmin -clrSpaceQuota /user/root/dir
5.2 security mode of HDFS
Security mode is a protection mechanism of hadoop, which is used to ensure the security of data blocks in the cluster. When the cluster starts, it will first enter the security mode. When the system is in security mode, it will check the integrity of data blocks.
Suppose we set the number of copies (that is, the parameter dfs.replication) If it is 3, there should be 3 replicas on the datanode. If there are only 2 replicas, the ratio is 2 / 3 = 0.666. The default replica rate of hdfs is 0.999. Our replica rate of 0.666 is obviously less than 0.999, so the system will automatically replicate replicas to other datanodes so that the replica rate is not less than 0.999. If there are 5 replicas in the system, which exceeds the 3 replicas we set, then The system will also delete more than 2 copies.
In the safe mode state, the file system only accepts data read requests, but does not accept change requests such as deletion and modification. When the whole system meets the security standard, HDFS automatically leaves the safe mode. 30s
Safe mode operation command
    hdfs  dfsadmin  -safemode  get #View safe mode status
    hdfs  dfsadmin  -safemode  enter #Enter safe mode
    hdfs  dfsadmin  -safemode  leave #Leave safe mode
6. block and replica mechanism of HDFS
HDFS abstracts all files into block blocks for storage. Regardless of file size, all files are stored in the unified size and form of block blocks, which is convenient for our distributed file system to manage files.
All files are stored in the HDFS file system in the form of block blocks. In Hadoop version 1, the default block size of the file is 64M. In Hadoop version 2, the default block size of the file is 128M. The block size can be specified through the configuration file in hdfs-site.xml.
<property>
    <name>dfs.block.size</name>
    <value>Block size in bytes</value> //Just write values
</property>
6.1 benefits of abstracting into block blocks
-
- A file may be larger than any disk in the cluster
10T*3/128 = xxx block 2T, 2T, 2T file storage – > multiple block blocks, which belong to one file
- A file may be larger than any disk in the cluster
-
- Using block abstraction instead of files simplifies the storage subsystem
-
- Blocks are ideal for data backup to provide data fault tolerance and availability
6.2 block cache
Usually, DataNode reads blocks from disk, but for frequently accessed files, the corresponding blocks may be displayed and cached in the memory of DataNode in the form of out of heap block cache. By default, a block is only cached in the memory of one DataNode. Of course, the number of datanodes can be configured for each file. The job scheduler can cache on the DataNode of the cache block Running tasks can take advantage of block cache to improve the performance of read operations.
For example:
A small query table used in join operations is a good candidate for block caching. Users or applications can tell namenode which files to cache and how long to cache by adding a cache directive to the cache pool. Cache pool is a management group with cache management permission and resource usage.
For example:
A file 130M will be divided into two block blocks and saved in two block blocks. It actually occupies 130M disk space instead of 256M disk space
6.3 file permission verification of HDFS
The file permission mechanism of hdfs is similar to that of linux system
r:read w:write x:execute
Permission x means ignore for files and whether you have permission to access the contents for folders
If the linux system user zhangsan uses the hadoop command to create a file, the owner of the file in HDFS is zhangsan
The purpose of HDFS file permissions is to prevent good people from doing wrong, not bad people from doing bad things. HDFS believes you tell me who you are and who you are
6.4 copy factor of HDFS
In order to ensure the security of block, that is, the security of data, in Hadoop 2, the file saves three copies by default. We can change the number of copies to improve the security of data
Modify the following configuration properties in hdfs-site.xml to change the number of copies of the file
<property>
     <name>dfs.replication</name>
     <value>3</value>
</property>
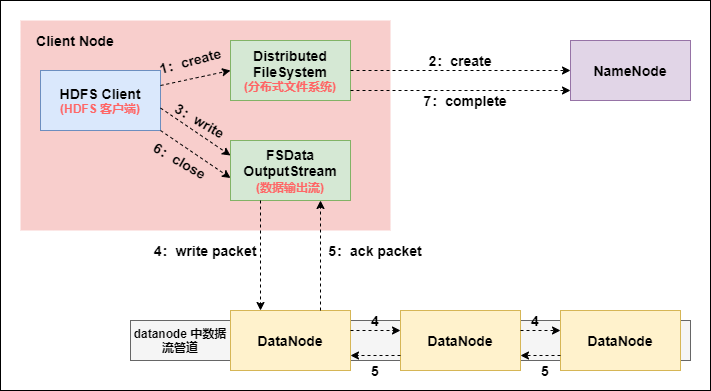
7. HDFS file writing process (very important)
-
The Client initiates a file upload request and establishes communication with the NameNode through RPC. The NameNode checks whether the target file exists, whether the parent directory exists, and returns whether it can be uploaded;
-
The Client requests which DataNode servers the first block should be transferred to;
-
NameNode allocates files according to the number of backups specified in the configuration file and the rack sensing principle, and returns the addresses of available datanodes, such as A, B, C;
In the design of Hadoop, considering the security and efficiency of data, three copies of data files are stored on HDFS by default. The storage strategy is one copy locally, one copy on other nodes in the same rack and one copy on a node in different racks.
-
The client requests a of the three datanodes to upload data (essentially an RPC call to establish a pipeline). A will continue to call B after receiving the request, and then B will call C to complete the establishment of the whole pipeline, and then return to the client level by level;
-
The Client starts to upload the first block to a (first read the data from the disk and put it into a local memory cache). With the packet as the unit (64K by default), a will send a packet to B and B will send it to C. A. each packet transmitted will be put into a reply queue to wait for a reply;
-
The data is divided into packet s, which are transmitted successively on the pipeline. In the opposite direction of the pipeline, acks are sent one by one (command correct response), and finally the first DataNode A in the pipeline sends the pipelineack to the Client;
-
After the transmission of a block is completed, the Client requests the NameNode to upload the second block again, and repeat step 2;
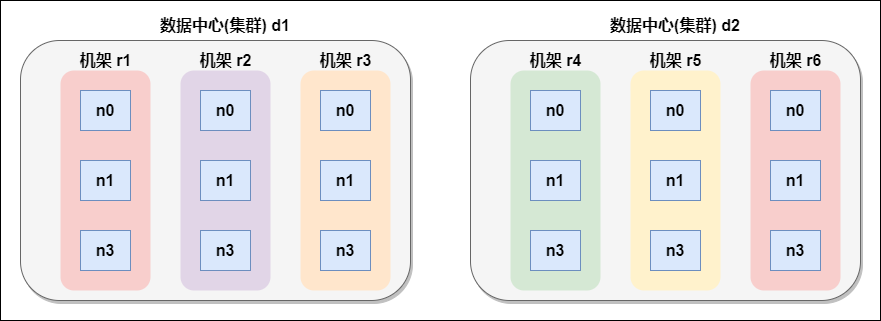
7.1 network topology concept
What does it mean that two nodes are called "close neighbors" in a local network? In massive data processing, the main limiting factor is the data transmission rate between nodes - bandwidth is very scarce. The idea here is to take the bandwidth between two nodes as a measure of distance.
Node distance: the sum of the distances from two nodes to the nearest common ancestor.
For example, suppose there is node n1 in rack r1 of data center d1. This node can be expressed as / d1/r1/n1. Using this marker, four distance descriptions are given here.
Distance(/d1/r1/n1, /d1/r1/n1)=0 (processes on the same node)
Distance(/d1/r1/n1, /d1/r1/n2)=2 (different nodes on the same rack)
Distance(/d1/r1/n1, /d1/r3/n2)=4 (nodes on different racks in the same data center)
Distance(/d1/r1/n1, /d2/r4/n2)=6 (nodes in different data centers)
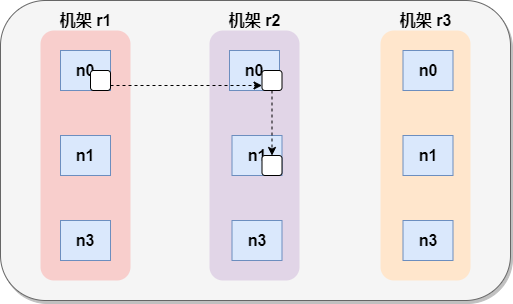
7.2 rack awareness (replica node selection)
- Node selection of low version Hadoop replica
The first copy is on the node where the client is located. If the client is outside the cluster, select one at random.
The second replica and the first replica are located on random nodes in different racks.
The third replica and the second replica are in the same rack with random nodes.
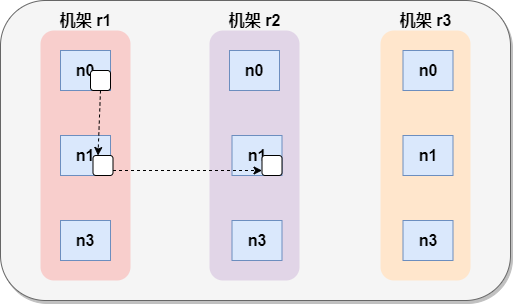
- Hadoop 2.7.2 replica node selection
The first copy is on the node where the client is located. If the client is outside the cluster, select one at random.
The second replica and the first replica are in the same rack, random nodes.
The third replica is located in a different rack, with random nodes.
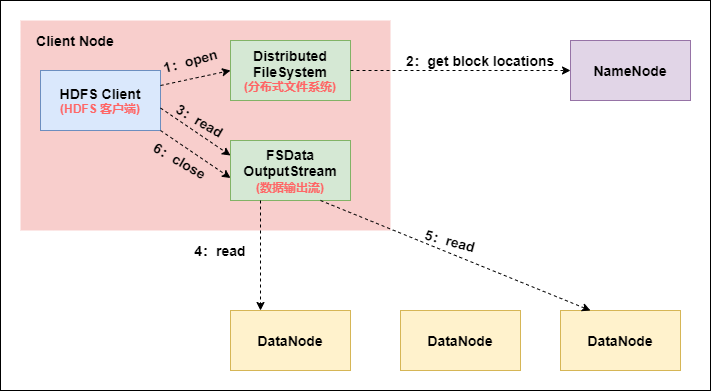
8.HDFS file reading process (very important)
-
The Client sends an RPC request to the NameNode to determine the location of the request file block;
-
NameNode will return part or all of the block list of the file as appropriate. For each block, NameNode will return the DataNode address containing the copy of the block; These returned DN addresses will be sorted according to the distance between the DataNode and the Client according to the cluster topology. The sorting rules are as follows: the one close to the Client in the network topology will be ranked first; In the heartbeat mechanism, the DN status of timeout report is state, which is behind;
-
The Client selects the top DataNode to read the block. If the Client itself is a DataNode, it will directly obtain data locally (short-circuit reading feature);
-
The bottom layer essentially creates a Socket Stream (FSDataInputStream) and repeatedly calls the read method of the parent DataInputStream until the data on this block is read;
-
After reading the blocks in the list, if the file reading is not finished, the client will continue to obtain the next batch of block list from the NameNode;
-
After reading a block, the checksum verification will be performed. If an error occurs when reading the DataNode, the client will notify the NameNode, and then continue reading from the next DataNode with a copy of the block.
-
The read method reads block information in parallel, not one by one; NameNode only returns the DataNode address of the block included in the Client request, not the data of the request block;
-
Finally, all block s read will be merged into a complete final file.
From the HDFS file reading and writing process, it can be seen that the HDFS file is written in serial. The data packet is sent to node A first, then node A sends it to B, and B sends it to C; HDFS file reading is parallel, and the Client directly reads the node where the block is located in parallel.
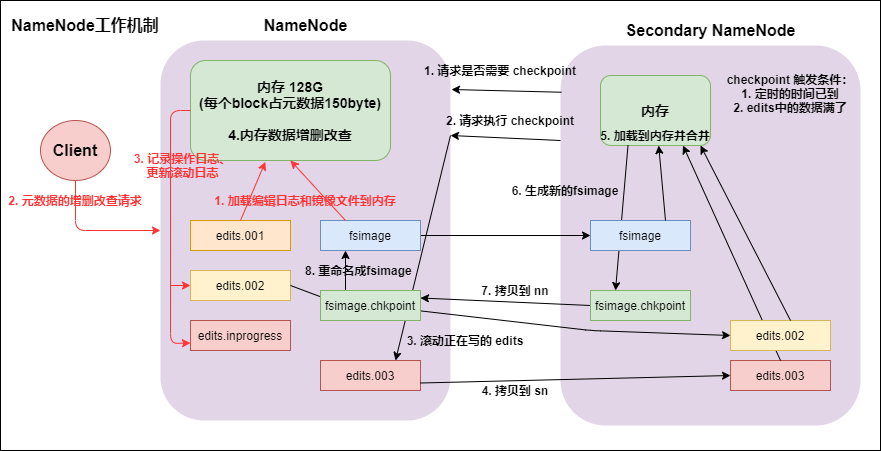
9. NameNode working mechanism and metadata management (important)
9.1 startup of namenode and datanode
- namenode working mechanism
- After you first start namenode formatting, create fsimage and edits files. If it is not the first time to start, directly load the editing log and image file into memory.
- The client requests to add, delete or modify metadata.
- namenode records the operation log and updates the rolling log.
- namenode adds, deletes, modifies and queries data in memory.
- secondary namenode
- secondary namenode asks namenode if it needs a checkpoint. Directly bring back namenode to check the results.
- secondary namenode requests checkpoint execution.
- namenode scrolls the edits log being written.
- Copy the editing log and image files before scrolling to the secondary namenode.
- secondary namenode loads the edit log and image files into memory and merges them.
- Generate a new image file fsimage.chkpoint.
- Copy fsimage.chkpoint to namenode.
- namenode renames fsimage.chkpoint to fsimage.
9.2 detailed explanation of fsimage and edits
All metadata information is saved in FsImage and Eidts files, which record the metadata information of all data, and the storage directory of metadata information is configured in hdfs-site.xml among
		<!--fsimage Path to file store-->
		<property>
                <name>dfs.namenode.name.dir</name>
                <value>file:///opt/hadoop-2.6.0-cdh5.14.0/hadoopDatas/namenodeDatas</value>
        </property>
        <!-- edits Path to file store -->
		<property>
                <name>dfs.namenode.edits.dir</name>
                <value>file:///opt/hadoop-2.6.0-cdh5.14.0/hadoopDatas/dfs/nn/edits</value>
  		</property>
When the client writes to the hdfs file, it will be recorded in the edits file first.
Metadata is also updated when edits is modified.
Each time hdfs is updated, edits is updated first, and then the client will see the latest information.
fsimage: it is the image of metadata in namenode, which is generally called checkpoint.
Generally, the operations on namenode are put in edits at the beginning. Why not put them in fsimage?
Because fsimage is a complete image of namenode and its content is very large, if it is loaded into memory every time, a tree topology will be generated, which consumes a lot of memory and CPU.
The fsimage content contains the metadata information of all datanodes under the management of namenode, the file block and the datanode where the block is located. As the content of edits increases, it needs to merge with fsimage at a certain point in time.
9.3 viewing file information in fsimage file
- Using the command hdfs oiv
cd  /opt/hadoop-2.6.0-cdh5.14.0/hadoopDatas/namenodeDatas/current
hdfs oiv -i fsimage_0000000000000000112 -p XML -o hello.xml
9.4 viewing file information in edits
- View command hdfs oev
cd  /opt/hadoop-2.6.0-cdh5.14.0/hadoopDatas/dfs/nn/edits
hdfs oev -i  edits_0000000000000000112-0000000000000000113 -o myedit.xml -p XML
9.5 how does secondarynamenode assist in managing FSImage and Edits files
- secnonaryNN notifies NameNode to switch editlog.
- secondaryNN obtains FSImage and editlog (via http) from NameNode.
- secondaryNN loads the fsimage into memory, and then starts merging editlog. After merging, it becomes a new fsimage.
- secondaryNN sends the new fsimage back to the NameNode.
- NameNode replaces the old fsimage with the new fsimage.

The merge is completed by secondarynamenode, which will request namenode to stop using edits and temporarily put the new write operation into a new file (edits.new).
secondarynamenode obtains edits from namenode through http get. Because it needs to merge with fsimage, it also loads fsimage into memory through http get, and then performs specific operations on the file system one by one. It merges with fsimage to generate a new fsimage, and then sends fsimage to namenode through http post.
After the namenode obtains the fsimage from the secondarynamenode, it will replace the original fsimage with a new fsimage, and change edits.new into edits. At the same time, it will update the fsimage.
When hadoop enters safe mode, the administrator needs to use the save namespace of dfsadmin to create a new checkpoint.
When merging edits and fsimage, secondary namenode consumes about the same memory as namenode, so it is generally placed on different machines.
The merging time of fsimage and edits depends on two parameters. The first parameter is that fsimage and edits are merged once every 1 hour by default.
- The first parameter: when the time reaches one hour, fsimage and edits will be merged
dfs.namenode.checkpoint.period 3600
- The second parameter: the hdfs operation will be merged after 1000000 times
dfs.namenode.checkpoint.txns 1000000
- The third parameter: how often to check the number of hdfs operations
dfs.namenode.checkpoint.check.period 60
9.6 multi directory configuration of namenode metadata information
In order to ensure the security of metadata, we usually determine our disk mount directory first and make the disk of metadata RAID1
The local directory of namenode can be configured into multiple directories, and each directory stores the same content, which increases the reliability.
-
Specific configuration scheme:
hdfs-site.xml
	<property>
         <name>dfs.namenode.name.dir</name>
         <value>file:///export/servers/hadoop-2.6.0-cdh5.14.0/hadoopDatas/namenodeDatas</value>
    </property>
9.7 namenode fault recovery
When our secondaryNamenode merges the fsimage and edits in the namenode, we first copy a copy of the fsimage and edits files in the namenode, so a copy of the fsimage and edits files will also be saved in the secondername do. If the fsimage and edits files in the namenode are damaged, we can copy the fsimage and edits in the secondaryNamenode Bei used to continue to use namenode, but some data may be lost. Here are several configuration options
- namenode saves the configuration path of fsimage
<!--  namenode The metadata storage path is generally used in practical work SSD Solid state drives, separated by multiple solid state drives, redundant metadata -->
	<property>
		<name>dfs.namenode.name.dir</name>
		<value>file:///export/servers/hadoop-2.6.0-cdh5.14.0/hadoopDatas/namenodeDatas</value>
	</property>
- namenode saves the configuration path of the edits file
<property>
		<name>dfs.namenode.edits.dir</name>
		<value>file:///export/servers/hadoop-2.6.0-cdh5.14.0/hadoopDatas/dfs/nn/edits</value>
</property>
- secondaryNamenode saves the configuration path of the fsimage file
<property>
		<name>dfs.namenode.checkpoint.dir</name>
		<value>file:///export/servers/hadoop-2.6.0-cdh5.14.0/hadoopDatas/dfs/snn/name</value>
</property>
- secondaryNamenode saves the configuration path of the edits file
<property>
		<name>dfs.namenode.checkpoint.edits.dir</name>
		<value>file:///export/servers/hadoop-2.6.0-cdh5.14.0/hadoopDatas/dfs/nn/snn/edits</value>
</property>
Next, let's simulate the fault recovery function of namenode
- Kill the namenode process: use jps to view the namenode process number and kill -9 directly.
- Delete the fsimage file and edits file of namenode.
According to the above configuration, find the namenode and place the fsimage and edits paths. Directly delete all rm -rf files.
- Copy the fsimage and edits files of secondaryNamenode to the fsimage and edits folder of namenode.
According to the above configuration, find the fsimage and edits path of secondaryNamenode, and use cp -r to copy all the contents to the directory corresponding to namenode.
- Restart namenode and observe whether the data exists.
10. datanode working mechanism and data storage
- datanode working mechanism
-
A data block is stored on disk in the form of a file on datanode, including two files, one is the data itself, and the other is metadata, including the length of the data block, the checksum of the block data, and the timestamp.
-
After the DataNode is started, it registers with the namenode. After passing the registration, it periodically reports all block information to the namenode (dfs.blockreport.intervalMsec).
-
The heartbeat occurs every 3 seconds. The heartbeat returns a command from namenode to the datanode, such as copying block data to another machine or deleting a data block. If the heartbeat of a datanode is not received for more than 10 minutes, the node is considered unavailable.
-
Some machines can be safely joined and exited during cluster operation.
- Data integrity
- When the DataNode reads the block, it calculates the checksum.
- If the calculated checksum is different from the value when the block was created, it indicates that the block has been damaged.
- client reads block s on other datanodes.
- datanode periodically validates the checksum after its file is created.
- Parameter setting of disconnection time limit
If the datanode process dies or a network failure causes the datanode to fail to communicate with the namenode, the namenode will not immediately judge the node as dead. It will take a period of time, which is temporarily called the timeout. The default timeout length of HDFS is 10 minutes + 30 seconds. If the timeout is defined as timeout, the calculation formula of the timeout is:
timeout = 2 * dfs.namenode.heartbeat.recheck-interval + 10 * dfs.heartbeat.interval.
The default size of dfs.namenode.heartbeat.recheck-interval is 5 minutes, and the default size of dfs.heartbeat.interval is 3 seconds.
Note that hdfs-site.xml heartbeat.recheck.interval in the configuration file is in milliseconds, and dfs.heartbeat.interval is in seconds.
<property>
    <name>dfs.namenode.heartbeat.recheck-interval</name>
    <value>300000</value>
</property>
<property>
    <name>dfs.heartbeat.interval </name>
    <value>3</value>
</property>
-
Directory structure of DataNode
Unlike namenode, the storage directory of datanode is automatically created in the initial stage without additional formatting.
Check the version number in the directory / opt / hadoop-2.6.0-cdh5.14.0/hadoop data / datanodata / current
    cat VERSION

    #Thu Mar 14 07:58:46 CST 2019
    storageID=DS-47bcc6d5-c9b7-4c88-9cc8-6154b8a2bf39
    clusterID=CID-dac2e9fa-65d2-4963-a7b5-bb4d0280d3f4
    cTime=0
    datanodeUuid=c44514a0-9ed6-4642-b3a8-5af79f03d7a4
    storageType=DATA_NODE
    layoutVersion=-56
Specific explanation:
storageID: storage id number.
clusterID cluster id, globally unique.
The cTime attribute marks the creation time of the datanode storage system. For the storage system just formatted, this attribute is 0; however, after the file system is upgraded, this value will be updated to the new timestamp.
datanodeUuid: the unique identifier of the datanode.
storageType: storage type.
layoutVersion is a negative integer. This version number is usually updated only when new features are added to HDFS.
- datanode multi directory configuration
datanode can also be configured into multiple directories, and the data stored in each directory is different. That is, the data is not a copy. The specific configuration is as follows:
-You only need to separate multiple storage directories with commas in value
  cd /opt/hadoop-2.6.0-cdh5.14.0/etc/hadoop
  <!--  definition dataNode The node location of data storage. In actual work, the mounting directory of the disk is generally determined first, and then multiple directories are used for segmentation  -->
          <property>
                  <name>dfs.datanode.data.dir</name>
                  <value>file:///opt/hadoop-2.6.0-cdh5.14.0/hadoopDatas/datanodeDatas</value>
          </property>
10.1 new data node
Requirements Description:
With the growth of the company's business, the amount of data is increasing. The capacity of the original data nodes can no longer meet the needs of storing data. It is necessary to dynamically add new data nodes on the basis of the original cluster.
10.1.1 environmental preparation
- Copy a new virtual machine
Copy our pure virtual machine as our new node
- Modify mac address and IP address
modify mac Address command
	vim /etc/udev/rules.d/70-persistent-net.rules
 modify ip Address command
	vim /etc/sysconfig/network-scripts/ifcfg-eth0
- Turn off the firewall and selinux
Turn off firewall
	service iptables stop
 close selinux
	vim /etc/selinux/config
- Change host name
The change hostname command will node04 Host name changed to node04.hadoop.com
vim /etc/sysconfig/network
- Change host name and IP address mapping for four machines
All four machines need to be added hosts file
vim /etc/hosts

192.168.52.100 node01.hadoop.com  node01
192.168.52.110 node02.hadoop.com  node02
192.168.52.120 node03.hadoop.com  node03
192.168.52.130 node04.hadoop.com  node04
- node04 server shutdown and restart
node04 Execute the following command to shut down and restart
	reboot -h now
- node04 installing jdk
node04 Unify two paths
	mkdir -p /export/softwares/
	mkdir -p /export/servers/
Then extract the jdk installation package and configure the environment variables
- Unzip the hadoop installation package
stay node04 Unzip on the server hadoop Install package to/export/servers , node01 Executing the following command will hadoop Copy installation package to node04 The server
	cd /export/softwares/
	scp hadoop-2.6.0-cdh5.14.0-Self compiled version.tar.gz node04:$PWD

node04 Unzip the installation package
	tar -zxf hadoop-2.6.0-cdh5.14.0-Self compiled version.tar.gz -C /export/servers/
- Copy all node01 hadoop configuration files to node04
node01 Execute the following command to hadoop Copy all configuration files to node04 Above the server
	cd /export/servers/hadoop-2.6.0-cdh5.14.0/etc/hadoop/
	scp ./* node04:$PWD
10.1.2 specific steps for new nodes in service
- Create dfs.hosts file
stay node01 that is namenode Of the machine/export/servers/hadoop-2.6.0-cdh5.14.0/etc/hadoop Create under directory dfs.hosts file

[root@node01 hadoop]# cd /export/servers/hadoop-2.6.0-cdh5.14.0/etc/hadoop
[root@node01 hadoop]# touch dfs.hosts
[root@node01 hadoop]# vim dfs.hosts

Add the following host name (including the new node)
node01
node02
node03
node04
- node01 edit hdfs-site.xml and add the following configuration
Add dfs.hosts attribute in hdfs-site.xml configuration file of namenode
node01 Execute the following command :

cd /export/servers/hadoop-2.6.0-cdh5.14.0/etc/hadoop
vim hdfs-site.xml

# Add something
	<property>
         <name>dfs.hosts</name>
         <value>/export/servers/hadoop-2.6.0-cdh5.14.0/etc/hadoop/dfs.hosts</value>
    </property>
    <!--Dynamic online and offline configuration: If there is in the configuration file, No configuration is required-->
    <property>
		<name>dfs.hosts</name>
		<value>/export/servers/hadoop-2.6.0-cdh5.14.0/etc/hadoop/accept_host</value>
	</property>

	<property>
		<name>dfs.hosts.exclude</name>
		<value>/export/servers/hadoop-2.6.0-cdh5.14.0/etc/hadoop/deny_host</value>
	</property>
- Refresh namenode
- node01 refreshes the namenode by executing the following command
[root@node01 hadoop]# hdfs dfsadmin -refreshNodes
Refresh nodes successful
- Update resourceManager node
- node01 refreshes the resourceManager by executing the following command
[root@node01 hadoop]# yarn rmadmin -refreshNodes
19/03/16 11:19:47 INFO client.RMProxy: Connecting to ResourceManager at node01/192.168.52.100:8033
- Add the host name of the new service node to the slave file of namenode
node01 edits the slave file and adds the host of the new node. After the change, the slave file does not need to be distributed to other machines
node01 Execute the following command to edit slaves file :
	cd /export/servers/hadoop-2.6.0-cdh5.14.0/etc/hadoop
	vim slaves

Add something:
node01
node02
node03
node04
- Start the new node separately
node04 The server executes the following command to start datanode and nodemanager :
	cd /export/servers/hadoop-2.6.0-cdh5.14.0/
	sbin/hadoop-daemon.sh start datanode
	sbin/yarn-daemon.sh start nodemanager
- Use the load balancing command to load data evenly on all machines
node01 Execute the following command :
	cd /export/servers/hadoop-2.6.0-cdh5.14.0/
	sbin/start-balancer.sh
10.2 retired old data
- Create dfs.hosts.exclude configuration file
Create dfs.hosts.exclude file in / export/servers/hadoop-2.6.0-cdh5.14.0/etc/hadoop directory of the server where namenod is located, and add the host name to be retired
node01 Execute the following command :
	cd /export/servers/hadoop-2.6.0-cdh5.14.0/etc/hadoop
	touch dfs.hosts.exclude
	vim dfs.hosts.exclude
 Add the following:
	node04.hadoop.com

Special note: the real host name or ip Any address is OK. You can't write it node04
- Edit hdfs-site.xml of the machine where namenode is located
Edit the hdfs-site.xml configuration file of the machine where namenode is located and add the following configuration
cd /export/servers/hadoop-2.6.0-cdh5.14.0/etc/hadoop
vim hdfs-site.xml

#Add the following:
	<property>
         <name>dfs.hosts.exclude</name>
         <value>/export/servers/hadoop-2.6.0-cdh5.14.0/etc/hadoop/dfs.hosts.exclude</value>
   </property>
- Refresh namenode, refresh resourceManager
stay namenode Execute the following command on the machine to refresh namenode,Refresh resourceManager :

hdfs dfsadmin -refreshNodes
yarn rmadmin -refreshNodes
- After the node is retired, stop the node process
Wait until the decommissioned node status is decommissioned (all blocks have been copied), stop the node and node resource manager. Note: if the number of replicas is 3 and the serving node is less than or equal to 3, it cannot be retired successfully. You need to modify the number of replicas before you can retire.
node04 Execute the following command to stop the node process :
	cd /export/servers/hadoop-2.6.0-cdh5.14.0
	sbin/hadoop-daemon.sh stop datanode
	sbin/yarn-daemon.sh stop nodemanager
- Remove retired nodes from the include file
namenode The node is node01 Execute the following command to delete the retired node :
	cd /export/servers/hadoop-2.6.0-cdh5.14.0/etc/hadoop
	vim dfs.hosts

Deleted content: Deleted node04
node01
node02
node03
- node01 executes the command to refresh the namenode and the resourceManager
hdfs dfsadmin -refreshNodes
yarn rmadmin -refreshNodes
- Delete the retired node from the slave file of namenode
namenode The machine is node01 Execute the following command from slaves Delete retired node from file :
	cd /export/servers/hadoop-2.6.0-cdh5.14.0/etc/hadoop
	vim slaves
 Deleted content: Deleted node04
node01
node02
node03
- If the data load is unbalanced, execute the following command to balance the load
node01 Execute the following command to balance the load
	cd /export/servers/hadoop-2.6.0-cdh5.14.0/
	sbin/start-balancer.sh
11. block blocks are manually spliced into complete data
All data is stored in block blocks. As long as we can find all block blocks of the file and splice them together, it will become a complete file. Next, we will splice the files through the command:
- Upload a file larger than 128M to hdfs
We select a file larger than 128M to upload to hdfs. Only a file larger than 128M will have multiple block blocks.
Here we choose to upload our jdk installation package to hdfs.
node01 executes the following command to upload the jdk installation package
cd /export/softwares/
hdfs dfs -put jdk-8u141-linux-x64.tar.gz  /
- View the two block block IDs of the jdk through the web browser interface
Here we see two block IDS:
1073742699 and 1073742700
Then we can manually splice our two block blocks through blockid.
- Find the path where the block is located according to our configuration file
According to us hdfs-site.xml Configuration, found datanode Path to
<!--  definition dataNode The node location of data storage. In actual work, the mounting directory of the disk is generally determined first, and then multiple directories are used for segmentation  -->
        <property>
                <name>dfs.datanode.data.dir</name>
                <value>file:///export/servers/hadoop-2.6.0-cdh5.14.0/hadoopDatas/datanodeDatas</value>
        </property>


Enter the following path : This basic path is in the above configuration value Path of
cd /export/servers/hadoop-2.6.0-cdh5.14.0/hadoopDatas/datanodeDatas/current/BP-557466926-192.168.52.100-1549868683602/current/finalized/subdir0/subdir3
- Perform splicing of block blocks
Put different block The blocks are spliced in order to form a complete file
cat blk_1073742699 >> jdk8u141.tar.gz
cat blk_1073742700 >> jdk8u141.tar.gz
 Move our jdk reach/export Path, and then decompress
mv  jdk8u141.tar.gz /export/
cd /export/
tar -zxf jdk8u141.tar.gz
 Normal decompression, no problem, indicating that our program follows block There is no problem with block storage
12. Other important functions of HDFS
1. Data copy between multiple clusters
In our actual work, we are likely to encounter copying the data of the test cluster to the production environment cluster, or copying the data of the production environment cluster to the test cluster, so we need to copy the data remotely between multiple clusters. hadoop also has commands to help us realize this function
- Local file copy scp
cd /export/softwares/

scp -r jdk-8u141-linux-x64.tar.gz root@node02:/export/
- Data copy distcp between clusters
cd /export/servers/hadoop-2.6.0-cdh5.14.0/

bin/hadoop distcp hdfs://node01:8020/jdk-8u141-linux-x64.tar.gz  hdfs://cluster2:8020/
2. hadoop archive
Each file is stored in blocks, and the metadata of each block is stored in the memory of namenode, so hadoop is very inefficient to store small files. Because a large number of small files will consume most of the memory in namenode. However, note that the disk capacity required to store small files will not increase compared with the disk space required to store the original contents of these files. For example, a 1MB file is stored in 128MB blocks, using 1MB of disk space instead of 128MB.
Hadoop archive file or HAR file is a more efficient file archive tool. It stores files into HDFS blocks, which allows transparent access to files while reducing the memory use of namenode. Specifically, Hadoop archive files can be used as input to MapReduce.
Create Archive
-
Step 1: create an archive
Note: archive files must ensure that the yarn cluster starts
cd /export/servers/hadoop-2.6.0-cdh5.14.0

bin/hadoop archive -archiveName myhar.har -p /user/root /user
- Step 2: view the contents of archived files
hdfs dfs -lsr /user/myhar.har

hdfs dfs -lsr har:///user/myhar.har
- Step 3: unzip the archive
hdfs dfs -mkdir -p /user/har
hdfs dfs -cp har:///user/myhar.har/* /user/har/
3. hdfs snapShot management
As the name suggests, snapshot is equivalent to a backup of our hdfs file system. We can set a backup of the folder we specify through snapshot. However, after adding snapshot, we will not copy all files immediately, but point to the same file. When a write occurs, a new file is generated
- Snapshots use basic syntax
1, Enable the snapshot function of the specified directory
	hdfs dfsadmin  -allowSnapshot  route
2,Disable the snapshot function of the specified directory (the default is disabled)
	hdfs dfsadmin  -disallowSnapshot  route
3,Create a snapshot of a path snapshot
	hdfs dfs -createSnapshot  route
4,Specify a snapshot name to create a snapshot snapshot
	hdfs dfs  -createSanpshot Path name
5,Rename snapshot
	hdfs dfs  -renameSnapshot  Path old name new name
6,Lists all snapshot directories available to the current user
	hdfs lsSnapshottableDir
7,Compare the directory differences between the two snapshots
	hdfs snapshotDiff  Path 1 path 2
8,Delete snapshot snapshot
	hdfs dfs -deleteSnapshot <path> <snapshotName>
- Actual case of snapshot operation
1,Enable and disable snapshots of the specified directory

    [root@node01 hadoop-2.6.0-cdh5.14.0]# hdfs dfsadmin -allowSnapshot /user

    Allowing snaphot on /user succeeded

    [root@node01 hadoop-2.6.0-cdh5.14.0]# hdfs dfsadmin -disallowSnapshot /user

    Disallowing snaphot on /user succeeded

2,Creates a snapshot of the specified directory

	Note: before creating a snapshot, allow the directory to create a snapshot

    [root@node01 hadoop-2.6.0-cdh5.14.0]# hdfs dfsadmin -allowSnapshot /user

    Allowing snaphot on /user succeeded

    [root@node01 hadoop-2.6.0-cdh5.14.0]# hdfs dfs -createSnapshot /user

    Created snapshot /user/.snapshot/s20190317-210906.549

	adopt web Browser access snapshot

	http://node01:50070/explorer.html#/user/.snapshot/s20190317-210906.549

3,Creates a snapshot with a specified name

    [root@node01 hadoop-2.6.0-cdh5.14.0]# hdfs dfs -createSnapshot /user mysnap1

    Created snapshot /user/.snapshot/mysnap1

4,Rename snapshot

	hdfs dfs -renameSnapshot /user mysnap1 mysnap2

5,Lists all directories that the current user can snapshot

	hdfs lsSnapshottableDir

6,Compare the differences between the two snapshots

    hdfs dfs -createSnapshot /user snap1

    hdfs dfs -createSnapshot /user snap2

    hdfs snapshotDiff  snap1 snap2

7,Delete snapshot

	hdfs dfs -deleteSnapshot /user snap1
4. hdfs recycle bin
Basically, any file system will have a trash can mechanism, that is, deleted files will not be cleared directly and completely. We always put the files in the trash can and automatically empty the files in the trash can after a period of time, which can ensure the safe deletion of files and avoid some misoperations, This may lead to the accidental deletion of files or data
- The recycle bin is configured with two parameters
The default value is fs.trash.interval=0. 0 means that the recycle bin is disabled. You can set the survival time of deleted files.
The default value is fs.trash.checkpoint.interval=0. The interval between checking the recycle bin.
Fs.trash.checkpoint.interval < = fs.trash.interval is required.
- Enable recycle bin
Modify the core-site.xml configuration file for all servers
<!--  open hdfs The deleted data can be recycled from the garbage can, in minutes -->
        <property>
                <name>fs.trash.interval</name>
                <value>10080</value>
        </property>
- View recycle bin
The recycle bin is under the path of / user/root/.Trash / of the cluster
- The data deleted through the Java API will not enter the recycle bin. You need to call moveToTrash() to enter the recycle bin
//How to use the Recycle Bin: delete data
    @Test
    public void  deleteFile() throws Exception{
        //1. Get the file system object
        Configuration configuration = new Configuration();
        FileSystem fileSystem = FileSystem.get(new URI("hdfs://node01:8020"), configuration, "root");
        //2. Delete
        // fileSystem.delete();   This operation will directly delete the data and will not enter the trash can
        Trash trash = new Trash(fileSystem,configuration);
        boolean flag = trash.isEnabled(); // Has the trash can mechanism been turned on
        System.out.println(flag);

        trash.moveToTrash(new Path("/quota"));

        //3. Release resources
        fileSystem.close();

    }
- Recover recycle bin data
hdfs dfs -mv trashFileDir hdfsdir
trashFileDir: the file path of the recycle bin
hdfsdir: which path to move files to hdfs
- Empty Trash
hdfs dfs -expunge