I have written the strategic logic for several months, which is a bit silly. To do database and table splitting, it took almost a day to use the simplest Mybatis in spring boot. The ability to solve macro problems has declined a lot after a long time in logic details.
To use Mybatis in spring boot, you need to do the following steps:
1. use Spring Initializr Create a maven project, download it, unzip it, and open it with IDEA.
2. Add maven dependency of mybatis:
<dependency>
	<groupId>org.mybatis.spring.boot</groupId>
	<artifactId>mybatis-spring-boot-starter</artifactId>
	<version>2.1.1</version>
</dependency>

<dependency>
	<groupId>mysql</groupId>
	<artifactId>mysql-connector-java</artifactId>
	<scope>runtime</scope>
</dependency>
If you want to use a single test, add junit dependency:
<dependency>
	<groupId>junit</groupId>
	<artifactId>junit</artifactId>
	<version>4.13</version>
	<scope>test</scope>
</dependency>
To add a RestController, add a web dependency:
<dependency>
	<groupId>org.springframework.boot</groupId>
	<artifactId>spring-boot-starter-web</artifactId>
</dependency>
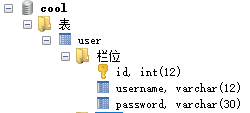
3. Prepare database and table:
In the local mysql database, create the database cool, and create the table user in it. The table structure is as follows:
4. Use the yml file to configure spring boot:
Under the resources folder, create application.yml and application-dev.yml. The contents are as follows:
application.yml
spring:
  profiles:
    active: dev
application-dev.yml
server:
  port: 8080

mybatis:
  mapper-locations: classpath:mapper/*.xml
  type-aliases-package: com.stan.mybatis.entity

spring:
  datasource:
    username: root
    password: Zkong_1234
    url: jdbc:mysql://127.0.0.1:3306/cool?serverTimezone=Asia/Shanghai&useUnicode=true&characterEncoding=UTF-8
    driver-class-name: com.mysql.cj.jdbc.Driver
5. Create the User class corresponding to the table:
package com.stan.mybatis.entity;

public class User {

    private int id;
    private String username;
    private String password;

    public int getId() {
        return id;
    }

    public void setId(int id) {
        this.id = id;
    }

    public String getUsername() {
        return username;
    }

    public void setUsername(String username) {
        this.username = username;
    }

    public String getPassword() {
        return password;
    }

    public void setPassword(String password) {
        this.password = password;
    }
}
6. Create query interface and corresponding xml file:
UserMapper.java
package com.stan.mybatis.mapper;

import com.stan.mybatis.entity.User;
import org.apache.ibatis.annotations.Param;
import org.springframework.stereotype.Repository;

@Repository
public interface UserMapper {
    User queryById(@Param("id") Integer id);
}
UserMapper.xml
<?xml version="1.0" encoding="UTF-8"?>
<!DOCTYPE mapper PUBLIC "-//mybatis.org//DTD Mapper 3.0//EN" "http://mybatis.org/dtd/mybatis-3-mapper.dtd">
<mapper namespace="com.stan.mybatis.mapper.UserMapper">

    <resultMap id="BaseResultMap" type="com.stan.mybatis.entity.User">
        <result column="id" jdbcType="INTEGER" property="id" />
        <result column="username" jdbcType="VARCHAR" property="username" />
        <result column="password" jdbcType="VARCHAR" property="password" />
    </resultMap>

    <select id="queryById" parameterType="java.lang.Integer" resultMap="BaseResultMap">
        select * from user where id = #{id}
    </select>

</mapper>
7. Add MapperScan and EntityScan to the Springboot startup class:
package com.stan.mybatis;

import org.mybatis.spring.annotation.MapperScan;
import org.springframework.boot.SpringApplication;
import org.springframework.boot.autoconfigure.SpringBootApplication;
import org.springframework.boot.autoconfigure.domain.EntityScan;

@MapperScan("com.stan.mybatis.mapper")
@EntityScan("com.stan.mybatis.entity")
@SpringBootApplication
public class MybatisApplication {

	public static void main(String[] args) {
		SpringApplication.run(MybatisApplication.class, args);
	}

}
8. Note that the structure of the project is:
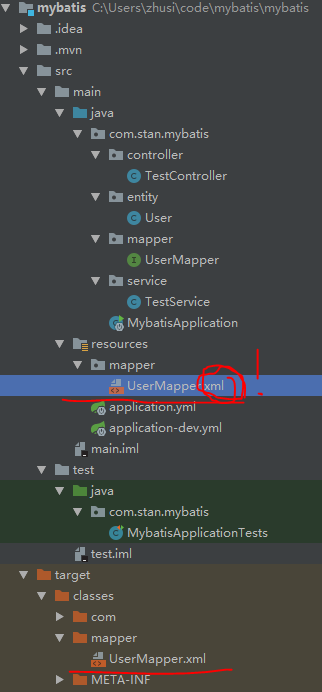
Mybatis queries through sql statements in the xml file. The core configuration is mapper locations, which specifies the location and format of the xml file. Therefore, you must ensure that the file has the suffix of. xml. Otherwise, there will be endless troubles. Most of today's time is used to solve this problem. Let's skip it first and then elaborate. Make sure that the xml file is packaged after compilation.
9. Add single test:
package com.stan.mybatis;

import com.stan.mybatis.mapper.UserMapper;
import org.junit.jupiter.api.Test;
import org.junit.runner.RunWith;
import org.springframework.beans.factory.annotation.Autowired;
import org.springframework.boot.test.context.SpringBootTest;
import org.springframework.test.context.junit4.SpringRunner;

@RunWith(SpringRunner.class)
@SpringBootTest
class MybatisApplicationTests {

	@Autowired
	UserMapper userMapper;

	@Test
	void testGetUser() {
		System.out.println(userMapper.queryById(1).getUsername());
	}

}
As long as there is data with id 1 in the database user table, the single test can run normally.
Today, I spent most of my time arranging questions:
org.apache.ibatis.binding.BindingException: Invalid bound statement (not found)
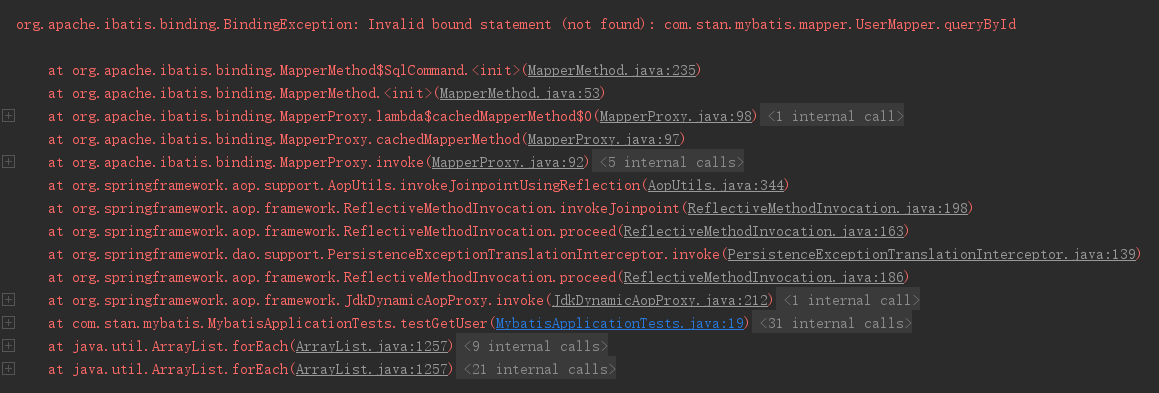
The reason is that my UserMapper file is generated through IDEA new. After writing the name and specifying the type, the file itself does not have a suffix of. xml. Because of the configuration
Mapper locations: classpath: mapper / *. XML mybatis loads a file by matching the suffix of the file name, so the file cannot be loaded and the corresponding interface cannot be bound.
This problem was found by copying the mapper xml file written by others! As long as the file name is changed to UserMapper.xml, the problem can be solved.