Istio is an open-source micro-service Service Mesh framework that combines Google, IBM and Lyft. It aims to solve the problems of discovery, connection, management, monitoring and security of a large number of micro-services.
The main characteristics of Istio include:
- Automatic Load Balancing of HTTP, gRPC and TCP Network Traffic
- Rich routing rules, fine-grained network traffic behavior control
- Traffic Encryption, Inter-Service Authentication, and Strong Identity Declaration
- Fleet-wide policy implementation
- Deep Telemetry and Reporting
principle
Istio can be logically divided into data plane and control plane:
- The data plane is mainly composed of a series of intelligent agents (Envoy), which manage the network communication between micro-services.
- The control plane is responsible for managing and configuring these intelligent agents and dynamically executing policies.
The Istio architecture can be shown in the following figure
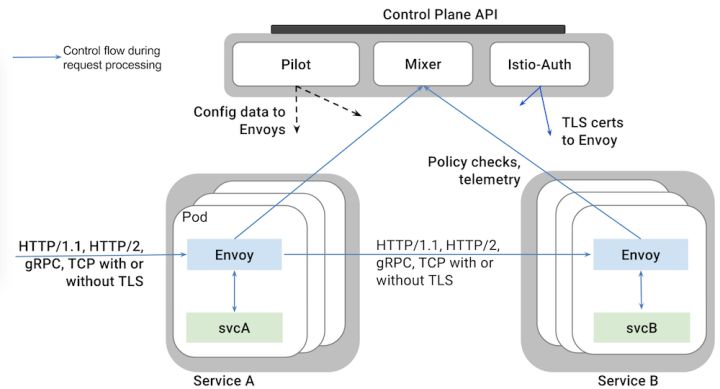
It consists mainly of the following components
- Envoy Lyft open source high performance proxy Bus supports dynamic service discovery, load balancing, TLS termination, HTTP/2 and gPRC proxy, health check, performance measurement and other functions. Envoy is deployed in the Pod of the related service as a sidecar.
- Mixer: Responsible for access control, execution of policies, and collection of telemetry data from Envoy agents. Mixer supports a flexible plug-in model for easy extension
- Pilot: User-Istio interface, validating user-provided configuration and routing policies and sending them to Istio components, managing the life cycle of the Envoy sample
- Istio-Auth: Providing inter-service and end-user authentication mechanisms
install
Istio currently only supports Kubernetes. Before deploying Istio, we need to deploy the Kubernetes cluster and configure the Kubernetes client.
Download Istio
curl -L https://git.io/getIstio | sh -
cd istio-0.1.6/
cp bin/istioctl /usr/local/bin/
Create RBAC roles and bindings
$ kubectl apply -f install/kubernetes/istio-rbac-beta.yaml
clusterrole "istio-pilot" created
clusterrole "istio-ca" created
clusterrole "istio-sidecar" created
rolebinding "istio-pilot-admin-role-binding" created
rolebinding "istio-ca-role-binding" created
rolebinding "istio-ingress-admin-role-binding" created
rolebinding "istio-sidecar-role-binding" created
If you encounter the following error
Error from server (Forbidden): error when creating "install/kubernetes/istio-rbac-beta.yaml": clusterroles.rbac.authorization.k8s.io "istio-pilot" is forbidden: attempt to grant extra privileges: [{[*] [istio.io] [istioconfigs] [] []} {[*] [istio.io] [istioconfigs.istio.io] [] []} {[*] [extensions] [thirdpartyresources] [] []} {[*] [extensions] [thirdpartyresources.extensions] [] []} {[*] [extensions] [ingresses] [] []} {[*] [] [configmaps] [] []} {[*] [] [endpoints] [] []} {[*] [] [pods] [] []} {[*] [] [services] [] []}] user=&{user@example.org [...]
Users need to be granted admin privileges
kubectl create clusterrolebinding myname-cluster-admin-binding --clusterrole=cluster-admin --user=myname@example.org
Deployment of Istio Core Services
Two ways (choose one to execute)
- Prohibit Auth: kubectl apply-f install/kubernetes/istio.yaml
- Enable Auth: kubectl apply-f install/kubernetes/istio-auth.yaml
Deploy Prometheus, Grafana and Zipkin plug-ins
kubectl apply -f install/kubernetes/addons/prometheus.yaml
kubectl apply -f install/kubernetes/addons/grafana.yaml
kubectl apply -f install/kubernetes/addons/servicegraph.yaml
kubectl apply -f install/kubernetes/addons/zipkin.yaml
After all the Pod s are started later, these services can be accessed through NodePort or the external IP of the load balancing service. For example, through the NodePort approach, query the NodePort of the service first
$ kubectl get svc grafana -o jsonpath='{.spec.ports[0].nodePort}'
32070
$ kubectl get svc servicegraph -o jsonpath='{.spec.ports[0].nodePort}'
31072
$ kubectl get svc zipkin -o jsonpath='{.spec.ports[0].nodePort}'
30032
$ kubectl get svc prometheus -o jsonpath='{.spec.ports[0].nodePort}'
30890
Access to Grafana services through http:/<kubernetes-ip>:32070/dashboard/db/istio-dashboard
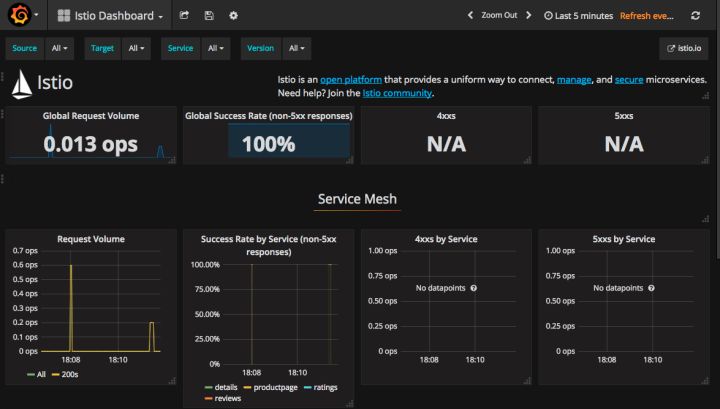
Visit the Service Graph service through http://<kubernetes-ip>:31072/dotviz to show the invocation diagram between services
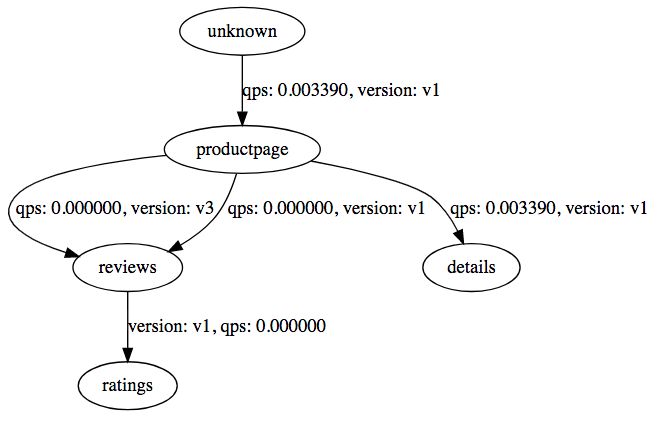
Access Zipkin Tracking Page through http://<kubernetes-ip>:30032
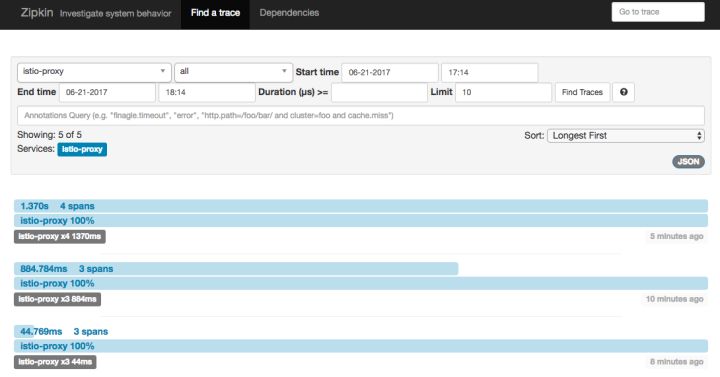
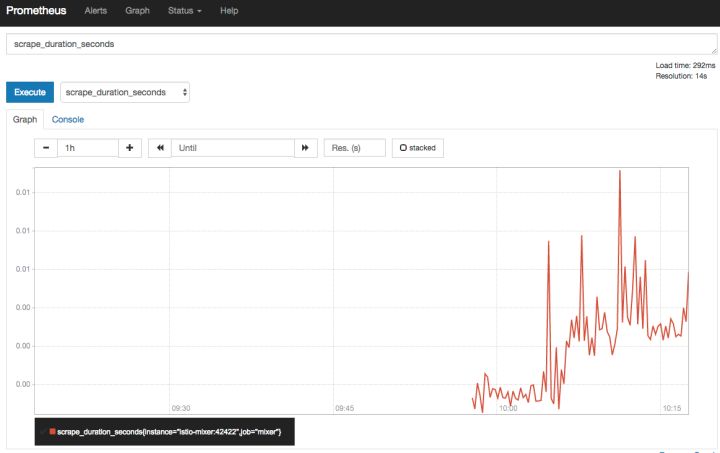
Access Prometheus page through http:/<kubernetes-ip>:30890
Deployment sample application
When deploying an application, Pod needs to be automatically inserted into the Envoy container through istioctl kube-inject ion, that is
kubectl create -f <(istioctl kube-inject -f <your-app-spec>.yaml)
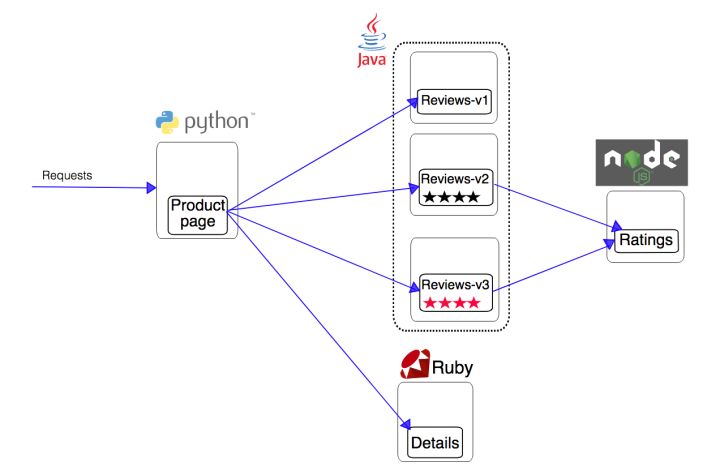
For example, the BookInof example provided by Istio:
kubectl apply -f <(istioctl kube-inject -f samples/apps/bookinfo/bookinfo.yaml)
The original application is shown in the following figure
istioctl kube-inject inserts an Envoy container into each Pod of the original application
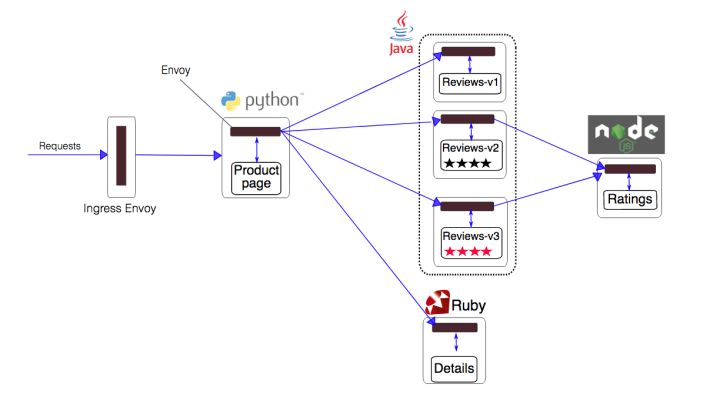
After the service is started, the BookInfo application can be accessed through the Ingress address http://<ingress-address>/product page.
$ kubectl describe ingress
Name:            gateway
Namespace:        default
Address:        192.168.0.77
Default backend:    default-http-backend:80 (10.8.0.4:8080)
Rules:
  Host    Path    Backends
  ----    ----    --------
  *
        /productpage     productpage:9080 (<none>)
        /login         productpage:9080 (<none>)
        /logout     productpage:9080 (<none>)
Annotations:
Events:    <none>

This article is from the open source book Kubernetes Guide We welcome your attention and participation.