Although UIScrollViewj inherits from UIView, it is a relatively special view, especially when it encounters AutoLayout. The purpose of using AutoLayout in UIScrollView is not only to use relative constraints to determine the location and size of child controls, but also how to automatically calculate the content Size of UIScrollView. Application).
Special features of UIScrollView
The special feature of UIScrollView is that its contentSize calculation rules are somewhat special when it encounters AutoLayout. Firstly, contentSize is determined by leading/trailing/top/bottom of the sub-view, and the location constraints of the sub-view must be determined by UIScrollView. This is a bit like the previous one. UICollectionView Adaptive Height The size calculation of UICollection ViewCell is to calculate the size of contentView. The size calculation of contentView depends on the leading/trailing/top/bottom of the sub-view, and the position constraints of the sub-view depend on contentView. At this time, as long as the sub-view has intrinsic content Size or specified size, leading/trailing/top/bottom is set. AutoLayout layout engine can calculate the size of contentView.
Back to AutoLayout, its contentSize computing principle is very similar to UICollectionViewCell self-adaptation, except that there is no contentView inside UIScrollView (but it can be imagined to exist for later understanding, but it is important to understand that the essence of UIScrollView scrolling is not to include a contentView, but to achieve through the transformation of bounds and frame coordinate system. As long as the leading/trailing/top/bottom of the sub-view is set (usually by edges=0 to ensure that the whole view is within the scope of the UIScrollView), then the size of the sub-view is determined by setting the size (width/height) constraint, and then the content Size of the UIScrollView is calculated by AutoLayout in reverse.
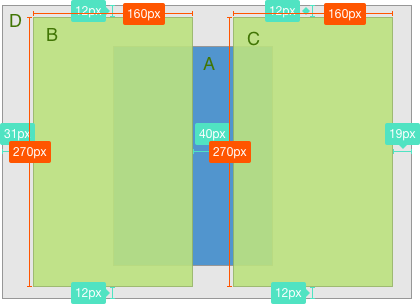
Assuming that A is UIScrollView (blue), B is sub-view 1 (green), C is sub-view 2 (green), D is content Size calculation area (gray, in fact it does not exist), in order to make cotentSize can automatically calculate only by determining the layout spacing of B and C, and then specifying the spacing and size of B and C, AutLayout can automatically infer the size of content Size. The layout is similar to Demo3 below.
demo
demo1 Single Subview Layout
For a single sub-view layout is relatively simple, just set lead/trailing/top/bottom, and then set the size (width/height) of the sub-view. Of course, if the sub-view has inherent size and wants to use inherent size, this step can also be omitted. For example, the following demo demo demonstrates a UIScrollView image viewing interface with a UIImageView subview. In the following layout, only the left and right margins of UIImageView are set, while UIImageView has inherent size, so the whole layout is fairly simple (AutoLayout layout is used). SnapKit Library).
    class ImageViewController: UIViewController {
        override func viewDidLoad() {
            super.viewDidLoad()

            self.view.addSubview(self.scrollView)
            self.scrollView.addSubview(self.imageView)
            self.scrollView.snp.makeConstraints { (make) in
                make.edges.equalTo(0.0)
            }

            self.imageView.snp.makeConstraints { (make) in
                // The following constraints are used to determine contentSize's edge constraints (leading/trailing/top/bottom)
                // Because UIImageView, like UILabel and UIButton, has intrinsic Content Size, contentSize can be calculated without other size constraints.
                make.edges.equalTo(0.0)
            }

        }

        // MARK: - Private attributes
        private lazy var scrollView:UIScrollView = {
            let temp = UIScrollView()
            return temp
        }()

        private lazy var imageView:UIImageView = {
            let image = UIImage(named: "img")
            let temp = UIImageView(image:image)
            return temp
        }()

    }
demo2 Multiple Subview Layouts Use containerView
Many UIScrollView's AutoLayout layout articles mention using a container view to contain multiple sub-views, and then completing sub-view layout and container view layout in UIScrollView respectively to simplify the layout process. The following Demo demonstrates the layout of an image paginated view. ContainerView as a container layout sets up the left and right spacing, and then sets its height equal to the height of UIScrollView (because you want to scroll left and right). There is no need to set the width at this time, because the calculation of the width depends on the sub-view. In the sub-view of containerView, AutoLayout can calculate the width of the containerView by setting the distance and width between the sub-view and the containerView. So that the containerView has set the distance and size around it to calculate the content Size.
    class SlideViewController: UIViewController {

        override func viewDidLoad() {
            super.viewDidLoad()

            self.automaticallyAdjustsScrollViewInsets = false

            self.view.addSubview(self.scrollView)
            self.scrollView.addSubview(self.containerView)
            self.containerView.addSubview(self.firstImageView)
            self.containerView.addSubview(self.secondImageView)
            self.containerView.addSubview(self.thirthImageView)

            self.scrollView.snp.makeConstraints { (make) in
                make.top.equalTo(self.topLayoutGuide.snp.bottom)
                make.left.bottom.right.equalTo(0.0)
            }

            // The following constraints determine the height of the containerView, equivalent to contentSize.heightIt has been determined that, width adopt cotnentView Subview determination is enough
            self.containerView.snp.makeConstraints { (make) in
                make.edges.equalTo(0.0)
                make.height.equalTo(self.scrollView.snp.height)
            }

            self.firstImageView.snp.makeConstraints { (make) in
                make.top.left.bottom.equalTo(0.0)
                make.width.equalTo(self.scrollView.snp.width)
            }

            self.secondImageView.snp.makeConstraints { (make) in
                make.top.bottom.equalTo(0.0)
                make.left.equalTo(self.firstImageView.snp.right)
                make.width.equalTo(self.scrollView.snp.width)
            }

            self.thirthImageView.snp.makeConstraints { (make) in
                make.top.bottom.equalTo(0.0)
                make.left.equalTo(self.secondImageView.snp.right)
                make.width.equalTo(self.scrollView.snp.width)
                make.right.equalTo(0.0) // Determine the right margin
            }

        }

        // MARK: - Private attributes
        private lazy var scrollView:UIScrollView = {
            let temp = UIScrollView()
            temp.isPagingEnabled = true
            return temp
        }()

        private lazy var containerView:UIView = {
            let temp = UIView()
            return temp
        }()

        private lazy var firstImageView:UIImageView = {
            let image = UIImage(named: "1")
            let temp = UIImageView(image:image)
            temp.contentMode = .scaleAspectFill
            temp.clipsToBounds = true
            return temp
        }()

        private lazy var secondImageView:UIImageView = {
            let image = UIImage(named: "2")
            let temp = UIImageView(image:image)
            temp.contentMode = .scaleAspectFill
            temp.clipsToBounds = true
            return temp
        }()

        private lazy var thirthImageView:UIImageView = {
            let image = UIImage(named: "3")
            let temp = UIImageView(image:image)
            temp.contentMode = .scaleAspectFill
            temp.clipsToBounds = true
            return temp
        }()

    }
demo3 multiple subviews do not use containerView layout
The containerView of demo2 contains multiple sub-views in a relatively more usable way, but the layout principle has not changed. If you are familiar with the AutoLayout layout principle of UIScrollView, you can decide by yourself without using containerView. If only a few sub-views have no special requirements, then direct layout can be done. It may be simpler, but if there are relatively many sub-views and there may be common operational requirements for all sub-views (for example, all sub-views need to change their location after the keyboard pops up), the containerView layout is more suitable. The following code removes the need for containerView to complete demo2. The principle is the same, and the code is not difficult to understand.
    class SlideViewController2: UIViewController {

        override func viewDidLoad() {
            super.viewDidLoad()

            self.automaticallyAdjustsScrollViewInsets = false

            self.view.addSubview(self.scrollView)
            self.scrollView.addSubview(self.firstImageView)
            self.scrollView.addSubview(self.secondImageView)
            self.scrollView.addSubview(self.thirthImageView)

            self.scrollView.snp.makeConstraints { (make) in
                make.top.equalTo(self.topLayoutGuide.snp.bottom)
                make.left.bottom.right.equalTo(0.0)
            }


            self.firstImageView.snp.makeConstraints { (make) in
                make.top.left.bottom.equalTo(0.0)
                make.size.equalTo(self.scrollView.snp.size)
            }

            self.secondImageView.snp.makeConstraints { (make) in
                make.top.bottom.equalTo(0.0)
                make.left.equalTo(self.firstImageView.snp.right)
                make.size.equalTo(self.scrollView.snp.size)
            }

            self.thirthImageView.snp.makeConstraints { (make) in
                make.top.bottom.equalTo(0.0)
                make.left.equalTo(self.secondImageView.snp.right)
                make.size.equalTo(self.scrollView.snp.size)
                make.right.equalTo(0.0) // Determine the right margin
            }

        }

        // MARK: - Private attributes
        private lazy var scrollView:UIScrollView = {
            let temp = UIScrollView()
            temp.isPagingEnabled = true
            return temp
        }()

        private lazy var firstImageView:UIImageView = {
            let image = UIImage(named: "1")
            let temp = UIImageView(image:image)
            temp.contentMode = .scaleAspectFill
            temp.clipsToBounds = true
            return temp
        }()

        private lazy var secondImageView:UIImageView = {
            let image = UIImage(named: "2")
            let temp = UIImageView(image:image)
            temp.contentMode = .scaleAspectFill
            temp.clipsToBounds = true
            return temp
        }()

        private lazy var thirthImageView:UIImageView = {
            let image = UIImage(named: "3")
            let temp = UIImageView(image:image)
            temp.contentMode = .scaleAspectFill
            temp.clipsToBounds = true
            return temp
        }()

    }
Final effect
summary
In fact, in summary, the most important problem of UIScrollView layout is to solve the problem of contentSize calculation. According to the characteristics of UIScrollView, contentSize calculation is ultimately derived from the upper and lower margins and the size of the sub-control itself. In the case of encountering multiple sub-views, container view is not used as the case may be. Container view only plays an auxiliary role. The whole layout principle is exactly the same. The advantages of using UIScrollView's AutoLayout layout are needless to say. In addition to getting rid of frame computing (the difference between absolute layout and relative layout), it naturally supports screen rotation (screen rotation adaptation only requires a little attention in layout). For example, the three demo s above all support vertical and horizontal screen viewing, which is much simpler than the frame layout code.