iOS7 topLayoutGuide/bottomLayoutGuide
To create a project called Layout Guide Study, let's open it and take a look at Main.storyboard:
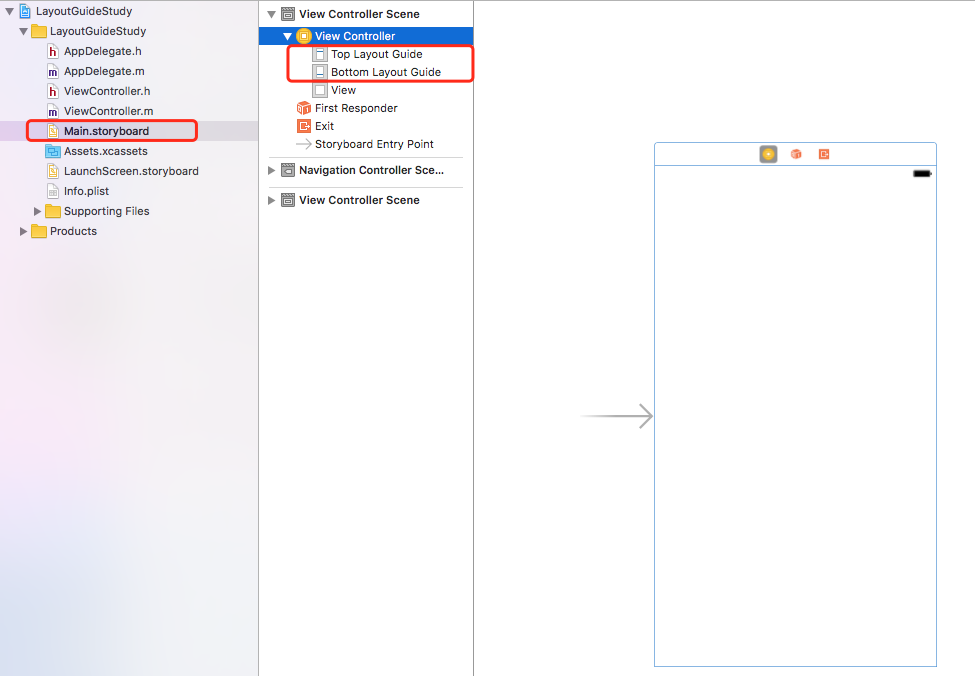
You can see two things under View Controller, topLayoutGuide/bottomLayoutGuide, and they are at the same level as the View of Controller.
And in the UIViewController header file, these two attributes are id types that follow a UILayoutSupport protocol and are read-only attributes:
// These objects may be used as layout items in the NSLayoutConstraint API
@property(nonatomic,readonly,strong) id<UILayoutSupport> topLayoutGuide NS_AVAILABLE_IOS(7_0);
@property(nonatomic,readonly,strong) id<UILayoutSupport> bottomLayoutGuide NS_AVAILABLE_IOS(7_0);
This shows that these two Layout Guides are automatically created and managed by the system, which also explains why the TopLayout Guide / Bottom Layout Guide appears automatically in Main.storyboard in the project we just created.
See what it does.
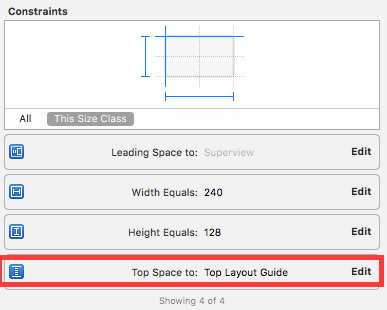
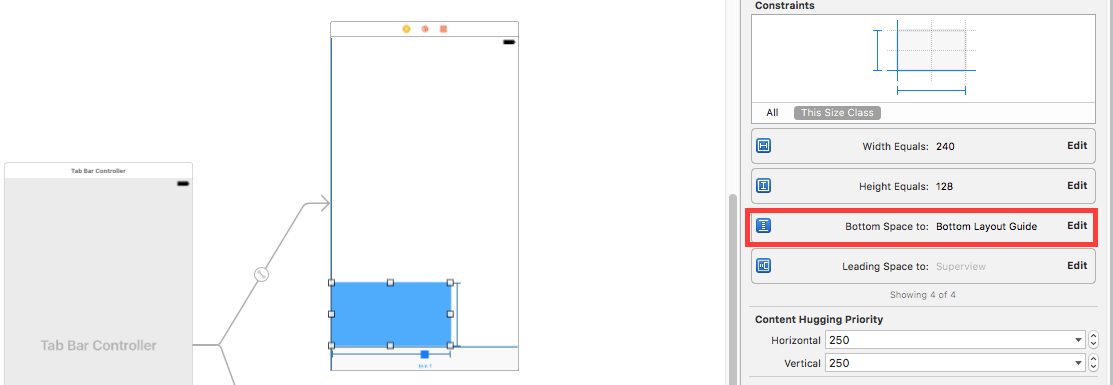
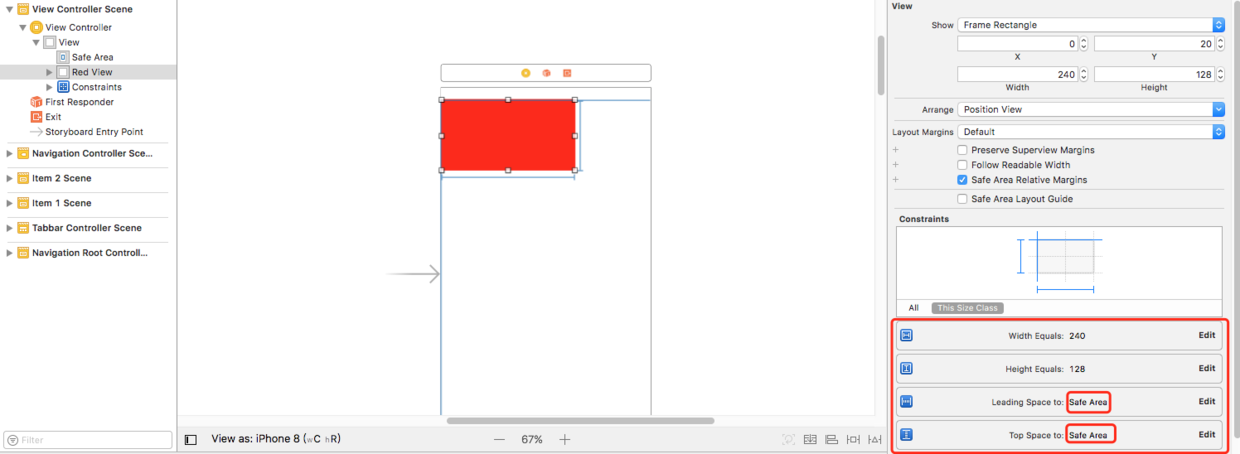
Drag a red view into Controller's view. When adding constraints, we notice that the constraint settings box is in the lower right corner. For the benchmark view drop-down selection of top constraints, xcode defaults to the Top Layout Guide:

Then, the width and height constraints are added, and the final result of the constraints is as follows:
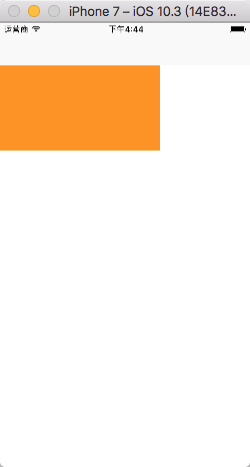
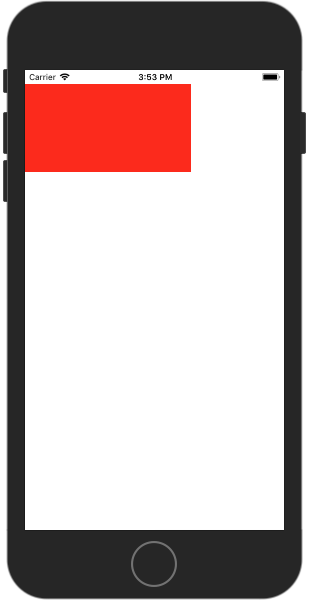
Direct build to see the results:
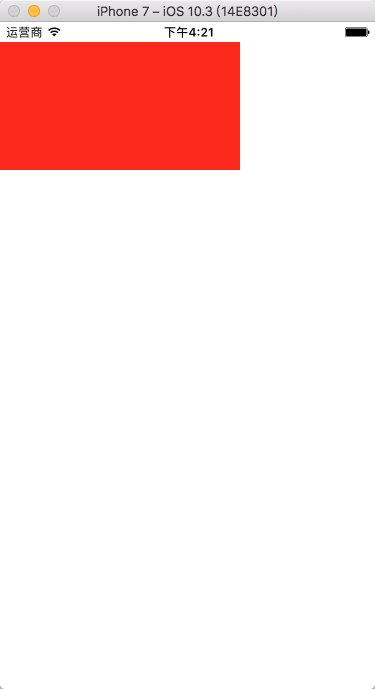
You can see that the top constraint is based on the topLayout Guide provided by the system, which automatically avoids the top status bar for this view.
We print the red view in ViewController:
<UIView: 0x7ff10860fa90; frame = (0 20; 240 128); autoresize = RM+BM; layer = <CALayer: 0x60000003b5c0>>
The y value of the red view is 20. It's just the height of the status bar. From this we can see that Top Layout Guide's function is to help developers isolate the space of the status bar in the process of automatic layout. Then let's look at the navigation controller (the navigation bar appears at the top):
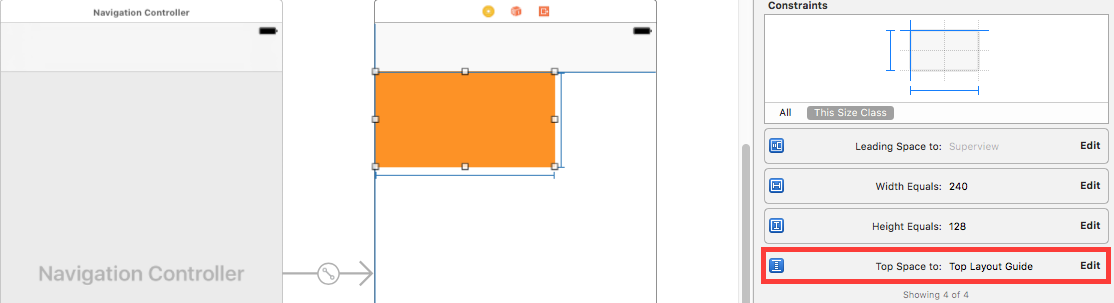
build to see the results:
Top Layout Guide also automatically helps isolate the status bar + navigation bar.
Print yellow view in ViewController:
<UIView: 0x7fb04fe08040; frame = (0 64; 240 128); autoresize = RM+BM; layer = <CALayer: 0x61800003ef60>>
The y value of the Yellow view is 64. It's just the height of the status bar + navigation bar.
Similarly, the bottomLayoutGuide is used to isolate the bottom tabbar in the Tabbar Controller:
Pick up the topLayoutGuide/bottomLayoutGuide object:
Printing in the viewDidLayoutSubviews method of UIViewController
- (void)viewDidLayoutSubviews
 {
    [super viewDidLayoutSubviews];
    NSLog(@"topLayoutGuide-%@",self.topLayoutGuide);
    NSLog(@"bottomLayoutGuide-%@",self.bottomLayoutGuide);
}
//Print results:
topLayoutGuide-
<_UILayoutGuide: 0x7fd7cce0c350; frame = (0 0; 0 64); hidden = YES; layer = <CALayer: 0x61000003f2c0>>

bottomLayoutGuide-
<_UILayoutGuide: 0x7fd7cce0d6b0; frame = (0 667; 0 0); hidden = YES; layer = <CALayer: 0x610000221620>>
This is a private object of type _UILayoutGuide. It looks like it has frame, hidden, layer attributes. It feels like UIView. Let's verify that:
if ([self.topLayoutGuide isKindOfClass:[UIView class]]) {
    NSLog(@"topLayoutGuide is an UIView");
}
 if ([self.bottomLayoutGuide isKindOfClass:[UIView class]]) {
    NSLog(@"bottomLayoutGuide is an UIView");
}
//Print results:
topLayoutGuide is an UIView
bottomLayoutGuide is an UIView
The conclusion is that topLayoutGuide/bottomLayoutGuide is actually an object of UIView type.
Let's print out the view subviews of UIViewController:
- (void)viewDidLayoutSubviews
 {
    [super viewDidLayoutSubviews];
     NSLog(@"viewController view subViews %@",self.view.subviews);
}
//Print results:
viewController view subViews (
    "<UIView: 0x7ffc774035b0; frame = (0 64; 240 128); autoresize = RM+BM; layer = <CALayer: 0x60800002c720>>",
    "<_UILayoutGuide: 0x7ffc7740ae10; frame = (0 0; 0 64); hidden = YES; layer = <CALayer: 0x60800002c480>>",
    "<_UILayoutGuide: 0x7ffc7740b1e0; frame = (0 667; 0 0); hidden = YES; layer = <CALayer: 0x60800002b820>>"
)
That's it!
To sum up:
TopLayout Guide/bottomLayout Guide is actually a virtual pit-occupying view that helps developers avoid the top status bar, navigation bar and tabbar at the bottom when they are automatically laid out.
iOS9 UILayoutGuide
Starting with iOS 9, Apple added a new UILayoutGuide class to see how Apple officially interprets it:
The UILayoutGuide class defines a rectangular area that can interact with Auto Layout.
Use layout guides to replace the dummy views you may have created to represent
inter-view spaces or encapsulation in your user interface
The UILayoutGuide is used to provide a rectangular area that can be customized with Auto Layout to serve as a virtual view.
I guess Apple engineers thought that the idea of topLayout Guide/bottomLayoutGuide providing virtual occupied view and isolating navigation bar/tabber was good, and that inspired them to make the whole LayoutGuide more flexible and freely customized, so the UILayoutGuide class was designed.
So how to customize a UILayoutGuide freely, let's look at several attributes of this class:
@property(readonly, strong) NSLayoutXAxisAnchor *leadingAnchor;
@property(readonly, strong) NSLayoutXAxisAnchor *trailingAnchor;
@property(readonly, strong) NSLayoutXAxisAnchor *leftAnchor;
@property(readonly, strong) NSLayoutXAxisAnchor *rightAnchor;
@property(readonly, strong) NSLayoutYAxisAnchor *topAnchor;
@property(readonly, strong) NSLayoutYAxisAnchor *bottomAnchor;
@property(readonly, strong) NSLayoutDimension *widthAnchor;
@property(readonly, strong) NSLayoutDimension *heightAnchor;
@property(readonly, strong) NSLayoutXAxisAnchor *centerXAnchor;
@property(readonly, strong) NSLayoutYAxisAnchor *centerYAnchor;
The classes NSLayout XAxis Anchor, NSLayout YAxis Anchor, NSLayout Dimension also follow UILayout Guide in
After iOS 9, even if it's strange, we can see that these attributes are used to add layout constraints to UILayoutGuide objects by looking at the familiar words leading, trailing, top, bottom, center and so on in the above UILayoutGuide attributes.
We're looking at a new category in UIView:
@interface UIView (UIViewLayoutConstraintCreation)

@property(readonly, strong) NSLayoutXAxisAnchor *leadingAnchor NS_AVAILABLE_IOS(9_0);
@property(readonly, strong) NSLayoutXAxisAnchor *trailingAnchor NS_AVAILABLE_IOS(9_0);
@property(readonly, strong) NSLayoutXAxisAnchor *leftAnchor NS_AVAILABLE_IOS(9_0);
@property(readonly, strong) NSLayoutXAxisAnchor *rightAnchor NS_AVAILABLE_IOS(9_0);
@property(readonly, strong) NSLayoutYAxisAnchor *topAnchor NS_AVAILABLE_IOS(9_0);
@property(readonly, strong) NSLayoutYAxisAnchor *bottomAnchor NS_AVAILABLE_IOS(9_0);
@property(readonly, strong) NSLayoutDimension *widthAnchor NS_AVAILABLE_IOS(9_0);
@property(readonly, strong) NSLayoutDimension *heightAnchor NS_AVAILABLE_IOS(9_0);
@property(readonly, strong) NSLayoutXAxisAnchor *centerXAnchor NS_AVAILABLE_IOS(9_0);
@property(readonly, strong) NSLayoutYAxisAnchor *centerYAnchor NS_AVAILABLE_IOS(9_0);
@property(readonly, strong) NSLayoutYAxisAnchor *firstBaselineAnchor NS_AVAILABLE_IOS(9_0);
@property(readonly, strong) NSLayoutYAxisAnchor *lastBaselineAnchor NS_AVAILABLE_IOS(9_0);

@end
It also provides the same attributes as UILayoutGuide. This shows that UILayoutGuide can interact with UIView's Auto Layout constraints.
Let's illustrate with an example:
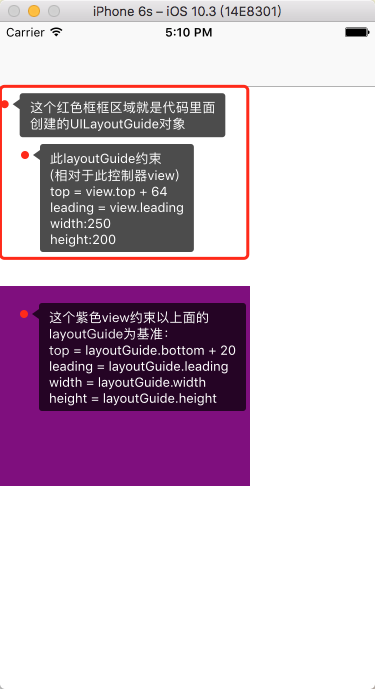
Create a UILayoutGuide that constrains it from the top 64, left 0, width 250, height 200 of the controller view, so the code in the viewDidLoad method:
// Establish
UILayoutGuide *layoutGuide = [[UILayoutGuide alloc] init];
// You need to add a new layoutGuide using the addLayoutGuide method of UIView
[self.view addLayoutGuide:layoutGuide];
// Formal constraint code
[layoutGuide.topAnchor constraintEqualToAnchor:self.view.topAnchor constant:64].active = YES;
[layoutGuide.leadingAnchor constraintEqualToAnchor:self.view.leadingAnchor].active = YES;
[layoutGuide.widthAnchor constraintEqualToConstant:250].active = YES;
[layoutGuide.heightAnchor constraintEqualToConstant:200].active = YES;
The constraint code is obviously much simpler than using NSLayout Constraint.
Next, we create a purple view, based on which the layoutGuide is constrained. The top of the purple view is 20 from the bottom of the layoutGuide mentioned above. It is left-aligned with the layoutGuide, and the width and height are consistent with the layoutGuide:
UIView *viewBaseLayoutGuide = [[UIView alloc] init];
viewBaseLayoutGuide.translatesAutoresizingMaskIntoConstraints = NO;
viewBaseLayoutGuide.backgroundColor = [UIColor purpleColor];
[self.view addSubview:viewBaseLayoutGuide];

[viewBaseLayoutGuide.topAnchor constraintEqualToAnchor:layoutGuide.bottomAnchor constant:20].active = YES;
[viewBaseLayoutGuide.leadingAnchor constraintEqualToAnchor:layoutGuide.leadingAnchor].active = YES;
[viewBaseLayoutGuide.widthAnchor constraintEqualToAnchor:layoutGuide.widthAnchor].active = YES;
[viewBaseLayoutGuide.heightAnchor constraintEqualToAnchor:layoutGuide.heightAnchor].active = YES;
The results of running the program are as follows:
iOS11 Safe Area / safeAreaLayoutGuide
IOS 11 also introduced the concept of a Safe Area, in which Apple recommends the placement of UI controls. The scope of this security area is actually the entire screen separated from the status bar, navigation bar, tabar, and the top bang of the iPhone X, the bottom of the virtual home gesture area.
From this introduction, it can be seen that the so-called Safe Area is actually an upgraded version of topLayout Guide/bottomLayout Guide, which used to restrict the top/bottom Layout out, but now it is more powerful.
Take another look at the UIViewController header file: (Open with Xcode 9 or more):
@property(nonatomic,readonly,strong) id<UILayoutSupport> topLayoutGuide API_DEPRECATED_WITH_REPLACEMENT("-[UIView safeAreaLayoutGuide]", ios(7.0,11.0), tvos(7.0,11.0));
@property(nonatomic,readonly,strong) id<UILayoutSupport> bottomLayoutGuide API_DEPRECATED_WITH_REPLACEMENT("-[UIView safeAreaLayoutGuide]", ios(7.0,11.0), tvos(7.0,11.0));
Apple prompted topLayoutGuide/bottomLayoutGuide that the two attributes had expired in iOS 11, and recommended using the safe Area LayoutGuide attribute of UIView (safe Area LayoutGuide will be introduced later).
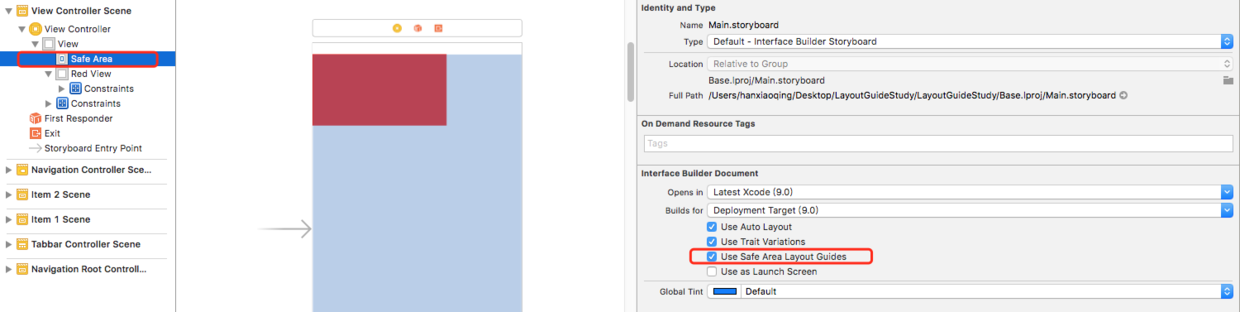
In addition, when creating a project with Xcode 9 or above, Main.storyboard defaults to Use Safe Area Layout Guides, and safe area appears under the controller view:
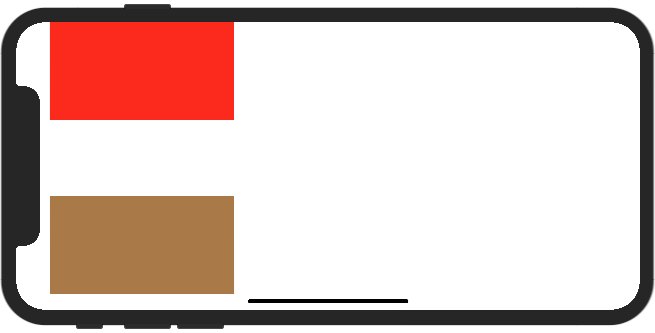
Verify the effect of using safeArea:
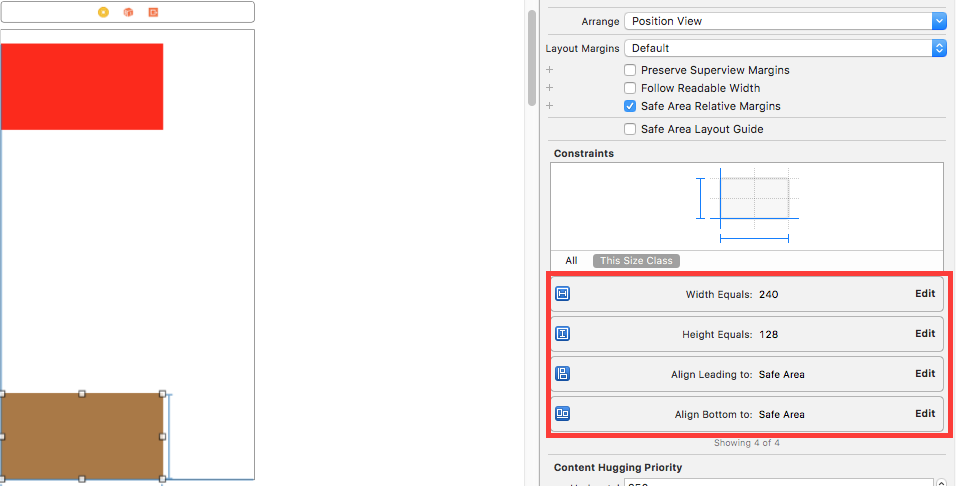
As shown in the figure above, we constrain the red view based on the safe Area area of the controller view provided by storyboard: the top distance
Safety Zone 0, Left Distance Safety Zone 0, Width 240, High 180:
Running results on the iPhone 8:
To verify the isolation effect of Safe Area at the bottom of the vertical screen iPhone X, a brown view is added: 0 from the left, 0 from the bottom, 240 wide and 180 high:
Running results on the iPhone X:
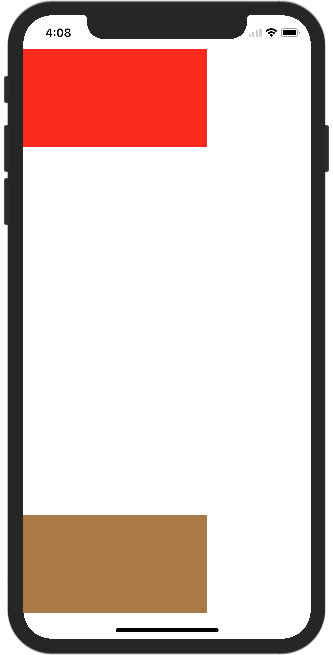
Auto Layout layout using security area, which is on the iPhone 8, the iPhone X and the home virtual gesture area avoiding the status bar/Liu Hai/the bottom, makes developers not care about the status bar and adapt the iPhone X to avoid the height of Liu Hai, only need to place sub-controls in the security area designated by the reassuring Apple, the layout can be done.
safeAreaLayoutGuide property of UIView
Look at two new attributes of UIView on iOS 11 about Safe Area:
@property (nonatomic,readonly) UIEdgeInsets safeAreaInsets API_AVAILABLE(ios(11.0),tvos(11.0));
@property(nonatomic,readonly,strong) UILayoutGuide *safeAreaLayoutGuide API_AVAILABLE(ios(11.0),tvos(11.0));
Obviously, this read-only safeAreaLayoutGuide property is automatically created by the system, allowing developers to use code for automatic layout based on security areas.
Click on the view of the controller to trigger touches Began for print verification:
- (void)touchesBegan:(NSSet<UITouch *> *)touches withEvent:(UIEvent *)event
{
    NSLog(@"safeAreaInsets %@",NSStringFromUIEdgeInsets(self.view.safeAreaInsets));
    NSLog(@"safeAreaGuide %@",self.view.safeAreaLayoutGuide);
}
//Print results:
safeAreaInsets {44, 0, 34, 0}
safeAreaGuide <UILayoutGuide: 0x6080009a3c60 - "UIViewSafeAreaLayoutGuide",
layoutFrame = {{0, 44}, {375, 734}}, owningView = <UIView: 0x7f888240c3b0; frame = (0 0; 375 812);
autoresize = W+H; layer = <CALayer: 0x608000431ec0>>>
According to the print result safeAreaInsets.top=44, it's exactly the distance that Apple prescribes to avoid the bangs when adapting to the iPhone X.
safeAreaInsets.bottom=34, which is exactly the height of the home virtual gesture area at the bottom.
Horizontal Screen Rotation Test:
After horizontal screen switching:
Click on the view of the controller again to trigger touches Began to print and verify the results.
safeAreaInsets {0, 44, 21, 44}
safeAreaGuide <UILayoutGuide: 0x6080009a3c60 - "UIViewSafeAreaLayoutGuide", layoutFrame =
{{44, 0}, {724, 354}}, owningView = <UIView: 0x7f888240c3b0; frame = (0 0; 812 375); autoresize =
W+H; layer = <CALayer: 0x608000431ec0>>>
After rotation, the safe AreaInsets. left is still 44 from the Liu Hai isolation area, and the home virtual gesture area at the bottom becomes 21.
This proves that the system also automatically calculates the rotation of the screen.
-
New Security Zone Change Method after iOS 11.0
|
1
2
3
4
|
Add in UIViewController:
- (void)viewSafeAreaInsetsDidChange;
Add:
- (void)viewSafeAreaInsetsDidChange;
|
-
Change the position of the view by changing the security area
If the screen rotates, the corresponding security area will change, so don't worry about it. [safe area. gif] (http://upload-
|
1
2
3
4
5
6
7
8
|
images.jianshu.io/upload_images/1186277-ab32b1be56378531.gif?imageMogr2/auto-orient/strip%7CimageView2/2/w/1240)
- (void)viewSafeAreaInsetsDidChange {
[super viewSafeAreaInsetsDidChange];
NSLog(@"viewSafeAreaInsetsDidChange-%@",NSStringFromUIEdgeInsets(self.view.safeAreaInsets));
[self updateOrientation];
}
|
|
1
2
3
4
5
6
7
8
9
10
11
12
13
14
|
/**
Update screen safe area frame
*/
- (void)updateOrientation {
if (@available(iOS 11.0, *)) {
CGRect frame = self.customerView.frame;
frame.origin.x = self.view.safeAreaInsets.left;
frame.size.width = self.view.frame.size.width - self.view.safeAreaInsets.left - self.view.safeAreaInsets.right;
frame.size.height = self.view.frame.size.height - self.view.safeAreaInsets.bottom;
self.customerView.frame = frame;
} else {
// Fallback on earlier versions
}
}
|
summary
This time, in order to adapt to the iPhone X, I saw the concept of Safe Area in iOS 11 from the very beginning, which goes back to iOS 7 top Layout Guide / bottom Layout Guide, and learned from scratch and benefited a lot. I also realized a series of explorations that Apple engineers have made for UI adaptation, developers, and optimization. We also see how they can design a flexible and scalable API with a good idea and reasonable expansion in the face of the current changes in demand.
IOS7: TopLayout Guide / Bottom Layout Guide, using a virtual view to initially solve the problem of isolation of navigation bar and tabbar.
2.iOS9: With the idea of virtual view and considering the limitations of top/bottom concept, developers can flexibly customize this isolation area, and provide some more convenient and easy-to-understand API s for automatic code layout, so UILayout Guide is a class.
3.Two years later, with iOS 11 and the iPhone X, Apple engineers naturally took advantage of their iOS 9 explorations. They customized a UILayout Guide, provided developers with a safe Area Layout Guide with read-only properties, and proposed the concept of a safe area.