1, Create a folder
mkdir Module
2, Download Engineering Scaffold
pod lib create AaronSwift
Aaron Swift is the name of the component project you want to create. During the installation process, you will be prompted to enter the configuration of the project to be downloaded (as follows:), and then enter iOS, Swift, Yes, Quick and Yes. In the second step, if you want to create an OC library, please enter ObjC. (each version may be different, please input according to the prompt)
Cloning `https://github.com/CocoaPods/pod-template.git` into `AaronSwift`.

Configuring AaronSwift template.

------------------------------

To get you started we need to ask a few questions, this should only take a minute.

If this is your first time we recommend running through with the guide:

 - https://guides.cocoapods.org/making/using-pod-lib-create.html

 ( hold cmd and double click links to open in a browser. )

What platform do you want to use?? [ iOS / macOS ]

 > iOS

What language do you want to use?? [ Swift / ObjC ]

 > Swift

Would you like to include a demo application with your library? [ Yes / No ]

 > Yes

Which testing frameworks will you use? [ Quick / None ]

 > Quick

Would you like to do view based testing? [ Yes / No ]

 > Yes

Running pod install on your new library.

Analyzing dependencies

Downloading dependencies

Installing AaronSwift (0.1.0)

Installing FBSnapshotTestCase (2.1.4)

Installing Nimble (7.3.4)

Installing Nimble-Snapshots (6.3.0)

Installing Quick (1.2.0)

Generating Pods project

Integrating client project

[!] Please close any current Xcode sessions and use `AaronSwift.xcworkspace` for this project from now on.

Pod installation complete! There are 5 dependencies from the Podfile and 5 total pods installed.

[!] Automatically assigning platform `iOS` with version `9.3` on target `AaronSwift_Example` because no platform was specified. Please specify a platform for this target in your Podfile. See `https://guides.cocoapods.org/syntax/podfile.html#platform`.

 Ace! you're ready to go!

 We will start you off by opening your project in Xcode

 open 'AaronSwift/Example/AaronSwift.xcworkspace'

To learn more about the template see `https://github.com/CocoaPods/pod-template.git`.

To learn more about creating a new pod, see `https://guides.cocoapods.org/making/making-a-cocoapod`.
3, Create Git Hub remote warehouse
If it is a project of the company, the operation and maintenance colleagues need to build a Git Lab warehouse and create a project. Instead of Git Hub. Create an Aaron swift project on Git Hub. Address: https://github.com/AaronYin0514/AaronSwift
4, Code submitted to remote warehouse
Enter project directory
cd AaronSwift/

git init

git add .

git commit -m "first commit"

git remote add origin https://github.com/AaronYin0514/AaronSwift.git

git push -u origin master
5, Write code
Now we can add code for the private library. The location is Aaron swift / classes under the directory. Our code must be added to this directory. The ReplaceMe.swift file is automatically generated when creating the library. We add some test code:
import Foundation

public struct RepleaceMeTest {

 public func test() {

 print("Test!")

 }

}
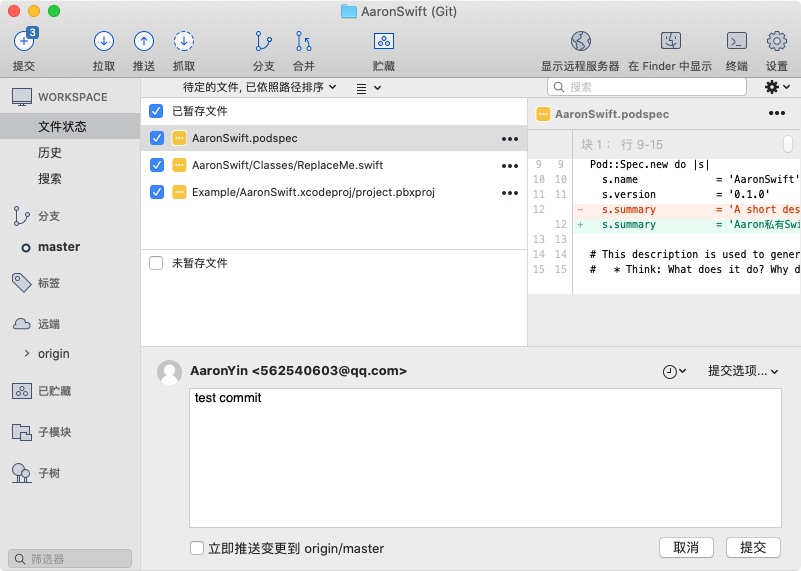
6, Submission code
Manage code through Source Tree, commit code changes:
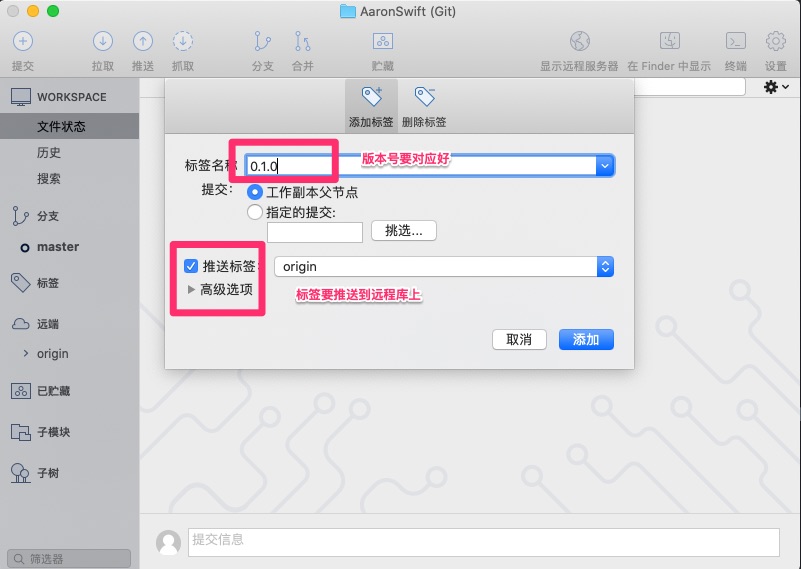
7, Add Tag
We need to add a Tag for each version, as shown below
8, Check whether the configuration file is filled in correctly
pod spec lint --allow-warnings
The -- allow warnings parameter means ignore warnings. If your code has warnings at compile time, an error will be reported if you do not add this parameter. The results are as follows:
 -> AaronSwift (0.1.0)

 - WARN | [iOS] swift: The validator used Swift `4.0` by default because no Swift version was specified. To specify a Swift version during validation, add the `swift_versions` attribute in your podspec. Note that usage of a `.swift-version` file is now deprecated.

 - NOTE | xcodebuild: note: Using new build system

 - NOTE | [iOS] xcodebuild: note: Planning build

 - NOTE | [iOS] xcodebuild: note: Constructing build description

 - NOTE | [iOS] xcodebuild: warning: Skipping code signing because the target does not have an Info.plist file and one is not being generated automatically. (in target 'App' from project 'App')

 - NOTE | [iOS] xcodebuild: note: Execution policy exception registration failed and was skipped: Error Domain=NSPOSIXErrorDomain Code=1 "Operation not permitted" (in target 'AaronSwift' from project 'Pods')

 - NOTE | [iOS] xcodebuild: note: Execution policy exception registration failed and was skipped: Error Domain=NSPOSIXErrorDomain Code=1 "Operation not permitted" (in target 'Pods-App' from project 'Pods')

 - NOTE | [iOS] xcodebuild: note: Execution policy exception registration failed and was skipped: Error Domain=NSPOSIXErrorDomain Code=1 "Operation not permitted" (in target 'App' from project 'App')

Analyzed 1 podspec.

AaronSwift.podspec passed validation.
9, Profile description
Is the detection configuration file just described configured correctly? Which file is it? In my case, it is the AaronSwift.podspec file.
Open this file, which is the configuration of the project. When we use the pod command to install the library, we find this file, obtain the address to download the library, and download the configuration of the dependent library and other projects according to the configuration.
Pod::Spec.new do |s|

 s.name  = 'AaronSwift'

 s.version = '0.1.0'

 s.summary = 'Aaron private Swift Common component library AaronSwift.'

# This description is used to generate tags and improve search results.

#  * Think: What does it do? Why did you write it? What is the focus?

#  * Try to keep it short, snappy and to the point.

#  * Write the description between the DESC delimiters below.

#  * Finally, don't worry about the indent, CocoaPods strips it!

 s.description = <<-DESC

TODO: Add long description of the pod here.

 DESC

 s.homepage  = 'https://github.com/AaronYin0514/AaronSwift'

 # s.screenshots  = 'www.example.com/screenshots_1', 'www.example.com/screenshots_2'

 s.license = { :type => 'MIT', :file => 'LICENSE' }

 s.author  = { 'AaronYin0514' => '562540603@qq.com' }

 s.source  = { :git => 'https://github.com/AaronYin0514/AaronSwift.git', :tag => s.version.to_s }

 # s.social_media_url = 'https://twitter.com/<TWITTER_USERNAME>'

 s.ios.deployment_target = '8.0'

 s.source_files = 'AaronSwift/Classes/**/*'

 # s.resource_bundles = {

 #  'AaronSwift' => ['AaronSwift/Assets/*.png']

 # }

 # s.public_header_files = 'Pod/Classes/**/*.h'

 # s.frameworks = 'UIKit', 'MapKit'

 # s.dependency 'AFNetworking', '~> 2.3'

end
- s.name: the key words of pod search. Please note that the name here must be the same as that of. podspec
- s.version: version number. This version number must be consistent with the corresponding Tag. In the example above, we set it to 0.1.0
- s.summary: introduction. You need to modify this introduction. It's a brief introduction to the project. If you don't modify it, there will be a warning.
- s.homepage: the homepage address of the project. This address needs to be https
- s.license: license
- s.author: Author
- s. Social media URL: Social Website
- s.source: address of the project
- s.source_files: the source files that need to be included. "" means to match all files, "*" means to match all subdirectories.
- s.resources: resource file
- s. Requirements? ARC: whether ARC is supported
- s.dependency: dependency Library
- s. Ios.deployment'target = '8.0': minimum supported pod version
10, Release version
pod repo add AaronSwift https://github.com/AaronYin0514/AaronSwift.git

pod repo push AaronSwift AaronSwift.podspec --allow-warnings
Perform these two steps as follows
yinzhongzhengdeMacBook-Pro:AaronSwift yinzhongzheng$ pod repo add AaronSwift https://github.com/AaronYin0514/AaronSwift.git

Cloning spec repo `AaronSwift` from `https://github.com/AaronYin0514/AaronSwift.git`

yinzhongzhengdeMacBook-Pro:AaronSwift yinzhongzheng$ pod repo push AaronSwift AaronSwift.podspec --allow-warnings

Validating spec

 -> AaronSwift (0.1.0)

 - WARN | [iOS] swift: The validator used Swift `4.0` by default because no Swift version was specified. To specify a Swift version during validation, add the `swift_versions` attribute in your podspec. Note that usage of a `.swift-version` file is now deprecated.

 - NOTE | xcodebuild: note: Using new build system

 - NOTE | [iOS] xcodebuild: note: Planning build

 - NOTE | [iOS] xcodebuild: note: Constructing build description

 - NOTE | [iOS] xcodebuild: warning: Skipping code signing because the target does not have an Info.plist file and one is not being generated automatically. (in target 'App' from project 'App')

 - NOTE | [iOS] xcodebuild: note: Execution policy exception registration failed and was skipped: Error Domain=NSPOSIXErrorDomain Code=1 "Operation not permitted" (in target 'AaronSwift' from project 'Pods')

 - NOTE | [iOS] xcodebuild: note: Execution policy exception registration failed and was skipped: Error Domain=NSPOSIXErrorDomain Code=1 "Operation not permitted" (in target 'Pods-App' from project 'Pods')

 - NOTE | [iOS] xcodebuild: note: Execution policy exception registration failed and was skipped: Error Domain=NSPOSIXErrorDomain Code=1 "Operation not permitted" (in target 'App' from project 'App')

Updating the `AaronSwift' repo

Adding the spec to the `AaronSwift' repo

 - [Update] AaronSwift (0.1.0)

Pushing the `AaronSwift' repo
11, Explain the name and address of pod repo add
This operation is to add the original warehouse to the local area and execute the following command:
cd ~/.cocoapods/repos/

open .
You can see the list of all local warehouses of Cocopods. The example library is Aaron swift. We can also browse other directories to find many files with the suffix podspec.
The pod install command is to traverse these directories according to the name of the library to be installed, find the corresponding configuration file, and then parse the address and configuration to download.
The Pod update command is to download these configuration files from the remote library to the local directory, and then install them.
12, Explain the pod repo push library name library configuration file (suffix: podspec) -- allow warnings
This command is a version release command. push the version to a remote location. We can find the directory corresponding to the version number in the ~ /. Cocoapods / repos / Aaron swift / Aaron swift / directory. The directory is the configuration file (suffix is podspec).
When the version or latest version is specified during pod install, the corresponding configuration file is found according to the version number.
13, pod udpate
In Example, this directory is our test code project. After pod update, we have installed the version we released. This completes the whole process.
yinzhongzhengdeMacBook-Pro:AaronSwift yinzhongzheng$ cd Example/

yinzhongzhengdeMacBook-Pro:Example yinzhongzheng$ ls

AaronSwift  Podfile  Tests

AaronSwift.xcodeproj  Podfile.lock

AaronSwift.xcworkspace  Pods

yinzhongzhengdeMacBook-Pro:Example yinzhongzheng$ pod update

Update all pods

Updating local specs repositories

^C[!] Cancelled

yinzhongzhengdeMacBook-Pro:Example yinzhongzheng$ pod update --no-repo-update

Update all pods

Analyzing dependencies

Downloading dependencies

Installing AaronSwift 0.1.0

Generating Pods project

Integrating client project

Pod installation complete! There are 5 dependencies from the Podfile and 5 total pods installed.

[!] Automatically assigning platform `iOS` with version `9.3` on target `AaronSwift_Example` because no platform was specified. Please specify a platform for this target in your Podfile. See `https://guides.cocoapods.org/syntax/podfile.html#platform`.