1, IOC container
IOC underlying principle
Concept and principle of IOC
1. What is IOC?
(1) Control inversion, and leave the object creation and calling process between objects to Spring for management
(2) Purpose of using IOC: to reduce coupling
2.IOC underlying principle
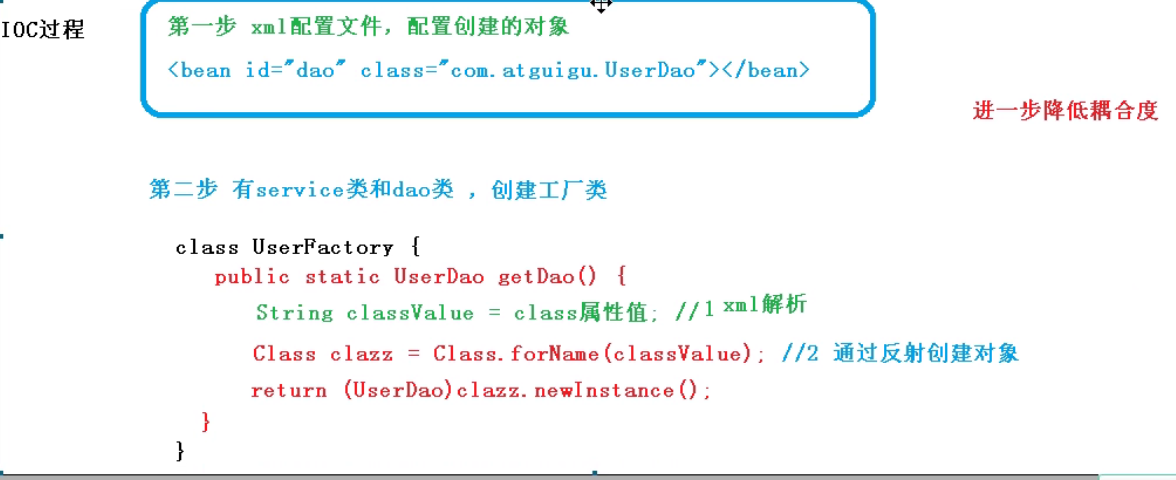
(1) xml parsing, factory schema, reflection
IOC operation
The first step is to create an object by configuring the xml configuration file
<bean id="dao" class="com.lp.UserDao"></bean>
The second step is to create a factory class with service class and dao class

IOC interface (BeanFactory)
1. The IOC idea is based on the IOC container, and the bottom layer of the IOC container is the object factory
2.Spring provides two ways to implement IOC container: (two interfaces)
(1) BeanFactory: the basic use of IOC container is the internal use interface of Spring, which is not provided for developers to use
Features: the object will not be created when loading the configuration file, but only when obtaining (using) the object
(2) ApplicationContext: the sub interface of BeanFactory interface, which provides more and more powerful functions and is generally used by developers
Features: when loading the configuration file, it will be created in the configuration file object
3. Main implementation classes of ApplicationContext
IOC operation Bean Management (XML based)
What is Bean management?
(1) Spring create object
(2) Spring injection properties
1. Create objects based on xml
<bean id="dao" class="com.lp.UserDao"></bean>
(1) Attribute introduction:
id attribute: unique identification
Class attribute: class full path (package class path)
(2) When creating an object, the default is to execute the parameterless construction method
2. Inject attributes based on xml:
(1) DI: dependency injection is the injection attribute
The first injection method: use the set method to inject
① Create a class, define properties and set methods for a
② Create a configuration object in the spring configuration file and configure attribute injection
Use property to complete attribute injection: Name: the name of the attribute in the class
Value: the value injected into the attribute
 <!--set Method injection properties-->
      <bean id="book" class="com.lp.springDemo1.book.Book">
          <property name="bname" value="<Grimm's Fairy Tales"></property>
          <property name="bauthor" value="Andersen"></property>
      </bean>
The second injection method: using parametric structure injection
<!--Constructor injection attribute-->
      <bean id="book" class="com.lp.springDemo1.book.Book">
          <constructor-arg index="0" value="<Journey to the West"></constructor-arg>
          <constructor-arg index="1" value="Wu Chengen"></constructor-arg>
      </bean>
Note: xml injects other types of attributes
1. Literal quantity
(1) null value
<property name="bauthor">
      <null></null>
  </property>
(2) Attribute values contain special symbols
① Escape < > & lt, & RT
② Write the contents with special symbols into CDATA, such as:
<property name="bauthor">
      <value><![CDATA[<Outlaws of the marsh]]></value>
  </property>
2. Injection attribute - External bean
(1) Create two classes: service class and dao class
(2) Call the method in dao in service
(3) Configure in the spring configuration file
 <!--    establish UserDao Object and UserService object-->
      <bean id="userService" class="com.lp.springDemo1.service.UserService">
  <!--    Attribute injection-->
          <property name="username" value="Xiao Ming"></property>
          <property name="age" value="11"></property>
  <!--    external bean injection-->
          <property name="userDao" ref="userDaoImpl"></property>
      </bean>
      <bean id="userDaoImpl" class="com.lp.springDemo1.dao.UserDaoImpl"></bean>
public class UserService {
private String username;
private int age;
private UserDao userDao;
public void setUsername(String username) {
this.username = username;
}
public void setAge(int age) {
this.age = age;
}
public void setUserDao(UserDao userDao) {
this.userDao = userDao;
}
public void look(){
System.out.println("UserService.look()========");
userDao.add();
}
}3. Injection attribute - internal bean and cascade assignment
(1) One to many relationships: departments and employees
A department has multiple employees, and one employee belongs to one department
(2) One to many relationships are represented between entity classes. Employees represent their departments and are represented by object types
//Department table
public class Dept {
private String dname;
public void setDname(String dname) {
this.dname = dname;
}
}
//Employee table
public class Emp {
private String ename;
private String sex;
//Employees belong to a department and are represented in the form of objects
private Dept dept;
public void setEname(String ename) {
this.ename = ename;
}
public void setSex(String sex) {
this.sex = sex;
}
public void setDept(Dept dept) {
this.dept = dept;
}
}<bean id="emp" class="com.lp.springDemo1.bean.Emp"> <property name="ename" value="Xiao Wang"></property> <property name="sex" value="male"></property> <property name="dept"> <bean id="dept" class="com.lp.springDemo1.bean.Dept"> <property name="dname" value="R & D department"></property> </bean> </property> </bean>
4. Injection attribute - cascade assignment
(1) The first method
<!--    Cascade assignment-->
      <bean id="emp" class="com.lp.springDemo1.bean.Emp">
          <property name="ename" value="Xiao Wang"></property>
          <property name="sex" value="male"></property>
          <property name="dept" ref="dept"></property>
      </bean>
      <bean id="dept" class="com.lp.springDemo1.bean.Dept">
          <property name="dname" value="R & D department"></property>
      </bean>
(2) The second method: generate the get play method,
//Employees belong to a department and are represented in object form (Emp table)
private Dept dept;
public Dept getDept() {
return dept;
}xml configuration file
<bean id="emp" class="com.lp.springDemo1.bean.Emp">
      <property name="ename" value="Xiao Wang"></property>
      <property name="sex" value="male"></property>
      <property name="dept.dname" value=""></property>
  </bean>
  <bean id="dept" class="com.lp.springDemo1.bean.Dept">
      <property name="dname" value="R & D department"></property>
  </bean>
5. Injection attribute - xml injection set attribute
(1) Inject array type properties
(2) Inject List collection properties
(3) Injection set collection properties
(4) Inject Map collection properties
① Create classes, define array, list, set and map type attributes, and generate corresponding set methods
public class Stu {
//1. Array type attribute
private String[] courses;
//2.list type attribute
private List<String> list;
//3.set type attribute
private Set<String> sets;
//4.map type attribute
private Map<String,String> map;
public void setCourses(String[] courses) {
this.courses = courses;
}
public void setList(List<String> list) {
this.list = list;
}
public void setSets(Set<String> sets) {
this.sets = sets;
}
public void setMap(Map<String, String> map) {
this.map = map;
}
}② xml file configuration
  <!--Inject collection type properties-->
      <bean id="stu" class="com.lp.springDemo1.Demo1.Stu">
  <!--Inject array type properties-->
          <property name="courses">
              <array>
                  <value>language</value>
                  <value>mathematics</value>
              </array>
          </property>
  <!--injection list Type properties-->
          <property name="list">
             <list>
                 <value>Monday</value>
                 <value>Tuesday</value>
             </list>
          </property>
  <!--injection set Type properties-->
          <property name="sets">
              <set>
                  <value>First</value>
                  <value>Second</value>
              </set>
          </property>
  <!--injection map Attribute type-->
          <property name="map">
              <map>
                  <entry key="a" value="Java"></entry>
                  <entry key="b" value="PHP"></entry>
              </map>
          </property>
      </bean>
6. Extract the injection set part
(1) Introducing the namespace util into the spring configuration file
 <beans xmlns="http://www.springframework.org/schema/beans"
         xmlns:xsi="http://www.w3.org/2001/XMLSchema-instance"
         xmlns:util="http://www.springframework.org/schema/util"
         xsi:schemaLocation="http://www.springframework.org/schema/beans http://www.springframework.org/schema/beans/spring-beans.xsd
                             http://www.springframework.org/schema/util http://www.springframework.org/schema/util/spring-util.xsd">
(2) Use util tag to complete list collection injection and extraction
 <!--extract list Collection type attribute injection-->
  <util:list id="bookList">
      <value>language</value>
      <value>mathematics</value>
      <value>English</value>
  </util:list>
  <!--extract list Collection type attribute injection usage-->
  <bean id="storyBook" class="com.lp.springDemo1.book.StoryBook">
      <property name="bookname" ref="bookList"></property>
  </bean>
IOC operation Bean Management (FactoryBean)
1.Spring has two types of beans: ordinary beans and factory beans
2. Ordinary bean: the bean type defined in the configuration file is the return type
3. Factory bean: the bean type defined in the configuration file can be different from the return type
Step 1: create a class that acts as a factory bean and implements the interface FactoryBean
Step 2: implement the method in the interface and define the returned bean type in the implemented method
IOC operation bean Management (bean scope)
1. In Spring, set whether to create a bean instance as a single instance or multiple instances
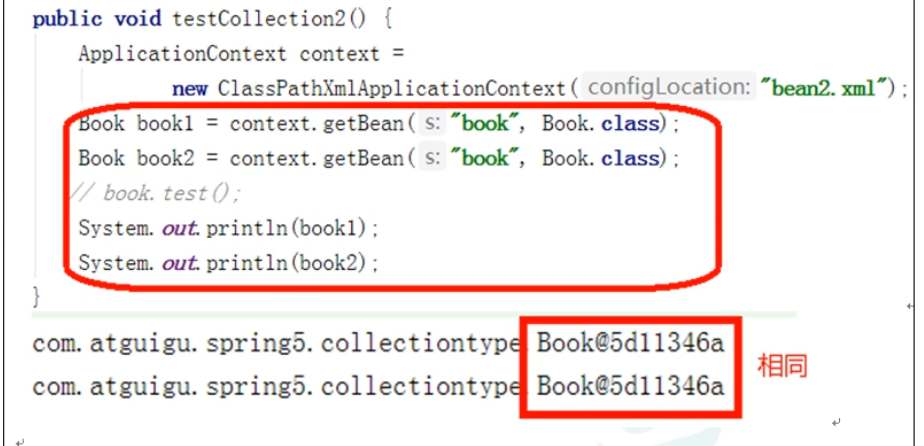
2. In Spring, by default, bean s are single instance objects

3. How to set single instance or multi instance
(1) In the bean tag of the Spring configuration file, there is a property (scope) to set whether to love single instances or multiple instances
(2) scope property value
The first value (default): singleton, which represents a single instance object
The second value, prototype, represents a multi instance object
 <bean id="userImp" class="com.spring2.UserImp" scope="prototype">
      <property name="list" value="userlist"></property>
  </bean>
(3) Differences between singleton and prototype:
First: singleton is a single instance and prototype is a multi instance
Second: when the scope value is set to singleton, a single instance object will be created when the spring configuration file is loaded;
When setting the scope value to prototype, the object will not be created when the Spring configuration file is loaded, but the multi instance object will be created when the getBean () method is called.
(4) scope has two other values:
request
session
IOC operation bean Management (bean name generation cycle)
1. Life cycle
(1) The process from object creation to object destruction
2. bean lifecycle
(1) Create bean instance through constructor (no parameter construction)
(2) Set values for bean properties and references to other beans (call the set method)
(3) Call the initialization method of the bean (configuration required)
(4) The bean is ready to use (the object is obtained)
(5) When the container is closed, the bean destruction method (the destruction method to be configured) is called
3. Demonstrate the process of bean declaration cycle
IOC operation Bean Management (automatic assembly)
bean tag attribute autowire, configure automatic assembly
The autowire property usually has two values: byName and byType
byName: injected by attribute name
byType: injected according to attribute category
IOC operation Bean Management (annotation based)
1. Spring provides annotations for creating objects in Bean management
①Component
②Service
③Contorller
④Repository
2. Object creation based on annotation
Step 1: introduce dependency in pom.xml file
<dependency>
      <groupId>org.springframework</groupId>
      <artifactId>spring-aop</artifactId>
      <version>5.3.8</version>
  </dependency>
Step 2: start component scanning
① Incoming space name:
 <beans xmlns="http://www.springframework.org/schema/beans"
         xmlns:xsi="http://www.w3.org/2001/XMLSchema-instance"
         xmlns:p="http://www.springframework.org/schema/p"
         xmlns:context="http://www.springframework.org/schema/context"
         xsi:schemaLocation="http://www.springframework.org/schema/beans http://www.springframework.org/schema/beans/spring-beans.xsd
                             http://www.springframework.org/schema/context http://www.springframework.org/schema/context/spring-context.xsd">
② Turn on the scan assembly
 <!--Turn on component scanning
      1,If scanning multiple packages, separate them with commas
      2,You can also scan their common upper directory-->
      <context:component-scan base-package="com.lp"></context:component-scan>
Step 3: create a class and add an object annotation on the class
 //In the annotation, the value attribute value can be omitted
  //The default is lowercase
  @Component(value = "serviceTest")
  public class ServiceTest {
      public void  add(){
          System.out.println("service add()......");
      }
  }
Attention to details:
① Indicates that only Controller annotations are scanned, and no other annotations are scanned
<context:component-scan base-package="com.lp" use-default-filters="false">
      <context:include-filter type="annotation" expression="org.springframework.stereotype.Controller"/>
  </context:component-scan>
② Indicates that the Controller annotation is not scanned, and others are scanned
 <context:component-scan base-package="com.lp">
      <context:exclude-filter type="annotation" expression="org.springframework.stereotype.Controller"/>
  </context:component-scan>
3. Attribute injection based on annotation
(1) @ Autowired auto assemble according to attribute type
//Define dao type properties
//There is no need to add a set method
//Add annotation for injection attribute
@Service
public class UserService {
@Autowired
private UserDao userDao;
public void add(){
System.out.println("service add()......");
userDao.add();
}
}(2)@Qualifier inject according to attribute name
The @ Qualifier annotation is used together with @ Autowired above.
//Define dao properties

//There is no need to add a set method

  @Autowired
  @Qualifier(value = "userDao")
  private UserDao userDao;
(3)@Resource can be injected either by type or by name
 @Resource(name = "userDao1")
  private UserDao userDao;
(4)@Value inject common type attribute
 @Value(value = "Xiao Ming")
  private String name;
4. Fully annotated development (no configuration files)
(1) Create a configuration class instead of an xml file
  @Configuration //As a configuration class, replace the xml file
  @ComponentScan(basePackages = "com.lp")
  public class SpringConfig {
  }
(2) Load configuration class
  //Load configuration class
  ApplicationContext ac = new AnnotationConfigApplicationContext(SpringConfig.class);