Introduction Face recognition is a popular technology nowadays. As developers, if we don't realize the function of face recognition, it's too Low. It's not advisable to invent wheels from the beginning. We can use a lot of ready-made face recognition technology to achieve it.
Current face recognition technology is divided into WEBAPI and SDK calls. WEBAPI needs real-time networking, and SDK calls can be used offline. The off-line version of SDK developed by Hongsoft is free of charge. The feature of the off-line version is that we can use it locally at any time without worrying about the problem of networking. The most important thing is that SDK is free, that is to say, there is no need to worry about the use of fees in the future.
For example code for this article, please download the sample project at http://download.csdn.net/download/feishixin/9954948. After downloading, you need to
 The. a file downloaded from http://www.arcsoft.com.cn/ai/arcface.html was introduced into the project. You can also go to http://www.arcsoft.com.cn/bbs/forum.
Php? Mod = forumdisplay & FID = 45 to download demo s in other languages.
Project objectives We need to implement a facial recognition function to recognize the real-time face information captured in the camera by calling the pre-assumption head of the mobile phone. If the face information is already in the face database, the data information after face recognition will be displayed. If not, the user will be prompted not to register and asked if the face information is added to the face database. Face registration Face registration means that after entering the user name and password, we call the camera to associate the saved facial features with a user in the system.
Face detection refers to a scene in which a person's face is detected. If it exists, it detects the face by locating the key points of the face.

In the face detection program, the result of face detection will return to a box. Face recognition engine extracts data called face feature points and stores them in the database by analyzing the pictures in the frame.

The process is called face information registration. After facial information registration, after recognizing a new face, the face recognition engine is called to obtain the similarity of different faces by comparing the face information in the database.

Value, completes the face recognition function.
 Dead work
Before we start, we need to download the IOS library we use. We use the Hongruo Face Recognition Library. You can use it in http://www.arcsoft.com.cn/ai/arcface.html After downloading the latest version, we got three packages, which are
face_tracking Used for face information tracking, it is used to locate and track the location of the face area. With the change of the face position, it can locate the face position quickly.
face_detection Used for face detection in static photos. Face detection is the basis of face technology. It detects and locates faces in images (pictures or videos).
face_recognition,face_tracking,face_detection
face_recognition It is used to extract facial feature points and compare facial information. FR According to different application scenarios, it can be divided into 1:1 and 1: N  .
(1:1) It is mainly used to analyze the similarity of two faces, mostly for user authentication and authentication.
(1:N) For an input face, similar faces are retrieved in the established face database.
We used 1:1 in this demo.
Since FR functions require FD or FT detection data, the download package contains all three libraries.
These three packages are basically the same structure. We need to decompress them.
The GUIDE document is stored in the doc directory, which is a description document. It introduces some API s published publicly and provides sample code. However, the sample code is relatively simple and difficult to understand if you have no experience.
inc saves reference libraries, usually header files corresponding to the current API l ib shared library, which contains SDK compiled. a file. You need to refer them all to the project.
Platform consists of two folders, inc is the platform-related header file, which is referred to by our SDK, so it must be included, the specific role.
See the notes to each document. lib is an mpbase library and needs to be included in our project.
Sample Code sample code
Set up a project
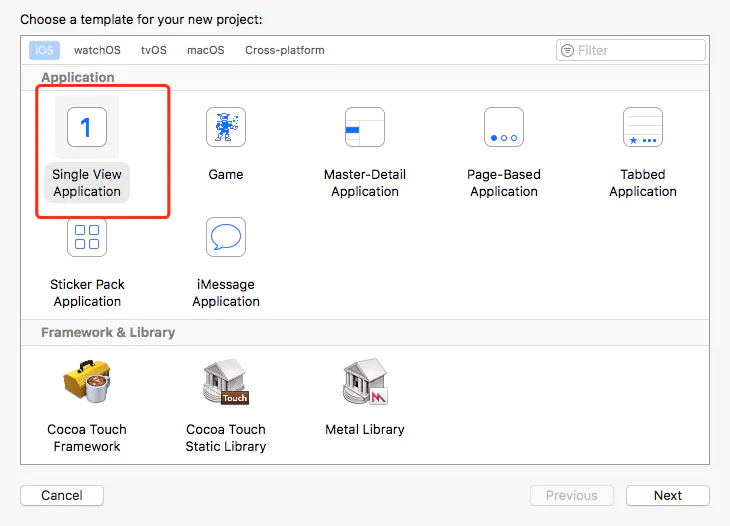
Our project is relatively simple, so we set up a common SingleView Applaction.
 Design view
View is very simple, because we mainly recognize faces, we use a sub-view to display face information data.
Main view
In the face display part, we directly use the custom OPENGL View, because this is a video recognition function, so we need to use OPENGL / hardware acceleration to achieve fast and efficient display.
This is a custom View. You can download the source code for this tutorial first, find it in GlView and drag it into our project.
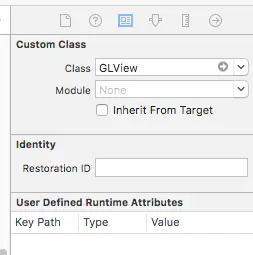
Open the designer, find the Main.storyboard. pull control to the Storboard window, Class select the GLView we use.
Set the height and width of the view to fill the entire window.
Design view
View is very simple, because we mainly recognize faces, we use a sub-view to display face information data.
Main view
In the face display part, we directly use the custom OPENGL View, because this is a video recognition function, so we need to use OPENGL / hardware acceleration to achieve fast and efficient display.
This is a custom View. You can download the source code for this tutorial first, find it in GlView and drag it into our project.
Open the designer, find the Main.storyboard. pull control to the Storboard window, Class select the GLView we use.
Set the height and width of the view to fill the entire window.
 Subview
We also need a sub-view to display the recognition box. This view is relatively simple. We add a new Controller and Class chooses the default class.
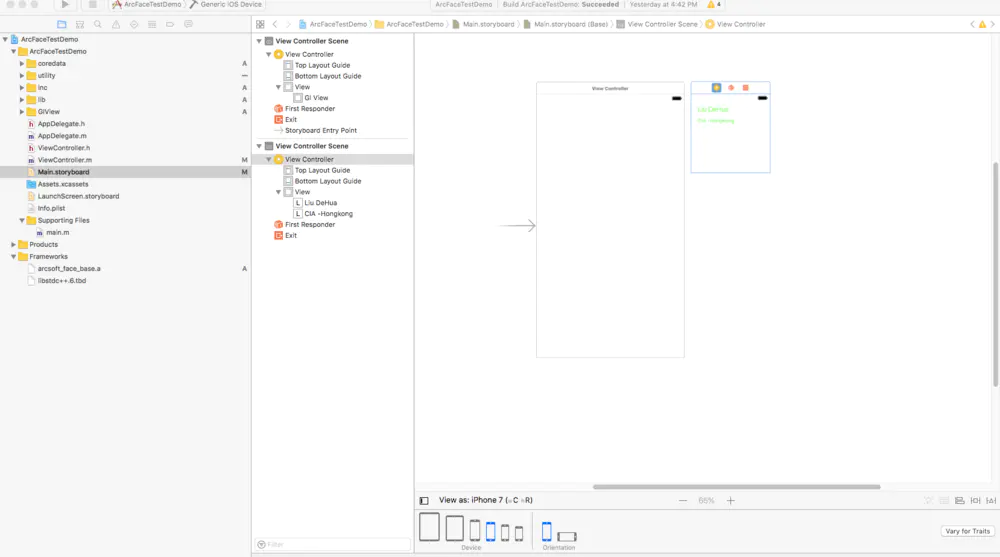 Here we can define several Label s for displaying face recognition information, similar to those displayed in American blockbusters, such as Andy Lau CIA-Hong Kong and so on.
We can even display the registered faces in the system for face comparison. But this requires another sub-view, which interested readers can try on their own.
Implementing business logic
First, we open the default ViewController
We added GlView.h header file to the. h file.
Here we can define several Label s for displaying face recognition information, similar to those displayed in American blockbusters, such as Andy Lau CIA-Hong Kong and so on.
We can even display the registered faces in the system for face comparison. But this requires another sub-view, which interested readers can try on their own.
Implementing business logic
First, we open the default ViewController
We added GlView.h header file to the. h file.
#import "GLView.h"
Define the OpenGL view interface properties, which is our main view.
@property (weak, nonatomic) IBOutlet GLView *glView;
A Set of Small Attempts for Storing Face Features
@property (nonatomic, strong) NSMutableArray* arrayAllFaceRectView;
Define the processing size of the image and video. Because it's a mobile phone, 720p is enough.
#define IMAGE_WIDTH     720
#define IMAGE_HEIGHT    1280
Find the ViewDidLoad method, where we define business logic.
We are going to use the front-facing camera video of the mobile phone, and hope that our face frame information will be consistent with the direction of the screen of the mobile phone.
//Automatically confirm the direction of image recognition according to the current direction of mobile phone
    UIInterfaceOrientation uiOrientation = [[UIApplication sharedApplication] statusBarOrientation];
    AVCaptureVideoOrientation videoOrientation = (AVCaptureVideoOrientation)uiOrientation;
We hope that the video of the camera can be full-screen and get a good experience effect. This part of the code is representative, but the logic is relatively simple.
 //Calculate OpenGL window size
    CGSize sizeTemp = CGSizeZero;
    if(uiOrientation == UIInterfaceOrientationPortrait || uiOrientation == UIInterfaceOrientationPortraitUpsideDown)
    {
        sizeTemp.width = MIN(IMAGE_WIDTH, IMAGE_HEIGHT);
        sizeTemp.height = MAX(IMAGE_WIDTH, IMAGE_HEIGHT);
    }
    else
    {
        sizeTemp.width = MAX(IMAGE_WIDTH, IMAGE_HEIGHT);
        sizeTemp.height = MIN(IMAGE_WIDTH, IMAGE_HEIGHT);
    }

    CGFloat fWidth = self.view.bounds.size.width;
    CGFloat fHeight = self.view.bounds.size.height;

    [Utility CalcFitOutSize:sizeTemp.width oldH:sizeTemp.height newW:&fWidth newH:&fHeight];
    self.glView.frame = CGRectMake((self.view.bounds.size.width-fWidth)/2,(self.view.bounds.size.width-fWidth)/2,fWidth,fHeight);
    [self.glView setInputSize:sizeTemp orientation:videoOrientation];
Initialization of Face Recognition Subview Data
self.arrayAllFaceRectView = [NSMutableArray arrayWithCapacity:0];

//TODO: Monitor camera changes. Detecting Face Information in Camera
Processing Camera Interactive Logic
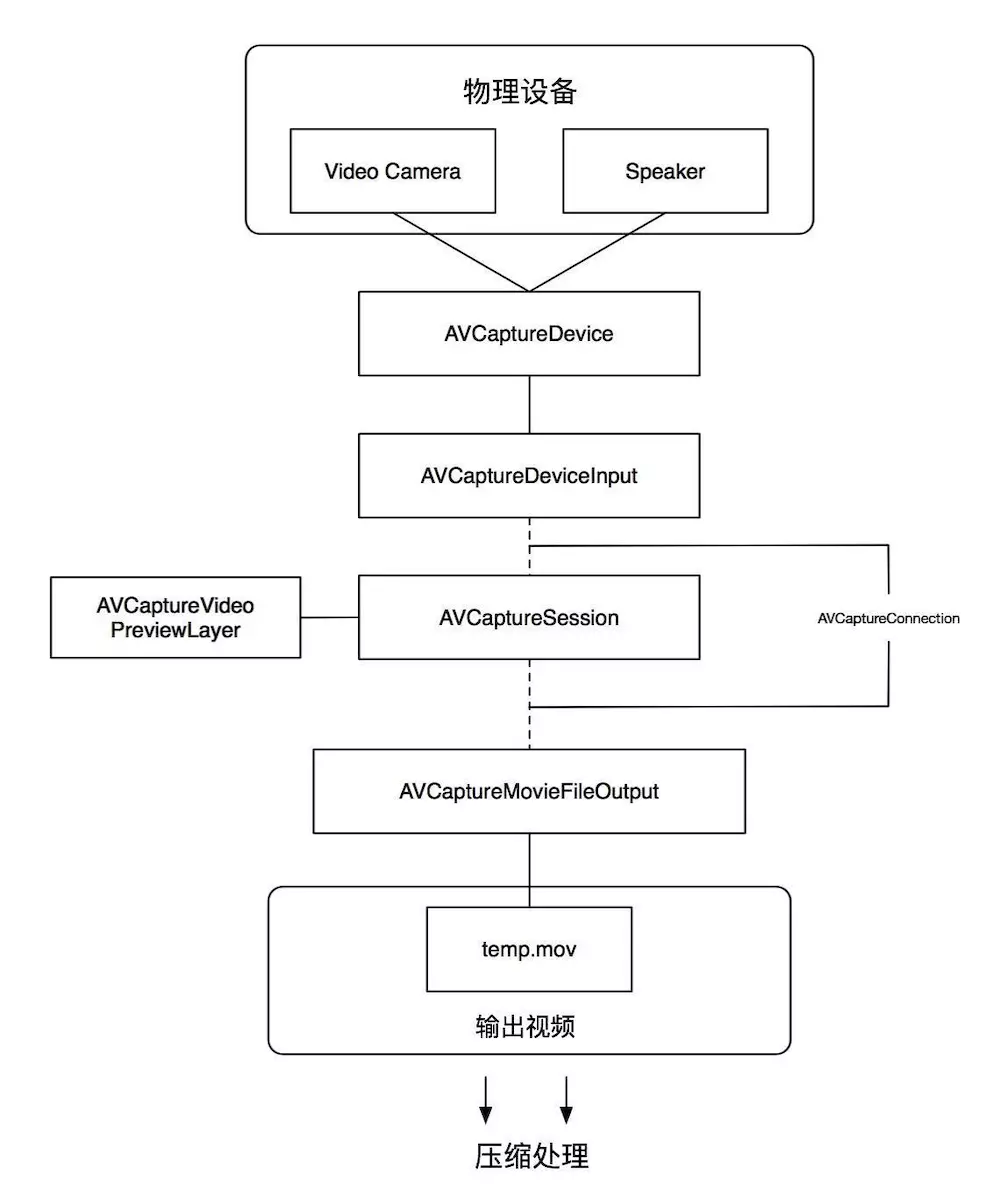
IOS provides AVFund for video and audio capture related work. AVCaptureSession is the core class of AVFoundation, which is used to capture video and audio, coordinate the input and output streams of video and audio.
 AFCameraController
To facilitate these processes, we separate these parts into a single class. Let's define a class AFCameraController
You can generate this class by selecting cocoa Touch Class, filling in the class name and the corresponding parent class name through the new file of xcode.
@interface AFCameraController : NSObject

- (BOOL) setupCaptureSession:(AVCaptureVideoOrientation)videoOrientation;
- (void) startCaptureSession;
- (void) stopCaptureSession;

@end
AVCaptureVideoDataOutputSampleBufferDelegate This delegation contains a callback function that provides an interface mechanism for processing video, which is handled directly by business logic. We need to redefine the delegation AVCapture Video Data Output Sample Buffer Delegate in AVCappture Session.
@protocol AFCameraControllerDelegate <NSObject>
- (void)captureOutput:(AVCaptureOutput *)captureOutput didOutputSampleBuffer:(CMSampleBufferRef)sampleBuffer fromConnection:(AVCaptureConnection *)connection;
@end
Adding delegates to class definitions
@property (nonatomic, weak) id <AFCameraControllerDelegate> delegate;
Defining Home Variables
AVCaptureSession    *captureSession;
    AVCaptureConnection *videoConnection;
We implement the setupCaptureSession method
captureSession = [[AVCaptureSession alloc] init];

    [captureSession beginConfiguration];

    AVCaptureDevice *videoDevice = [self videoDeviceWithPosition:AVCaptureDevicePositionFront];

    AVCaptureDeviceInput *videoIn = [[AVCaptureDeviceInput alloc] initWithDevice:videoDevice error:nil];
    if ([captureSession canAddInput:videoIn])
        [captureSession addInput:videoIn];

    AVCaptureVideoDataOutput *videoOut = [[AVCaptureVideoDataOutput alloc] init];
    [videoOut setAlwaysDiscardsLateVideoFrames:YES];


    NSDictionary *dic = [NSDictionary dictionaryWithObject:[NSNumber numberWithInt:kCVPixelFormatType_420YpCbCr8BiPlanarFullRange] forKey:(id)kCVPixelBufferPixelFormatTypeKey];

    [videoOut setVideoSettings:dic];


    /*Processing and defining video output delegation processing*/

    dispatch_queue_t videoCaptureQueue = dispatch_get_global_queue(DISPATCH_QUEUE_PRIORITY_HIGH,0);
    [videoOut setSampleBufferDelegate:self queue:videoCaptureQueue];

    if ([captureSession canAddOutput:videoOut])
        [captureSession addOutput:videoOut];
    videoConnection = [videoOut connectionWithMediaType:AVMediaTypeVideo];

    if (videoConnection.supportsVideoMirroring) {
        [videoConnection setVideoMirrored:TRUE];
    }

    if ([videoConnection isVideoOrientationSupported]) {
        [videoConnection setVideoOrientation:videoOrientation];
    }

    if ([captureSession canSetSessionPreset:AVCaptureSessionPreset1280x720]) {
        [captureSession setSessionPreset:AVCaptureSessionPreset1280x720];
    }

    [captureSession commitConfiguration];

    return YES;
In the code above, we define the local processing setSampleBufferDelegate Therefore, we need to add AVCaptureVideoData Output SampleBufferDelegate delegate to the class name of. m, as shown below.
@interface AFCameraController ()<AVCaptureVideoDataOutputSampleBufferDelegate>
We need to implement this delegation-based approach
- (void)captureOutput:(AVCaptureOutput *)captureOutput didOutputSampleBuffer:(CMSampleBufferRef)sampleBuffer fromConnection:(AVCaptureConnection *)connection
{
    if (connection == videoConnection) {
        if (self.delegate && [self.delegate respondsToSelector:@selector(captureOutput:didOutputSampleBuffer:fromConnection:)]) {
            [self.delegate captureOutput:captureOutput didOutputSampleBuffer:sampleBuffer fromConnection:connection];
        }
    }
}
Then we fill in session start and stop methods, which are relatively simple.
- (void) startCaptureSession
{
    if ( !captureSession )
        return;

    if (!captureSession.isRunning )
        [captureSession startRunning];
}

- (void) stopCaptureSession
{
    [captureSession stopRunning];
    captureSession = nil;
}
Add AFCamaraController reference
Let's go back to the business ViewController class, add a reference to AFCamaraController.h in. h, and add the variable camaraController
#import "AFCameraController.h"

@property (nonatomic, strong) AFCameraController* cameraController;
In the viewDidLoad method, the processing logic of camaraController is added.
 // Start the camera monitor thread in another Controller way
    self.cameraController = [[AFCameraController alloc]init];
    self.cameraController.delegate = self;
    [self.cameraController setupCaptureSession:videoOrientation];
    [self.cameraController startCaptureSession];
Because we use other classes, we need to actively call uninit methods in dealloc methods to complete the release of memory objects.
- (void)dealloc
{

    [self.cameraController stopCaptureSession];

}
We define a delegation in AFCamera Controller to handle the processing of video captured by a camera. First, like the AFCamera Controller class, our ViewController also needs to implement the AFCamera Controller Delegate delegation.
@interface ViewController : UIViewController<AFCameraControllerDelegate>
We fulfill this commission.
- (void)captureOutput:(AVCaptureOutput *)captureOutput didOutputSampleBuffer:(CMSampleBufferRef)sampleBuffer fromConnection:(AVCaptureConnection *)connection
{
    //Get image
    //Display captured images on a view
    //Call the face detection engine to get the range of face
    //Use sub-view to display captured face information. Yes, a frame is added to indicate the location of the face.
}
See the above comment, do you think this Commission is our protagonist?
Constructing ASVLOFFSCREEN Structure
Opening the downloaded API document, you can see that video processing requires a structure ASVLOFFSCREEN, the image format to be processed is
ASVL_PAF_NV12 video format is one of the two YUV formats of preview callback provided by IOS camera.
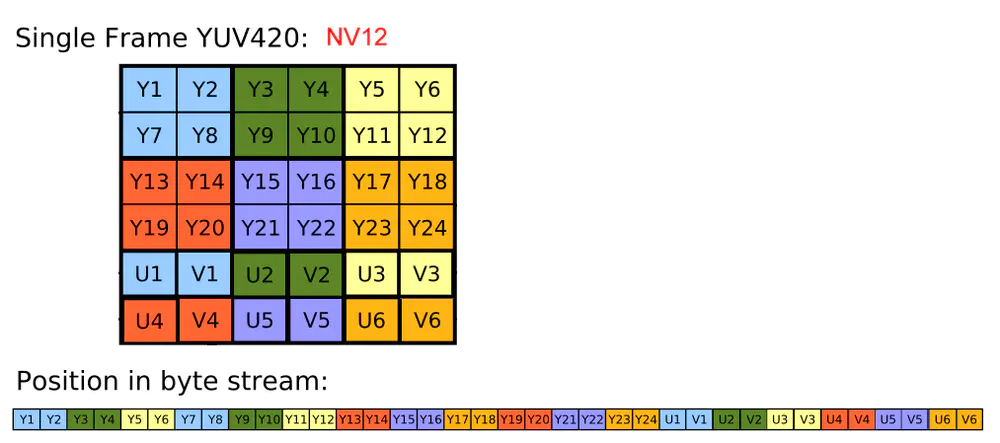 This structure is defined in the asvloffscreen.h file. It is defined as follows
typedef struct __tag_ASVL_OFFSCREEN
{
    MUInt32 u32PixelArrayFormat;
    MInt32  i32Width;
    MInt32  i32Height;
    MUInt8* ppu8Plane[4];
    MInt32  pi32Pitch[4];
}ASVLOFFSCREEN, *LPASVLOFFSCREEN;
Among them, ppu8Plan stores image data. From the above structure, we can see that in order to achieve the function, we must first pass the correct value to the structure. Ppu8Plan saves the binary data information of the corresponding image of Pixel Array Format.
Continue with the delegation and add the following code to the captureOutput
  CVImageBufferRef cameraFrame = CMSampleBufferGetImageBuffer(sampleBuffer);
    int bufferWidth = (int) CVPixelBufferGetWidth(cameraFrame);
    int bufferHeight = (int) CVPixelBufferGetHeight(cameraFrame);
    LPASVLOFFSCREEN pOffscreenIn = [self offscreenFromSampleBuffer:sampleBuffer];

    //Display captured video
    dispatch_sync(dispatch_get_main_queue(), ^{
    [self.glView render:bufferWidth height:bufferHeight yData:pOffscreenIn->ppu8Plane[0] uvData:pOffscreenIn->ppu8Plane[1]];
    }
Converting image information to offscreen
We implement the offscreenFromSampleBuffer method
In this method, the ASVLOFFSCREEN structure is constructed by acquiring the data sampleBuffer of the camera.
- (LPASVLOFFSCREEN)offscreenFromSampleBuffer:(CMSampleBufferRef)sampleBuffer
{
    if (NULL == sampleBuffer)
        return NULL;

    CVImageBufferRef cameraFrame = CMSampleBufferGetImageBuffer(sampleBuffer);
    int bufferWidth = (int) CVPixelBufferGetWidth(cameraFrame);
    int bufferHeight = (int) CVPixelBufferGetHeight(cameraFrame);
    OSType pixelType =  CVPixelBufferGetPixelFormatType(cameraFrame);

    CVPixelBufferLockBaseAddress(cameraFrame, 0);


        /*Judge whether there is already content, there is content empty*/
        if (_offscreenIn != NULL)
        {
            if (_offscreenIn->i32Width != bufferWidth || _offscreenIn->i32Height != bufferHeight || ASVL_PAF_NV12 != _offscreenIn->u32PixelArrayFormat) {
                [Utility freeOffscreen:_offscreenIn];
                _offscreenIn = NULL;
            }
        }

        /*Pre-tectonic structure*/
        if (_offscreenIn == NULL) {
            _offscreenIn = [Utility createOffscreen:bufferWidth height:bufferHeight format:ASVL_PAF_NV12];
        }


        //Get camaraFrame data information and copy it to ppu8Plane[0]

        ASVLOFFSCREEN* pOff = _offscreenIn;

        uint8_t  *baseAddress0 = (uint8_t *)CVPixelBufferGetBaseAddressOfPlane(cameraFrame, 0); // Y
        uint8_t  *baseAddress1 = (uint8_t *)CVPixelBufferGetBaseAddressOfPlane(cameraFrame, 1); // UV

        size_t   rowBytePlane0 = CVPixelBufferGetBytesPerRowOfPlane(cameraFrame, 0);
        size_t   rowBytePlane1 = CVPixelBufferGetBytesPerRowOfPlane(cameraFrame, 1);

        // YData
        if (rowBytePlane0 == pOff->pi32Pitch[0])
        {
            memcpy(pOff->ppu8Plane[0], baseAddress0, rowBytePlane0*bufferHeight);
        }
        else
        {
            for (int i = 0; i < bufferHeight; ++i) {
                memcpy(pOff->ppu8Plane[0] + i * bufferWidth, baseAddress0 + i * rowBytePlane0, bufferWidth);
            }
        }
        // uv data
        if (rowBytePlane1 == pOff->pi32Pitch[1])
        {
            memcpy(pOff->ppu8Plane[1], baseAddress1, rowBytePlane1 * bufferHeight / 2);
        }
        else
        {
            uint8_t  *pPlanUV = pOff->ppu8Plane[1];
            for (int i = 0; i < bufferHeight / 2; ++i) {
                memcpy(pPlanUV + i * bufferWidth, baseAddress1+ i * rowBytePlane1, bufferWidth);
            }
        }

      CVPixelBufferUnlockBaseAddress(cameraFrame, 0);

    return _offscreenIn;
}
The createOffscreen we used in the above code is the method we defined in the Utility class, which creates the specified size of the Offscreen and returns the pointer.
+ (LPASVLOFFSCREEN) createOffscreen:(MInt32) width height:( MInt32) height format:( MUInt32) format
{

    ASVLOFFSCREEN* pOffscreen = MNull;
    do
    {
        pOffscreen = (ASVLOFFSCREEN*)malloc(sizeof(ASVLOFFSCREEN));
        if(!pOffscreen)
            break;

        memset(pOffscreen, 0, sizeof(ASVLOFFSCREEN));

        pOffscreen->u32PixelArrayFormat = format;
        pOffscreen->i32Width = width;
        pOffscreen->i32Height = height;


            pOffscreen->pi32Pitch[0] = pOffscreen->i32Width;        //Y
            pOffscreen->pi32Pitch[1] = pOffscreen->i32Width;        //UV

            pOffscreen->ppu8Plane[0] = (MUInt8*)malloc(height * pOffscreen->pi32Pitch[0] ) ;    // Y
            memset(pOffscreen->ppu8Plane[0], 0, height * pOffscreen->pi32Pitch[0]);

            pOffscreen->ppu8Plane[1] = (MUInt8*)malloc(height / 2 * pOffscreen->pi32Pitch[1]);  // UV
            memset(pOffscreen->ppu8Plane[1], 0, height * pOffscreen->pi32Pitch[0] / 2);

    }while(false);

    return pOffscreen;
}
This part of the code can be directly copied to your program to use, to understand this part of the code, need more knowledge of graphics and images, will not be repeated in this article. Access to Rainbow Soft Face Detection Engine From here on, we are officially connected to the face detection engine. We build an AFVideoProcessor-like facial-related function separately. Used to write code related to face recognition SDK Add the necessary references We can trace the sample code directly to add the necessary references, so we add references as needed to the header file in the downloaded SDK.
#import "AFVideoProcessor.h"
#import "ammem.h"
#import "merror.h"
#import "arcsoft_fsdk_face_tracking.h"
#import "Utility.h"
#import "AFRManager.h"

#define AFR_DEMO_APP_ID         "bCx99etK9Ns4Saou1EbFdC8JMYnMmmLmpw1***"
#define AFR_DEMO_SDK_FT_KEY     "FE9XjUgYTNXyBHiapTApnFydX4PpXB2ZaxhvtkD***"


#define AFR_FT_MEM_SIZE         1024*1024*5
Above APID and FT KEY, please go to the download engine page to see, you can find the Key information you applied in the user center application history.
Define variables in the interface section
MHandle          _arcsoftFT;
MVoid*           _memBufferFT;
Defining face structural volume variables
@property(nonatomic,assign) MRECT faceRect;
Define ASVLOFFSCREEN variable
ASVLOFFSCREEN* _offscreenForProcess;
Define three main methods
- (void)initProcessor;
- (void)uninitProcessor;
- (NSArray*)process:(LPASVLOFFSCREEN)offscreen;
initProcessor
This method is used to initialize the rainbow soft engine, and the application needs to actively call this method.
- (void)initProcessor
{
_memBufferFT = MMemAlloc(MNull,AFR_FT_MEM_SIZE);
    AFT_FSDK_InitialFaceEngine((MPChar)AFR_DEMO_APP_ID, (MPChar)AFR_DEMO_SDK_FT_KEY, (MByte*)_memBufferFT, AFR_FT_MEM_SIZE, &_arcsoftFT, AFT_FSDK_OPF_0_HIGHER_EXT, 16, AFR_FD_MAX_FACE_NUM);
}
Note: HongSoft provides some functions of memory operation in this library, which are defined in ammem.h. Our program calls the methods above first when it needs to allocate memory. uninitProcessor
This method is used in the anti-initialization engine, mainly to release the occupied memory.
- (void)uninitProcessor
{
    AFT_FSDK_UninitialFaceEngine(_arcsoftFT);
    _arcsoftFT = MNull;
    if(_memBufferFT != MNull)
    {
        MMemFree(MNull, _memBufferFT);
        _memBufferFT = MNull;

    }
}
process recognition of face location
This method is the main method of recognizing face location. We can refer to the sample code in the API document to complete it.
- (NSArray*)process:(LPASVLOFFSCREEN)offscreen
{
    MInt32 nFaceNum = 0;
    MRECT* pRectFace = MNull;

    __block AFR_FSDK_FACEINPUT faceInput = {0};

        LPAFT_FSDK_FACERES pFaceResFT = MNull;
        AFT_FSDK_FaceFeatureDetect(_arcsoftFT, offscreen, &pFaceResFT);
        if (pFaceResFT) {
            nFaceNum = pFaceResFT->nFace;
            pRectFace = pFaceResFT->rcFace;
        }

        if (nFaceNum > 0)
        {
            faceInput.rcFace = pFaceResFT->rcFace[0];
            faceInput.lOrient = pFaceResFT->lfaceOrient;
        }


    NSMutableArray *arrayFaceRect = [NSMutableArray arrayWithCapacity:0];
    for (int face=0; face<nFaceNum; face++) {
        AFVideoFaceRect *faceRect = [[AFVideoFaceRect alloc] init];
        faceRect.faceRect = pRectFace[face];
        [arrayFaceRect addObject:faceRect];
    }
}
This method returns an array in which face recognition information can be saved. This information can be used to display face in the program.
As mentioned above, header files are introduced and variables are defined.
#import "AFVideoProcessor.h"
@property (nonatomic, strong) AFVideoProcessor* videoProcessor;
Initialize the engine in the viewDidLoad method
self.videoProcessor = [[AFVideoProcessor alloc] init];
[self.videoProcessor initProcessor];
Back to the captureOutput method, we can get the recognized face data.
NSArray *arrayFaceRect = [self.videoProcessor process:pOffscreenIn];
Since the Rainbow Soft Face Engine supports multiple face recognition, it returns us a data. We need to process and display each face. The display here is to add a box and display the data in our customized sub-attempts. So here's a loop.
for (NSUInteger face=self.arrayAllFaceRectView.count; face<arrayFaceRect.count; face++) {
                //Locate to a custom View
                UIStoryboard *faceRectStoryboard = [UIStoryboard storyboardWithName:@"Main" bundle:nil];
                UIView *faceRectView = [faceRectStoryboard instantiateViewControllerWithIdentifier:@"FaceRectVideoController"].view;

                //Our view needs to be shown as a green box
                faceRectView.layer.borderColor=[UIColor greenColor].CGColor;
                faceRectView.layer.borderWidth=2;

                [self.view addSubview:faceRectView];
                [self.arrayAllFaceRectView addObject:faceRectView];
            }
Here is just a box. If our box needs to track the position of the face and automatically zoom in and out, we need to do some work. We need to set view.frame attributes based on the returned face data.
Face frame location requires a series of simple mathematical calculations. That is to say, the window size of the face in the view window is fitted. The code is as follows:
- (CGRect)dataFaceRect2ViewFaceRect:(MRECT)faceRect
{
    CGRect frameFaceRect = {0};
    CGRect frameGLView = self.glView.frame;
    frameFaceRect.size.width = CGRectGetWidth(frameGLView)*(faceRect.right-faceRect.left)/IMAGE_WIDTH;
    frameFaceRect.size.height = CGRectGetHeight(frameGLView)*(faceRect.bottom-faceRect.top)/IMAGE_HEIGHT;
    frameFaceRect.origin.x = CGRectGetWidth(frameGLView)*faceRect.left/IMAGE_WIDTH;
    frameFaceRect.origin.y = CGRectGetHeight(frameGLView)*faceRect.top/IMAGE_HEIGHT;

    return frameFaceRect;
}
Let's go back to captureOutput and try to define the display for each face.
for (NSUInteger face=0; face<arrayFaceRect.count; face++) {
            UIView *faceRectView = [self.arrayAllFaceRectView objectAtIndex:face];
            faceRectView.hidden = NO;
            faceRectView.frame = [self dataFaceRect2ViewFaceRect:((AFVideoFaceRect*)[arrayFaceRect objectAtIndex:face]).faceRect];

            NSLog(@"Frame:(%.2f,%.2f,%.2f,%.2f",faceRectView.frame.origin.x,faceRectView.frame.origin.y,faceRectView.frame.size.width,faceRectView.frame.size.height);

        }
We also need to deal with the case of face removal. When the face view data is larger than the number of recognized faces, hide and display.
if(self.arrayAllFaceRectView.count >= arrayFaceRect.count)
        {
            for (NSUInteger face=arrayFaceRect.count; face<self.arrayAllFaceRectView.count; face++) {
                UIView *faceRectView = [self.arrayAllFaceRectView objectAtIndex:face];
                faceRectView.hidden = YES;
            }
        }
Operation test
At this point, the code is finally complete, and you can run the test. The results are as follows:
It should be good.
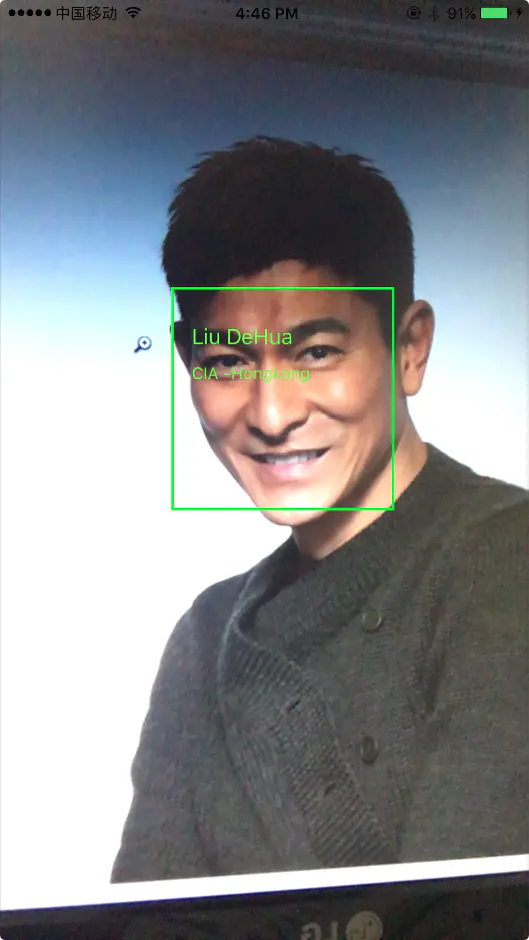 Of course, we only use the most basic facial detection function, and that cool message box is hard-coded on the interface.
If we want to achieve real information, we need to extract face features, build our own face database, and then use face recognition engine to compare these face information. These are provided in HongSoft's face_recongation SDK.
Extraction of facial feature information
Face_reconciliation is quite simple to extract face information.
Of course, we only use the most basic facial detection function, and that cool message box is hard-coded on the interface.
If we want to achieve real information, we need to extract face features, build our own face database, and then use face recognition engine to compare these face information. These are provided in HongSoft's face_recongation SDK.
Extraction of facial feature information
Face_reconciliation is quite simple to extract face information.
     AFR_FSDK_FACEMODEL faceModel = {0};
                AFR_FSDK_ExtractFRFeature(_arcsoftFR, pOffscreenForProcess, &faceInput, &faceModel);
The extracted information is stored in the faceModel structure.
typedef struct {
    MByte       *pbFeature;     // The extracted features
    MInt32      lFeatureSize;   // The size of pbFeature
}AFR_FSDK_FACEMODEL, *LPAFR_FSDK_FACEMODEL;
We can get feature data in faceModel from the following code
AFR_FSDK_FACEMODEL currentFaceModel = {0};
                currentFaceModel.pbFeature = (MByte*)[currentPerson.faceFeatureData bytes];
                currentFaceModel.lFeatureSize = (MInt32)[currentPerson.faceFeatureData length];
The pbFeature in this structure is the face feature data. We need to get this data and save it to the database in our program. Comparison of different face data For comparison between different faces, we use the AFR_FSDK_FacePairMatching interface. We compare current FaceModel with refFaceModel. The code is as follows:
AFR_FSDK_FACEMODEL refFaceModel = {0}; refFaceModel.pbFeature = (MByte*)[person.faceFeatureData bytes]; refFaceModel.lFeatureSize = (MInt32)[person.faceFeatureData length]; MFloat fMimilScore = 0.0; MRESULT mr = AFR_FSDK_FacePairMatching(_arcsoftFR, &refFaceModel, ¤tFaceModel, &fMimilScore); MFloat scoreThreshold = 0.56; if (fMimilScore > scoreThreshold) { //TODO: Logic for Face Recognition }
In the Hongsoft Face Comparing Engine, 0.56 is considered to be the relative value of the same face. If it is above 0.56, it is considered that it matches the same person. As for the specific processing of face comparison and recognition, please continue to pay attention to my blog. I will introduce the steps and methods to realize this function in the following blog.
Epilogue Face-based technology is an important part of AI. Integrating face into the system can effectively expand the existing functions of our program, such as judging whether APP is the same person or not based on face recognition. In important security areas, we can even authenticate real names by comparing the consistency of face and ID information. As Hong Soft Face Recognition Engine said in the introduction page, "Future" has come to more practical products for us to create together!