This is the last article in the DOM Series ~ the main content of this article is node operations, events and DOM event flow.
1, Node operation
1. Node overview
All contents in a web page are nodes (labels, attributes, text, comments, etc.), and nodes are represented by nodes in DOM.
| Node type | Node name |
|---|---|
| Element node | Name of HTML tag (upper case) |
| Attribute node | The name of the property |
| Text node | Its value is always #text |
| Document node | Its value is always #document |
We know that nodes can be divided into different hierarchical relationships by using DOM tree, and the common hierarchical relationship is parent-child brother. When we need to obtain too many elements, we can use the node relationship to operate on the elements.
2. Node level
1. Parent node
node.parentNode -- Nearest parent node (parent)
Returns null if the specified node has no parent node
2. Child nodes
- parentNode.childNodes (standard) The return value contains all child nodes (text, elements, etc.)
- Parentnode.children (non-standard) Only child element nodes are returned, and other nodes are not returned
parentNode.children is a read-only attribute, which is widely used in practical development.
Returns the first / last node of a child element
- parentNode.firstChild/parentNode.lastChild Return all nodes
- parentNode.firstElementChild/parentNode.lastElementChild returns the corresponding child element node. There is a compatibility problem
- parentNode.childre[0]/parentNode.children[element.children.length - 1]
3. Brother node
Returns the next sibling node of the current element / returns the previous sibling node of the current element
- node.nextSibling /node.previousSibling Return all nodes
- node.nextElementSibling/node.previousElementSibling Return element node, compatible
3. Node operation
1. Create node
document.createElement('tagName')
2. Add node
- Add to the end of the list: node.appendChild(child)
- Add in front of the specified child node: node.insertBefore(child, specified element)
3. Delete node
node.removeChild(child)
If you want to prevent link jump behavior, you can use javascript:void(0); Or javascript:; sentence.
4. Clone nodes
node.cloneNode()
be careful:
1. If the bracket parameter is empty or false, that is, shallow copy, only copy the node itself, not the content
2. If the parenthesis parameter is true, that is, deep copy, copy the node itself and all child nodes
4. Case -- production of simple message board

Effect requirements:
- You can enter the content in the text box and click publish to publish the content in the text box below.
- Published content can be deleted.
Idea: dynamically create and delete nodes.
Case code:
<!DOCTYPE html>
<html lang="en">

<head>
    <meta charset="UTF-8">
    <meta http-equiv="X-UA-Compatible" content="IE=edge">
    <meta name="viewport" content="width=device-width, initial-scale=1.0">
    <title>Message Board</title>
    <style>
        textarea {
            resize: none;
            outline: none;
        }

        li {
            width: 300px;
            height: 40px;
            background-color: pink;
            margin: 10px;
            line-height: 40px;
        }

        li a {
            float: right;
        }
    </style>
</head>

<body>
    <div class="box">
        <textarea name="" id="" cols="30" rows="10"></textarea>
        <button>publish</button>
        <ul></ul>
    </div>
    <script>
        var text = document.querySelector('textarea');
        var but = document.querySelector('button');
        var ul = document.querySelector('ul')
        //1. Create node

        //2. Add node
        but.onclick = function () {
            if (text.value == '') {
                alert('Please enter the content');
            } else {
                var li = document.createElement('li');
                li.innerHTML = text.value + "<a href='javascript:;'>delete</a>";
                ul.insertBefore(li, ul.children[0]);
                text.value = '';
                //3. Delete node
                var as = document.querySelectorAll('a');
                for (var i = 0; i < as.length; i++) {
                    as[i].onclick = function () {
                        ul.removeChild(this.parentNode);
                    }
                }
            }
        }


    </script>

</body>

</html>
2, Summary of DOM core operations
1. Dynamically create elements
1.document.write()
2.element.innerHTML
3.document.createElement()
difference:
- document.write() It is the content stream that directly writes the content to the page, but when the document stream is completed, the page will be redrawn
- innerHTML is to write the content to a DOM node, which will not cause all pages to be redrawn
- innerHTMl is more efficient in creating multiple. Note that it is the most efficient when using array splicing, but the structure is slightly complex. When using splicing string, it is less efficient than createElement().
- createElement() is less efficient than innerHTML array form in creating multiple elements, but its structure is cleaner.
Summary: innerHTML is more efficient than createElement() in different browsers
2. Add elements
1.appendChild
2.insertBefore
3. Delete element
removeChild
4. Modify elements
It mainly modifies the attributes of DOM elements. DOM element content, attributes, form values, etc
1. Modify element attributes: src, href, title, etc
2. Modify the contents of common elements: innerHTML and innerText
3. Modify form elements: value, type, disabled, etc
5. Find elements
It mainly gets the elements of the query DOM
1. API methods provided by Dom: getElementById, getElementByTagName
2. New methods provided by H5: querySelector, querySelectorAll
3. Use node operations to obtain: parent node, children, and brother (previousElementSibling, nexterelementsibling)
6. Attribute operation
Mainly for custom attributes
1.setAttribute: sets the attribute value of dom
2.getAttribute: get the attribute value of dom
3.removeAttribute: remove attribute
3, Event operation
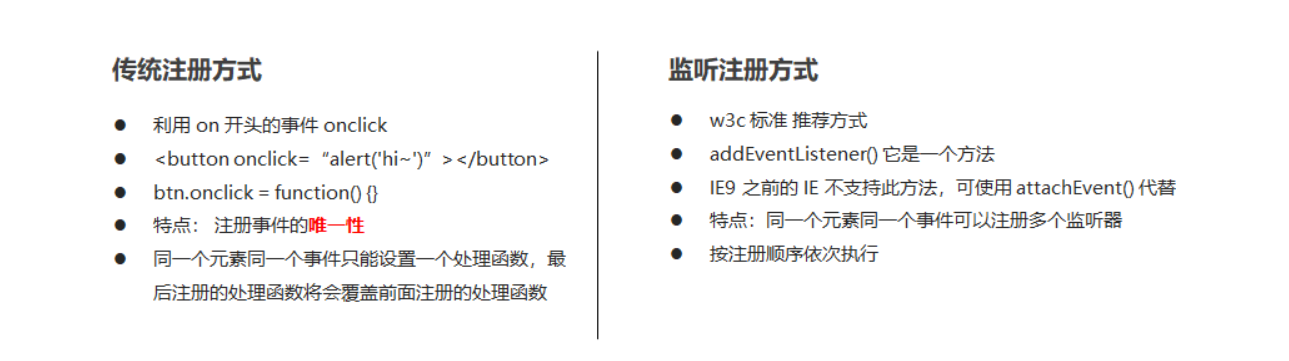
1. Registration event
Adding events to elements is called registration events or binding events. There are two ways to register events: traditional and listener registration.
event listeners
1.addEventListener() event listening (supported after IE9)
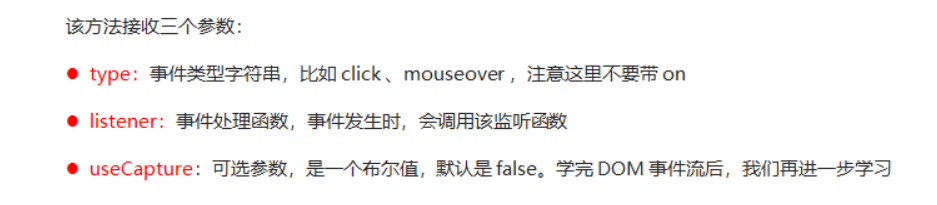
The eventTarget.addEventListener() method registers the specified listener with the eventTarget (target object). When the object triggers the specified event, the event handling function will be executed.
2.attacheEvent() event listening (supported by IE678)
The eventTarget.attachEvent() method registers the specified listener with the eventTarget (target object). When the object triggers the specified event, the specified callback function will be executed.

Summary: in actual development, we generally use the addEventListener() event to listen for events. If compatibility needs to be considered, we can encapsulate a function.
2. Delete event (unbind event)
1. Traditional registration method: eventTarget.onclick = null
2. Method monitoring registration method:
①removeEventListener(type,listener[,useCapture])
②detachEvent(eventNameWithon,callback)
Similarly, the compatibility problem can be solved by encapsulating a function.
4, DOM event flow
1. Event flow overview
1.1 what are event flows and DOM event flows?
Event flow describes the order in which events are received from the page. When events occur, they will propagate between element nodes in a specific order. This propagation process is DOM event flow.
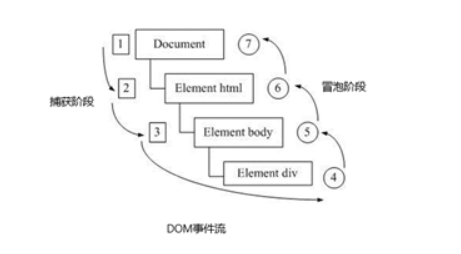
1.2 three stages of DOM event flow
1) Event capture phase
2) At target stage
3) Event bubbling phase
Event bubbling: IE first proposed that the event is received by the most specific element at the beginning, and then propagated up to the top node of DOM level by level.
Event capture: Netscape was first proposed. It starts from the top node of DOM, and then propagates down to the most specific element level by level.

be careful:
- js code can only execute one of the capture or bubbling phases
- onclick and attachEvent can only get the bubbling phase
- If the third parameter in addEventListener() is true, it indicates the event capture phase (from large to small). If it is false or empty, it indicates the event bubble phase (from small to large)
- In actual development, we seldom use event capture and pay more attention to event bubbling
- Some events do not bubble, such as onblur, onfocus, onmousenter, onmousesave
2. Event object
2.1 what is the event object?
After an event occurs, the collection of a series of information data related to the event is put into this object, which is the event object.
2.2 use of event object
When an event trigger occurs, an event object will be generated, and the system will pass it to the event handler in the form of an argument.
Therefore, declare a formal parameter in the event handler function to receive the event object.
1. eventTarget.onclick = function(event){ }
2.eventTarget.addEventListener('click',function(event){})
3.eventTarget.addEventListener('click',fn)
function(event){}
The event inside is the event object, which can also be written as e or evt.
Note: in IE6-8, you need to use window.event to get the lookup.
2.3. Properties and methods of event object
The properties and methods of common event objects are shown in the following table.
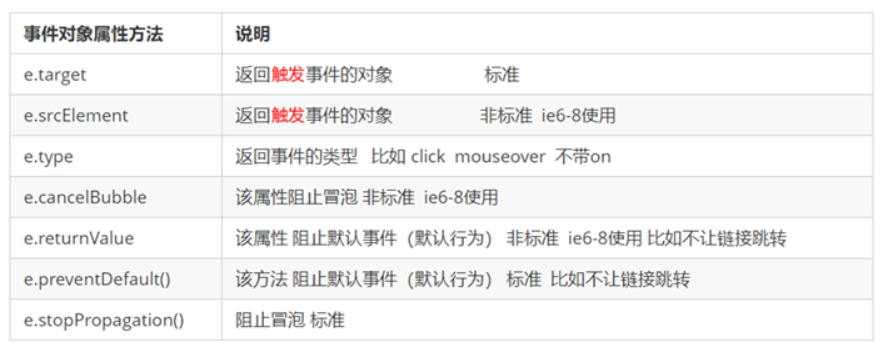
- e. The difference between target and this
this is the event binding element (the element that binds the event handler).
e.target is the element triggered by the event.
Generally, terget and this are the same, but there is a difference, that is, when the event bubbles (the parent and child elements have the same event, click the child element, and the event handling function of the parent element will also be triggered for execution). At this time, this points to the parent element, because it is the element object binding the event, and the target points to the child element, Because it is the specific element object that triggers the event.
2.4 block default behavior
1.preventDefault() -- dom standard writing (this is a method!! with ())
2.returnValue -- ie678 applies (this is an attribute!!)
3.return false -- there is no compatibility problem, but the code behind return is not executed, which is only limited to the traditional registration method
    <a href="http://Www.baidu.com "> Baidu</a>
    <script>
        // 2. Block the default behavior so that the link does not jump
        var a = document.querySelector('a');
        a.addEventListener('click', function(e) {
             e.preventDefault(); //  dom standard writing
        });
        // 3. Traditional registration methods
        a.onclick = function(e) {
            // Normal browser e.preventDefault(); method
            e.preventDefault();
            // Lower browser ie678 returnValue property
            e.returnValue = false;
            // We can also use return false to prevent the default behavior without compatibility problems
            return false;
        }
    </script>
2.5 prevent event bubbling
The characteristics of event bubbling can bring both disadvantages and benefits. The following are the methods and properties to prevent event bubbling.
one e.stopPropagation() -- Standard writing, this is a method
two e.cancelBubble = true; -- Non standard, IE6-8 applies, this is an attribute
2.6 event delegation
Event delegation is to delegate things to others and handle them on their behalf, that is, using the feature of event bubbling, do not register events for child elements, register events for parent elements, and execute the processing code in the events of parent elements.
Role of event delegation:
- We only operated the DOM once, which improved the performance of the program.
- Dynamic newly created child elements also have events.
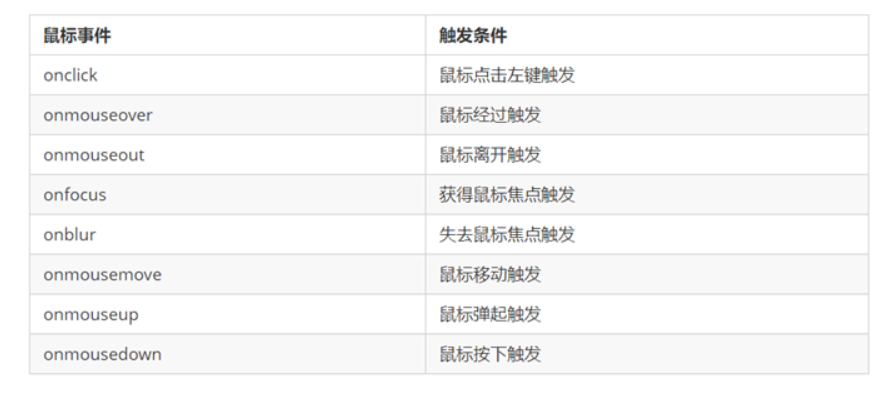
3. Common mouse events
3.1 mouse events
Common mouse events are as follows:
Case: prohibit text selection and right-click menu
Case code:
<body>
    I am a text that I don't want to share
    <script>
        // 1. contextmenu we can disable the right-click menu, which is mainly used by programmers to cancel the default context menu
        document.addEventListener('contextmenu', function(e) {
                e.preventDefault();
        })
        // 2. The text selectstart cannot be selected
        document.addEventListener('selectstart', function(e) {
            e.preventDefault();
        })
    </script>
</body>
3.2 mouse event object
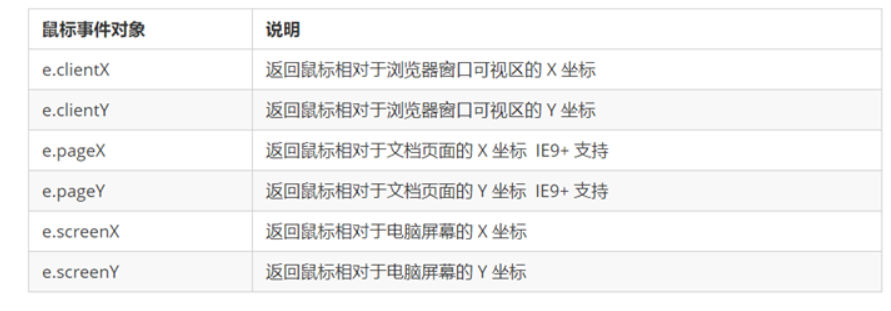
Case: picture following mouse movement

Effect requirements: the picture moves with the mouse.
Case ideas:
- The mouse moves continuously. Use the mouse to move the event: mousemove
- Set the absolute positioning for the picture. When the mouse moves, obtain the latest mouse coordinates, and take the x and y coordinates as the left and top values of the picture.
Case code:
<!DOCTYPE html>
<html lang="en">

<head>
    <meta charset="UTF-8">
    <meta name="viewport" content="width=device-width, initial-scale=1.0">
    <meta http-equiv="X-UA-Compatible" content="ie=edge">
    <title>Document</title>
    <style>
        img {
            position: absolute;
            top: 2px;
        }
    </style>
</head>

<body>
    <img src="image/angel.gif" alt="">
    <script>
        var pic = document.querySelector('img');
        document.addEventListener('mousemove', function (e) {
            // 1. Mousemovethis event will be triggered as long as we move 1px the mouse
            // 2. Core principle: each time the mouse moves, we will get the latest mouse coordinates,
            // Take the x and y coordinates as the top and left values of the picture to move the picture
            var x = e.pageX;
            var y = e.pageY;
            console.log('x The coordinates are' + x, 'y The coordinates are' + y);
            //3. Don't forget to add px units to left and top
            pic.style.left = x - 50 + 'px';
            pic.style.top = y - 40 + 'px';
        });
    </script>

</body>

</html>
4. Common keyboard events
4.1 keyboard events
Common keyboard events are shown in the following table:

be careful:
- If you use addEventListener, you do not need to add on
- The difference between onkeypress and onkeyup and onkeydown is that it does not recognize function keys.
- The execution order of the three events is: keydowm -- keypress --keyup
4.2 keyboard event object

be careful:
- onkeydowm and onkeyup are case insensitive, and onkeypress is case sensitive.
- In our actual development, we use more keydown and keyup, which can identify all keys.
- keypress does not recognize function keys, but the keyCode attribute is case sensitive and returns different ASCii values.
Case: simulate JD express order No. query
Effect requirements: when we enter content in the text box, large font content will be automatically displayed on the text box.
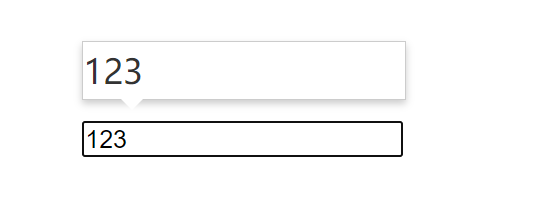
Case ideas:
1. Input the content, display it in the large font box above, and assign the value in the form to this con box.
2. If there is no content in the form, hide the con box.
3. When the focus is lost, the con box is hidden, the focus is obtained, and the content of the text box is not empty, the con box is displayed.
4. Note: the characteristics of keydowm and keypress in the text box: when these two events are triggered, the text has not yet fallen into the text box, while when the keyup event is triggered, the text has already fallen into the text box.
Case code:
<!DOCTYPE html>
<html lang="en">

<head>
    <meta charset="UTF-8">
    <meta name="viewport" content="width=device-width, initial-scale=1.0">
    <meta http-equiv="X-UA-Compatible" content="ie=edge">
    <title>Document</title>
    <style>
        * {
            margin: 0;
            padding: 0;
        }

        .search {
            position: relative;
            width: 178px;
            margin: 100px;
        }

        .con {
            display: none;
            position: absolute;
            top: -40px;
            width: 171px;
            border: 1px solid rgba(0, 0, 0, .2);
            box-shadow: 0 2px 4px rgba(0, 0, 0, .2);
            padding: 5px 0;
            font-size: 18px;
            line-height: 20px;
            color: #333;
        }

        .con::before {
            content: '';
            width: 0;
            height: 0;
            position: absolute;
            top: 28px;
            left: 18px;
            border: 8px solid #000;
            border-style: solid dashed dashed;
            border-color: #fff transparent transparent;
        }
    </style>
</head>

<body>
    <div class="search">
        <div class="con">123</div>
        <input type="text" placeholder="Please enter your courier number" class="jd">
    </div>
    <script>
        // When you enter the contents of the express order number, the large font box (con) above will be displayed (the font size in this box is larger)
        // Form detection user input: add keyboard events to the form
        // At the same time, get the value in the express order number and assign it to the con box (innerText) as the content
        // If the content in the express order number is empty, the large font box (con) box is hidden
        var con = document.querySelector('.con');
        var jd_input = document.querySelector('.jd');
        jd_input.addEventListener('keyup', function() {
                // console.log('input content ');
                if (this.value == '') {
                    con.style.display = 'none';
                } else {
                    con.style.display = 'block';
                    con.innerText = this.value;
                }
            })
            // When we lose focus, we hide the con box
        jd_input.addEventListener('blur', function() {
                con.style.display = 'none';
            })
            // When we get the focus, the con box is displayed
        jd_input.addEventListener('focus', function() {
            if (this.value !== '') {
                con.style.display = 'block';
            }
        })
    </script>
</body>
So far, we have almost introduced the DOM in JavaScript. There are many methods and properties that we need to master. The next content is the browser object model in the three cores of JavaScript, namely BOM.