vue
vue Foundation
Install vue
-
Using CDN import
-
Download and import
-
npm installation npm i vue
vue is declarative programming.
Case 1
    <div id="app">{{message}}</div>
    <script>
        // let is used to define variables and const is used to define constants
        const app = new Vue({
            el: '#app',
            data: { //Define data
                message: 'How do you do'
            }
        })
    </script>
-
Let's first read the following js code and find that a Vue object is created.
-
When creating the vue object, some options are passed in: {}
- {} contains the el attribute, which determines which element this vue object is attached to. Obviously, we are attached to the element with id app.
- {} contains the data attribute, which will store some data. These data are directly defined by us, and may also be loaded from the server from the network.
-
The code is responsive.
Case 2 display list
    <div id="app">
        <ul>
            <li v-for="item in movies">{{item}}</li>
        </ul>
    </div>
    <script>
        const app = new Vue({
            el: '#app',
            data: {
                message: 'Hello',
                movies: ['One Piece', 'Former three', 'Interstellar crossing', 'Westward Journey']
            }
        })
    </script>
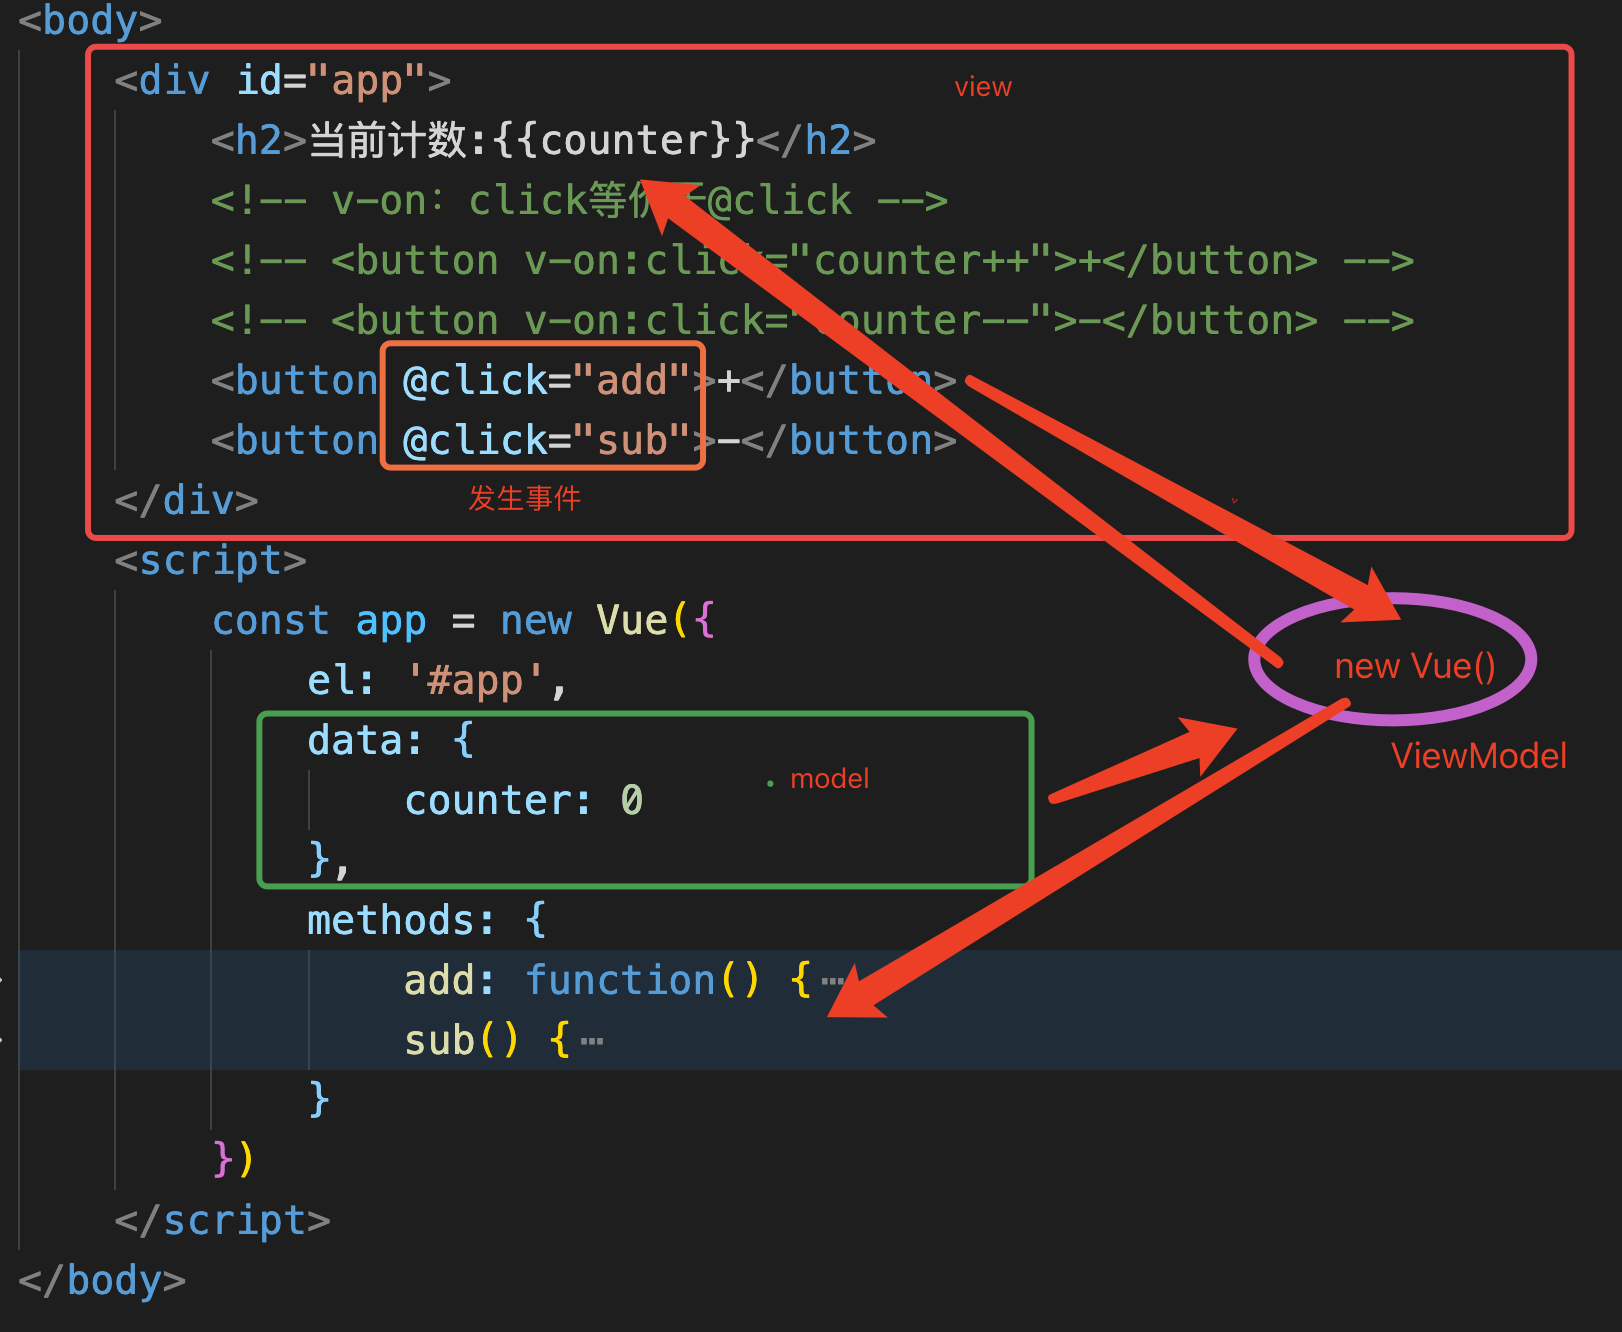
Case 3 counter
    <div id="app">
        <h2>Current count:{{counter}}</h2>
        <!-- v-on: click Equivalent to@click -->
        <!-- <button v-on:click="counter++">+</button> -->
        <!-- <button v-on:click="counter--">-</button> -->
        <button @click="add">+</button>
        <button @click="sub">-</button>
    </div>
    <script>
        const app = new Vue({
            el: '#app',
            data: {
                counter: 0
            },
            methods: {
                add: function() {
                    console.log('add Executed');
                    this.counter += 1

                },
                sub() {
                    console.log('sub Executed');
                    this.counter -= 1
                }
            }
        })
    </script>
Grammar sugar is: this writing method is too complicated. I'll give you some sweets and write in simple sentences.
MVVM in Vue
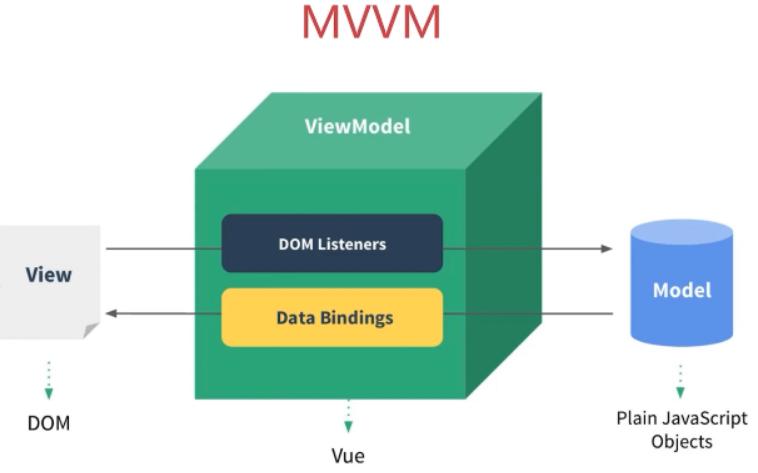
- view layer
The view layer is usually the DOM layer in our front-end development. The main function is to show users all kinds of information
- model layer
In the data layer, the data may be our fixed data, and more of it comes from the data requested by our server from the network
- VueModel layer
View layer model. It is a bridge between view and model. On the one hand, it realizes Data binding and reacts the changes of model to view in real time. On the other hand, it implements Dom Listener, that is, DOM listening. When some events (click, scroll, touch, etc.) occur in the DOM, it can listen, and write and change the corresponding Data if necessary.
For example, in the counter case of case 2
Create options passed in by Vue instance
In creating the vue instance, an object options is passed in. So what options can this option contain?
- el
- Type: string|HTMLElement
- Role: decide which DOM the Vue instance will manage
- data
- Type: Object|Function (in componentization, data must be a function)
- Role: the data object corresponding to the Vue instance
- methods
- Type: {[key: String]: function}
- Function: defines methods belonging to Vue, which can be called elsewhere or used in instructions
When is it called a method and when is it called a function in development?
The method is called method, and the method defined in the class is called method, which is linked to an instance object. The function is called function and is separate
Life cycle of Vue
Life cycle, literally, is the whole process of things from birth to death. Vue has its own life cycle.
Create an instance through new Vue(). Each Vue instance must go through a series of initialization processes when it is created - for example, you need to set data listening, compile a template, mount the instance to the DOM, and update the DOM when the data changes.
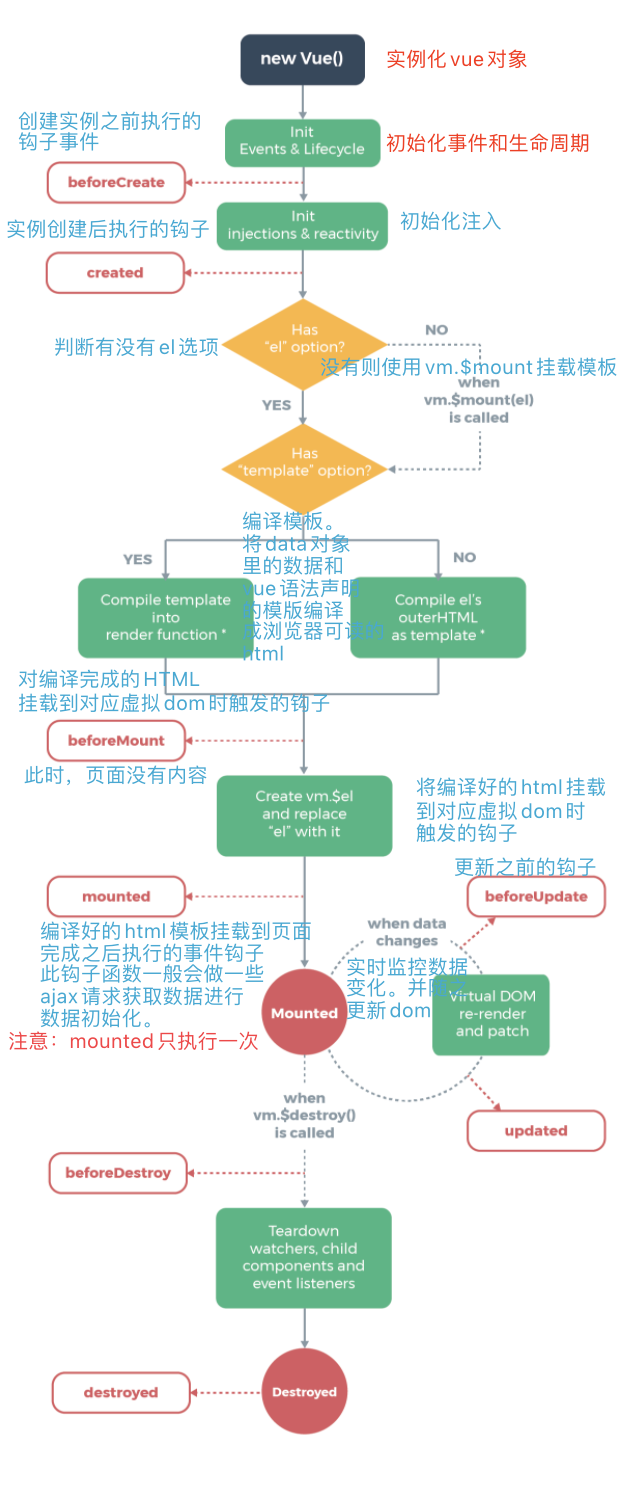
Difference between created and mounted:
created: calls before templates are rendered into html, that is, initialization of some attribute values and rendering them into views.
mounted: is invoked after the template is rendered into html, usually after initialization of the page, and then some necessary operations on the dom node of html.
In fact, the two are easy to understand. Usually created is used many times, while mounted is usually used in the use of some plug-ins or components, such as the use of plug-in chart.js: var ctx = document.getElementById(ID); This step usually occurs. If you write to the component, you will find that you cannot initialize and configure chart in created. You must wait until the html is rendered. Mounted is the best choice.
Define the template of vue
mustache
    <div id="app">
        <h2>{{message}}</h2>
        <!-- stay mustache In syntax, you can not only write variables directly, but also write simple expressions -->
        <h2>{{firstName+" "+lastName}}</h2>
        <h2>{{firstName}} {{lastName}}</h2>
        <h2>{{counter*2}}</h2>
    </div>
    <script>
        const app = new Vue({
            el: '#app',
            data: {
                message: "How do you do",
                firstName: 'Kobe',
                lastName: 'bryant',
                counter: 100
            }
        })
    </script>
v-once doesn't want a response
    <div id="app">
        <h2>{{message}}</h2>
  <!-- add once After the command, when we modify it on the console app.message.  this message Will not modify -->
        <h2 v-once>{{message}}</h2>
    </div>
    <script>
        const app = new Vue({
            el: '#app',
            data: {
                message: "How do you do"
            }
        })
    </script>
v-html note that dynamically rendered arbitrary HTML can be very dangerous because it can easily lead to XSS attack . Please use HTML interpolation only for trusted content and never for user provided content.
        <!-- v-html,Express with html Syntax parsing data for -->
        <h2 v-html="url"></h2>
    </div>
    <script>
        const app = new Vue({
            el: '#app',
            data: {
                url: '<a href="http:www.baidu.com">use Baidu Search</a>'
            }
        })
    </script>
v-pre
        <!-- v-pre Do not parse this{{}},Page display{{message}}-->
        <h2 v-pre>{{message}}</h2>
    </div>
    <script>
        const app = new Vue({
            el: '#app',
            data: {
                message: "How do you do"
            }
        })
    </script>
V-cloak (rarely used)
        <!-- stay vue After parsing, div There is no attribute v-cloak -->
        <h2 v-cloak>{{message}}</h2>
    </div>
    <script>
        const app = new Vue({
            el: '#app',
            data: {
                message: "How do you do"
            }
        })
v-bind dynamic binding
v-bind is used to bind one or more attribute values, or pass props values to another component. In development, src links of pictures, href links of websites, and dynamically bind some classes and styles. For example, the src and href of the element are dynamically bound through the data in the vue instance as follows:
    <div id="app">
        <!-- v-bind:The abbreviation is: -->
        <!-- in other words v-bind The grammar of sugar is : -->
        <img v-bind:src="imgUrl" alt="">
        <a v-bind:href="url">use Baidu Search</a>
    </div>
    <script>
        const app = new Vue({
            el: '#app',
            data: {
                message: 'How do you do',
                imgUrl: './img/1.jpeg',
                url: 'http://www.baidu.com'

            }
        })
    </script>
In addition, v-bind can also bind classes dynamically. The significance is that in development, sometimes we need to add classes, and sometimes we don't need to add classes.
Object syntax:
<!-- Object syntax -->
      <style>
      .active {
                  color: red
              }
      </style>

        <!-- <h2 :class="{key1:value1,key2:value2}">{{message}}</h2> -->
        <!-- <h2 :class="{Class name 1:true,Class name 2:false}">{{message}}</h2> -->

        <h2 :class="{active:isActive,line:isLine}">{{message}}</h2>
        <button @click="btnClick">I'm the button</button>
    </div>
    <script>
        const app = new Vue({
            el: '#app',
            data: {
                message: 'How do you do',
                active: 'active',
                isActive: true,
                isLine: true
            },
            methods: {
                btnClick() {
                    this.isActive = !this.isActive
                }
            }
        })
    </script>


//You can also use the form of method to make the object the method getClasses
  <h2 :class="getClasses()">{{message}}</h2>
            methods: {
                btnClick() {
                    this.isActive = !this.isActive
                },
                getClasses() {
                    return {
                        active: this.isActive,
                        line: this.isLine
                    }
                }
            }
Array syntax:
    <div id="app">
        <!-- Array syntax -->
        <h2 class="title" :class="getClasses()">{{message}}</h2>
    </div>
    <script>
        const app = new Vue({
            el: '#app',
            data: {
                message: 'How do you do',
                active: 'aaa',
                line: 'bbb'
            },
            methods: {
                getClasses() {
                    return [this.active, this.line]
                }
            }
        })
    </script>
Small case: implement a list. Initially, the first one is red. Click which li, which li will become red.
    <style>
        .active {
            color: red
        }
    </style>
<div id="app">
        <ul>
            <li v-for="(item,index) in movies"
                :class="{active:currentIndex === index}" 					      @click="liClick(index)">{{index}}=={{item}}</li>
        </ul>
    </div>
    <script>
        const app = new Vue({
            el: "#app",
            data: {
                movies: ['Awakening age', 'Wulin biography', 'Deep affection', 'Your glory'],
                currentIndex: 0
            },
            methods: {
                liClick(index) {
                    this.currentIndex = index
                }
            }
        })
    </script>
Dynamic binding properties
- Object syntax
    <div id="app">
        <!-- <h2 :style="{key(css Attribute name):value(Attribute value)}">{{message}}</h2> -->
        <!-- It should be noted that font-size Single quotation marks are required, color Attribute value must be added-->
        <!-- <h2 :style="{'font-size':'50px',color:'red'}">{{message}}</h2> -->
        <h2 :style="{'font-size':size+'px',color:col}">{{message}}</h2>
    </div>
    <script>
        const app = new Vue({
            el: '#app',
            data: {
                message: 'Hello',
                size: 100,
                col: 'red'
            }
        })
    </script>
- Array syntax is rarely used
    <div id="app">
        <h2 :style="[baseStyle]">{{message}}</h2>
    </div>
    <script>
        const app = new Vue({
            el: '#app',
            data: {
                message: 'Hello',
                baseStyle: {
                    backgroundColor: 'red'
                }
            }
        })
    </script>
Use of calculated properties
We know that in the template, some data in data can be displayed directly through interpolation syntax, but in some cases, we can display the data after some conversion or combine multiple data. For example:
- We have two variables: firstName and lastName. We need to display the full name
- But many places need complete names, so we need to write multiple {{firstname} {{LastName}}
Then we can convert the code into calculated attributes
    <div id="app">
        <h2>{{firstName}} {{lastName}}</h2>
        <h2>{{fullName}}</h2>
    </div>
    <script>
        const app = new Vue({
            el: '#app',
            data: {
                firstName: 'Kobe',
                lastName: 'bryant'
            },
            //Calculation properties
            computed: {
                fullName() {
                    return this.firstName + ' ' + this.lastName
                }
            }
        })
    </script>
Complex operation of calculating attributes
    <div id="app">
        <!-- Total output price -->
        <h2>Total price:{{totalPrice}}</h2>
    </div>
    <script>
        const app = new Vue({
            el: '#app',
            data: {
                books: [{
                    id: 110,
                    name: 'Linux',
                    price: 119
                }, {
                    id: 111,
                    name: 'web',
                    price: 109
                }, {
                    id: 112,
                    name: 'Deep understanding of Computer Principles',
                    price: 89
                }]
            },
            //Calculation properties
            computed: {
                //     filter/map/reduce
                totalPrice() {
                    let result = 0
                    for (let i = 0; i < this.books.length; i++) {
                        result += this.books[i].price
                    }
                    return result
                }
            }
        })
    </script>
Calculate getter s and setter s for properties
                //The calculated property has no set method and is a read-only property
            computed: {
                // fullName() {
                //     return this.firstName + ' ' + this.lastName
                // }
              //The original wording should be as follows
                fullName: {
                    set() {},
                    get() {
                        return this.firstName + this.lastName
                    }
                }
            }
Comparison between calculated attributes and methods (higher performance of calculated attributes)
    <div id="app">
        <!-- Calculate properties and methods Differences between -->
        <!-- By definition methods method,Will be called 4 times -->
        <h2>{{getFullName()}}</h2>
        <h2>{{getFullName()}}</h2>
        <h2>{{getFullName()}}</h2>
        <h2>{{getFullName()}}</h2>
        <!-- adopt computed Will be called once, so computed Higher performance-->
        <h2>{{fullName}}</h2>
        <h2>{{fullName}}</h2>
        <h2>{{fullName}}</h2>
        <h2>{{fullName}}</h2>
    </div>
    <script>
        const app = new Vue({
            el: '#app',
            data: {
                firstName: 'Kobe',
                lastName: 'Bryant'
            },
            //The calculated property has no set method and is a read-only property
            //The original wording should be as follows
            computed: {
                fullName() {
                    console.log('methods');
                    return this.firstName + ' ' + this.lastName
                }
            },
            methods: {
                getFullName() {
                    console.log('methods');
                    return this.firstName + ' ' + this.lastName
                }
            }
        })
    </script>
Syntax of ES6
let/const
In fact, the design of VaR can be regarded as an error in the design of js language, but most of this error can not be repaired and removed, and it needs to be backward compatible in the future. We can think of let as a more perfect var.
Block level scope
JS uses var to declare a variable. The scope of the variable is mainly related to the definition of the function. There is no scope for other block definitions, such as if/for, which often causes some problems in our development.
        //1. Variable scope, in what range is the variable available
        //  The block level scope of var is global and variable promotion
        {
            var name = 'why'
            console.log(name); //why
        }
        console.log(name); //why

        {
            let reason = "because"
            console.log(reason); //because
        }
        console.log(reason); //reason is not defined
        // var situation
        console.log(foo); // Output undefined
        var foo = 2;

        // let's go
        console.log(bar); // Error ReferenceError
        let bar = 2;
In the above code, the variable foo is declared with the var command, and the variable promotion will occur. That is, when the script starts running, the variable foo already exists but has no value, so it will output undefined. The variable bar is declared with the let command and will not be promoted. This means that the variable bar does not exist before it is declared. If it is used, an error will be thrown.
var tmp = 123;

if (true) {
  tmp = 'abc'; // ReferenceError
  let tmp;
}
In the above code, there is a global variable tmp, but the let in the block level scope declares a local variable tmp, which causes the latter to bind the block level scope. Therefore, an error will be reported when assigning a value to tmp before the let declares the variable.
ES6 clearly stipulates that if there are let and const commands in the block, the variables declared by the block for these commands form a closed scope from the beginning. If these variables are used before declaration, an error will be reported.
In short, within a code block, a variable is not available until it is declared using the let command. Syntactically, this is called "temporary dead zone" (TDZ).
Const gives priority to const in development. let is used only when an identifier is required. Const defines a constant and cannot be modified!
//Note 1: once the identifier modified to const is copied, it cannot be modified
        const a = 20
        a = 30 //Error Assignment to constant variable

        //Note 2: when using const to define an identifier, it must be assigned
        const name
        name = 'hahaha' // Missing initializer in const declaration

        //Note 3: constant means that the object pointed to cannot be modified, but the internal properties of the object can be changed
        const obj = {
            name: 'why',
            age: 19,
            height: 188
        }
        console.log(obj); //{name: "why", age: 19, height: 188}
        obj.name = 'koba'
        console.log(obj); //{name: "koba", age: 19, height: 188}
Enhanced writing of object literals
        // 1. Enhanced writing method of attribute. When the attribute and value are the same, write the attribute name directly
        const name = 'why'
        const age = 18
        const height = 1.88
        const obj = {
            name,
            age,
            height
        }
        console.log(obj);
        //2. Enhanced writing of functions
        // ES5 syntax
        const obj = {
                run: function() {},
                eat: function() {}
            }
            // ES6 syntax does not need to write: function
        const obj = {
            run() {},
            eat() {}
        }
v-on event listening
    <div id="app">
        <h2>{{counter}}</h2>
        <!-- <button v-on:click="counter++">plus</button>
        <button v-on:click="counter--">reduce</button> -->
        <!-- v-on The grammar of sugar is called sugar  @ -->
        <button @click="increment">plus</button>
        <button @click="decrement">reduce</button>
    </div>
    <script>
        const app = b = new Vue({
            el: '#app',
            data: {
                counter: 0
            },
            methods: {
                increment() {
                    this.counter++
                },
                decrement() {
                    this.counter--
                }
            }
        })
    </script>
When you define methods in methods for @ click to call, you need to pay attention to the following parameters:
-
If the method does not require additional parameters, the () after the method may not be added.
Note, however, that if the method itself has a parameter, the event parameter of the native event is passed in by default
-
If you need to pass in a parameter and an event at the same time, you can pass in an event through $event
    <div id="app">
        <!-- 1,There are no parameters when the event is called -->
        <button @click="btn1Click()">Button 1</button>
        <button @click="btn1Click">Button 2</button>

        <!-- 2,In the event definition, the parentheses are omitted when writing the function, but a parameter is required when writing the method itself -->
        <button @click="btn2Click(123)">Button 3</button>
        <!-- 2.1,Parentheses are written, no parameters are written. Output results: undefined "-----" -->
        <button @click="btn2Click()">Button 4</button>
        <!-- 2.2,Output result without parentheses: MouseEvent {isTrusted: true, screenX: 315, screenY: 159, clientX: 267, clientY: 23, ...} -->
        <button @click="btn2Click">Button 5</button>

        <!-- 3,When defining methods, we need event Object, and other parameters are required at the same time -->
        <!-- In the calling mode, how to manually obtain the browser parameters event Object: $event -->
        <button @click="btn3Click(123,$event)">Button 6</button>
    </div>
    <script>
        const app = b = new Vue({
            el: '#app',
            data: {
                counter: 0
            },
            methods: {
                btn1Click() {
                    console.log('btn1');
                },
                btn2Click(a) {
                    console.log(a, '-----');
                },
                btn3Click(a, event) {
                    console.log("+++++", a, event);
                }
            }
        })
    </script>
v-on modifier
- (. stop modifier)
- (. prevent modifier)
- Monitor key cap
- (. once) only triggered once (not commonly used)
 <div id="app">
        <!-- 1, .stop Stop bubbling. For example, if we click the button, we won't be bubbling div -->
        <div @click="divClick">aaaa
            <button @click.stop="btnClick">Button</button>
        </div>
        <!-- 2, .prevent Use of modifiers to block default events -->
        <form action="baidu">
            <input type="submit" value="Submit"     @click.prevent="submitClick">
        </form>
        <!-- 3,Monitor the key cap of a keyboard, for example, when the user completes input, enter event -->
        <input type="text" @keyup.enter="keyup">
        <!-- 4,Only one callback is triggered -->
        <button @click.once="onceClick">once Button</button>
    </div>
    <script>
        const app = new Vue({
            el: '#app',
            data: {

            },
            methods: {
                btnClick() {
                    console.log('btn');
                },
                divClick() {
                    console.log('div');
                },
                submitClick() {
                    console.log('submitClick');
                },
                keyup() {
                    console.log("You must click enter To trigger me");
                },
                onceClick() {
                    console.log('once');
                }

            }
        })
    </script>
v-if conditional rendering
v-if,v-else
    <div id="app">
        <h2 v-if=isShow>{{message}}</h2>
        <h2 v-else>Very fashionable</h2>
    </div>
    <script>
        const app = new Vue({
            el: '#app',
            data: {
                message: 'Hello',
                isShow: true
            }
        })
    </script>
v-if,v-else-if,v-else
    <div id="app">
        <!-- <h2 v-if=isShow>{{message}}</h2>
        <h2 v-else>Very fashionable</h2> -->

        <h2 v-if="score>=90">excellent</h2>
        <h2 v-else-if="score>=80">good</h2>
        <h2 v-else-if="score>=60">qualified</h2>
        <h2 v-else>fail,</h2>
    </div>
    <script>
        const app = new Vue({
            el: '#app',
            data: {
                message: 'Hello',
                score: 70
            }
        })
    </script>
In development, writing v-else-if is not recommended. You can use calculated properties
 <div id="app">
        <h2>{{result}}</h2>
    </div>
    <script>
        const app = new Vue({
            el: '#app',
            data: {
                message: 'Hello',
                score: 90
            },
            computed: {
                result() {
                    let showMessage = ""
                    if (this.score >= 90) {
                        showMessage = 'excellent'
                    } else if (this.score >= 80) {
                        showMessage = 'good'
                    } else {
                        showMessage = 'qualified'
                    }
                    return showMessage
                }
            }
        })
    </script>
Conditional rendering cases: toggle bar
<div id="app">
        <span v-if="isUser">
          <label for="">User account:</label>
          <input type="text" id="username" placeholder="Enter user account">
        </span>
        <span v-else>
          <label for="">User mailbox:</label>
          <input type="text" id="emai"  placeholder="Enter user mailbox">
        </span>
        <button @click="change">Switch type</button>
    </div>
Then switching loginType in the above code will not clear what the user has entered. Because the two templates use the same element, < input > will not be replaced -- just its placeholder.
This is because the virtual dom of vue puts the things to be displayed in memory in a box. Because vue in DOM rendering, for performance reasons, existing elements will be reused as much as possible instead of re creating elements. Because v-if and v-else will not appear on the page at the same time. When we change it to false, we find that label and input are not used, and the label and input to be rendered will not be created again.
This is not always in line with the actual needs, so Vue provides you with a way to express "these two elements are completely independent, don't reuse them". Just add a key attribute with unique value:
    <div id="app">
        <span v-if="isUser">
          <label for="">User account:</label>
          <input type="text" id="username" placeholder="Enter user account" key="username-input">
        </span>
        <span v-else>
          <label for="">User mailbox:</label>
          <input type="text" id="emai"  placeholder="Enter user mailbox"  key="email-input">
        </span>
        <button @click="change">Switch type</button>
    </div>
Now, each time you switch, you will compare whether the key value is the same. If it is different, the input box will be re rendered.
The use of v-show and its difference from v-if
    <!-- should be v-if When, the condition is false When, include v-if The element of the instruction does not exist at all dom in -->
    <!-- should be v-show When, the condition is false When, v-show Just added an inline style display:none -->
    <div id="app">
        <h2 v-if="isShow">{{message}}</h2>
        <h2 v-show=isShow>{{message}}</h2>
    </div>
    <script>
        const app = new Vue({
            el: '#app',
            data: {
                message: 'How do you do',
                isShow: false
            }
        })
    </script>
In development, if the slices between show and hide are very frequent, use v-show. When there is only one switch, use v-if
v-for traversal
array
    <div id="app">
        <!-- Subscripts are not used during traversal -->
        <ul>
            <li v-for="item in names">{{item}}</li>
        </ul>
        <!-- During traversal, subscripts are used -->
        <ul>
            <li v-for="(item,index) in names">{{index+1}}--{{item}}</li>
        </ul>
    </div>
    <script>
        const app = new Vue({
            el: '#app',
            data: {
                names: ['Marry', 'Jack', 'Lisa', 'Bob']
            }
        })
    </script>
object
<!-- Traversal object -->
        <!-- 1.In the process of traversing the object, if you only get a value, what you get is value -->
        <ul>
            <li v-for="value in info">{{value}}</li>
        </ul>
        <!-- 2.obtain key and value and index-->
        <ul>
            <li v-for="(value,key,index) in info">{{value}}--{{key}}--{{index}}</li>
        </ul>
    </div>
    <script>
        const app = new Vue({
            el: '#app',
            data: {
                names: ['Marry', 'Jack', 'Lisa', 'Bob'],
                info: {
                    name: 'why',
                    age: 18,
                    height: 1.88
                }
            }
        })
    </script>
key attribute of component
    <div id="app">
        <ul>
          <!-- key The function of is to update the virtual database efficiently dom,key Must be unique -->
            <li v-for="item in names" :key="item">{{item}}</li>
        </ul>
    </div>
    <script>
        const app = new Vue({
            el: '#app',
            data: {
                names: ['Marry', 'Jack', 'Lisa', 'Bob']
            }
        })
    </script>
Which methods in the array are responsive, array update detection
Vue wraps the change method of the array being listened on, so they will also trigger view updates. These wrapped methods include:
- push() adds the element at the end
- pop() deletes the last element
- shift() deletes the first element in the array
- unshift() adds an element to the front of the array
- splice()
- sort()
- reverse()
   ArrayClick() {
                    // 1. push() adds an element after the array (multiple elements can be added)
                    this.names.push('aaa')
                    //2. pop() deletes the last element
                    this.names.pop()
                     //3. shift() deletes the first element
                    this.names.shift()
                    //4. unshift() adds an element at the front of the array (multiple elements can be added)
                    this.names.unshift('aaa', 'bbb')
                    // 5. splice() can delete / insert / replace elements
                    //The first element indicates where to start the deletion / insertion / replacement
                        //  5.1,
                    // If you want to delete elements, the second parameter means to delete several elements,
                    //  If not, it means that all elements after 1 are deleted
                    this.names.splice(1, 1)
                        // 5.2,
                 //If you want to replace an element, the second parameter indicates how many elements you want to replace, and the latter indicates the new value
                 //It can also be understood that I deleted these two elements first, and then added these two elements here
                    this.names.splice(1, 2, 'm', 'n')
                        //5.3,
                        //It means to delete 0 elements, and the following indicates to insert
                    this.names.splice(1, 0, 'x', 'y', 'z')

                    //6. Sort
                    this.names.sort()

                    //7. Reverse
                    this.names.reverse()
                },
Shopping cart case
<!DOCTYPE html>
<html lang="en">

<head>
    <meta charset="UTF-8">
    <meta http-equiv="X-UA-Compatible" content="IE=edge">
    <meta name="viewport" content="width=device-width, initial-scale=1.0">
    <title>Document</title>
    <script src="./js/vue.js"></script>
</head>

<body>
    <div id="app">
        <div v-if="books.length">
            <table>
                <thead>
                    <tr>
                        <th> </th>
                        <th>Book name</th>
                        <th>Publication date</th>
                        <th>Price</th>
                        <th>Purchase quantity</th>
                        <th>operation</th>
                    </tr>
                </thead>
                <tbody>
                    <tr v-for="(item,index) in books">
                        <td>{{item.id}}</td>
                        <td>{{item.name}}</td>
                        <td>{{item.date}}</td>
                        <td>{{item.price|showPrice}}</td>
                        <td><button @click="descend(index)" :disabled="item.number<=1">-</button>{{item.number}}<button @click="increase(index)">+</button></td>
                        <td><button @click="remove(index)">remove</button></td>
                    </tr>
                </tbody>
            </table>
            <h2>Total price:{{totalPrice|showPrice}}</h2>
        </div>
        <h2 v-else>Shopping cart is empty</h2>
    </div>
    <script>
        const app = new Vue({
            el: '#app',
            data: {
                books: [{
                    id: 1,
                    name: 'Introduction to Algorithms',
                    date: '2006-9',
                    price: 85.00,
                    number: 1,
                    isDisplay: true
                }, {
                    id: 2,
                    name: 'UNIX Programming art',
                    date: '2006-2',
                    price: 59.00,
                    number: 1,
                    isDisplay: true
                }, {
                    id: 3,
                    name: 'Programming host',
                    date: '2008-10',
                    price: 39.00,
                    number: 1,
                    isDisplay: true
                }, {
                    id: 4,
                    name: 'Code Complete ',
                    date: '2006-3',
                    price: 128.00,
                    number: 1,
                    isDisplay: true
                }]
            },
            methods: {
                descend(id) {
                    console.log(id);
                    this.books[id].number -= 1
                },
                increase(id) {
                    console.log(id);
                    this.books[id].number += 1
                },
                remove(id) {
                    this.books.splice(id, 1)
                        // this.books[id].isDisplay = false
                        // this.books[id].number = 0

                }
            },
            //filter
            filters: {
                showPrice(price) {
                    return '¥' + price.toFixed(2)
                }
            },
            computed: {
                totalPrice() {
                    let totalPrice = 0;
                    for (let i = 0; i < this.books.length; i++) {
                        totalPrice += (this.books[i].price) * (this.books[i].number)
                    }
                    return totalPrice
                }
            }
        })
    </script>
</body>

</html>
A simple way to write a for loop:
  //2. for(let i in this.books)
                    let totalPrice = 0;
                    for (let i in this.books) {
                        console.log(i); //Here i is the index value
                        totalPrice += (this.books[i].price) * (this.books[i].number)
                    }
                    return totalPrice
                    //3.for(let i of this.books)
                    let totalPrice = 0;
                    for (let item of this.books) {
                        console.log(item); //The item here is each object in the array
                        totalPrice += item.price * item.number
                    }
                    return totalPrice
Using higher order functions
                    // Programming paradigm, imperative programming, follow the command step by step. Declarative programming allows the program to execute slowly.

                    const nums = [10, 20, 302, 123, 30, 40, 50]

                    //  Functional programming example, requirements: find the value less than 100 and all * 2
                        // Use of filter function

                    //The filter must return a Boolean value,
                    //When we return true, the function will automatically add the callback n to the new array
                    //When we return false, the function will filter out this n
                    let newNums = nums.filter(n => {
                            return n < 100
                        })
                        // console.log(newNums);
                        //Use of map function
                    let newsNum = newNums.map(n => {
                            return n * 2
                        })
                        // console.log(newsNum);

                    //The reduce function summarizes all contents in the array
                    // Reduce (parameter 1, parameter 2) in this case, parameter 1 is a function and parameter 2 is 0
                    let total = newsNum.reduce(function(preValue, n) {
                            return preValue + n
                        }, 0)
                        //First time: preValue:0 n:20
                        //Second time: preValue:20 n:40
                        //Third time: preValue:60 n:80
                        //Fourth time: preValue:140 n:100
Simple writing method
                    const nums = [10, 20, 302, 123, 40, 50]
                    let total = nums.filter(n => n < 100)
                        .map(n => {
                            return n * 2
                        })
                        .reduce((prevValue, n) => {
                            return prevValue + n
                        }, 0)
                    console.log(total);
let total = nums.filter(n => n < 100).map(n => n * 2).reduce((pre, n) => pre + n)
                    console.log(total);
Then the previous case is written as follows:
 computed: {
                totalPrice() {
				return this.books.reduce(function(pre, item) {
                        return pre + item.price * item.number
                    }, 0)
                }
 }
Bidirectional binding of v-model data
        <input type="text" v-model="message">
        <h2> {{message}}</h2>
The principle of v-model. v-model is actually a syntax sugar. Its essence is that it contains two operations
- v-bind binds a value attribute
- The v – on instruction binds an input event to the current element
 <!-- v-model Principle of -->
   <div id="app">
        <input type="text" :value="message" @input="valueChange">
        <input type="text" :value="message" @input="message=$event.target.value">
        <h2>{{message}}</h2>

    </div>
    <script>
        const app = new Vue({
            el: '#app',

            data: {
                message: 'Hello'
            },
            methods: {
                valueChange(event) {
                    this.message = event.target.value
                }
            }


        })
    </script>
v-model is used in radio box
    <div id="app">
        <!-- name If they are the same, they will be mutually exclusive -->
        <!-- But when we v-model The binding is the same, so you don't need to use it name -->
        <label>
        <input type="radio" value="male" v-model="sex">male</label>
        <label>
        <input type="radio"  value="female" v-model="sex"> female</label>
        <h2>The gender you choose is:{{sex}}</h2>
    </div>
    <script>
        const app = new Vue({
            el: '#app',
            data: {
                sex: 'male'
            }
        })
    </script>
v-model uses the checkbox check box
<!-- checkbox Single choice -->
        <label for="agree">
          <input type="checkbox" id="agree" v-model="isAgree">Consent agreement
        </label>
        <h2>Your choice is:{{isAgree}}</h2>
        <button :disabled="!isAgree">next step</button>
        <!-- checkbox Checkbox  -->
        <label for="">
          <input type="checkbox" value="Basketball" v-model="hobbies">Basketball
          <input type="checkbox" value="Football" v-model="hobbies">Football
          <input type="checkbox" value="Table Tennis" v-model="hobbies">Table Tennis
          <input type="checkbox" value="badminton" v-model="hobbies">badminton
          <input type="checkbox" value="Volleyball" v-model="hobbies">Volleyball
        </label>
        <h2>What's your hobby{{hobbies}}</h2>
    </div>
    <script>
        const app = new Vue({
            el: '#app',
            data: {
                sex: 'male',
                isAgree: false,
                hobbies: []
            }
        })
    </script>
v-model uses select
 <!-- select Type select single-->
        <select name="abc" id="" v-model="fruit">
          <option value="Apple">Apple</option>
          <option value="Banana">Banana</option>
          <option value="Grape">Grape</option>
          <option value="watermelon">watermelon</option>
        </select>
        <h2>What do you choose:{{fruit}}</h2>
        <!-- select Select multiple types -->
        <select name="abc" id="" v-model="fruits" multiple>
          <option value="Apple">Apple</option>
          <option value="Banana">Banana</option>
          <option value="Grape">Grape</option>
          <option value="watermelon">watermelon</option>
        </select>
        <h2>What do you choose:{{fruits}}</h2>
    </div>
    <script>
        const app = new Vue({
            el: '#app',
            data: {
                sex: 'male',
                isAgree: false,
                hobbies: [],
                fruit: 'Banana',
                fruits: []
            }
        })
    </script>
Value binding (value should not be written dead, dynamic binding)
<div id="app">
        <label v-for="item in hobbies">
        <input type="checkbox" :value="item" v-model="hobby">{{item}}
      </label>
        <h2>Your choice is:{{hobby}}</h2>
    </div>
    <script>
        const app = new Vue({
            el: '#app',
            data: {
                hobbies: ['Basketball', 'Football', 'badminton', 'golf'],
                hobby: []
            }
        })
    </script>
Modifier for value binding (. Lazy. Number. Trim)
        <!-- .lazy,When we change the data in the input box, it will not be in real time. use lazy When we hit enter Will be updated -->
        <input type="text" v-model.lazy="message">
        <h2>{{message}}</h2>
        <!-- .number,Indicates that what we want to enter must be a number,No type conversion is required -->
        <input type="text" v-model.number="age">
        <h2>{{age}}--{{typeof age}}</h2>

        <!-- .trim,Remove spaces -->
        <input type="text" v-model.trim="name">
        <h2>{{name}}</h2>
    </div>
    <script>
        const app = new Vue({
            el: '#app',
            data: {
                message: 'How do you do',
                age: 0,
                name: ''
            }
        })
    </script>
Componentization
The idea of componentization:
If we put all the processing logic in a page together, the processing will become very complex and is not conducive to subsequent management and expansion.
However, if we split a page into small functions, and each function block completes its own independent functions, the management and maintenance of the whole page will become very easy.
Vue's idea of componentization
It provides an abstraction, which makes us happy to develop independent reusable small components to construct our applications. Any application will be abstracted into a component tree.

Basic steps for registering components
- Create a component constructor. Call the Vue.extend() method to create a component constructor
- Register components. Call the Vue.component() method to register the component
- Use components. Use components within the scope of Vue instances
    <div id="app">
    <!-- Use components -->
        <my-cpn></my-cpn>
    </div>
    <script>
        //ES6 syntax
        // ```Template string
        //1. Create a component constructor object
        const cpnC = Vue.extend({
                template: `<div>
                  <h2>I'm the title</h2>Ha ha ha ha ha ha</div>`
            })
            //2. Register components
        Vue.component('my-cpn', cpnC)

        const app = new Vue({
            el: '#app',
            data: {
                message: 'How do you do'
            }
        })
    </script>
- Vue.extend():
- Calling Vue.extend() creates a component constructor.
- Usually, when creating a component constructor, the template passed in represents the template of our custom component
- The template is the html code to be displayed where the component is used
- In fact, this method is rarely seen. He will directly use grammar sugar.
- Vue.component():
- Calling Vue.component() registers the component constructor as a component and gives it a component label name.
- Therefore, you need to pass two attempts: 1 is the tag name of the registered component and 2 is the component constructor
- Components must be attached to a vue instance, otherwise they will not take effect.
Global component
 <div id="app">
        <cpn></cpn>
    </div>
    <div id="app2">
        <cpn></cpn>
    </div>
    <script>
        //1. Create a component constructor object
        const cpnC = Vue.extend({
                template: `<div>
                  <h2>I'm the title</h2>Ha ha ha ha ha ha</div>`
            })
            //2. Register components (global components, which means they can be used under multiple vue instances)
            // Vue.component('my-cpn', cpnC)

        const app = new Vue({
            el: '#app',
            data: {
                message: 'How do you do'
            },
            //Local component
            components: {
                //Tag name when using components
                cpn: cpnC
            }
        })
        const app2 = new Vue({
            el: '#app2'
        })
    </script>
Parent component
    <div id="app">
        <cpn2></cpn2>
    </div>
    <script>
        //1. Create the first component (sub component)
        const cpn1 = Vue.extend({
                template: `
        <div>
          <h2>I'm Title 1</h2>
          <p>I am content 1</p>
          </div>
        `
            })

            //Create a second component (parent component)
        const cpn2 = Vue.extend({
            template: `
        <div>
          <h2>I'm Title 2</h2>
          <p>I am content 2</p>
          <cpn1></cpn1>
          </div>
        `,
            components: {
                cpn1: cpn1
            }
        })
        const app = new Vue({
            el: '#app',
            data: {
                message: 'How do you do'
            },
            components: {
                cpn2: cpn2
            }
        })
    </script>
Syntax of registered components (Vue.extend() is omitted)
    <div id="app">
        <cpn1></cpn1>
        <cpn2></cpn2>
    </div>
    <script>
        //1. Global component syntax
        // 1.1 create component constructor
        // const cpn1 = Vue.extend({
        //         template: `
        // <div>
        //   <h2>I'm Title 1</h2>
        //   <p>I am content 1</p>
        //   </div>
        // `
        //     })
        //     //1.2 registered components
        // Vue.component('cpn1', cpn)

        // Global component syntax
        Vue.component('cpn1', {
            template: `
        <div>
          <h2>I'm Title 1</h2>
          <p>I am content 1</p>
          </div>
        `
        })

        //Local component syntax sugar
        const app = new Vue({
            el: '#app',
            data: {
                message: 'How do you do'
            },
            components: {
                'cpn2': {
                    template: `
        <div>
          <h2>I'm Title 2</h2>
          <p>I am content 2</p>
          </div>
        `
                }
            }
        })
    </script>
Extract the template of the component
- script tag method (connected by id)
    <div id="app">
        <cpn></cpn>
    </div>
    <script type="text/x-template" id="cpn">
        <div>
            <h2>I'm Title 1</h2>
            <p>I am content 1</p>
        </div>
    </script>
    <script>
        // Global component syntax
        Vue.component('cpn', {
            template: '#cpn'
        })
- template tag method (connected by id)
 <template id="cpn">
        <div>
            <h2>I'm Title 1</h2>
            <p>I am content 1</p>
            <span>hahahhah </span>
        </div>
    </template>
    <script>
        // Global component syntax
        Vue.component('cpn', {
            template: '#cpn'
        })
Can components directly access data in vue instances-------- No
Even if it can be accessed, if all the data is placed in the Vue instance, the Vue instance will become particularly bloated.
Storage of component data
- The component object also has a data attribute (or methods and other attributes)
- Only this data must be a function
- And this function returns an object, which holds data
Why does the data in the component have to be a function?
The data option of a component must be a function, so each instance can maintain an independent copy of the returned object. If Vue does not have this rule, clicking a button may affect all other instances.
 <div id="app">
        <cpn></cpn>
        <cpn></cpn>
        <cpn></cpn>
    </div>
    <template id="cpn">
        <div>
            <button @click="descend">-</button>
            <span>{{counter}}</span>
             <button @click="increment">+</button>
        </div>
    </template>
    <script>
        // Global component syntax
        Vue.component('cpn', {
            template: '#cpn',
            // Must be a function that returns a new object each time
            data() {
                return {
                    counter: 0
                }
            },
            methods: {
                increment() {
                    this.counter += 1
                },
                descend() {
                    this.counter -= 1
                }
            }
        })
Parent child component communication
As mentioned earlier, child components cannot reference the data of parent components or vue instances. However, in development, some data often needs to be transferred from the upper layer to the lower layer.
- For example, in a page, we request a lot of data from the server
- Some of the data is not displayed by the large components of our whole page, but by the following small components
- At this time, the widget will not send another request, but directly let the large component (parent component) pass the data to the small component (child component)
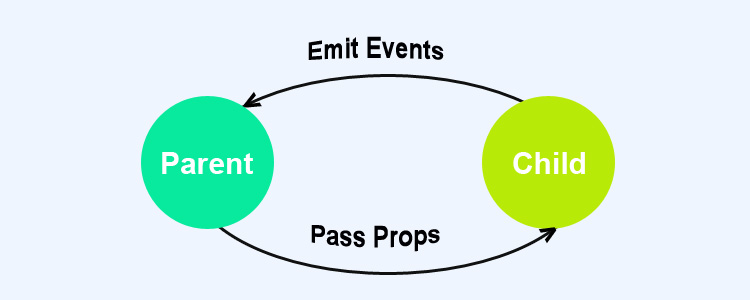
How to communicate between parent and child components.
- Props. ------- > properties. Pass data to subcomponents through props
- Send messages to parent components through events. Custom event
props usage (passed from parent component to child component)
//Array form
<div id="app">
        <cpn :cmovies="movies" :cmessage="message"></cpn>
    </div>
    <template id="cpn">
      <div>
        <ul>
          <li v-for="item in cmovies">{{item}}</li>
        </ul>
        <h2>{{cmessage}}</h2>
      </div>
    </template>
    <script>
        //props for father to son
        const cpn = {
            template: '#cpn',
            props: ['cmovies', 'cmessage']
        }
        const app = new Vue({
            el: '#app',
            data: {
                message: 'How do you do',
                movies: ['dominant sea power', 'One Piece', 'Haier brothers ']
            },
            components: {
                cpn
            }
        })
    </script>
//Object form (usually object type)
    <script>
        //props for father to son
        const cpn = {
            template: '#cpn',
            // props: ['cmovies', 'cmessage']
            props: {
                // 1. Type restrictions
                cmovies: Array,
                //2. Or provide a default value. When the parent component does not pass child component data, the default value will be used
                cmessage: {
                    type: String,
                    default: 'aaaa',
                  //You have to pass this
                  	require:true
                }
            }
        }
        const app = new Vue({
            el: '#app',
            data: {
                message: 'How do you do',
                movies: ['dominant sea power', 'One Piece', 'Haier brothers ']
            },
            components: {
                cpn
            }
        })
    </script>
Hump identification in props
In html, main cannot recognize humps. For example, cInfo should be written as c-info
The child component transmits the value to the parent component (for example, we first classify the mobile phone. When we click fresh food, this event will be transmitted from the child component to the parent component, and then the parent component sends a request to obtain the corresponding fresh food data)
<body>
    <!-- Parent component template -->
    <div id="app">
        <!-- The parent component listens to the event. After listening, it processes the event in the instance
        It will send events to the sub components by default item Pass in
       -->
        <cpn @item-click='cpnClick'></cpn>
    </div>
    <!-- Subcomponent template -->
    <template id="cpn">
      <div>
         <button v-for="item in categories"
                  @click="btnClick(item)">{{item.name}}</button>
      </div>
    </template>
    <script>
        //Son to father
        const cpn = {
            template: '#cpn',
            data() {
                return {
                    categories: [{
                        id: 'aaaa',
                        name: 'Popular recommendation'
                    }, {
                        id: 'bbbb',
                        name: 'Mobile digital'
                    }, {
                        id: 'cccc',
                        name: 'Household appliances'
                    }, {
                        id: 'dddd',
                        name: 'Computer office'
                    }]
                }
            },
            methods: {
                //w we want to pass the option we clicked to the parent component
                btnClick(item) {
                    // console.log(item);
                    // Launch event. This. $emit (event name)
                    this.$emit('item-click', item)
                }
            }

        }
        const app = new Vue({
            el: '#app',
            data: {
                message: 'How do you do'
            },
            components: {
                cpn
            },
            methods: {
                //Handling events
                cpnClick(item) {
                    console.log(item);
                }
            }
        })
    </script>
</body>
Parent child component communication summary
Parent child component communication combined with two-way binding case
 <div id="app">
        <cpn :cnum1="num1" :cnum2="num2" @num1change="num1change" @num2change="num2change"></cpn>
    </div>
    <template id="cpn">
      <div>
        <h2>props:{{cnum1}}</h2>
        <h2>{{dcnum1}}</h2>
        <input type="text" :value="dcnum1" @input="num1Input">
            <h2>props:{{cnum2}}</h2>
         <h2>{{dcnum2}}</h2>

            <input type="text" :value="dcnum2" @input="num2Input">
      </div>
    </template>
    <script>
        const app = new Vue({
            el: '#app',
            data: {
                num1: 1,
                num2: 1
            },
            methods: {
                num1change(value) {
                    this.num1 = parseInt(value)
                },
                num2change(value) {
                    this.num2 = parseInt(value)
                }
            },
            components: {
                cpn: {
                    template: '#cpn',
                    props: {
                        cnum1: Number,
                        cnum2: Number
                    },
                    data() {
                        return {
                            dcnum1: this.cnum1,
                            dcnum2: this.cnum2
                        }
                    },
                    methods: {

                        num1Input(event) {
                            //1. Assign value in input to dcnum
                            this.dcnum1 = event.target.value
                                //2. Issue an event so that the parent component can modify the value
                            this.$emit('num1change', this.dcnum1)
                                //3. Modify the value of dcnum2 at the same time
                            this.dcnum2 = this.dcnum1 * 100
                            this.$emit('num2change', this.dcnum2)
                        },
                        num2Input(event) {
                            this.dcnum2 = event.target.value
                            this.$emit('num2change', this.dcnum2)
                                //3. Modify the value of dcnum1 at the same time
                            this.dcnum1 = this.dcnum2 / 100
                            this.$emit('num1change', this.dcnum1)
                        }
                    }
                }
            }
        })
    </script>
Access mode of parent-child components
Sometimes, we need the parent component to directly access the child component, the child component to directly access the parent component, or the child component to access the root component.
- Parent components access child components, using c h i l d r e n , or person children, or children, or refs.reference()
- Child component accessing parent component: use $parent
Parent access child
Let's take a look at the visit of $children first
- this.$children is an array type that contains all child component objects
- Here, we take out the message state of the sub component through a traversal
  <div id="app">
        <cpn></cpn>
        <cpn></cpn>
        <cpn></cpn>
        <button @click="btnClick">Button</button>
    </div>
    <template id="cpn">
      <div>I am a subcomponent</div>
    </template>
    <script>
        const app = new Vue({
            el: '#app',
            data: {},
            methods: {
                btnClick() {
                    console.log(this.$children);
                    //Get the sub component and call the method of the sub component
                    this.$children[0].showMessage()
                        //You can get the data of sub components
                    console.log(this.$children[0].name);
                }
            },
            components: {
                cpn: {
                    template: '#cpn',
                    data() {
                        return {
                            name: 'I'm a subcomponent name'
                        }
                    },
                    methods: {
                        showMessage() {
                            console.log('showMessage');
                        }
                    }
                }
            }
        })
    </script>
But in actual development, we usually don't use $tchildren
<cpn ref="aaa"></cpn>
                    // $ref  	 The default is an empty object.
                    console.log(this.$refs.aaa.name);
Child access parent p a r e n t . And parent. And parent. Similar to children. Use less
Access root component $root
                            methods: {
                                btnClick() {
                                    //1. Access parent component through $parent
                                    // console.log(this.$parent.cmessage);
                                    console.log(this.$root.message);
                                }
                            }
slot
The purpose of the slot is to make the original device have a lot of scalability. For example, the USB of the computer, we can insert U disk, hard disk, mobile phone and stereo.
Slots for components:
- In order to make our encapsulated components more extensible
- It allows users to decide what is displayed inside the component
How to package properly? Extract commonalities and retain differences.
- The best packaging method is to extract commonalities into components and expose different as slots.
- Once we reserve the slot, users can decide what to insert into the slot according to their own needs.
- Whether it is a search box, text, or menu is up to the caller.
    <div id="app">
        <cpn><button>Button</button></cpn>
        <cpn><span>Hee hee hee</span></cpn>
        <cpn><i>Hehe hehe</i></cpn>
        <cpn></cpn>
    </div>
    <template id="cpn">
      <div>
        <h2>I'm a component</h2>
        <p>I'm a component, ha ha ha ha ha</p>
        <!-- You can set the default value. If it is not written, it will be displayed as the fourth one -->
        <slot>
          <button>Ha ha ha ha ha ha</button>
        </slot>
      </div>
    </template>
Named slot
    <div id="app">
        <!-- To specify slot Name of -->
        <cpn><span slot="center">title</span></cpn>
    </div>
    <template id="cpn">
      <div>
        <slot name="left"><span>left</span></slot>
        <slot name="center"><span>middle</span></slot>
        <slot name="right"><span>right</span></slot>
      </div>
    </template>
The compilation scope will use which instance the variable is applied to
Scope slot
The parent component replaces the label of the slot, but the content is provided by the child component.
Case requirements:
-
The subcomponent includes a set of data, such as language: ['Javascript', 'Python', 'Swift', 'Go', 'C + +]
-
It needs to be displayed in multiple interfaces.
- Some interfaces are displayed horizontally
- Some interfaces are displayed in list form
- Some interfaces display an array directly
-
The content is in the child component. What should we do if the parent component tells us how to display it?
Answer: use the scope slot
    <div id="app">
        <cpn>
            <template slot-scope="slot">
              <span v-for="item in slot.data">{{item}}--</span>
          </template>
        </cpn>
        <cpn></cpn>
        <cpn> <template slot-scope="slot">
              <span v-for="item in slot.data">{{item}}****</span>
          </template></cpn>
    </div>
    <template id="cpn">
      <div>
        data Is arbitrary
        <slot :data="languages">
        <ul>
          <li v-for="item in languages">{{item}}</li>
        </ul></slot>
      </div>
    </template>
Vue scaffold
The full name of CLI is called common line interface, which is translated into command line page, commonly known as scaffold.
Vue cli can be used to quickly build Vue development environment and corresponding webpack configuration.
Vue Cli depends on node and webpack.
Use of Vue CLI
- Install, global install npm install -g @vue/cli
- Enter vue --version on the terminal to view the version
- Enter vue create vuecli4 to create the project
- Enter npm run serve to run the project
Routing Vue router
Routing is a term in network engineering. Routing is the activity of the Internet network to transmit information from the source address to the destination address
Contact the router in your life:
Router provides two mechanisms: routing and forwarding
- Routing determines the path of a packet from its source to its destination
- Forwarding transfers data from the input to the appropriate output
A very important concept in routing is called routing table
- The routing table is essentially a mapping table, which determines the direction of data packets
Front end rendering
Back end routing phase
Backend rendering / server rendering: jsp/php.
Back end Routing: the back end processes the mapping relationship between URL pages
In the early days of website development, the whole HTML page was rendered by the server. The server directly produces and renders the corresponding HTML page and returns it to the client for display.
But how does the server handle a website with so many pages?
- A page has its own corresponding url, that is, url
- The url will be sent to the server, and the server will match the url through regular, and finally give it to a controller for processing.
- The controller performs various processing, and finally generates HTML or data, which is returned to the front end
- This completes an IO operation.
The above operation is back-end routing
- When we need to request different path contents in the page, we give it to the server for processing. The server renders the whole page and returns the page to the client.
- In this case, the rendered page can be directly presented to the browser without loading any js and css separately, which is also conducive to SEO optimization.
Disadvantages of back-end routing
- In one case, the module of the whole page is written and maintained by the back-end personnel
- In another case, if front-end personnel want to develop pages, they need to write page code through languages such as PHP and Java
- And usually, HTML code and data and corresponding logic will mix together, and writing and maintenance are very bad.
Front end routing phase
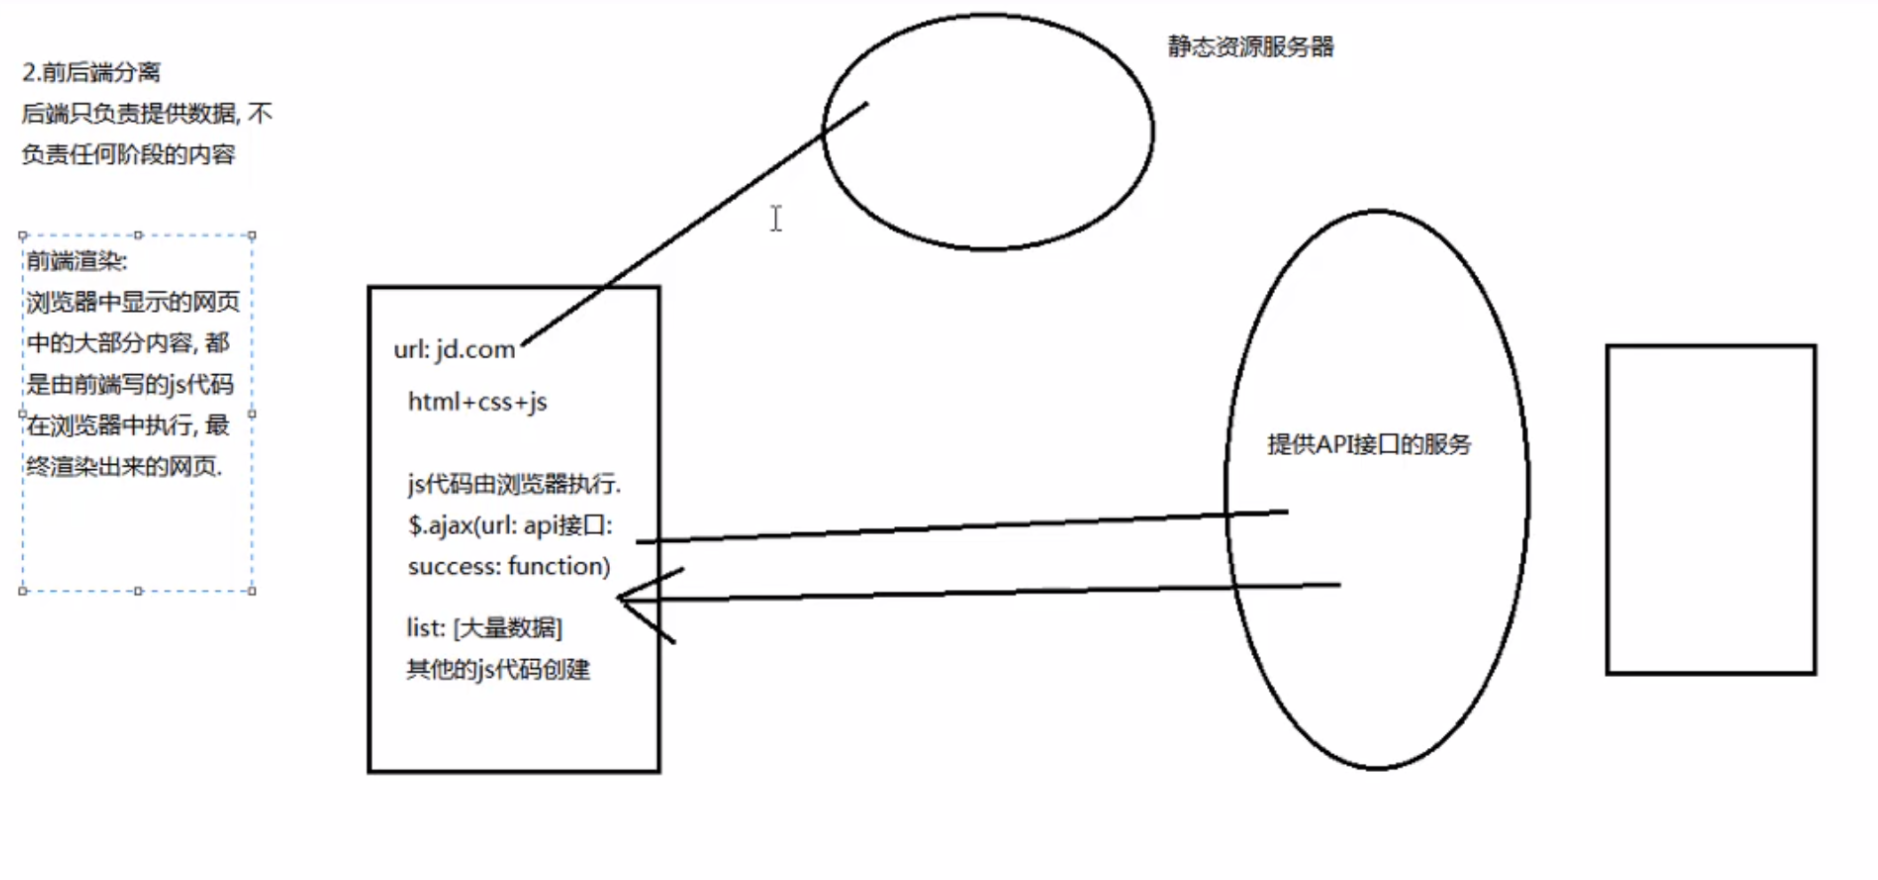
- Front and rear end separation stage:
- With the emergence of Ajax, there is a development mode of front-end and back-end separation
- The back end only provides API s to return data. The front end obtains data through Ajax and can render the data to the page through JS.
- The advantage of this is that the responsibilities of the front and back ends are clear. The back end does not need any processing, and the previous set of API s can still be used.
- After the mobile terminal appears, the back end does not need any processing, and the previous set of API s can still be used
- At present, many websites use front-end and back-end separation technology.
- Single page SPA rich application stage
- In fact, the main feature of SPA is to add a layer of front-end routing on the basis of front-end and back-end separation.
- That is, the front end maintains a set of routing rules
All. vue files are synthesized into js files. The core of front-end routing is to remove the resources corresponding to js requests in static resources once the url changes.
Know Vue router
At present, the three popular front-end frameworks have their own routing implementation
- ngRouter of Angular
- ReactRouter of React
- Vue router of Vue
Install and use Vue router
-
Install Vue router NPM install Vue router -- save
-
Use it in a modular project (because it is a plug-in, Vue.use() is used to install the routing function)
-
Import the routing object and call Vue.use(VueRouter)
-
Create a routing instance and pass in the routing mapping configuration
-
Mount the created routing instance in the Vue instance
-
//Configure routing related information
import Vue from 'vue'
import VueRouter from 'vue-router'

//1. Install the plug-in through vue.use (plug-in)
Vue.use(VueRouter)

//2. Create vueroter object

const routes = [

]
const router = new VueRouter({
    //Configure the mapping relationship between paths and components
    routes
})

//3. Pass our router object into the Vue instance
// Mount to vue instance in main.js
export default router
In main.js
import Vue from 'vue'
import App from './App.vue'
import router from './router'

// Prompt information
Vue.config.productionTip = false

new Vue({
    render: h => h(App),
    router
}).$mount('#app')
To use Vue router
-
Create routing component
-
Configure route mapping: mapping relationship between components and paths
import Home from '../components/Home.vue'
import About from '../components/About.vue'

//1. Install the plug-in through vue.use (plug-in)
Vue.use(VueRouter)

//2. Create vueroter object

const routes = [{
    path: '/home',
    component: Home
}, {
    path: '/about',
    component: About
}]
- Using routing: through < router link > and < router View >
<template>
  <div id="app">
    <router-link to='/home'>home page</router-link>
    <router-link to='/about'>about</router-link>
    <router-view></router-view>
  </div>
</template>
- < router link > this tag is a built-in component in Vue router, which will be rendered as a < a > tag.
- < router View > this tab will dynamically render different components according to the current path
- Other contents of the web page, such as the title / navigation at the top or some copyright information at the bottom, will be at the same level as < router View >
- During route switching, the < router View > mounted components are switched, and other contents will not be changed
< router link > in addition to the to attribute, there is also a tag
    <router-link to='/home' tag="button">home page</router-link>//Render as button
    <router-link to='/about'>about</router-link>
Routing code jump
Routing page
methods:{
    homeClick(){
      // this.$router.push('/home')
      this.$router.replace('/home')
      console.log(this.$router);
    },
    aboutClick(){
      // this.$router.push('/about')
      this.$router.replace('/about')
    }
  }
Dynamic routing
const routes = [{
        path: '/',
        redirect: '/home'
    },
    {
        path: '/home',
        component: Home
    }, {
        path: '/about',
        component: About
    }, {
        path: '/user/:userId',
        component: User
    }
]


App.vue page

        userClick(){
      // this.$router.push('/about')
      this.$router.replace('/user/'+this.userId)
    }


User.vue page
  computed:{
    userId(){
      //Get the active route. Note that $route is the entire route array and $route is the active route object
      return this.$route.params.userId
    }
  }
Route lazy loading
-
When the application is packaged and built, the javascript package will become very large and affect the page loading
-
If we can divide the components corresponding to different routes into different code blocks, and then load the corresponding components when the route is accessed, it will be more efficient.
Route lazy loading method
const Home=()=>import('../components.Home.vue')
// import Home from '../components/Home.vue'
// import About from '../components/About.vue'
// import User from '../components/User.vue'
// Lazy loading mode
const Home = () =>
    import ('../components/Home.vue')
const About = () =>
    import ('../components/About.vue')
const User = () =>
    import ('../components/User.vue')
Nested Route
- Create corresponding sub components and configure corresponding sub routes in route mapping
- Use the < router View > tag inside the component
stay home page
<template>
  <div>
    <h2>I'm the home page</h2>

    <router-link to="/home/news">Journalism</router-link>
    <router-link to="/home/messages">information</router-link>
    <router-view></router-view>
  </div>
</template>
    {
        path: '/home',
        component: Home,
        children: [{
            path: '/',
            redirect: 'news'
        }, {
            path: 'news',
            component: HomeNews
        }, {
            path: 'messages',
            component: HomeMessage
        }]
    },
Vue router pass parameter
There are two main types of passed parameters: params and query
Type of params
- Configure routing format: / router/:id
- Transfer method: follow the corresponding value after the path
- Paths formed after transfer: / router/123, / router/abc
    userClick(){
      // this.$router.push('/about')
      this.$router.replace('/user/'+this.userId)
    }
Type of query
- Configure routing format: / router, that is, normal configuration
- Transfer method: the key of query is used as the transfer method in the object
- Path formed after transfer: / router?id=123, / router?id=abc
    <router-link :to="{
      path:'/profile',
      query:{
        name:'why',
        age:18,
        height:1.88
      }
    }" tag="button">archives</router-link>
      path:'/profile',
      query:{
        name:'why',
        age:18,
        height:1.88
      }
Global navigation guard
  //Callback after creating the component
  created(){
    console.log('created');
    document.title='home page'
  },
  //When the template is mounted on the dom, the callback
  mounted(){},
  //Callback when page refresh occurs
  updated(){}
We can modify the title through the navigation guard
 {
        path: '/profile',
        component: Profile,
        meta: { title: 'archives' }
    }


router.beforeEach((to, from, next) => {
    //Jump from to
    document.title = to.matched[0].meta.title
    console.log(to);
    next()
})
Route exclusive guard beforeEnter
Guard in assembly
- beforeRouteEnter
- Beforerouteupdate (new in 2.2)
- beforeRouteLeave
When keep alive encounters router view
The internal state of the component is not preserved. Every time you go back to this component. This component will be recreated
- < router View > is also a component. If it is directly wrapped in keep alive, all view components matching the path will be cached.
  //These two functions are valid only if the component is kept in state and keep alive is used
   activated(){
    // this.$router.push(this.path)
  },
  deactivated(){
    console.log('deactivated');
  },
  //Intra component routing
  beforeRouteLeave(to, from, next) {
    console.log(this.$route.path);
    this.path=this.$route.path
    next()
  }
Use the path attribute in the home page to record the leaving path, and record it in beforeRouteLeave
Short for path
Alias some folders. Under the scaffold of cli3, create vue.config.js in the project root directory.
const { resolve } = require('path')

module.exports = {
    configureWebpack: {
        resolve: {
            alias: {
                '@': resolve(__dirname, 'src'),
                'assets': resolve(__dirname, '@/assets'),
                'components': resolve(__dirname, '@/components'),
                'views': resolve(__dirname, '@/views')
            }
        }
    }
}
Promise
promise is a solution to asynchronous programming.
When will we handle asynchronous events?
-
A very common scenario is network request
-
We encapsulate a network request function. Because we can't get the result immediately, we can't return the result like a simple 4 + 3 = 7.
-
Therefore, we often pass in another function to call back the data through the incoming function when the data request is successful.
-
If it is a simple network request, this scheme will not bring us much trouble.
-
However, when the network request is very complex, callback hell occurs.
Asynchronous event of timer
 // Promise parameter is a function with two parameters resolve and reject
        //Resolve and reject are functions themselves
        //Chain programming
        new Promise((resolve, reject) => {
            //After 1 second, execute console.log('hello ')
            setTimeout(() => {
                // console.log("hello ");
                //When the resolve function is called here, then() will be called later. The parameter of then is also a function
                resolve()
            }, 1000)
        }).then(() => {
            console.log('hello world');
        })

        //Under what circumstances will promise be encountered? Generally, when there is an asynchronous operation, promise is used to encapsulate the asynchronous operation

        //1. When we execute new Promise() to save some status information.
        //2. Then execute the passed in function
        //3. When executing the incoming callback function, pass two parameters resolve and reject to the function, which is also a function
        //4. In
        new Promise((resolve, reject) => {
            setTimeout((data) => {
                //resolve is called when successful
                resolve(data) //Here, the request is processed, and the result is obtained successfully. After obtaining the data, it is passed to then()

                //reject() is called when failure occurs
                reject('err message') //Pass the error message to catch()
            }, 1000)
        }).then((data) => {
            //The data returned by the request is processed here
        }).catch(err => {
            console.log(err);
        })
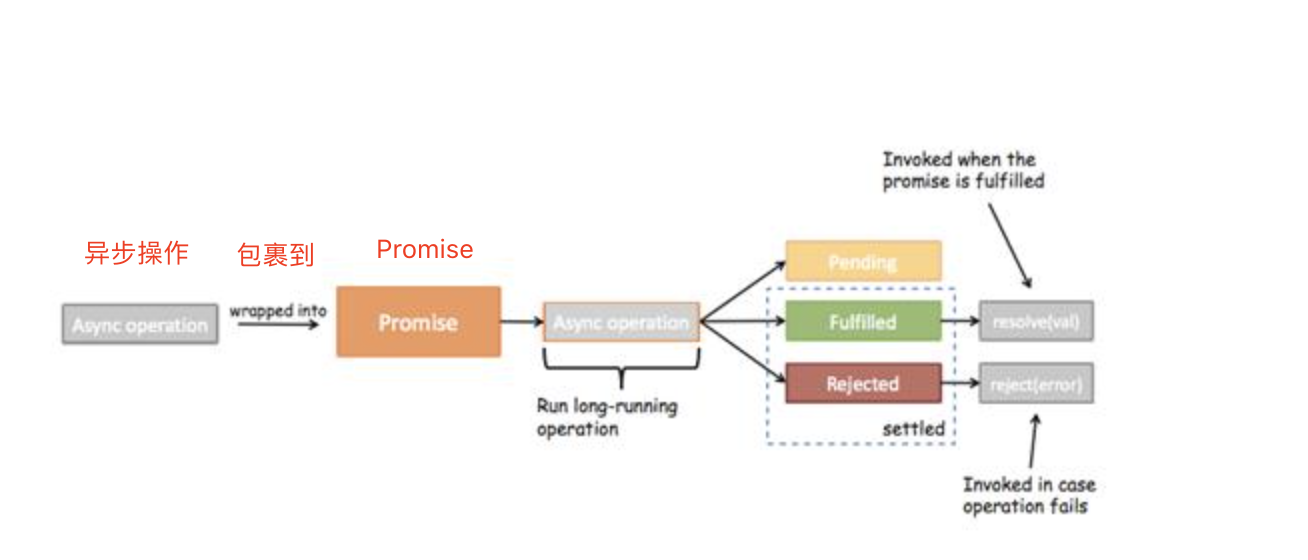
Three states of Promise
Pending: waiting status, such as a network request in progress, or the timer is not up
Full: satisfied state. When we actively call back resolve, we are in this state and will call back. then()
Reject: reject status. When we are destined to call back reject, we are in this state and will call back. catch()
Another way to write Promise
        new Promise((resolve, reject) => {
            setTimeout(() => {
                    //When successful
                    resolve('Hello')

                    //Error time
                    reject('err')
                }, 1000)
                //You can also not be afraid of catch. In that case, pass in two parameters (both functions) to then, one data and one err. Comma separated
        }).then(data => {
            console.log(data);
        }, err => {
            console.log(err);
        })
Promise chained call
        new Promise((resolve, reject) => {
            //First network request code
            setTimeout(() => {
                resolve('First send request')
            }, 1000)
        }).then(() => {
            console.log('Processing data from the first request');
            //If you want to continue the second request in the requested data
            return new Promise((resolve, reject) => {
                //Second network request code
                setTimeout(() => {
                    resolve('Second send request')
                }, 1000)
            }).then(() => {
                console.log('Processing data from the second request');
                //If you want to continue the third request in the requested data
                return new Promise((resolve, reject) => {
                    //Third network request code
                    setTimeout(() => {
                        resolve('Third send request')
                    }, 1000)
                }).then(() => {
                    console.log('Processing data from the third request');
                })
            })
        })
Case:
/ / network request: obtain aaa, process it yourself (111 on the splice), and then pass the result to the next step
/ / processing: aaa111, process by yourself (splicing 222), and then pass the result to the next step
/ / processing: aaa111222, self reprocessing (splicing 333)
        new Promise((resolve, reject) => {
            setTimeout(() => {
                //Get the returned data aaa
                resolve('aaa')
            }, 1000)
        }).then(res => {
            //1. Handle 10 lines of code by yourself
            console.log(res, 'Layer 1 processing code');
            //2. Process the results for the first time
            return new Promise((resolve, reject) => {
                resolve(res + '111')
            })
        }).then(res => {
            //3. Handle 10 lines of code by yourself
            console.log(res, 'Layer 2 processing code');
            return new Promise((resolve, reject) => {
                //4. Second processing of results
                resolve(res + '222')
            })
        }).then(res => {
            console.log(res, 'Layer 3 processing code');
        })
        //Abbreviation
        new Promise((resolve, reject) => {
            setTimeout(() => {
                //Get the returned data aaa
                resolve('aaa')
            }, 1000)
        }).then(res => {
            //1. Handle 10 lines of code by yourself
            console.log(res, 'Layer 1 processing code');
            //2. Process the results for the first time
            return res + '111'
        }).then(res => {
            //3. Handle 10 lines of code by yourself
            console.log(res, 'Layer 2 processing code');
            return res + '222'
        }).then(res => {
            console.log(res, 'Layer 3 processing code');
        })
Promise's all method uses
        //Suppose we encounter such a situation,
        //After two requests are completed, we need to get the two request data before we can make the next request

        //Request one
        let isResult1 = false;
        $ajax({
            url: '',
            success: function() {
                console.log('Result 1');
                isResult1 = true
                    // Because we don't know whether request 1 or request 2 is completed first, we need to call this function in both requests
                    //Suppose that the request is completed first than the request two, then the function can be called directly in request 2, but there is no such assumption.
                handleResult()
            }
        });
        //Request two
        let isResult2 = false;
        $ajax({
            url: '',
            success: function() {
                console.log('Result 1');
                isResult2 = true
                    // Because we don't know whether request 1 or request 2 is completed first, we need to call this function in both requests
                handleResult()
            }
        });

        function handleResult() {
            if (isResult1 && isResult2) {
                //Initiate request
            }
        }
Use Promise.all() method
        // Promise.all(iterator)
        // Iterator iterator, that is, iteratable, that is, ergodic.
        //We replace network requests with timers
        Promise.all([
            new Promise((resolve, reject) => {
                setTimeout(() => {
                    resolve({
                        name: 'why',
                        age: 18
                    })
                }, 2000)
            }),
            new Promise((resolve, reject) => {
                setTimeout(() => {
                    resolve({
                        name: 'kobe',
                        age: 28
                    })
                }, 1000)
            }),
        ]).then(results => {
            //  results[0] results of the first request
            //  results[1] the result of the second request

            //At this time, we have completed the data acquisition of the two requests
            console.log(results);

        })
Vuex
Vuex understand
Vuex is a state management pattern developed specifically for Vue.js applications
- It uses centralized storage to manage the state of all components of the application, and ensures that the state changes in a predictable way with corresponding rules.
- Vuex is also integrated into Vue's official debugging tool devtools extension, which provides advanced debugging functions such as time travel debugging with zero configuration, import and export of state snapshots and so on.
What is state management?
- The names of state management mode and centralized storage management sound tall and confusing.
- In fact, you can simply think of it as storing all the variables that need to be shared by multiple components in one object.
- Then, put this object in the Vue instance at the top level so that other components can use it.
- Can multiple components share all variable attributes in this object?
Vuex is to provide such a plug-in to share state among multiple components.
What is the state of management?
-
User login status, user name, avatar, geographical location, etc
-
Such as the collection of goods and the items in the shopping cart
-
We can all put these status information in the same place. It is saved and managed, and they are responsive
Steps for using vuex
- Install vuexnpm i vuex --save
- Create a new store folder and the index.js file
import Vue from 'vue'
import Vuex from 'vuex'

Vue.use(Vuex)

const store = new Vuex.Store({
    state: {
        counter: 1000
    },
    mutations: {},
    actions: {},
    getters: {},
    modules: {}
})

export default store
- Introduce in main.js
import Vue from 'vue'
import App from './App.vue'
import store from './store'

Vue.config.productionTip = false
Vue.prototype.$store = store

new Vue({
    render: h => h(App),
    store
}).$mount('#app')
- Import in App component
<template>
  <div id="app">
    <h1>---------App content------------------</h1>
    <h2>{{$store.state.counter}} App</h2>
    <button @click="$store.state.counter--">reduce</button>
    <button @click="$store.state.counter++">increase</button>
    <h1>---------HelloWorld content------------</h1>
        <hello-world></hello-world>
  </div>
</template>
Vuex operation diagram
[the external link image transfer fails. The source station may have an anti-theft chain mechanism. It is recommended to save the image and upload it directly (img-QRNVJOmS-1631626349445)(/Users/wadong/Desktop/vue learning / img/image-20210621114720083.png)]
Core concepts of Vuex
- State
- Getters
- Mutation
- Action
- Module
State single state tree
Vuex uses a single state tree. Each application will contain only one store instance. The single state tree allows us to directly locate any specific state fragment, and easily obtain a snapshot of the current application state during debugging.
Basic use of Getters
Vuex allows us to define "getters" (which can be considered as the calculated attributes of the store) in the store. Just like calculating attributes, the return value of getter will be cached according to its dependency, and will be recalculated only when its dependency value changes.
const store = new Vuex.Store({
    state: {
        counter: 1000
    },
    mutations: {
        //Method, a parameter will be passed in by default
        increment(state) {
            state.counter++
        },
        decrement(state) {
            state.counter--
        }
    },
    actions: {},
    getters: {
        powerCounter(state) {
            return state.counter * state.counter
        }
    },
    modules: {}
})
In component methods. Call function
  methods:{
    addition(){
      this.$store.commit('increment')
    },
    subtraction(){
       this.$store.commit('decrement')
    }
  }
Demand 1: screening students over 20 years old
    getters: {
        powerCounter(state) {
            return state.counter * state.counter
        },
        more20stu(state) {
            return state.students.filter(s => s.age >= 20)
        }
    },
getter can also accept other getters as the second parameter:
Demand 2: number of students over 20 years old:
    getters: {
        powerCounter(state) {
            return state.counter * state.counter
        },
        more20stu(state) {
            return state.students.filter(s => s.age >= 20)
        },
        more20stuLength(state, getters) {
            return getters.more20stu.length
        }
    },
Demand 3: get students older than age. This age is passed in by the user and returns a function
        moreAgeStu(state) {
            //Returns a function
            return function(age) {
                return state.students.filter(s => s.age > age)
            }
            //Arrow function writing
            return age=>{
                return state.students.filter(s => s.age > age)
            }
        }
this age Temporarily 31 years old
<h1>---------App content---greater than age student--------</h1>
<h2>{{$store.getters.moreAgeStu(31)}}</h2>
Variables pass parameters
The only way to change the state in Vuex's store is to submit the mutation. The mutation in Vuex is very similar to an event.
Each mutation has two parts
- Event type of a string
- A callback function (handler). This callback function is where we actually make state changes, and it will accept state as the first parameter.
Definition of mutation
   mutations: {
        //Method, a parameter will be passed in by default
        increment(state) {
            state.counter++
        },
        decrement(state) {
            state.counter--
        }
    },
Requirement 1: click the button once to ➕ 5.. You can pass in the parameter @ click="addCount(5)" (the passed parameter is one)
mutations:
        incrementCount(state, count) {
            state.counter += count
        }
App.vue file:
    addCount(count){
      this.$store.commit('incrementCount',count)
    }
Requirement 2: add a student (pass multiple parameters)
mutations:
        addStudent(state, stu) {
            state.students.push(stu)
        }
App.vue file:
    //Transfer object
    addStudent(){
      const stu={id:114,name:'lilei',age:23}
      this.$store.commit('addStudent',stu)
    }
To sum up: when updating data through mutation. Maybe we want to carry some additional parameters
- The parameter is called the load of mutation (Payload)
- But when the parameter is not one, we usually pass it in the form of an object, that is, the payload is an object.
- At this time, we can extract relevant information from the object
The principle of the data response of the variables
Since the state in Vuex's store is responsive, when we change the state, the Vue component that monitors the state will also be updated automatically. This also means that the mutation in Vuex also needs to follow some precautions like using Vue:
- It's best to initialize all the required attributes in your store in advance and add them to the responsive system.
- When a new attribute needs to be added to an object, as in the following code, it cannot be displayed. The added object is not added to the responsive system and does not belong to the scope of listening.
        updateInfo(state) {
            // state.info.name = 'coderwhy'
            state.info['address'] = 'shanghai'
        }
[the external link image transfer fails. The source station may have an anti-theft chain mechanism. It is recommended to save the image and upload it directly (img-EW0yaL9R-1631626349445)(/Users/wadong/Desktop/vue learning / img/image-20210621154554508.png)]
Therefore, when adding new attributes, we should: use Vue.set(obj, 'newProp', 123)
        updateInfo(state) {
            // state.info.name = 'coderwhy'
            // state.info['address'] = 'shanghai'
            Vue.set(state.info, 'address', 'shanghai')
        }
[external link image transfer failed. The source station may have an anti-theft chain mechanism. It is recommended to save the image and upload it directly (img-GOzPHzfr-1631626349446)(/Users/wadong/Desktop/vue learning / img/image-20210621154809081.png)]
Similarly, when we want to delete an attribute, we use Vue.delete(obj,'prop')
        updateInfo(state) {
            // state.info.name = 'coderwhy'
            // state.info['address'] = 'shanghai'
            Vue.set(state.info, 'address', 'shanghai')

            //This method cannot be responsive
            // delete state.info.age
            // Use the following method
            Vue.delete(state.info, 'age')
        }
Changes must be a synchronization function
The main reasons are as follows:
- When we use devtools, using devtools can help us capture a snapshot of the mutation
- However, if it is an asynchronous operation, devtools will not be able to track when the operation will be completed.
Now imagine that we are debug ging an app and observing the mutation log in devtool. Every mutation is recorded, and devtools needs to capture snapshots of the previous state and the next state. However, in the above example, the callback in the asynchronous function in the mutation makes this impossible: because when the mutation is triggered, the callback function has not been called, and devtools does not know when the callback function is actually called - essentially, any state change in the callback function is untraceable.
Action processing asynchronous
We emphasize that we should not use Mutation for asynchronous operation
- However, in some cases, we really want to perform some asynchronous operations in Vuex, such as network requests, which must be asynchronous. What should we do at this time?
- Action is similar to Mutation, but it is used to perform asynchronous operations instead of Mutation.
Action is similar to mutation in that:
- The Action submits the mutation instead of directly changing the status.
- An Action can contain any asynchronous Action.
Case 1: asynchronous request
For example, we treat the timer as an asynchronous network request
actions:
    actions: {
        //Context context. In this position, context is understood as store
        aUpdateInfo(context, payload) {
            setTimeout(() => {
                //commit is submitted to mutations
                context.commit('updateInfo')
                console.log(payload);
            }, 1000)
        }
    }
App.vue
    updateInfo(){
      //commit is submitted to mutations
      // this.$store.commit('updateInfo')
      //dispatch is submitted to actions
      this.$store.dispatch('aUpdateInfo','I am payload')
    }
     <h1>---------App content info-------------</h1>
    <h2>{{$store.state.info}}</h2>
    <button @click="updateInfo()">Modify information</button>
Case 2: when the asynchronous request is completed, the successful message is returned
Actions:
    actions: {
        //Context context. In this position, context is understood as store
        aUpdateInfo(context, payload) {
            setTimeout(() => {
                //commit is submitted to mutations
                context.commit('updateInfo')
                console.log(payload.message);
                payload.success()
            }, 1000)
        }
    },
App.vue
    updateInfo(){
      //commit is submitted to mutations
      // this.$store.commit('updateInfo')
      //dispatch is submitted to actions
      this.$store.dispatch('aUpdateInfo',{
        message:'I carry the information',
        success:()=>{
          console.log('It's done');
        }
      })
    }
But this method is not elegant enough. Change it
actions
        aUpdateInfo(context, payload) {
            return new Promise((resolve) => {
                setTimeout(() => {
                    context.commit('updateInfo')
                    console.log(payload);
                    resolve('1111')
                }, 1000)
            })
        }
App.vue
   updateInfo(){
			this.$store
      .dispatch('aUpdateInfo','I carry the information')
      .then(res=>{
        console.log('Submission completed');
        console.log(res);
      })
    }
Modules
Due to the use of a single state tree, all the states of the application will be concentrated in a relatively large object. When the application becomes very complex, the store object may become quite bloated.
To solve the above problems, Vuex allows us to divide the store into modules. Each module has its own state, mutation, action, getter, and even nested sub modules
const moduleA = {
  state: () => ({ ... }),
  mutations: { ... },
  actions: { ... },
  getters: { ... }
}

const moduleB = {
  state: () => ({ ... }),
  mutations: { ... },
  actions: { ... }
}

const store = new Vuex.Store({
  modules: {
    a: moduleA,
    b: moduleB
  }
})

store.state.a // ->Status of ModuleA
store.state.b // ->Status of moduleb
Use of components
const moduleA = {
    state: {
        name: 'Dong Huan'
    },
    mutations: {
        updateName(state, payload) {
            state.name = payload
        }
    },
    actions: {
        aUpdateName(context) {
            setTimeout(() => {
                context.commit('updateName', 'wangwu')
            }, 1000)

        }
    },
    getters: {
        fullName(state) {
            return state.name + '1111'
        },
        //Incoming getters
        fullName2(state, getters) {
            return getters.fullName + '2222'
        },
        // Splice the state in the root
        fullName3(state, getters, rootState) {
            return getters.fullName2 + rootState.counter
        }
    }
}
App.vue file
    <h1>---------App content module-------------</h1>
    <h1>{{$store.state.a.name}}</h1>
    <button @click="updateName()">Modify name</button>
    <h1>{{$store.getters.fullName}}</h1>
    <h1>{{$store.getters.fullName2}}</h1>
    <h1>{{$store.getters.fullName3}}</h1>
    <button @click="asyncUpdateName">Asynchronously modify name</button>
    updateName(){
      this.$store.commit('updateName','Zhang San')
    },
    asyncUpdateName(){
      this.$store.dispatch('aUpdateName')
    }
If you want to use global state and getter, rootState and rootGetters will be passed in getter as the third and fourth parameters, and action will also be passed in through the properties of the context object.
If you need to distribute action or submit mutation in the global namespace, pass {root: true} as the third parameter to dispatch or commit.
modules: {
  foo: {
    namespaced: true,

    getters: {
      // In the getter of this module, ` getters' is localized
      // You can use the fourth parameter of getter to call ` rootGetters`
      someGetter (state, getters, rootState, rootGetters) {
        getters.someOtherGetter // -> 'foo/someOtherGetter'
        rootGetters.someOtherGetter // -> 'someOtherGetter'
      },
      someOtherGetter: state => { ... }
    },

    actions: {
      // In this module, dispatch and commit are also localized
      // They can accept the 'root' attribute to access the root dispatch or commit
      someAction ({ dispatch, commit, getters, rootGetters }) {
        getters.someGetter // -> 'foo/someGetter'
        rootGetters.someGetter // -> 'someGetter'

        dispatch('someOtherAction') // -> 'foo/someOtherAction'
        dispatch('someOtherAction', null, { root: true }) // -> 'someOtherAction'

        commit('someMutation') // -> 'foo/someMutation'
        commit('someMutation', null, { root: true }) // -> 'someMutation'
      },
      someOtherAction (ctx, payload) { ... }
    }
  }
}
Deconstruction assignment of object
// Deconstruction assignment of object
const obj = {
    name: 'why',
    age: 18,
    height: 1.88
}

const { name, age, height } = obj
console.log(name, age, height);
Directory organization of vuex
├── index.html
├── main.js
├── api
│   └── ... # Extract API request
├── components
│   ├── App.vue
│   └── ...
└── store
    ├── index.js          # Where we assemble the module and export the store
    ├── actions.js        # Root level action
    ├── mutations.js      # Root level mutation
    └── modules
        ├── cart.js       # Shopping Cart module
        └── products.js   # Product module
Network module packaging
- There are many ways for Vue to send network requests, so how to choose in development?
-
Traditional Ajax is based on XMLHttpRequest(XHR)
Why not use it?
- Because the configuration and invocation are very chaotic
- Coding looks hard
- In real development, jQuery AJAX is rarely used directly
- jQuery-Ajax.
- In the whole development of Vue, jQuery is not required
- This means that we deliberately apply a jQuery for network requests, which is unreasonable
- Code 1W + line of jQuery
- Vue's code is only 1W + lines
- There is no need to reference this heavyweight framework in order to use network requests.
- Vue-Resource
- Vue resource will not be updated in the future, which has great hidden dangers for the development and maintenance of the project
Why axios?
- Create from browser XMLHttpRequests
- Create from node.js http request
- support Promise API
- Intercept requests and responses
- Convert request data and response data
- Cancel request
- Automatically convert JSON data
- Client support defense XSRF
axios request mode
axios.request(config)
axios.get(url[, config])
axios.delete(url[, config])
axios.head(url[, config])
axios.options(url[, config])
axios.post(url[, data[, config]])
axios.put(url[, data[, config]])
axios.patch(url[, data[, config]])
axios usage
-
Install npm install axios --save
-
Use import axios from 'axios' in the entry file main.js
axios sends concurrent requests
axios
    .all([
        axios({ url: 'http://123.207.32.32:8000/home/multidata' }),
        axios({
            url: 'http://123.207.32.32:8000/home/data',
            params: {
                type: 'sell',
                page: 5
            }
        })
    ])
    .then((result) => {
        console.log(result)
    })

//There is an axios.spread() method
    .then(
        axios.spread((res1, res2) => {
            console.log(res1)
            console.log(res2)
        })
    )
Global configuration of axios
- In fact, in development, many parameters are fixed
- At this time, we can do some extraction or use the global configuration of axios.
axios.defaults.baseURL = 'http://123.207.32.32:8000'
axios.defaults.timeout = 5000
Common configuration options
- Request address url: '/'
- Request type: 'get'
- Request root path:‘ http://www.mt.com/api ’
- Data processing before request: transformRequest: [function(data)]
- Data processing after request: transformResponse:[function(data)]
- Custom request header: headers: {'x-Requested-With': 'XMLHttpRequest'}
- URL query object: params:{id:12}
axios instances and modular encapsulation
- axios instance
//Create an axios instance
const instance1 = axios.create({
    baseURL: 'http://123.207.32.32:8000',
    timeout: 5000
})
instance1({
        url: '/home/multidata'
    }).then((res) => {
        console.log(res)
    })
    //Second instance
const instance2 = axios.create({
    baseURL: '',
    timeout: 5000
})
- Modular packaging
Create the netword directory under the src directory. Then cd into this directory and create request.js
import axios from 'axios'
export function request(config, success, failure) {
    return new Promise((resolve, reject) => {
        //1. Create an instance of axios
        const instance = axios.create({
                baseURL: 'http://123.207.32.32:8000',
                timeout: 5000
            })
            //Send a real network request
        return instance(config)
    })
}
When we need to send a network request
import { request } from './network/request.js'

request({
        url: ''
    })
    .then((res) => {
        console.log(res)
    })
    .catch((err) => {
        console.log(err)
    })
axios interceptor
  //request interceptor
    instance.interceptors.request.use(
        (config) => {
            // console.log(config)
            //Because the config was intercepted, it needs to be returned
            //Role of interception
            //1. For example, some information in config does not meet the requirements of the server, such as adding header request headers
            //2. For example, every time we send a network request, we want an icon in the request
            //3. Some network requests must carry some special information (such as token)
            return config
        },
        (err) => {
            console.log(err)
        }
    )

    //Response interceptor
    instance.interceptors.response.use(
        //Response successful
        (res) => {
            // console.log(res)
            return res.data
        },
        //Response failed
        (err) => {
            console.log(err)
        }
    )