Introduction to Spring MVC
Spring MVC is the framework design Srping provides for Web applications. SpringMVC is a typical textbook-style MVC framework, unlike Struts and others, which are variants or are not entirely mvc-based.
Spring MVC has clear roles, detailed division of labor, and seamlessly combines with the Spring framework. As the most mainstream Web development framework in the industry today, Spring MVC has become the hottest development skill and is widely used in desktop development.
MVC design is not limited to java Web applications, but also includes many references, such as front-end, PHP,.NET, and so on. The reason for this is to decouple the modules.
MVC is an abbreviation for Model, View, and Conntroller, representing three responsibilities in a Web application.
-
Model: Business logic for storing data and handling user requests
-
View: Submit data to the controller, display data in the model
-
Conntroller: Determine which module to submit the request to for processing based on the request made by the view, and update the display to which view to submit the processed results
The implementation of Servlet-based MVC mode is as follows:
-
Model: One or more JavaBean objects used to store data (entity models, created by JavaBean classes) and process business logic (business models, created by generic java classes)
-
View: Submit data to the controller and display data for the model. JSP pages display data mainly using HTML and JavaBean Tags
-
Controller: One or more Servlet objects that are controlled based on requests submitted by the view, which forwards the request to the javaBean of the Business Logic Department, and stores the processing results in the entity model javaBean, which is output to the view display.
Features and Advantages of MVC
-
Let's make it very easy to design clean and thin Web layers;
-
Inborn integration with Spring framework (such as IOC container, AOP, etc.);
-
Provides strong contractual programming support with conventions larger than configurations;
-
Simple unit testing at the Web tier;
-
Support flexible mapping of URL s to page controllers;
-
Very easy to integrate with other view technologies;
-
Very flexible data validation, formatting, and data binding mechanisms;
-
Simpler exception handling;
-
Support for static resources;
-
Support Restful style.
SpringMVC Workflow
-
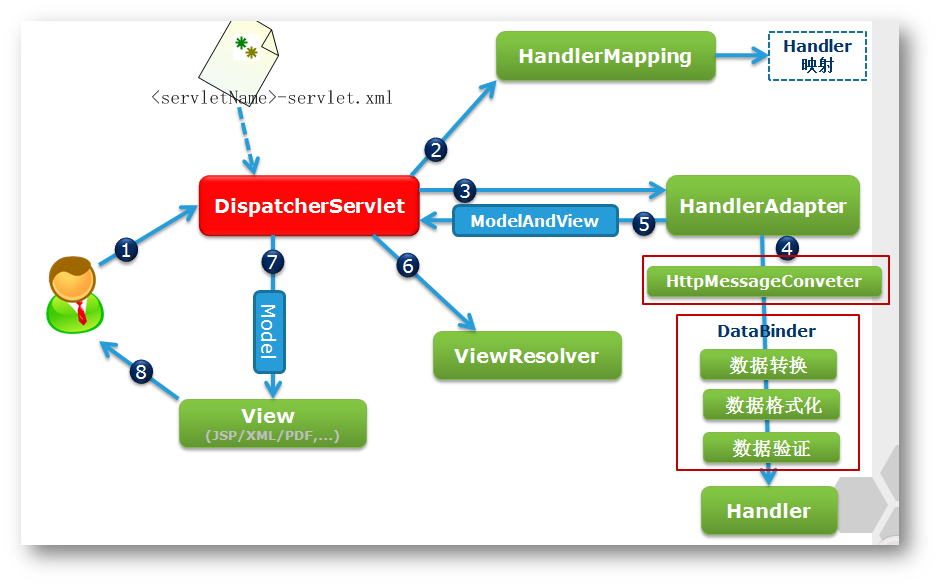
The user sends a request to the server, which is captured by the Spring Front End Control Servelt Dispatcher Servlet;
-
Dispatcher Servlet parses the request URL to get the request resource identifier (URI). Then, based on the URI, call HandlerMapping to get all the related objects (including the Handler object and the interceptor corresponding to the Handler object) of the Handler configuration, and finally return as the HandlerExecutionChain object;
-
Dispatcher Servlet chooses an appropriate Handler Adapter based on the handler obtained. (Note: If the Handler Adapter is successfully obtained, execution of the interceptor's preHandler(...) method will begin at this point)
-
Extract the model data from Request, populate the Handler input, and start executing the Handler. During the process of populating the Handler input, Spring will do some additional work for you, depending on your configuration:
- HttpMessageConveter: Converts a request message (such as Json, xml, etc.) into an object and an object into a specified response message
- Data conversion: Data conversion of request messages. For example, String conversion to Integer, Double, etc.
- Data Rooting: Data formatting of request messages. For example, converting strings to formatted numbers or formatted dates
- Data validation: Validate the validity of the data (length, format, etc.) and store the validation results in BindingResult or Error
-
After the Handler execution is completed, a ModelAndView object is returned to the Dispatcher Servlet;
-
Based on the returned ModelAndView, select a suitable ViewResolver (which must be a ViewResolver registered in the Spring container) to return to Dispatcher Servlet;
-
ViewResolver combines Model and View to render the view
-
Returns the rendering result to the client.
Spring MVC Workflow Description
- First the user sends a request to the front-end controller, which decides which page controller to process and delegates the request to based on the request information (such as the URL). This is the control logic part of the previous controller; steps 1 and 2 in the diagram;
- After the page controller receives the request, it performs functional processing. First, it collects and binds the request parameters to an object, which is called a command object in Spring Web MVC, validates it, and then delegates the command object to a business object for processing. Return a ModelAndView (model data and logical view name) after processing; Steps 3, 4, and 5 in the diagram;
- The front-end controller takes back control, then chooses the appropriate view to render based on the returned logical view name, and passes in the model data for view rendering. Steps 6 and 7 in the diagram;
- The front-end controller takes back control again and returns the response to the user, step 8 in the figure; This concludes the whole story.
### Spring MVC development steps
- Configuring Tomcat in your project
- Add Maven Dependent Libraries for Spring and Spring Web MVC
- Configure Dispatcher Servlet
- Configure applicationContext.xml
- Define Controller for Controller
- Define JSP
Maven Dependent Library
-
spring-core
<dependency>
			<groupId>org.springframework</groupId>
			<artifactId>spring-core</artifactId>
			<version>4.3.1.RELEASE</version>
		</dependency>
-
spring-context
<dependency>
			<groupId>org.springframework</groupId>
			<artifactId>spring-context</artifactId>
			<version>4.3.1.RELEASE</version>
		</dependency>
-
spring-context-support
<dependency>
			<groupId>org.springframework</groupId>
			<artifactId>spring-context-support</artifactId>
			<version>4.3.1.RELEASE</version>
		</dependency>
-
spring-aspects
<dependency>
			<groupId>org.springframework</groupId>
			<artifactId>spring-aspects</artifactId>
			<version>4.3.1.RELEASE</version>
		</dependency>
-
**spring-webmvc **
<dependency>
			<groupId>org.springframework</groupId>
			<artifactId>spring-webmvc</artifactId>
			<version>4.3.1.RELEASE</version>
		</dependency>
-
jstl
<dependency>
			<groupId>jstl</groupId>
			<artifactId>jstl</artifactId>
			<version>1.2</version>
		</dependency>
-
commons-logging
<dependency>
			<groupId>commons-logging</groupId>
			<artifactId>commons-logging</artifactId>
			<version>1.2</version>
		</dependency>
DispatcherServlet
-
DispatcherServlet
-
Front-end central controller for Spring MVC, where all requests are centralized for subsequent processing, such as selecting a mapped Controller for request processing
-
web.xml
<!DOCTYPE web-app PUBLIC "-//Sun Microsystems, Inc.//DTD Web Application 2.3//EN" "http://java.sun.com/dtd/web-app_2_3.dtd" >
<web-app>
    <display-name>Archetype Created Web Application</display-name>
<!--Why is it called MvcServlet,Because it's called here
        If this is called here XX ,that dispatcherServlet The configuration file is called xx-servlet.xml-->
    <servlet>
        <servlet-name>MvcServlet</servlet-name>
        <servlet-class>org.springframework.web.servlet.DispatcherServlet</servlet-class>
        <init-param>
            <param-name>contextConfigLocation</param-name>
            <param-value>classpath:applicationContext.xml</param-value>
        </init-param>
        <load-on-startup>1</load-on-startup>
    </servlet>
    <servlet-mapping>
    	<servlet-name>xx</servlet-name>
        <url-pattern>/</url-pattern>
    </servlet-mapping>
</web-app>
-
Resolve Random Code
-
web.xml
<filter>
	<filter-name>encode</filter-name>
    <filter-class>org.springfiramework.web.filter.CharacterEncodingFilter</filter-class>
    <init-param>
    	<param-name>encoding</param-name>
        <param-value>utf-8</param-value>
    </init-param>
</filter>
<filter-mapping>
	<filter-name>encode</filter-name>
    <url-pattern>/*</url-pattern>
</filter-mapping>
Configuring ViewResolver in applicationContext.xml
-
Configure ViewResolver
<bean
class="org.springframework.web.servlet.view.InternalResourceViewResolver">
	<property name="viewClass"
		value="org.springframework.web.servlet.view.JstlView"></property>
	<property name="prefix" value="/WEB-INF/jsp/"></property>
	<property name="suffix" value=".jsp"></property>
</bean>
InternalResourceViewResolver: Used to support Servlet, JSP view resolution;
viewClass: JstlView means that the JSP template page needs to use a JSTL tag library, and the classpath must contain the relevant jar package of jstl;
Prefix and suffix: Find the prefix and suffix (prefix [logical view name] suffix) of the view page, such as the incoming logical view name hello, which should be stored in "WEB-INF/jsp/hello.jsp";
Configure <mvc:annotation-driven>in applicationContext.cml
Zero Configuration
-
Use notes
<context:component-scan base-package="com.trkj"/>
<!--Automatic Scan Class-->
<mvc:annotation-driven/>
<!--Enable mvc annotation-->
<beans xmlns="http://www.springframework.org/schema/beans"
	xmlns:context="http://www.springframework.org/schema/context"
	xmlns:xsi="http://www.w3.org/2001/XMLSchema-instance" xmlns:aop="http://www.springframework.org/schema/aop"
	xmlns:tx="http://www.springframework.org/schema/tx" xmlns:p="http://www.springframework.org/schema/p"
	xmlns:jpa="http://www.springframework.org/schema/data/jpa" xmlns:mvc="http://www.springframework.org/schema/mvc"
	xsi:schemaLocation="
        http://www.springframework.org/schema/beans
        http://www.springframework.org/schema/beans/spring-beans-4.0.xsd
        http://www.springframework.org/schema/mvc
        http://www.springframework.org/schema/mvc/spring-mvc-4.0.xsd
        http://www.springframework.org/schema/tx
        http://www.springframework.org/schema/tx/spring-tx-4.0.xsd
        http://www.springframework.org/schema/aop
        http://www.springframework.org/schema/aop/spring-aop-4.0.xsd
        http://www.springframework.org/schema/data/jpa
        http://www.springframework.org/schema/data/jpa/spring-jpa.xsd
        http://www.springframework.org/schema/context
        http://www.springframework.org/schema/context/spring-context-4.0.xsd">
<!-- Turn on automatic scanning-->
	<context:component-scan base-package="com.trkj" />
<!--View Resolution-->
	<bean class="org.springframework.web.servlet.view.InternalResourceViewResolver">
		<property name="viewClass" value="org.springframework.web.servlet.view.JstlView"></property>
		<property name="prefix" value="/WEB-INF/jsp/"></property>
		<property name="suffix" value=".jsp"></property>
<!--        http://localhost:8080/con/index-->
<!--        What you get is index,In front of him /WEB-INF/jsp/ ,Followed by .jsp. This is spelled-->
<!--        /WEB-INF/jsp/index.jsp-->
	</bean>
<!--Open Notes-->
<mvc:annotation-driven />
</beans>
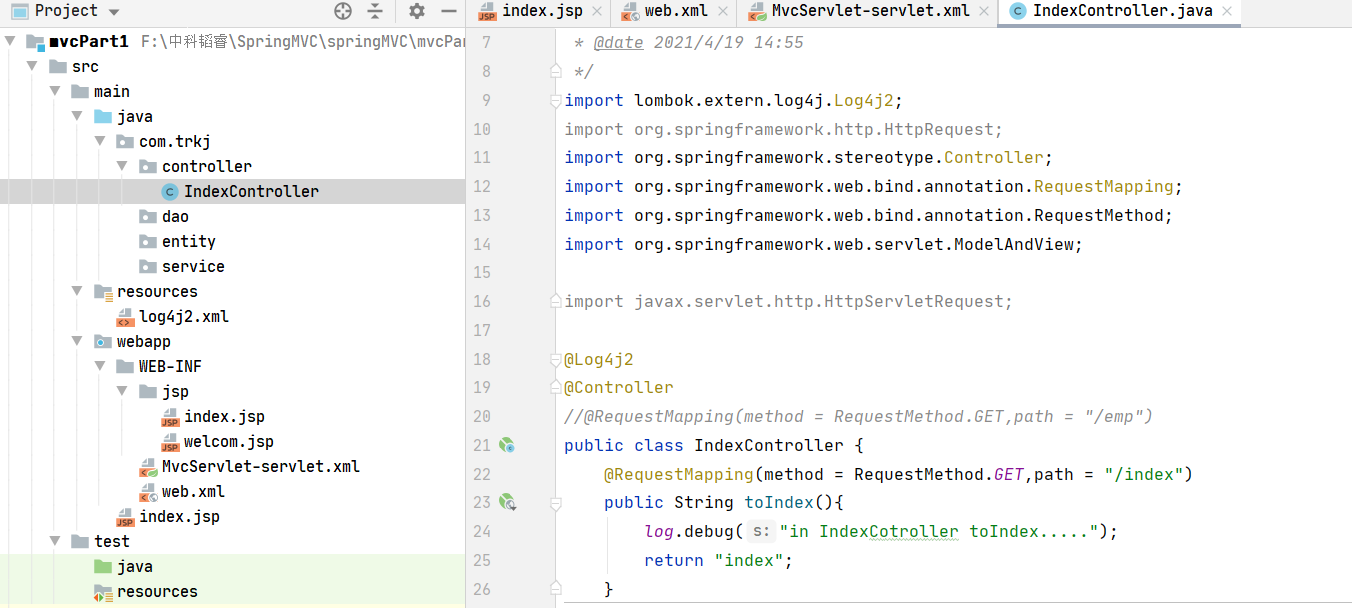
@Controller and @RequestMapping
@Controller
Declare Bean as Controller Controller
@RequestMapping
-
Define Controller
You can specify different access paths for different methods to implement a Controller that handles multiple different requests
-
method = RequestMethod.GET | POST
Define Request Type
Controller Annotation Implementation
Visit
http://localhost:8089/yf02702jpa_war_exploded/wa/hello
@Controller
@RequestMapping("/wa")//Narrow mapping, as a prefix to access paths, can be omitted
public class WorldController{
    @RequestMapping("/hello")//Access Path
	public ModelAndView hello(){
        System.out.println("Get into Controller");
        ModelAndView mv = new ModelAndView();
        mv.addObject("attr1","Zhuzhou");
        mv.addObject("attr2","Xu Xian");
        mv.setViewName("hello");
        return mv;
    }
}
Controller receives request parameters
- The parameter of the method is the request parameter
- Automatic Type Conversion
- By default, request and method parameter names are the same
- @RequestParam is used to specify the request parameter name
@Controller
@RequestMapping("/xuxiang")//Narrow mapping, prefix to access path, omitted
public class WorldController{
    @RequestMapping("/world")
    public ModelAndView world(@ReuqestParam("aa") int a, int b){
        System.out.println(a + "," + b);
        return null;
    }
}
Visit http://localhost:8089/SpringMVC3/wa/world?aa=10&b=20
Full folder
Spring MVC Integration Swagger
Overview of Swagger
Swagger is a canonical and complete framework for generating, describing, invoking, and visualizing RESTful-style Web services.
If there is no good development specification during the development process, code modification may occur, but the document is not updated in time, and the front end cannot get the latest interface in time.
Swagger is a good solution. It can generate Api interface documents dynamically, reduce communication costs, and promote efficient project development. Swagger2 is a specification and complete framework for generating, invoking, describing, and visualizing RESTful-style Web services. Its advantages are as follows:
	1. Timeliness: After interface changes, front-end and back-end developers can be informed promptly and accurately.
	2. Normality: and guarantees the specificity of an interface, such as its address, request mode, parameters, response format, and error information.
	3. Consistency: Interface information is consistent and there are no differences due to inconsistent versions of documents available to developers.
	4. Testability: Testing directly on the interface documentation to facilitate understanding the business.
Adding dependencies to pox.xml
Dependency
	<dependency>
      <groupId>io.springfox</groupId>
      <artifactId>springfox-swagger2</artifactId>
      <version>3.0.0</version>
	</dependency>
	<dependency>
      <groupId>io.springfox</groupId>
      <artifactId>springfox-swagger-ui</artifactId>
      <version>3.0.0</version>
    </dependency>
<!--because swagger Need jackson Support, so pom.xml Need to be introduced in jackson Associated Packages-->
    <dependency>
      <groupId>com.fasterxml.jackson.core</groupId>
      <artifactId>jackson-core</artifactId>
      <version>2.9.8</version>
    </dependency>
    <dependency>
      <groupId>com.fasterxml.jackson.core</groupId>
      <artifactId>jackson-annotations</artifactId>
      <version>2.9.8</version>
    </dependency>
    <dependency>
      <groupId>com.fasterxml.jackson.core</groupId>
      <artifactId>jackson-databind</artifactId>
      <version>2.9.8</version>
    </dependency>
Add swaggerConfig
Create a config directory under the directory and add SwaggerConfig.java
/**
 * @author XuLuBao
 * @version V1.0
 * @Package com.trkj.config
 * @date 2021/4/20 9:04
 */
@Configuration
@EnableSwagger2
public class SwaggerConfig extends WebMvcConfigurationSupport {
    @Bean
    public Docket createRestApi(){
        Docket docket = new Docket(DocumentationType.SWAGGER_2);
        //Call the apiInfo method to create an ApiInfo instance.
        //Inside is the information displayed in the document
        docket.apiInfo(apiInfo())
                .enable(true)
                .select()
        //Control instances under exposed paths
        //If an interface does not want to be exposed, you can use a comment
                .apis(RequestHandlerSelectors.basePackage("com.trkj.controller"))
                .paths(PathSelectors.any())
                .build();
        return docket;
    }

    private ApiInfo apiInfo() {
        return new ApiInfoBuilder()
                //Page Title
                    .title("SpringMVC swagger List")
                    .description("Controller Interface Testing")
                    .contact(new Contact("Contact us","http://www.baidu.com","2324962847@qq.com"))
                    .version("1.1")
                    .build();
    }
}
MvcServlet-servlet.xml Configuration
Add in the original MVCservlet-servlet.xml
<!--    swagger2 Static Resource Mapping-->
    <mvc:resources mapping="/swagger-ui/**" location="classpath:/META-INF/resources/webjars/springfox-swagger-ui"/>
    <mvc:resources mapping="/webjars/**" location="classpath:/META-INF/resources/webjars/"/>
Controller
-
Add Api to Class Name
@Api(value = "IndexController",tags = {"Module 1 example"}) -
Method
-
No parameters
@ApiOperation(value = "Jump to index Home page",notes="index",httpMethod = "GET")
-
Has Parameters
@ApiOperation(value="Register user, enter after success show Page, showing user information",notes = "register",httpMethod = "GET")
@ApiImplicitParams(value = {@ApiImplicitParam(name="name",value="Full name",required = true,dataType = "String"),
                                @ApiImplicitParam(name="sex",value = "Gender",required = true,dataType = "String"),
                                @ApiImplicitParam(name="age",value = "Age",required = true,dataType = "String")})
-
Test Swagger
Start the server with the following access addresses:
http://localhost:8080/mvcPart1/swagger-ui/index.html