start
cv version 2.4.9
Compiler vs2019
Reference book: introduction to OpenCV3 programming (Mao Xingyun)
to configure
Follow the online tutorial.
Problems encountered
Problems encountered running the test program:
OpenCV Error: Assertion failed (size.width>0 && size.height>0) in cv::imshow, file ........\opencv\modules\highgui\src\window.cpp, line 261
The reason is that the address of the picture is wrong. The picture should exist under the project.

Test procedure
#include <opencv2/opencv.hpp>
using namespace cv;
int main() {
	/*Mat img = imread("1.jpg");*///The picture here exists under the project (in the file)
	Mat img = imread("D:\\cv\\opencv_demo\\1.jpg");//Note that the address is\
	imshow("[Loaded picture]", img);
	waitKey(6000);
}
During operation, if XXX is not defined, it is better to delete cv and decompress it again
A few simple examples
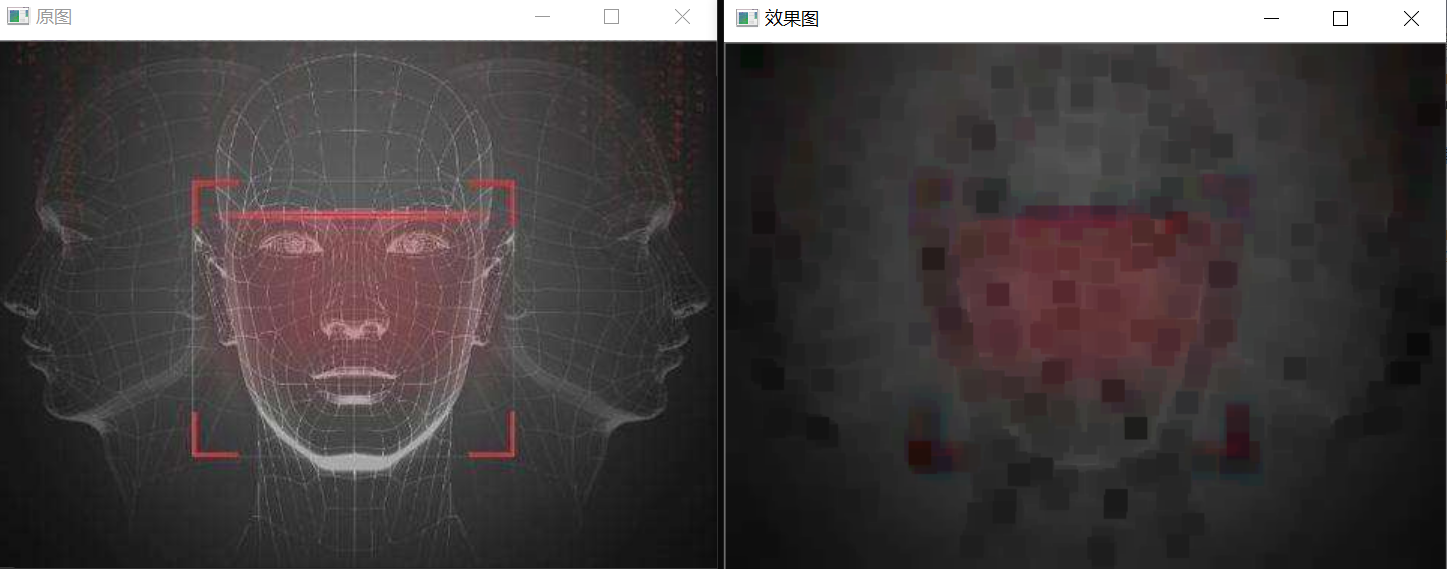
1. Image corrosion
Corrode the bright part of the picture with the dark part
#include <opencv2/opencv.hpp>
using namespace cv;
//Picture corrosion
int main() {
	Mat scrimage = imread("1.jpg");
	imshow("Original drawing", scrimage);
	//Corrosion operation
	Mat element = getStructuringElement(MORPH_RECT, Size(15, 15));
	Mat dstImage;
	erode(scrimage, dstImage, element);//Image etching
	imshow("design sketch", dstImage);
	waitKey();
	return 0;
}
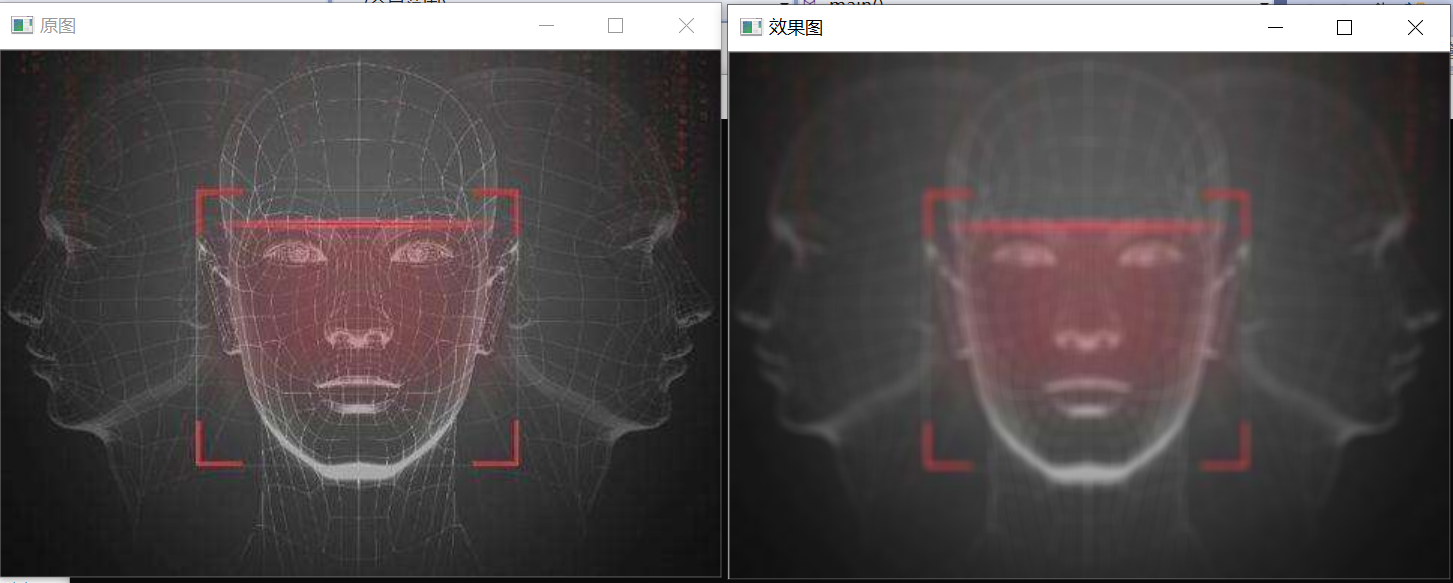
2. Image blur
#include <opencv2/opencv.hpp>
using namespace cv;
//Picture blur
int main() {
	Mat scrImage = imread("1.jpg");
	imshow("Original drawing", scrImage);
	Mat dstImage;
	blur(scrImage, dstImage, Size(7, 7));//Picture blur
	imshow("design sketch", dstImage);
	waitKey();
}
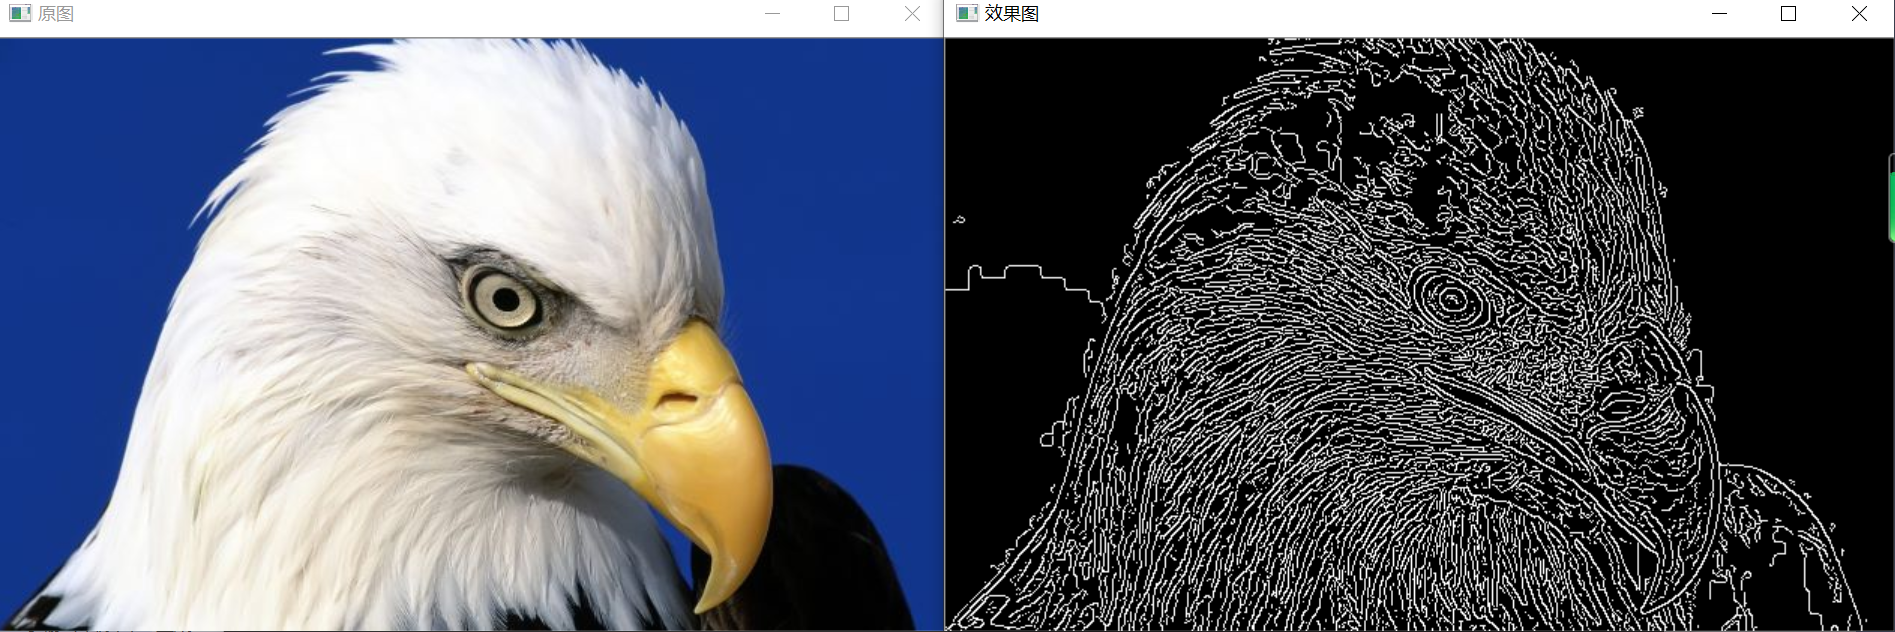
3. canny edge detection
Load the image, first turn it into a gray image, then blur the image for noise reduction, and use canny for edge detection
#include <opencv2/opencv.hpp>
using namespace cv;
//Image edge detection
int main() {
	Mat srcImage = imread("2.jpg");
	imshow("Original drawing", srcImage);
	Mat dstImage,edge,grayImage;
	dstImage.create(srcImage.size(), srcImage.type());//Set the same matrix as the original drawing
	cvtColor(srcImage, grayImage, CV_BGR2GRAY);//Generate graph on dstImage matrix
	blur(grayImage, edge, Size(3, 3));
	Canny(edge, edge, 3, 9, 3);
	imshow("design sketch", edge);
	waitKey();
	return 0;
}
4. Read and play video
#include <opencv2\opencv.hpp>
using namespace cv;
int main(){
    VideoCapture capture("1.avi");//Same storage location
    while(1){
        Mat frame;
        capture>>frame;
        imshow("Read video",frame);
        waitKey(30);
    }
    return 0;
}
5. Capture the camera image and canny process it
#include <opencv2/opencv.hpp>
using namespace cv;
int main() {
	VideoCapture capture(0);//Indicates the use of a camera
	Mat edges;
	while (1) {
		Mat frame;
		capture >> frame;
		cvtColor(frame, edges, CV_BGR2GRAY);
		blur(edges, edges, Size(7, 7));
		Canny(edges, edges, 0, 30, 3);
		imshow("result", edges);
		if (waitKey(30) >= 0) {
			break;
		}
	}
	return 0;
}
//Output current cv version
printf("\t edition OpenCV" CV_VERSION);
Preliminary of HighGUI graphical user interface
cv2 starts using Mat to access images for data types
Image loading, display and output
imread()
Reading images from files
Mat imread(const string& filename,int flags=1);
Const string & filename: fill in the pathname of the picture
int flags: load flag, which specifies the color type of the loaded image. The default value is 1, which can be ignored.
Meaning of each value:
- 1: Abolish
0: return after the image is converted to grayscale
1: Convert image to color and return (default)
2: If this value is taken and the depth of the loaded image is 16 or 32 bits, the image with the corresponding depth is returned; otherwise, it is converted to an 8-bit image and returned
If you do not want to use the above fixed assignment method, you can also:
Falls > 0 returns three channel color images
flags=0 returns a grayscale image (that is, gray)
Flags < 0 returns the loaded image containing the Alpha channel
imshow()
Displays an image in the specified window
void imshow(const string& winname,InputArray mat)
Const strings & winname: the identification name of the window to be displayed
InputArray mat: image to be displayed
If the window is CV_ WINDOW_ If the autosize (default) flag is created, the original size of the image is displayed, otherwise the image is scaled to fit the window.
Note: the InputArray type encountered here can be directly regarded as a Mat type
namedWindow()
Create a window
If you simply display images, you don't need this step. You can directly imread and imshow. However, if you need to use the window name before displaying the window, such as adding a slider, you need to create a window first and specify the window name explicitly
void namedWindow(const string& winname,int flags = WINDOW_AUTOSIZE)
winname: fill in the window name used as the identifier of the window
flags: the identification of the window. It can fill in the following values
WINDOW_ Normal: the user can change the size of the window (or CV_WINDOW_NORMAL)
WINDOW_AUTOSIZE: automatically resizes the window, which cannot be manually modified by the user (default)
WINDOW_OPENGL: the Open GUI is supported when the window is created
The above identification can also be written as CV in CV2_ identification
Note that the window created by namedwindow should use the same name as the subsequent imread display images
imwrite()
Output image to file
bool imwrite(const string& filename,InputArray img,const vector& params=vector())
filename: the name of the file to be written. With a suffix
img: image data of Mat data type
params: parameter code saved in a specific format. There are default values. Check if you want to fill in.
#include <opencv2/opencv.hpp>
#include <vector>
using namespace cv;
using namespace std;
void createAlphaMat(Mat& mat)
{
	for (int i = 0; i < mat.rows; ++i) {
		for (int j = 0; j < mat.cols; ++j) {
			Vec4b& rgba = mat.at<Vec4b>(i, j);
			rgba[0] = UCHAR_MAX;
			rgba[1] = saturate_cast<uchar>((float(mat.cols - j)) / ((float)mat.cols) * UCHAR_MAX);
			rgba[2] = saturate_cast<uchar>((float(mat.rows - i)) / ((float)mat.rows) * UCHAR_MAX);
			rgba[3] = saturate_cast<uchar>(0.5 * (rgba[1] + rgba[2]));
		}
	}
}
int main()
{
	//Create Mat with alpha channel
	Mat mat(480, 640, CV_8UC4);
	createAlphaMat(mat);

	vector<int>compression_params;
	compression_params.push_back(CV_IMWRITE_PNG_COMPRESSION);//CV2 version
	//compression_params.push_back(IMWRITE_PNG_COMPRESSION);//CV3 version
	compression_params.push_back(9);
//Here is the input setting of params parameter in imwrite

	//display picture
	try {
		imwrite("transparent Alpha Value diagram.png", mat, compression_params);
		imshow("Generated png chart", mat);
		fprintf(stdout, "PNG Of picture files alpha Data saved~\n It can be viewed in the project directory imwrite Function generated picture\n");
		waitKey(0);
	}
	catch (runtime_error& ex) {
		fprintf(stderr, "Image conversion to PNG Format error:%s\n", ex.what());
		return 1;
	}

	return 0;
}
The above code focuses on the use of imwrite, and there is no need to tangle with its drawing
CV_IMWRITE_PNG_COMPRESSION: png format picture
CV_IMWRITE_JPEG_QUALITY: jpeg format
Image blending
#include <opencv2/opencv.hpp>
#include <vector>
using namespace cv;
using namespace std;
int main()
{
	Mat image = imread("dota.jpg", 199);
	Mat logo = imread("1.jpg");
	namedWindow("Original drawing");
	imshow("Original drawing", image);
	Mat imageROI;
	//imageROI = image(Rect(800, 350, logo.cols, logo.rows));
	imageROI = image(Range(100, 100 + logo.rows), Range(200, 200 + logo.cols));
    //100 and 200 indicate the position of the starting point
	addWeighted(imageROI, 0.5, logo, 0.3, 0., imageROI);
	namedWindow("After modification");
	imshow("After modification", image);
	imwrite("generate.jpg", image);
	waitKey(0);
	return 0;
}
Paste the two pictures together. It should be noted that when using Range to calculate the position of the logo posted on the dota chart, the position should be calculated well, otherwise an error will occur
Slider creation
Exist attached to the window
createTrackbar()
Create a slider that can adjust values
int createTrackbar(const string& trackbarname,const string& winname,int value,int count,TrackbarCallback onChange=0,void userdata=0)**
trackbarname: the name of the track bar
winname: name of the window (corresponding to namedWindow)
value: pointer to an integer indicating the position of the slider
count: value indicating the maximum position that the slider can reach. The value of the minimum position of the slider is 0
onChange: the default is 0. Point to the callback function pointer, and the function will callback when the slider position changes. Function callback prototype must be
void XX(int,void *) form
userdata: the default is 0. The user returns the data of the callback function to process the track bar event. If value is a global variable, you do not need to control the function
#include <opencv2/opencv.hpp>
#include <vector>
using namespace cv;
using namespace std;
//The slider controls the blend image
#define WINDOW_NAME "linear blend example"
//The window name defined here can point to the same window in both function and main
const int g_nMaxAlphaValue = 100;//Maximum Alpha value
int g_nAlphaValueSlider;//Variables corresponding to the slider
double g_dAlphaValue;
double g_dBetaValue;

//Declare the variable that stores the image
Mat g_srcImage1;
Mat g_srcImage2;
Mat g_dstImage;

void on_Trackbar(int, void*)
{
	//Find the ratio of the current alpha value to the maximum value
	g_dAlphaValue = (double)g_nAlphaValueSlider / g_nMaxAlphaValue;
	//Then the beta value is 1 minus the alpha value
	g_dBetaValue = (1.0 - g_dAlphaValue);

	//Linear blending based on alpha and beta values
	addWeighted(g_srcImage1, g_dAlphaValue, g_srcImage2, g_dBetaValue, 0.0, g_dstImage);

	//Display renderings
	imshow(WINDOW_NAME, g_dstImage);
}
int main(int argc, char** argv)
{

	//Load image (the size of the two images should be the same)
	g_srcImage1 = imread("3.1.jpg");
	g_srcImage2 = imread("3.2.jpg");
	if (!g_srcImage1.data) { printf("Error reading the first picture. Please make sure there is one in the directory imread The function specifies that the picture does not exist~! \n"); return -1; }
	if (!g_srcImage2.data) { printf("Error reading the second picture. Please make sure there is one in the directory imread The function specifies that the picture does not exist~!\n"); return -1; }

	//Set the initial value of the slider to 70
	g_nAlphaValueSlider = 70;

	//Create form
	namedWindow(WINDOW_NAME, 1);

	//Create a slider control in the created form
	char TrackbarName[50];//The length of the description character before the slider
	sprintf(TrackbarName, "Transparent value %d", g_nMaxAlphaValue);

	createTrackbar(TrackbarName, WINDOW_NAME, &g_nAlphaValueSlider, g_nMaxAlphaValue, on_Trackbar);
	//The third parameter value here is a global variable, so the last parameter can be omitted. on_Trackbar is a callback function

	//The result is displayed in the callback function
	on_Trackbar(g_nAlphaValueSlider, 0);///Displays the value of the drag. Just opened as default

	//press any key to exit
	waitKey(0);

	return 0;
}

You can change the transparency of the picture through the slider above


getTrackbarPos()
Gets the position of the current track bar and returns.
Int gettrackbarpos (const string & trackname, const string & winname): trackname is the name of the track bar, and winname is the name of the parent window of the track bar
Mouse operation
void setMouseCallback(const string& winname,MouseCallback onMouse,void* userdata = 0)
winname: window name
onmouse: Specifies the function pointer to be called every time the mouse time occurs in the window
userdata: a user-defined parameter passed to the callback function. The default value is 0
#include <opencv2/opencv.hpp>
using namespace cv;

#define WINDOW_NAME "[program window]" / / macro defined for window title


//-----------------------------------[global function declaration]------------------------------------
//		Description: Declaration of global functions
//------------------------------------------------------------------------------------------------
void on_MouseHandle(int event, int x, int y, int flags, void* param);
void DrawRectangle(cv::Mat& img, cv::Rect box);

//-----------------------------------[global variable declaration]-----------------------------------
//		Description: Declaration of global variables
//-----------------------------------------------------------------------------------------------
Rect g_rectangle;
bool g_bDrawingBox = false;//Do you want to draw
RNG g_rng(12345);

//-----------------------------------[main() function]--------------------------------------------
//		Description: the entry function of the console application. Our program starts from here
//-------------------------------------------------------------------------------------------------
int main(int argc, char** argv)
{
	//[1] Prepare parameters
	g_rectangle = Rect(-1, -1, 0, 0);
	Mat srcImage(600, 800, CV_8UC3), tempImage;
	srcImage.copyTo(tempImage);
	g_rectangle = Rect(-1, -1, 0, 0);
	srcImage = Scalar::all(0);

	//[2] Set mouse operation callback function
	namedWindow(WINDOW_NAME);
	setMouseCallback(WINDOW_NAME, on_MouseHandle, (void*)&srcImage);

	//[3] The main loop of the program draws when the identifier for drawing is true
	while (1)
	{
		srcImage.copyTo(tempImage);//Copy source map to temporary variable
		if (g_bDrawingBox) DrawRectangle(tempImage, g_rectangle);//When the identifier for drawing is true, drawing is performed
		imshow(WINDOW_NAME, tempImage);
		if (waitKey(10) == 27) break;//Press ESC to exit the program
	}
	return 0;
}

//--------------------------------[on_MouseHandle() function]-----------------------------
//		Description: the mouse callback function performs different operations according to different mouse events
//-----------------------------------------------------------------------------------------------
void on_MouseHandle(int event, int x, int y, int flags, void* param)
{

	Mat& image = *(cv::Mat*) param;
	switch (event)
	{
		//Mouse movement message
	case EVENT_MOUSEMOVE:
	{
		if (g_bDrawingBox)//If the identifier of whether to draw is true, record the length and width into the RECT type variable
		{
			g_rectangle.width = x - g_rectangle.x;
			g_rectangle.height = y - g_rectangle.y;
		}
	}
	break;
	//Left press message
	case EVENT_LBUTTONDOWN:
	{
		g_bDrawingBox = true;
		g_rectangle = Rect(x, y, 0, 0);//Record start point
	}
	break;
	//Left click to lift the message
	case EVENT_LBUTTONUP:
	{
		g_bDrawingBox = false;//Set identifier to false
		//Treatment of width and height less than 0
		if (g_rectangle.width < 0)
		{
			g_rectangle.x += g_rectangle.width;
			g_rectangle.width *= -1;
		}

		if (g_rectangle.height < 0)
		{
			g_rectangle.y += g_rectangle.height;
			g_rectangle.height *= -1;
		}
		//Call function to draw
		DrawRectangle(image, g_rectangle);
	}
	break;
	}
}
//-----------------------------------[DrawRectangle() function]------------------------------
//		Description: Custom rectangle drawing function
//-----------------------------------------------------------------------------------------------
void DrawRectangle(cv::Mat& img, cv::Rect box)
{
	cv::rectangle(img, box.tl(), box.br(), cv::Scalar(g_rng.uniform(0, 255), g_rng.uniform(0, 255), g_rng.uniform(0, 255)));//Random color
}
Data structure and basic drawing
Pictures exist in the form of pixel matrix in the device
Mat
Mat is a class that consists of two data parts: a matrix header and a pointer to the matrix that stores all pixel values.
Automatically open up space without manually releasing space
When using image processing functions, a large number of pictures are passed in the functions. When transferring a large number of pictures, the copying of pictures will reduce the running speed of the program. Therefore, the reference counting mechanism is introduced.
Reference counting mechanism: each Mat object has its own header, but shares the same matrix. This is achieved by having the matrix pointer point to the same address. The copy constructor copies only the header and matrix pointer, not the matrix.
Mat A,C;
A = imread("1.jpg");
c = A;//Here, both C and A point to the same matrix. Any modification will lead to the change of the matrix
When a matrix belongs to more than one object, it is cleaned up by the last object
If you want to copy the matrix itself, you can use the functions clone() or copyTo()
Mat F = A.clone();
Mat C;
A.copyTo(C);//A is the copied matrix
++++++++++++++++++++++++++++++++++++++++++++
Storing pixel values requires specifying color space and data type.
There are many color systems:
- RGB: most common
- HSV and HLS: color is divided into hue, saturation, brightness and lightness. Insensitive to light conditions
- YCrCb: commonly used in JPEG format
How to store a primary color determines the precision that can be controlled in its domain. The minimum is char, or signed or unsigned. Three chars in RGB can represent 16 million possible colors. But if you use float or double, you can give more precise color resolution.
Increasing the color size will also increase the memory space occupied by the image
Create objects explicitly
Mat is not only an image container class, but also a general matrix class.
- Using the Mat() constructor
Mat (number of rows, columns, CV #[][] [digits] [signed or not] [type prefix] [number of channels])
Mat M(2,2,CV_8UC3,Scalar(0,0,255));
cout<<M<<endl;
//The operator < < is only valid for two-dimensional matrices
//Scalar is a vector of short type, specifying the initial value

//Construct multidimensional
int sz[3] = {2,2,2};
Mat L(3,sz,CV_8UC,Scalar::all(0));

//Create a header using a pointer
IPlImage* img = cvLoadImage("1.jpg",1);
Mat mtx(img);

//create function
M.create(4,4,CV_8UC(2));//This method can not set the initial value for the matrix, but reopen the memory for the matrix data when changing the size

Mat F = Mat::eye(4,4,CV_64F);

Mat C = (Mat_<double>(3,3) << 0,-1,0,-1,5,-1,2,2,2);

Mat RowClone = C.row(1).clone();
Common data structures
Point class
It represents the point in the two-dimensional coordinate system, that is, it is represented by X and y
Point point;
point.x = 1;
point.y = 2;
//perhaps
Point point = Point(1,2);
Scalar class
It is used to transfer pixel values. It can represent values with 4 pixels, but it can also be written with only 3 pixels.
Such as Scalar(a,b,c)
In RGB, a is the blue component, b is green, and c is red
Size class
Represent size
Rect class
Representation matrix.
Its member variables are x, y, width and height, indicating the coordinates of the upper left corner and the width and height of the rectangle
Size returns size; area() returns the area; contains(Point) to see whether the point is in the rectangle; inside(Rect function determines whether the rectangle is inside the rectangle);
tl() returns the upper left coordinate; br return the coordinates of the lower right corner
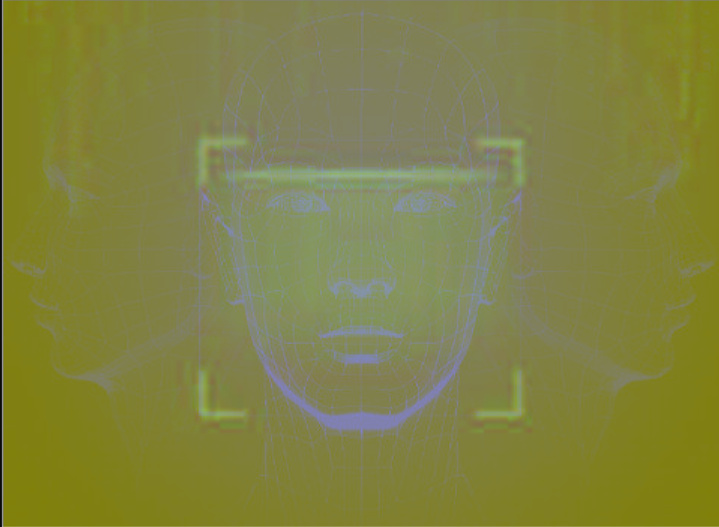
Color space conversion
Use the cvtColor() function
Cvtcolor (input image, output image, color space conversion identifier, number of channels of target object (if 0, it indicates the number of channels of target image and source image))
The default image channel storage order in Opencv is BGR
#include<iostream>
#include<opencv2/opencv.hpp>

using namespace cv;
using namespace std;

int main()
{
	Mat image1 = imread("1.1.jpg"),dstImage;  //Read the image;
	if (image1.empty())
	{
		cout << "Read error" << endl;
		return -1;
	}
	cvtColor(image1, dstImage, COLOR_BGR2Lab);
	imshow("xiaog", dstImage);
	waitKey(0);
	return 0;
}
Basic graphics drawing
Before drawing, the program source file will start with:
define WINDOW_WIDTH 600 / / macro defining window size
#include <opencv2/core/core.hpp>
#include <opencv2/highgui/highgui.hpp>
using namespace cv;

//OpenCV3 needs to add header files:
#include <opencv2/imgproc/imgproc.hpp>
//-----------------------------------[macro definition]--------------------------------------------
//		Description: defines some auxiliary macros
//------------------------------------------------------------------------------------------------
#define WINDOW_NAME1 "[draw Figure 1]" / / macro defined for window title
#define WINDOW_NAME2 "[draw Figure 2]" / / macro defined for window title
#define WINDOW_WIDTH 600 / / macro defining window size

void DrawEllipse(Mat img, double angle);//Draw ellipse
void DrawFilledCircle(Mat img, Point center);//Draw circle
void DrawPolygon(Mat img);//draw a polygon
void DrawLine(Mat img, Point start, Point end);//Draw line segments

int main(void)
{

	// Create a blank Mat image
	Mat atomImage = Mat::zeros(WINDOW_WIDTH, WINDOW_WIDTH, CV_8UC3);
	Mat rookImage = Mat::zeros(WINDOW_WIDTH, WINDOW_WIDTH, CV_8UC3);

	// ---------------------<1> Drawing example diagrams of atoms in Chemistry------------------------

	//[1.1] draw the ellipse first
	DrawEllipse(atomImage, 90);//Draw an ellipse, 90 indicates the rotation reading of the ellipse
	DrawEllipse(atomImage, 0);
	DrawEllipse(atomImage, 45);
	DrawEllipse(atomImage, -45);

	//[1.2] draw the center of the circle again
	DrawFilledCircle(atomImage, Point(WINDOW_WIDTH / 2, WINDOW_WIDTH / 2));

	// ----------------------------<2> Draw combination diagram-----------------------------
	//[2.1] draw the ellipse first
	DrawPolygon(rookImage);

	// [2.2] draw rectangle
	rectangle(rookImage,
		Point(0, 7 * WINDOW_WIDTH / 8),
		Point(WINDOW_WIDTH, WINDOW_WIDTH),
		Scalar(0, 255, 255),
		-1,
		8);

	// [2.3] draw some line segments
	DrawLine(rookImage, Point(0, 15 * WINDOW_WIDTH / 16), Point(WINDOW_WIDTH, 15 * WINDOW_WIDTH / 16));
	DrawLine(rookImage, Point(WINDOW_WIDTH / 4, 7 * WINDOW_WIDTH / 8), Point(WINDOW_WIDTH / 4, WINDOW_WIDTH));
	DrawLine(rookImage, Point(WINDOW_WIDTH / 2, 7 * WINDOW_WIDTH / 8), Point(WINDOW_WIDTH / 2, WINDOW_WIDTH));
	DrawLine(rookImage, Point(3 * WINDOW_WIDTH / 4, 7 * WINDOW_WIDTH / 8), Point(3 * WINDOW_WIDTH / 4, WINDOW_WIDTH));

	// ---------------------------<3> Displays the drawn image------------------------
	imshow(WINDOW_NAME1, atomImage);
	moveWindow(WINDOW_NAME1, 0, 200);
	imshow(WINDOW_NAME2, rookImage);
	moveWindow(WINDOW_NAME2, WINDOW_WIDTH, 200);

	waitKey(0);
	return(0);
}


//-------------------------------[DrawEllipse() function]--------------------------------
//		Description: custom drawing function, which can draw ellipses with different angles and the same size
//-----------------------------------------------------------------------------------------
void DrawEllipse(Mat img, double angle)
{
	int thickness = 2;
	int lineType = 8;

	ellipse(img,
		Point(WINDOW_WIDTH / 2, WINDOW_WIDTH / 2),
		Size(WINDOW_WIDTH / 4, WINDOW_WIDTH / 16),
		angle,
		0,
		360,
		Scalar(255, 129, 0),
		thickness,
		lineType);
}


//-----------------------------------[DrawFilledCircle() function]---------------------------
//		Description: custom drawing function, which realizes the drawing of solid circles
//-----------------------------------------------------------------------------------------
void DrawFilledCircle(Mat img, Point center)
{
	int thickness = -1;
	int lineType = 8;

	circle(img,
		center,
		WINDOW_WIDTH / 32,
		Scalar(0, 0, 255),
		thickness,
		lineType);
}


//-----------------------------------[DrawPolygon() function]--------------------------
//		Description: custom drawing function to realize the drawing of concave polygon
//--------------------------------------------------------------------------------------
void DrawPolygon(Mat img)
{
	int lineType = 8;

	//Create some points
	Point rookPoints[1][20];
	rookPoints[0][0] = Point(WINDOW_WIDTH / 4, 7 * WINDOW_WIDTH / 8);
	rookPoints[0][1] = Point(3 * WINDOW_WIDTH / 4, 7 * WINDOW_WIDTH / 8);
	rookPoints[0][2] = Point(3 * WINDOW_WIDTH / 4, 13 * WINDOW_WIDTH / 16);
	rookPoints[0][3] = Point(11 * WINDOW_WIDTH / 16, 13 * WINDOW_WIDTH / 16);
	rookPoints[0][4] = Point(19 * WINDOW_WIDTH / 32, 3 * WINDOW_WIDTH / 8);
	rookPoints[0][5] = Point(3 * WINDOW_WIDTH / 4, 3 * WINDOW_WIDTH / 8);
	rookPoints[0][6] = Point(3 * WINDOW_WIDTH / 4, WINDOW_WIDTH / 8);
	rookPoints[0][7] = Point(26 * WINDOW_WIDTH / 40, WINDOW_WIDTH / 8);
	rookPoints[0][8] = Point(26 * WINDOW_WIDTH / 40, WINDOW_WIDTH / 4);
	rookPoints[0][9] = Point(22 * WINDOW_WIDTH / 40, WINDOW_WIDTH / 4);
	rookPoints[0][10] = Point(22 * WINDOW_WIDTH / 40, WINDOW_WIDTH / 8);
	rookPoints[0][11] = Point(18 * WINDOW_WIDTH / 40, WINDOW_WIDTH / 8);
	rookPoints[0][12] = Point(18 * WINDOW_WIDTH / 40, WINDOW_WIDTH / 4);
	rookPoints[0][13] = Point(14 * WINDOW_WIDTH / 40, WINDOW_WIDTH / 4);
	rookPoints[0][14] = Point(14 * WINDOW_WIDTH / 40, WINDOW_WIDTH / 8);
	rookPoints[0][15] = Point(WINDOW_WIDTH / 4, WINDOW_WIDTH / 8);
	rookPoints[0][16] = Point(WINDOW_WIDTH / 4, 3 * WINDOW_WIDTH / 8);
	rookPoints[0][17] = Point(13 * WINDOW_WIDTH / 32, 3 * WINDOW_WIDTH / 8);
	rookPoints[0][18] = Point(5 * WINDOW_WIDTH / 16, 13 * WINDOW_WIDTH / 16);
	rookPoints[0][19] = Point(WINDOW_WIDTH / 4, 13 * WINDOW_WIDTH / 16);

	const Point* ppt[1] = { rookPoints[0] };
	int npt[] = { 20 };

	fillPoly(img,
		ppt,
		npt,
		1,
		Scalar(255, 255, 255),
		lineType);
}


//-----------------------------------[DrawLine() function]--------------------------
//		Description: custom drawing function to realize the drawing of lines
//---------------------------------------------------------------------------------
void DrawLine(Mat img, Point start, Point end)
{
	int thickness = 2;
	int lineType = 8;
	line(img,
		start,
		end,
		Scalar(0, 0, 0),
		thickness,
		lineType);
}