MotionLayout is a new class introduced in ConstrainLayout 2.0 library to help Android developers associate gestures with component animation. The next article will show you how to add and use Motion Layout in your application.
Chapter 1 will introduce the foundation of Motion Layout:
- What is Motion Layout?
- Add ConstrainLayout 2.0 and MotionLayout to the project
- How to use Motion Layout
- ConstraintSets
- MotionScene
- Example 1: Associate existing layout files
- Processing OnSwipe
- Example 2: Self-contained Motion Scene
- MotionLayout attribute
- summary
You can see the source code of the sample here. ConstraintLayout examples github repositor
What is Motion Layout?
The Android framework already provides the following ways to use animation in applications:
- Animated Vector Drawable
- Property Animation framework
- LayoutTransition animations
- Layout transitions with TransitionManager
- CoordinatorLayout
This section describes the differences between Motion Layout and these animations.
Motion Layout is like its name. First, it is a layout that can place components. Secondly, it is a subclass of ConstrainLayout, with rich built-in functions.
MotionLayout was created to reduce the difficulty between layout transition animation and complex gesture processing. You can think of it as having the functions of comprehensive attribute animation, Transition Manager, and Coordinator Layout.
It has integrated attribute animation, Transition Manager, and Coordinator Layout functions
With Motion Layout, you can describe the transition animation of a layout through two layout files like Transition Manager, but you can use any attributes (not just layout attributes). It also supports traceable transitions, like Coordinator Layout (which can respond to transition animation instantly by sliding). It supports custom transition animation by sliding and key frames.
Motion Layout is completely declarative
Another key difference of Motion Layout is that it is completely declarative. A complex transition animation can be described with only an XML file (if you describe the animation through code, the attributes provided by the system can fully meet the requirements).
Motion Layout Tool
We believe that this declarative specification will simplify transitional animation and help provide better graphical tools for Android Studio. We are actively developing such a tool, which is not yet available. )
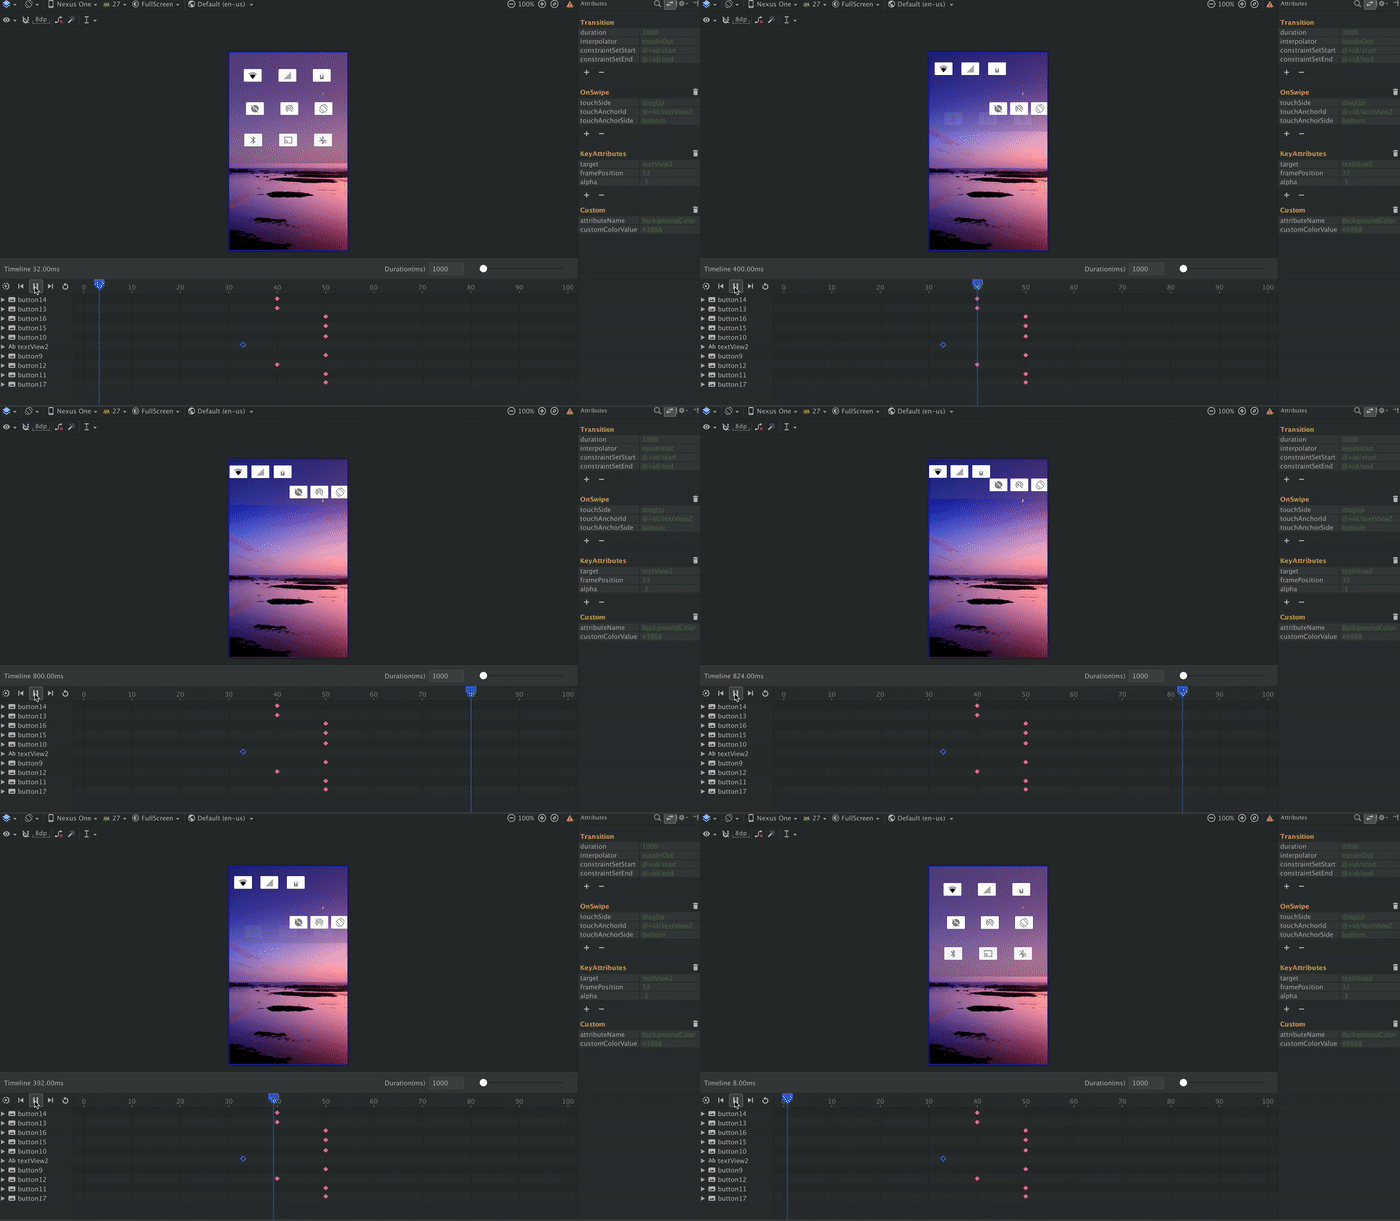
Finally, as part of ConstrainLayout 2.0, it supports Android API at a minimum of 14, and 99.8% of devices are available.
limit
Unlike Transition Manager, Motion Layout can only be used for its direct subcomponents.
When to use Motion Layout
We imagine using MotionLayout scenarios: when you need to move, zoom, or animate actual UI components (button s, Title bars, etc.) to provide interaction with users.
Add ConstrainLayout 2.0 and MotionLayout to the project
Just add the following code to the Gradle file
dependencies {
    implementation 'com.android.support.constraint:constraint-layout:2.0.0-beta1'
}
How to use Motion Layout
MotionLayout is a subclass of ConstrainLayout, so you can think of it as a common layout. Converting an existing ConstrainLayout layout to a MotionLayout layout requires only the following class names:
<android.support.constraint.ConstraintLayout .../>
replace with
<android.support.constraint.motion.MotionLayout .../>
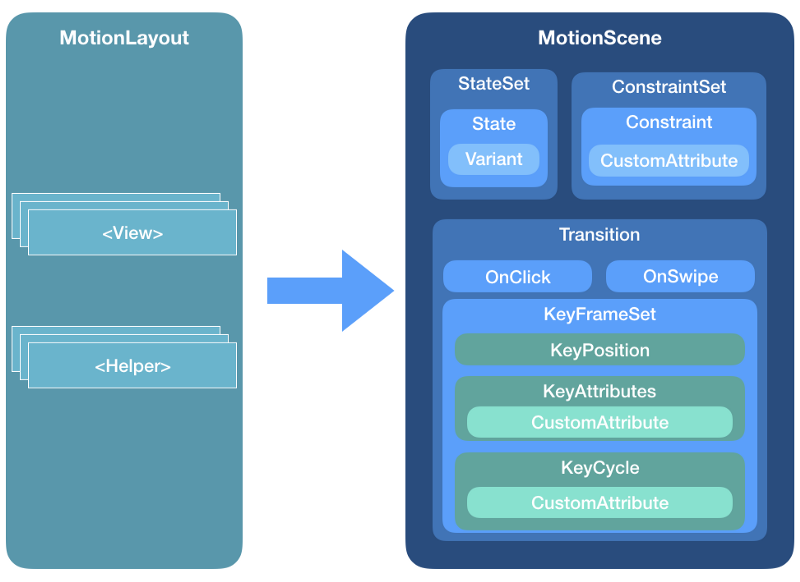
The main difference between ConstrainLayout and Motion Layout is that Motion Layout does not have to include the actual description information in the XML layout file. MotionLayout usually stores this information in a separate XML file (MotionScene) and associates it with the layout file. In this way, the layout file only needs to contain View and their attributes, not location information and animation.
ConstraintSets
Usually ConstrainSets will contain all the location information rules in the layout file; you can use multiple ConstrainSets, and you can decide which rules to apply to the layout. When applied, these View s will not be rebuilt, but will only change their location and size. With Transition Manager, it's easy to create ConstrainLayout animations.
Motion Layout actually comes from this idea and adds richer functionality.
MotionScene
The MotionLayout specification is stored in a separate MotionScene XML file, which is stored in the res / xml directory.
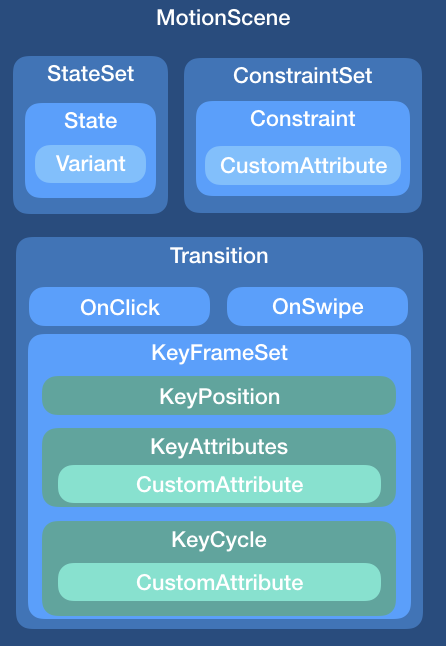
A MotionScene file can contain the content needed for animation:
- Containing Constraint Sets
- Transition between these Constraint Sets
- Key frame, event processing
For example, you can drag a View from one side of the screen to the other:
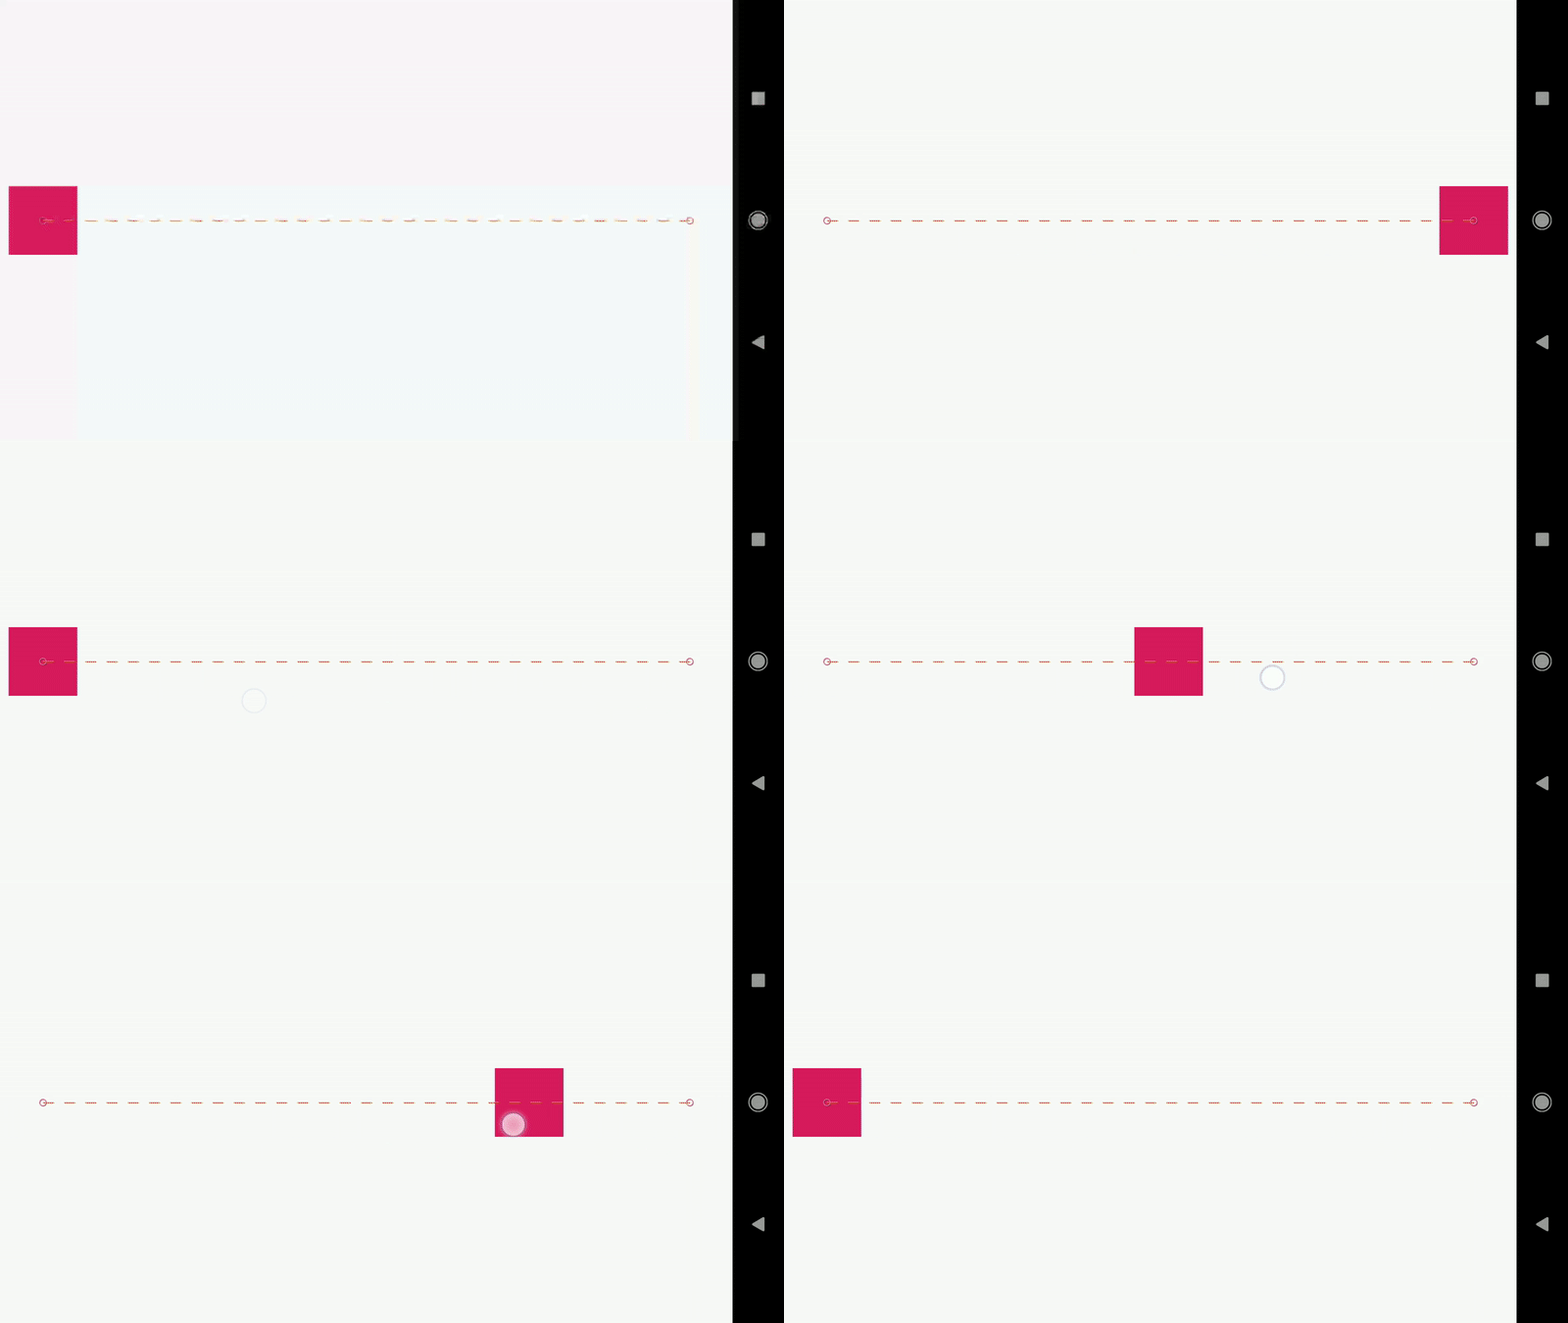
Example 1: Associated layout file
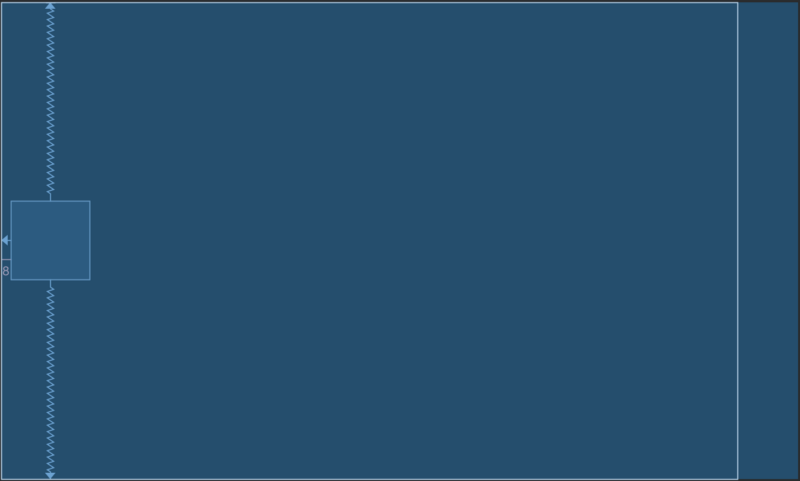
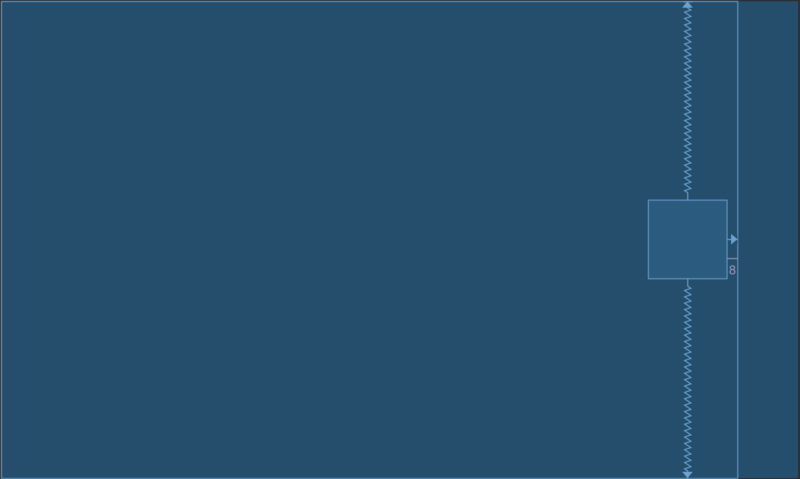
You need to use ConstrainLayout to create two ConstrainSet s. One is the initial position (the component is on the left side of the screen) and the other is the end position (the component is on the right side of the screen).
Initial position:
<?xml version="1.0" encoding="utf-8"?>
<android.support.constraint.ConstraintLayout xmlns:android="http://schemas.android.com/apk/res/android"
    xmlns:tools="http://schemas.android.com/tools"
    xmlns:app="http://schemas.android.com/apk/res-auto"
    android:layout_width="match_parent"
    android:layout_height="match_parent">

    <View
        android:id="@+id/button"
        android:background="@color/colorAccent"
        android:layout_width="64dp"
        android:layout_height="64dp"
        android:layout_marginStart="8dp"
        android:text="Button"
        app:layout_constraintBottom_toBottomOf="parent"
        app:layout_constraintStart_toStartOf="parent"
        app:layout_constraintTop_toTopOf="parent" />

</android.support.constraint.ConstraintLayout>
End position:
<?xml version="1.0" encoding="utf-8"?>
<android.support.constraint.ConstraintLayout xmlns:android="http://schemas.android.com/apk/res/android"
    xmlns:tools="http://schemas.android.com/tools"
    xmlns:app="http://schemas.android.com/apk/res-auto"
    android:layout_width="match_parent"
    android:layout_height="match_parent">

    <View
        android:id="@+id/button"
        android:background="@color/colorAccent"
        android:layout_width="64dp"
        android:layout_height="64dp"
        android:layout_marginEnd="8dp"
        android:text="Button"
        app:layout_constraintBottom_toBottomOf="parent"
        app:layout_constraintEnd_toEndOf="parent"
        app:layout_constraintTop_toTopOf="parent" />

</android.support.constraint.ConstraintLayout>
Using these two layout files, you can initialize two ConstrainSet s and use them (there will be a smooth transition of animation if you use Transition Manager). One problem with this approach is that once the transformation begins, it will not end, and you can't tell the system that the transformation will be in a certain place (you can't control the transformation through input events).
Motion Layout solves these problems. You can do the same thing with Motion Layout and reuse existing layout files to initialize the state. First you need to create a MotionLayout file for the component( motion_01_basic.xml ):
<?xml version="1.0" encoding="utf-8"?>
<androidx.constraintlayout.motion.widget.MotionLayout
    xmlns:android="http://schemas.android.com/apk/res/android"
    xmlns:app="http://schemas.android.com/apk/res-auto"
    xmlns:tools="http://schemas.android.com/tools"
    android:id="@+id/motionLayout"
    android:layout_width="match_parent"
    android:layout_height="match_parent"
    app:layoutDescription="@xml/scene_01"
    tools:showPaths="true">

    <View
        android:id="@+id/button"
        android:layout_width="64dp"
        android:layout_height="64dp"
        android:background="@color/colorAccent"
        android:text="Button"
        tools:layout_editor_absoluteX="147dp"
        tools:layout_editor_absoluteY="230dp" />

</androidx.constraintlayout.motion.widget.MotionLayout>
A MotionScene file scene_01 is referenced in the layout file
<?xml version="1.0" encoding="utf-8"?>
<MotionScene
    xmlns:motion="http://schemas.android.com/apk/res-auto">

    <Transition
        motion:constraintSetStart="@layout/motion_01_cl_start"
        motion:constraintSetEnd="@layout/motion_01_cl_end"
        motion:duration="1000">
        <OnSwipe
            motion:touchAnchorId="@+id/button"
            motion:touchAnchorSide="right"
            motion:dragDirection="dragRight" />
    </Transition>

</MotionScene>
scene_01 sets the default transformation, the start and end ConstrainSet (motion_01_cl_start and motion_01_cl_end), and OnSwipe processing for the transformation.
OnSwipe handler
In scene_01.xml file, we set up OnSwipe processor in Transition. The processor controls the conversion by matching the user's input events.
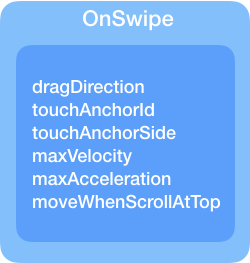
There are some attributes you need to understand:
Touch AnchorId: Objects to be tracked
Touch AnchorSide: Track the right / left / top / bottom side of your finger
dragDirection: Tracking the direction of finger movement (dragRight/dragLeft/dragUp/dragDown will determine the change of progress value by 0-1)
Example 2: Self-contained Motion Scene
Example 1 shows how to quickly create a Motion Layout, and ultimately use the existing layout file. MotionLayout also supports defining ConstraintSet s directly in the MotionScene file. This has the following advantages:
- A file can contain multiple ConstraintSet s
- In addition to existing functions, other attributes and custom attributes can also be handled.
- For the future: The upcoming Android Studio Motion Editor may only support self-contained MotionScene files
Interpolation attributes
The attributes that ConstraintSet elements in MotionScene files can use include not only common layout attributes, but also attributes below location and margin.
alphavisibilityelevationrotation,rotation[X/Y]translation[X/Y/Z]scaleX/Y
Let's recreate a new self-contained Motion Scene file for Example 1. The MotionLayout file does not differ from the new scene_02.xml reference in Example 1:
<?xml version="1.0" encoding="utf-8"?>
<android.support.constraint.motion.MotionLayout
    xmlns:android="http://schemas.android.com/apk/res/android"
    xmlns:tools="http://schemas.android.com/tools"
    xmlns:app="http://schemas.android.com/apk/res-auto"
    android:id="@+id/motionLayout"
    app:layoutDescription="@xml/scene_02"
    android:layout_width="match_parent"
    android:layout_height="match_parent">

    <View
        android:id="@+id/button"
        android:background="@color/colorAccent"
        android:layout_width="64dp"
        android:layout_height="64dp"
        android:text="Button" />

</android.support.constraint.motion.MotionLayout>
There are obvious differences in MotionScene files. Transition settings are the same, but we define Start and End directly in XML files. The main difference from the general layout file is that we don't specify specific components, but write qualified attributes in the Constrain element.
<?xml version="1.0" encoding="utf-8"?>
<MotionScene xmlns:android="http://schemas.android.com/apk/res/android"
    xmlns:motion="http://schemas.android.com/apk/res-auto">

    <Transition
        motion:constraintSetStart="@+id/start"
        motion:constraintSetEnd="@+id/end"
        motion:duration="1000">
        <OnSwipe
            motion:touchAnchorId="@+id/button"
            motion:touchAnchorSide="right"
            motion:dragDirection="dragRight" />
    </Transition>

    <ConstraintSet android:id="@+id/start">
        <Constraint
            android:id="@+id/button"
            android:layout_width="64dp"
            android:layout_height="64dp"
            android:layout_marginStart="8dp"
            motion:layout_constraintBottom_toBottomOf="parent"
            motion:layout_constraintStart_toStartOf="parent"
            motion:layout_constraintTop_toTopOf="parent" />
    </ConstraintSet>

    <ConstraintSet android:id="@+id/end">
        <Constraint
            android:id="@+id/button"
            android:layout_width="64dp"
            android:layout_height="64dp"
            android:layout_marginEnd="8dp"
            motion:layout_constraintBottom_toBottomOf="parent"
            motion:layout_constraintEnd_toEndOf="parent"
            motion:layout_constraintTop_toTopOf="parent" />
    </ConstraintSet>

</MotionScene>
ConstraintSet
Just understand how ConstrainSet works, and the new attributes will be replaced with the associated components. Just include all the attributes that need to be replaced in Constraint. Usually this clears the attributes used on the component and assigns new attributes to the component.
Attributes of MotionLayout
In development, you may use the following properties of MotionLayout:
app:layoutDescription= "reference" specifies the MotionScene XML file
app:applyMotionScene= "boolean" whether to apply MotionScene [default=true]
app:showPaths= "boolean" shows the path [default=false]. Remember to close it in the release version
app:progress= "float" specifies the progress of the transformation [0-1]
app:currentState= "reference" specifies a ConstraintSet
summary
The first article contains the basic features of Motion Layout, where you can view the source code. ConstraintLayout examples github repository
In the next article, we will include more explanations:
Custom Properties, Picture Transform, Key Frame( part II) Chinese translation
Use Motion Layout (Coordinator Layout, Drawer Layout, ViewPager) in existing layout( part III) Chinese translation
All about key frames!( part IV)
Motion Layout as the root layout
Nested Motion Layout & Other Components
Motion Layout and fragments