1, What is cluster
A group of computers interconnected by a high-speed network and managed in a single system model
Say a lot of servers come together to provide the same service. In the client, it looks like there is only one server
Relatively high benefits in terms of performance, reliability and flexibility can be achieved at a lower cost
Task scheduling is the core technology of cluster system
Purpose of cluster
Improve performance
For example, the application of computational secrets, such as weather forecast and nuclear test simulation
cost reduction
It's cheaper than a million dollar supercomputer
Improve scalability
Just add cluster nodes
Enhanced reliability
Multiple nodes perform the same function to avoid single point failure
Cluster classification
High performance computing cluster HPC
Parallel applications developed through clusters. Solving complex scientific problems
Load balancing (LB) cluster
The client load is shared equally in the computer as much as possible
High availability (HA) cluster
Avoid single point of failure. When a system fails, it can be quickly migrated
LVS cluster composition

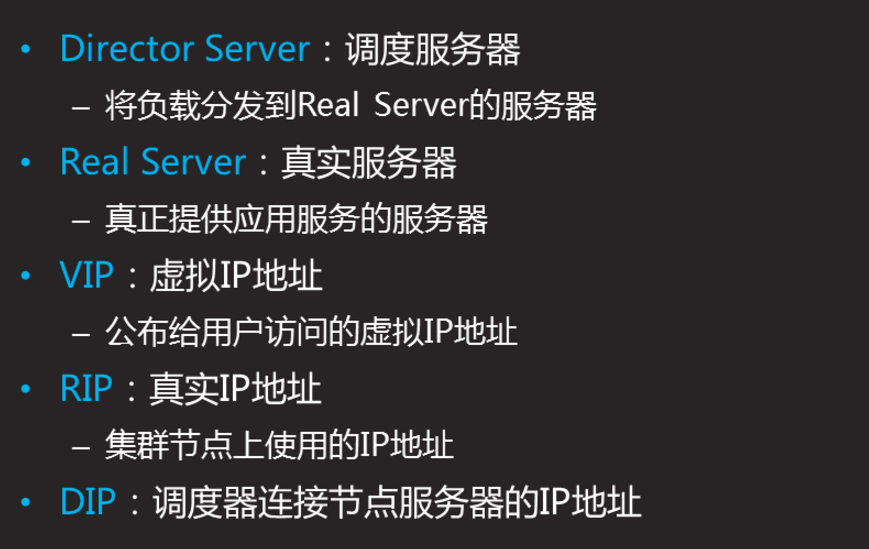
LVS terminology
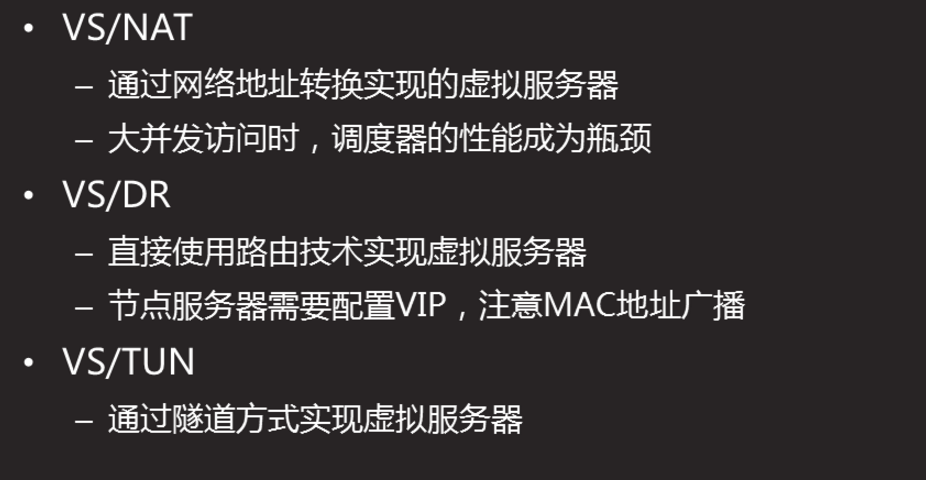
LVS working mode
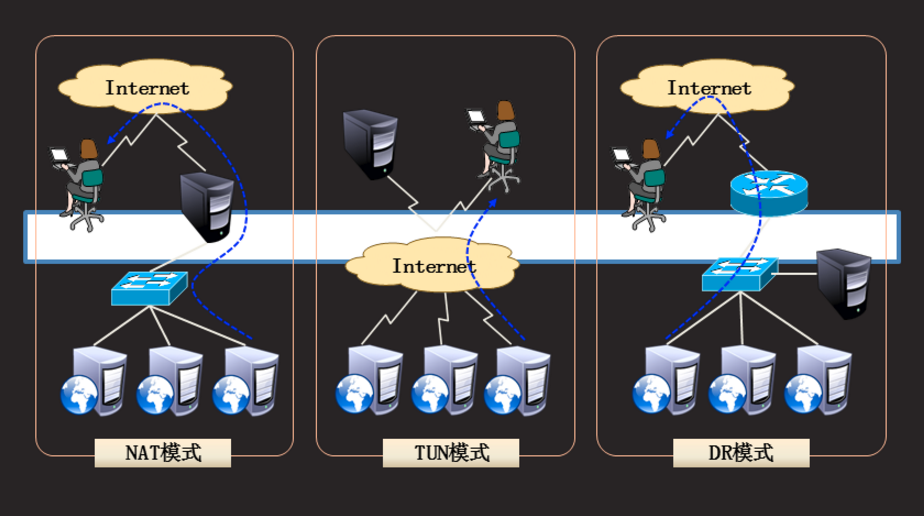
LVS working mode
Load balancing scheduling algorithm

Load balancing scheduling algorithm (Continued)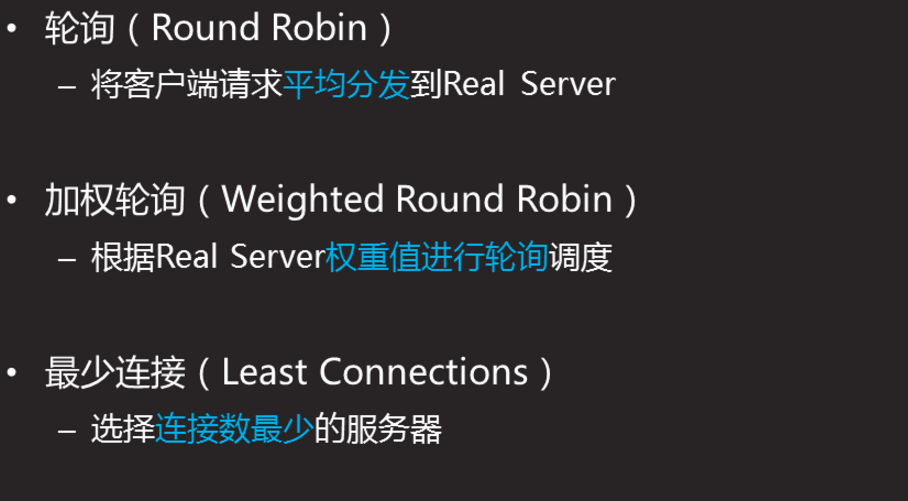
Load balancing scheduling algorithm (continued 2)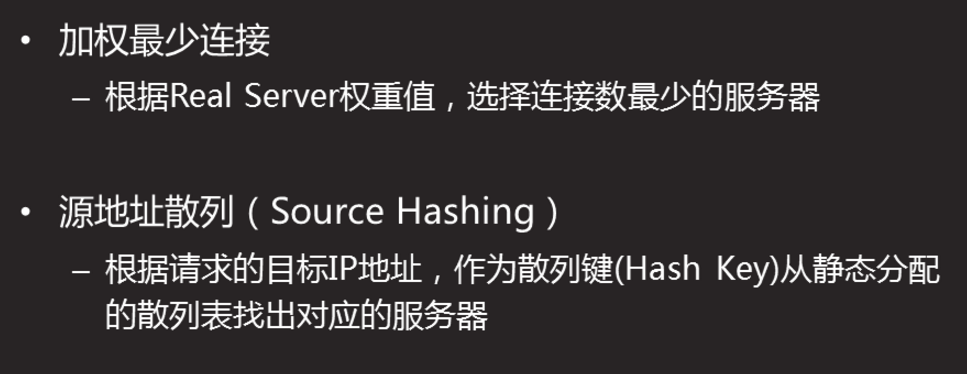
Load balancing scheduling algorithm (Continued 3)
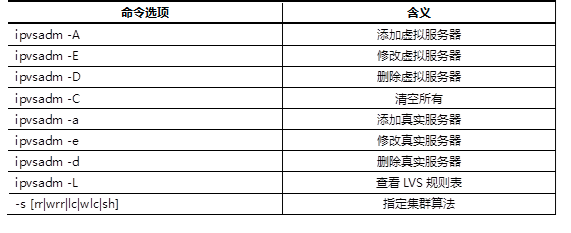
Ipvsadm-a create cluster
-A add virtual server
-D delete cluster
-C clear all
-E edit cluster
ipvsadm -A -t 192.168.4.5:80 -s wrr
-T = TCP protocol
-s = algorithm wrr weight Round robin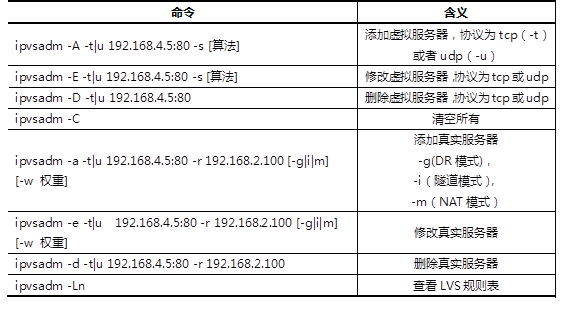
1.3 steps
To implement this case, follow the steps below.
Step one:
Use the command to add, delete, and change LVS cluster rules
1) Create LVS virtual cluster server (the algorithm is weighted polling: wrr)
[root@proxy ~]# yum -y install ipvsadm
[root@proxy ~]# ipvsadm -A -t 192.168.4.5:80 -s wrr
[root@proxy ~]# ipvsadm -Ln
IP Virtual Server version 1.2.1 (size=4096)
Prot LocalAddress:Port Scheduler Flags
  -> RemoteAddress:Port           Forward Weight ActiveConn InActConn
TCP  192.168.4.5:80 wrr
2) Add several real server s to the cluster
```cpp
[root@proxy ~]# ipvsadm -a -t 192.168.4.5:80 -r 192.168.2.100
[root@proxy ~]# ipvsadm -Ln
IP Virtual Server version 1.2.1 (size=4096)
Prot LocalAddress:Port Scheduler Flags
  -> RemoteAddress:Port           Forward Weight ActiveConn InActConn
TCP  192.168.4.5:80 wrr
  -> 192.168.2.100:80             router    1      0          0
[root@proxy ~]# ipvsadm -a -t 192.168.4.5:80 -r 192.168.2.200 -m -w 2
[root@proxy ~]# ipvsadm -a -t 192.168.4.5:80 -r 192.168.2.201 -m -w 3
[root@proxy ~]# ipvsadm -a -t 192.168.4.5:80 -r 192.168.2.202 -m -w 4
3) Modify cluster server settings (modify scheduler algorithm, change weighted polling to polling)
[root@proxy ~]# ipvsadm -E -t 192.168.4.5:80 -s rr
[root@proxy ~]# ipvsadm -Ln
IP Virtual Server version 1.2.1 (size=4096)
Prot LocalAddress:Port Scheduler Flags
  -> RemoteAddress:Port           Forward Weight ActiveConn InActConn
TCP  192.168.4.5:80 rr
  -> 192.168.2.100:80             router    1      0          0
  -> 192.168.2.200:80             masq      2      0          0
  -> 192.168.2.201:80             masq      2      0          0
  -> 192.168.2.202:80             masq      1      0          0
4) Modify read server (use the - g option to change the mode to DR mode)
[root@proxy ~]# ipvsadm -e -t 192.168.4.5:80 -r 192.168.2.202 -g
5) View LVS status
[root@proxy ~]# ipvsadm -Ln
6) Create another cluster (the algorithm is the least connection algorithm; use the - m option to set the working mode to NAT mode)
[root@proxy ~]# ipvsadm -A -t 192.168.4.5:3306 -s lc
[root@proxy ~]# ipvsadm -a -t 192.168.4.5:3306 -r 192.168.2.100 -m
[root@proxy ~]# ipvsadm -a -t 192.168.4.5:3306 -r 192.168.2.200 -m
7) Permanently save all rules
[root@proxy ~]# ipvsadm-save -n > /etc/sysconfig/ipvsadm
8) Clear all rules
[root@proxy ~]# ipvsadm -C
Case 2: deploy LVS-NAT cluster
2.1 problem
LVS is used to implement the cluster scheduling server in NAT mode to provide Web services for users:
The IP address of the external public network of the cluster is 192.168.4.5
The internal IP address of dispatcher is 192.168.2.5
The real Web server addresses are 192.168.2.100 and 192.168.2.200 respectively
Using weighted polling scheduling algorithm, the real server weights are 1 and 2 respectively
2.2 plan
The details of the host configuration of the experimental topology are shown in table-3.
Table -3
Use 4 virtual machines, 1 as Director scheduler, 2 as Real Server and 1 as client. The topology is shown in figure-1. Note: web1 and web2 must be configured with gateway address.
Figure -1
2.3 steps
To implement this case, follow the steps below.
Step 1: configure the basic environment
1) Set up Web server (take web1 as an example)
[root@web1 ~]# yum -y install httpd
[root@web1 ~]# echo "192.168.2.100" > /var/www/html/index.html
2) Start Web server software
[root@web1 ~]# systemctl restart httpd
FAQ: if the httpd service starts slowly?
Solution: you can modify the / etc/httpd/conf/httpd.conf file,
Delete the comment character in the line of ServerName www.example.com:80.
Step two:
Deploy LVS-NAT mode scheduler
1) Confirm the route forwarding function of the dispatcher (if it is enabled, it can be ignored)
[root@proxy ~]# echo 1 > /proc/sys/net/ipv4/ip_forward
[root@proxy ~]# cat /proc/sys/net/ipv4/ip_forward
1
[root@proxy ~]# echo "net.ipv4.ip_forward = 1" >> /etc/sysctl.conf
**
Modify the configuration file and set permanent rules*
2) Create a clustered server
[root@proxy ~]# yum -y install ipvsadm
[root@proxy ~]# ipvsadm -A -t 192.168.4.5:80 -s wrr
3) Add real server
[root@proxy ~]# ipvsadm -a -t 192.168.4.5:80 -r 192.168.2.100 -w 1 -m
[roo**Bold style**t@proxy ~]# ipvsadm -a -t 192.168.4.5:80 -r 192.168.2.200 -w 1 -m
4) View the rule list and save the rule
[root@proxy ~]# ipvsadm -Ln
[root@proxy ~]# ipvsadm-save -n > /etc/sysconfig/ipvsadm
Step 3: client test
The client uses the curl command to repeatedly connect to http://192.168.4.5 to check whether the visited page will poll to different back-end real servers.
3 case 3:
Deploy LVS-DR cluster
3.1 problem
Use LVS to realize DR mode cluster scheduling server, and provide Web services for users:
The IP address of the client is 192.168.4.10
LVS dispatcher VIP address is 192.168.4.15
LVS scheduler DIP address set to 192.168.4.5
The real Web server addresses are 192.168.4.100 and 192.168.4.200 respectively
Using weighted polling scheduling algorithm, the weight of web1 and web2 is 1 and 2 respectively
Explain:
CIP is the IP address of the client;
VIP is the IP address to provide services to clients;
RIP is the real IP address of the back-end server;
DIP is the IP address of the dispatcher to communicate with the back-end server (VIP must be configured in the virtual interface).
3.2 plan
Four virtual machines are used, one as client, one as Director scheduler and two as Real Server. The topology is shown in figure-2. The details of the host configuration of the experimental topology are shown in table-4.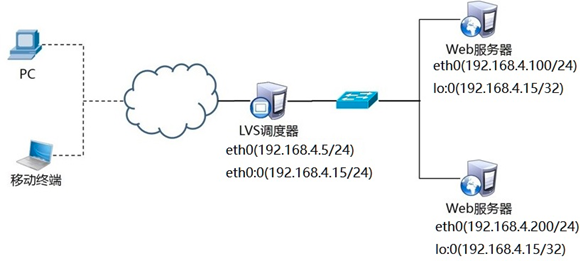
Figure -2
Table -4
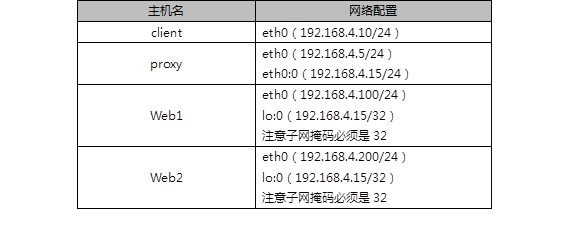
3.3 steps
To implement this case, follow the steps below.
Explain:
CIP is the IP address of the client;
VIP is the IP address to provide services to clients;
RIP is the real IP address of the back-end server;
DIP is the IP address of the dispatcher to communicate with the back-end server (VIP must be configured in the virtual interface).
Step one
: configure the experimental network environment
1) Set up VIP and DIP of Proxy server
Note: in order to prevent conflicts, VIP must be configured in the virtual interface of network card!!!
 [root@proxy ~]# cd /etc/sysconfig/network-scripts/
[root@proxy ~]# cp ifcfg-eth0{,:0}    **//This "," represents the space "{}" represents the previous file name**
[
root@proxy ~]# vim ifcfg-eth0:0
TYPE=Ethernet
#Network card type: Ethernet card
BOOTPROTO=none
#none manually configures IP or dhcp automatically configures IP
NAME=eth0:0
#NIC name
DEVICE=eth0:0
#Device name
ONBOOT=yes
#Whether the network card will be activated automatically when power on
IPADDR=192.168.4.15
#IP address
PREFIX=24
#Subnet mask
[root@proxy ~]# systemctl restart network
[root@proxy ~]# ifconfig
FAQ: there are two services of management network in RHEL7 and Centos7 systems, which may conflict?
Solution: shut down the network manager service and restart the network.
2) Set Web1 server network parameters
[root@web1 ~]# nmcli connection modify eth0 ipv4.method manual
ipv4.addresses 192.168.4.100/24 connection.autoconnect yes
[root@web1 ~]# nmcli connection up eth0
Next, configure the VIP address for web1.
Note: the subnet mask here must be 32 (that is, all 255). The network address is the same as the IP address, and the broadcast address is the same as the IP address.
[r
oot@web1 ~]# cd /etc/sysconfig/network-scripts/
[root@web1 ~]# cp ifcfg-lo{,:0}
[root@web1 ~]# vim ifcfg-lo:0
DEVICE=lo:0
IPADDR=192.168.4.15
NETMASK=255.255.255.255
NETWORK=192.168.4.15
BROADCAST=192.168.4.15
ONBOOT=yes
NAME=lo:0
To prevent address conflicts:
Here, because web1 is also configured with the same VIP address as the scheduler, there will definitely be address conflicts by default;
The main purpose of writing the following four lines of sysctl.conf file is to access the 192.168.4.15 packet. Only the scheduler will respond, and other hosts will not respond, so as to prevent address conflict.
[root@web1 ~]# vim /etc/sysctl.conf
#Manually write the following 4 lines
net.ipv4.conf.all.arp_ignore = 1
net.ipv4.conf.lo.arp_ignore = 1
net.ipv4.conf.lo.arp_announce = 2
net.ipv4.conf.all.arp_announce = 2
#When an ARP broadcast asks who is 192.168.4.15, the local computer ignores the ARP broadcast and makes no response
#Do not announce that your lo loop address is 192.168.4.15
[root@web1 ~]# sysctl -p
Restart network service, set firewall and SELinux
[root@web1 ~]# systemctl restart network
[root@web1 ~]# ifconfig
Common error: if the lo:0 is not configured correctly after restarting the network, there may be a conflict between the network manager and the network service. Close the network manager and restart the network. (not necessary operation)
[root@web1 ~]# systemctl stop NetworkManager
[root@web1 ~]# systemctl restart network
3) Set Web2 server network parameters
[root@web2 ~]# nmcli connection modify eth0 ipv4.method manual
ipv4.addresses 192.168.4.200/24 connection.autoconnect yes
[root@web2 ~]# nmcli connection up eth0
Next, configure the VIP address for web2
Note: the subnet mask here must be 32 (that is, all 255). The network address is the same as the IP address, and the broadcast address is the same as the IP address.
[root@web2 ~]# cd /etc/sysconfig/network-scripts/
[root@web2 ~]# cp ifcfg-lo{,:0}
[root@web2 ~]# vim ifcfg-lo:0
DEVICE=lo:0
IPADDR=192.168.4.15
NETMASK=255.255.255.255
NETWORK=192.168.4.15
BROADCAST=192.168.4.15
ONBOOT=yes
NAME=lo:0
To prevent address conflicts:
Here, because web1 is also configured with the same VIP address as the scheduler, there will definitely be address conflicts by default;
The main purpose of writing the following four lines of sysctl.conf file is to access the 192.168.4.15 packet. Only the scheduler will respond, and other hosts will not respond, so as to prevent address conflict.
[root@web2 ~]# vim /etc/sysctl.conf
#Manually write the following 4 lines
net.ipv4.conf.all.arp_ignore = 1
net.ipv4.conf.lo.arp_ignore = 1
net.ipv4.conf.lo.arp_announce = 2
net.ipv4.conf.all.arp_announce = 2
#When an ARP broadcast asks who is 192.168.4.15, the local computer ignores the ARP broadcast and makes no response
#Do not announce that your lo loop address is 192.168.4.15
[root@web2 ~]# sysctl -p
Restart network service, set firewall and SELinux
[root@web2 ~]# systemctl restart network
[root@web2 ~]# ifconfig
Common error: if the lo:0 is not configured correctly after restarting the network, there may be a conflict between the network manager and the network service. Close the network manager and restart the network. (not necessary operation)
[root@web1 ~]# systemctl stop NetworkManager
[root@web1 ~]# systemctl restart network
Step two:
proxy scheduler installs software and deploys LVS-DR mode scheduler
1) Install the software (this step can be ignored if it is already installed)
[root@proxy ~]# yum -y install ipvsadm
2) Clean up the rules from previous experiments and create new cluster server rules
[root@proxy ~]# ipvsadm -C                                #Clear all rules
[root@proxy ~]# ipvsadm -A -t 192.168.4.15:80 -s wrr
3) Add real server (- g parameter sets LVS working mode to DR mode, - w sets weight)
[root@proxy ~]# ipvsadm -a -t 192.168.4.15:80 -r 192.168.4.100 -g -w 1
[root@proxy ~]# ipvsadm -a -t 192.168.4.15:80 -r 192.168.4.200 -g -w 1
4) View the rule list and save the rule
[root@proxy ~]# ipvsadm -Ln
TCP  192.168.4.15:80 wrr
  -> 192.168.4.100:80             Route   1      0          0
  -> 192.168.4.200:80             Route   2      0          0
Step three:
Client test
The client uses the curl command to repeatedly connect to http://192.168.4.15 to check whether the visited page will poll to different back-end real servers.
Extended knowledge: LVS does not have health check function by default. You need to manually write dynamic detection script to realize this function: (reference script is as follows, for reference only)
[root@proxy ~]# vim check.sh
#!/bin/bash
VIP=192.168.4.15:80
RIP1=192.168.4.100
RIP2=192.168.4.200
while :
do
   for IP in $RIP1 $RIP2
   do
           curl -s http://$IP &>/dev/vnull
if [ $? -eq 0 ];then
            ipvsadm -Ln |grep -q $IP || ipvsadm -a -t $VIP -r $IP
        else
             ipvsadm -Ln |grep -q $IP && ipvsadm -d -t $VIP -r $IP
        fi
   done
sleep 1
done

