date: 2020-01-12 21:46:05
Article directory
This time it's mainly controls.
From the first line of code (Second Edition), used to record your own learning (chao) and learning (shu)
control
TextView, Button, EditText and ImageView are all simple.
Button
It should be noted that the English displayed by Button is capitalized by default. You need to set the property android:textAllCaps=false to cancel all capitalized settings.
TextView
You can set the text color, size, and so on, and use the android:gravity property to set the text alignment.
EditText
Set the default prompt text through android:hint, and click the text box to disappear. By default, if there is more than one line of text, it will automatically switch to the next line and always switch. If the android:maxLines property is set, such as 2, the maximum text box is two lines. If you enter the third line, only the second and third lines will be displayed, and the first line will be hidden.
ImageView
In the property, set the image resource through android:src="@drawble/xxx", or through imageview.setImageResource(R.drawble.xxx) in the code.
ProgressBar
Writing in xml
<ProgressBar
        android:layout_width="match_parent"
        android:layout_height="wrap_content" />
You can set a progress bar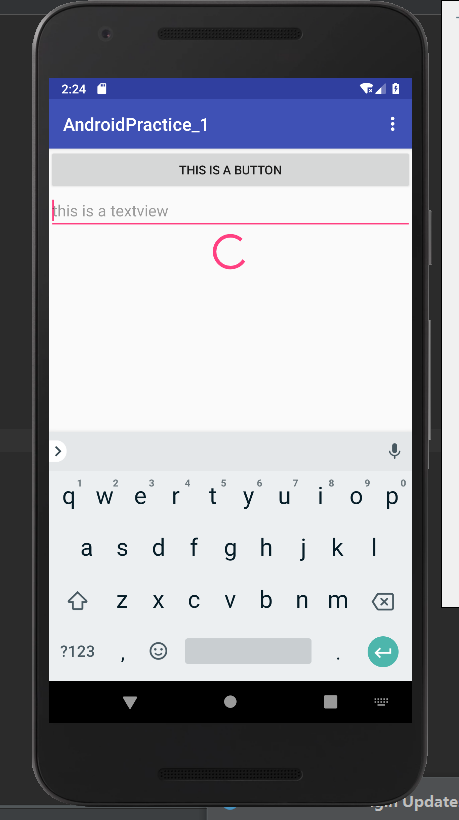
However, the progress bar does not always exist in actual use, but will be displayed when we need it.
In Android, all controls have a visible property Android: visibility. There are three optional values: visible, invisible and gone. Visible by default; invisible means that the control is invisible, but it still maintains its original position and size, which is equivalent to transparency; gone means that it is invisible and does not occupy any screen space.
It can also be set in the code through the setVisibility() method. The parameter values are View.INVISIBLE, view.visibility and view.fine. You can use the getVisibility() method to get the visible state of the control.
Modify the monitor of the button
Button.setOnClickListener(new View.OnClickListener() {
            @Override
            public void onClick(View v) {
                if (MyProgressBar.getVisibility()==View.INVISIBLE)
                    MyProgressBar.setVisibility(View.VISIBLE);
                else
                    MyProgressBar.setVisibility(View.INVISIBLE);
            }
        });
Start the program, press the button once to display the progress bar, and press again to hide it
You can change the style of the progress bar, such as changing it to horizontal progress bar and setting the maximum value
<ProgressBar
        android:id="@+id/ProgressBar"
        android:layout_width="match_parent"
        android:layout_height="wrap_content"
        style="?android:attr/progressBarStyleHorizontal"
        android:max="100"/>
At the same time, modify the monitor and press the button to increase the progress
Button.setOnClickListener(new View.OnClickListener() {
            @Override
            public void onClick(View v) {
                MyProgressBar.setProgress(MyProgressBar.getProgress()+10);
            }
        });

AlertDialog
The most commonly used dialogue store is used to prompt warnings, such as asking whether to save data when exiting. The main process is new an object - > set header information - > set button and monitor. Where the setCancelable() method is to set whether the dialog can be closed by the return key.
Button.setOnClickListener(new View.OnClickListener() {
            @Override
            public void onClick(View v) {
                AlertDialog.Builder alert=new AlertDialog.Builder(FirstActivity.this);
                alert.setTitle("This is a title");
                alert.setMessage("this is a message");
                alert.setCancelable(false);
                alert.setNegativeButton("Cancel", new DialogInterface.OnClickListener() {
                    @Override
                    public void onClick(DialogInterface dialog, int which) {

                    }
                });
                alert.setPositiveButton("OK", new DialogInterface.OnClickListener() {
                    @Override
                    public void onClick(DialogInterface dialog, int which) {

                    }
                });
                alert.show();
            }
        });
ProgressDialog
This dialog box will display a progress bar, which is generally used to let users wait. The general setting is similar to that of alert dialog.
If setCancelable(false) is set, it means that the dialog box cannot be cancelled by using the return key. You need to call the loss() method of the dialog box to destroy the dialog box after the time-consuming event.
layout
LenearLayout
Linear layout can set vertical or horizontal through android:orientation.
Note that if vertical is set, the height cannot match the parent. If horizontal is set, the width cannot match the parent.
android:layout_gravity
Specify the alignment of the controls in the layout. If it is horizontal, only the vertical ones will work for the Qi, but the horizontal ones won't work. If it is vertical, only the horizontal ones will work for the Qi, but the vertical ones won't work.
android:layout_weight
Specifying the size of the control according to the proportion plays a great role in the adaptation of the program to different mobile phones. If there are two controls, Android: layout? Weight is 1, and the layout is horizontal, the width of each control is 50%.
You can also set the weight of some controls as follows
<?xml version="1.0" encoding="utf-8"?>
<LinearLayout xmlns:android="http://schemas.android.com/apk/res/android"
    android:orientation="horizontal" android:layout_width="match_parent"
    android:layout_height="match_parent">
    <Button
        android:id="@+id/Button_1"
        android:text="this is a button"
        android:layout_width="wrap_content"
        android:layout_height="wrap_content"
        />
    <EditText
        android:layout_width="0dp"
        android:layout_height="wrap_content"
        android:hint="this is a textview"
        android:maxLines="2"
        android:layout_weight="1"
        />
</LinearLayout>
RelativeLayout
You can determine the position of the control more freely through the relative positioning method. There are many properties that can be set in this layout method. Take a look at the chestnut
<?xml version="1.0" encoding="utf-8"?>
<RelativeLayout xmlns:android="http://schemas.android.com/apk/res/android"
    android:orientation="horizontal" android:layout_width="match_parent"
    android:layout_height="match_parent">
    <Button
        android:id="@+id/Button_1"
        android:text="this is a button"
        android:layout_width="wrap_content"
        android:layout_height="wrap_content"
        android:layout_alignParentLeft="true"
        android:layout_alignParentBottom="true"
        />
</RelativeLayout>
The attributes relative to the position of the parent component mainly include Android: layout > alignparenttop, Android: layout > alignparentbottom, Android: layout > alignparentright, Android: layout > alignparenttop and Android: layout > centerinparent.
At the same time, you can set the position relative to the control, with more properties, including Android ﹐ layout ﹐ about, Android ﹐ layout ﹐ below, Android ﹐ layout ﹐ to rightof, Android ﹐ layout ﹐ to leftof, etc., indicating that the control is located at the top, bottom, right and left of the previous control.
<?xml version="1.0" encoding="utf-8"?>
<RelativeLayout xmlns:android="http://schemas.android.com/apk/res/android"
    android:orientation="horizontal" android:layout_width="match_parent"
    android:layout_height="match_parent">
    <Button
        android:id="@+id/Button_1"
        android:text="button 1"
        android:layout_width="wrap_content"
        android:layout_height="wrap_content"
        android:layout_centerInParent="true"
        />
    <Button
        android:id="@+id/Button_2"
        android:layout_width="wrap_content"
        android:layout_height="wrap_content"
        android:layout_above="@id/Button_1"
        android:layout_toRightOf="@id/Button_1"
        android:text="button 2"
        />
    <Button
        android:id="@+id/Button_3"
        android:layout_width="wrap_content"
        android:layout_height="wrap_content"
        android:layout_below="@id/Button_1"
        android:layout_toLeftOf="@id/Button_1"
        android:text="button 3"/>
</RelativeLayout>
The effect is as follows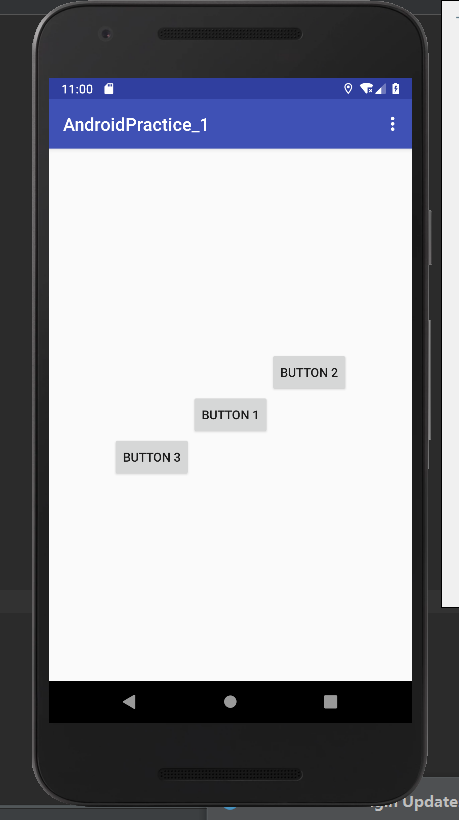
In addition to the relative position, there are also a set of relative alignment attributes, Android: layout ﹣ alignright, Android: layout ﹣ alignleft, Android: layout ﹣ aligntop and Android: layout ﹣ alignbottom, which are right alignment, left alignment, top alignment and bottom alignment of the control and the target control respectively.
FrameLayout
The frame layout is relatively simple, and there are few application places. All controls are placed in the upper left corner by default.
Chestnut
<?xml version="1.0" encoding="utf-8"?>
<FrameLayout xmlns:android="http://schemas.android.com/apk/res/android"
    android:orientation="horizontal" android:layout_width="match_parent"
    android:layout_height="match_parent">
    <Button
        android:id="@+id/Button_1"
        android:text="button 1"
        android:layout_width="wrap_content"
        android:layout_height="wrap_content"
        />
    <TextView
        android:layout_width="wrap_content"
        android:layout_height="wrap_content"
        android:text="This is a TextView"/>
</FrameLayout>
You can see that if not set, all controls are placed in the upper left corner by default.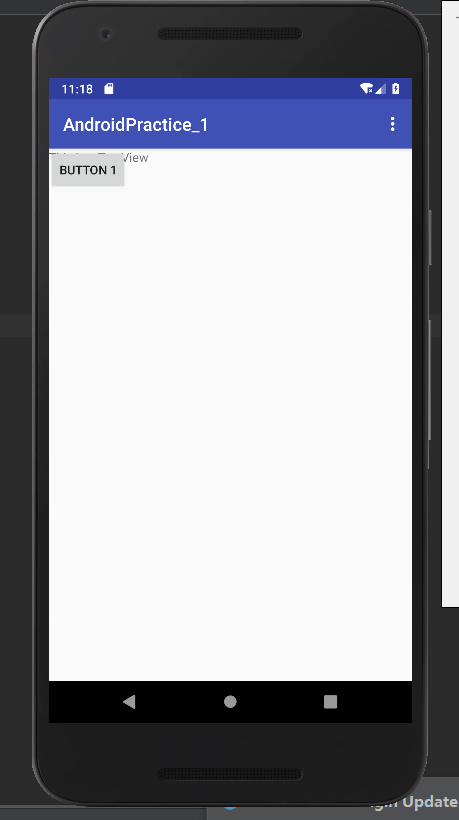
You can set the position of the control in the frame layout through Android: layout > gravity.
Percentage layout
In LinearLayout, you can use android:weight to change the size of the control in proportion, but the other two layouts are not. Therefore, Android introduces the percentage layout method, which does not need to use wrap ﹣ parent or match ﹣ parent, and you can directly set the percentage value.
But this is new. In order to be available in all versions, the Android team has defined the percentage layout in the supprt library. Just add the library dependency in build.gradle to ensure compatibility.
compile 'com.android.support:percent:24.2.1'
It is better that this version is the same as the appcompat version.
<?xml version="1.0" encoding="utf-8"?>
<android.support.percent.PercentFrameLayout xmlns:android="http://schemas.android.com/apk/res/android"
    xmlns:app="http://schemas.android.com/apk/res-auto"
    android:orientation="horizontal"
    android:layout_width="match_parent"
    android:layout_height="match_parent">
    <Button
        android:text="button 1"
        android:layout_gravity="left|top"
        app:layout_widthPercent="50%"
        app:layout_heightPercent="50%"
        />
    <Button
        android:text="button 2"
        android:layout_gravity="left|bottom"
        app:layout_widthPercent="50%"
        app:layout_heightPercent="50%"
        />
    <Button
        android:text="button 3"
        android:layout_gravity="right|top"
        app:layout_widthPercent="50%"
        app:layout_heightPercent="50%"
        />
    <Button
        android:text="button 4"
        android:layout_gravity="right|bottom"
        app:layout_widthPercent="50%"
        app:layout_heightPercent="50%"
        />
</android.support.percent.PercentFrameLayout>
You need to write the app namespace first, app: layout? Widthpercent and app: layout? Hightpercent. Because android.support.percent.PercentFrameLayout inherits the FrameLayout layout, all controls are placed in the upper left corner by default to avoid overlap. You can set the upper, lower, left, and right sides of the placement through Android: layout? Gravity.
Other
In addition, the layout includes AbsoluteLayout, TableLayout and so on, but it is rarely used.
Custom control
You can also customize the controls in zhuozhong. The following figure shows the inheritance relationship between some controls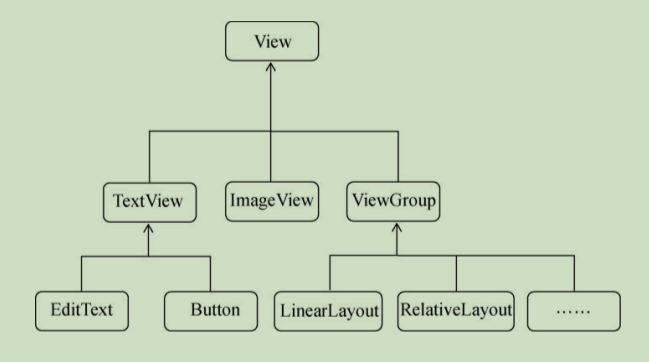
All controls inherit view directly or indirectly, and all layouts inherit ViewGroup directly or indirectly. View is the most basic UI component in Android, drawing a rectangular area on the screen and corresponding events in this area. All controls add their own functions on the basis of view. ViewGroup is a special view, which can contain many views and viewgroups. It is a container used to prevent controls and layouts.
Here is an example to customize a title block. There are only two buttons and a TextView to use. If you need to use the title block in multiple activities, it will be troublesome to write it one by one for each activity, so it will be more convenient to write it as a control direct reference.
It is mainly to set the Android: layout? Gravity of the three controls, and set the width of TextView to Android: layout? Weight = "1". The three background pictures used here are all picture materials
<?xml version="1.0" encoding="utf-8"?>
<LinearLayout
    xmlns:android="http://schemas.android.com/apk/res/android"
    android:layout_width="match_parent"
    android:layout_height="wrap_content"
    android:background="@drawable/title_bg">
    <Button
        android:text="back"
        android:layout_width="wrap_content"
        android:layout_height="wrap_content"
        android:layout_gravity="center"
        android:layout_margin="5dp"
        android:background="@drawable/back_bg"/>
    <TextView
        android:layout_width="0dp"
        android:layout_height="wrap_content"
        android:layout_weight="1"
        android:text="Title"
        android:textSize="24sp"
        android:layout_gravity="center"
        android:gravity="center"/>
    <Button
        android:text="edit"
        android:layout_width="wrap_content"
        android:layout_height="wrap_content"
        android:layout_gravity="center"
        android:layout_margin="5dp"
        android:background="@drawable/edit_bg"/>
</LinearLayout>
Add a line to first_layout.xml to introduce the layout
<include layout="@layout/title"
Then remove the original title block in FirstActivity.java
protected void onCreate(Bundle savedInstanceState) {
        super.onCreate(savedInstanceState);
        setContentView(R.layout.first_layout);
        ActionBar actionBar=getSupportActionBar();
        if (actionBar!=null)
            actionBar.hide();
    }
But my effect looks so bad
After that, you need to write code to respond to the events in the control, create a new TitleLayout class, inherit from LinearLayout, override the constructor, which means that the construction method will be called automatically when loading the layout, and the title bar will be loaded automatically.
public class TitleLayout extends LinearLayout {
    public TitleLayout(Context context, @Nullable AttributeSet attrs) {
        super(context, attrs);
        LayoutInflater.from(context).inflate(R.layout.title,this);

    }
}
The layout file needs to be modified to change the imported layout into a custom control
<com.example.k.androidpractice_1.TitleLayout
        android:layout_width="match_parent"
        android:layout_height="wrap_content"/>
Simply set up listening. Note that context acquisition here is not just this
public TitleLayout(Context context, @Nullable AttributeSet attrs) {
        super(context, attrs);
        LayoutInflater.from(context).inflate(R.layout.title,this);
        //Listen
        Button BackButton=findViewById(R.id.BackButton);
        Button EditButton=findViewById(R.id.EditButton);
        BackButton.setOnClickListener(new OnClickListener() {
            @Override
            public void onClick(View v) {
                ((Activity)getContext()).finish();
            }
        });
        EditButton.setOnClickListener(new OnClickListener() {
            @Override
            public void onClick(View v) {
                Toast.makeText(getContext(),"this is edit",Toast.LENGTH_SHORT).show();
            }
        });
    }
Click the EDIT button to see a Toast pop-up, indicating that the event response is successful.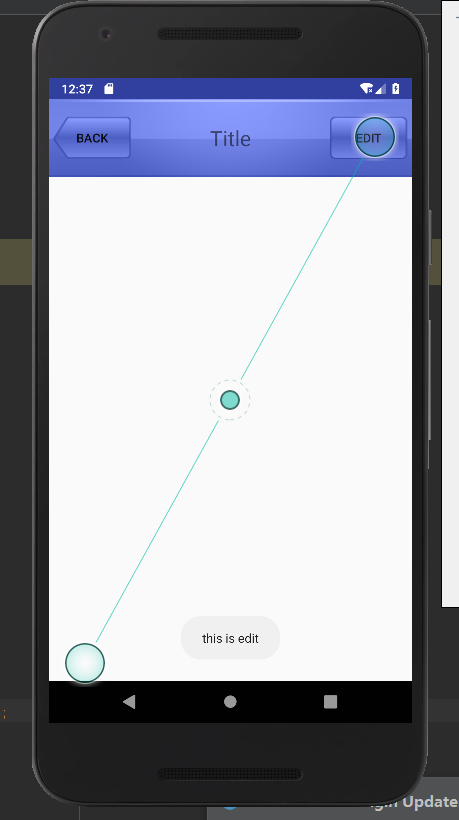
ListView
Is the most commonly used control, you can scroll the way to display off-screen content.
Just add a simple control code to xml
<ListView
        android:id="@+id/ListView_1"
        android:layout_width="match_parent"
        android:layout_height="match_parent"/>
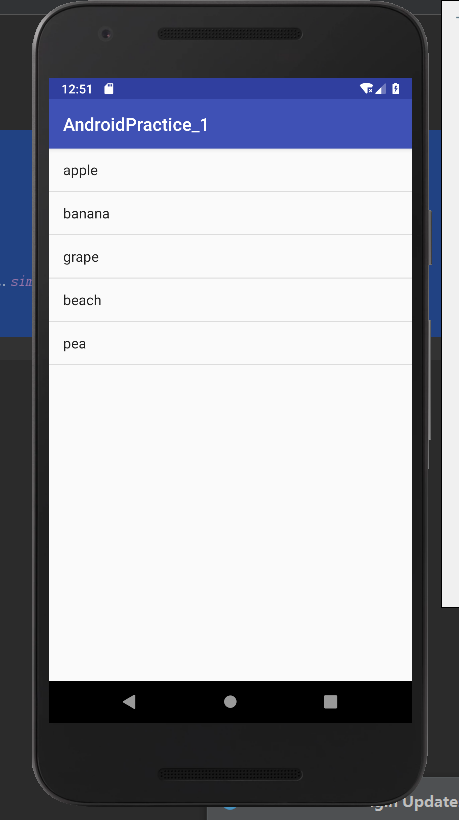
ListView can't directly place content, it needs to set content through adapter. Using the data obtained from the network or database, construct the corresponding array, build the adapter, and pass it into the adapter for ListView. Android.r.layout.simple menu list item menu 1 is an Android built-in layout id with only one TextView.
private String[] data={"apple","banana","grape","beach","pea"};
    @Override
    protected void onCreate(Bundle savedInstanceState) {

        super.onCreate(savedInstanceState);
        setContentView(R.layout.first_layout);
        ArrayAdapter<String> Adapter=new ArrayAdapter<String>(FirstActivity.this,android.R.layout.simple_list_item_1,data);
        ListView MyListView=findViewById(R.id.ListView_1);
        MyListView.setAdapter(Adapter);
    }
Customizing the ListView UI
There can't be only one TextView in the list. Here let him display one TextView and one ImageView for each item.
First, create a new Fruit class to save Fruit information, such as name and picture ID
public class Fruit {
    private String Name;
    private int ImageID;
    public Fruit(String Name,int ImageID){
        this.Name=Name;
        this.ImageID=ImageID;
    }
    public String getName(){
        return Name;
    }
    public int getImageID(){
        return ImageID;
    }
}
Create new fruit item.xml and write the layout of each item in the list
Here, the width and height of LinearLayout need to be set to wrap [content] instead of match [parent], otherwise, there will be only one kind of fruit in a screen.
<?xml version="1.0" encoding="utf-8"?>
<LinearLayout xmlns:android="http://schemas.android.com/apk/res/android"
    android:orientation="vertical" android:layout_width="match_parent"
    android:layout_height="match_parent">
    <ImageView
        android:id="@+id/ImageView_1"
        android:layout_width="wrap_content"
        android:layout_height="wrap_content" />
    <TextView
        android:id="@+id/TextView_1"
        android:layout_width="wrap_content"
        android:layout_height="wrap_content"/>
</LinearLayout>
Write a custom adapter, create a new friendadapter class, inherit from ArrayAdapter, override the constructor, pass in the context, the id and data of the listview child layout. Rewrite the getView() method, which is called when each sub item scrolls to the screen. In this method, first get the Fruit instance of this item, then load the layout, and then set the picture and text to return to the layout view.
public class FruitAdapter extends ArrayAdapter {
    private int ID;
    public FruitAdapter(@NonNull Context context, int resource, List<Fruit> Object) {
        super(context, resource, Object);
        ID=resource;
    }
    public View getView(int position,View ConvertView,ViewGroup parent){
        Fruit fruit=(Fruit)getItem(position);
        View view= LayoutInflater.from(getContext()).inflate(ID,parent,false);
        ImageView FruitImage=(ImageView)view.findViewById(R.id.ImageView_1);
        TextView FruitName=(TextView)view.findViewById(R.id.TextView_1);
        FruitImage.setImageResource(fruit.getImageID());
        FruitName.setText(fruit.getName());
        return view;

    }
}
Modify the code in FirstActivity. Initialize first. When initializing, put the names and pictures of all fruits in the List to facilitate parameter passing. for twice is to get more data. new is a user-defined adapter to get ListView and pass in adapter parameters.
public class FirstActivity extends AppCompatActivity {
    private List<Fruit>  FruitList=new ArrayList<>();
    @Override
    protected void onCreate(Bundle savedInstanceState) {

        super.onCreate(savedInstanceState);
        setContentView(R.layout.first_layout);

        initFruits();
        FruitAdapter Adapter=new FruitAdapter(FirstActivity.this,R.layout.fruit_item,FruitList);
        ListView MyListView=findViewById(R.id.ListView_1);
        MyListView.setAdapter(Adapter);
    }
    private void initFruits(){
        String[] ItemName={"apple","banana","orange","watermelon","pear","grape","pineapple","strawberry","cherry","mango"};
        int[] ItemImage={R.drawable.apple_pic,R.drawable.banana_pic,R.drawable.orange_pic,R.drawable.watermelon_pic,R.drawable.pear_pic,R.drawable.grape_pic,R.drawable.pineapple_pic,R.drawable.strawberry_pic,R.drawable.cherry_pic,R.drawable.mango_pic};
        for (int i=0;i<=1;i++){
            for (int j=0;j<ItemName.length;j++){
                Fruit Item=new Fruit(ItemName[j],ItemImage[j]);
                FruitList.add(Item);
            }
        }
    }
}
After running, you can see the list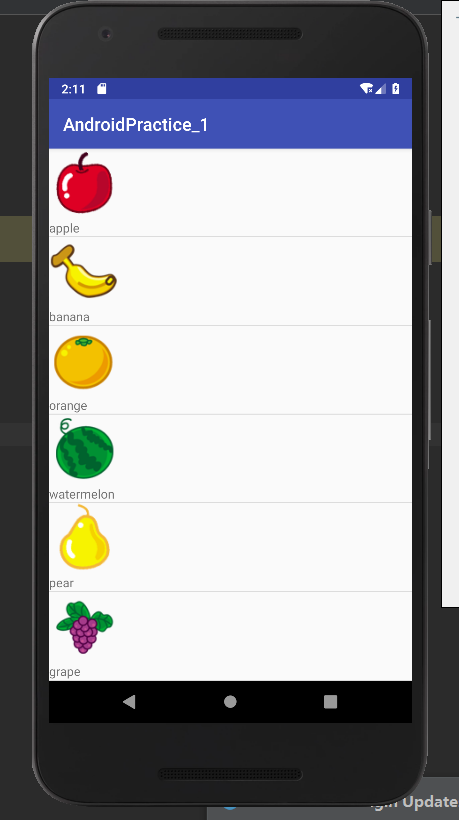
optimization
The above-mentioned getView() method will be reloaded when the list scrolls. If the list scrolls quickly, the efficiency will be relatively low. Note that there is a parameter in the getView() method, ConvertView, which can cache the previously loaded layout and directly reuse it to improve efficiency.
public View getView(int position,View ConvertView,ViewGroup parent){
        Fruit fruit=(Fruit)getItem(position);
        View view;
        if (ConvertView==null){
            view= LayoutInflater.from(getContext()).inflate(ID,parent,false);
        }else
            view=ConvertView;
        ImageView FruitImage=(ImageView)view.findViewById(R.id.ImageView_1);
        TextView FruitName=(TextView)view.findViewById(R.id.TextView_1);
        FruitImage.setImageResource(fruit.getImageID());
        FruitName.setText(fruit.getName());
        return view;

    }
Click events
Listen for click events through OnItemClickListener.
RecyclerView
Because LIstView performance is not very good, and can only be used for vertical, not horizontal scrolling.
RecyclerView is also recommended. This is also new, just like the percentage layout. You need to add dependencies. The best version is the same
compile 'com.android.support:recyclerview-v7:24.2.1'
Modify the controls of the layout
<?xml version="1.0" encoding="utf-8"?>
<LinearLayout xmlns:android="http://schemas.android.com/apk/res/android"
    android:orientation="horizontal"
    android:layout_width="match_parent"
    android:layout_height="match_parent">
    <android.support.v7.widget.RecyclerView
        android:id="@+id/RecyclerView_1"
        android:layout_width="match_parent"
        android:layout_height="match_parent"/>
</LinearLayout>
A new adapter is needed, inherited from RecyclerView.Adapter. First, an internal class ViewHolder is defined to facilitate the processing of two control instances. The View parameter is passed in the constructor, which is usually the outermost layout of subitems, from which TextView and ImageView can be obtained. The argument to the constructor of the main class, fruit adapter, is the List data passed in.
After inheritance, three methods need to be overridden. The onCreateViewHolder() method creates a ViewHolder instance, loads the Fruit object into the layout, and returns the instance.
The onBindViewHolder() method can assign a value to the data of each sub item, execute when the sub item rolls to the screen, obtain the sub item instance through the post, and then set the data to the ViewHolder.
getItemCount() is the length of the child.
public class FruitAdapter extends RecyclerView.Adapter<FruitAdapter.ViewHolder> {
    private List<Fruit> FruitList;
    static class ViewHolder extends RecyclerView.ViewHolder {
        ImageView MyImageView;
        TextView MyTextView;

        public ViewHolder(View view) {
            super(view);
            MyImageView = (ImageView) view.findViewById(R.id.ImageView_1);
            MyTextView = (TextView) view.findViewById(R.id.TextView_1);
        }
    }
    @Override
    public ViewHolder onCreateViewHolder(ViewGroup parent, int viewType) {
        View view=LayoutInflater.from(parent.getContext()).inflate(R.layout.fruit_item,parent,false);
        ViewHolder holder=new ViewHolder(view);
        return holder;
    }
    @Override
    public void onBindViewHolder(FruitAdapter.ViewHolder holder, int position) {
        Fruit fruit=FruitList.get(position);
        holder.MyImageView.setImageResource(fruit.getImageID());
        holder.MyTextView.setText(fruit.getName());
    }
    @Override
    public int getItemCount() {
        return FruitList.size();
    }
    public FruitAdapter(List<Fruit> FruitList){
        this.FruitList=FruitList;
    }
}
Modify FirstActivity
public class FirstActivity extends AppCompatActivity {
    private List<Fruit>  FruitList=new ArrayList<>();
    @Override
    protected void onCreate(Bundle savedInstanceState) {

        super.onCreate(savedInstanceState);
        setContentView(R.layout.first_layout);

        initFruits();
        RecyclerView MyRecyclerView=(RecyclerView)findViewById(R.id.RecyclerView_1);
        LinearLayoutManager LayoutManager=new LinearLayoutManager(this);
        MyRecyclerView.setLayoutManager(LayoutManager);
        FruitAdapter Adapter=new FruitAdapter(FruitList);
        MyRecyclerView.setAdapter(Adapter);
    }
    private void initFruits(){
        String[] ItemName={"apple","banana","orange","watermelon","pear","grape","pineapple","strawberry","cherry","mango"};
        int[] ItemImage={R.drawable.apple_pic,R.drawable.banana_pic,R.drawable.orange_pic,R.drawable.watermelon_pic,R.drawable.pear_pic,R.drawable.grape_pic,R.drawable.pineapple_pic,R.drawable.strawberry_pic,R.drawable.cherry_pic,R.drawable.mango_pic};
        for (int i=0;i<=1;i++){
            for (int j=0;j<ItemName.length;j++){
                Fruit Item=new Fruit(ItemName[j],ItemImage[j]);
                FruitList.add(Item);
            }
        }
    }
}
After that, it succeeded, but the size was a little strange, because my fruit item.xml was not written well, no matter what
Anyway, the problem is probably the setting in fruit item. LinearLayout needs to set width as wrap'parent, height as wrap'content, and control properties as wrap'content
Horizontal rolling and waterfall flow
To realize horizontal scrolling, first change the layout of fruit item.xml. You need the picture above and the name below to place it horizontally.
If the width is set to 100dp, it may overstretch if it is match, and wrap will have long, short and ugly, so the length is fixed.
<?xml version="1.0" encoding="utf-8"?>
<LinearLayout xmlns:android="http://schemas.android.com/apk/res/android"
    android:orientation="vertical"
    android:layout_width="100dp"
    android:layout_height="wrap_content">
    <ImageView
        android:id="@+id/ImageView_1"
        android:layout_width="wrap_content"
        android:layout_height="wrap_content"
        android:layout_gravity="center_horizontal"/>
    <TextView
        android:id="@+id/TextView_1"
        android:layout_width="wrap_content"
        android:layout_gravity="center_horizontal"
        android:layout_marginTop="10dp"
        android:layout_height="wrap_content"/>
</LinearLayout>
After that, modify the onCreate() method of FirstActivity.java code, just add a sentence to LayoutManager.setOrientation(LinearLayoutManager.HORIZONTAL);
protected void onCreate(Bundle savedInstanceState) {
        super.onCreate(savedInstanceState);
        setContentView(R.layout.first_layout);
        initFruits();
        RecyclerView MyRecyclerView=(RecyclerView)findViewById(R.id.RecyclerView_1);
        LinearLayoutManager LayoutManager=new LinearLayoutManager(this);
        LayoutManager.setOrientation(LinearLayoutManager.HORIZONTAL);
        MyRecyclerView.setLayoutManager(LayoutManager);
        FruitAdapter Adapter=new FruitAdapter(FruitList);
        MyRecyclerView.setAdapter(Adapter);
    }
You can see that it's been shown horizontally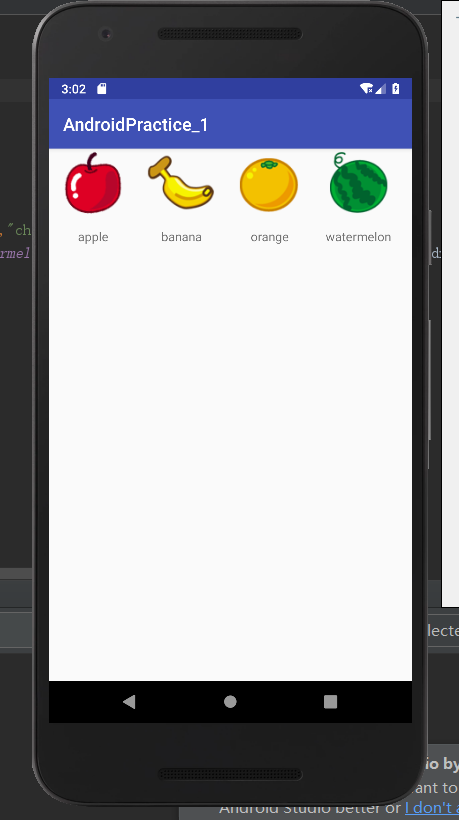
In addition to LinearLayoutManager, RecyclerView also provides two other layout modes, GridLayoutManager and StaggeredGridLayoutManager, which can realize waterfall flow.
Modify fruit_layout.xml
<?xml version="1.0" encoding="utf-8"?>
<LinearLayout xmlns:android="http://schemas.android.com/apk/res/android"
    android:orientation="vertical"
    android:layout_width="match_parent"
    android:layout_height="wrap_content"
    android:layout_margin="5dp">
    <ImageView
        android:id="@+id/ImageView_1"
        android:layout_width="wrap_content"
        android:layout_height="wrap_content"
        android:layout_gravity="center_horizontal"/>
    <TextView
        android:id="@+id/TextView_1"
        android:layout_width="wrap_content"
        android:layout_gravity="left"
        android:layout_marginTop="10dp"
        android:layout_height="wrap_content"/>
</LinearLayout>
Modify onCreate() of FirstActivity.java, and add a function that randomly generates file names. The length of the function is indefinite to show the layout management. When each sub item is different in height, it can better reflect the characteristics of waterfall flow. The first of the two parameters of the stacgeredgridlayoutmanager represents three columns, and the second represents the vertical direction.
protected void onCreate(Bundle savedInstanceState) {
        super.onCreate(savedInstanceState);
        setContentView(R.layout.first_layout);
        initFruits();
        RecyclerView MyRecyclerView=(RecyclerView)findViewById(R.id.RecyclerView_1);
        StaggeredGridLayoutManager LayoutManager=new StaggeredGridLayoutManager(3,StaggeredGridLayoutManager.VERTICAL);
        MyRecyclerView.setLayoutManager(LayoutManager);
        FruitAdapter Adapter=new FruitAdapter(FruitList);
        MyRecyclerView.setAdapter(Adapter);
    }
...
private String getRandomLengthName(String Name){
        Random random=new Random();
        int length=random.nextInt(20)+1;
        StringBuilder sb=new StringBuilder();
        for (int i=0;i<length;i++){
            sb.append(Name);
        }
        return sb.toString();
    }
Then run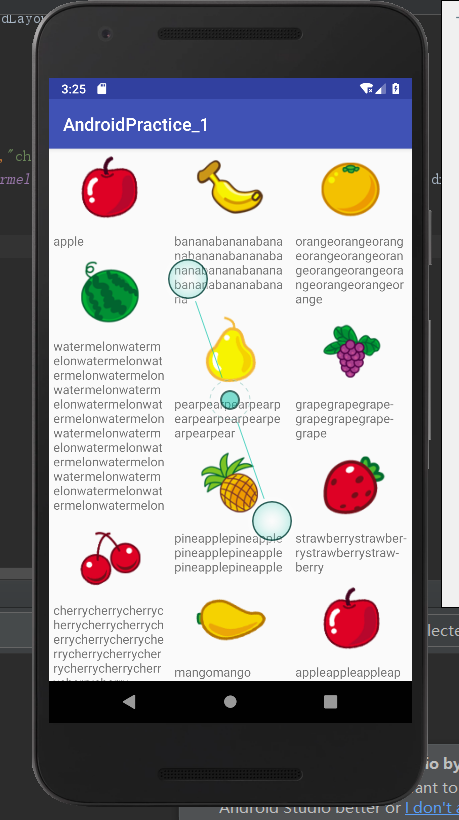
Click events
The click implementation of RecyclerView is different from that of ListView. There is no existing listener method. You need to register click events for each view. Why is it so troublesome? If there is a button in the sub item, when we just click the button, the ListView can't meet this demand very well, so RecyclerView simply deleted the listener.
Modify the code of the FruitAdapter, add a view type variable FruitView in the class of the FruitAdapter, assign a view to the FruitView in the ViewHolder() construction method, and register the listening in the ViewHolder()
...
public class FruitAdapter extends RecyclerView.Adapter<FruitAdapter.ViewHolder> {
    private List<Fruit> FruitList;
    static class ViewHolder extends RecyclerView.ViewHolder {
        ImageView MyImageView;
        TextView MyTextView;
        View FruitView;
        public ViewHolder(View view) {
            super(view);
            FruitView=view;
            MyImageView = (ImageView) view.findViewById(R.id.ImageView_1);
            MyTextView = (TextView) view.findViewById(R.id.TextView_1);
        }
    }
    @Override
    public ViewHolder onCreateViewHolder(ViewGroup parent, int viewType) {
        View view=LayoutInflater.from(parent.getContext()).inflate(R.layout.fruit_item,parent,false);
        final ViewHolder holder=new ViewHolder(view);
        holder.FruitView.setOnClickListener(new View.OnClickListener() {
            @Override
            public void onClick(View v) {
                int position=holder.getAdapterPosition();
                Fruit fruit=FruitList.get(position);
                Toast.makeText(v.getContext(),fruit.getName(),Toast.LENGTH_SHORT).show();
            }
        });
        holder.MyImageView.setOnClickListener(new View.OnClickListener() {
            @Override
            public void onClick(View v) {
                int position=holder.getAdapterPosition();
                Fruit fruit=FruitList.get(position);
                Toast.makeText(v.getContext(),fruit.getName(),Toast.LENGTH_SHORT).show();
            }
        });
        return holder;
    }
...

}
It can be seen that at this time, Toast will pop up not only for clicking the picture but also for the name, indicating success.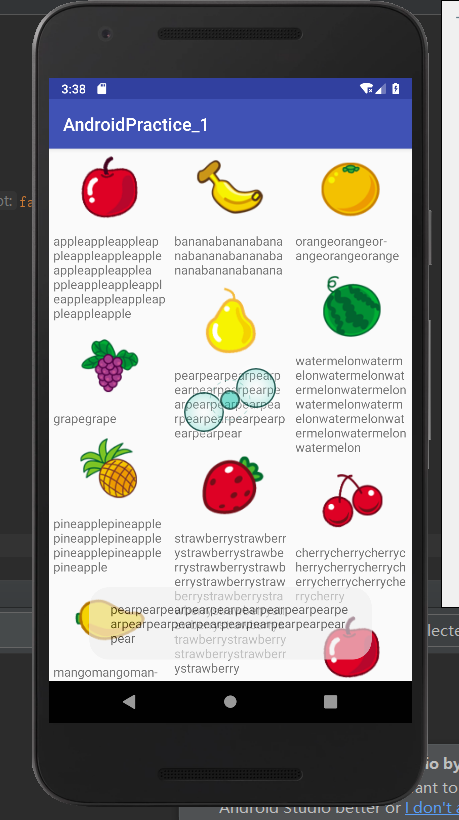
Practice - dialog UI
First of all, you need to know how to make a nine patch image, which is a PNG image specially processed. It can specify that some areas are stretched and some areas are not stretched.
Like this picture
If it's stretched, it might look like this
In Android SDK/tools/draw9patch.bat, you need to add Android SDK/jre/bin to the environment variable and double-click to open it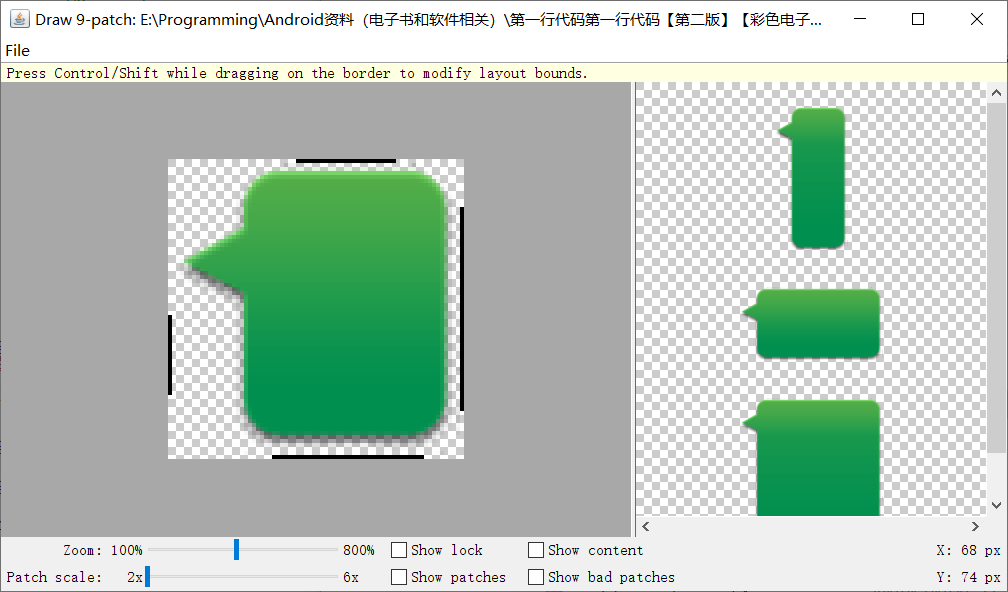
Then copy the picture to the drawable folder, set the background for LinearLayout without adding controls, set the width to match [parent] and height to wrap [content], and the effect is as follows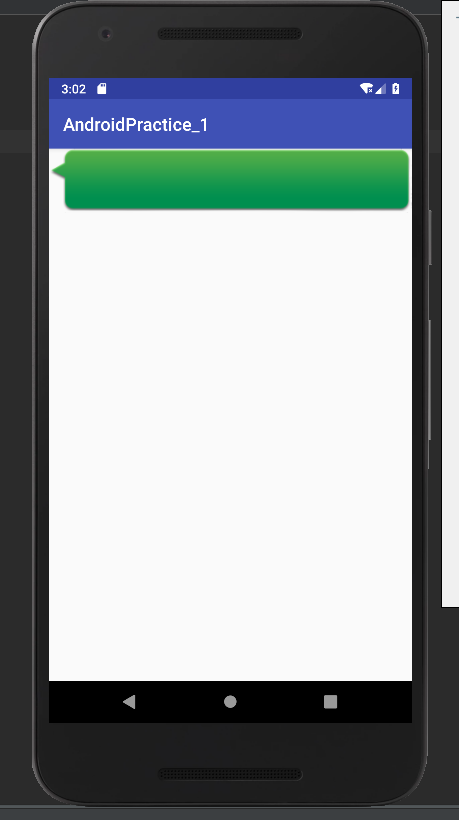
Start writing main interface
filename:first_layout.xml
<?xml version="1.0" encoding="utf-8"?>
<LinearLayout xmlns:android="http://schemas.android.com/apk/res/android"
    android:orientation="vertical"
    android:layout_width="match_parent"
    android:layout_height="match_parent"
    android:background="#d8d0d8">
    <android.support.v7.widget.RecyclerView
        android:layout_width="match_parent"
        android:layout_height="0dp"
        android:layout_weight="1"/>
    <LinearLayout
        android:layout_width="match_parent"
        android:layout_height="wrap_content">
        <EditText
            android:id="@+id/InputMessage"
            android:layout_width="0dp"
            android:layout_height="wrap_content"
            android:hint="Input your message"
            android:maxLines="2"
            android:layout_weight="1"/>
        <Button
            android:id="@+id/Send"
            android:layout_width="wrap_content"
            android:layout_height="wrap_content"
            android:text="Send"/>
    </LinearLayout>
</LinearLayout>
Defines the entity class Msg of the message, where the Type variable is used to mark whether the message is received or sent.
filename:Msg.java
package com.example.k.androidpractice_1;

/**
 * Created by kang on 2020/1/30.
 */

public class Msg {
    public static final int TYPE_RECEIVED=0;
    public static final int TYPE_SEND=1;
    private String Content;
    private int Type;
    public Msg(String Content,int Type){
        this.Content=Content;
        this.Type=Type;
    }
    public String getContent(){
        return Content;
    }
    public int getType(){
        return Type;
    }
}
Write the sub item Layout of RecyclerView msg_items.xml. Here are two layouts, which are the dialog boxes for receiving messages and sending messages. In the code, you can determine what to display through the visible properties.
filename:mas_items.xml
<?xml version="1.0" encoding="utf-8"?>
<LinearLayout
    xmlns:android="http://schemas.android.com/apk/res/android" android:layout_width="match_parent"
    android:layout_height="wrap_content"
    android:orientation="vertical">
    <LinearLayout
        android:id="@+id/Left"
        android:layout_width="wrap_content"
        android:layout_height="wrap_content"
        android:background="@drawable/message_left"
        android:layout_gravity="left">
        <TextView
            android:id="@+id/LeftMessage"
            android:layout_width="wrap_content"
            android:layout_height="wrap_content"
            android:textColor="#fff"
            android:layout_gravity="center"/>
    </LinearLayout>
    <LinearLayout
        android:id="@+id/Right"
        android:layout_width="wrap_content"
        android:layout_height="wrap_content"
        android:background="@drawable/message_right"
        android:layout_gravity="right">
        <TextView
            android:id="@+id/RightMessage"
            android:layout_width="wrap_content"
            android:layout_height="wrap_content"
            android:textColor="#fff"
            android:layout_gravity="center"/>
    </LinearLayout>
</LinearLayout>
It's the adapter again. Now the adapter is a little handy. When binding data, first determine whether it is received or sent, and set the corresponding visible properties.
package com.example.k.androidpractice_1;

import android.support.v7.widget.LinearLayoutManager;
import android.support.v7.widget.RecyclerView;
import android.view.LayoutInflater;
import android.view.View;
import android.view.ViewGroup;
import android.widget.LinearLayout;
import android.widget.TextView;

import java.util.ArrayList;
import java.util.List;

/**
 * Created by kang on 2020/1/30.
 */

public class MsgAdapter extends RecyclerView.Adapter<MsgAdapter.ViewHolder> {
    private List<Msg> MyMessageList=new ArrayList<>();

    @Override
    public ViewHolder onCreateViewHolder(ViewGroup parent, int viewType) {
        View view= LayoutInflater.from(parent.getContext()).inflate(R.layout.msg_items,parent,false);
        return new ViewHolder(view);
    }

    @Override
    public void onBindViewHolder(ViewHolder holder, int position) {
        Msg Message=MyMessageList.get(position);
        if (Message.getType()==Msg.TYPE_RECEIVED){
            holder.LeftLayout.setVisibility(View.VISIBLE);
            holder.RightLayout.setVisibility(View.GONE);
            holder.LeftMessageTextView.setText(Message.getContent());
        }else{
            holder.LeftLayout.setVisibility(View.GONE);
            holder.RightLayout.setVisibility(View.VISIBLE);
            holder.RightMessageTextView.setText(Message.getContent());
        }
    }

    @Override
    public int getItemCount() {
        return MyMessageList.size();
    }

    static class ViewHolder extends RecyclerView.ViewHolder{
        LinearLayout LeftLayout,RightLayout;
        TextView LeftMessageTextView,RightMessageTextView;
        public ViewHolder(View view){
            super(view);
            LeftLayout=view.findViewById(R.id.Left);
            RightLayout=view.findViewById(R.id.Right);
            LeftMessageTextView=view.findViewById(R.id.LeftMessage);
            RightMessageTextView=view.findViewById(R.id.RightMessage);
        }
    }
    public MsgAdapter(List<Msg> MessageList){
        MyMessageList=MessageList;
    }
}
Then initialize in FirstActivity.java to set the data, mainly to get the control instance, set the adapter and monitor, and initialize the data. After sending the message, call the MessageAdapter.ntifyItemChanged() method to refresh when there is a message. Call the MessageRecyclerView.scrollToPosition() method to scroll the list to the last item.
filename:FirstActivity.java
package com.example.k.androidpractice_1;

import android.content.Context;
import android.content.DialogInterface;
import android.content.Intent;
import android.net.Uri;
import android.support.v4.app.Fragment;
import android.support.v4.app.FragmentManager;
import android.support.v4.app.FragmentTransaction;
import android.support.v7.app.ActionBar;
import android.support.v7.app.AlertDialog;
import android.support.v7.app.AppCompatActivity;
import android.os.Bundle;
import android.support.v7.widget.LinearLayoutManager;
import android.support.v7.widget.RecyclerView;
import android.support.v7.widget.StaggeredGridLayoutManager;
import android.view.Menu;
import android.view.MenuItem;
import android.view.View;
import android.widget.ArrayAdapter;
import android.widget.Button;
import android.widget.EditText;
import android.widget.ListView;
import android.widget.ProgressBar;
import android.widget.Toast;

import java.io.InputStreamReader;
import java.util.ArrayList;
import java.util.List;
import java.util.Random;

public class FirstActivity extends AppCompatActivity {
    private List<Msg> MessageList=new ArrayList<>();
    private EditText InputMessageEditText;
    private Button SendButton;
    private RecyclerView MessageRecyclerView;
    @Override
    protected void onCreate(Bundle savedInstanceState) {
        super.onCreate(savedInstanceState);
        setContentView(R.layout.first_layout);

        initMsgs();
        InputMessageEditText=findViewById(R.id.InputMessage);
        SendButton=findViewById(R.id.Send);
        MessageRecyclerView=findViewById(R.id.MessageList);
        LinearLayoutManager linearLayoutManager=new LinearLayoutManager(this);
        MessageRecyclerView.setLayoutManager(linearLayoutManager);
        final MsgAdapter MessageAdapter=new MsgAdapter(MessageList);
        MessageRecyclerView.setAdapter(MessageAdapter);
        SendButton.setOnClickListener(new View.OnClickListener() {
            @Override
            public void onClick(View v) {
                String Content=InputMessageEditText.getText().toString();
                if (!"".equals(Content)){
                    Msg Message=new Msg(Content,Msg.TYPE_SEND);
                    MessageList.add(Message);               //Add message
                    //MessageAdapter.notifyItemChanged(MessageList.size()-1); / / refresh when there is a message
                    MessageRecyclerView.scrollToPosition(MessageList.size()-1);     //Scroll to last
                    InputMessageEditText.setText("");
                }
            }
        });
    }
    private void initMsgs(){
        Msg Message1=new Msg("this is a message 1",Msg.TYPE_SEND);
        MessageList.add(Message1);
        Msg Message2=new Msg("this is a message 22222",Msg.TYPE_RECEIVED);
        MessageList.add(Message2);
    }
}
Then run the program and you can see that it has been successful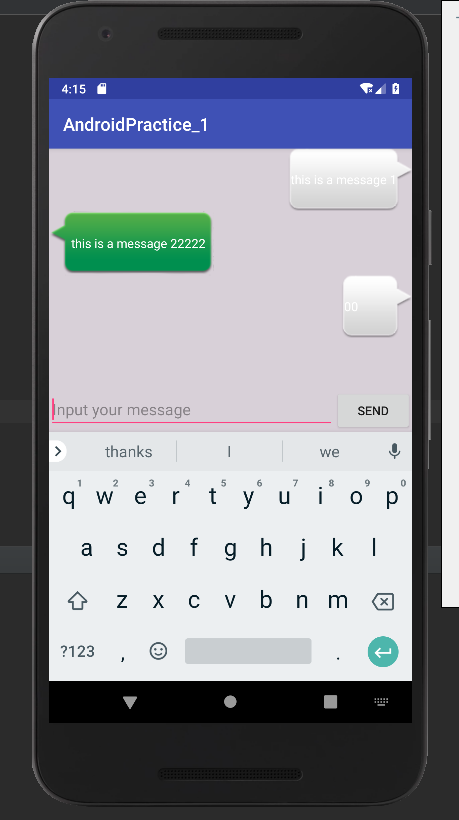
But there is a problem. Listen to the MessageAdapter.notifyItemChanged(MessageList.size()-1) in it. If this line is not commented out, an error will be reported, and the error content seems to be the control itself
<font color="red">
E/AndroidRuntime: FATAL EXCEPTION: main
                  Process: com.example.k.androidpractice_1, PID: 20929
                  java.lang.NoClassDefFoundError: Failed resolution of: Landroid/support/v4/animation/AnimatorCompatHelper;
                      at android.support.v7.widget.DefaultItemAnimator.resetAnimation(DefaultItemAnimator.java:515)
                      at android.support.v7.widget.DefaultItemAnimator.animateAdd(DefaultItemAnimator.java:218)
                      at android.support.v7.widget.SimpleItemAnimator.animateAppearance(SimpleItemAnimator.java:114)
                      at android.support.v7.widget.RecyclerView.animateAppearance(RecyclerView.java:3528)
                      at android.support.v7.widget.RecyclerView$4.processAppeared(RecyclerView.java:461)
                      at android.support.v7.widget.ViewInfoStore.process(ViewInfoStore.java:249)
                      at android.support.v7.widget.RecyclerView.dispatchLayoutStep3(RecyclerView.java:3385)
                      at android.support.v7.widget.RecyclerView.dispatchLayout(RecyclerView.java:3135)
                      at android.support.v7.widget.RecyclerView.onLayout(RecyclerView.java:3568)
                      at android.view.View.layout(View.java:20672)
                      at android.view.ViewGroup.layout(ViewGroup.java:6194)
                      at android.widget.LinearLayout.setChildFrame(LinearLayout.java:1812)
                      at android.widget.LinearLayout.layoutVertical(LinearLayout.java:1656)
                      at android.widget.LinearLayout.onLayout(LinearLayout.java:1565)
                      at android.view.View.layout(View.java:20672)
                      at android.view.ViewGroup.layout(ViewGroup.java:6194)
                      at android.widget.FrameLayout.layoutChildren(FrameLayout.java:323)
                      at android.widget.FrameLayout.onLayout(FrameLayout.java:261)
                      at android.view.View.layout(View.java:20672)
                      at android.view.ViewGroup.layout(ViewGroup.java:6194)
                      at android.support.v7.widget.ActionBarOverlayLayout.onLayout(ActionBarOverlayLayout.java:443)
                      at android.view.View.layout(View.java:20672)
                      at android.view.ViewGroup.layout(ViewGroup.java:6194)
                      at android.widget.FrameLayout.layoutChildren(FrameLayout.java:323)
                      at android.widget.FrameLayout.onLayout(FrameLayout.java:261)
                      at android.view.View.layout(View.java:20672)
                      at android.view.ViewGroup.layout(ViewGroup.java:6194)
                      at android.widget.LinearLayout.setChildFrame(LinearLayout.java:1812)
                      at android.widget.LinearLayout.layoutVertical(LinearLayout.java:1656)
                      at android.widget.LinearLayout.onLayout(LinearLayout.java:1565)
                      at android.view.View.layout(View.java:20672)
                      at android.view.ViewGroup.layout(ViewGroup.java:6194)
                      at android.widget.FrameLayout.layoutChildren(FrameLayout.java:323)
                      at android.widget.FrameLayout.onLayout(FrameLayout.java:261)
                      at com.android.internal.policy.DecorView.onLayout(DecorView.java:753)
                      at android.view.View.layout(View.java:20672)
                      at android.view.ViewGroup.layout(ViewGroup.java:6194)
                      at android.view.ViewRootImpl.performLayout(ViewRootImpl.java:2792)
                      at android.view.ViewRootImpl.performTraversals(ViewRootImpl.java:2319)
                      at android.view.ViewRootImpl.doTraversal(ViewRootImpl.java:1460)
                      at android.view.ViewRootImpl$TraversalRunnable.run(ViewRootImpl.java:7183)
                      at android.view.Choreographer$CallbackRecord.run(Choreographer.java:949)
                      at android.view.Choreographer.doCallbacks(Choreographer.java:761)
                      at android.view.Choreographer.doFrame(Choreographer.java:696)
                      at android.view.Choreographer$FrameDisplayEventReceiver.run(Choreographer.java:935)
                      at android.os.Handler.handleCallback(Handler.java:873)
                      at android.os.Handler.dispatchMessage(Handler.java:99)
                      at android.os.Looper.loop(Looper.java:193)
                      at android.app.ActivityThread.main(ActivityThread.java:6669)
                      at java.lang.reflect.Method.invoke(Native Method)
                      at com.android.internal.os.RuntimeInit$MethodAndArgsCaller.run(RuntimeInit.java:493)
                      at com.android.internal.os.ZygoteInit.main(ZygoteInit.java:858)
E/AndroidRuntime: Caused by: java.lang.ClassNotFoundException: Didn't find class "android.support.v4.animation.AnimatorCompatHelper" on path: DexPathList[[zip file "/system/framework/org.apache.http.legacy.boot.jar", zip file "/data/app/com.example.k.androidpractice_1-qLD9Df1Lh_NOfCKU_GrQ2w==/base.apk"],nativeLibraryDirectories=[/data/app/com.example.k.androidpractice_1-qLD9Df1Lh_NOfCKU_GrQ2w==/lib/x86, /system/lib]]
                      at dalvik.system.BaseDexClassLoader.findClass(BaseDexClassLoader.java:134)
                      at java.lang.ClassLoader.loadClass(ClassLoader.java:379)
                      at java.lang.ClassLoader.loadClass(ClassLoader.java:312)
                      	... 52 more
</font>
I/Process: Sending signal. PID: 20929 SIG: 9
Application terminated.
I haven't found out why, so I don't want this line for the time being.
Over

