preface
Today, I'd like to introduce two interactive software Here Document and Expect. The former system comes with its own tools, and the latter needs to be installed. After mastering these two tools, it will help our production work. Let's go into them and have a look.
1, Here Document interaction free
1. Overview:
Use I/O redirection to provide a list of commands to interactive programs or commands, such as ftp, cat, or read commands
It is an alternative to standard input, which can help script developers not use temporary files to build input information, but directly generate a "file" in place and use it as standard input for "commands"
Here Document can also be used with non interactive programs and commands
2. Various orders
command <<sign
...
content    #Tags are directly incoming content
...
sign
 Note:<<Redirect input append
3. Precautions
① Tags can use any legal character (usually EOF)
② The mark at the end must be written in the top grid and cannot be preceded by any characters
③ There must be no characters (including spaces) after the tag at the end
④ Spaces before and after the opening mark are omitted
4. Cases
Case ①:

Case ②:
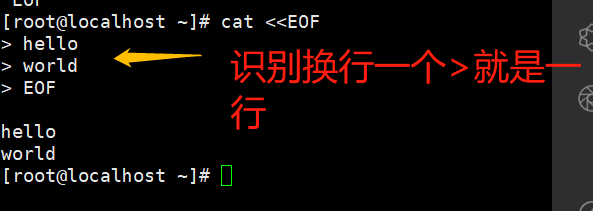
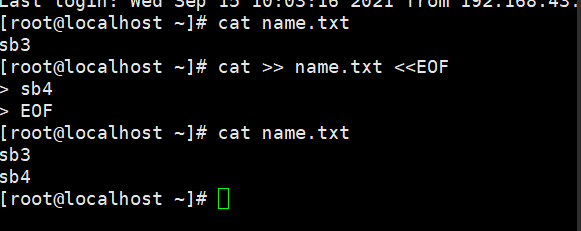
Case ③: redirect input, can be superimposed
Case ④: use EOF method to directly write local source content in the content, and then output it to the file for viewing with cat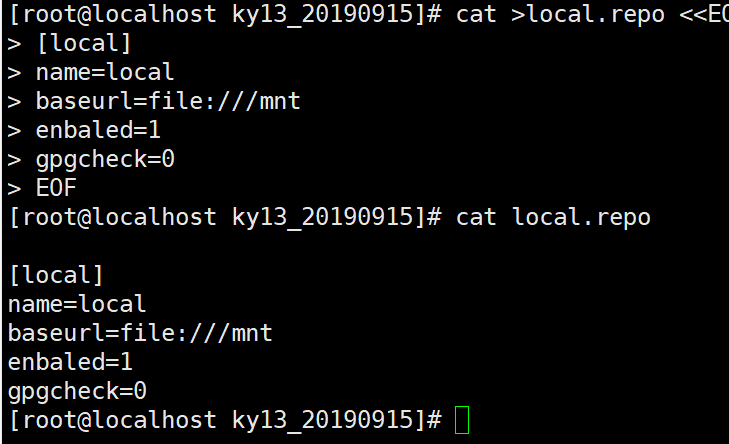
Case ⑤
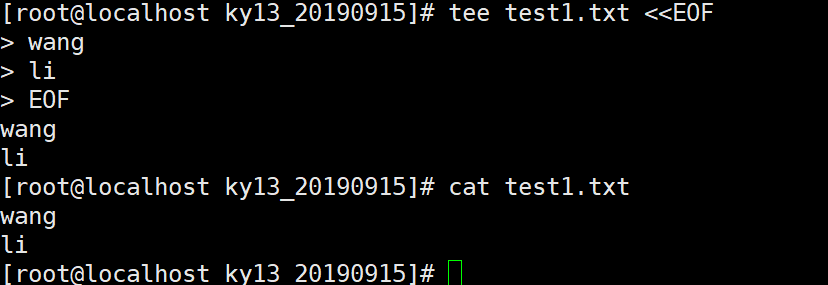
Case ⑥
[root@localhost ~]# useradd sz123
[root@localhost ~]# passwd sz123 << EOF
123123
123123
EOF
 Change user sz123 Your password.
New password: invalid password: password is less than 8 characters
 Re enter the new password: passwd: All authentication tokens have been successfully updated.
Case ⑦
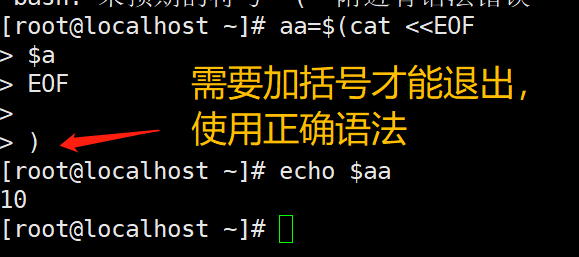
Case ⑧
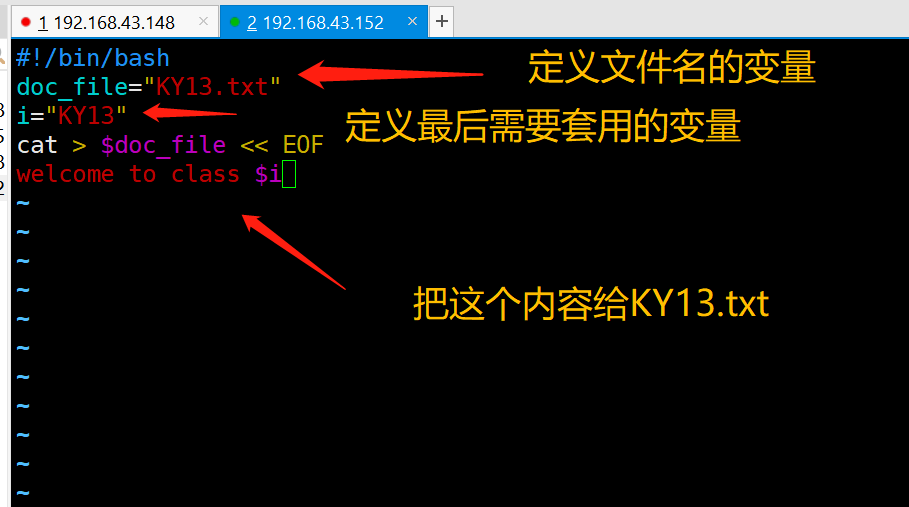
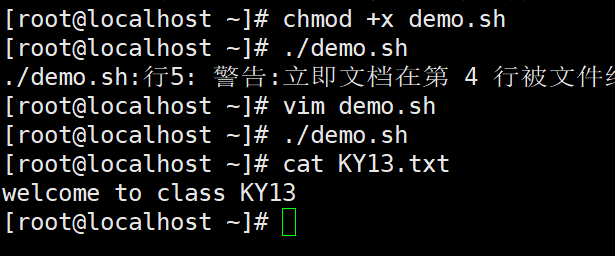
Support variable replacement
When writing to a file, variables are first replaced with actual values
Then the writing is completed in combination with the cat command
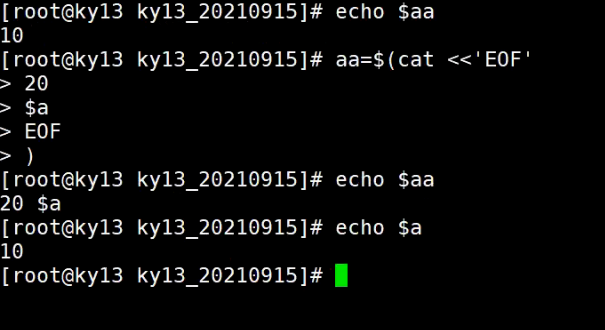
Case ⑨:
Close variable
2, Expect automated interaction
1. General
expect is a free programming tool language, which is often used to communicate automatically and interactively without human intervention
Expect requires the support of Tcl programming language. To run expect on the system, Tcl must be installed first
yum -y install tcl

yum -y install expect
2. Basic commands
2.1 script interpreter
The expect script first introduces a file to indicate which shell is used
#!/usr/bin/expect
2.2 spawn
spawn is usually followed by a Linux execution command to start a session, start a process, and track subsequent interaction information
example: spawn passwd root ##Tracking starts the process of changing user passwords
2.3 expect
Judge whether the last input result contains the specified string. If so, it will be returned immediately. Otherwise, it will be returned after the timeout
Only the output of processes started by spawn can be captured
It is used to receive the output after the command is executed, and then match the expected string
2.4 send
Sends a string to the process to simulate user input
This command cannot automatically enter and wrap lines. Generally, it needs to add \ r (enter) or \ n
Mode 1
expect ""Password" {send "abc123\r"}
##The send part of the same line must have {}
Mode II
expect ""Password"
send "$abc123\r"
##The newline send part does not need to have {}
Mode III
expect "Support multiple branches

expect  {        ##As long as one of these conditions is matched, execute the corresponding send statement and exit the expect statement
"Password 1 {send "abc123\r"}"
"Password 2 {send "123123\r"}"
"Password 3 {send "123123\r"}"
}
2.5 Terminator
expect eof
Indicates the end of interaction, waits for the end of execution, and returns to the original user, corresponding to spawn
For example, when switching to the root user, the expect script waits for 10s by default. After executing the command, it stays for 10s by default and will automatically switch back to the original user.
interact
After execution, keep the interactive state, hand over the control to the console and stay at the target terminal. At this time, you can operate manually. The commands after the interaction do not work. For example, the interaction will remain at the terminal and will not return to the original terminal. For example, if you switch to the root user, it will always be in the root user state
For example, when ssh goes to another server, it will always be on the target server terminal, rather than switching back to the original server
Note: only one of expect eof and interact can be selected
2.6 set
The default timeout of expect is 10 seconds. You can set the session timeout through the set command. If the timeout is not limited, it should be set to - 1
##Example:
set timeout 30
2.7 exp_continue
exp_ After continue is attached to an expect judgment item, you can continue to match other items in the expect judgment statement after the item is matched
exp_continue is similar to the continue statement in the control statement, indicating that expect is allowed to continue to execute instructions downward
The following example will judge whether there is yes/no or * password in the interactive output. If yes/no is matched, output yes and execute the judgment again; If * assword matches, output 123123 and end the expect statement
expect
"(yes/no)" {send "yes\r"; exp_ continue; }
"*password" {set timeout 300; send "123123\r";}
2.8 send_user
send_ user means echo command, which is equivalent to echo
2.9 receiving parameters
The expect script can accept the parameters passed from the bash command line and obtain them using [lindex $argv n], where n starts from 0 and represents the first, second and third
Example:
set hostname [lindex $argv 0]
##Equivalent to hostname=
set password [lindex $argv 1]
##Equivalent to password=
3.expect direct execution
Take SSH as an example:
$argv 0 represents the location variable $1
$argv 1 represents the location variable $2
#!/ usr/bin/expect is the path to the Expect binary
[root@localhost shell]# vim zxc11.sh

#!/usr/bin/expect
#Set timeout
set timeout 20
#Open log
log_file test.log
#display information
log_user 1
#Define variables
set hostname [lindex $argv 0]
set password [lindex $argv 1]
#Tracking instruction
spawn ssh root@${hostname}
#Capture tips
expect {
        "connecting (yes/no)"
        {send "yes\r";exp_continue}
        "*password:"
        {send "${password}\r";}
}
#Transfer of control
interact
4.expect embedded execution
Integrate the expect process into the Shell to facilitate execution and processing
Create user and set password
#! /bin/bash
user=$1
password=$2
#Non interactive commands are placed outside expect
useradd $user
#Start swap free execution
/usr/bin/expect <<-EOF
#expect start flag, - remove tab
spawn passwd $user
#Enable - a process tracks the passwd command. expect can only capture the process information
expect "new*"
send "$ {password}\r" .
expect "again*"
send "$ {password} \r"
expect eof
EOF
Take SSH as an example
#!/bin/bash
  hostname=$1
  password=$2
  /usr/bin/expect<<-EOF
  spawn ssh root@${hostname}
  expect {
      "(yes/no)"
      {send "yes\r";exp_continue}
      "*password"
      {send "$password\r"}
  }
  expect "*]#"
  send "exit\r"
  expect eof
EOF		'Expect End flag, EOF There must be no spaces before and after'
5. Realize SSH automatic login`
[root@localhost shell]# vim zxc12.sh

#!/usr/bin/expect
set timeout 15
set hostname [lindex $argv 0]
set password [lindex $argv 1]
spawn ssh root@${hostname}
expect {
        "connection refused" exit
        #Connection failure, such as ssh service shutdown
        "Name or service not known" exit
        #The server cannot be found. For example, the IP address entered is incorrect
        "to continue"{send "yes\r";exp_continue}
        "password:"{send "${password}\r";}
}
interact
#Carrying the interact parameter means that the console will be handed over to the user after successful login, otherwise it will exit after login
exit
6. Create disk without interaction
First, manually add a disk in the virtual machine shutdown state, and then power on
[root@localhost ~]# vim disk.sh


#!/bin/bash

disk=$1

/usr/bin/expect <<-EOF

spawn fdisk $disk

expect "command" {send "n\r"}
expect "Select" {send "\r"}
expect "partition" {send "\r"}
expect "start" {send "\r"}
expect "Last" {send "\r"}
expect "command(input m get help): " {send "w\r"}
expect eof
EOF
partprobe
mkfs.xfs $disk -f &> /dev/null

if [ $? -eq 0 ]
    then
    echo -e "\033[31m Disk format complete \033[0m"
    mkdir $disk.1
    mount $disk $disk.1
    df -h
    else
    echo "Formatting failed, the script has bug"
fi
Execute script
[root@localhost ~]# sh disk.sh /dev/sdb$1
spawn fdisk /dev/sdb
 Welcome fdisk (util-linux 2.23.2).

The changes remain in memory until you decide to write the changes to disk.
Think twice before using the write command.

Device does not contain a recognized partition table
 Use disk identifier 0 x1f0887af Create a new DOS Disk label.

command(input m get help): n
Partition type:
   p   primary (0 primary, 0 extended, 4 free)
   e   extended
Select (default p):
Using default response p
 Partition number (1-4,Default 1):
Start sector (2048-41943039,The default is 2048):
The default value 2048 will be used
Last a sector, +a sector or +size{K,M,G} (2048-41943039,The default is 41943039):
The default value 41943039 will be used
 Partition 1 is set to Linux Type, size set to 20 GiB

command(input m get help): w
The partition table has been altered!

Calling ioctl() to re-read partition table.
Synchronizing disks.
Warning: Cannot open in read-write mode /dev/sr0 (Read-only file system ). /dev/sr0 Opened as read-only.
 Disk format complete
file system        Capacity used available used% Mount point
/dev/sda2        20G  3.8G   17G   19% /
devtmpfs        1.9G     0  1.9G    0% /dev
tmpfs           1.9G     0  1.9G    0% /dev/shm
tmpfs           1.9G  9.0M  1.9G    1% /run
tmpfs           1.9G     0  1.9G    0% /sys/fs/cgroup
/dev/sr0        4.3G  4.3G     0  100% /mnt
/dev/sda1       6.0G  174M  5.9G    3% /boot
/dev/sda3        10G   37M   10G    1% /home
tmpfs           378M  8.0K  378M    1% /run/user/42
tmpfs           378M     0  378M    0% /run/user/0
/dev/sdb         20G   33M   20G    1% /dev/sdb.1
summary
In fact, these two tools are not difficult to master, and this article is equipped with enough examples to help understand. As an operation and maintenance engineer, you can master them well.