I. integration ideas
SSM framework, namely spring MVC + Spring + mybati framework set, is a lightweight Web open source framework. The modules they are responsible for in the JAVA three-tier architecture are as follows:
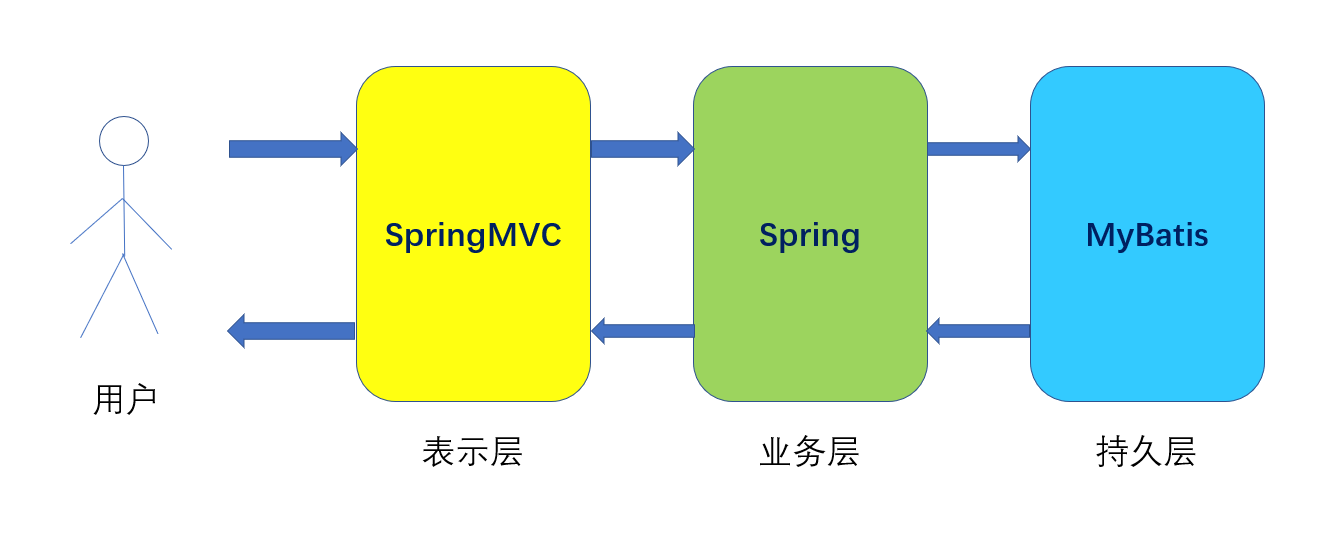
Among them, there is an inclusion relationship between spring MVC and spring, so there is no need to integrate them, just configure and use them in web.xml. Spring MVC does not interact directly with MyBatis, so there is no need to configure between them. Only between spring and MyBatis, we need to use spring to integrate MyBatis.
Therefore, we only need to do some additional configuration for the configuration files of web.xml and Spring.
Next, we demonstrate the integration and use of the SSM framework by implementing a simple transfer system.
II. SSM framework integration
First, create a new Java Web project, import the jar packages of Spring MVC, Spring and MyBatis and the required jar packages for integration between them.

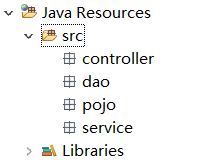
In the src directory, create four packages: controller, dao, service and pojo, which are respectively used to store the code of control layer, persistence layer, business layer and common java classes.
Configure web.xml so that the project loads Spring MVC and Spring.
 1 <?xml version="1.0" encoding="UTF-8"?>
 2 <web-app xmlns:xsi="http://www.w3.org/2001/XMLSchema-instance" xmlns="http://xmlns.jcp.org/xml/ns/javaee" xsi:schemaLocation="http://xmlns.jcp.org/xml/ns/javaee http://xmlns.jcp.org/xml/ns/javaee/web-app_4_0.xsd" id="WebApp_ID" version="4.0">
 3   <display-name>SSM</display-name>
 4   <welcome-file-list>
 5     <welcome-file>index.html</welcome-file>
 6     <welcome-file>index.htm</welcome-file>
 7     <welcome-file>index.jsp</welcome-file>
 8     <welcome-file>default.html</welcome-file>
 9     <welcome-file>default.htm</welcome-file>
10     <welcome-file>default.jsp</welcome-file>
11   </welcome-file-list>
12   <!-- Configure load on server startup SpringMVC Scheduler -->
13   <servlet>
14       <servlet-name>SpringMVC</servlet-name>
15       <servlet-class>org.springframework.web.servlet.DispatcherServlet</servlet-class>
16       <load-on-startup>1</load-on-startup>
17   </servlet>
18   <!-- Configure the URL -->
19   <servlet-mapping>
20       <servlet-name>SpringMVC</servlet-name>
21       <url-pattern>/</url-pattern>
22   </servlet-mapping>
23   <!-- Configure listener startup Spring -->
24   <listener>
25       <listener-class>org.springframework.web.context.ContextLoaderListener</listener-class>
26   </listener>
27   <!-- Appoint Spring Profile path -->
28   <context-param>
29       <param-name>contextConfigLocation</param-name>
30       <param-value>classpath:applicationContext.xml</param-value>
31   </context-param>
32   <!-- Configure filter to avoid Chinese code confusion -->
33   <filter>
34       <filter-name>characterEncodingFilter</filter-name>
35       <filter-class>org.springframework.web.filter.CharacterEncodingFilter</filter-class>
36       <init-param>
37           <param-name>encoding</param-name>
38           <param-value>UTF-8</param-value>
39       </init-param>
40   </filter>
41   <filter-mapping>
42       <filter-name>characterEncodingFilter</filter-name>
43       <url-pattern>/*</url-pattern>
44   </filter-mapping>
45 </web-app>
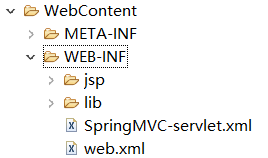
Create the spring MVC configuration file spring mvc-servlet.xml in WEB-INF (you can also put the configuration file in another location, but you need to indicate the path of the configuration file in web.xml) and jsp folder, which is used to store jsp pages.
 1 <?xml version="1.0" encoding="UTF-8"?>
 2 <beans xmlns="http://www.springframework.org/schema/beans"
 3     xmlns:xsi="http://www.w3.org/2001/XMLSchema-instance"
 4     xmlns:context="http://www.springframework.org/schema/context"
 5     xsi:schemaLocation="
 6         http://www.springframework.org/schema/beans
 7         http://www.springframework.org/schema/beans/spring-beans.xsd
 8         http://www.springframework.org/schema/context
 9         http://www.springframework.org/schema/context/spring-context.xsd">
10     <!-- Configure the control layer package requiring annotation scanning -->
11     <context:component-scan base-package="controller" />
12     <!-- Configure view resolver -->
13     <bean class="org.springframework.web.servlet.view.InternalResourceViewResolver">
14         <property name="prefix" value="/WEB-INF/jsp/"/>
15         <property name="suffix" value=".jsp"/>
16     </bean>
17 </beans>
Create the Spring configuration file applicationContext.xml in the src directory (the file path is specified in web.xml), configure Spring and load MyBatis.
 1 <?xml version="1.0" encoding="UTF-8"?>
 2 <beans xmlns="http://www.springframework.org/schema/beans"
 3     xmlns:xsi="http://www.w3.org/2001/XMLSchema-instance"
 4     xmlns:context="http://www.springframework.org/schema/context"
 5     xmlns:tx="http://www.springframework.org/schema/tx"
 6     xsi:schemaLocation="http://www.springframework.org/schema/beans
 7         https://www.springframework.org/schema/beans/spring-beans.xsd
 8         http://www.springframework.org/schema/context
 9         http://www.springframework.org/schema/context/spring-context.xsd
10         http://www.springframework.org/schema/tx
11         http://www.springframework.org/schema/tx/spring-tx.xsd">
12     <!-- Configure the business layer package requiring annotation scanning -->
13     <context:component-scan base-package="service"/>
14     <!-- Configure data sources -->
15     <bean id="dataSource" class="org.springframework.jdbc.datasource.DriverManagerDataSource">
16             <property name="driverClassName" value="com.mysql.cj.jdbc.Driver"/>
17             <property name="url" value="jdbc:mysql://localhost:3306/user?serverTimezone=Asia/Shanghai"/>
18             <property name="username" value="root"/>
19             <property name="password" value="root"/>
20     </bean>
21     <!-- To configure MyBatis factory -->
22     <bean id="sqlSessionFactory" class="org.mybatis.spring.SqlSessionFactoryBean">
23         <property name="dataSource" ref="dataSource"/>
24         <property name="configLocation" value="classpath:dao/mybatis-config.xml"/>
25     </bean>
26     <!-- To configure Spring scanning MyBatis Interface -->
27     <bean class="org.mybatis.spring.mapper.MapperScannerConfigurer">
28         <property name="basePackage" value="dao"/>
29         <property name="sqlSessionFactoryBeanName" value="sqlSessionFactory"/>
30     </bean>
31     <!-- Add transaction support -->
32     <bean id="txManager" class="org.springframework.jdbc.datasource.DataSourceTransactionManager">
33         <property name="dataSource" ref="dataSource"/>
34     </bean>
35     <!-- Enable transaction annotation scanning -->
36     <tx:annotation-driven transaction-manager="txManager"/>
37 </beans>
Create mybatis-config.xml (the file path is specified in the Spring configuration file) in dao package, indicating the path of MyBatis mapping file.
1 <?xml version="1.0" encoding="UTF-8"?>
2 <!DOCTYPE configuration
3     PUBLIC "-//mybatis.org//DTD Config 3.0//EN"
4     "http://mybatis.org/dtd/mybatis-3-config.dtd">
5 <configuration>
6     <mappers>
7         <mapper resource="dao/UserMapper.xml"/>
8     </mappers>
9 </configuration>
Create the mapping file UserMapper.xml of MyBatis in the dao package, which is used to implement the transfer system later.
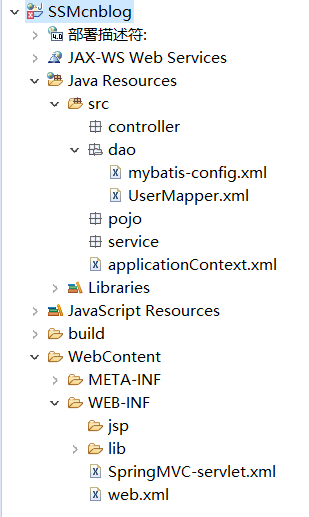
Here, the SSM framework environment has been built, and you can start to write code to implement the transfer system. The overall directory structure after integration is as follows:
III. implementation of transfer system
The transfer system we want to implement is very simple. The specific operation process of the system is "registration login transfer". After the user registers, there is a balance of 100 yuan by default, and then he can log in to the system and transfer to the designated user. Although the system is simple, it contains the most basic part of the SSM framework.
1. Implementation of persistence layer
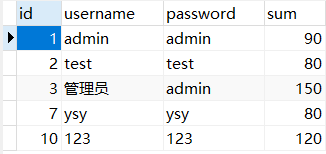
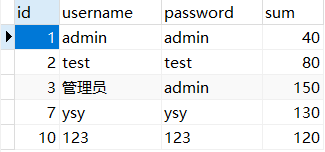
After analysis, to implement such a transfer system, we first need a table to record user information. Therefore, we create a user database and a user table in the database. The table definition is as follows:
1 CREATE TABLE `user`  (
2   `id` int(11) NOT NULL AUTO_INCREMENT,
3   `username` varchar(10) CHARACTER SET utf8 COLLATE utf8_general_ci NOT NULL,
4   `password` varchar(10) CHARACTER SET utf8 COLLATE utf8_general_ci NOT NULL,
5   `sum` int(11) NOT NULL DEFAULT 100,
6   PRIMARY KEY (`id`) USING BTREE
7 ) ENGINE = InnoDB AUTO_INCREMENT = 10 CHARACTER SET = utf8 COLLATE = utf8_general_ci ROW_FORMAT = Dynamic;
And insert several pieces of initial data.
In the pojo package, create a User.java class corresponding to the user table field, which is convenient for us to transfer data.
 1 package pojo;
 2
 3 public class User {
 4
 5     private int id;
 6
 7     private String username;
 8
 9     private String password;
10
11     private int sum;
12
13     public int getId() {
14         return id;
15     }
16
17     public void setId(int id) {
18         this.id = id;
19     }
20
21     public String getUsername() {
22         return username;
23     }
24
25     public void setUsername(String username) {
26         this.username = username;
27     }
28
29     public String getPassword() {
30         return password;
31     }
32
33     public void setPassword(String password) {
34         this.password = password;
35     }
36
37     public int getSum() {
38         return sum;
39     }
40
41     public void setSum(int sum) {
42         this.sum = sum;
43     }
44
45     @Override
46     public String toString() {
47         return "User [id=" + id + ", username=" + username + ", password=" + password + ", sum=" + sum + "]";
48     }
49
50 }
In the MyBatis mapping file UserMapper.xml created earlier, write the required SQL statement.
 1 <?xml version="1.0" encoding="UTF-8"?>
 2 <!DOCTYPE mapper
 3     PUBLIC "-//mybatis.org//DTD Mapper 3.0//EN"
 4     "http://mybatis.org/dtd/mybatis-3-mapper.dtd">
 5 <mapper namespace="dao.UserDao">
 6     <select id="selectUserByNameAndPass" resultType="pojo.User" parameterType="pojo.User">
 7         select * from user where username = #{username} and password = #{password}
 8     </select>
 9     <select id="selectUserByName" resultType="pojo.User" parameterType="pojo.User">
10         select * from user where username = #{username}
11     </select>
12     <insert id="addUser" parameterType="pojo.User">
13         insert into user (username,password) values (#{username},#{password})
14     </insert>
15     <update id="updateSumByName" parameterType="pojo.User">
16         update user set sum = #{sum} where username = #{username}
17     </update>
18 </mapper>
Create the UserDao.java interface in the dao package, and write the MyBatis mapping interface.
 1 package dao;
 2
 3 import org.apache.ibatis.annotations.Mapper;
 4
 5 import pojo.User;
 6
 7 @Mapper
 8 public interface UserDao {
 9
10     public User selectUserByNameAndPass(User user);
11
12     public int addUser(User user);
13
14     public User selectUserByName(User user);
15
16     public int updateSumByName(User user);
17 }
At this point, the persistence layer is completed. The directory structure is as follows:

2. Realize the business layer
After analysis, the system needs to achieve three businesses, which are "login", "registration" and "transfer". We can create the UserService.java class under the service package and implement these businesses with three methods. The code is as follows:
 1 package service;
 2
 3 import javax.servlet.http.HttpSession;
 4
 5 import org.springframework.beans.factory.annotation.Autowired;
 6 import org.springframework.stereotype.Service;
 7 import org.springframework.transaction.annotation.Transactional;
 8
 9 import dao.UserDao;
10 import pojo.User;
11
12 @Service
13 public class UserService {
14
15     @Autowired
16     private UserDao userDao;
17
18     @Autowired
19     private HttpSession httpSession;
20
21     public boolean login(User user) {
22         //Verify account password
23         user = userDao.selectUserByNameAndPass(user);
24         if (user == null) {
25             return false;
26         }
27         //Set up Session
28         httpSession.invalidate();
29         httpSession.setAttribute("username", user.getUsername());
30         return true;
31     }
32
33     public boolean register(User user) {
34         //Check if the user name is duplicate
35         if (userDao.selectUserByName(user) != null) {
36             return false;
37         }
38         userDao.addUser(user);
39         return true;
40     }
41
42     @Transactional
43     public boolean transfer(User user_in) {
44         //Check whether you transfer money to yourself
45         if (((String) httpSession.getAttribute("username")).equals(user_in.getUsername())) {
46             return false;
47         }
48         int transferSum = user_in.getSum();
49         //Check whether the transfer target user exists
50         user_in = userDao.selectUserByName(user_in);
51         if (user_in == null) {
52             return false;
53         }
54         //Check whether the user has enough balance to transfer
55         User user_out = new User();
56         user_out.setUsername((String) httpSession.getAttribute("username"));
57         user_out = userDao.selectUserByName(user_out);
58         int remainSum = user_out.getSum() - transferSum;
59         if ( remainSum < 0) {
60             return false;
61         }
62         //Start transfer
63         user_out.setSum(remainSum);
64         userDao.updateSumByName(user_out);
65         user_in.setSum(user_in.getSum() + transferSum);
66         userDao.updateSumByName(user_in);
67         return true;
68     }
69 }
III. implementation control layer
Like the business layer, the control layer needs three controllers to call the business layer. We need to write three methods to create the UserController.java class in the controller package. The code is as follows:
 1 package controller;
 2
 3 import org.springframework.beans.factory.annotation.Autowired;
 4 import org.springframework.stereotype.Controller;
 5 import org.springframework.web.bind.annotation.RequestMapping;
 6
 7 import pojo.User;
 8 import service.UserService;
 9
10 @Controller
11 public class UserController {
12
13     @Autowired
14     private UserService userService;
15
16     @RequestMapping("/login")
17     public String login(User user) {
18         if(!userService.login(user)) {
19             return "LoginError";
20         }
21         return "Transfer";
22     }
23
24     @RequestMapping("/register")
25     public String register(User user) {
26         if(userService.register(user)) {
27             return "RegisterSuccess";
28         }
29         return "RegisterError";
30     }
31
32     @RequestMapping("/transfer")
33     public String transfer(User user) {
34         if (userService.transfer(user)) {
35             return "TransferSuccess";
36         }
37         return "TransferError";
38     }
39 }
4. Realize visual layer
According to the definition in the control layer, we need to write seven jsp pages, as follows:
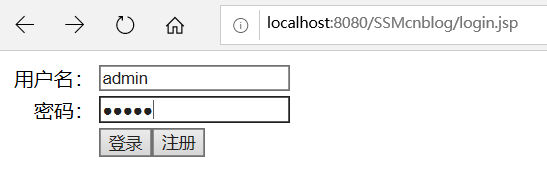
login.jsp:
 1 <%@ page language="java" contentType="text/html; charset=UTF-8"
 2     pageEncoding="UTF-8"%>
 3 <!DOCTYPE html>
 4 <html>
 5 <head>
 6 <meta charset="UTF-8">
 7 <title>Sign in</title>
 8 </head>
 9 <body>
10     <form action="${pageContext.request.contextPath}/login" method="post">
11         <table>
12             <tr>
13                 <td align="right">User name:</td>
14                 <td><input type="text" name="username"/></td>
15             </tr>
16             <tr>
17                 <td align="right">Password:</td>
18                 <td><input type="password" name="password"/></td>
19             </tr>
20             <tr>
21                 <td align="center" colspan="2"><input type="submit" value="Sign in"/><input type="submit" value="register" formaction="${pageContext.request.contextPath}/register"/></td>
22             </tr>
23         </table>
24     </form>
25 </body>
26 </html>
Login failure page LoginError.jsp:
 1 <%@ page language="java" contentType="text/html; charset=UTF-8"
 2     pageEncoding="UTF-8"%>
 3 <!DOCTYPE html>
 4 <html>
 5 <head>
 6 <meta charset="UTF-8">
 7 <title>Login failed</title>
 8 </head>
 9 <body>
10     Wrong user name or password!
11 </body>
12 </html>
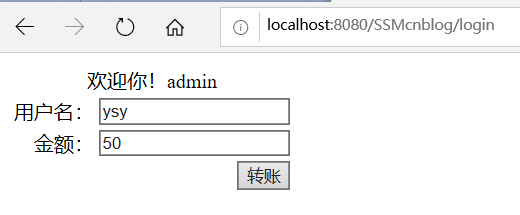
Transfer.jsp: transfer.jsp
 1 <%@ page language="java" contentType="text/html; charset=UTF-8"
 2     pageEncoding="UTF-8"%>
 3 <!DOCTYPE html>
 4 <html>
 5 <head>
 6 <meta charset="UTF-8">
 7 <title>Transfer accounts</title>
 8 </head>
 9 <body>
10     <form action="${pageContext.request.contextPath}/transfer" method="post">
11         <table>
12             <tr>
13                 <td align="center" colspan="2">Welcome! ${user.username}</td>
14             </tr>
15             <tr>
16                 <td align="right">User name:</td>
17                 <td><input type="text" name="username"/></td>
18             </tr>
19             <tr>
20                 <td align="right">Amount of money:</td>
21                 <td><input type="text" name="sum"/></td>
22             </tr>
23             <tr>
24                 <td/>
25                 <td align="right"><input type="submit" value="Transfer accounts"/></td>
26             </tr>
27         </table>
28     </form>
29 </body>
30 </html>
Registration failure page RegisterError.jsp:
 1 <?xml version="1.0" encoding="UTF-8" ?>
 2 <!DOCTYPE html PUBLIC "-//W3C//DTD XHTML 1.0 Transitional//EN" "http://www.w3.org/TR/xhtml1/DTD/xhtml1-transitional.dtd">
 3 <html xmlns="http://www.w3.org/1999/xhtml">
 4 <head>
 5 <%@ page language="java" contentType="text/html; charset=UTF-8"
 6     pageEncoding="UTF-8"%>
 7 <meta http-equiv="Content-Type" content="text/html; charset=UTF-8" />
 8 <title>login has failed</title>
 9 </head>
10 <body>
11     Registration failed!
12 </body>
13 </html>
Registration success page RegisterSuccess.jsp:
 1 <?xml version="1.0" encoding="UTF-8" ?>
 2 <!DOCTYPE html PUBLIC "-//W3C//DTD XHTML 1.0 Transitional//EN" "http://www.w3.org/TR/xhtml1/DTD/xhtml1-transitional.dtd">
 3 <html xmlns="http://www.w3.org/1999/xhtml">
 4 <head>
 5 <%@ page language="java" contentType="text/html; charset=UTF-8" pageEncoding="UTF-8"%>
 6 <meta http-equiv="Content-Type" content="text/html; charset=UTF-8" />
 7 <title>login was successful</title>
 8 </head>
 9 <body>
10     Registration succeeded!
11 </body>
12 </html>
Transfer failure page TransferError.jsp:
 1 <?xml version="1.0" encoding="UTF-8" ?>
 2 <!DOCTYPE html PUBLIC "-//W3C//DTD XHTML 1.0 Transitional//EN" "http://www.w3.org/TR/xhtml1/DTD/xhtml1-transitional.dtd">
 3 <html xmlns="http://www.w3.org/1999/xhtml">
 4 <head>
 5 <%@ page language="java" contentType="text/html; charset=UTF-8"
 6     pageEncoding="UTF-8"%>
 7 <meta http-equiv="Content-Type" content="text/html; charset=UTF-8" />
 8 <title>Transfer failure</title>
 9 </head>
10 <body>
11     Transfer failed!
12 </body>
13 </html>
Transfer success page TransferSuccess.jsp:
 1 <?xml version="1.0" encoding="UTF-8" ?>
 2 <!DOCTYPE html PUBLIC "-//W3C//DTD XHTML 1.0 Transitional//EN" "http://www.w3.org/TR/xhtml1/DTD/xhtml1-transitional.dtd">
 3 <html xmlns="http://www.w3.org/1999/xhtml">
 4 <head>
 5 <%@ page language="java" contentType="text/html; charset=UTF-8"
 6     pageEncoding="UTF-8"%>
 7 <meta http-equiv="Content-Type" content="text/html; charset=UTF-8" />
 8 <title>Successful transfer</title>
 9 </head>
10 <body>
11     Transfer succeeded!
12 </body>
13 </html>
Here, the transfer system is basically implemented, and the final directory structure is as follows:

Running screenshot:
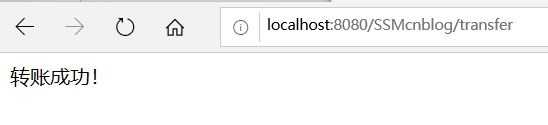
It can be seen that the admin account successfully transferred 50 yuan to the ysy account.