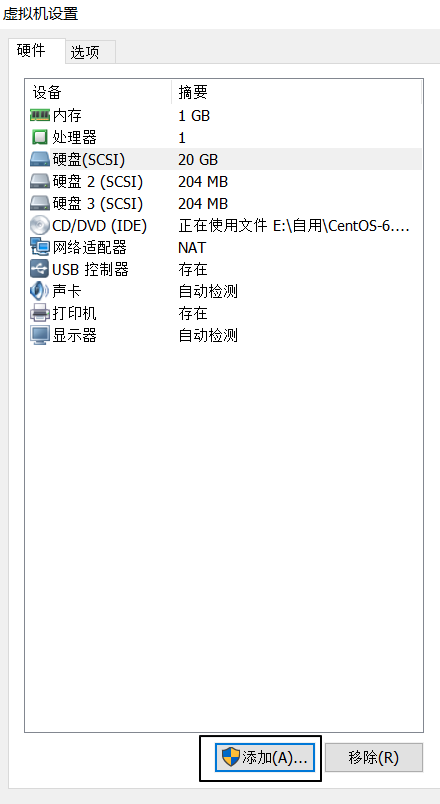
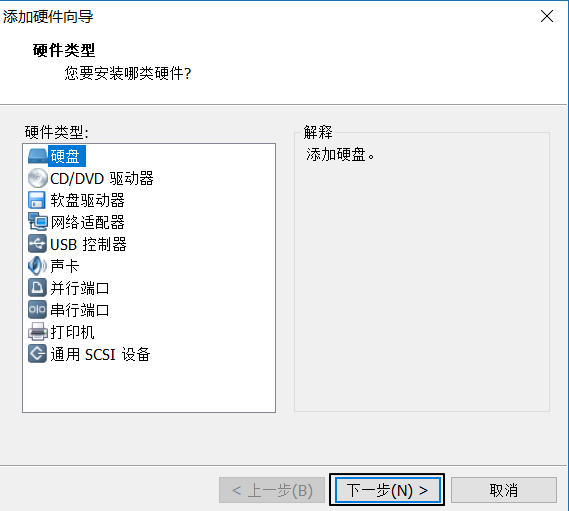
First, let's simulate the environment. The following image uses VMware to add a 300G (actual 200M~~manual funny--) hard disk device to me.

Add them step by step.You need to restart your virtual machine after adding it to take effect.

OK, then we have the environment.I have installed a 300G (200M) hard disk for our Server. Now let's mount it under / data.
The first step is to create a partition for the new disk.
[root@~]# ll /dev/sdb*    #Check the second hard disk, and partitions
brw-rw---- 1 root disk 8, 16 Aug 15 14:35 /dev/sdb
#This shows that you have a second disk, but no partitions, brother~~
Create partitions for disks using two commands, fdisk and parted.Let's start with fdisk.Pared said later
fdisk command, -c option: turn off dos compatibility mode, -u partitions in sectors.
You can use it when you need to partition your disks more carefully. Let's mount all 300G s to / data now without using the command option.
The following are the meanings of the fdisk internal instructions you need to use later:
m Display help.Create partitions.p Display disk partition information.d. Delete partitions.w. Save and exit.Quit without saving.
[root@~]# fdisk /dev/sdb      #Add disk files directly after fdisk command

WARNING: DOS-compatible mode is deprecated. It's strongly recommended to
         switch off the mode (command 'c') and change display units to
         sectors (command 'u').
#The warning here is that it is recommended that you turn off dos compatibility mode and enable the -u option, which in short lets you use the -cu option.
//This warning, however, should not be overlooked. It will only be displayed when the disk is not partitioned and will not have any impact on our next actions.
Command (m for help): p   #Take a look at the partitions first

Disk /dev/sdb: 213 MB, 213909504 bytes
64 heads, 32 sectors/track, 204 cylinders
Units = cylinders of 2048 * 512 = 1048576 bytes
Sector size (logical/physical): 512 bytes / 512 bytes
I/O size (minimum/optimal): 512 bytes / 512 bytes
Disk identifier: 0x1bf8bec7

   Device Boot      Start         End      Blocks   Id  System

#Well, what's left blank is that no disk partitions have been made.
Command (m for help): n      #Create Disk Partition
Command action
   e   extended
   p   primary partition (1-4)   #Here's the system hint. Do you want to create an extended partition by e or a primary partition by p?
p                #Let's prepare a whole partition and naturally choose the p main partition~~
Partition number (1-4): 1        #Type 1, which means primary partition number 1.
First cylinder (1-204, default 1):"Enter key (press Enter)    #Here is the cylindrical surface that allows you to choose the starting point of the partition. Enter is the default, meaning initially
Using default value 1
Last cylinder, +cylinders or +size{K,M,G} (1-204, default 204):"Enter key (press Enter)   #Here is the cylindrical surface that lets you choose the end of the partition. Enter is the default. Last meaning
Using default value 204    (Created)

Command (m for help): p        #Let's have a look again

Disk /dev/sdb: 213 MB, 213909504 bytes
64 heads, 32 sectors/track, 204 cylinders
Units = cylinders of 2048 * 512 = 1048576 bytes
Sector size (logical/physical): 512 bytes / 512 bytes
I/O size (minimum/optimal): 512 bytes / 512 bytes
Disk identifier: 0x1bf8bec7

   Device Boot      Start         End      Blocks   Id  System
/dev/sdb1               1         204      208880   83  Linux
#Well, the partition name / dev/sdb1 is about'300G'
Command (m for help): w     # Type w. Be sure to save and exit.Otherwise, all settings will not work.
The partition table has been altered!

Calling ioctl() to re-read partition table.
Syncing disks.
Fdisk-l Check the disk information.
[root@~]# fdisk -l| grep '/dev/sdb'

Disk /dev/sdb: 213 MB, 213909504 bytes
/dev/sdb1               1         204      208880   83  Linux

#This means that our partition has been created.
Step 2, create a file system for your partition (formatting)
First, update it manually to let the system know that the sdb disk partition table has changed ~~
[root@~]# partprobe /dev/sdb
[root@~]#

# The proud Linux won't give you any hints.But this step is essential
Then just install an ext4 file system directly to the partition
[root@~]# mkfs.ext4 /dev/sdb1    #No spaces are required between mkfs commands and.ext4.Note that the file name followed by the partition is not the disk file name.
mke2fs 1.41.12 (17-May-2010)
··························Omit a few lines here
Writing superblocks and filesystem accounting information: done

This filesystem will be automatically checked every 21 mounts or
180 days, whichever comes first.  Use tune2fs -c or -i to override.
#The last two tips are the most important, which means that the file system will be automatically checked after 21 mounts or 180 days, using tune2fs-c or-i to override the default automatic check.
I don't need to check anything by default anyway, so I'll just turn it off and use its recommended tune2fs command.
[root@~]# tune2fs -c 0 -i 0 /dev/sdb1    # -c and-i followed by zero (unchecked meaning), or disk partition file ~~
tune2fs 1.41.12 (17-May-2010)
Setting maximal mount count to -1
Setting interval between checks to 0 seconds
#The prompt will not be translated one by one, which probably means that the system will not check automatically.
The third step is to mount/dev/sdb1 ~~to/data and enable the boot-up auto-mount.
Mount mount, that's easy, I won't talk about it.
[root@~]# mount /dev/sdb1 /data
[root@~]# df -h            #Better df-h check it out
Filesystem      Size  Used Avail Use% Mounted on
/dev/sda3        19G  2.3G   16G  13% /
tmpfs           490M     0  490M   0% /dev/shm
/dev/sda1       190M   66M  115M  37% /boot
/dev/sdb1       194M  1.8M  182M   1% /data
               #Shouldn't it be 300G here? Am I hanging up wrong? - -?
There are many ways to automatically mount when you turn on the computer. Let's just talk about three.
Method 1: Start up mount/dev/sdb1/data by /etc/rc.local.To achieve automatic boot-up mounting
[root@~]# ll /etc/rc.local
lrwxrwxrwx 1 root root 13 Aug  6 17:57 /etc/rc.local -> rc.d/rc.local
# /etc/rc.local is a symbolic link to/etc/rc.d/rc.local.Modify the symbolic link file directly under the root privilege.
[root@~]# vim /etc/rc.d/rc.local      #But I have obsessive-compulsive disorder and I'm going to modify the source file.Hem~~

#!/bin/sh
#
# This script will be executed *after* all the other init scripts.
# You can put your own initialization stuff in here if you don't
# want to do the full Sys V style init stuff.

touch /var/lock/subsys/local
mount /dev/sdb1 /data            #That's a good sentence to write, but I don't recommend it.Maybe it's because you compare Low
Method 2: Auto-mount on power by/etc/fstab
[root@~]# vim /etc/fstab
#
# /etc/fstab
# Created by anaconda on Sat Jul 28 14:15:11 2018
#
# Accessible filesystems, by reference, are maintained under '/dev/disk'
# See man pages fstab(5), findfs(8), mount(8) and/or blkid(8) for more info
#
UUID=4b7f430b-398b-4ca4-a6f4-75e11c8498f0 /                       ext4    defaults        1 1
UUID=b001470a-e506-4b50-a705-7b4343ac6a7c /boot                   ext4    defaults        1 2
UUID=ec344814-973b-45d3-95f0-7ce6265b3247 swap                    swap    defaults        0 0
tmpfs                   /dev/shm                tmpfs   defaults        0 0
devpts                  /dev/pts                devpts  gid=5,mode=620  0 0
sysfs                   /sys                    sysfs   defaults        0 0
proc                    /proc                   proc    defaults        0 0
/dev/sdb1               /data/                  ext4    defaults        0 0
#Name of the first list of devices         #Second column mount point (directory)     #3,file system type   #4,defaults Is the default mount parameter
#The first 0 refers to whether to back up 0 (no) and the second 0 refers to whether to turn on disk check 0 (no check)
Method 3: Start up automatically by chkconfig.
I don't recommend this method either, since chkconfig is better for enabling system services and fstab is better for mounting things.
The following links are the ones I wrote about how to implement chkconfig's on-boot ~~link, which you can check out if you are interested.
https://www.cnblogs.com/xuenil/p/9470812.html
As for the difference between fdisk and parted, let's talk about ~~~ again tomorrow.