I. Overview
PuTTY is a Telnet, SSH, rlogin, pure TCP and serial interface connection software. Earlier versions only support Windows platforms, and in recent versions, Unix platforms have been supported and are intended to be ported to Mac OS X. In addition to the official version, many third-party groups or individuals have ported PuTTY to other platforms, such as Symbian-based mobile phones. PuTTY is an open source software maintained by Simon Tatham and authorized by MIT licence. With the popularity of Linux in server-side applications, Linux system management is increasingly dependent on remote. Putty is one of the excellent remote login tools. Putty is a free Telnet, SSH and rlogin client on Windows x86 platform, but its function is no less than that of commercial Telnet tools.
Official website
https://www.putty.org/
III. Installation
1. Double-click the installation file directly and install it step by step according to the prompt.
2. After successful installation, the installation directory will be added to the environment variable PATH to facilitate remote linking through the command line.
List of files under installation directory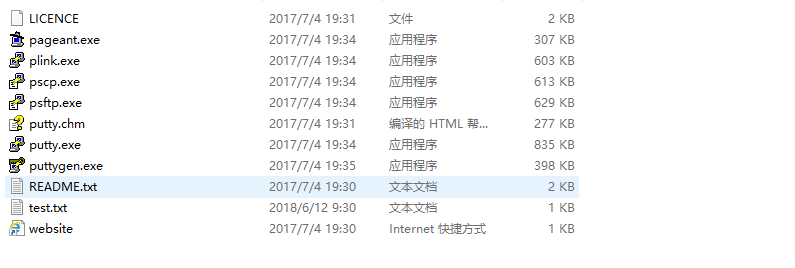
Where plink can link linux directly or execute scripts remotely
pscp for remote file transfer
psftp for file transfer of remote sftp protocol
puttygen is used to generate key pairs or key transformations
putty.chm is a very useful offline help document
3. Secret-free remote linux
1. Generating key pairs
useradd jenkins
passwd jenkins
ssh-keygen -t rsa
cd ~/.ssh
cat id_rsa.pub authorized_keys
Copy the id_rsa file back to the local area and save it in txt format for the second step.
2. Generating ppk Private Key
Because putty only recognizes the private key file in ppk format, it is necessary to convert the private key generated on linux.
Use the puttygen tool to generate.
File_Load private key, find the private key file.
By default, putty can only select files in ppk format, and select All Files to select private key files in other formats.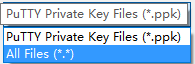
(2) Keep ppk Private Key File
Click Save private key to save the file in ppk format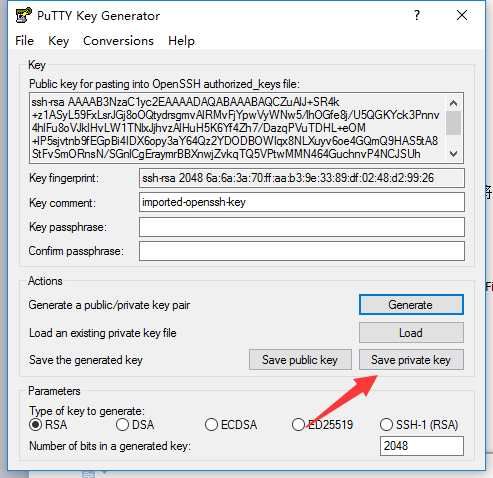
3. Log on to remote linux using private key
Open putty and enter the user name for login and the target server IP or name for access in Host or IP.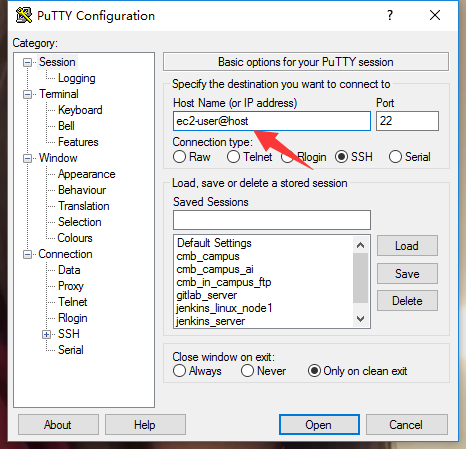
(2) Selecting Private Key Files
Connection → SSH → Auth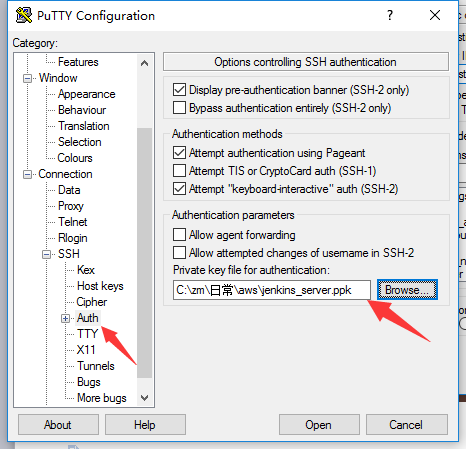
(3) Click Session Open to reach the target machine remotely. The first connection will have a confirmation prompt box. Click on confirmation.
If you don't want to repeat the above steps every time, you can enter a name in Session Save Sessions and click Save. Next time, you can click on the name in the Session list to go by remotely.
IV. putty command
1. Use the putty command line to login to remote linux confidentially
putty -load "jenkins_server" -ssh
Where jenkins_server is the name of the session saved by putty
2. Log on to remote linux using putty command-line password
putty.exe [-ssh | -telnet | -rlogin | -raw] [user@]host
Example: putty -ssh -l  user- pw  password -P 2222  -m  exe.txt  127.0.0.1
3. Execute scripts after login (scripts are stored locally)
putty -load "jenkins_server" -ssh -m test.txt
4. Log in with username and password
putty -load "qa server" -ssh -l {username} -pw {password}
5. pscp command
1. Upload files to remote directories
pscp get-pip.py ubuntu@192.168.1.236:/home/ubuntu
2. Viewing remote directories
pscp -load "jenkins_server" -ls ec2-user@ec2-52-83-149-95.cn-northwest-1.compute.amazonaws.com.cn:/home/ec2-user/maven
The load parameter needs to be placed after the pscp command and must specify the user name and server name.
3. Transfer files from local to linux
pscp -load "jenkins_server" README.txt ec2-user@ec2-52-83-149-95.cn-northwest-1.compute.amazonaws.com.cn:/home/ec2-user
4. Transfer files from remote linux to local
pscp -load "jenkins_server" ec2-user@ec2-52-83-149-95.cn-northwest-1.compute.amazonaws.com.cn:/home/ec2-user/maven35-agent.jar C:/Users/Neo/Desktop
5. Transfer folders from remote linux to local
pscp -load "jenkins_server" -r ec2-user@ec2-52-83-149-95.cn-northwest-1.compute.amazonaws.com.cn:/home/ec2-user/maven C:/Users/Neo/Desktop/maven
6. Transfer multiple files from local to linux
pscp -load "jenkins_server" README.txt putty.chm ec2-user@ec2-52-83-149-95.cn-northwest-1.compute.amazonaws.com.cn:/home/ec2-user
7. Transfer files using private key login (for jenkins windows nodes)
pscp.exe -i privatekey.ppk -batch E:\SVCePOP\putty\HCTDS.csv servername@server IP:/data/ftproot

pscp -i C:\Users\Administrator\Desktop\jenkins_linux_node1.ppk -batch C:\jenkins\workspace\jenkins_windows_linux\target\jenkins_test-1.0-SNAPSHOT.war ec2-user@ec2-52-83-189-59.cn-northwest-1.compute.amazonaws.com.cn:/home/ec2-user

pscp.exe -load "linux_node1" -batch C:\jenkins\workspace\jenkins_windows_linux\target\jenkins_test-1.0-SNAPSHOT.war ec2-user@ec2-52-83-189-59.cn-northwest-1.compute.amazonaws.com.cn:/home/ec2-user
6. plink command
1. Connect remote linux
plink jenkins_server
The name Jenkins_server saves for session
2. Remote execution script
plink jenkins_server /home/ec2-user/test.sh