install
- Download the installation package of mysql on the official website and follow the instructions http://www.jb51.net/article/23876.htm Installation steps above are enough.
- Be careful
- Because I am an individual learning goal, the number of simultaneous connections is set smaller, if many people use it at the same time, we need to pay attention to it.
- In the process of installation, you need to remember the port number and password, so as to facilitate later operation.
- For ease of use, add mysql paths to environment variables
- After installation, you can check mysql's service in the computer's service. If you use it frequently, you can set its type to auto-start. If you use it less frequently, you can set it to start. Before you need to use it every time, you need to start mysql's service first.
open
- Open MySQL 5.5 Command Line Client in the navigation panel, prompt for a password, and then enter the mysql development environment
- Open cmd and enter mysql-u root-p (if environment variables are added successfully, otherwise you need to enter the folder where mysql.exe is located first). It will also prompt you to enter the password, and then you can enter the development environment.
- Database files are stored by default in C: ProgramData MySQL MySQL Server 5.5 data
Use
- All statements should be followed by a semicolon
- Display all databases
- show databases;
-
Create a database
- create database db1 DEFAULT CHARSET utf8;
- New db1 database with utf8 character set
-
Use a database
- use dbname; use the existing dbname database
- View all table s in the database
- show tables;
-
Create a new table in the current database
- The specific instructions are as follows
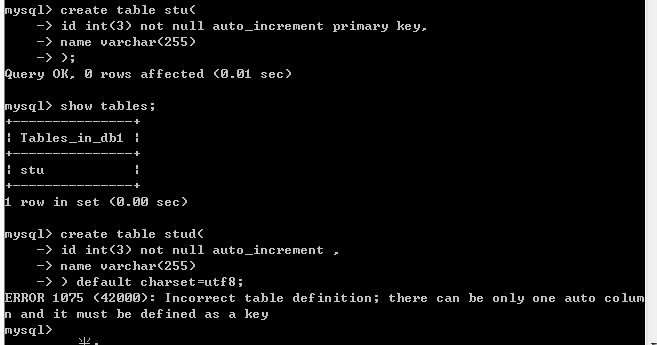
-
If you find the input instructions too cumbersome, you can write them into the. SQL file and execute them, such as C: ProgramData MySQL MySQL Server 5.5 data with a run.sql. The contents are as follows:
create table test
    (
        id int(10) unsigned not null auto_increment primary key,
        name char(255) not null
    );
Run the instruction source C: ProgramData MySQL MySQL Server 5.5 data run. SQL (no semicolon!! Yes.
-
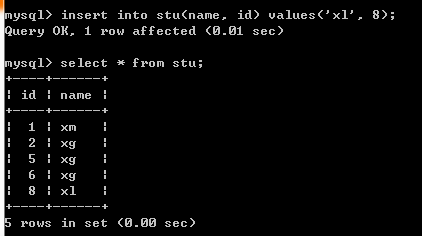
Add data to the table
- Insert into stu values (NULL,'xm'); because id is specified as non-NULL, id is automatically filled unless automatically specified
- You can also specify data items to fill in, such as insert into stu(name,id) values('xg', 5);
-
Query data (select)
-
The result of select * from stu is all the data in stu

-
General statements for queries: select column name from table name [query condition]; as shown below

-
-
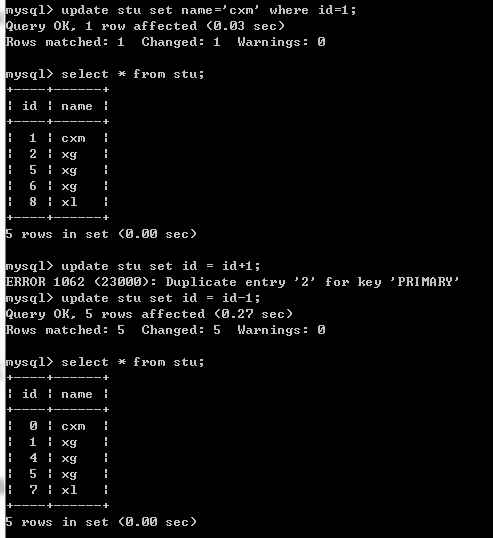
Update the data in the list
-
Update form: update table name set column name = new value where update condition; use the following figure
-
-
Column modifications after table creation
- Add columns: alter table table name add column name column data type [after insertion location];
- Modify column names or attributes: alter table table table table name change column name column new name new data type;
- Delete column: alter table table table table name drop column name;
-
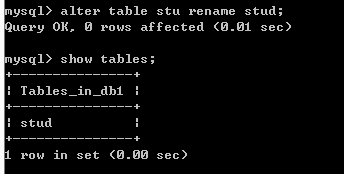
Modified name: alter table table table table name rename new table name;

-
export file
- After entering the SQL environment, export: select * from stud into outfile'E: output. sql'
-
After entering the sql environment, import: source XXX.sql
-
Command Line Export

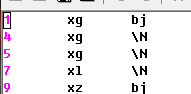
The file information exported is as follows:-- MySQL dump 10.13 Distrib 5.5.19, for Win32 (x86) -- -- Host: localhost Database: db1 -- ------------------------------------------------------ -- Server version 5.5.19 /*!40101 SET @OLD_CHARACTER_SET_CLIENT=@@CHARACTER_SET_CLIENT */; /*!40101 SET @OLD_CHARACTER_SET_RESULTS=@@CHARACTER_SET_RESULTS */; /*!40101 SET @OLD_COLLATION_CONNECTION=@@COLLATION_CONNECTION */; /*!40101 SET NAMES utf8 */; /*!40103 SET @OLD_TIME_ZONE=@@TIME_ZONE */; /*!40103 SET TIME_ZONE='+00:00' */; /*!40014 SET @OLD_UNIQUE_CHECKS=@@UNIQUE_CHECKS, UNIQUE_CHECKS=0 */; /*!40014 SET @OLD_FOREIGN_KEY_CHECKS=@@FOREIGN_KEY_CHECKS, FOREIGN_KEY_CHECKS=0 */; /*!40101 SET @OLD_SQL_MODE=@@SQL_MODE, SQL_MODE='NO_AUTO_VALUE_ON_ZERO' */; /*!40111 SET @OLD_SQL_NOTES=@@SQL_NOTES, SQL_NOTES=0 */; -- -- Table structure for table `stud` -- DROP TABLE IF EXISTS `stud`; /*!40101 SET @saved_cs_client = @@character_set_client */; /*!40101 SET character_set_client = utf8 */; CREATE TABLE `stud` ( `id` int(3) NOT NULL AUTO_INCREMENT, `name` varchar(255) DEFAULT NULL, `address` char(60) DEFAULT 'bj', PRIMARY KEY (`id`) ) ENGINE=InnoDB AUTO_INCREMENT=10 DEFAULT CHARSET=utf8; /*!40101 SET character_set_client = @saved_cs_client */; -- -- Dumping data for table `stud` -- LOCK TABLES `stud` WRITE; /*!40000 ALTER TABLE `stud` DISABLE KEYS */; INSERT INTO `stud` VALUES (1,'xg','bj'),(4,'xg',NULL),(5,'xg',NULL),(7,'xl',NULL),(9,'xz','bj'); /*!40000 ALTER TABLE `stud` ENABLE KEYS */; UNLOCK TABLES; /*!40103 SET TIME_ZONE=@OLD_TIME_ZONE */; /*!40101 SET SQL_MODE=@OLD_SQL_MODE */; /*!40014 SET FOREIGN_KEY_CHECKS=@OLD_FOREIGN_KEY_CHECKS */; /*!40014 SET UNIQUE_CHECKS=@OLD_UNIQUE_CHECKS */; /*!40101 SET CHARACTER_SET_CLIENT=@OLD_CHARACTER_SET_CLIENT */; /*!40101 SET CHARACTER_SET_RESULTS=@OLD_CHARACTER_SET_RESULTS */; /*!40101 SET COLLATION_CONNECTION=@OLD_COLLATION_CONNECTION */; /*!40111 SET SQL_NOTES=@OLD_SQL_NOTES */; -- Dump completed on 2017-02-12 10:13:29
This is a command file for generating tables. In sql environment, the corresponding tables can be generated by using the source command.
- Change Password
- Enter the command line (not the sql development environment! (mysqladmin-u root-p password)