Links to the original text: http://blog.csdn.net/xyang81/article/details/52837974
FastDFS, developed by Mr. Yu Qing of Taobao, is a lightweight, high-performance open source distributed file system, which is pure. C language Development, including file storage, file synchronization, file access (upload, download), access load balancing, online expansion, the same content only store one function, suitable for applications or systems with large capacity storage requirements. When developing distributed systems, one of the problems to be solved is the sharing of pictures, audio and video, and files, which can be solved by distributed file systems. Similar distributed file systems There are Google's GFS, HDFS( Hadoop TFS (Taobao) and so on.
Open source download address: https://github.com/happyfish100
Early source open download address: https://sourceforge.net/projects/fastdfs/files/
Official Forum: http://bbs.chinaunix.net/forum-240-1.html
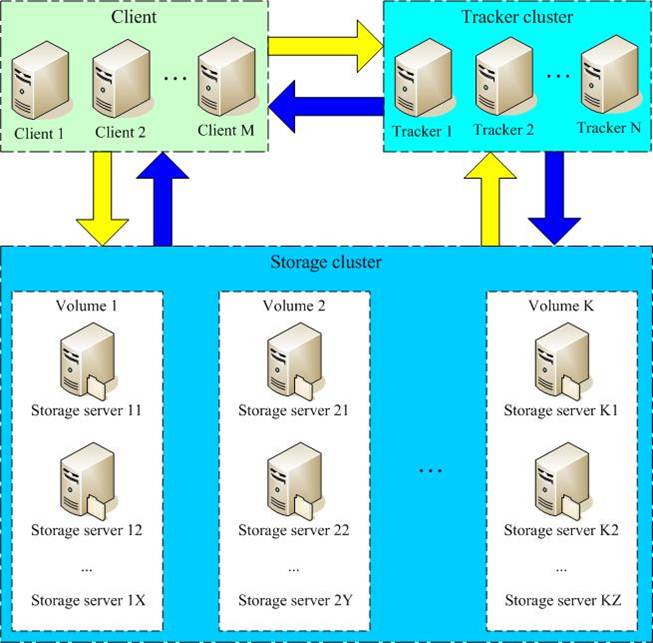
FastDFS system architecture:
FastDFS file upload process:
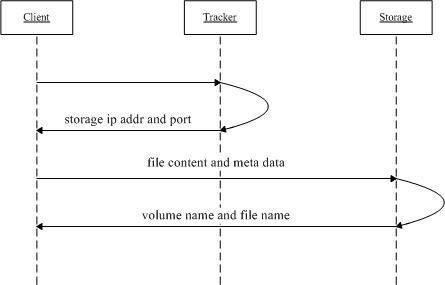
1. client inquires about the storage uploaded by tracker without additional parameters;
2. tracker returns an available storage;
3. client communicates with storage directly to upload files.
FastDFS file download process:
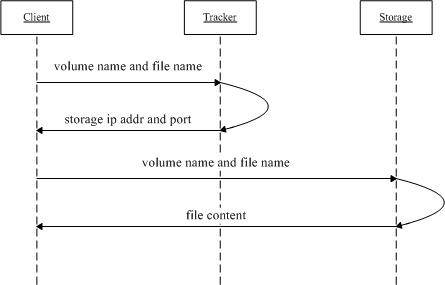
1. client asks tracker to download the file storage, the parameter is file identification (group name and file name);
2. tracker returns an available storage;
3. client communicates with storage directly to download files.
term
Two main roles of FastDFS: Tracker Server and Storage Server
Tracker Server: Tracker Server, which is mainly responsible for dispatching the communication between storage node and client, plays the role of load balancing in access, and records the running status of storage node. It is the hub connecting client and storage node.
Storage Server: Storage server, meta data for storing files and files
Group: A file group, also known as a volume. The files on the servers in the same group are exactly the same. When clustering, there are often multiple servers in a group. After uploading a file to a machine in the same group, FastDFS will synchronize the file to all other machines in the same group, and play a backup role.
Meta data: file-related properties, Key Value Pair, such as width=1024, height=768. It is similar to meta data of Aliyun OSS.
FastDFS Single Node Installation-Server Planning:
Tracker Server: 192.168.0.200
Storage Server: 192.168.0.201
operating system: CentOS7
User: root
Data Storage Directory: / fastdfs
Installation package:
Fasstdfs-master-V5.05.zip: FastDFS source code
Libfast common-master.zip: (Common C libraries extracted from FastDFS and FastDHT)
fastdfs-nginx-module-master.zip: storage node http service nginx module
nginx-1.10.0.tar.gz: Nginx installation package
ngx_cache_purge-2.3.tar.gz: Image cache clears Nginx modules (used in cluster environments)
click here Download all installation packages, and you can also download them from Author github Official website to download.
After downloading, extract the compressed package into the / usr/local/src directory
1. All tracker and storage nodes perform the following operations
1. Dependency packages required for installation
shell> yum install make cmake gcc gcc-c++- 1
- 1
2. Install libfatscommon
shell> cd /usr/local/src
shell> unzip libfastcommon-master.zip
shell> cd libfastcommon-master
shell> ll
-rw-r--r--. 1 root root 6670 10 Month 809:39 HISTORY
-rw-r--r--. 1 root root  566 10 Month 809:39 INSTALL
-rw-r--r--. 1 root root 1438 10 Month 809:39 libfastcommon.spec
-rwxr-xr-x. 1 root root 3099 10month  8 09:39 make.sh
drwxr-xr-x. 2 root root 4096 10month  8 09:39 php-fastcommon
-rw-r--r--. 1 root root  812 10 Month 809:39 README
drwxr-xr-x. 3 root root 4096 10month  8 09:39 src
## Compile and install
shell> ./make.sh
shell> ./make.sh install- 1
- 2
- 3
- 4
- 5
- 6
- 7
- 8
- 9
- 10
- 11
- 12
- 13
- 14
- 1
- 2
- 3
- 4
- 5
- 6
- 7
- 8
- 9
- 10
- 11
- 12
- 13
- 14
3. Installation of FastDFS
shell> cd /usr/local/src
shell> unzip fastdfs-master-V5.05.zip
shell> cd fastdfs-master
shell> ll
[root@localhost fastdfs-master]# ll
drwxr-xr-x. 3 root root  4096 8 Month 815:17 client
drwxr-xr-x. 2 root root  4096 8 Month 815:17 common
drwxr-xr-x. 2 root root  4096 8 Month 815:17 conf
-rw-r--r--. 1 root root 35067 8month   8 15:17 COPYING-3_0.txt
-rw-r--r--. 1 root root  2881 8month   8 15:17 fastdfs.spec
-rw-r--r--. 1 root root 32259 8month   8 15:17 HISTORY
drwxr-xr-x. 2 root root    46 8 Month 815:17 init.d
-rw-r--r--. 1 root root  7755 8month   8 15:17 INSTALL
-rwxr-xr-x. 1 root root  5548 8month   8 15:17 make.sh
drwxr-xr-x. 2 root root  4096 8 Month 815:17 php_client
-rw-r--r--. 1 root root  2380 8month   8 15:17 README.md
-rwxr-xr-x. 1 root root  1768 8month   8 15:17 restart.sh
-rwxr-xr-x. 1 root root  1680 8month   8 15:17 stop.sh
drwxr-xr-x. 4 root root  4096 8 Month 815:17 storage
drwxr-xr-x. 2 root root  4096 8 Month 815:17 test
drwxr-xr-x. 2 root root  4096 8 Month 815:17 tracker
## Compile and install
shell> ./make.sh
shell> ./make.sh install- 1
- 2
- 3
- 4
- 5
- 6
- 7
- 8
- 9
- 10
- 11
- 12
- 13
- 14
- 15
- 16
- 17
- 18
- 19
- 20
- 21
- 22
- 23
- 24
- 1
- 2
- 3
- 4
- 5
- 6
- 7
- 8
- 9
- 10
- 11
- 12
- 13
- 14
- 15
- 16
- 17
- 18
- 19
- 20
- 21
- 22
- 23
- 24
By default, the corresponding files and directories are as follows:
1 > Service script:
/etc/init.d/fdfs_storaged
/etc/init.d/fdfs_trackerd- 1
- 2
- 1
- 2
2 > Configuration File (Sample Configuration File):
/etc/fdfs
shell> ll /etc/fdfs/
Total consumption 20
-rw-r--r--. 1 root root 1461 10 month 17 15:15 client.conf.sample
-rw-r--r--. 1 root root 7927 10 month 17 15:15 storage.conf.sample
-rw-r--r--. 1 root root 7200 10 month 17 15:15 tracker.conf.sample- 1
- 2
- 3
- 4
- 5
- 6
- 1
- 2
- 3
- 4
- 5
- 6
3 > Command Line Tools (/ usr/bin directory)
shell> ll /usr/bin/ | grep fdfs
-rwxr-xr-x.   1 root root      315391 10month 17 15:15 fdfs_appender_test
-rwxr-xr-x.   1 root root      315168 10month 17 15:15 fdfs_appender_test1
-rwxr-xr-x.   1 root root      302016 10month 17 15:15 fdfs_append_file
-rwxr-xr-x.   1 root root      301692 10month 17 15:15 fdfs_crc32
-rwxr-xr-x.   1 root root      302075 10month 17 15:15 fdfs_delete_file
-rwxr-xr-x.   1 root root      302810 10month 17 15:15 fdfs_download_file
-rwxr-xr-x.   1 root root      302400 10month 17 15:15 fdfs_file_info
-rwxr-xr-x.   1 root root      316229 10month 17 15:15 fdfs_monitor
-rwxr-xr-x.   1 root root     1101974 10month 17 15:15 fdfs_storaged
-rwxr-xr-x.   1 root root      325327 10month 17 15:15 fdfs_test
-rwxr-xr-x.   1 root root      320448 10month 17 15:15 fdfs_test1
-rwxr-xr-x.   1 root root      447878 10month 17 15:15 fdfs_trackerd
-rwxr-xr-x.   1 root root      303002 10month 17 15:15 fdfs_upload_appender
-rwxr-xr-x. 1 root root 304022 10month 17 15:15 fdfs_upload_file- 1
- 2
- 3
- 4
- 5
- 6
- 7
- 8
- 9
- 10
- 11
- 12
- 13
- 14
- 15
- 1
- 2
- 3
- 4
- 5
- 6
- 7
- 8
- 9
- 10
- 11
- 12
- 13
- 14
- 15
Configuration of tracker server
1 > Copy the tracker sample configuration file and rename it
shell> cp /etc/fdfs/tracker.conf.sample /etc/fdfs/tracker.conf- 1
- 1
2 > Modify the tracker configuration file
shell> vim /etc/fdfs/tracker.conf
# The amendments are as follows:
disabled=false              # Enable configuration files
port=22122                  # tracker server port (default 22122)
base_path=/fastdfs/tracker # Root directory for storing logs and data- 1
- 2
- 3
- 4
- 5
- 1
- 2
- 3
- 4
- 5
The default configuration is reserved for other parameters. For specific configuration explanations, please refer to the official documentation. http://bbs.chinaunix.net/thread-1941456-1-1.html
3 > Create the directory specified by base_path
shell> mkdir -p /fastdfs/tracker- 1
- 1
4 > Open the tracker server port in the firewall (default: 22122)
shell> vi /etc/sysconfig/iptables
Add the following port lines:
-A INPUT -m state --state NEW -m tcp -p tcp --dport 22122 -j ACCEPT
Restart the firewall:
shell> service iptables restart
5 > Start the tracker server
shell> /etc/init.d/fdfs_trackerd start- 1
- 1
Initially, two directories, logs and data, are generated in the / fastdfs/tracker directory. 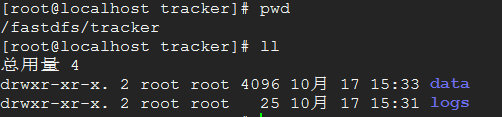
Check whether FastDFS Tracker Server started successfully:
ps -ef | grep fdfs_trackerd 
6 > Stop the tracker server
shell> /etc/init.d/fdfs_trackerd stop- 1
- 1
7 > Set up tracker service to boot
shell> chkconfig fdfs_trakcerd on- 1
- 1
Configuration of storage Server
1 > Copy the storage sample configuration file and rename it
shell> cp /etc/fdfs/storage.conf.sample /etc/fdfs/storage.conf- 1
- 1
2 > Edit Profile
shell> vi /etc/fdfs/storage.conf

# The amendments are as follows:
disabled=false                      # Enable configuration files
port=23000                          # storage Service Port
base_path=/fastdfs/storage          # Data and log file storage root directory
store_path0=/fastdfs/storage        # First storage directory
tracker_server=192.168.0.200:22122  # tracker server IP and port
http.server_port=8888 # Ports for http to access files- 1
- 2
- 3
- 4
- 5
- 6
- 7
- 8
- 9
- 1
- 2
- 3
- 4
- 5
- 6
- 7
- 8
- 9
The default configuration is reserved for other parameters. For specific configuration explanations, please refer to the official documentation. http://bbs.chinaunix.net/thread-1941456-1-1.html
3 > Create a basic data catalog
shell> mkdir -p /fastdfs/storage- 1
- 1
4 > Open storage Server Port in Firewall (default: 23000)
shell> vi /etc/sysconfig/iptables
Add the following port lines:
-A INPUT -m state --state NEW -m tcp -p tcp --dport 23000 -j ACCEPT
Restart the firewall:
shell> service iptables restart
5 > Start storage Server
shell> /etc/init.d/fdfs_storaged start- 1
- 1
Initially, two directories, logs and data, will be generated in the / fastdfs/storage directory. 
Check whether FastDFS Tracker Server started successfully:
ps -ef | grep fdfs_storaged 
6 > Stop storage Server
shell> /etc/init.d/fdfs_storaged stop- 1
- 1
7 > Setting storage Service Start Up
shell> chkconfig fdfs_storaged on- 1
- 1
IV. File upload test (192.168.0.200)
1 > Modify Tracker Server Client Configuration File
shell> cp /etc/fdfs/client.conf.sample /etc/fdfs/client.conf
shell> vim /etc/fdfs/client.conf
# Modify the following configuration and keep the others by default
base_path=/fastdfs/tracker
tracker_server=192.168.0.200:22122- 1
- 2
- 3
- 4
- 5
- 1
- 2
- 3
- 4
- 5
2 > Execute file upload commands
shell> /usr/bin/fdfs_upload_file /etc/fdfs/client.conf /usr/include/stdio.h - 1
- 1
Return the file ID number: group1/M00/00/wKgAyVgEjSGANYtkAAB7mZt7HdQ08538.h
(Can return the above file ID, indicating that the file has been uploaded successfully)
5. Install fastdfs-nginx-module on all storage nodes
1 > Functional description of fastdfs-nginx-module
FastDFS stores files on the Storage server through the Tracker server, but there is a synchronization delay between the same group of storage servers due to the need for file replication. The fake Tracker server uploaded the file to 192.168.0.201, and the file ID was returned to the client after the upload was successful. At this time, FastDFS storage cluster mechanism will synchronize this file to the same group storage 192.168.0.202. In the case that the file has not been copied, if the client uses this file ID to fetch the file on 192.168.4.126, there will be an error that the file cannot be accessed. And fastdfs-nginx-module can redirect files to connect to the source server to fetch files, so as to avoid the inaccessibility of files caused by the client's delay in replication.
2 > decompression fastdfs-nginx-module-master.zip
shell> cd /usr/local/src
shell> unzip fastdfs-nginx-module-master.zip- 1
- 2
- 1
- 2
3 > Install Nginx
Refer to Nginx Installation Nginx Source Installation
Note: When configuring nginx parameters with. / configure, you need to compile the fastdfs-nginx-mouse source code as a module:. / configure --prefix=/opt/nginx --sbin-path=/usr/bin/nginx --add-module=/usr/local/src/fastdfs-nginx-module/src
4 > Copy the configuration file from the fastdfs-nginx-module source to the / etc/fdfs directory and modify it
shell> cp /usr/local/src/fastdfs-nginx-module/src/mod_fastdfs.conf /etc/fdfs/
shell> vi /etc/fdfs/mod_fastdfs.conf- 1
- 2
- 1
- 2
Modify the following configuration:
connect_timeout=10                  # Client Access File Connection Timeout (in seconds)
base_path=/tmp                      # Temporary directory
tracker_server=192.168.0.200:22122  # tracker service IP and port
storage_server_port=23000           # storage Service Port
group_name=group1                   # Group name
url_have_group_name=true            # Access link prefix plus group name
store_path0=/fastdfs/storage # File Storage Path- 1
- 2
- 3
- 4
- 5
- 6
- 7
- 1
- 2
- 3
- 4
- 5
- 6
- 7
Keep other configurations by default.
5 > Copy part of FastDFS configuration file to / etc/fdfs directory
shell> cd /usr/local/src/fastdfs-master/conf
shell> cp http.conf mime.types /etc/fdfs/- 1
- 2
- 1
- 2
6 > Create a soft connection under the / fastdfs/storage file storage directory and link it to the directory where the data is actually stored
shell> ln -s /fastdfs/storage/data/ /fastdfs/storage/data/M00- 1
- 1
7 > Configure nginx to access storage files
Concise version of nginx configuration:
user nobody;
worker_processes 1;
events {
    worker_connections 1024;
}
http {
    include mime.types;
    default_type application/octet-stream;
    sendfile on;
    keepalive_timeout 65;
    server {
        listen 8888;
        server_name localhost;
        location ~/group([0-9])/M00 {
            ngx_fastdfs_module;
        }
        error_page 500 502 503 504 /50x.html;

        location = /50x.html {
            root html;
        }
    }
}- 1
- 2
- 3
- 4
- 5
- 6
- 7
- 8
- 9
- 10
- 11
- 12
- 13
- 14
- 15
- 16
- 17
- 18
- 19
- 20
- 21
- 22
- 23
- 1
- 2
- 3
- 4
- 5
- 6
- 7
- 8
- 9
- 10
- 11
- 12
- 13
- 14
- 15
- 16
- 17
- 18
- 19
- 20
- 21
- 22
- 23
Notes:
A > 8888 port value corresponds to http.server_port=8888 in / etc/fdfs/storage.conf, because http.server_port defaults to 8888, and if you want to change it to 80, you need to modify it accordingly.
B > Storage corresponds to multiple groups, and the access path has a group name, such as / group1/M00/00/00/xxx. The corresponding Nginx configuration is as follows:
location ~/group([0-9])/M00 {
    ngx_fastdfs_module;
}- 1
- 2
- 3
- 1
- 2
- 3
C > If you find the old newspaper 404 when you check the download, change the user nobody in the first line of nginx.conf to user root and restart it.
8 > Open port 8888 of Nginx in the firewall
vi /etc/sysconfig/iptables
Add to:
-A INPUT -m state --state NEW -m tcp -p tcp --dport 8888 -j ACCEPT
Restart the firewall:
shell> service iptables restart- 1
- 1
9 > Start Nginx
shell> /usr/bin/nginx
ngx_http_fastdfs_set pid=xxx- 1
- 2
- 1
- 2
The nginx restart command is: / usr/sbin/nginx-s reload
After starting nginx, if you print out ngx_http_fastdfs_set pid=xxx x, it means that the fastdfs-nginx-module has been loaded successfully, and xxx indicates the process ID of the module.
10 > Access through Browser test Documents uploaded from time to time
The ID of the file returned after uploading is: group1/M00/00/wKgAyVgEjSGANYtkAAB7mZt7HdQ08538.h. The address accessed by browsing is: http://192.168.0.201:8888/group1/M00/00/00/wKgAyVgEjSGANYtkAAB7mZt7HdQ08538.h
Note: Do not use kill-9 command to kill FastDFS process, otherwise it may cause binlog data loss.
Introduction to FastDFS (Official Documents): http://download.csdn.net/detail/xyang81/9656542
FastDFS configuration file details: http://download.csdn.net/detail/xyang81/9656557