Installation under centos MySQL A good article reprinted.
http://www.cnblogs.com/xiaoluo Five 0 One Three 9 Five Three 77/archive/Two 0 One 3/0 Four/07/3003 Two 78.html link
Introduction to mysql
Speaking of data base Most of us think about relational databases like mysql, Oracle SQL server, etc. These database software are very convenient to install on windows. Linux If we want to install the database, we have to recommend MySQL database first, and the first version of Mysql database is released on Linux system.
MySQL is a relational database management system developed by Swedish MySQL AB Company and currently belongs to Oracle Company. MySQL is an associated database management system, which stores data in different tables instead of all data in a large warehouse, thus increasing speed and flexibility. MySQL's SQL language is the most commonly used standardized language for accessing databases. MySQL software adopts a dual authorization policy (the term "authorization policy"), which is divided into community version and commercial version. Because of its small size, fast speed, low overall cost of ownership, especially open source, MySQL is generally chosen as the website database for the development of small and medium-sized websites. Because of its excellent performance and collocation in Community Edition PHP Apache and Apache can form a good development environment.
Installing mysql database on Linux, we can download the rpm package of mysql database from its official website. http://dev.mysql.com/downloads/mysql/5.Six.html#downloads Everyone can do it according to their own operating system To download the corresponding database files, the latest version is 5.6.10.
Here I use yum to install MySQL database. By installing this way, we can install some services and jar packages related to mysql, so we can save a lot of unnecessary trouble!!!
2. Unload the original mysql
Because mysql database is so popular on Linux, the current downloaded mainstream Linux system versions are basically integrated with mysql database. We can check whether mysql database has been installed on our operating system by following commands
If so, we can uninstall it by using the rpm-e command or the rpm-e-nodeps command.[root@xiaoluo ~]# Rpm-qa | grep mysql // / This command will see if the mysql database has been installed on the operating system.
[root@xiaoluo ~]# Rpm-e MySQL // normal deletion mode
[root@xiaoluo ~]# Rpm-e -- nodeps MySQL // forceful deletion mode. If you use the above command to delete, prompt other files that you depend on, you can use this command to forcefully delete them.
After deletion, we can check whether mysql has been uninstalled successfully by using the rpm-qa | grep mysql command!
3. Installation of mysql through yum
I install mysql database through yum. First, we can enter the yum list | grep mysql command to view the downloadable version of mysql database provided on yum:
You can get downloadable version information of mysql database on yum server:[root@xiaoluo ~]# yum list | grep mysql

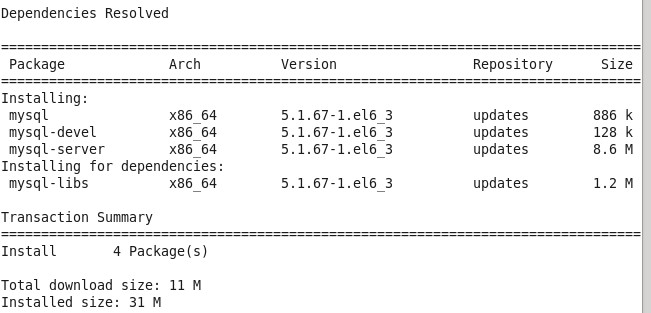
Then we can install mysql mysql-server mysql-devel by typing Yum install-y mysql-server mysql-devel command. (Note: when installing mysql, we don't install MySQL client, we install MySQL database, we need to install mysql-server server server server server)
After waiting for some time, yum will help us choose the software needed to install mysql database and some other ancillary software.[root@xiaoluo ~]# yum install -y mysql-server mysql mysql-deve
At this point, we can view the newly installed version of mysql-server through the following commands
[root@xiaoluo ~]# rpm -qi mysql-server
The mysql-server we installed is not the latest version. If you want to try the latest version, just download the rpm package and install it on the MySQL official website. So far, our MySQL database has been installed.
Installation of the episode, I installed mysql when the following errors occurred!
Transaction Check Error:
file /usr/lib/mysql/libmysqlclient.so.15.0.0 from install of mysql-5.0.77-4.el5_5.4.i386 conflicts with file from package mysqlclient15-5.0.91-1.jason.1.i386
file /usr/lib/mysql/libmysqlclient_r.so.15.0.0 from install of mysql-5.0.77-4.el5_5.4.i386 conflicts with file from package mysqlclient15-5.0.91-1.jason.1.i386
I uninstalled the previous higher version of mysql
yum remove mysql mysql-devel mysql-server
Then yum install mysql mysql-server mysql-devel
It's normal after that.~~
IV. Initialization of mysql database and related configuration
After installing the mysql database, we will find that there will be an additional mysqld service. This is our database service. We can start our mysql service by typing the service mysqld start command.
Note: If we start the mysql service for the first time, the mysql server will first initialize the configuration, such as:
[root@xiaoluo ~]# service mysqld start

//Initialize MySQL database: WARNING: The host'xiaoluo'could not be looked up with resolveip.
This probably means that your libc libraries are not 100 % compatible
with this binary MySQL version. The MySQL daemon, mysqld, should work
normally with the exception that host name resolving will not work.
This means that you should use IP addresses instead of hostnames
when specifying MySQL privileges !
Installing MySQL system tables...
OK
Filling help tables...
OK

To start mysqld at boot time you have to copy
support-files/mysql.server to the right place for your system

PLEASE REMEMBER TO SET A PASSWORD FOR THE MySQL root USER !
To do so, start the server, then issue the following commands:

/usr/bin/mysqladmin -u root password 'new-password'
/usr/bin/mysqladmin -u root -h xiaoluo password 'new-password'

Alternatively you can run:
/usr/bin/mysql_secure_installation

which will also give you the option of removing the test
databases and anonymous user created by default.  This is
strongly recommended for production servers.

See the manual for more instructions.

You can start the MySQL daemon with:
cd /usr ; /usr/bin/mysqld_safe &

You can test the MySQL daemon with mysql-test-run.pl
cd /usr/mysql-test ; perl mysql-test-run.pl

Please report any problems with the /usr/bin/mysqlbug script!

                                                           [Determine]
//Starting mysqld:[OK][root@xiaoluo ~]# service mysqld restart Stop mysqld:[OK] Starting mysqld:[OK]
We found that the mysqld service does not start automatically. Of course, we can set it to boot by chkconfig mysqld on command, so we don't have to start it manually every time.[root@xiaoluo ~]# chkconfig --list | grep mysqld mysqld 0:Close 1:Close 2:Close 3:Close 4:Close 5:Close 6:Close
After the installation of mysql database, there will only be a root administrator account, but at this time the root account has not set a password for it. When the mysql service is first started, some initialization of the database will be carried out. In the output of a large number of information, we can see such a line of information:[root@xiaoluo ~]# chkconfig mysqld on [root@xiaoluo ~]# chkconfig --list | grep mysql mysqld 0:Close 1:Close 2:Enable 3:Enable 4:Enable 5:Enable 6:Close
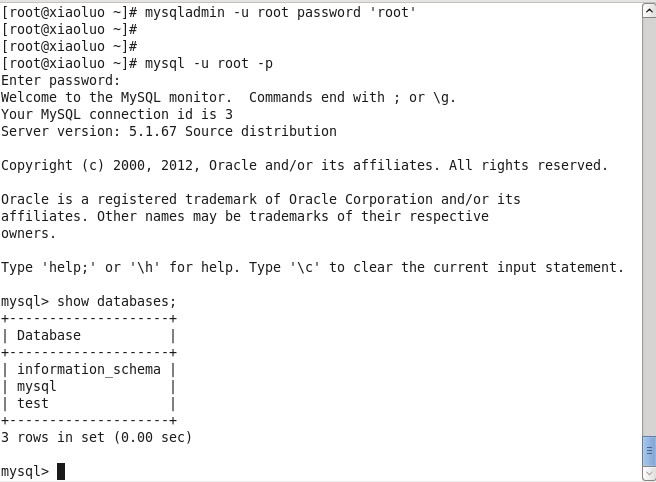
So we can use this command to set a password for our root account (note: this root account is mysql's root account, not Linux's root account)/usr/bin/mysqladmin -u root password 'new-password' // Set password for root account
At this point, we can login to our MySQL database through the mysql-u root-p command.[root@xiaoluo ~]# Mysqladmin-u root password'root'// / Password the root account to root through this command
5. Main configuration files of mysql database
1./etc/my.cnf. This is the main configuration file for mysql
We can check some information about this file.
[root@xiaoluo etc]# ls my.cnf
my.cnf

[root@xiaoluo etc]# cat my.cnf
[mysqld]
datadir=/var/lib/mysql
socket=/var/lib/mysql/mysql.sock
user=mysql
# Disabling symbolic-links is recommended to prevent assorted security risks
symbolic-links=0

[mysqld_safe]
log-error=/var/log/mysqld.log
pid-file=/var/run/mysqld/mysqld.pid
2./var/lib/mysql
The database files of our mysql database are usually stored in the directory / ver/lib/mysql
We can create a database ourselves to verify the location of the database files.[root@xiaoluo ~]# cd /var/lib/mysql/ [root@xiaoluo mysql]# ls -l //Total dosage 20488 -rw-rw----. 1 mysql mysql 10485760 4 June 22:01 ibdata1 -rw-rw----. 1 mysql mysql 5242880 4 June 22:01 ib_logfile0 -rw-rw----. 1 mysql mysql 5242880 4 June 21:59 ib_logfile1 drwx------. 2 mysql mysql 4096 4 June 21:59 mysql // These are the default two database files for mysql database installation srwxrwxrwx. 1 mysql mysql 0 4 June 22:01 mysql.sock drwx------. 2 mysql mysql 4096 4 June 21:59 test // These are the default two database files for mysql database installation
Create our own database:
mysql> create database xiaoluo;
Query OK, 1 row affected (0.00 sec)

[root@xiaoluo mysql]# ls -l
 Total dosage 20492
 - rw-rw----. 1 MySQL MySQL 10485760 April 6 22:01 ibdata1
 - rw-rw----. 1 MySQL MySQL 5242880 April 6 22:01 ib_logfile 0
 - rw-rw----. 1 MySQL MySQL 5242880 April 6 21:59 ib_logfile 1
 Drwx - --. 2 MySQL MySQL 4096 April 6 21:59 mysql
 Srwxrwxrwx.1 MySQL MySQL April 6 22:01 mysql.sock
 Drwx - --. 2 MySQL MySQL 4096 April 6 21:59 test
 Drwx - --. 2 MySQL MySQL 4096 April 6 22:15 xiaoluo // / This is the xiaoluo database we just created.
[root@xiaoluo mysql]# cd xiaoluo/
[root@xiaoluo xiaoluo]# ls
db.opt
3./var/log mysql database log output storage location
Some of our mysql database's log output is stored in the directory / var/log
[root@xiaoluo xiaoluo]# cd
[root@xiaoluo ~]# cd /var/log
[root@xiaoluo log]# ls
amanda                cron           maillog-20130331   spice-vdagent.log
anaconda.ifcfg.log    cron-20130331  mcelog             spooler
anaconda.log          cups           messages           spooler-20130331
anaconda.program.log  dirsrv         messages-20130331  sssd
anaconda.storage.log  dmesg          mysqld.log         tallylog
anaconda.syslog       dmesg.old      ntpstats           tomcat6
anaconda.xlog         dracut.log     piranha            wpa_supplicant.log
anaconda.yum.log      gdm            pm-powersave.log   wtmp
audit                 httpd          ppp                Xorg.0.log
boot.log              ibacm.log      prelink            Xorg.0.log.old
btmp                  lastlog        sa                 Xorg.1.log
btmp-20130401         libvirt        samba              Xorg.2.log
cluster               luci           secure             Xorg.9.log
ConsoleKit            maillog        secure-20130331    yum.log
The file mysqld.log is the log information that we store when we operate with the mysql database. By looking at the log file, we can get a lot of information from it.
Because our mysql database can be accessed through the network, not a stand-alone version of the database, which uses the protocol tcp/ip protocol, we all know that the port number of mysql database binding is 3306, so we can check through the netstat-anp command, whether the Linux system is listening to 3306 this. Port number:
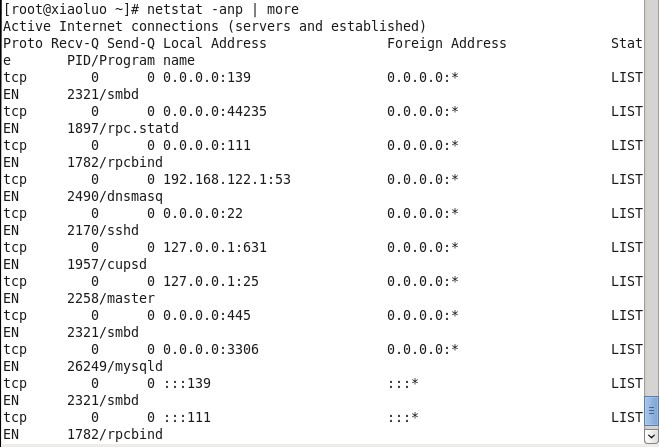
As shown above, the port number 3306 monitored by Linux system is our mysql database!!!!