brief introduction
Please click here to view the U-Net paper . U-Net was originally used for cell recognition. For a small amount of training data, the author achieved good results and won the championship through data enhancement. After modification, U-Net can also be used for other purposes.
The author of the U-Net paper has provided the version of caffe, and it has been provided on github Version of pytorch However, after modification, the implementation provided in this paper is loyal to the description of the paper and has not studied the version provided by the author, so it is not guaranteed that this implementation is close enough to the implementation provided by the author. It is only a personal understanding of the paper. If there is any error, please correct it and welcome to leave a message. In addition, there is no corresponding training data, so there is no strict verification.
text
The code is as follows, which is described later
import torch
import torch.nn as nn
from torchsummary import summary

class MyUnetDown(nn.Module):
    def __init__(self, in_channels):
        super(MyUnetDown, self).__init__()

        self.down_and_conv = nn.Sequential(
            nn.MaxPool2d(
                kernel_size = 2,
                stride=2,
            ),
            nn.Conv2d(
                in_channels = in_channels,
                out_channels = in_channels*2,
                kernel_size = 3,
                stride=1,
                padding=0, # The paper says unpadded revolutions
            ),
            nn.ReLU(),
            nn.Conv2d(
                in_channels = in_channels*2,
                out_channels = in_channels*2,
                kernel_size = 3,
                stride=1,
                padding=0,
            ),
            nn.ReLU(),
        ) # If you accidentally write a comma in this place, it's over!!!

    def forward(self, x):
        return self.down_and_conv(x)


class MyUnetUp(nn.Module):
    def __init__(self, in_channels, cropsize):
        super(MyUnetUp, self).__init__()

        # Corresponding to the maximum pool, if an odd number is encountered, the maximum pool will discard the excess without padding, so out here_ padding=0
        # The maximum pool size (shape) is equivalent to convolution kernel = 2 and stripe = 2. Here is the inverse process on size (shape)
        # The parameters are the same as the corresponding Conv2d, and the convolution of stripe = 2 is ambiguous, out_padding distinguishes ambiguity. It is set to 0 here and corresponds to an even number
        # For details, see the ConvTranspose2d document and the graphic link of ConvTranspose2d given in the document
        #
        # ConvTranspose2d calculates the real padding according to the parameter division * (kernel_size - 1) - padding
        # If the stripe is not 1, it will be filled internally, similar to padding, and then the real convolution stripe is 1, and then convolution operation will be performed,
        # In this way, it corresponds back. If the stripe is not 1, there is a disagreement, through out_padding distinguishes differences, that is, add out on one side first_ padding,
        # The normal padding is double-sided. After adding it, it is convoluted back. In this way, the result is the same in size (shape) as before Conv2d,
        # It is equivalent to the inverse operation of size (shape), shape - > conv2d - > convtranspose2d - > shape
        self.up = nn.ConvTranspose2d(
            in_channels = in_channels,
            out_channels = in_channels//2,
            kernel_size=2,
            stride=2,
        )

        # After testing, it is found that this can be trained, but the model cannot be saved!!!
        # # According to the figure in the paper, the left side is cropped and then spliced with the right side,
        # def _crop_and_copy(left, right):
        #     #print("input", left.shape, right.shape)
        #     _, left, _ = torch.tensor_split(left, (cropsize, cropsize+right.shape[2]), dim = 2)
        #     _, left, _ = torch.tensor_split(left, (cropsize, cropsize+right.shape[3]), dim = 3)
        #     #print(cropsize,left.shape, right.shape, torch.cat([left, right], dim=1).shape)
        #     return torch.cat([left, right], dim=1)

        #self.crop_and_copy = _crop_and_copy
        self.cropsize = cropsize

        self.conv = nn.Sequential(
            nn.Conv2d(
                in_channels = in_channels,
                out_channels = in_channels//2,
                kernel_size = 3,
                stride=1,
                padding=0,
            ),
            nn.ReLU(),
            nn.Conv2d(
                in_channels = in_channels//2,
                out_channels = in_channels//2,
                kernel_size = 3,
                stride=1,
                padding=0,
            ),
            nn.ReLU()
        )

    def forward(self, x, left):
        x = self.up(x)
        # Who has a better way?
        #x = self.crop_and_copy(left = left, right = x)
        _, left, _ = torch.tensor_split(left, (self.cropsize, self.cropsize+x.shape[2]), dim = 2)
        _, left, _ = torch.tensor_split(left, (self.cropsize, self.cropsize+x.shape[3]), dim = 3)
            #print(cropsize,left.shape, right.shape, torch.cat([left, right], dim=1).shape)
        x = torch.cat([left, x], dim=1)

        return self.conv(x)


class MyUnet(nn.Module):
    def __init__(self, depth=4, num_features=64):
        super(MyUnet,self).__init__()

        #depth = 4
        #num_features = 64
        _num_features_dbg = num_features

        # The first step before downsampling is to facilitate the use of the output results of the downsampling process in the upsampling process
        # The down sampling + two convolution ReLU are defined as a whole, and the up sampling + two convolution ReLU are defined as a whole
        # In this way, before the first down sampling, there are two more convolutions ReLu, which is in_conv
        #
        # If two convolution ReLU + lower samples are defined as a whole, they need to be provided to
        # The result of the up sampling section is the output of the two convolution ReLU, not the final output
        # It's quite troublesome to handle
        self.in_conv = nn.Sequential(
            nn.Conv2d(
                in_channels = 1,#In this paper, it is 1, corresponding to the gray image
                out_channels = num_features,
                kernel_size = 3,
                stride=1,
                padding=0,
            ),
            nn.ReLU(),
            nn.Conv2d(
                in_channels = num_features,
                out_channels = num_features,
                kernel_size = 3,
                stride=1,
                padding=0,
            ),
            nn.ReLU(),
        )

        up = [None] * depth
        down = [None] * depth

        for i in range(depth):
            down[i] = MyUnetDown(num_features)
            num_features *= 2

        cropsize = 4
        for i in range(depth):
            up[i] = MyUnetUp(in_channels=num_features, cropsize=cropsize)
            num_features //= 2
            cropsize = (cropsize + 4) * 2

        # All down sampling modules
        self.down_list = nn.ModuleList(down)
        # All up sampling modules
        self.up_list = nn.ModuleList(up)

        # Last step
        assert(num_features == _num_features_dbg)
        self.out_conv = nn.Conv2d(
            in_channels=num_features,
            out_channels=2,
            kernel_size=1,
        )


    def forward(self, x):

        # Save the output results of the lower sampling process for upper sampling, in_conv is also part of the down sampling process
        left_results = []

        x = self.in_conv(x)

        for down in self.down_list:
            left_results.append(x)
            x = down(x)

        for up in self.up_list:
            x = up(x, left = left_results.pop())

        assert(len(left_results) == 0)

        return self.out_conv(x)


unet = MyUnet()
print(unet)
summary(unet, (1,572,572),batch_size=32, device="cpu")

# Hidden layer does not support tensor_split, I don't know if there are other better ways. Who knows, please tell me.
# import hiddenlayer as hl
# graph = hl.build_graph(unet, torch.zeros([1,1,572,572]))
# graph.theme = hl.graph.THEMES["blue"].copy()
# graph.save("/tmp/unet.png", format="png")


from torchviz import make_dot
x = torch.randn(1,1, 572,572).requires_grad_(True)
y = unet(x)
vis = make_dot(y, params=dict(list(unet.named_parameters()) + [('x', x)]))
vis.format = "png"
vis.directory = "/tmp"
vis.view()
Run the above code to see the print results of the network and the generated pictures.
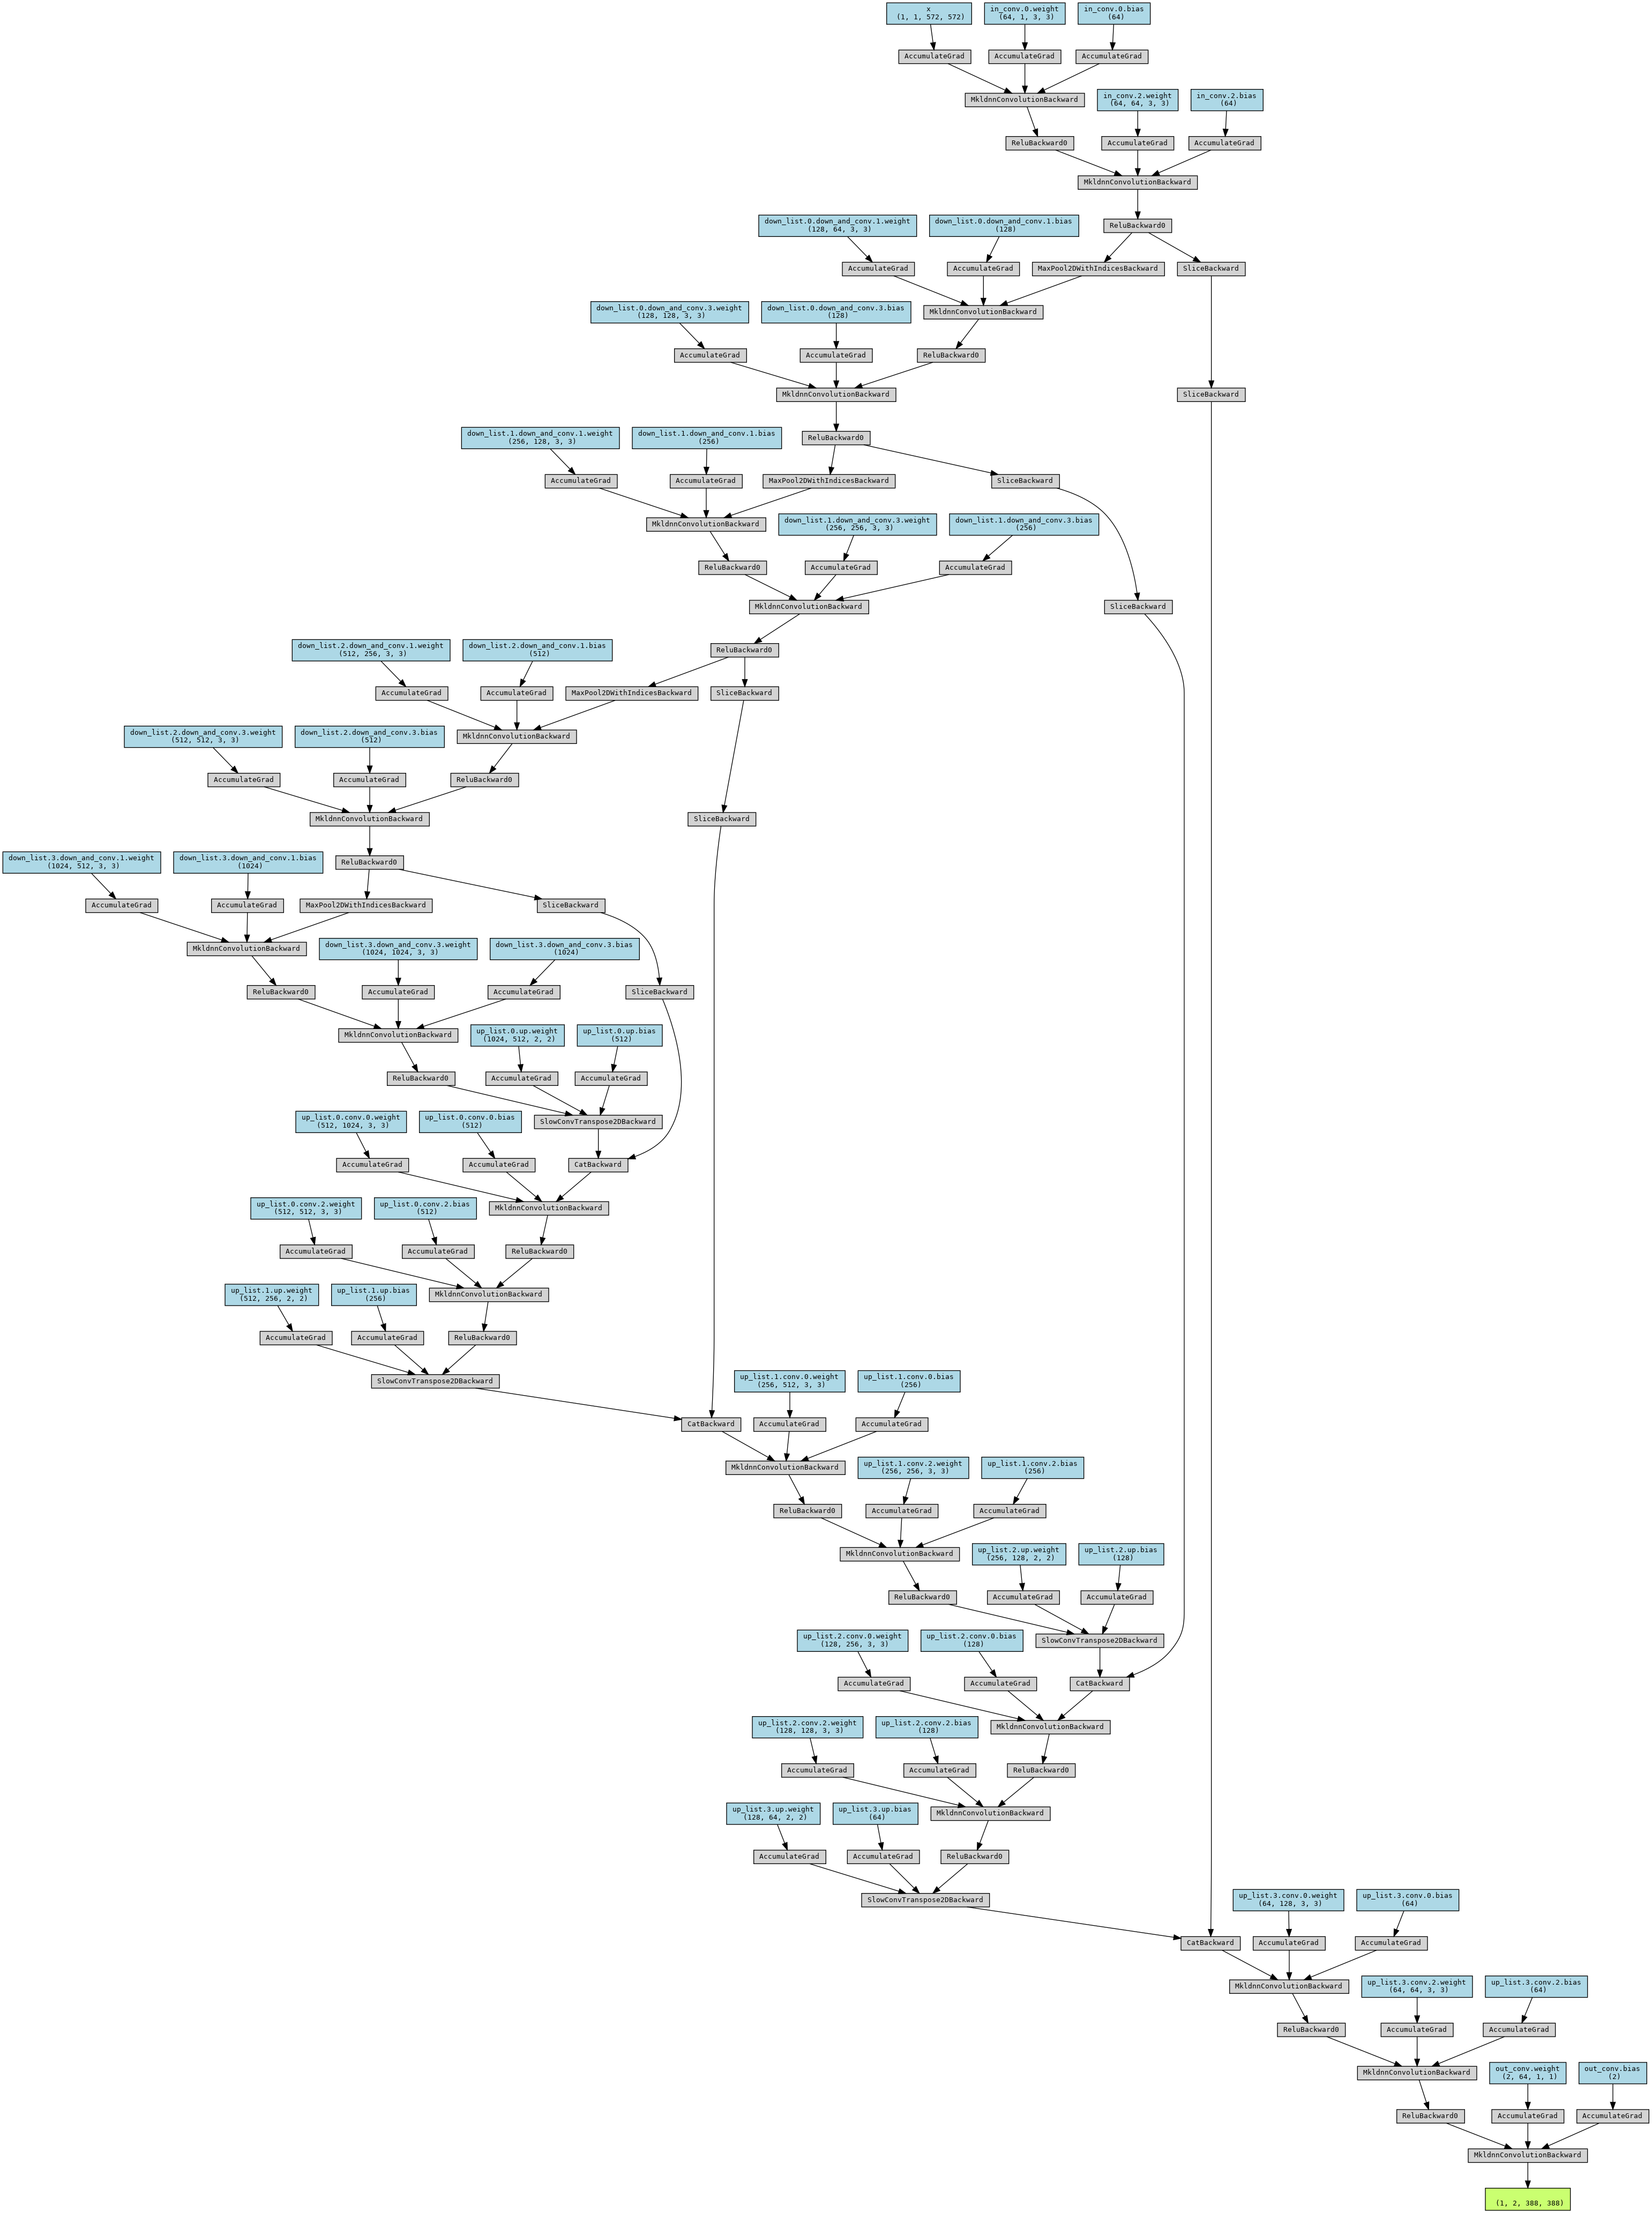
The structure of U-Net network is all on the figure in the paper. It is not clear about the authorization problem. Look at the paper. There is no paste here. It has to be said that the author's figure is of high quality and seems simple, but it is found that the description is very clear. The above code is mainly written and checked according to such pictures. The above code mainly divides the nodes in the paper diagram into four parts, in_conv, 4 down, 4 up, out_conv, down is the combination of 2x2 maximum pooling + two convolution ReLU, and up is transpose convolution + copy_and_crop_and_cat + two convolution ReLU combinations, out_conv is the number of output classifications. Each channel has a class. Down and up define a class separately. Then four classes are generated in batch through parameters. Finally, they are saved in MyUnet through nn.ModuleList and can be printed normally. The main difficulty lies in copy_ and_ crop_ and_ In the process of cat, you need to save the results in the down, use them in the up, cut them, and then splice them according to the number of channels. The reason is that because padding is not used in U-Net, the size becomes smaller in the convolution process. Up and down are symmetrical. The size increases by 2 times and decreases by 2 times (the number of channels is opposite). However, due to the convolution loss, the sizes on both sides are different, so the size in down needs to be cut. In this way, it is the same as that in up. Look carefully at the figure in the paper, it is very clear, and the final output result is the same, The size is smaller than the original image, so special processing should be done during training and verification. See later. The author's advantage is that the input image can be seamlessly spliced and cropped. The original is overlap tile, which should mean that there is overlap. My personal view is that overlap should be better than no overlap. Although there is no padding, the convolution of 3x3. In the innermost part, considering a dimension, each point contributes three times, but the edge point contributes only once, The points of the secondary edge contribute twice, so there is still a difference between the edge and the interior. When training, the edge part will be wasted. If the training image is relatively small, the wasted part (92 on each side) may be more than the useful part. The author uses the method of inputting super large images and reducing batch to save video memory. As for the input and output sizes, the examples in the paper figure are input 512x512x1 and output 388x388x2. However, because there is no full link layer and a fixed symmetrical structure, the clipping size on the left (the down side in the paper figure) can be determined when splicing left and right, which is independent of the input. Therefore, the input size is not necessarily 512x512x1, which is variable. The output changes with the input, and the change can be calculated. For the calculation method, refer to the calculation of cropsize and channel in the code notes. In addition, print the network information (summary) and output graphics, such as the above figure, to see the corresponding size. There are also restrictions on the selection of input size, because if the width or height is an odd number, the last remainder will be discarded for 2x2 maximum pooling. In order to ensure that the maximum pooling meets an even number at each step, it is recommended to push it up from the bottom, so that the input size will be no problem.
verification
If there is no same data as the author of the paper, it may need to be modified. If the input image is color, the input channel (1) should be changed to 3. If the output is multi classification, the output channel (2) should be changed to the corresponding classification number.
The input image and label image of most data sets should be of the same size. Since the segmentation image output by U-Net is smaller than that input, the segmentation part of the general foreground should not be close to the edge, otherwise it may be affected by the edge, and it is also necessary to ensure that the segmentation part of the data in the input size image is exactly all in the label image. My processing method is to first set a size as the size of the label image, and then pad the non label image on the size of the label image. During padding, in order to avoid the influence of 0, use the 'edge' method to fill the edge pixels. As long as the foreground cutting part does not appear on the edge, the filled edge should not be the foreground, Therefore, I think it can be handled in this way with little impact on the results. Personally, I think U-Net is more suitable for continuous and seamless images, which can minimize the boundary effect. If different images are spliced together, there are always strange abrupt parts at the junction. Training with this part of data should have more or less impact on the training of the content in normal images.
For network initialization, the method given in the paper refers to delving deep into correctors: Surpassing human-
level performance on imagenet classification is initialized by default in pytorch, but it seems that the initialization parameters are different. According to the description in the paper, I think 3x3 convolution should be initialized according to the following parameters
@torch.no_grad()
def init_weights(layer):
    print("layer type is ", type(layer))
    if type(layer) == nn.Conv2d:
        nn.init.kaiming_normal_(layer.weight, nonlinearity='relu')
        if layer.bias is not None:
            print("bias not none")
            nn.init.constant_(layer.bias, 0)


unet.apply(init_weights)
The initialization of transpose convolution is not clear how to set it better.
The final loss function uses cross entropy. nn.CrossEntropyLoss() can be directly used in pytorch. The shape of the input parameter (batchsize, classify, h, w), nn.CrossEntropyLoss() supports this shape and is calculated according to the dimension of class. However, different weights are used in the theory to increase the weight of the division boundary, including the corresponding weight of different number of classes, Different types of weight function parameters can be directly supported. For the weights at different positions in the image, you need to make a weight graph in advance. The formula is given in the paper. If there is no weight graph, you can calculate it directly, that is, all pixel weights are the same. If you use the weight graph, set the reduction in the parameters to 'none', and the shape of the result is (batchsize, h, w), multiply by the corresponding position of the weight graph, and then sum or average.
This network takes up a lot of space. If the batchsize is set too large, it may not be enough. Maybe you can consider using the optimization technology of changing 32-bit floating-point numbers into 16 bit floating-point numbers.
According to the example of fcn network training and the corresponding data set (very small) in the book introduction and practice of PyTorch deep learning, the training effect of U-Net is not good (the means of data set expansion is not adopted). Of course, the training effect of fcn in the book is not good.