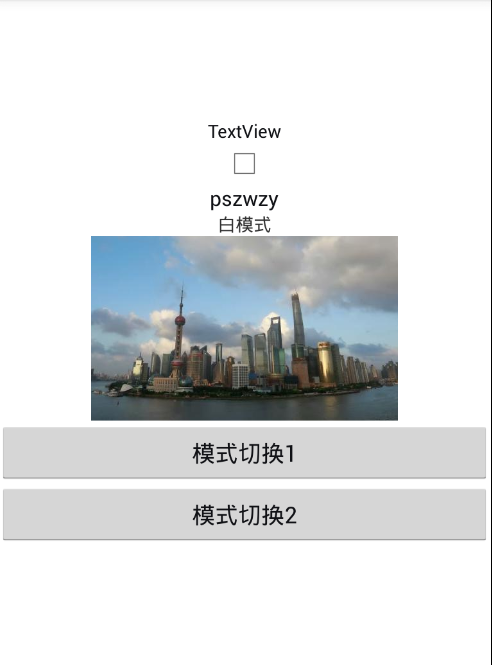
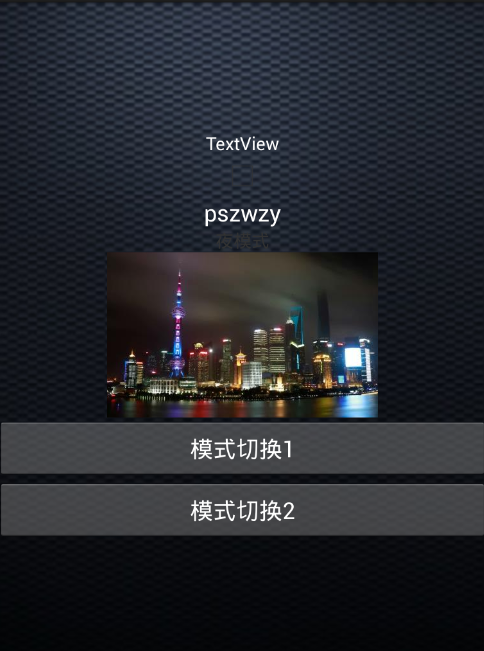
1: Modify the theme and restart the activity (many applications, including Google's own, use this approach to achieve night mode)
Advantages: Nocturnal mode of Zhenger's Eight Classics, comfortable color matching
Disadvantages: For large-scale applications, there will be many attributes that need to be changed with the theme. They need to be defined one by one, which is a bit cumbersome. Another disadvantage is to make the new theme effective. Generally, restart activity is needed to switch UI, which will cause the interface to flicker when switching the theme.
Core idea: Customize a color attribute name A. A has specific color codes in daytime and night mode. Page layout file only refers to A. As for daytime or night, it is decided by the background theme.
Attached is a diagram of the method used in the second and twelfth section.
 (original)
 (First implementation)
 (second implementation)
Okay, let's talk about the implementation steps. The development environment used in this section is Eclipse demo address. http://www.oschina.net/code/snippet_2702417_55892
1 first
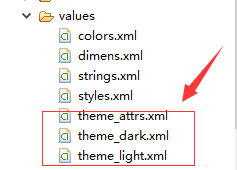
attrs.xml (declaring the type of attribute, used in layout xml) reference can use the system's resource ID, such as R.color.gray; color can use the # ffffff color code directly
 <attr name="colorValue" format="color" />
    <attr name="floatValue" format="float" />
    <attr name="integerValue" format="integer" />
    <attr name="booleanValue" format="boolean" />
    <attr name="dimensionValue" format="dimension" />
    <attr name="stringValue" format="string" />
    <attr name="referenceValue" format="color|reference" />
    <attr name="imageValue" format="reference"/>

    <attr name="curVisibility">
<! - Visiblity equivalent to View - >.
    <enum name="show" value="0" />
Not displayed, but taken into account during layout (space is left for it). UnVisiblity equivalent to View-->.
    <enum name="inshow" value="1" />
Completely hidden, as if the View had not been added.
    <enum name="hide" value="2" />
    </attr>
colors.xml (palette, centralized management of color hex) follows Excellent Format Specification That is, palette mode, avoid using color names such as btn1,btn2,fontTitle,fontText.
<?xml version="1.0" encoding="utf-8"?>
<resources>
   <color name="title">#101115</color>
   <color name="night_title">#FFFFFF</color>
</resources>
string.xml
 <string name="app_name">dayandNight</string>
    <string name="hello_world">Hello world!</string>
    <string name="action_settings">White mode</string>
    <string name="night_action_settings">Night mode</string>
styles.xml (day and night themes)
<resources>
      <style name="AppBaseTheme" parent="android:Theme.Light">
        <!--
            Theme customizations available in newer API levels can go in
            res/values-vXX/styles.xml, while customizations related to
            backward-compatibility can go here.


        -->
    </style>

    <!-- Application theme. -->
    <style name="AppTheme" parent="AppBaseTheme">
        <!-- All customizations that are NOT specific to a particular API-level can go here. -->
    </style>


    <style name="DayTheme" parent="AppTheme">
        <item name="colorValue">@color/title</item>
        <item name="floatValue">0.35</item>
        <item name="integerValue">33</item>
        <item name="booleanValue">true</item>
        <item name="dimensionValue">16dp</item>
<! -- If the string type is not a reference filled in, but a string placed directly, it works well in the layout file, but there is a problem with getting it in the code - > If the string type is not a reference filled in, it will be used correctly in the layout file.
        <item name="stringValue">@string/action_settings</item>
        <item name="referenceValue">@drawable/bg</item>
        <item name="imageValue">@drawable/day</item>
        <item name="curVisibility">show</item>
    </style>

    <style name="NightTheme" parent="AppTheme">
        <item name="colorValue">@color/night_title</item>
        <item name="floatValue">1.44</item>
        <item name="integerValue">55</item>
        <item name="booleanValue">false</item>
        <item name="dimensionValue">18sp</item>
        <item name="stringValue">@string/night_action_settings</item>
        <item name="referenceValue">@drawable/night_bg</item>
        <item name="imageValue">@drawable/night</item>
        <item name="curVisibility">hide</item>
    </style>
</resources>
The Use of 2activity
protected void onCreate(Bundle savedInstanceState) {
		super.onCreate(savedInstanceState);
		if(MyApp.isLightMode()){
            this.setTheme(R.style.NightTheme);
        }else{
            this.setTheme(R.style.DayTheme);
        }
		setContentView(R.layout.activity_one);
	}

	public void onClick(View view){
		MyApp.setIslightMode(!MyApp.isLightMode());
		recreate();
	}
The layout of xml:
<?xml version="1.0" encoding="utf-8"?>
<LinearLayout xmlns:android="http://schemas.android.com/apk/res/android"
    android:layout_width="match_parent"
    android:layout_height="match_parent"
    android:background="?attr/referenceValue"
    android:orientation="vertical"
    android:gravity="center" >

    <TextView
        android:id="@+id/setting_Color"
        android:layout_width="wrap_content"
        android:layout_height="wrap_content"
        android:text="TextView"
        android:textColor="?attr/colorValue" />

    <CheckBox
        android:id="@+id/setting_show_answer_switch"
        android:layout_width="wrap_content"
        android:layout_height="wrap_content"
        android:checked="?attr/booleanValue" />

    <TextView
        android:id="@+id/setting_Title"
        android:layout_width="wrap_content"
        android:layout_height="wrap_content"
        android:text="pszwzy"
        android:textColor="?attr/colorValue"
        android:textSize="?attr/dimensionValue" />

    <TextView
        android:id="@+id/setting_Text"
        android:layout_width="wrap_content"
        android:layout_height="wrap_content"
        android:text="?attr/stringValue" />

    <ImageView
        android:id="@+id/setting_Image"
        android:layout_width="wrap_content"
        android:layout_height="wrap_content"
        android:src="?attr/imageValue" />

    <View
        android:id="@+id/setting_line"
        android:layout_width="match_parent"
        android:layout_height="1dp"
        android:visibility="?attr/curVisibility" />
    <Button
		android:onClick="onClick"
		android:layout_width="match_parent"
		android:layout_height="wrap_content"
		android:text="Mode switching"
		android:textColor="?attr/colorValue"
 		/>

</LinearLayout>(1) Create the following method in BaseActivity
public static void updateTheme(Activity activity,isNight)
{
  MyApp.setNightMode(isNight);
  activity.recreate();
}
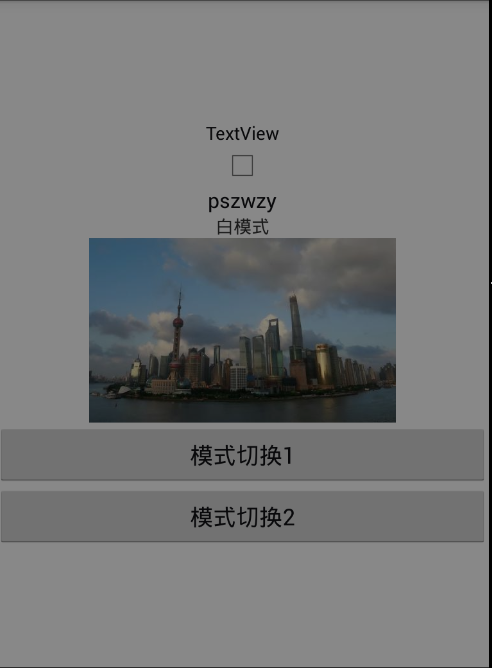
2: Use a Black and Transparent View to cover the existing activity. The effect is similar to that of wearing sunglasses and not glaring at the sun.
Advantages: Do not restart the activity, do not flash screen; coupled with transparency transition animation, mode switching is very comfortable, to solve 1, white background picture is still dazzling problem. ;
Disadvantage: No change in color matching, even with sunglasses, the day is still daytime.
Core idea: Using Windows Manager, add a black-band transparent View to the current activity through addView.
//The second way is to provide a way of thinking, logic does not go to practice.
	public void onClickT(View view){
		LayoutParams  mNightViewParam = new LayoutParams(
	                LayoutParams.TYPE_APPLICATION,
	                LayoutParams.FLAG_NOT_TOUCHABLE | LayoutParams.FLAG_NOT_FOCUSABLE,
	                PixelFormat.TRANSPARENT);

		WindowManager   mWindowManager = (WindowManager) getSystemService(Context.WINDOW_SERVICE);
	    View   mNightView = new View(this);
	    mWindowManager.addView(mNightView, mNightViewParam);
	    mNightView.setBackgroundResource(R.color.night_mask);
}
3: Modify Theme to switch night mode, but there will be no flash screen.
 As with the first approach, you need top-down code for theme settings
<?xml version="1.0" encoding="utf-8"?>
<resources>
    <attr name="gray_3_double" format="color" />
    <attr name="source_bg" format="reference" />
</resources>
</pre><pre code_snippet_id="1671755" snippet_file_name="blog_20160504_8_4007554" name="code" class="html"><?xml version="1.0" encoding="utf-8"?>
<resources xmlns:android="http://schemas.android.com/apk/res/android">
<style name="AppTheme_Night" >
<item name="gray_3_double">@color/gray_3_night</item>
<item name="source_bg">@drawable/source_bg_night</item>
</style>
</resources><?xml version="1.0" encoding="utf-8"?>
<resources xmlns:android="http://schemas.android.com/apk/res/android">
<style name="AppTheme_Light" >
<item name="gray_3_double">@color/gray_3_light</item>
<item name="source_bg">@drawable/source_bg_light</item>
</style>
</resources>public abstract class BaseActivity extends Activity {
protected int skin;
public Context mContext;
SharedPreferences sp;
@Override
protected void onCreate(Bundle savedInstanceState) {
<span style="white-space:pre"> </span>setThemeMode(getSkinTypeValue());
<span style="white-space:pre"> </span>super.onCreate(savedInstanceState);
<span style="white-space:pre"> </span>init();
<span style="white-space:pre"> </span>}
<span style="white-space:pre"> </span>public abstract void init();
<span style="white-space:pre"> </span>protected void setThemeMode(SkinType skinType) {
<span style="white-space:pre"> </span> switch (skinType) {
<span style="white-space:pre"> </span> case Light:
<span style="white-space:pre"> </span>setTheme(R.style.AppTheme_Light);<span style="white-space:pre"> </span> break;
<span style="white-space:pre"> </span> case Night:
<span style="white-space:pre"> </span>setTheme(R.style.AppTheme_Night);
<span style="white-space:pre"> </span> break;
<span style="white-space:pre"> </span> default:
<span style="white-space:pre"> </span>setTheme(R.style.AppTheme_Light);
<span style="white-space:pre"> </span> break;
<span style="white-space:pre"> </span>}
}
//Getting user-selected patterns
protected SkinType getSkinTypeValue() {
<span style="white-space:pre"> </span>if (sp == null) {
<span style="white-space:pre"> </span>sp = getSharedPreferences("AppSkinType", Context.MODE_PRIVATE);
<span style="white-space:pre"> </span>}
<span style="white-space:pre"> </span>int i = sp.getInt("AppSkinTypeValue", 0);
<span style="white-space:pre"> </span>switch (i) {
<span style="white-space:pre"> </span> case 0:
<span style="white-space:pre"> </span>return SkinType.Light;
case 1:
<span style="white-space:pre"> </span>return SkinType.Night;
<span style="white-space:pre"> </span> default:
<span style="white-space:pre"> </span> break;
<span style="white-space:pre"> </span>}
<span style="white-space:pre"> </span>return SkinType.Light;
}
//Save the user is the selected mode
public void saveSkinValue(int skin) {
<span style="white-space:pre"> </span>if (sp == null) {
<span style="white-space:pre"> </span>sp = getSharedPreferences("AppSkinType", Context.MODE_PRIVATE);
<span style="white-space:pre"> </span>}
<span style="white-space:pre"> </span>Editor editor = sp.edit();
<span style="white-space:pre"> </span>editor.putInt("AppSkinTypeValue", skin);
<span style="white-space:pre"> </span>editor.commit();
}
Look at the use of the first activity
public class MainActivity extends BaseActivity {
	private CheckBox cbSetting;
	private Button btnForward;
	private TextView tv_title;
	private View llNight;


	@Override
	public void init() {
		setContentView(R.layout.activity_main);
		llNight = findViewById(R.id.ll_night);
		tv_title = (TextView) findViewById(R.id.tv_title);
		btnForward = (Button) findViewById(R.id.forward);
		cbSetting = (CheckBox) findViewById(R.id.cb_setting);
		cbSetting.setOnCheckedChangeListener(new OnCheckedChangeListener() {
			@Override
			public void onCheckedChanged(CompoundButton buttonView, boolean isChecked) {
				if (isChecked) {
					// Night mode
					saveSkinValue(1);
					setTheme(R.style.AppTheme_Night);//Prevent getTheme() from fetching a value at creation time
					initView();
				} else {
					// Daytime mode
					saveSkinValue(0);
					setTheme(R.style.AppTheme_Light);//Prevent getTheme() from fetching a value at creation time
					initView();
				}
			}
		});

		btnForward.setOnClickListener(new View.OnClickListener() {
			@Override
			public void onClick(View v) {
				Intent intent = new Intent(MainActivity.this,SecondActivity.class);
				startActivity(intent);
			}
		});
	}
	//Modify UI manually after changing mode, otherwise flash screen will appear
	private void initView(){
		<span style="color:#ff6666;">TypedValue typedValue = new TypedValue();
		Theme theme = getTheme();
		theme.resolveAttribute(R.attr.gray_3_double, typedValue, true);
		btnForward.setTextColor(getResources().getColor(typedValue.resourceId));
		tv_title.setTextColor(getResources().getColor(typedValue.resourceId));
		theme.resolveAttribute(R.attr.source_bg, typedValue, true);
		llNight.setBackgroundDrawable(getResources().getDrawable(typedValue.resourceId));</span>
	}
}
Advantage:
Less bug s, better user experience
Disadvantages:
When there are many UI controls, it takes a lot of work to change them. A lot of code
4 Through the schema library changesKin
Note: All the schemes mentioned here are embedded in Apk. For example, qq can go to Baidu by downloading at night.
Reference resources: http://m.oschina.net/blog/668384

