
1. Software versions
- IntelliJ IDEA 2016.1
- jdk1.8
- maven3.3.9
- tomcat 8.5.11 or jetty
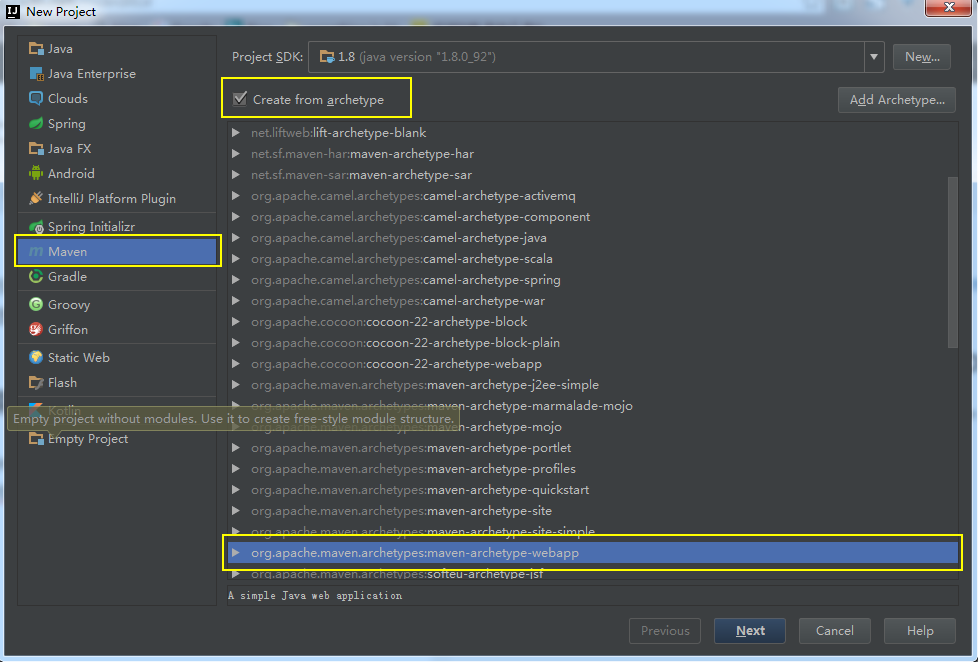
2. Building a webapp with maven skeleton
- Select create new project-Maven-Create from archetype. Find the maven-archetype-webapp skeleton, and then next.
- Enter GroupId and ArtifactId for the next step.

- Fill in the local maven environment, where you can choose your own local environment, or you can use idea's own maven 3.3.9. To configure the corresponding configuration file, the Maven provided by idea has no configuration file. If you need to configure it separately, you can add the set. XML file in the corresponding directory, such as jdk version or maven mirror.
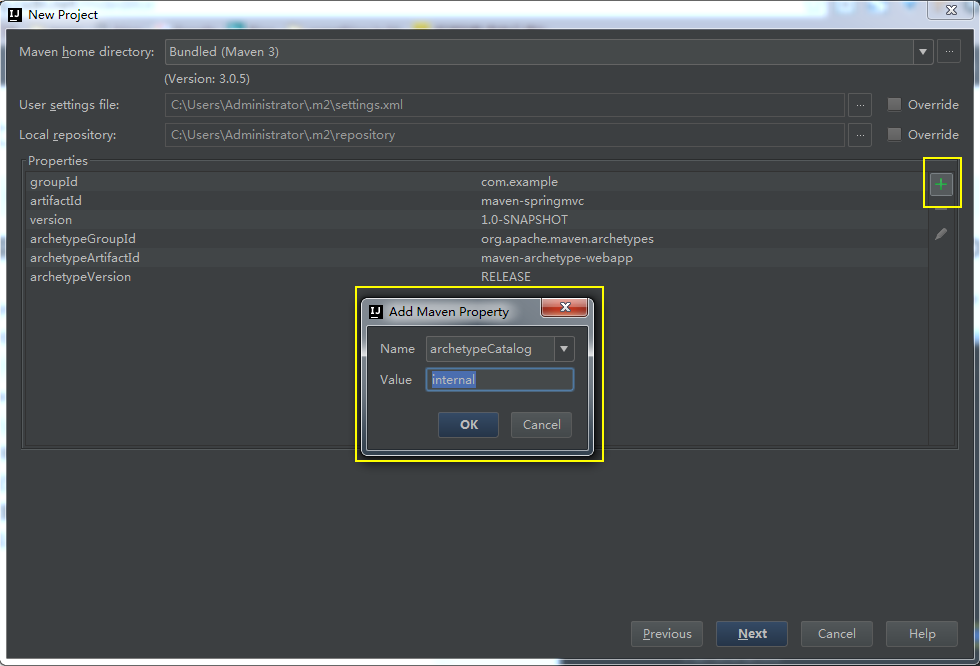
Because the Maven skeleton and some jar s need to go to the Maven repository to download, the project will be created very slowly (foreign servers you know), so we can directly access http://repo1.maven.org/maven2/archetype-catalog.xml, download the XML into the local maven directory, and then add a parameter named Catalog=international.
- next fill in the project name and finish it.
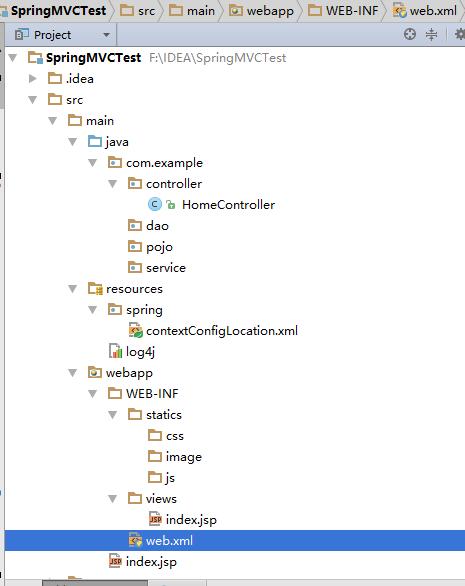
3. Establishing corresponding catalogues
After the project is created, it is impossible to create new packages, java classes and other files under the src-main directory. In idea, directories need to be annotated.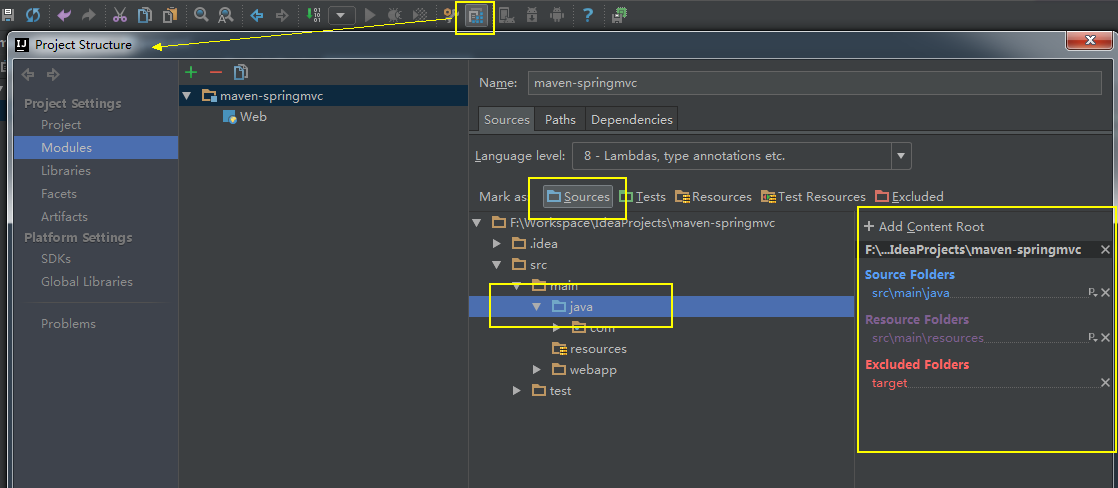
- Sources are commonly used to annotate compilable directories like src. Sometimes we not only need to compile the SRC directory of the project, but also some other special directories. Maybe we need to label this directory as compilable directory. Only compilable directories like Sources can create new Java classes and packages, which needs to be kept in mind.
- Tests are generally used to annotate compilable unit test directories. In the standard Maven project structure, the top-level directory is src, maven's SRC is not set to Sources, but to the Java directory in its subdirectory main directory, we will set to Sources. The unit test directory is src - test - java, where the Java directory is set to Tests, indicating that the directory is a compilable unit test directory. Usually this and the latter are both here. The maven project is configurable, but I'll talk about it first. From this point, we can also see that IntelliJ IDEA's support for the maven project is more thorough.
- Resources are commonly used to annotate resource file directories. Under the maven project, the resource directory is separately divided into: src - main -resources, where the resources directory is set to Resources, indicating that the directory is a resource directory. Files in the resource directory are compiled into the output directory.
Test Resources are commonly used to annotate the directory of resource files for unit tests. Under the maven project, the resource directory for unit testing is separately divided into: src - test -resources, where the resource directory is set to Test Resources, indicating that the directory is the resource directory for unit testing. Files in the resource directory are compiled into the output directory. - Excluded is generally used to annotate excluded directories. Excluded directories will not be indexed by IntelliJ IDEA, which is equivalent to being discarded by IntelliJ IDEA. Code files in this directory do not have regular code functions such as code checking and intelligent prompting.
- Through the introduction above, we know that for non-maven projects we only need to set up src.
(Cited from http://wiki.jikexueyuan.com/project/intellij-idea-tutorial/eclipse-java-web-project-introduction.html)
After labeling, create the following directory.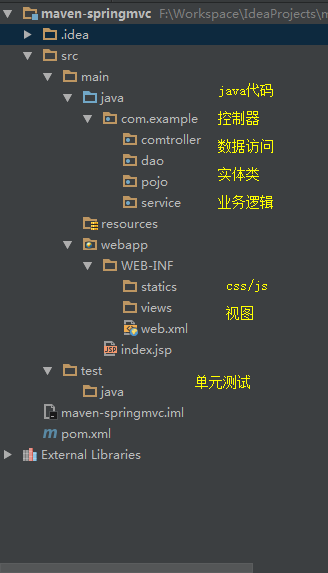
My final catalogue is as follows:
Configure Maven and Spring MVC
Configure Maven's pom.xml
The complete configuration file is as follows.
<project xmlns="http://maven.apache.org/POM/4.0.0" xmlns:xsi="http://www.w3.org/2001/XMLSchema-instance"
         xsi:schemaLocation="http://maven.apache.org/POM/4.0.0 http://maven.apache.org/maven-v4_0_0.xsd">
    <modelVersion>4.0.0</modelVersion>
    <groupId>com.example</groupId>
    <artifactId>maven-springmvc</artifactId>
    <packaging>war</packaging>
    <version>1.0-SNAPSHOT</version>
    <name>maven-springmvc Maven Webapp</name>
    <url>http://maven.apache.org</url>
    <!--Project dependence -->
    <dependencies>
        <!--Log pack-->
        <dependency>
            <groupId>junit</groupId>
            <artifactId>junit</artifactId>
            <version>3.8.1</version>
            <scope>test</scope>
        </dependency>
        <dependency>
            <groupId>org.slf4j</groupId>
            <artifactId>slf4j-log4j12</artifactId>
            <version>1.7.21</version>
        </dependency>

        <!--j2ee Related packages servlet,jsp,jstl-->
        <dependency>
            <groupId>javax.servlet</groupId>
            <artifactId>javax.servlet-api</artifactId>
            <version>3.1.0</version>
        </dependency>
        <dependency>
            <groupId>javax.servlet.jsp</groupId>
            <artifactId>jsp-api</artifactId>
            <version>2.2</version>
        </dependency>
        <dependency>
            <groupId>javax.servlet</groupId>
            <artifactId>jstl</artifactId>
            <version>1.2</version>
        </dependency>

        <!--mysql Driving package-->
        <dependency>
            <groupId>mysql</groupId>
            <artifactId>mysql-connector-java</artifactId>
            <version>5.1.35</version>
        </dependency>

        <!--spring Related packages-->
        <dependency>
            <groupId>org.springframework</groupId>
            <artifactId>spring-web</artifactId>
            <version>4.3.1.RELEASE</version>
        </dependency>
        <dependency>
            <groupId>org.springframework</groupId>
            <artifactId>spring-webmvc</artifactId>
            <version>4.3.1.RELEASE</version>
        </dependency>

        <!--Other required packages-->
        <dependency>
            <groupId>org.apache.commons</groupId>
            <artifactId>commons-lang3</artifactId>
            <version>3.4</version>
        </dependency>
        <dependency>
            <groupId>commons-fileupload</groupId>
            <artifactId>commons-fileupload</artifactId>
            <version>1.3.1</version>
        </dependency>
    </dependencies>

    <build>
        <finalName>maven-springmvc</finalName>
        <resources>
            <!--Express the java Relevant under the catalogue xml file,properties File compilation/Put it in the bag when you pack it. resource Directory-->
            <resource>
                <directory>${basedir}/src/main/java</directory>
                <includes>
                    <include>**/*.properties</include>
                    <include>**/*.xml</include>
                </includes>
            </resource>
            <resource>
                <directory>${basedir}/src/main/resources</directory>
            </resource>
        </resources>
        <plugins>
            <!--servlet container jetty Plug-in unit-->
            <plugin>
                <groupId>org.eclipse.jetty</groupId>
                <artifactId>jetty-maven-plugin</artifactId>
                <version>9.3.10.v20160621</version>
            </plugin>
        </plugins>
    </build>
</project>
After updating the pom.xml file, idea should automatically download the corresponding jar package (vpn may be required), if not, you can click the "Reimport All Maven Projects" button to reload the project. As shown in the figure.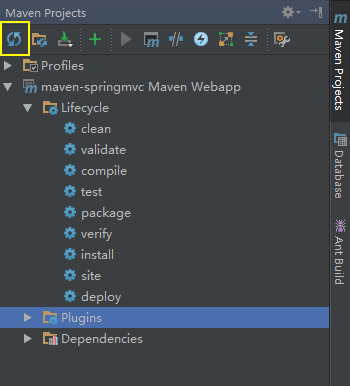
After the jar download is complete, all the dependencies required for the project have been added.
Configure web.xml
The default version of web.xml generated by maven is 2.3, so some configuration nodes idea will not be recognized, so we add a 3.0 version.
<?xml version="1.0" encoding="UTF-8"?>
<web-app xmlns="http://java.sun.com/xml/ns/javaee"
           xmlns:xsi="http://www.w3.org/2001/XMLSchema-instance"
           xsi:schemaLocation="http://java.sun.com/xml/ns/javaee
          http://java.sun.com/xml/ns/javaee/web-app_3_0.xsd"
           version="3.0">
    <!--welcome pages-->
    <welcome-file-list>
        <welcome-file>index.jsp</welcome-file>
    </welcome-file-list>

    <!--To configure springmvc DispatcherServlet-->
    <servlet>
        <servlet-name>springMVC</servlet-name>
        <servlet-class>org.springframework.web.servlet.DispatcherServlet</servlet-class>
        <init-param>
            <!--Sources Need to create a new one under the annotated folder spring Folder-->
            <param-name>contextConfigLocation</param-name>
            <param-value>classpath:spring/contextConfigLocation.xml</param-value>
        </init-param>
        <load-on-startup>1</load-on-startup>
        <async-supported>true</async-supported>
    </servlet>
    <servlet-mapping>
        <servlet-name>springMVC</servlet-name>
        <url-pattern>/</url-pattern>
    </servlet-mapping>
</web-app>
The received http request is distributed through the Dispatcher Servlet.
Configure contextConfigLocation file
<?xml version="1.0" encoding="UTF-8"?>
<beans xmlns="http://www.springframework.org/schema/beans"
       xmlns:xsi="http://www.w3.org/2001/XMLSchema-instance"
       xmlns:context="http://www.springframework.org/schema/context"
       xmlns:mvc="http://www.springframework.org/schema/mvc"
       xsi:schemaLocation="http://www.springframework.org/schema/beans
                        http://www.springframework.org/schema/beans/spring-beans-3.2.xsd
                         http://www.springframework.org/schema/context
                        http://www.springframework.org/schema/context/spring-context-3.2.xsd
                        http://www.springframework.org/schema/mvc
                        http://www.springframework.org/schema/mvc/spring-mvc.xsd">
    <!--Enable spring Some of annotation -->
    <context:annotation-config/>

    <!-- Scanning the package automatically SpringMVC Think the package is used.@controller The annotated class is the controller -->
    <context:component-scan base-package="com.zjut.ssm.controller">
        <context:include-filter type="annotation" expression="org.springframework.stereotype.Controller"/>
    </context:component-scan>

    <!--HandlerMapping No configuration is required. springmvc Start by default-->

    <!--Static resource mapping-->
    <!--This project puts static resources in place WEB-INF Of statics Under the directory, resources are mapped as follows-->
    <mvc:resources mapping="/css/**" location="/WEB-INF/statics/css/"/>
    <mvc:resources mapping="/js/**" location="/WEB-INF/statics/js/"/>
    <mvc:resources mapping="/image/**" location="/WEB-INF/statics/image/"/>

    <!--But the project is deployed to linux Find below WEB-INF Static resources will be unresolved, but local tomcat Access is normal, so it is recommended that static resources be placed directly webapp Of statics Next, the mapping configuration is as follows-->
    <!--<mvc:resources mapping="/css/**" location="/statics/css/"/>-->
    <!--<mvc:resources mapping="/js/**" location="/statics/js/"/>-->
    <!--<mvc:resources mapping="/image/**" location="/statics/images/"/>-->

    <!-- Configuration annotation drivers can request Parameters and binding to controller Parameter -->
    <mvc:annotation-driven/>

    <!-- Analysis of Model View Names by Adding Prefixes and Suffixes to Model View Names(If the last one still represents the folder,And don't miss the last slash.) Use JSP-->
    <!-- The default view parser is used when parsing errors above (Default use html)- -->
    <bean id="defaultViewResolver" class="org.springframework.web.servlet.view.InternalResourceViewResolver">
        <property name="viewClass" value="org.springframework.web.servlet.view.JstlView"/>
        <property name="prefix" value="/WEB-INF/views/"/><!--Set up JSP Directory location of files-->
        <property name="suffix" value=".jsp"/>
    </bean>

    <!-- springmvc Nodes to be configured for file upload-->
    <bean id="multipartResolver" class="org.springframework.web.multipart.commons.CommonsMultipartResolver">
        <property name="maxUploadSize" value="20971500"/>
        <property name="defaultEncoding" value="UTF-8"/>
        <property name="resolveLazily" value="true"/>
    </bean>
</beans>
Configure log4j.properties
Log files are an essential tool in debug, so log4j log packages have been added. The configuration file is as follows.
#Following the configuration root Logger are several Appender s
log4j.rootLogger=DEBUG,A1,R
#log4j.rootLogger=INFO,A1,R

# ConsoleAppender output
log4j.appender.A1=org.apache.log4j.ConsoleAppender
log4j.appender.A1.layout=org.apache.log4j.PatternLayout
log4j.appender.A1.layout.ConversionPattern=%-d{yyyy-MM-dd HH:mm:ss,SSS} [%c]-[%p] %m%n

# File outputs a file a day. The output path can be customized, usually under the root path.
log4j.appender.R=org.apache.log4j.DailyRollingFileAppender
log4j.appender.R.File=log.txt
log4j.appender.R.MaxFileSize=500KB
log4j.appender.R.MaxBackupIndex=10
log4j.appender.R.layout=org.apache.log4j.PatternLayout
log4j.appender.R.layout.ConversionPattern=%d{yyyy-MM-dd HH:mm:ss,SSS} [%t] [%c] [%p] - %m%n
The Writing of controller and view
Create a new "Home Controller" under the controller. Write the following code.
package com.zjut.ssm.controller;

import org.slf4j.Logger;
import org.slf4j.LoggerFactory;
import org.springframework.stereotype.Controller;
import org.springframework.web.bind.annotation.RequestMapping;

/**
 * @author Chingyu Mo
 * @create 2016-07-23-20:20
 */
// Annotations annotate this type of controller as spring mvc, url mapped to "/home"
@Controller
@RequestMapping("/home")
public class HomeController {
    //Add a logger
    private static final Logger logger = LoggerFactory.getLogger(HomeController.class);

    //Mapping an action
    @RequestMapping("/index")
    public  String index(){
        //Output log file
        logger.info("the first jsp pages");
        //Return an index.jsp view
        return "index";
    }
}
Create a JSP file named "index.jsp" under the views folder
The basic coding is done.
Configuration and operation of servlet container
The servlet container has two configurations.
- Configure the local tomcat server
- Configure the maven plug-in
Configure the local tomcat server
Configure the tomcat server according to the figure above. In this way, you need to download tomcat locally and configure the environment variables.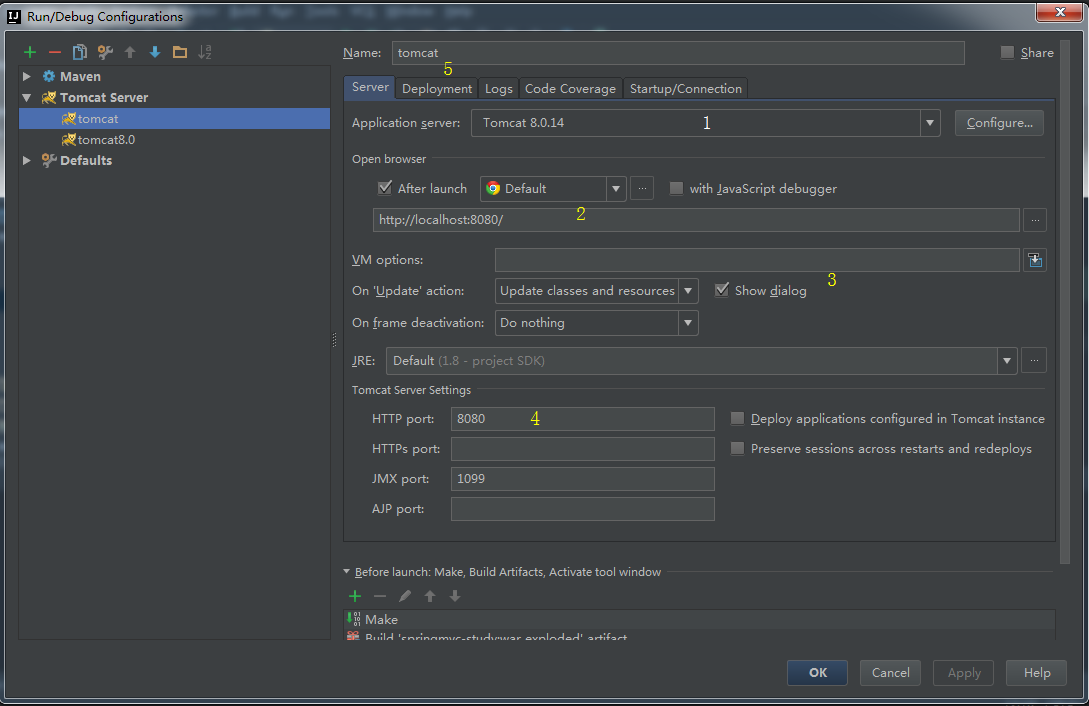
The main points are as follows.
- 1. Select the local tomcat container.
- 2. You can choose to modify the access path.
- 3.On Update action When we update the container by pressing Ctrl + F10, we can update the container according to the event content we configure. The Update classes and resources events I chose are the most common ones, indicating that when we update the container according to Ctrl + F10, we trigger the update of the compiled class and resource files into the container.
- 4. Tomcat's HTTP port is 8080 by default. If you need to change its port, you can set it here.
- 5. Add Artifact to the Deployment tab.
Configure the maven plug-in
The maven plug-in includes tomcat and jetty, both containers for servlet s. I configure jetty here. The plug-in has been configured in pom.xml.
 <plugins>
            <!--servlet container jetty Plug-in unit-->
            <plugin>
                <groupId>org.eclipse.jetty</groupId>
                <artifactId>jetty-maven-plugin</artifactId>
                <version>9.3.10.v20160621</version>
            </plugin>
        </plugins>
Then configure jetty in idea.
Running the first Spring MVC application
Click Run and run.
This is a simple way to create Spring MVC applications in idea.
Or you can run it directly using tomact.
Download address for the whole project: http://download.csdn.net/detail/u011269801/9752815
Reference: http://www.cnblogs.com/Sinte-Beuve/p/5730553.html