Installation of Django
1. Using Pipenv to create an isolated environment
First, install Pipenv by command pip install pipenv.
Then create a folder as the root directory of the blog project we are going to develop. For example, I create a new directory named blog under my personal working directory C: Users Zerobit SpaceLocal Workspace G_Courses as the root directory of the project.
Then go into this directory and execute pipenv install in this directory. Pipenv will do everything for us. Specifically, Pipenv creates a virtual environment based on the name of the project folder, and generates Pipfile and Pipfile.lock under the project root directory to manage project dependencies. (Dependencies installed with Pipenv will be automatically written to the Pipfile file file later, without having to manually maintain the requirements.txt file, which is similar to the package.json of node.js. It's simply crooked.)
In addition, Pipenv is very considerate in exporting the following information to show you how to use the created virtual environment:
To activate this project's virtualenv, run pipenv shell.Alternatively, run a command inside the virtualenv with pipenv run.
That is, to activate the virtual environment, run the pipenv shell command in the project root directory.
Or, without activating the virtual environment, run the pipenv run + command, or execute the specified command in the virtual environment.
Considering that Pipenv can help us manage virtual environments and project dependencies very easily, we will always use Pipenv as a virtual environment management tool in the future.
Tips: You may want to know where the virtual environment pipenv created is. By default, Pipenv creates the virtual environment in the ~/. virtualenvs directory, and by using pipenv --venv in the project root directory, you can see the exact location of the virtual environment corresponding to the project.
2. Install Django
Install Django using Pipenv:
pipenv install django
3. View the Django version:
>>> import django
>>> django.get_version()
II. Creating Django Projects
1. Create project commands:
Django-admin start project project project name
2. Important documentation:
- The management.py command-line tool, which interacts with the current project, is also a wrapper for the django-admin tool; users do not need to modify the file.
Under the project name directory:
- settings.py Current Project Settings and Configuration Items
- urls.py contains the URL path
- wsgi.py configuration runs as a Web Server Gateway Interface (WSGI) application project
3. Create database tables
Under the project root directory:
python manage.py migrate
4. Running Development Server
python manage.py runserver
You can also instruct Django to run the development server on a custom host and port, or notify Django to run the project and load different settings files at the same time:
python manage.py runserver 0.0.0.0:8000 --settings=mysite.settings
Reference to the method of compiling settings files in different environments: click here
5. Basic Project Settings
- DEBUG is defined as a Boolean value that indicates the debugging mode of the current project to be turned on/off.
- ALLOWED_HOST This option is not available when debugging mode is turned on or testing is executed. Once the site is moved to the product environment and DEBUG is set to False, you need to add the domain/host to this setting to allow it to serve the Django site.
- INSTALLED_APPS This setting tells Django which application is active for the current site.
- MIDDLEWARE is represented as a list of Middleware
- ROOT_URLCONF defines the root URL path of the application.
- DATABASES database settings. SQLite3 database is used as the default configuration
- The default code language for the LANGUAGE_CODE Django site. Chinese is zh-hans.
- TIME_ZONE sets the time. The Chinese time zone can be set to Asia/Shanghai.
6. Create applications
Our project is considered to be a site with multiple applications, such as blogs, wiki s or forums. Run the following commands in the project root directory:
Python management.py startapp blog (application name)
The command generates the basic structure of the application. The directory structure file is described as follows:
- admin.py can register the model in this file and incorporate it into the Django administration site.
- apps.py contains the configuration of the application.
- The migrations directory contains the database migration for the application. Migration enables Django to track module changes and synchronize to the database accordingly.
- Model.py contains the data model of the application.
- test.py can add application tests to this file.
- View.py contains application logic content. Each view receives an HTTP request and returns a response result after processing.
Defining data models
Examples of data models are as follows:
from django.db import models
from django.utils import timezone
from django.contrib.auth.models import User


# Create your models here.
class Post(models.Model):
    STATUS_CHOICES = (
        ('draft', 'Draft'),
        ('published', 'Published'),
    )
    title = models.CharField(max_length=250)
    slug = models.SlugField(max_length=250, unique_for_date='publish')
    author = models.ForeignKey(User, on_delete=models.CASCADE, related_name='blog_posts')
    body = models.TextField()
    publish = models.DateTimeField(default=timezone.now)
    created = models.DateTimeField(auto_now_add=True)
    updated = models.DateTimeField(auto_now=True)
    status = models.CharField(max_length=10, choices=STATUS_CHOICES, default='draft')

    class Meta:
        ordering = ('-publish',)

    def __str__(self):
        return self.title
1. Registration application
Edit the settings.py file and register the application with the INSTALLED_APPS settings:
INSTALLED_APPS = [
    'django.contrib.admin',
    'django.contrib.auth',
    'django.contrib.contenttypes',
    'django.contrib.sessions',
    'django.contrib.messages',
    'django.contrib.staticfiles',
    'blog.apps.BlogConfig', # Registration application
]
2. Setting up and migrating databases
The data model is created and database tables need to be defined for it. In the root directory of the project, you can run the following commands:
Python management.py makemigrations blog (application name)
Synchronize the database with the model:
python manage.py migrate
4. Creating management sites for models
1. Creating Super Users
First create a user and manage the site:
python manage.py createsuperuser
2. Django Management Site
After launching the project, the management site can be accessed through the following address:
http://127.0.0.1:8000/admin
3. Adding models to management sites
Edit the admin.py file of the application as follows:
from django.contrib import admin
from .models import Post

# Register your models here.
admin.site.register(Post)
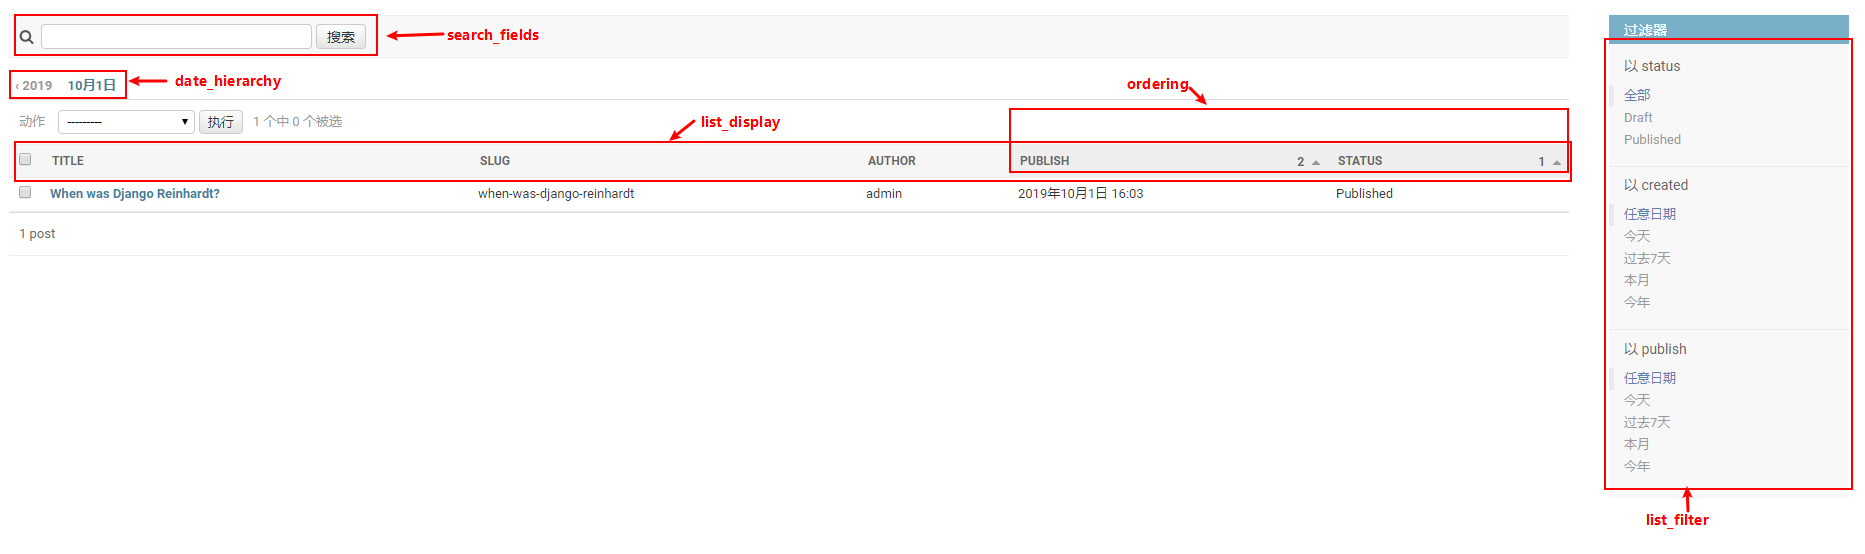
4. Display mode of customized model
Modify the admin.py file of the application as follows:
from django.contrib import admin
from .models import Post


# Register your models here.
@admin.register(Post)
class PostAdmin(admin.ModelAdmin):
    list_display = ('title', 'slug', 'author', 'publish', 'status')
    list_filter = ('status', 'created', 'publish', 'author')
    search_fields = ('title', 'body')
    prepopulated_fields = {'slug': ('title',)}
    raw_id_fields = ('author',)
    date_hierarchy = 'publish'
    ordering = ('status', 'publish')
Next, click the Add Post button. When you enter the title of a new post, the slug field is automatically filled in, which is what prepopulated_fields do.
5. Adding, deleting, modifying and checking QuerySet
The ORM of Django objects is based on QuerySet. QuerySet is represented as a collection of objects from the database, which contains multiple filters to restrict the results.
1. Create Objects
Open the terminal and run the following command to start Python Shell:
python manage.py shell
Then enter the following lines of code:
>>> from django.contrib.auth.models import User
>>> from blog.models import Post
>>> user = User.objects.get(username='admin') # Getting User Objects by Username admin
>>> post = Post(title='Another Post', slug='another-post', body='Post body.', author=user) # Creating Post Objects
>>> post.save() # Save the object to the database
- get() method can get a single object from the database. Note that this method expects to match the query results. If the database does not return any results, a DoesNotExist exception is thrown; if the database returns multiple results, a MultipleObjectsReturned exception is thrown.
Objects can also be created through the create() method:
Post.objects.create(title='One more post', slug='one-more-post', body='Post body.', author=user)
2. Update objects
Modify the title of the post and save the object again:
>>> post.title = 'New title'
>>> post.save()
3. Getting Objects
Get all objects:
all_posts = Post.objects.all()
3.1 Use filter() method
The filter() method filters QuerySet:
Post.objects.filter(publish__year=2017) # Get Posts published in 2017
You can also filter through multiple fields:
Post.objects.filter(publish__year=2017, author__username='admin')
Queries containing field lookup methods can be constructed with two underscores, such as publish_year, but can also be used to access fields across tables, such as author_username.
3.2 Use exclude() method
This method can exclude specific results from QuerySet:
# Get a post that didn't start with Why and was published in 2017
Post.objects.filter(publish__year=2017).exclude(title__startswith='Why')
3.3 Use the order_by() method
Using the order_by() method, the results can be sorted by different fields.
Post.objects.order_by('-publish')
4. Delete objects
post = Post.objects.get(id=1)
post.delete()
5. Custom Model Manager
The default manager for objects is objects (all objects in the database can be retrieved). But you can also define custom managers for models. The customized manager function below is to retrieve all posts containing published status. Now edit the models.py file and add the custom manager:
from django.db import models
from django.utils import timezone
from django.contrib.auth.models import User


# Create your models here.
class PublishedManager(models.Manager):
    def get_queryset(self):
        return super(PublishedManager, self).get_queryset().filter(status='published')


class Post(models.Model):
    ...
    objects = models.Manager()
    published = PublishedManager()
Then you can use the following code to get all the objects whose status is public:
Post.published.all()
6. Building Lists and Detailed Views
1. Generating lists and views
Edit views.py file in the application directory:
from django.shortcuts import render, get_object_or_404
from .models import Post


# Create your views here.
def post_list(request):
    posts = Post.published.all()
    return render(request, 'blog/post/list.html', {'posts': posts})
- The post_list view receives the request object as the only parameter that all views need to use.
- The view function renders a list of Posts containing a given template using the render() method.
Next, create a second view to display individual posts:
def post_detail(request, year, month, day, post):
    post = get_object_or_404(Post, slug=post, status='published', published__year=year, published__month=month,
                             published__day=day)
    return render(request, 'blog/post/detail.html', {'post': post})
- The view takes year, month, day, and post as parameters and retrieves Posts containing established slug s and dates.
- Use get_object_or_404() to retrieve the desired post, and throw an HTTP 404 exception if the object does not exist.
2. Adding URL paths to views
The following code is added to the urls.py file of the application directory:
from django.urls import path
from . import views

app_name = 'blog'

urlpatterns = [
    path('', views.post_list, name='post_list'),
    path('<int:year>/<int:month>/<int:day>/<slug:post>/', views.post_detail, name='post_detail'),
]
- The application namespace is defined by the app_name variable
- The first URL path does not receive any parameters and maps to the post_list view function
- The second URL path receives different types of parameters
In addition to using path() to define URL paths, you can also use re_path() Define complex URL paths containing regular expressions. The following documents can be parameterized: Python 3 Regular Expressions
Currently, you need to include the URL path of the blog application in the main URL path of the project. To this end, you can edit the urls.py file under the project directory:
from django.contrib import admin
from django.urls import path, include

urlpatterns = [
    path('admin/', admin.site.urls),
    path('blog/', include('blog.urls', namespace='blog')),
]
- Defining a new URL path with include refers to a URL path defined in a blog application, and the namespace must be unique throughout the project.
3. Building URL s in the model
We will define the get_absolute_url() method in the models.py template and link to a specific URL. Using the reverse() method, the URL can be constructed by the corresponding name and the optional parameters passed.
from django.urls import reverse

class Post(models.Model):
    ...
    def get_absolute_url(self):
        return reverse('blog:post_detail', args=[self.publish.year, self.publish.month, self.publish.day, self.slug])