Scripting language: it can be parsed and executed by the browser without compilation
Overview of Wed concept
JavaWed:
- Using java language to develop Internet based projects
Software architecture:
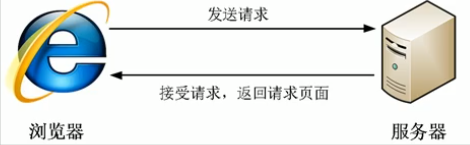
1. C/S: Client / Server
 *    There is a client program locally and a server program remotely
 *    For example: QQ,Thunder...
 *    Advantages: good user experience
 *    Disadvantages: development, installation, deployment and maintenance are troublesome
2. B / s: Browser / server
-
Only one browser is needed. Users can access different server-side programs through different web addresses (URL s)
-
Advantages: simple development, installation, deployment and maintenance
-
Disadvantages: 1. If the application is too large, the user experience may be affected
2. The requirements for hardware are too high
B/S architecture details
Resource classification:
-
1. Static resources

   Resources published using static web development technology.

   	  Features: all users access and get/The results are the same

   				  Such as text, picture, audio, video HTML,CSS,JavaScript

   				  If the user requests a static resource, the server will directly send the static resource to the browser.

   				  The browser has built-in parsing engine for static resources, which can display static resources

   	  HTML: It is used to build a basic web page and display the content of the page

         CSS   : Used to beautify pages and layout pages

   	   JavaScript  :  Control the elements of the page to make the page have some dynamic effects

2. dynamic resource

   Resources published using dynamic web technology.

   	    Features: all users access and get/The results may be different

   				   For example: JSP  /   servlet  ,PHP  ,asp...

   				    If the user requests dynamic resources, the server will execute dynamic resources and convert them into static resources,

   				    Then send it to the browser (the browser can only parse static resources)
HTML
- Concept: the most basic web development language
♥ Hyper Text Markup Language
 Hypertext: it is a network text that organizes text information in different spaces by means of hyperlinks

 Markup Language: the language composed of tags.<Label name>  as html  ,xml
The tag language is not a programming language
-
Quick start:
Syntax:
♥ html document suffix:. html or. htm
♥ Labels are divided into:
- Containment label: there are start label and end label. Such as < HTML ></html>
- Self closing and tag: start tag and end tag are together. Such as < br / > line feed label
♥ Labels can be nested:
It needs to be nested correctly. You can't have me in you and you in me
Correct: < a > < b ></b></a>
♥ Attributes can be defined in the start tag. The attribute consists of key value pairs, and the values need to be enclosed in quotation marks (either single or double)
The most basic html code:
<html>
	<head>
		<title></title>
	</head>
	<body>
		<font color="blue"> Hello World </font><br/>
	</body>
</html>
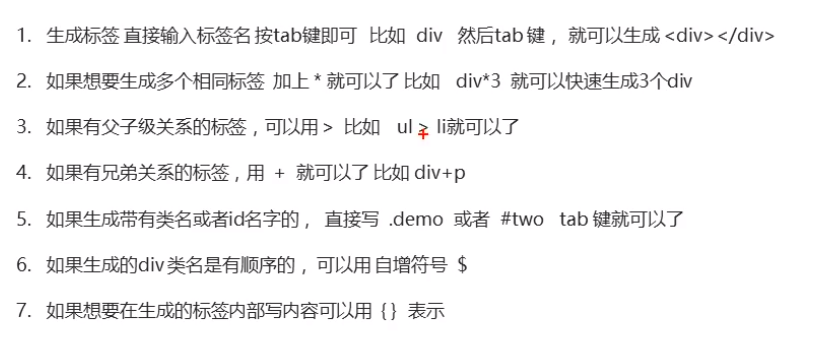
Emmet syntax
html tag shortcuts
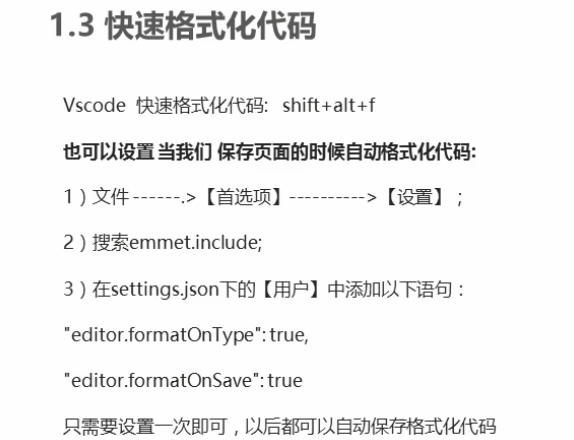
VSCode save AutoFormat code
label
file label
The most basic tags that make up html
The < HTML > tag tells the browser that this is an HTML document and the outermost element in the HTML document.
The < body > tag defines the body of the document, and the element contains all the contents of the document (such as text, hyperlink, image, table, list, etc.)
The < title > tag defines the title of the document. An HTML document cannot have more than one < title > element.
< head > header tag is used to specify some attributes of html document and introduce external resources.
Text label
Text related labels
< H1 > < H6 > title label
<h1>This is Title 1</h1>
<h2>This is Title 2</h2>
<h3>This is title 3</h3>
<h4>This is title 4</h4>
<h5>This is title 5</h5>
<h6>This is title 6</h6>
< p > < / P > paragraph labels
<p>This is a paragraph.</p>
< br / > line feed label
<p>
use br element<br>In text<br>Line feed.
</p>
< HR > is displayed as a horizontal line. Tags define topic changes in HTML pages (such as topic transfer)
< HR > attribute color: color width: width size: height
align: alignment method - > center, left, right
<hr color= "red" width="200" size="10" align="left"/>
< b > bold font
<p>This is an ordinary text- <b>This is a bold text</b>. </p>
< I > font Italic
<p>He named his car <i>The lightning</i>, because it was very fast.</p>
< font > font label
<font face="verdana" color="green">Here are some texts!</font>
<!-- --> notes
<!--This is a comment that does not appear in the browser-->
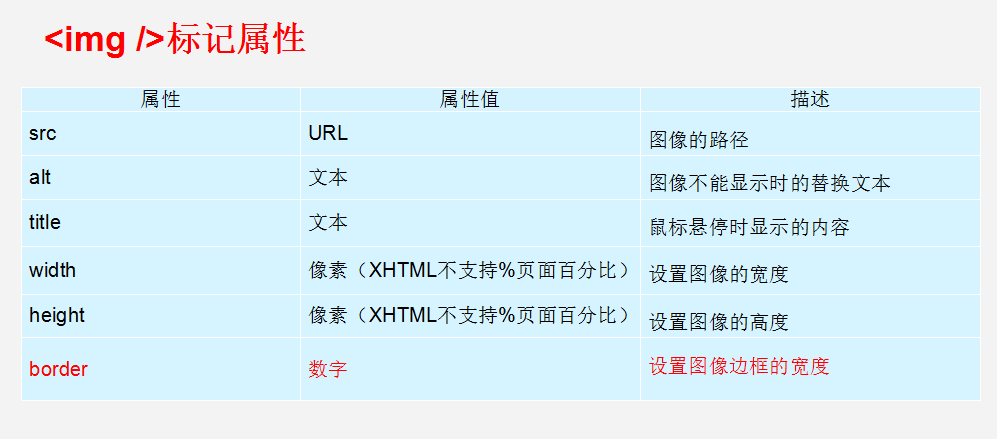
Picture label
< img > picture label
Representation of relative path:
Path starting with *.. / represents the current directory *.. /: represents the upper level directory
List label
< ol > define a sequence table
<ol>
  <li>Coffee</li>
  <li>Tea</li>
  <li>Milk</li>
</ol>
< UL > define an unordered list
<ul>
<li>Coffee</li>
<li>Tea</li>
<li>Milk</li>
</ul>
Link label
< a > < / a > link label
href: Specifies the URL to access the resource (uniform resource locator)
target: specifies how the resource is opened
_ self: the default value. It opens on the current page
_ Blank: open on a blank page
 <a href="https://Www.runoob. Com "> this is a link < / a > <-- Open on current page -- >
 <a href="https://www.runoob.com" target="_ Blank "> this is a link < / a > <-- Open on a blank page -- >
 <a href="./Local label.html"> Local label</a>       <!--Open local tab-->
div and span
< div > tags are often used to combine block level elements so that they can be formatted through CSS. Block level label
Each div occupies a whole row. Block level label
<span>Used to combine inline elements in a document. Inline label
The text information is displayed on one line
Semantic label
In order to improve the readability of the program, some tags are provided in html5.
The < header > tag defines the header of the document or part of the document.
Note: < header > tags cannot be placed inside < footer >, < address > or another < header > element.
The < footer > tag defines the footer of a document or part of an area of a document.
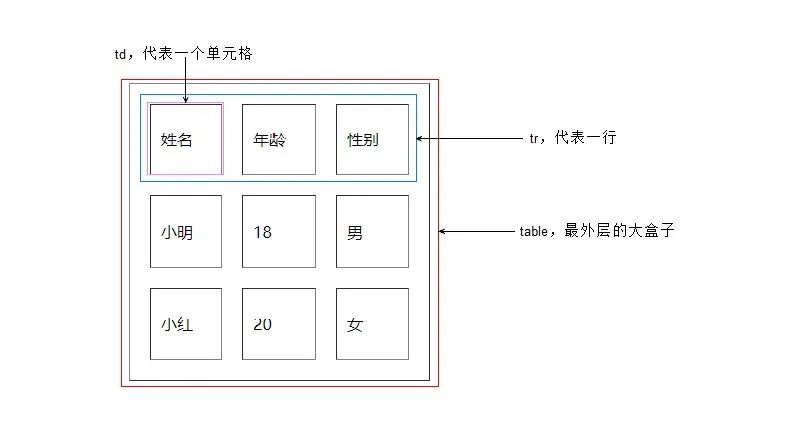
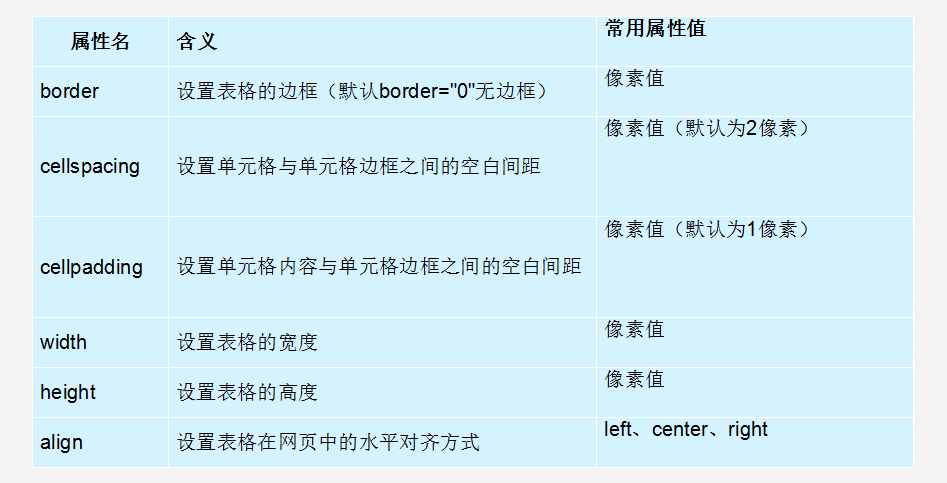
Table label
< Table > define table
< tr > define line
<td>Define cell
colspan: merge columns
rowspan: merge rows
< th > define header cells
Form label
< form > is used to define the of the form. You can define a range that represents the range in which user data is collected
Attribute: 1. action: Specifies the URL to submit data
2. methon: specify the submission method
Classification: there are 7 kinds in total, and 2 kinds are commonly used
get: the request parameters will be displayed in the address bar and encapsulated in the request line
The request parameter size / length is limited
Not very safe
post: the request parameters will not be displayed in the address bar, but will be encapsulated in the request body
There is no limit on the size / length of the request parameters
Relatively safe
To submit the data in a single table item: its name attribute must be specified
* Form item label:
	* input: Can pass type Attribute value to change the display style of the element
		* type Properties:
			* text: Text entry box, default
		 			* placeholder: Specify the prompt information of the input box. When the content of the input box changes, the prompt information will be cleared automatically
					* password: Password input box
					* radio:Radio
						* be careful:
							1. If you want multiple radio boxes to achieve the effect of radio selection, you must select multiple radio boxes name Property values must be the same.
							2. Generally, each radio box will be provided with value Property to specify the value to submit when it is selected
							3. checked Property, you can specify a default value
					* checkbox: check box
						* be careful:
							1. Generally, each radio box will be provided with value Property to specify the value to submit when it is selected
							2. checked Property, you can specify a default value
					* file: File selection box
					* hidden: Hidden field, used to submit some information.
					* Button:
						* submit: Submit button. Forms can be submitted
						* button: Normal button
						* image: Picture submit button
						* src Property specifies the path to the picture

		   * label: Specifies the text description of the entry
			  	 * be careful:
				 * label of for Properties are generally associated with input of id Attribute values correspond. If so, click label Area, will let input Input box to get focus.
		* select: Drop down list
			* Child element: option,Specify list items

		* textarea: Text field
			* cols: Specify the number of columns and how many characters are in each row
			* rows: The default number of rows.
<form action="#" method="get">
		user name:<input type="text" name="username"><br>
		password:<input type="password" name="password"><br>
		<input type="submit" `value="Submit"/>
</form>
<!DOCTYPE html>
<html lang="ch">
<head>
	<meta charset="UTF-8">
	<meta name="viewport" content="width=device-width, initial-scale=1.0">
	<meta http-equiv="X-UA-Compatible" content="ie=edge">
	<title></title>
</head>
<body>
	<form action="case.html" method="get"> <!--form -->

		<label for="username">user name</label>: <input type="text" name="username" placeholder="enter one user name" id="username"><br>
		<label for="password">password:<input type="password" name="password" placeholder="Please input a password" id="password"><br>

		Gender:<input type="radio" name="gender"  value="male"> male
			  <input type="radio" name="gender"  value="female"> female
			  <br> <!-- radio Radio box-->

		Hobbies:<input type="checkbox" name="hobby" value="game" > Play games
			 <input type="checkbox" name="hobby" value="plane" > sing
			 <input type="checkbox" name="hobby" value="code" > Type code
		     <br><!-- checkbox check box-->

		Picture:<input type="file" name="file" value="picture" />	<br>
		Hidden fields:<input type="hidden" name="id" value="aaa" />
				<!-- file File submission can be selected--><br>

		Color pickup:<input type="color" name="color" value="" />	<br>

		birthday:<input type="time" name="birthday" ><br>
		birthday:<input type="datetime-local" name="birthday" ><br>

		Email:<input type="email" name="email" ><br>

		Age:<input type="number" name="age" ><br>

		province:<select name="province">
			<option value="">--Please select--</option>
			<option value="1">Beijing</option>
			<option value="2">Shanghai</option>
			<option value="3">Guangzhou</option>
			<!--<option value="3" selected="">Guangzhou</option>-->
			<!--selected Indicates that it is selected by default-->
			</select><br>
		<!--Text field-->
		Self Description:<textarea rows="5" cols="20" name="Self description"></textarea><br>

				<input type="button" value="Button" >
				    <input type="submit" `value="Submit">
	</form>
</body>
</html>
Case:
<!DOCTYPE html>
<html lang="ch">
<head>
	<meta charset="UTF-8">
	<meta name="viewport" content="width=device-width, initial-scale=1.0">
	<meta http-equiv="X-UA-Compatible" content="ie=edge">
	<title>Registration page</title>
</head>
<body>
	<form action="#" method="post">
		<table border="1" align="center" width="500">
			 <tr>
				<td><label for="username">user name</label></td>
				<td><input type="text" name="username" id="username" value="" /></td>
			 </tr>

			 <tr>
				<td><label for="password">password</label></td>
				<td><input type="password" name="password" id="password" value="" /></td>
			 </tr>

			 <tr>
				<td><label for="eamil">Email</label></td>
				<td><input type="eamil" name="eamil" id="eamil" value="" /></td>
			 </tr>

			 <tr>
				<td><label for="name">full name</label></td>
				<td><input type="text" name="name" id="name" value="" /></td>
			 </tr>

			 <tr>
				<td><label for="tel">cell-phone number</label></td>
				<td><input type="number" name="tel" id="password"></td>
			 </tr>

			 <tr>
				<td><label for="tel">Age</label></td>
				<td><input type="number" name="age" ></td>
			 </tr>

			 <tr>
				<td><label >Gender</label></td>
				<td><input type="radio" name="gender" value="male">male
				<input type="radio" name="gender" value="female">female</td>
			 </tr>

			 <tr>
				<td><label >date of birth</label></td>
				<td><input type="date" name="birthday" id="birthday" ></td>
			 </tr>

			 <tr>
				<td><label for="checkcode" >Verification Code</label></td>
				<td><input type="text" name="checkcode" id="checkcode" ></td>
			 </tr>

			<tr>
				<td colspan="2" align="center"><input type="submit" value="register" ></td>
			</tr>

		</table>

	</form>
</body>
</html>
CSS
concept
Cascading Style Sheets cascading style sheets
- Cascade: multiple styles can act on the same html element and take effect at the same time
benefit
- Powerful
- Separating content presentation from style control
-
Reduce coupling. decoupling
-
Make division of labor and cooperation easier
-
Improve development efficiency
-
3, The use of CSS: the combination of CSS and html
inline style
inline style
		 * Use in label style Attribute assignment css code
		 * For example:<div style="color:red;">hello css</div>
Internal style
Internal style
		* stay head Inside the label, define style label, style The label body content of the label is css code
		* For example:
			<style>
		        div{
		            color:blue;
		        }
		    </style>
			<div>hello css</div>
External style
External style
		1. definition css Resource file.
		2. stay head Inside the label, define link Tag to import external resource files
		* For example:
    		* a.css File:
				div{
				    color:green;
				}
			<link rel="stylesheet" href="css/a.css">
			<div>hello css</div>
			<div>hello css</div>
be careful:
	* 1,2,3 Ways css The scope of action is increasing
	* 1 2. The method is not commonly used, and it is commonly used in the later stage,3
	* The third format can be written as:
	<style>
	     @import "css/a.css";
	</style>
css syntax
Format:
Selector{
Attribute name 1: attribute value 1;
Attribute name 2: attribute value 2;
...
}
Selectors: filter elements with similar characteristics
Note:
Each pair of attributes needs to be used; Separated, the last pair of attributes can not be added**
selector
Base selector
5, Selectors: filter elements with similar characteristics
	* Classification:
		1. Base selector
			1. id Selector: select a specific id Element of attribute value.Suggest in a html On page id Unique value
		        * Syntax:#id attribute value {}
    <html>
    <head>
        <meta charset="utf-8">
        <title>Rookie tutorial(runoob.com)</title>
            <style>
                    #div     <!--  This is ID -- >
                    {
                        text-align:center;
                        color:red;
                    }
            </style>
     </head>
          <body>
                    <p id="div">Hello World!</p>
                    <p>This paragraph is not affected by this style.</p>
            </body>
     </html>
element selector
	2. Element selector: select an element with the same label name
		        * Syntax: label name{}
		        * be careful: id Selectors take precedence over element selectors
		id Selectors can be marked with specific id of HTML Element specifies a specific style.
		HTML Element to id Property id selector,CSS in id Selector to "#"To define.

        <html>
            <head>
                <meta charset="utf-8">
                <title>casual</title>
                        <style>
                            div{    color:red;   }
                        </style>
            </head>
            <body>
                <div>Intelligence Podcast</div>
                <div1>Dark horse programmer</div1>
            </body>
        </html>
Class selector
	 3. Class selector: select a class with the same class The element of the attribute value.
		        * Syntax:.class Attribute value{}
		        * Note: class selectors take precedence over element selectors
    class Selectors are used to describe the style of a set of elements, class Selectors are different from id Selector, class Can be used in multiple elements.
    class Selector in HTML Zhongyi class Attribute representation, stay CSS In, the class selector takes a point"."Number display:

<html>
	<head>
		<meta charset="utf-8">
		<title>casual</title>
            <style>
                #div{     color:red;     }
                div{    color: green;    }
                .cls{    color: blue;    }
            </style>
        </head>
        <body>
            <div id="div">Intelligence Podcast</div>
            <div1>Dark horse programmer</div1>
            <p class="cls">College of communication and intelligence</p>
	</body>
</html>
Extension selector
Extension selector:
  1. Select all elements:
	Syntax: *{}
	 <html>
	<head>
		<style>
			* {  background-color: pink;  }
		</style>
	</head>
	<body>
		<div class="intro">
			<p>My name is Donald.</p>
			<p>I live in Duckburg.</p>
		</div>
	<p>My best friend is Mickey.</p>
	</body>
</html>
Union selector
2. Union selector: select all<div>Element and<p>element  (div,p)
	grammar :Selector 1,Selector 2{}
        <html>
            <head>
                <style>
                    div,p {  background-color: pink;  }
                    <!-- Select all<p>Element and h1>element: -->
                </style>
            </head>
            <body>
                <div>
                    <p>My name is Donald.</p>
                    <p>I live in Duckburg.</p>
                </div>
                My best friend is Mickey.
            </body>
        </html>
Child selectors
3. Sub selectors: selecting<div>All within the element<p>element  (div p)
	 Syntax: selector 1 selector 2{}
<html>
	<head>
		<style>
			 div p {  background-color: pink;	}
		</style>
	</head>
	<body>
		<div>
			<p>My name is Donald.</p>
			 I live in Duckburg.
		</div>
		My best friend is Mickey.
	</body>
</html>
Parent selector
4. Parent selector: select all<p>Parent of element<div>element  (div>p)
	 Syntax: selector 1 > Selector 2{}
	 <html>
            <head>
                <style>
                    div>p {  background-color: pink;  }
                </style>
            </head>
            <body>
                <div>
                    <p>My name is Donald.</p>
                      I live in Duckburg.
                </div>
                My best friend is Mickey.
            </body>
        </html>
attribute selectors
5. Attribute selector: select element name and attribute name=Element of attribute value
	 Syntax: element name[Attribute name="Attribute value"]{}
<html>
	<head>
		<style>
			input[type='text']{  border:3px solid 	}
           </style>

	</head>
	<body>
		<div>  <p>My name is Donald.</p>  </div>

		My best friend is Mickey. <br>
		<input type="password"> <br>
		<input type="text">
	</body>
</html>
Pseudo class selector
6. Pseudo class selector: select the state that some elements have
				* Syntax: Elements:state{}
				* For example: <a>
					* Status:
						* link: Status of initialization
						* visited: Accessed status
						* hover: Mouse hover
                  		* active: Accessing status
  <html>
	<head>
		<style>
			a:link{  /* Status of initialization */
				color:skyblue;
			}
            a:visited{  /* Mouse hover */
				color:green;
			}
			a:hover{  /* Accessed status */
				color:yellow;
			}
			a:active{  /* Accessing status */
				color:blue;
			}
           </style>
	</head>
	<body>      <a href="#"> blind date, boy</a> 	</ body>
</html>
focus pseudo class selector
The: focus pseudo class selector is used to select the form element that gets the focus
The focus is the cursor, which can only be obtained by form like elements in general, so this selector is mainly for form elements
input:focus{
	background-color:yellow;
}
attribute
1. Font, text
		* font-size: font size
		* color: text color
		* text-align: On its way
		* line-height: Row height
2. background
		* background:
3. frame
		* border: Set the border to match the properties
4. size
		* width: width
		* height: height
    <html>
        <head>
            <style>
                p{
                    color: #fe9cfd;            /* Text color*/
                    font-size: 30px;		  /*font size*/
                    text-align: center; 	  /*On its way*/
                    line-height: 200px;		  /*Row height*/
                    border: 1px solid red;     /*frame*/
                }
            </style>
        </head>
        <body>
            <p>I like you!</p>
        </body>
    </html>
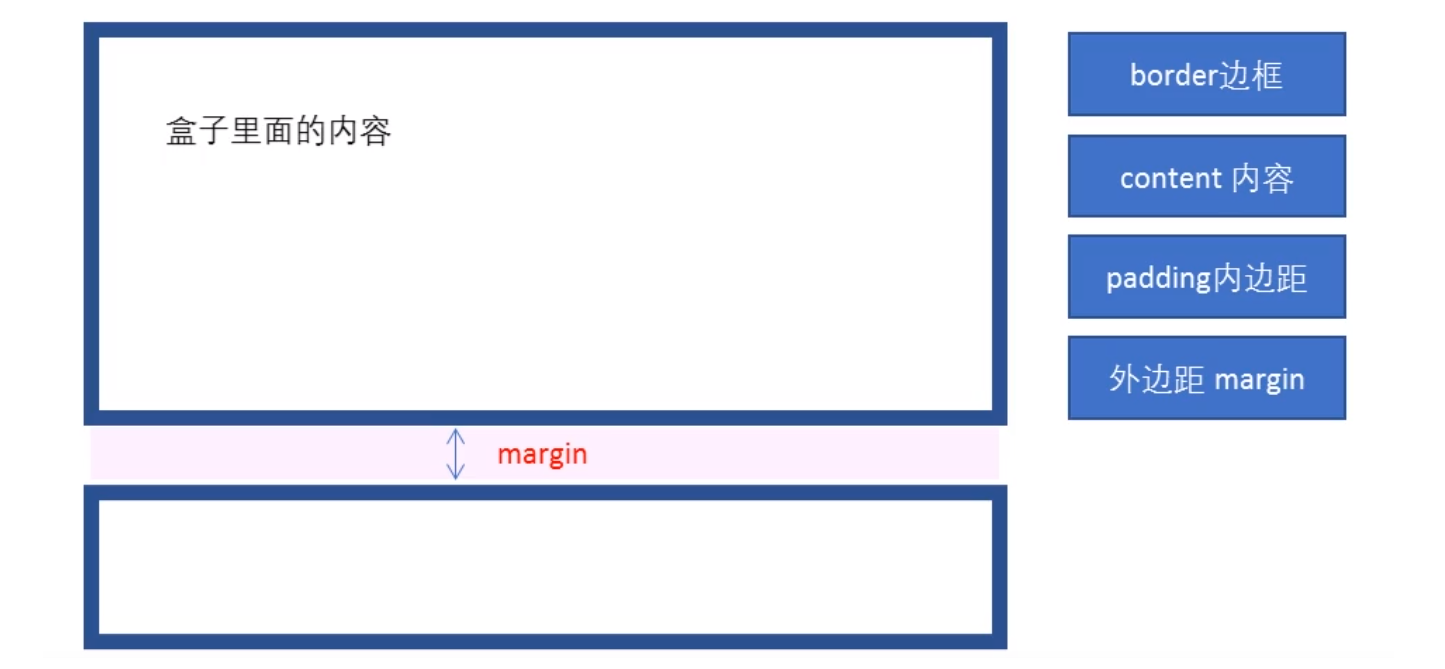
Box model
5. Box models: controlling layout
		* margin: Margin
		* padding: padding
			* By default, the inside margin affects the size of the entire box
			* box-sizing: border-box;  Set the properties of the box so that width and height Is the size of the final box

		* float: float
			* left
			* right
<html>
	<head>
		<style>
			div{
				border: 1px solid red;
				width:100px
			}
			.div1{
				width: 100px;
				height: 100px;
			}
			.div2{
				width: 200px;
				height: 200;
				padding: 50px;
				box-sizing: border-box;   /*Set the properties of the box to determine the final size*/
			}
			.div3{	float: left;	}
			.div4{  float: left;	}
			.div5{  float: right;	}
           </style>
	</head>
	<body>
		<div class="div2">
		<div class="div1"></div>Damn it</div>
		<div class="div3">aaaa</div>
		<div class="div4">bbbb</div>
		<div class="div5">cccc</div>
	</body>
</html>
Font properties
The CSS Fonts property is used to define the font family, size, thickness, and text style (such as italic, Microsoft elegant black)
CSS uses the font family attribute to define the font family of text
<head>
<style>
        h2{font-family:'Hua Wen Caiyun';}
        p{font-family: 'Microsoft YaHei '; }
    </style>
</head>
<body>
    <h2>ping teacher</h2>
    <p>I like you! i</p>
</body>
- Various fonts must be separated by commas in English
- Generally, if there is a font composed of multiple words separated by spaces, use quotation marks
- Try to use the default built-in font of the system to ensure that it can be displayed correctly in any user's browser
Element display mode of CSS
Block element
Common block elements are
~
,
,
-
,
- ,
- Wait,
among
Characteristics of block level elements:
① He is more overbearing and monopolizes his own business.
② Height, width, outer margin and inner margin can be controlled.
③ The width defaults to 100% of the container (parent width).
④ Is a container and box that can release internal or block level elements.
- Block level elements cannot be used within elements of a text class
- <p>Tags are mainly used to store text, so block level elements, especially < div > cannot be placed in < p >
- Similarly, < H1 > ~ < H6 > are text block level labels, and other block level elements cannot be placed in them
Inline element
Common inline elements include,,,,,,,,, and so on
<span>Tags are the most typical inline elements. In some places, inline elements are also called = = inline elements = =.
Characteristics of inline elements:
① Elements in adjacent rows are on one row, and multiple elements can be displayed in one row.
② The direct setting of height and width is invalid.
③ The default width is the width of its own content.
④ Inline elements can only hold text or other inline elements.
be careful:
- No more links can be placed in the link
- In special cases, block level elements can be placed in the link, but it is safest to convert the block level mode
Inline block element
There are several special tags in the inline element -,,, which have the characteristics of both block elements and inline elements.
Some data call them inline block elements.
Characteristics of inline block elements:
① And adjacent inline elements (inline blocks), but there will be a gap between them. Multiple elements can be displayed in a row (characteristics of elements in a row).
② The default completion is the width of its own content (characteristics of inline elements).
③ Height, row height, outer margin and inner margin can be controlled (block level element characteristics).
Element display conversion
Convert to block element: display:block

Convert to inline element: display:inline;

Convert to inline block: display:inline-block;
CSS background
With CSS background properties, you can add background styles to page elements.
Background properties can set background color, background picture, background tile, background picture position, background image fixation, etc.
background color
The background color attribute defines the background color of the element.
background-color: Color value;
Generally, the default value of element background color is transparent. We can also manually specify the background color as transparent.
Background picture
The background image attribute describes the background image of the element. The actual development is often seen in logo s, small decorative pictures or large backgrounds
Picture, the advantage is that it is very easy to control the position (wizard diagram is also an application scene)
background-image:none | url (url)
| Parameter value | effect |
|---|---|
| none | No background (default) |
| url | Specifies the background image using an absolute or relative address |
Background tile
If you need to tile the background image on the HTML page, you can use the background repeat attribute.
background-repeat:repeat | no-repeat | repeat-x | repeat-y
				  Tile      no-repeat 		along x Axis tiling    along y Axis tiling
| Parameter value | effect |
|---|---|
| repeat | The background image is tiled vertically and horizontally (default) |
| no-repeat | Background image is not tiled |
| repeat-x | The background image is tiled horizontally |
| repeat-y | The background image is tiled vertically |
Background picture location
The background position attribute can be used to change the position of the picture in the background.
background-position:x y;
The parameters represent x and y coordinates. You can use location nouns or precise units
| Parameter value | explain |
|---|---|
| length | Percentage | length value composed of floating-point number and unit identifier |
| position | top | center | bottom I left | center | right |
1. The parameter is a location noun
-
If both specified values are location nouns, the sequence of the two values is irrelevant. For example, the effects of left top and top left are the same
-
If only one orientation noun is specified and the other value is omitted, the second value is centered by default
2. Parameters are in exact units
-
If the parameter value is an exact coordinate, the first must be an x coordinate and the second must be a y coordinate
-
If only one value is specified, the value must be the x coordinate, and the other is centered vertically by default
3. The parameter is mixed unit
- If the two values specified are a mixture of exact units and azimuth nouns, the first value is the x coordinate and the second value is the y coordinate
Background image fixation
The background attachment property sets whether the background image is fixed or scrolls with the rest of the page.
Background attachment the parallax scrolling effect can be produced later.
background-attachment:scroll | fixed
| parameter | effect |
|---|---|
| scroll | The background image scrolls with the object content |
| fixed | Background image fixation |
Background compound writing
In order to simplify the code of background attributes, we can combine these attributes and abbreviate them in the same attribute background. So as to save the amount of code
When writing attributes, there is no specific writing order. Generally, the agreed order is:
Background: background color background picture address background tile background image scrolling background picture position;
background:transparent url(image.jpg)repeat-y fixed top;
Background color translucent
CSS3 provides us with the effect of translucent background color.
background:rgba(0,0,0,0.3);
- The last parameter is alpha transparency, which ranges from 0 to 1
- We are used to omitting the 0 of 0.3 and writing it as background:rgba (0, 0, 0,. 3);
- Note: background translucency means that the box background is translucent, and the contents of the box are not affected
CSS weights
| selector | Selector weight |
|---|---|
| Inherit or* | 0,0,0,0 |
| element selector | 0,0,0,1 |
| Class selector | 0,0,1,0 |
| ID Selector | 0,1,0,0 |
| Inline style = "" | 1,0,0,0 |
| ! Important important | Infinity |
id selector > class selector > element selector > inheritance
Box model
frame
Border can set the border of the element.
The border consists of two parts: border width (thickness) border style border color
Syntax:
border:border-width || border-style || border-color
| attribute | effect |
|---|---|
| border-width | Defines the border thickness in px |
| border-style | The style of the border |
| border-color | Border color |
Parameters:
none: no border. Independent of any specified border width value
hidden: hides the border. IE does not support
Dotted: IE4 + on MAC platform and IE5.5 + on WINDOWS and UNIX platforms are dotted lines. Otherwise, it is a solid line
dashed: IE4 + on MAC platform and IE5.5 + on WINDOWS and UNIX platforms are dotted lines. Otherwise, it is a solid line
Solid: solid border
Double: double line border. The sum of two single lines and their intervals is equal to the specified border width value
Groove: draw a 3D groove according to the value of border color
ridge: draw a diamond border according to the value of border color
inset: draw a 3D concave edge according to the value of border color
Outlet: draw 3D convex edges according to the value of border color
border: 1px solid red;No order
Border separation:
border-top: 1px solid red;/*Only the top border is set, and the rest are the same*/
Thin border of table
The border collapse property controls how the browser draws the table border. It controls the borders of adjacent cells.
Syntax:
border-collapse:collapse;
- The word collapse means merge
- border-collapse:collapse; Indicates that adjacent borders are merged together
<style>
        table {
            width: 500px;
            height: 249px;
        }

        th {
            height: 35px;
        }

        table,
        td,
        th {
            border: 1px solid pink;
            /* Merge adjacent borders */
            border-collapse: collapse;
            font-size: 14px;
            text-align: center;
        }
    </style>
padding
The padding property is used to set the inner margin, that is, the distance between the border and the content.
| attribute | effect |
|---|---|
| padding left | Left inner margin |
| padding-right | Right inner margin |
| padding-top | Upper inner margin |
| padding-bottom | Lower inner margin |
The padding attribute (abbreviated attribute) can have one to four values.
| Number of values | Express meaning |
|---|---|
| padding: 5px; | 1 value, which means that there are 5 pixel inner margins up, down, left and right; |
| padding: 5px 10px; | 2 values, representing that the upper and lower inner margins are 5 pixels and the left and right inner margins are 10 pixels; |
| padding: 5px 10px20px; | 3 values, representing the upper inner margin of 5 pixels, the left and right inner margin of 10 pixels and the lower inner margin of 20 pixels; |
| padding: 5px 10px20px30px; | 4 values, 5 pixels on the top, 10 pixels on the right, 20 pixels on the bottom, 30 pixels on the left, clockwise |
When we assign the padding value to the box, two things happen:
1. There is a distance between the content and the border, and an inner margin is added.
2.padding affects the actual size of the box.
In other words, if the box already has a width and height, specifying the inner border will enlarge the box
If the width/height attribute is not specified for the box itself, padding will not open the box size at this time
Margin
The margin property is used to set the outer margin, which controls the distance between boxes.
| attribute | effect |
|---|---|
| margin-left | Left outer margin |
| margin-right | Right outer margin |
| margin-top | Upper outer margin |
| margin-bottom | Bottom outer margin |
Outer margin horizontal center
The outer margin can center the block level box horizontally, but two conditions must be met:
① The box must have a width specified
② The left and right outer margins of the box are set to auto
.header{ width: 960px;margin: 0 auto; }
There are three common ways to write:
- margin-left:auto; margin-right auto;
- margin: auto;
- margin: 0 auto;
Note: the above method is to center the block level element horizontally, and center the inline element or inline block element horizontally. Add text align: Center to its parent element.
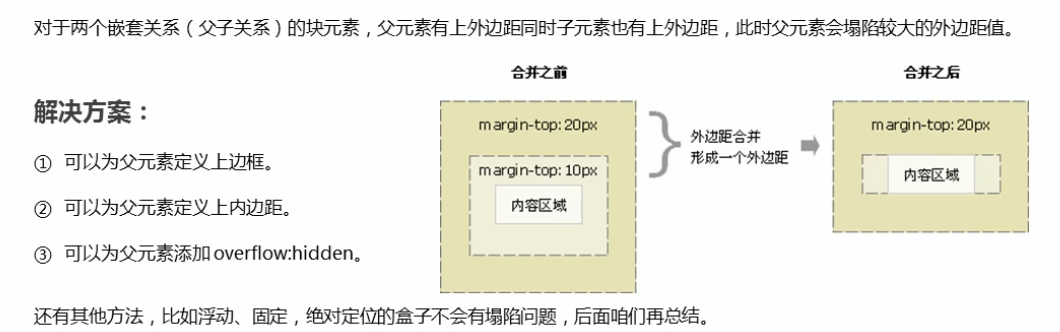
Collapse problem
Collapse of the vertical outer margin of nested block elements
Clear inner and outer margins
Many web page elements have default inside and outside margins, and the defaults of different browsers are also inconsistent. Therefore, before layout, we should first clear the next page element
The inner and outer margins of the element.
*{
	padding : 0;  /*Clear inner margin*/
	margin : 0;   /*Clear outer margin*/
}
Note: for in-line elements, in order to take care of compatibility, try to set only the left and right inner and outer margins, not the upper and lower inner and outer margins. However, it is converted to block level and inline block elements
Just plain
float
The float attribute is used to create a floater and move it to one side until the left or right edge touches the edge containing the block or another floater.
Floating characteristics
The most important properties of elements with float set:
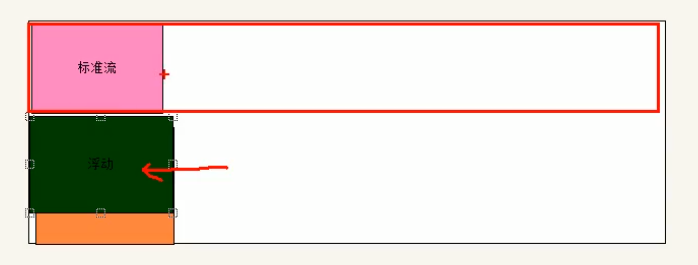
1. Move from the control (floating) of the standard ordinary flow to the specified position (moving), (commonly known as off standard)
2. The floating box no longer retains its original position
3. If multiple boxes are set to float, they will be displayed in a row of attribute values and aligned at the top.

Note: floating elements are close to each other (there will be no gap). If the parent width cannot hold these floating boxes, the extra boxes will be aligned in another line.
4. Floating elements will have inline block element properties.
Any element can float. No matter what the original pattern of elements, adding floating has similar characteristics to inline block elements.
- If the width of the block level box is not set, the default width is the same as that of the parent, but after adding a float, its size depends on the content
- There is no gap in the middle of the floating box, which is next to each other
- The same is true for inline elements
<!DOCTYPE html>
<html lang="en">
<head>
    <meta charset="UTF-8">
    <meta name="viewport" content="width=device-width, initial-scale=1.0">
    <meta http-equiv="X-UA-Compatible" content="ie=edge">
    <title>zhao</title>
    <style>
        .l {
            /* Float left */
            float: left;
            width: 200px;
            height: 200px;
            background-color: pink;
        }

        .o {
            width: 300px;
            height: 300px;
            background-color: skyblue;
            float: left;
        }

        .v {
            width: 300px;
            height: 300px;
            background-color: purple;
            /* float: left; */
            float: right;
        }
    </style>
</head>

<body>
    <div class="l"></div>
    <div class="o"></div>
    <div class="v"></div>
</body>

</html>
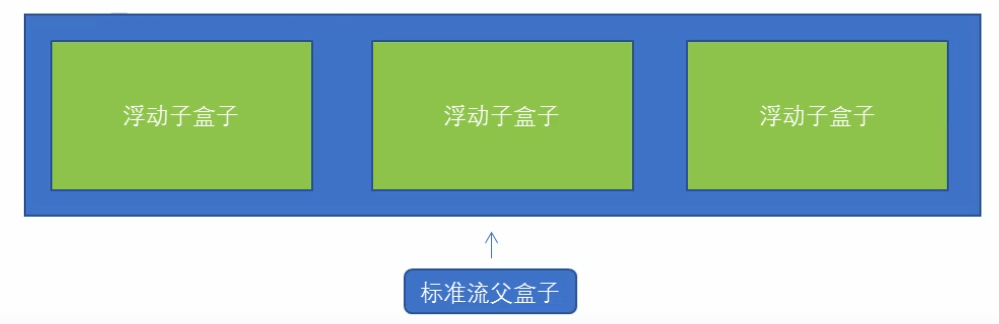
Floating elements are often used with standard flow parents
In order to restrict the position of floating elements, our general strategy for web page layout is:
The first rule of web layout
First, the parent elements of the standard flow are used to arrange the upper and lower positions, and then the internal child elements are floating to arrange the left and right positions, which meets the first criterion of web page layout
The second rule of web page layout: first set the size of the box, and then set the position of the box
Floating layout
Attention
1. The parent box of floating and standard flow is matched.
First, the parent elements of the standard flow are used to arrange the upper and lower positions, and then the internal child elements are floating to arrange the left and right positions
2. If one element floats, theoretically the other sibling elements should also float.
There are multiple sub boxes in a box. If one of the boxes floats, the other brothers should also float to prevent problems.
A floating box only affects the standard flow behind the floating box, not the previous standard flow
Clear float
Clear floating essence
- The essence of clearing floating is to clear the influence caused by floating elements. If the parent box itself has a height, it is not necessary to clear floating
- After floating is cleared, the parent will automatically detect the height according to the floating sub box. If the parent has a height, it will not affect the following standard flow
Syntax:
selector{clear: Attribute value;}
| Attribute value | describe |
|---|---|
| left | Floating elements on the left are not allowed (clear the influence of floating on the left) |
| right | Floating elements on the right are not allowed (clear the influence of floating on the right) |
| both | At the same time, remove the influence of left and right floating |
In our actual work, we almost only use clear:both;
The strategy to clear floating is to close floating
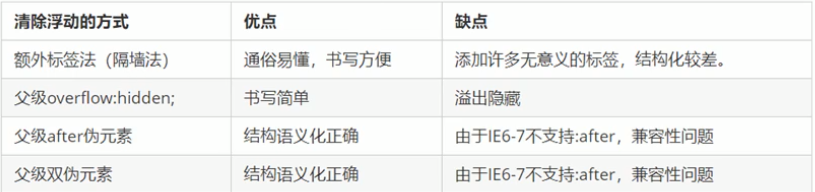
Method of clearing floating
1. Additional labeling method (partition method)
2. Add overflow attribute to parent
3. Add after pseudo element to parent
4. Add double pseudo element to parent
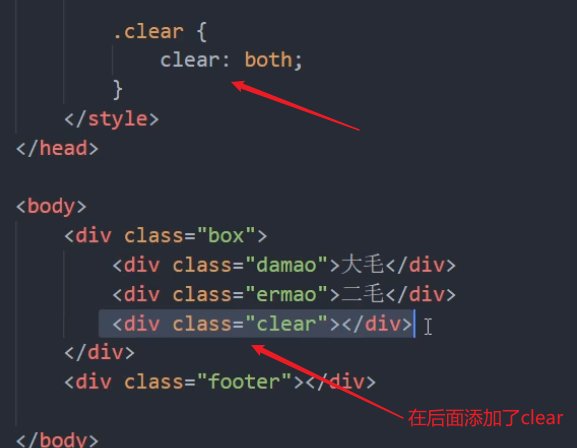
Additional labeling method (partition method)
The extra tag method adds an empty tag at the end of the floating element.
for example
, or other labels (e.g < br / > etc.).-
Advantages: easy to understand and write
-
Disadvantages: add many meaningless tags and poor structure
Note: this new empty tag must be a block level element.
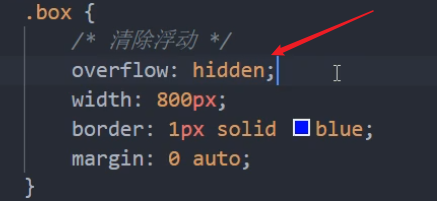
Add overflow attribute to parent
You can add an overflow attribute to the parent and set its attribute value to hidden, auto, or scroll.
-
Advantages: simple code
-
Disadvantages: the overflow part cannot be displayed
Add overflow to the parent
Add after pseudo element to parent
        .clearfix:after {
            content: "";
            display: block;
            height: 0;
            clear: both;
            /* eliminate */
            visibility: hidden;
                }

        .clearfix {
            /* IE6,7 proper */
            *zoom: 1;
        }
-
Advantages: no label is added, and the structure is simpler
-
Disadvantages: take care of low version browsers
-
Representative websites: Baidu, Taobao, Netease, etc
Add double pseudo element to parent
		.clearfix:before,
        .clearfix:after {
            content: "";
            display: table;
        }

        .clearfix:after {
            clear: both;
        }

        .clearfix {
            /* IE6,7 proper */
            *zoom: 1;
        }
- Advantages: more concise code
- Disadvantages: take care of low version browsers
- Representative websites: Xiaomi, Tencent, etc
summary
Sprite map
Purpose of wizard Technology:
In order to effectively reduce the number of requests received and sent by the server and improve the loading speed of the page
Bootstrap
In order to make the website developed by Bootstrap friendly to mobile devices and ensure proper drawing and touch screen scaling, you need to add a viewport meta tag in the head of the web page, as shown below:
<meta name="viewport" content="width=device-width, initial-scale=1, shrink-to-fit=no">
Width = device width indicates that the width is the width of the device screen.
Initial scale = 1 indicates the initial scale.
Shrink to fit = no automatically adapts to the width of the phone's screen.
Bootstrap local load
<!DOCTYPE html>
<html>
<head>
	<title>curriculum vitae</title>
	<meta charset="utf-8">
	<meta http-equiv="X-UA-Compatible" content="IE=edge">
    <meta name="viewport" content="width=device-width, initial-scale=1">
	<link rel="stylesheet" href="css/bootstrap.css">
	<script src="js/jquery-3.2.1.min.js"></script>
	<script src="js/bootstrap.js"></script>
</head>

<body>
</body>
</html>

//<link rel="styleheet" href="">
//<script src=""></script>
Bootstrap 3 template
<!DOCTYPE html>
<html lang="zh-CN">
  <head>
    <meta charset="utf-8">
    <meta http-equiv="X-UA-Compatible" content="IE=edge">
    <meta name="viewport" content="width=device-width, initial-scale=1">
    <!-- Above 3 meta label*must*Put it first, anything else*must*Follow! -->
    <title>Bootstrap 101 Template</title>
	<link href="https://cdn.jsdelivr.net/npm/bootstrap@3.3.7/dist/css/bootstrap.min.css" rel="stylesheet">
      <script src="https://cdn.jsdelivr.net/npm/html5shiv@3.7.3/dist/html5shiv.min.js"></script>
      <script src="https://cdn.jsdelivr.net/npm/respond.js@1.4.2/dest/respond.min.js"></script>
       <script src="https://cdn.jsdelivr.net/npm/jquery@1.12.4/dist/jquery.min.js"></script>
    <script src="https://cdn.jsdelivr.net/npm/bootstrap@3.3.7/dist/js/bootstrap.min.js"></script>
  </head>
  <body>
    <h1>Hello, world!</h1>
  </body>
</html>
Bootstrap 4 template
<!doctype html>
<html lang="en">
  <head>
    <!-- Required meta tags -->
    <meta charset="utf-8">
    <meta name="viewport" content="width=device-width, initial-scale=1, shrink-to-fit=no">

    <!-- Bootstrap CSS -->
    <link rel="stylesheet" href="https://cdn.jsdelivr.net/npm/bootstrap@4.5.0/dist/css/bootstrap.min.css" integrity="sha384-9aIt2nRpC12Uk9gS9baDl411NQApFmC26EwAOH8WgZl5MYYxFfc+NcPb1dKGj7Sk" crossorigin="anonymous">
    <script src="https://cdn.jsdelivr.net/npm/jquery@3.5.1/dist/jquery.slim.min.js" integrity="sha384-DfXdz2htPH0lsSSs5nCTpuj/zy4C+OGpamoFVy38MVBnE+IbbVYUew+OrCXaRkfj" crossorigin="anonymous"></script>
    <script src="https://cdn.jsdelivr.net/npm/popper.js@1.16.0/dist/umd/popper.min.js" integrity="sha384-Q6E9RHvbIyZFJoft+2mJbHaEWldlvI9IOYy5n3zV9zzTtmI3UksdQRVvoxMfooAo" crossorigin="anonymous"></script>
    <script src="https://cdn.jsdelivr.net/npm/bootstrap@4.5.0/dist/js/bootstrap.min.js" integrity="sha384-OgVRvuATP1z7JjHLkuOU7Xw704+h835Lr+6QL9UvYjZE3Ipu6Tp75j7Bh/kR0JKI" crossorigin="anonymous"></script>

    <title>Hello, world!</title>
  </head>
  <body>
    <h1>Hello, world!</h1>


  </body>
</html>
Container class
Bootstrap 4 requires a container element to wrap the content of the website.
We can use the following two container classes:
- The. container class is used for containers with fixed width and supporting responsive layout. Leave blank on both sides
- The. Container fluid class is used for containers that are 100% wide and occupy all viewport s. Each device is 100% wide

<div class="container">
  <h1>My first Bootstrap page</h1>
  <p>Here are some texts.</p>
</div>
-----------------------------------------------------------------------------------------------------
<div class="container-fluid">
  <h1>My first Bootstrap page</h1>
  <p>Used .container-fluid,100% Width, occupying all viewports( viewport)Container for.</p>
</div>
navbar
. navbar -- set nav element as navigation bar component;
. navbar default - specifies the navigation bar component as the default theme;
. navbar inverse - specifies that the navigation bar component is a black theme;
. navbar fixed top - set the navigation bar component to be fixed on the top;
. navbar fixed bottom -- set the navigation bar component to be fixed at the bottom;
. container fluid -- set the width to fill the parent element, that is, 100%;
. navbar header - mainly specify div element as navigation bar component, package brand icon and switch button;
. navbar toggle -- set the button element as the toggle button of the navigation bar component;
. collapsed -- set the button element to be displayed only when the viewport is less than 768px;
. navbar brand - set the brand icon in the navigation bar component;
Navbar brand can put text or pictures by default, but it must be a small picture. If the picture is too large, the position will be lower
<html>
<head>
<link rel="stylesheet" href="css/bootstrap.css">
<script src="js/bootstrap.js"></script>
<style>
.navbar-brand>img {
display: inline;
}
</style>
</head>
<body>
<nav class="navbar navbar-default navbar-fixed-top">
<div class="container">
<div class="navbar-header">
<a href="" class="navbar-brand" style="width:250px;">
<img src="img/icon_1.jpg" style="height:30px;"> STEM education
</a>
</div>
</div>
</nav>
</body>
</html>
https://www.cnblogs.com/jipinglong/p/9032640.html
grid system
Responsive layout
The grid system is used to create a page layout through a series of combinations of row s and column s
-
The same set of pages can be compatible with devices with different resolutions.
-
Implementation: depending on the grid system: divide a row into 12 grids on average, and you can specify how many grids the elements occupy
-
step
- Define rows. Create a set of column s horizontally through rows
- Define the element. Specifies the number of cells the element occupies on different devices. Style: col - Equipment Code - number of grids
- Equipment code:
- XS: ultra small screen mobile phone (< 768px): col-xs-12
- sm: small screen flat panel (≥ 768px)
- md: medium screen desktop display (≥ 992px)
- lg: large screen large desktop display (≥ 1200px)
- Equipment code:
- be careful:
- If the number of cells in a row exceeds 12, the excess part will wrap automatically.
- Grid class properties are upward compatible. The grid class is applicable to devices with a screen width greater than or equal to the size of the dividing point.
- If the real device width is less than the minimum value of the device code that sets the grid class attribute, an element will be covered with a whole line.
<div class="container">   <!-- Leave blank on both sides-->
      <h1>Hello World!</h1>
      <p>Create three columns of equal width! Try in class="row" of div Add new to class="col"  div,Four columns of equal width are displayed.</p>
      <div class="row">
        <div class="col" style="background-color:lavender;">JavaScript</div>
        <div class="col" style="background-color:orange;">CSS</div>
        <div class="col" style="background-color:lavender;">HTML</div>
      </div>
    </div>

<div class="container-fluid"> <!-- Each device is 100%width-->

Offset column
The offset column is set through the offset - * - * class. The first asterisk (*) can be sm, md, lg, xl, indicating the screen device type, and the second asterisk (*) can be a number from 1 to 11.
To use offset on large screen displays, use the. Offset MD - * class. These classes increase the left margin of a column by ***** column, where ***** ranges from 1 to 11.
For example:. offset-md-4 moves. col-md-4 four columns to the right.
<div class="row">
  <div class="col-md-4">.col-md-4</div>
  <div class="col-md-4 offset-md-4">.col-md-4 .offset-md-4</div>
</div>
<div class="row">
  <div class="col-md-3 offset-md-3">.col-md-3 .offset-md-3</div>
  <div class="col-md-3 offset-md-3">.col-md-3 .offset-md-3</div>
</div>
<div class="row">
  <div class="col-md-6 offset-md-3">.col-md-6 .offset-md-3</div>
</div>

Button
<button type="button" class="btn">Basic button</button>
<button type="button" class="btn btn-primary">Main button</button>
<button type="button" class="btn btn-secondary">Secondary button</button>
<button type="button" class="btn btn-success">success</button>
<button type="button" class="btn btn-info">information</button>
<button type="button" class="btn btn-warning">warning</button>
<button type="button" class="btn btn-danger">DANGER</button>
<button type="button" class="btn btn-dark">black</button>
<button type="button" class="btn btn-light">light colour</button>
<button type="button" class="btn btn-link">link</button>

Button classes can be used on < a >, < button >, or < input > elements:
<a href="#"Class =" BTN BTN info "role =" button "> link button</a>
<button type="button" class="btn btn-info">Button</button>
<input type="button" class="btn btn-info" value="Input box button">
<input type="submit" class="btn btn-info" value="Submit button">

Button set border
<button type="button" class="btn btn-outline-primary">Main button</button>
<button type="button" class="btn btn-outline-secondary">Secondary button</button>
<button type="button" class="btn btn-outline-success">success</button>
<button type="button" class="btn btn-outline-info">information</button>
<button type="button" class="btn btn-outline-warning">warning</button>
<button type="button" class="btn btn-outline-danger">DANGER</button>
<button type="button" class="btn btn-outline-dark">black</button>
<button type="button" class="btn btn-outline-light text-dark">light colour</button>

Buttons of different sizes
<button type="button" class="btn btn-primary btn-lg">Large button</button>
<button type="button" class="btn btn-primary">Default button</button>
<button type="button" class="btn btn-primary btn-sm">Small button</button>

Block level button
You can set block level buttons by adding the. BTN block class:
<button type="button" class="btn btn-primary btn-block">Button 1</button>

Active and disabled buttons
The button can be set to enable or disable clicking.
The. active class can set that the button is available, and the disabled property can set that the button is not clickable. Note that the element does not support the disabled attribute. You can disable the click of the link by adding the. Disabled class.
<button type="button" class="btn btn-primary active">Click the button after</button>
<button type="button" class="btn btn-primary" disabled>Forbidden button</button>
<a href="#"Class =" BTN BTN primary disabled "> forbidden links</a>

colour
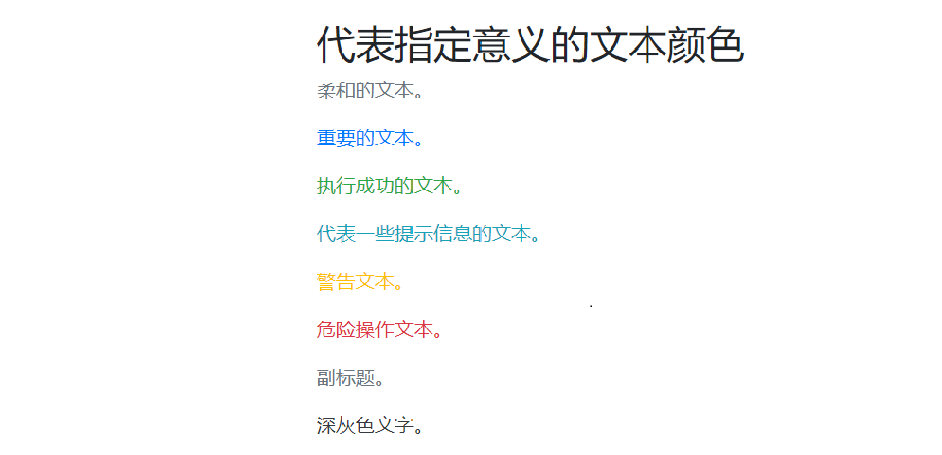
<div class="container">
      <h2>Represents the text color of the specified meaning</h2>
      <p class="text-muted">Soft text.</p>
      <p class="text-primary">Important text.</p>
      <p class="text-success">Text for successful execution.</p>
      <p class="text-info">Text representing some prompt information.</p>
      <p class="text-warning">Warning text.</p>
      <p class="text-danger">Dangerous operation text.</p>
      <p class="text-secondary">Subtitle.</p>
      <p class="text-dark">Dark gray text.</p>
      <p class="text-light">Light gray text (not visible on a white background).</p>
      <p class="text-white">White text (not visible on a white background).</p>
</div>
Use in links
<div class="container">
  <h2>text color</h2>
  <p>Move the mouse over the link.</p>
  <a href="#"Class =" text muted "> soft links</ a>
  <a href="#"Class =" text primary "> main link</ a>
  <a href="#"Class =" text success "> successful link</ a>
  <a href="#"Class =" text info "> information text link</ a>
  <a href="#"Class =" text warning "> warning link</ a>
  <a href="#"Class =" text danger "> dangerous links</ a>
  <a href="#"Class =" text secondary "> subtitle link</ a>
  <a href="#"Class =" text dark "> dark grey link</ a>
  <a href="#"Class =" text light "> light gray link</ a>
</div>
background color
<div class="container">
  <h2>background color </h2>
  <p class="bg-primary text-white">Important background colors.</p>
  <p class="bg-success text-white">Background color after successful execution.</p>
  <p class="bg-info text-white">The background color of the message prompt.</p>
  <p class="bg-warning text-white">Warning background color</p>
  <p class="bg-danger text-white">Dangerous background color.</p>
  <p class="bg-secondary text-white">Subtitle background color.</p>
  <p class="bg-dark text-white">Dark gray background color.</p>
  <p class="bg-light text-dark">Light gray background color.</p>
</div>
image
Fillet picture
The. rounded class allows the picture to display the fillet effect:
<div class="container">
  <h2>Fillet picture</h2>
  <p>.rounded Class allows the picture to display the fillet effect:</p>
  <img src="https://static.runoob.com/images/mix/cinqueterre.jpg" class="rounded" alt="Cinque Terre" width="304" height="236">
</div>
Ellipse picture
The. Rounded circle class can set oval pictures:
<div class="container">
  <h2>Ellipse picture</h2>
  <p>.rounded-circle Class can set oval pictures:</p>
 <img src="https://static.runoob.com/images/mix/cinqueterre.jpg" class="rounded-circle" alt="Cinque Terre" width="604" height="436">
</div>
thumbnail
The. Img thumbnail class is used to set the picture thumbnail (the picture has a border):
<div class="container">
  <h2>thumbnail</h2>
  <p>.img-thumbnail Class is used to set picture thumbnails(The picture has a border):</p>
  <img src="https://static.runoob.com/images/mix/cinqueterre.jpg" class="img-thumbnail" alt="Cinque Terre" width="404" height="336" >
</div>
Picture alignment
Use the. Float right class to set the right alignment of the picture, and use the. Float left class to set the left alignment of the picture:
<div class="container">
  <h2>Picture alignment</h2>
  <p>use .float-right Class to set the right alignment of the picture, using .float-left Class to set picture left alignment:</p>
 <img src="https://static.runoob.com/images/mix/paris.jpg" class="float-left" width="304" height="236">
  <img src="https://static.runoob.com/images/mix/cinqueterre.jpg" class="float-right" width="304" height="236">
</div>
Responsive picture
Images have a variety of sizes, and we need to automatically adapt according to the size of the screen.
We can set the responsive picture by adding the. Img fluid class to the * * * * tag.
The. Img fluid class sets max width: 100% height: auto; :
<div class="container">
  <h2>Responsive picture</h2>
  <p>.img-fluid Class can set a responsive picture, reset the browser size, and view the effect:</p>
  <img src="https://static.runoob.com/images/mix/paris.jpg" class="img-fluid">
</div>
JavaScript
The origin story of JAVA
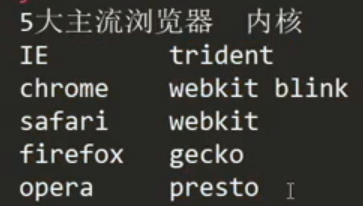
Top 5 mainstream browsers
It has its own developed kernel
The JS engine is single threaded

concept
- JavaScript is the programming language for the Web. Is a client scripting language
- Run in the client browser. Every browser has a JavaScript parsing engine
- Scripting language: it can be parsed and executed by the browser without compilation
Function:
-
It can enhance the interaction process between users and HTML pages, control HTML elements, make the page have some dynamic effects and enhance the user experience
-
JavaScript = ECMAScript + something unique to JavaScript (BOM+DOM)
JavaScript web One of the three languages that developers must learn:
    1,HTML Defines the content of the web page
    2,CSS Describes the layout of the web page
    3,JavaScript Programming web page behavior
ECMAScript: Standard for client scripting languages
Basic grammar
Combination with html:
(1) internal JS: definition
(2) external JS: definition
Note: 1
2,
Use, output
Between labels.<script>
document.getElementById("demo").innerHTML = "My first paragraph JavaScript";
</script>
**Note: * * old JavaScript examples may use the type attribute:
**Note: * * type attribute is not required. JavaScript is the default scripting language in HTML.
JavaScript can "display" data in different ways:
 use window.alert() Write warning box
 use document.write() write in HTML output
 use innerHTML write in HTML element
 use console.log() Write to browser console
innerHTML
To access HTML elements, JavaScript can use the document.getElementById(id) method.
The id attribute defines the HTML element. The innerHTML attribute defines the HTML content:
<!DOCTYPE html>
<html>
<body>

<h1>My first page</h1>

<p>My first paragraph</p>

<p id="demo"></p>

<script>
 	document.getElementById("demo").innerHTML = 5 + 6;
</script>

</body>
</html>
document.write()
For testing purposes, it is convenient to use document.write():
<!DOCTYPE html>
<html>
<body>

<h1>My first page</h1>

<p>My first paragraph</p>

<script>
	document.write(5 + 6);
</script>

</body>
</html>
After the HTML document is fully loaded, using document.write() will delete all existing HTML:
<!DOCTYPE html>
<html>
<body>

<h1>My first page</h1>

<p>My first paragraph</p>

<button onclick="document.write(5 + 6)">have a try</button>

</body>
</html>
The document.write() method is only used for testing.
window.alert()
You can use the warning box to display data:
<!DOCTYPE html>
<html>
<body>

<h1>My first page</h1>

<p>My first paragraph</p>

<script>
	window.alert(5 + 6);
</script>

</body>
</html>
console.log()
In the browser, you can use the console.log() method to display the data.
Please activate the browser console through F12 and select "console" in the menu
<!DOCTYPE html>
<html>
<body>

<h1>My first page</h1>

<p>My first paragraph</p>

<script>
	console.log(5 + 6);
</script>

</body>
</html>
data type
Original data type (basic data type)
1 ️⃣: Number: number. Integer / decimal / NaN (not a number)
2 ️⃣: String: string“ abc” “a”
3 ️⃣: boolean: true and false
4 ️⃣: null: a placeholder with an empty object
5 ️⃣: Undefined: undefined. If a variable has no initialization value, it will be assigned to undefined by default
Number
JavaScript does not distinguish between integers and floating-point numbers. It is uniformly represented by Number. The following are legal Number types:
123; // Integer 123
0.456; // Floating point number 0.456
1.2345e3; // Scientific counting means 1.2345x1000, which is equivalent to 1234.5
-99; // negative
NaN; // NaN means Not a Number. When the result cannot be calculated, NaN means Not a Number
Infinity; // Infinity means infinity. When the value exceeds the maximum value that JavaScript Number can represent, it means infinity
character string
A string is any text enclosed in = = single quotation marks' or double quotation marks' = = ', such as' abc', 'xyz', and so on. Please note that '' or '' itself is only a representation, not a part of the string. Therefore, the string 'abc' has only three characters: A, b and c.
JavaScript strings are represented by characters enclosed by '' or ''.
If 'itself is also a character, it can be enclosed by "". For example, "I'm OK" contains six characters: I,', m, space, O and K.
What if the string contains both 'and'? You can use the escape character \, for example:
'I\'m \"OK\"!';
The content of the string is: I'm "OK"!
Escape character \ can escape many characters, such as \ n for line feed, \ t for tab, and the character \ itself needs to be escaped, so the character represented by \ \ is \.
ASCII characters can be represented in hexadecimal in the \ x## form, for example:
'\x41'; // Exactly equivalent to 'A'
You can also use \ u##### to represent a Unicode character:
'\u4e2d\u6587'; // Exactly equivalent to 'Chinese'
Multiline string
Because multi line strings are cumbersome to write in \ n, the latest ES6 standard adds a representation method of multi line strings, which is represented by backquotes \ *... \ *:
`This is a
 Multiline
 character string`;
┌─────┐ ┌─────┬─────┬─────┬─────┐
│ ESC │ │ F1  │ F2  │ F3  │ F4  │
│     │ │     │     │     │     │
└─────┘ └─────┴─────┴─────┴─────┘
┌─────┬─────┬─────┬─────┬─────┐
│  ~  │  !  │  @  │  #  │  $  │
│  `  │  1  │  2  │  3  │  4  │
├─────┴──┬──┴──┬──┴──┬──┴──┬──┘
│        │     │     │     │
│  tab   │  Q  │  W  │  E  │
├────────┴──┬──┴──┬──┴──┬──┘
│           │     │     │
│ caps lock │  A  │  S  │
└───────────┴─────┴─────┘
Template string
To connect multiple strings, use the + sign:
var name = 'Xiao Ming';
var age = 20;
var message = 'Hello, ' + name + ', You this year' + age + 'Years old!';
alert(message);
Operation string
Common operations of string are as follows:
var s = 'Hello, world!';
s.length; // 13
To get the character at a specified position in the string, use an Array like subscript operation, and the index number starts from 0:
var s = 'Hello, world!';

s[0]; // 'H'
s[6]; // ' '
s[7]; // 'w'
s[12]; // '!'
s[13]; // Undefined indexes that exceed the range will not report an error, but will always return undefined
It should be noted that the string is immutable. If an index of the string is assigned, there will be no error, but there will be no effect:
var s = 'Test';
s[0] = 'X';
alert(s); // s is still 'Test'
JavaScript provides some common methods for strings. Note that calling these methods will not change the content of the original string, but return a new string
toUpperCase
toUpperCase() capitalizes a string:
var s = 'Hello';
s.toUpperCase(); // Return to 'HELLO'
toLowerCase
toLowerCase() changes all strings to lowercase:
var s = 'Hello';
var lower = s.toLowerCase(); // Return 'hello' and assign it to the variable lower
lower; // 'hello'
indexOf
indexOf() searches where the specified string appears:
var s = 'hello, world';
s.indexOf('world'); // Return 7
s.indexOf('World'); // If the specified substring is not found, - 1 is returned
substring
substring() returns the substring of the specified index interval:
var s = 'hello, world'
s.substring(0, 5); // From index 0 to 5 (excluding 5), return 'hello'
s.substring(7); // From index 7 to the end, return 'world'
Boolean value
Boolean values are completely consistent with Boolean algebra. A Boolean value has only two values: true and false, either true or false. You can directly use true and false to represent Boolean values or calculate them through Boolean operations:
true; // This is a true value
false; // This is a false value
2 > 1; // This is a true value
2 >= 3; // This is a false value
&&The operation is an and operation, and the & & operation result is true only if all are true:
true && true; // This & & statement evaluates to true
true && false; // This & & statement evaluates to false
false && true && false; // This & & statement evaluates to false
||The operation is an or operation. As long as one of them is true, the operation result is true:
false || false; // This | statement evaluates to false
true || false; // This | statement evaluates to true
false || true || false; // This | statement evaluates to true
! The operation is a non operation. It is a unary operator, changing true to false and false to true:
! true; // The result is false
! false; // The result is true
! (2 > 5); // The result is true
Boolean values are often used in condition judgment, such as:
var age = 15;
if (age >= 18) {
    alert('adult');
} else {
    alert('teenager');
}
Comparison operator
When we compare numbers, we can get a Boolean value through the comparison operator:
2 > 5;   // false
5 >= 2;  // true
7 == 7;  // true
In fact, JavaScript allows you to compare any data type:
false == 0;    // true
false === 0;   // false
Pay special attention to the equality operator = =. JavaScript is designed with two comparison operators:
The first is = = comparison, which will automatically convert the data type for comparison. In many cases, very strange results will be obtained;
The second is = = = comparison, which does not automatically convert data types. If the data types are inconsistent, false is returned. If they are consistent, compare again.
Due to the design defect of JavaScript, do not use = = = comparison. Always use = = = comparison.
Another exception is that the special Number NaN is not equal to all other values, including itself:
NaN === NaN; // false
The only way to judge NaN is through the isNaN() function:
isNaN(NaN); // true
Finally, pay attention to the equality comparison of floating-point numbers:
1 / 3 === (1 - 2 / 3); // false
null and undefined
Null represents an "empty" value, which is different from 0 and the empty string ''. 0 is a numeric value, '' represents a string of length 0, and null represents "empty".
In other languages, there are also null expressions similar to JavaScript. For example, Java also uses null, Swift uses nil, and Python uses None. However, in JavaScript, there is also an undefined similar to null, which means = = "undefined" = =.
JavaScript designers want to use null to represent an empty value, while undefined means that the value is undefined. Facts have proved that this is of little use, and it is of little significance to distinguish between the two. In most cases, we should use null.
undefined is only useful when judging whether a function parameter is passed.
array
An array is a set of sequentially arranged collections, each value of which is called an element. Arrays of JavaScript can include any data type. For example:
[1, 2, 3.14, 'Hello', null, true];
The above array contains 6 elements. Arrays are represented by [] and elements are separated by.
Another way to create an array is through the Array() function:
new Array(1, 2, 3); // Created array [1, 2, 3]
However, for the sake of code readability, it is strongly recommended to use [].
The elements of the array can be accessed by index. Note that the starting value of the index is 0:
var arr = [1, 2, 3.14, 'Hello', null, true];
arr[0]; // Returns the element with index 0, i.e. 1
arr[5]; // Returns the element with index 5, that is, true
arr[6]; // Index out of range, return undefined
object
JavaScript objects are a set of unordered collections composed of key values, such as:
var person = {
    name: 'Bob',
    age: 20,
    tags: ['js', 'web', 'mobile'],
    city: 'Beijing',
    hasCar: true,
    zipcode: null
};
The keys of JavaScript objects are all string types, and the values can be any data type. The above person object defines a total of 6 key value pairs, and each key is also called the attribute of the object. For example, the name attribute of person is' Bob ', and the zipcode attribute is null.
To obtain the properties of an object, we use the method of object variable. Property name:
<script>
    var person = {
    name: 'Bob',
    age: 20,
    tags: ['js', 'web', 'mobile'],
    city: 'Beijing',
    hasCar: true,
    zipcode: null
};
document.write(person.name); // 'Bob'
document.write('<br>'); // 'Bob'
document.write(person.zipcode); // null
</script>
variable
Variables are represented by a variable name in JavaScript. Variable names are uppercase and lowercase English, numbers, $and_ And cannot start with a number. Variable names cannot be JavaScript keywords, such as if, while, etc. Declare a variable with a var statement, such as:
var a; // The variable a is declared, and the value of a is undefined
var $b = 1; // Declare the variable $b and assign a value to $b. at this time, the value of $b is 1
var s_007 = '007'; // s_007 is a string
var Answer = true; // Answer is a Boolean value true
var t = null; // The value of t is null
Variable names can also be in Chinese, but please don't make trouble for yourself.
In JavaScript, the equal sign = is used to assign values to variables. Any data type can be assigned to a variable. The same variable can be assigned repeatedly, and it can be a variable of different types. However, it should be noted that var can only be declared once,
For example:
var a = 123; // The value of a is an integer 123
a = 'ABC'; // A becomes a string
This kind of language whose variable type is not fixed is called dynamic language, which corresponds to static language. Static language must specify variable types when defining variables. If the types do not match when assigning values, an error will be reported.
For example, Java is a static language, and the assignment statement is as follows:
int a = 123; // a is an integer type variable, and the type is declared with int
a = "ABC"; // Error: cannot assign string to integer variable
This is why dynamic languages are more flexible than static languages.
Please do not equate the equal sign of assignment statement with the equal sign of mathematics.
2. Reference data types: objects
3. Variable
Concept: a small piece of memory space for storing data
==Syntax: var Variable name = initialize value;==
typeof operator: gets the type of the variable
Note: after null operation, object is obtained
4. Operator
1.Unary operator: an operator with only one operand
		* ++(--) Before, self increase first(Self subtraction),Recalculation
		* ++(--) After that, first calculate, and then increase(Self subtraction)
		* +(-): Sign
	    * Note: in JS If the operand is not of the type required by the operator, then js The engine will automatically type the operand
        * Other types of transfer number:
        * string turn number: Convert by literal value. If the literal value is not a number, it is converted to NaN((not a number)
        * boolean turn number: true To 1, false Go to 0

2. Arithmetic operator
		+ - * / % ...

3. Assignment Operators
	= += -+....

4. Comparison operator
	> < >= <= == ===(All equal)
	* Comparison mode
    1. Same type: direct comparison
        * String: compare in dictionary order. Compare bit by bit until you get the size.
    2. Different types: type conversion first, and then comparison
        * ===: All equal. Before comparison, judge the type. If the type is different, it will be returned directly false

5. Logical operator
     && || !
     * Other types of transfer boolean:
     1. number: 0 or NaN False, others true
     2. string: Except empty string(""),Everything else true
     3. null&undefined:All false
     4. Objects: all objects are true

6. Ternary operator
   	 ? : expression
     var a = 3;
     var b = 4;

     var c = a > b ? 1:0;
     * Syntax:
     * expression? Value 1:Value 2;
   	 * Judge the value of the expression. If yes true Then the value is 1. If yes false Then value
5. Process control statement
1. if...else...

2. switch:
	* stay java In, switch Acceptable data types for statement: byte int short char,enumeration(1.5) ,String(1.7)
	* switch(variable):
		case value:
	* stay JS in,switch Statement can accept any raw data type

3. while

4. do...while

5. for
6. JS special syntax:
1. Statement with;At the end, if there is only one statement on a line ;Can be omitted (Not recommended)
2. Definition and use of variables var Keywords can also be left unused
       * Use: the defined variable is a local variable
       * No: the defined variable is a global variable(Not recommended)
7. 99 multiplication table
<script>
for (var i = 1; i <=9; i++) {
for (var j = 1; j <=i; j++) {
document.write(i + "×" +j + "=" + (i*j) + "  ");
}
document.write('<br>');
}
</script>
Basic object
Function
Function (method) object
1. Create:
1, var fun = new Function(Formal parameter list,Method body);  //Not recommended

2, function Method name(Formal parameter list){
    Method body
  }

3, var Method name = function(Formal parameter list){
      Method body
  }
2. Properties:
length: represents the number of formal parameters
3. Features:
-
The method definition is that the type of the formal parameter and the return value type are not written.
-
Method is an object. If a method with the same name is defined, it will be overwritten
-
In JS, the method call is only related to the method name, not the parameter list
-
In the method declaration, there is a hidden built-in object (array), arguments, which encapsulates all the actual parameters
4. Call:
Method name (actual parameter list);
Standard object
Date
In JavaScript, a Date object is used to represent a Date and time.
Syntax for creating Date objects:
var date=new Date()
**Note: * * Date object will automatically save the current date and time as its initial value.
To get the current system time, use:
var date = new Date();
date; 	// Returns the date and time of the current day.
date.getFullYear(); 	// Returns the year in four digits from the date object.
date.getMonth(); 	// Returns the month (0 ~ 11) from the date object.
date.getDate();	 	// Returns a day of the month (1 to 31) from the date object.
date.getDay(); 		// Returns a day of the week (0 ~ 6) from the date object.
date.getHours(); 	// Returns the hour (0 ~ 23) of the date object.
date.getMinutes();	// Returns the minute (0 ~ 59) of the date object.
date.getSeconds(); 	// Returns the number of seconds (0 ~ 59) of the date object.
date.getMilliseconds();	 // Returns the milliseconds (0 ~ 999) of the date object.
date.getTime(); 	// Returns the number of milliseconds since January 1, 1970.
date.toLocaleString()	//Convert the date object to a string according to the local time format.
other Method of Date object
Note: the month range of JavaScript is expressed as an integer from 0 to 11, 0 represents January, 1 represents February... So to represent June, we pass in 5!
The month value of the Date object in JavaScript starts from 0. Remember that 0 = January, 1 = February, 2 = March,..., 11 = December.
RegExp
1. Regular expressions: define the composition rules of strings
1,Single character:[ ]
    For example:[a],[ab],[a-zA-Z0-9_]
   Special symbols represent single characters with special meanings:
   	   \d : Single numeric character [0-9]
       \w : Single word character [a-zA-Z0-9_]

 2,quantifier symbol
	?  : Indicates 0 or 1 occurrences
	*  : Indicates 0 or more occurrences
	+  : Indicates one or more occurrences
    {m,n}: express m<= quantity <= n
			 mIf default:{,n}: mostnsecond
			 nIf default:{m,}: leastmsecond
 3,Start end symbol
 	^  : start
 	$  : end
2. Regular object
1,establish
	* var reg = new RegExp("regular expression ");
	* var reg = /regular expression /;
2,method
	* test(parameter): Verifies that the specified string conforms to the specification of the regular definition
precompile
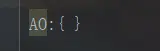
How does the JS interpreter find the functions and variables we define?
*Get through * * variable object (VO) *. VO is an abstract concept of "object", which is used to store the following in the execution context:
1. Variable; 2. Declaration; 3. Function parameters.
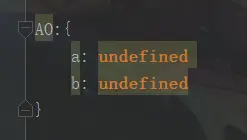
The VO of a function is divided into two stages -- variable initialization and code execution. In the variable initialization phase, VO is filled in the following order:
1. Function parameter (if it is not passed in, the initialization value of the parameter is undefined)
2. Function declaration (in case of naming conflict, it will be overwritten)
3. Variable declaration (the initialization variable value is undefined. In case of naming conflict, it will be ignored)
Note: function expressions are independent of variable initialization.
In the variable initialization phase, you need to initialize the arguments variable (activation object, AO), and then declare the variable in the function body with the function
The description is stored in AO, VO(functionContext) === AO.
At the moment before the function is executed, he creates a space, then takes a look at the function and puts the aa we will use in this space. This process is called precompiling
Before the function is executed, collect the variables and methods in the function and store them in a space so that the function can be retrieved from this space when it is executed later
Get the variables and methods needed in the function. This space is called the execution time context, also known as the Activation Object, which will be used later
Called AO, he is an object.
Summary:
The precompiled process is not executed from top to bottom, and the order in which function declarations are stored in AO is after variable declarations.
Precompiling occurs immediately before function execution!
Precompiled process (precompiled Trilogy):

1,establish AO Object( Activation Object)(Execution time context)

2,Find the formal parameter and variable declaration, and take the variable and formal parameter name as AO Property name with value undefined

3,Unify argument values and formal parameters

4,Find function declaration, function name as AO Property name, value is function body
Example 1:
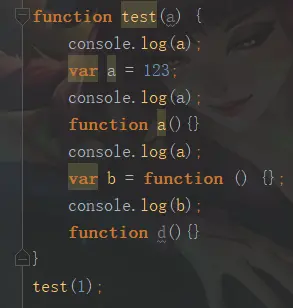
Write out all printed results.
Step 1: create AO object
The second step is to find the formal parameter, the variable declaration, and the value is undefined
Step 3: unify arguments and formal parameters
A is a formal parameter
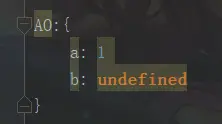
Step 4: find the function declaration. The value is the function body
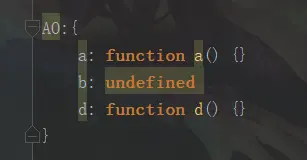
Then the function is executed normally, and the final result is
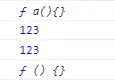
Note: var b = function() {} it is not a function declaration, but a variable declaration + assignment statement
Example 2:
<script>
        function test(a) {
            console.log(a);
            var a = 123;
            console.log(a);

            function a() {}
            console.log(a);
            console.log(b);
            var b = function () {}
            console.log(b);

            function d() {}
        }
        test(1);
    </script>
  1,establish AO object
    	 AO {

        	}
  2, Formal parameter and variable declaration not found, Use variables and parameter names as AO Attribute name, Value is undefined
        AO {
            a : undefined  //Formal parameter
            b : undefined  //Variable declaration
            }

  3,Unify argument values and formal parameters
        AO {
             a : 1
             b : undefined
           }
   4, Find the function declaration in the function body, Values are assigned to the function body.
        AO {
             a : function a(){}
             b : function () {}
             d : function d() {}
           }
Global Context
GO global object
1. Find variable
2. Function declaration not found
3. Execute
var	a = 1;
function a(){
 	console.log(2);
}
console.log(a);

output:1
1,establish GO variable
 		AO {

        	}
2,Find variable
		AO {
           	  a:undefined;
            }
3,Function declaration not found
		AO {
           	  a:undefined  ---> function a(){} ;
            }
4,Assignment argument
		AO {
           	  a:undefined  ---> function a(){} ---> 1;
            }
GO === window
<script>
		function test(){
			console.log(b);
			if(a){
				var b =2;
			}
			c=3;
			console.log(c);
		}

		var a;
		test();
		a=1;
		console.log(a);

</script>
Output: undefined
	  3
	  1
	GO={
		a : undefined,
		    --->1
		test : function test() {}
		c:3
	}

	AO={
		b : undefined
	}
if The statement is not executed before precompiling, so b Yes AO of
c=3; No, var Statement, so in GO
Global
Features: Global variable. This method encapsulated in Global can be called directly without an object.
Method name ();
1. Method
encodeURI() : url code

decodeURI()  : url decode

encodeURIComponent() : url code

decodeURIComponent() : url decode

parseInt();   //Convert string to number
//Judge whether each character is a number one by one until it is not a number, and turn the front number part into number

isNaN();  //Judge whether a value is NaN

eval();   //The JavaScript string and execute it as script code.
encodeURI() ,decodeURI()
encodeURI() and decodeURI() cases
URL code
 Intelligence Podcast = %E4%BC%A0%E6%99%BA%E6%92%AD%E5%AE%A2
<script>
        var str = "Intelligence Podcast";
        var encode = encodeURI(str);    //url encoding
        document.write(encode+"<br/>");
        var decode =decodeURI(str);     //url decoding
        document.write(decode);
</script>

result:
%E4%BC%A0%E6%99%BA%E6%92%AD%E5%AE%A2
 Intelligence Podcast
parseInt()
parseInt() converts a string to a number
 var str2 = "234abc";
 document.write(parseInt(str2));
result:234


If the number is not preceded by a number, it becomes NaN
 var str2 = "a234abc";
 document.write(parseInt(str2));
result: NaN
ParseInt (STR2, radius) indicates binary conversion
var str2 = '10';
console.log(parseInt(str2,16));

//Convert 10 to hexadecimal number
 output:16
parseFloat
<script>
    var str2 = parseFloat('3.1415926');
	console.log(str2);
</script>
output:3.1415926
toFixed: keep several decimal places (rounded)
<script>
    var str2 = parseFloat('3.1415926');
	console.log(str2.toFixed(3));
</script>
output:3.142
isNaN()
isNaN(); // Judge whether a value is NaN
Convert it to number -- >, then judge whether it is Nan -- >, and then output the boolean value
<script>
 var a = "NaN";
 document.write(a==NaN);
 document.write("<br/>");
 document.write(isNaN(a));
</script>

result:
false
true

console.log(isNaN('a'));
console.log(isNaN(null));
console.log(isNaN(undefined));
Output: true,false,true
eval()
eval(); // The JavaScript string and execute it as script code.
<script>
	var jscode = "alert(123)";
    eval(jscode);
</script>

Result: a 123 window pops up
DOM
concept
* Concept: Document Object Model Document object model
	* Encapsulate each component of the markup language document as an object. You can use these objects to modify markup language documents CRUD Dynamic operation of

* W3C DOM The standard is divided into three different parts:

	* core DOM - Standard model for any structured document
		* Document: Document object
		* Element: Element object
		* Attribute: Attribute object
		* Text: Text object
		* Comment:annotation objects

		* Node: Node object, parent of the other 5
	* XML DOM - in the light of XML Standard model for documents
	* HTML DOM - in the light of HTML Standard model for documents
Core DOM model
* core DOM Model:
	* Document: Document object
		1. establish(obtain): stay html dom Can be used in the model window Object to get
			1. window.document
			2. document
		2. method:
			1. obtain Element Object:
				1. getElementById()	:  according to id Gets the element object from the attribute value. id Attribute values are generally unique
				2. getElementsByTagName(): Get the element objects according to the element name. The return value is an array
				3. getElementsByClassName():according to Class Get the element objects from the attribute value. The return value is an array
				4. getElementsByName(): according to name Get the element objects from the attribute value. The return value is an array
			2. Create other DOM Object:
				createAttribute(name)
            	createComment()
            	createElement()
            	createTextNode()
            3. attribute
        * Element: Element object
            1. obtain/Creating: by document To get and create
            2. method:
                1. removeAttribute(): Delete attribute
                2. setAttribute(): set a property
        * Node: Node object, parent of the other 5
            * Features: all dom Objects can be considered as a node
            * method:
                * CRUD dom Tree:
                    * appendChild(): Adds a new child node to the end of the node's child node list.
                    * removeChild()	: Deletes (and returns) the specified child node of the current node.
                    * replaceChild(): Replace a child node with a new node.
            * Properties:
                * parentNode Returns the parent node of the node.
Element: element object case
Element:Element object case
 Method case:
1. removeAttribute(): Delete attribute
2. setAttribute(): set a property
<body>
    <a>Let me have a try</a>
    <input type="button" id="btn_set" value="set a property">
    <input type="button" id="btn_remove" value="Delete attribute">

    <script>
        //Get btn
        var btn_set = document.getElementById("btn_set");
        btn_set.onclick = function(){
        //Get a tag
        var element_a = document.getElementsByTagName("a")[0];
        element_a.setAttribute("href","https://www.baidu.com");
        }


        var btn_remove = document.getElementById("btn_remove");
        btn_remove.onclick = function(){
        //Delete a tag
        var element_a = document.getElementsByTagName("a")[0];
        element_a.removeAttribute("href");
        }

    </script>
</body>
Node object instance
* appendChild(): Adds a new child node to the end of the node's child node list.
* removeChild()	: Deletes (and returns) the specified child node of the current node.
* replaceChild(): Replace a child node with a new node.


<!DOCTYPE html>
<html lang="en">

<head>
    <meta charset="UTF-8">
    <meta name="viewport" content="width=device-width, initial-scale=1.0">
    <title>Document</title>
    <style>
        div {
            border: 1px solid red;
        }

        #div1 {
            width: 200px;
            height: 200px;
        }

        #div2 {
            width: 100px;
            height: 100px;
        }

        #div3 {
            width: 100px;
            height: 100px;
        }
    </style>
</head>

<body>
    <div id="div1">
        <div id="div2">div2</div>
        div1
    </div>
    <a href="javascript:void(0);" id="del">Delete child node</a>
    <a href="javascript:void(0);" id="add">Add child node</a>
    <script>
        //1. Get hyperlink
        var element = document.getElementById("del");
        //2. Bind click event
        element.onclick = function () {
            var div1 = document.getElementById("div1");
            var div2 = document.getElementById("div2");
            div1.removeChild(div2);
        }

        //1. Get hyperlink
        var element_add = document.getElementById("add");
        //2. Bind click event
        element_add.onclick = function () {
            var div1 = document.getElementById("div1");
            //Add child nodes to div1
            //Create div node
            var div3 = document.createElement("div");
            div3.setAttribute("id", "div3");
            div1.appendChild(div3);
        }
    </script>
</body>
</html>
javascript:void(0);
href="#",Contains a location information.The default anchor is#top, that is, the upper end of the web page, will cause the browser to slow down or even crash when clicking this link continuously and quickly. javascript:void(0) only represents a dead link without any information. Therefore, it is best to use void(0) when calling a script

href="#"Difference from javascript: void (0)

1,href="#"Method actually means empty connection, but clicking it will automatically jump to the top of the page, because using this method is equivalent to clicking an anchor, but the anchor does not write an ID, so it will jump to the top of the page by default.

2,#You can jump to the destination with id set
3,javascript:void(0)We call it "dead link"
Nothing happens when you click on a hyperlink
<!-- 1.When users link, void(0)Calculated as 0,User clicks will not have any effect -->
    <a href="javascript:void(0);">Nothing happens when you click here</a><br>
Execute the code in the void operator
<!-- 2.implement void() Code in operator -->
    <a href="javascript:void(alert('You are so obedient!!! Ha ha ha!!!'))">Click me to pop up the warning box!!!</a><br>
    <a href="javascript:void(console.log('You are so obedient!!! Ha ha ha!!!'))">Click my output to the console!!!</a><br>
Calculates the arithmetic in the void operator
<button type="button">Point me</button>
<script type="text/javascript">
        document.querySelector('button').addEventListener('click', function () {
            var a, b, c, d;
            a = void(b = 2, c = 3);
            console.log('a => ' + a);
            console.log('b => ' + b);
            console.log('c => ' + c);
            console.log('d => ' + d);
        });
    </script>
HTML DOM
* HTML DOM
	1. Setting and obtaining of label body: innerHTML
	2. use html Attributes of element objects
	3. Control element style
		1. Using element style Property
			For example:
				 //Modify style mode 1
		        div1.style.border = "1px solid red";
		        div1.style.width = "200px";
		        //font-size--> fontSize
		        div1.style.fontSize = "20px";
		2. Define the style of the class selector in advance, and pass the className Property to set its class Property value.
Event monitoring mechanism
https://www.w3school.com.cn/jsref/dom_obj_event.asp
* Concept: after some operations are performed on some components, the execution of some code is triggered.
	* Events: some actions. For example, click, double-click, press the keyboard, and move the mouse
	* Event source: component. For example: button text input box...
	* Listener: code.
	* Register listener: combine event, event source and listener. When an event occurs on the event source, it triggers the execution of a listener code.
Common events:
Click event
		1. onclick: Click event
		2. ondblclick: Double click the event
focal event
	1. onblur: Lose focus        -----Generally used for form validation
	2. onfocus:Element gets focus.
Load event
onload: A page or an image is loaded.
Mouse event
    1. onmousedown	The mouse button is pressed.
     	*When defining a method, define a formal parameter and accept event object
		*event Object button Properties can be obtained when the mouse button is clicked
    2. onmouseup	The mouse button is released.
    3. onmousemove	The mouse is moved.
    4. onmouseover	Move the mouse over an element.
    5. onmouseout	Move the mouse away from an element.
Keyboard events
    1. onkeydown	A keyboard key is pressed.
    2. onkeyup		A keyboard key is released.
   	3. onkeypress	A keyboard key is pressed and released.
Selection and change
    1. onchange	The content of the domain is changed.
    2. onselect	The text is selected.
Form Events
1. onsubmit	The confirm button is clicked.
	* Form submission can be blocked
    * Method return false The form is blocked from submission
2. onreset	The reset button is clicked.
Event object
The Event object represents the state of the Event, such as the element in which the Event is sent, the state of the keyboard keys, the position of the mouse, and the state of the mouse buttons.
Events are usually used in conjunction with functions. Functions will not be executed before the event occurs!
Meet case requirements
-
Function: control the content of html document
-
Get page label (Element) object: Element
-
document.getElementById("id value"): get the element object through the id of the element
-
Action Element object:
-
Modify attribute value:
-
Which object is explicitly obtained?
-
Check the API documentation to find out which properties can be set
-
Modify label body content:
Attribute: innerHTML
-
Get element object
-
Use the innerHTML attribute to modify the content of the tag body
-
Event simple learning
-
Function: after some operations are performed on some components, the execution of some codes is triggered.
-
How to bind events
-
Directly on the html tag, specify the attribute (operation) of the event, and the attribute value is js code
- Event: onclick -- click the event
-
Get the element object through js, specify the event attribute, and set a function
-
<body>
			<img id="light" src="img/off.gif"  onclick="fun();">
			<img id="light2" src="img/off.gif">

			<script>
			    function fun(){
			        alert('I was ordered');
			        alert('I was ordered again');
			    }

			    function fun2(){
			        alert('Why should I be old?');
			    }

			    //1. Get light2 object
			    var light2 = document.getElementById("light2");
			    //2. Binding events
			    light2.onclick = fun2;
			</script>
</body>
BOM
concept
Browser Object Model
- Encapsulate the components of the browser into objects.
form
- Window: window object
- Navigator: Browser Objects
- Screen: display screen object
- History: history object
- Location: address bar object
Window: window object
method
1. Methods related to pop ups:
    alert()	Displays a warning box with a message and a confirmation button.
    confirm() Displays a dialog box with a message and confirm and Cancel buttons.
        * If the user clicks the OK button, the method returns true
        * If the user clicks the Cancel button, the method returns false
    prompt()  Displays a dialog box that prompts the user for input.
    	* Return value: gets the value entered by the user
<script>
    var flag = confirm("Are you sure you want to exit?");
    if(flag){
        alert("Looking forward to your next visit!");
    }else{
        alert("Don't shake your hands");
    }
</script>
<script>
    var result = prompt("Please enter user name:");
    alert(result);
</script>
Methods related to opening and closing
    close()	Close the browser window.
    * Who calls me, I close who
    open()	Open a new browser window
    * Return to new Window object
<body>
     	  <input id="openBtn" type="button" value="Open a new window"/>
    	  <input id="closeBtn" type="button" value="close window"/>
      <script>
           var openBtn = document.getElementById('openBtn');
           var newWindow;
           openBtn.onclick = function() {
                newWindow = open("https://www.baidu.com");
           }

           var closeBtn = document.getElementById('closeBtn');
           closeBtn.onclick = function() {
           newWindow.close();
      }
      </script>
</body>
Timer related mode
     setTimeout()	Call a function or compute expression after a specified millisecond count.
     * Parameters:
     1. js Code or method object
     2. Millisecond value
     * Return value: unique identification, used to cancel the timer

     clearTimeout()	Cancelled by setTimeout() Method set timeout.

     setInterval()	Calls a function or evaluates an expression for a specified period (in milliseconds).
     clearInterval()	Cancelled by setInterval() Set timeout.
Cycle timer
<script>
     function fun(){
           alert('Boom');
       }
    setInterval(fun,2000);
</script>
Rotation chart
<body>
      <img src="img/banner_1.jpg" id="img" width="100%">

      <script>
            var number = 1;

            function fun() {
                  number++;
                  if (number > 3) {
                        number = 1;
                  }
                  var img = document.getElementById("img");
                  img.src = "img/banner_" + number + ".jpg";

            }
            setInterval(fun, 3000);
      </script>
</body>
attribute
    1. Get other BOM Object:
        history
        location
        Navigator
        Screen:
    2. obtain DOM object
        document
characteristic
   * Window Objects do not need to be created and can be used directly window use. window.Method name();
   * window References can be omitted. Method name();
Location
Address bar object
1. establish(obtain):
   1. window.location
   2. location

2. method:
   * reload()	Reload the current document. Refresh

3. attribute
   * href	Sets or returns the complete URL.
reload() example:
<body>
      <button id="btn" type="button" value="Refresh">Refresh</button>

      <script>
          var btn = document.getElementById('btn');
          btn.onclick = function () {
                location.reload();
          }
      </script>
</body>
href example:
<body>
      <button id="goItcast" type="button" value="Rookie tutorial">Rookie tutorial</button>

      <script>
          var btn1 = document.getElementById('goItcast');
          btn1.onclick = function () {
                location.href ="https://www.runoob.com/";
          }
      </script>
</body>
Auto jump page
     <style>
          p{
            text-align: center;
          }
          span{
                color:red;
          }
      </style>
<body>
     <p><span id="time">5</span>After seconds, the page will jump automatically</p>

      <script>
         var second = 5;
         var time = document.getElementById("time");
         function showtime() {
            second --;
            //If the judgment time is < = 0, jump to the page
            if (second<=0) {
                  location.href ="https://www.runoob.com/";
            }
           time.innerHTML = second +"";
         }
         //Set the cycle timer and execute the method once a second
         setInterval(showtime,1000);

      </script>
</body>
HTML DOM
https://www.w3school.com.cn/htmldom/dom_intro.asp //W3 tutorial
1. Tag body setting and acquisition: innerHTML
2. Use attributes of html element objects
3. Control element style
Control style 1: use the style attribute of the element to set
<body>
    <div id="div1">
        div
    </div>

    <script>
        var div1  = document.getElementById('div1');
        div1.onclick = function(){
            //Modify style 1
            div1.style.border = '1px solid red';

            div1.style.fontSize = '50px';
            div1.style.width = '200px';
        }
    </script>
</body>
Control style 2: define the style of the selector in advance, and set its class attribute value through the className attribute of the element
<!DOCTYPE html>
<html lang="en">
<head>
    <meta charset="UTF-8">
    <meta name="viewport" content="width=device-width, initial-scale=1.0">
    <title>Document</title>
    <style>

        .d2{
            border: 1px solid blue;
            width:100px;
        }
    </style>
</head>
<body>

    <div id="div2">
        div2
    </div>

    <script>
        var div2 = document.getElementById('div2');
        div2.onclick = function(){
            div2.className="d2";
        }
    </script>
</body>
</html>
Event delegation (event agent)
concept
Event Delegation is also called Event Delegation. It is a common technique for binding events in Javascript.
"Event agent" delegates the response events (click, keydown...) that need to be bound to the child element to the parent element, so that the parent element can play the role of event listening.
The principle of event broker is event bubbling of DOM elements.
Popular examples:
For example, when a dormitory student arrives at the same time, one way is for them to get it one by one. Another way is to entrust the matter to the dormitory head, let one person go out and get all the express, and then distribute it to each dormitory student one by one according to the recipient;

Here, taking express delivery is an event. Each student refers to the person who needs to respond to the event DOM Element, and the dormitory head who goes out to collect the express is the agent element, so this element is really bound to the event. In the process of distributing the express according to the recipient, it is necessary to judge which or which of the proxy elements the current response event should match.
Event delegate in Javascript
For example, you need to add a click event to a dom node, but now the event is not added to the dom node itself, but to its parent node. Use its parent node to trigger the event and achieve the event effect for the dom node
Implementation principle
Event delegation is implemented by using the bubble principle of events
Event Bubbling
Events start at the deepest node and then propagate up gradually
When an event is triggered, it propagates between the child element and the parent element
Event propagation is divided into three stages:
-
Capture phase: the transmission from the window object to the target node (from the upper layer to the lower layer) is called "capture phase", and the capture phase will not respond to any events;
-
Target phase: triggered on the target node, which is called "target phase"
-
Bubbling phase: conduct window objects back from the target node (from the bottom layer to the top layer), which is called bubbling phase. Event agent is to use the event bubbling mechanism to bind the events that the inner layer needs to respond to to to the outer layer;
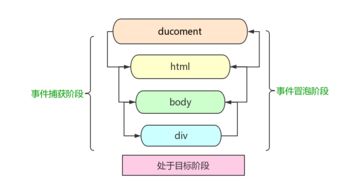
Bubbling example:
There is such a node tree on the page, div>ul>li>a;For example, for the innermost a Add one click Click the event, and the event will be executed outward layer by layer, in order a>li>ul>div,There is such a mechanism, then we give it to the outermost div Add a click event to make the inside ul,li,a To achieve the event effect, it will be triggered. This is the event delegate, which delegates their parent to execute the event on behalf of them.
Using the role of event delegation
- Save resources and improve efficiency. In JavaScript, the number of event handlers added to the page will directly affect the overall running performance of the page, because it needs to interact with DOM nodes continuously. The more times you visit DOM, the more times the browser redraws and rearranges, which will prolong the interaction readiness time of the whole page. If you use event delegate, It will only interact with the DOM node once, which effectively reduces the number of interactions with the dom
- You can also have events for newly created dom nodes
- It can save a lot of memory and reduce event registration
- You can realize that when you add a new sub object, you do not need to bind it again (dynamic binding event)
Usage scenario
- Repeatedly adding events to dom nodes
- Add events to elements in the dom tree that have not yet been created (dynamically created)
Add event delegates using js
Example 1:
<body>
<ul id="ul">
    <li>Go to play on Monday</li>
    <li>Go to work on Tuesday</li>
    <li>Go to rest on Wednesday</li>
    <li>Go to dinner on Thursday</li>
</ul>

<!--Delegate events to each li Tag add click event-->
<script>
    var ul = document.querySelector("#ul");
    ul.onclick = function(){
        console.log("Wake up,I have to work every day!")
    }
</script>
</body>
In example 1, the parent ul is used for event processing. When li is clicked, the event will bubble on the ul due to the bubble principle. Because there is a click event on the ul, the event will be triggered.
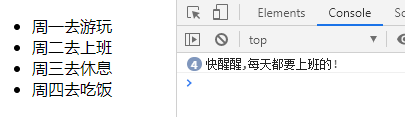
Example 2: different event codes
<body>
<ul id="ul">
    <li>Go to play on Monday</li>
    <li class="work-day">Go to work on Tuesday</li>
    <li>Go to rest on Wednesday</li>
    <li>Go to dinner on Thursday</li>

</ul>

<script>
    var ul = document.querySelector("#ul");
    ul.onclick = function(e) {
        var e = event || window.event;
        var target = e.srcElement || e.target;
        if(target.className == "work-day"){
            console.log("good boy")
        }else{
            console.log("Wake up,I have to work every day!")
        }
    }
</script>
</body>
In example 2, different events will be made for the li element whose class attribute is equal to "work day", and other events are the default events
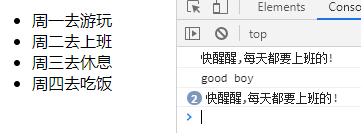
Event delegate for jQuery
$(function () {
        $('#ul').on('click', 'li', function () {
            if ($(this).hasClass('work-day')) {
                alert("good boy");
            } else {
                alert("Wake up,I have to work every day!");
            }
        })
    });
Event delegation summary
- When using "event delegation", it does not mean that the closer the element to which the event is delegated, the better.
- The process of event bubbling also takes time. The closer to the top level, the longer the "event propagation chain" of the event, the more time-consuming it will be.
- If the DOM nested structure is deep, event bubbling through a large number of ancestor elements will lead to performance loss.
- Rational use of event delegation can help us save resources and improve efficiency
- You can also add events to nodes in the dom that have not yet been created
- Events suitable for event delegation:
- click
- mousedown
- mouseup
- keydown
- keyup
- keypress
- Events not suitable for event delegation:
- MouseMove (you have to calculate its position every time, which is very difficult to control)
- focus, blur, etc. (the bubbling feature is not used, so event delegation is not allowed)
XML
concept
Extensible markup language
- Extensible: labels are customized
- Function: store data
1. Configuration file
2. Transmission in the network - The difference between xml and html
1. xml tags are customized and html tags are predefined
2. The syntax of xml is strict and that of html is loose
3. xml is used to store data, and html is used to display data - w3c: World Wide Web Consortium
grammar
-
Basic grammar
1. Suffix after xml document:. xml
2. The first line of xml must be defined as a document declaration
3. There is one and only one tag in the xml document
4. Attribute values must be enclosed in quotation marks (either single or double)
5. The label must be closed correctly
6. xml tag names are case sensitive
quick get start
<?xml version='1.0' ?>

<users>
	<user id ='1'>
		<name>zhangsan</name>
		<age>23</age>
	</user>

	<user id ='2'>
		<name>lisa</name>
		<age>25</age>
	</user>
</users>
JQuery
concept
A JavaScript framework. Simplify JS development
-
JQuery is a fast and concise JavaScript framework. It is another excellent JavaScript code base (or JavaScript framework) after Prototype. The purpose of jQuery design is "write Less, Do More", which advocates writing less code and doing more things. It encapsulates the common functional code of JavaScript, provides a simple JavaScript Design pattern, and optimizes HTML document operation, event processing, animation design and Ajax interaction.
-
JavaScript framework: in essence, it is just some js files that encapsulate the native code of js
-
Differences between jquery-xxx.js and jquery-xxx.min.js:
- jquery-xxx.js: development version. For programmers, there are good indentation and comments. Larger size
- jquery-xxx.min.js: production version. Used in the program without indentation. Smaller size. Faster program loading
JQ and JS conversion
Difference and transformation between JQuery object and JS object
-
JQuery objects are more convenient to operate.
-
JQuery object and js object methods are not common
-
The two are converted to each other
* jq -- > js : jq object[Indexes] perhaps jq object.get(Indexes)
* js -- > jq : $(js object)
-
example
<body>
	<div id="div1">div1...</div>
	<div id="div2">div2...</div>

	<script>
		//Through js
		var divs=document.getElementsByTagName("div");
		alert(divs.length);
		for (var i=0; i<divs.length; i++){
			$(divs[i]).html("ccc"); //jq --> js
		}
		//Through jq
		var $divs = $("div");
		alert($divs.length);
		$divs[0].innerHTML ="ddd";  //js --> jq
		$divs.get(1).innerHTML ="eee";
		</script>
</body>
ECMAScript
keyword
ECMA-262 defines a set of keyword s supported by ECMAScript.
These keywords identify the beginning and / or end of an ECMAScript statement. According to regulations, keywords are reserved and cannot be used as variable names or function names.
The following is a complete list of ECMAScript Keywords:
break
case
catch
continue
default
delete
do
else
finally
for
function
if
in
instanceof
new
return
switch
this
throw
try
typeof
var
void
while
with
**Note: * * if you use a keyword as a variable name or function name, you may get an error message such as "Identifier Expected".
Basic grammar
NaN (not a number)->Number type

infinity (Infinity) -> Number type
  (1/0)->Infinitesimal
-infinity (Infinitesimal) -> Number type
  (-1/0)->Infinitesimal
undefined, NaN, null, "", 0, false are false, others are true
Object object
Property name / key name: property value / key value
// Object object
		var person = {
			name: 'Xiao Zhao',
			age: 18,
			height: 160,
			weight: 40,
			job: 'student'
		}
        person.name = 'Xiao Huang';
		console.log(person);

Output:{name: "Xiao Huang", age: 18, height: 160, weight: 40, job: "student"}
typeof
console.log(typeof (num));
Output: undefined

console.log(typeof (typeof (num)));
Output: string
Summary: if there is another typeof after typeof, its type must be String.
arguments
JavaScript also has a free keyword arguments, which only works inside the function and always points to all parameters passed in by the caller of the current function. Arguments is similar to Array, but it is not an Array:
function foo(x) {
    console.log('x = ' + x); // 10
    for (var i=0; i<arguments.length; i++) {
        console.log('arg ' + i + ' = ' + arguments[i]); // 10, 20, 30
    }
}
foo(10, 20, 30);
With arguments, you can get all the parameters passed in by the caller. That is, even if the function does not define any parameters, you can still get the value of the parameters:
function abs() {
    if (arguments.length === 0) {
        return 0;
    }
    var x = arguments[0];
    return x >= 0 ? x : -x;
}

abs(); // 0
abs(10); // 10
abs(-9); // 9
Implicit type conversion
<script>
	var a = '123';  //Number(a)
    a++;
    console.log(a);
</script>
Output::124
<script>
     var str2 = 'a' + 1;   //String(1)
     console.log(str2);
 </script>
Output: a1
<script>
    var str2 = '7' * 2;   // * / - %  -->  String --> Number
	console.log(str2);
</script>
Output: 14
<script>
    var a = undefined == null;
    console.log(a);
</script>
Output: true
undefined and null Neither greater than nor less than 0 nor equal to 0
 But they both==by true
NaN Not equal to NaN
Argument summation
<script>
		function sum() {
			var a = 0;
			for (var i = 0; i < arguments.length; i++) {
				a += arguments[i];
			}
			console.log(a);
		}
		sum(1, 2, 3, 4, 5); //Argument
</script>

output:15
<script>
        function test(a, b) {
        b = 3;
        console.log(arguments[1]);
    	}
    	test(1);
</script>
Output: undefined
If the value is passed in the argument, we can modify the parameter value inside the function,
But there is no value passed in the argument, and it is useless if you assign a value to the formal parameter
Scope
Object - > some properties are inaccessible to us, which are implicit properties inherent in the JS engine
[[scope]]
1,When the function is created, a JS Internal implicit properties

2,Function to store the container of the scope chain
AO/GO
AO: execution time context of function
GO: Global execution context
After the function is executed, the AO is to be destroyed
AO is an instant storage container
As long as the function is defined, the scope and the corresponding scope chain are generated GO

As long as the function is executed, it is generated AO
function a(){
    function b(){
        function c(){

        }
        c();
    }
    b();
}
a();
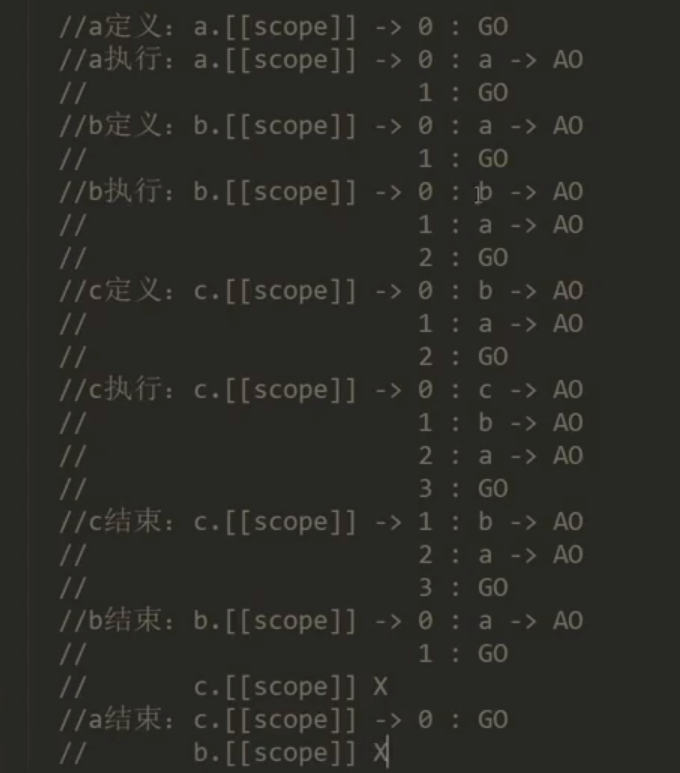
closure
Closures are functions that can read internal variables of other functions
In Javascript language, only child functions inside a function can read local variables, so closures can be simply understood as * * "functions defined inside a function" * *.
Therefore, in essence, closure is a bridge connecting the inside and outside of a function.
When an internal function is returned to the outside and saved, a closure will be generated. The closure will not release the original scope chain. The transitional closure may lead to memory leakage or slow loading
Conclusion: the closure finds the final value of the corresponding variable in the parent function in the same address
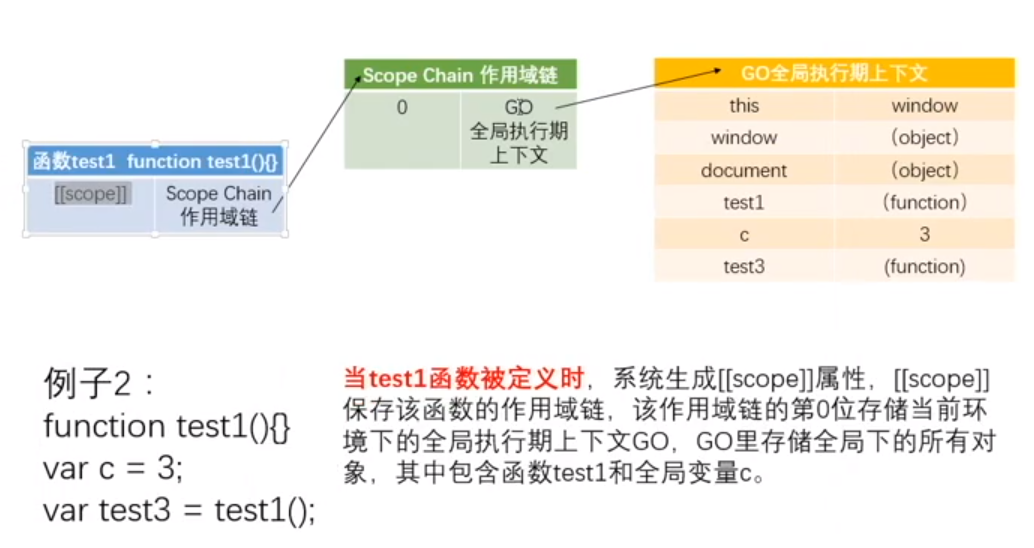
When test1 is executed, test2 is defined, so the scope and scope chain of test2 are consistent with that of test1
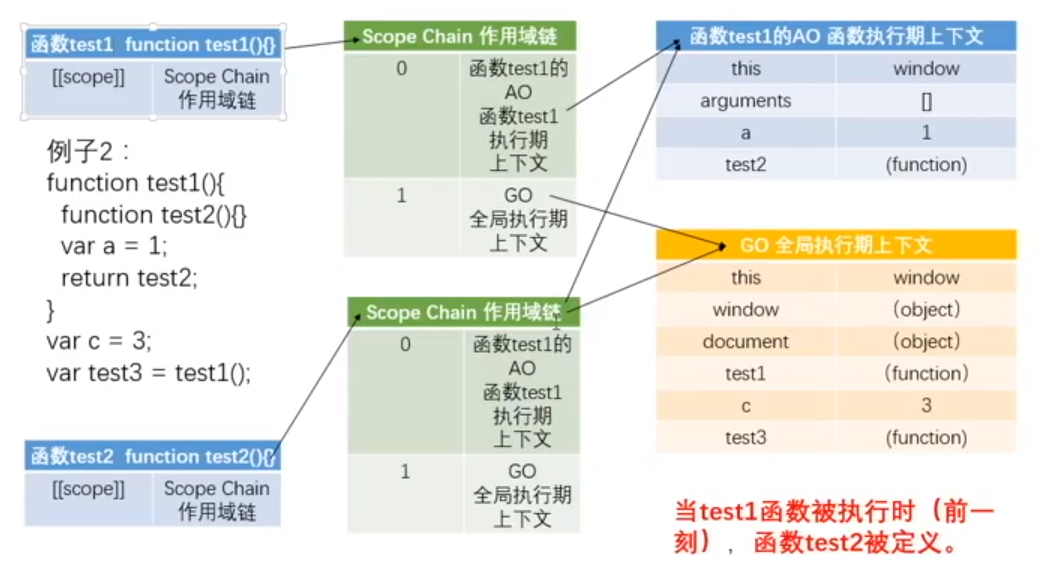
When executing return test2; Time
(test2 was thrown out and became the overall situation. Test2 contains test1's AO, so test1's AO cannot be destroyed, but retained.)
So var test3 = test1(); test1() of is test2.
(test1() function is returned to test2; Test2 assignment of, test1(); Test 2 is stored)
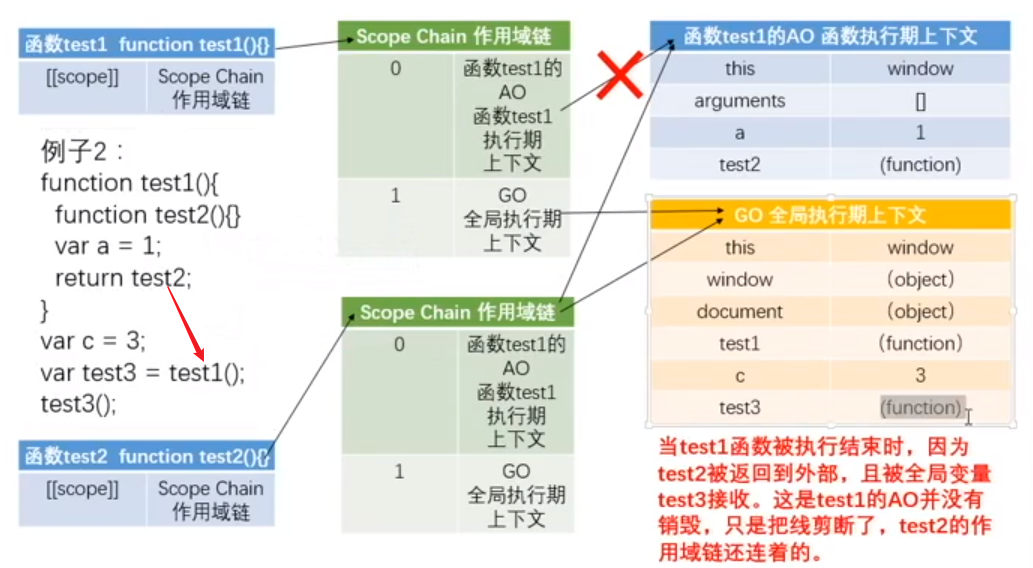
When executing test3(); Time
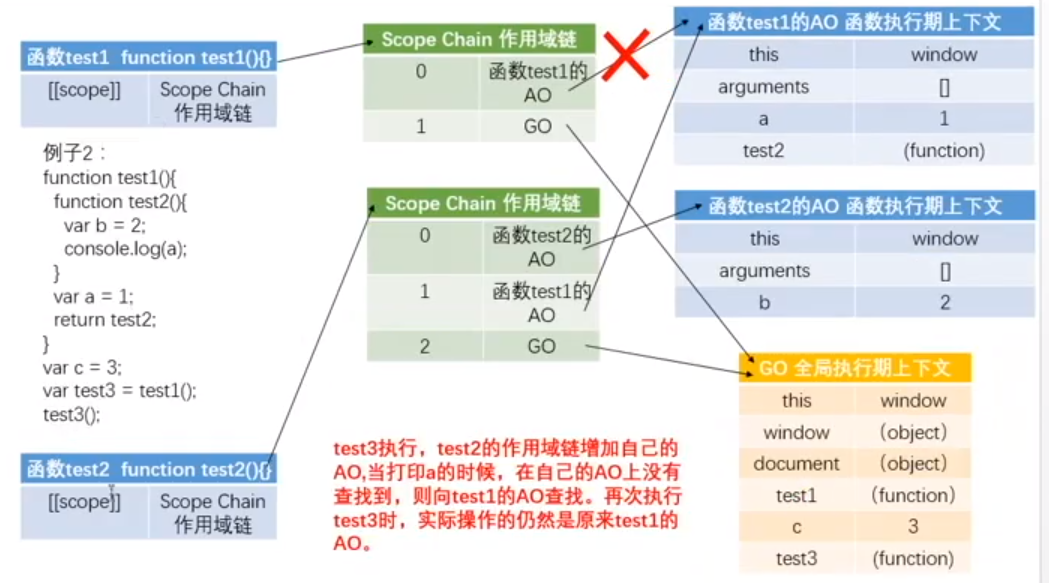
When test3 execution ends
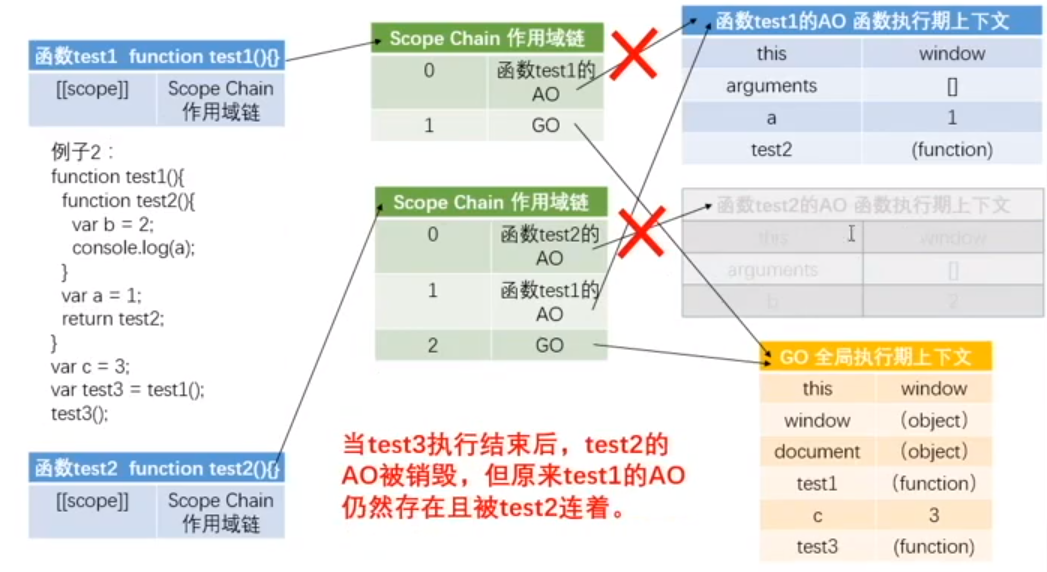
Closure example:
var i = 0;								function outerFn(){
function outerFn(){							var i = 0;
  function innnerFn(){						function innnerFn(){
       i++;										 i++;
       console.log(i);							 console.log(i);
  }											 }
  return innnerFn;							 return innnerFn;
}											}
var inner1 = outerFn();				      var inner1 = outerFn();
var inner2 = outerFn();				      var inner2 = outerFn();
inner1();								  inner1();
inner2();								  inner2();
inner1();								  inner1();
inner2();								  inner2();

Output: 1 2 3 4							  Output: 1 1 2 2
Execute function now
Execute function now - initialize function
(IIFE - immediately-invoked function expression)
It must be an expression to be executed
1,
(function(){

}()); //w3c recommendations
----------------------
2,
(function test (){

})();
======================
function test(){

}
test();
3,
var test = function(){
    console.log();
}();
Function declaration becomes the method of expression + -! |&&
1 && function test(){
	console.log(1);
}();
Example: click 1 ~ 5 and return to 0 ~ 4
<body>
    <ul>
        <li>1</li>
        <li>2</li>
        <li>3</li>
        <li>4</li>
        <li>5</li>
    </ul>
    <script>
        var oli = document.querySelectorAll('li');
        for (var i = 0; i < oli.length; i++) {
            oli[i].onclick = function () {
                console.log(i); // 5
            }
        }
    </script>
</body>
Output: all clicks are 5
//Form closure
--------------------------------------------------------------------------------
//Solve with immediate execution function
<body>
    <ul>
        <li>1</li>
        <li>2</li>
        <li>3</li>
        <li>4</li>
        <li>5</li>
    </ul>
    <script>
        var oli = document.querySelectorAll('li');
        for (var i = 0; i < oli.length; i++) {
            (function (j) {  //Execute function now
                oli[j].onclick = function () {
                    console.log(j);
                }
            })(i);
        }
    </script>
</body>
Output: click 1 ~ 5 Then return 0~4
object
Object literal quantity
example:
To delete an object, you can use the delete + key;
To delete a function, use the delete + key value. Function name( (no parentheses)
<script>
        var teacher = {
            name: 'Zhang San',
            age: 18,
            sex: 'male',
            height: 176,
            teach: function () {
                console.log('I am teaching JavaScript');
            },
            eat: function () {
                console.log('I am having dinner');
            }
        }
        //Increase of objects
        teacher.address = "Yunfu";
        teacher.drink = function () {
            console.log('I am drinking beer');
        }
        //delete object
        delete teacher.address;
        //Delete function expression
        delete teacher.drink;
        //correction
        teacher.name = "Xiao Zhao";
		//lookup
		console.log(teacher.name);
        console.log(teacher);
</script>
Constructor
System built-in constructor Object
<script>
        var obj = new Object();
        obj.name = 'Xiao Zhao';
        obj.sex = 'female';
        console.log(obj);
</script>
Custom constructor
1,
<script>
        function Teacher() {
            this.name = "Xiao Zhao";
            this.sex = "male";
            this.smoke = function () {
                console.log("smoking");
            }
        }
        //this exists only after the object is instantiated
        //Object instantiation
        var teacher = new Teacher();
</script>
2,
<script>
        function Teacher(name,sex) {
            this.name = name;
            this.sex = sex;
            this.smoke = function () {
                console.log("smoking");
            }
        }
        var teacher1 = new Teacher('Xiao Zhao','female');
		var teacher2 = new Teacher('Xiao Huang','male');

		console.log(teacher1);
		console.log(teacher1);
</script>
3. Commonly used
<script>
        function Teacher(opt) {
            this.name = opt.name;
            this.sex = opt.sex;
            this.smoke = function () {
                console.log("smoking");
            }
        }
        var teacher1 = new Teacher({
            name:'Xiao Zhao',
            sex:'female'
        });
		var teacher2 = new Teacher({
            name:'Xiao Huang',
            sex:'male'
        });

		console.log(teacher1);
		console.log(teacher1);
</script>
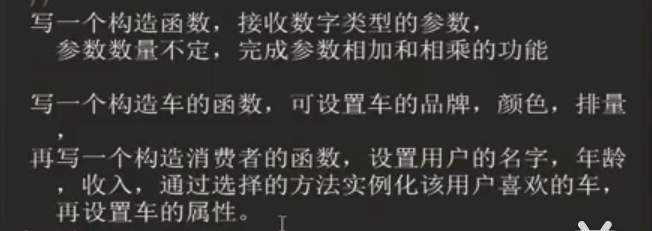
Packaging
The original value does not have its own methods and properties
var a =123; //Original value
a.len = 3;
//new Number(123).len =3;
console.log(a.len);

Output: undefined
 Reason: no place to save, and then deleted
--------------------------------------------------------------------------------

var a = new Number(123); //Original value
a.len = 3;
console.log(a.len);

Output: 3
 Reason: because a It's already an object
var str ='abc';
console.log(str.length);
===
console.log(new String(str).length);
Array truncation method
var arr = [1,2,3,4,5];
arr.length = 3;
console.log(arr);

Output:[1,2,3]
prototype
prototype
Prototype should be called prototype in English. Any object has a prototype. We can use non-standard attributes__ proto__ To access the prototype of an object: the prototype belongs to the instantiated object, not the constructor
// The prototype of a pure object defaults to an empty object
console.log({}.__proto__); // => {}

function Student(name, grade) {
  this.name = name;
  this.grade = grade;
}

const stu = new Student('xiaoMing', 6);
// The prototype of the Student type instance is also an empty object by default
console.log(stu.__proto__); // => Student {}
In JavaScript, each function has a prototype attribute, which points to the prototype object of the function.
function Person(age) {
    this.age = age
}
Person.prototype.name = 'kavin'
var person1 = new Person()
var person2 = new Person()
console.log(person1.name) //kavin
console.log(person2.name)  //kavin
In the above example, the prototype of the function points to an object, which is the prototype of the instance created when calling the constructor,
That is, the prototypes of person1 and person2.
Concept of prototype: when each javascript object (except null) is created, it will be associated with another object, which is me
In the prototype, every object "inherits" properties from the prototype: it means that all objects constructed by the constructor can inherit the properties and methods on the prototype.
- In general, if parameters need to be written to death, prototype is preferred and can be inherited when calling
//This prototype is the common ancestor of each object constructed by defining the constructor
function Handphone(color, brand) {
            this.color = color;
            this.brand = brand;
            this.screen = '18:9';
            this.system = 'Android';
        }

        Handphone.prototype.rom = '64G';
        Handphone.prototype.ram = '6G';
		Handphone.prototype.screen = '16:9';

        var hp1 = new Handphone('red', 'millet');
        var hp2 = new Handphone('black', 'HUAWEI');
        console.log(hp1.rom);
        console.log(hp2.ram);
 	    console.log(hp1.screen);
output:64G
	 6G
     18:9   // Because there is already screen='18:9 'in the constructor, the prototype screen will not be used.
			// If you have this attribute, you won't go to the prototype to find it
So it's usually written like this 🔻
function Handphone(color, brand) {
            this.color = color;
            this.brand = brand;
          //this.screen = '18:9';
          //this.system = 'Android';
        }

        //Handphone.prototype.rom = '64G';
        //Handphone.prototype.ram = '6G';
		//Handphone.prototype.screen = '18:9';
		//Handphone.prototype.system = 'Android';
		//Handphone.prototype.call = function(){
        //    console.log("I am calling somebody");
       // }
		//You can use the following more convenient methods
		Handphone.prototype = {
            rom: '64G',
            ram: '6G',
            screen: '16:9',
            system: 'Android',
            call: function () {
                console.log('I am calling somebody');
            }
        }

        var hp1 = new Handphone('red', 'millet');
        var hp2 = new Handphone('black', 'HUAWEI');
		hp2.call();

Output: I am calling somebody
Relationship between constructor and instance prototype:
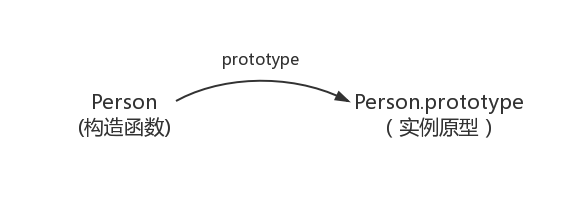
__proto__
__ proto__ Is a non-standard property, which is a property that every object (except null) will have. This property will point to the prototype of the object.
To access the prototype of an object, you can use the Reflect.getPrototypeOf() or Object.getPrototypeOf() methods added in ES6.
function Person() {

}
var person = new Person();
console.log(person.__proto__ === Person.prototype); // true
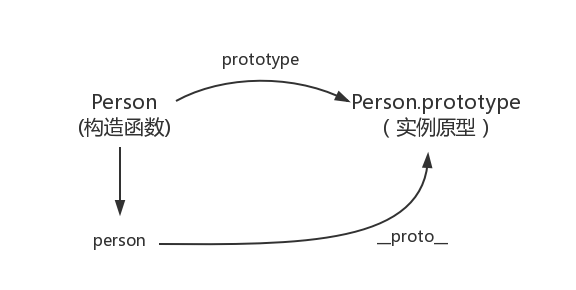
    function Car() {

    }
    Car.prototype.name = 'Benz';

    var car = new Car();
    console.log(car);
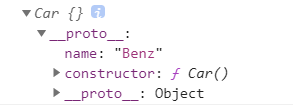
		Car.prototype.name = 'Benz';
        function Car() {}      //Constructor

        var car = new Car();   //Instantiate object

        Car.prototype = {
            name: 'Mazda'
        }
        console.log(car);
//Name: 'Benz' is because the object is instantiated before writing Car.prototype={name:'Mazda'}.
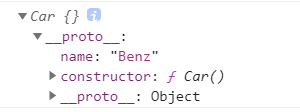
Car.prototype.name = 'Benz';

        function Car() {}

        Car.prototype = {
            name: 'Mazda'
        }
        var car = new Car();

        console.log(car);
constructor
In JavaScript, functions can be used as constructors. Constructors can also be called classes
- Constructor - > points to the constructor itself
- Constructors can be modified
function Handphone(color, brand) {
            this.color = color;
            this.brand = brand;
        }
 console.log(Handphone.prototype);

Output: constructor: ƒ Handphone(color, brand)   //Constructor --- > points to the constructor itself
function Person() {

}
console.log(Person===Person.prototype.constructor)  //true
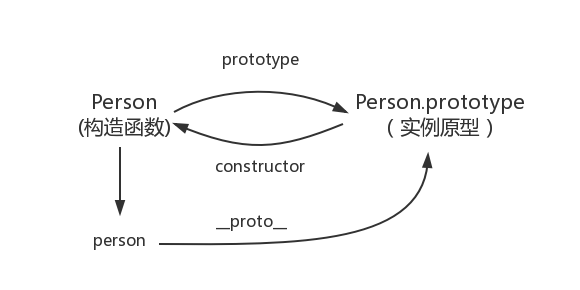
function Person() {

}

var person = new Person();

console.log(person.__proto__ == Person.prototype) // true
console.log(Person.prototype.constructor == Person) // true
// By the way, learn an ES5 method to obtain the prototype of the object
console.log(Object.getPrototypeOf(person) === Person.prototype) // true
Prototype chain
Along_ proto_ The chain of finding the attributes in the prototype and inheriting the attributes of the prototype layer by layer is called the prototype chain
//Look at the properties of the prototype chain from bottom to top
<script>
        Professor.prototype.tSkill = 'JAVA';

        function Professor() {}
        var professor = new Professor();

        Teacher.prototype = professor;
        function Teacher() {
            this.mSkill = 'JS/JQ';
        }
        var teacher = new Teacher();

        Student.prototype = teacher;
        function Student() {
            this.pSkill = 'HTML/CSS';
        }

        var student = new Student();
        console.log(student);
</script>

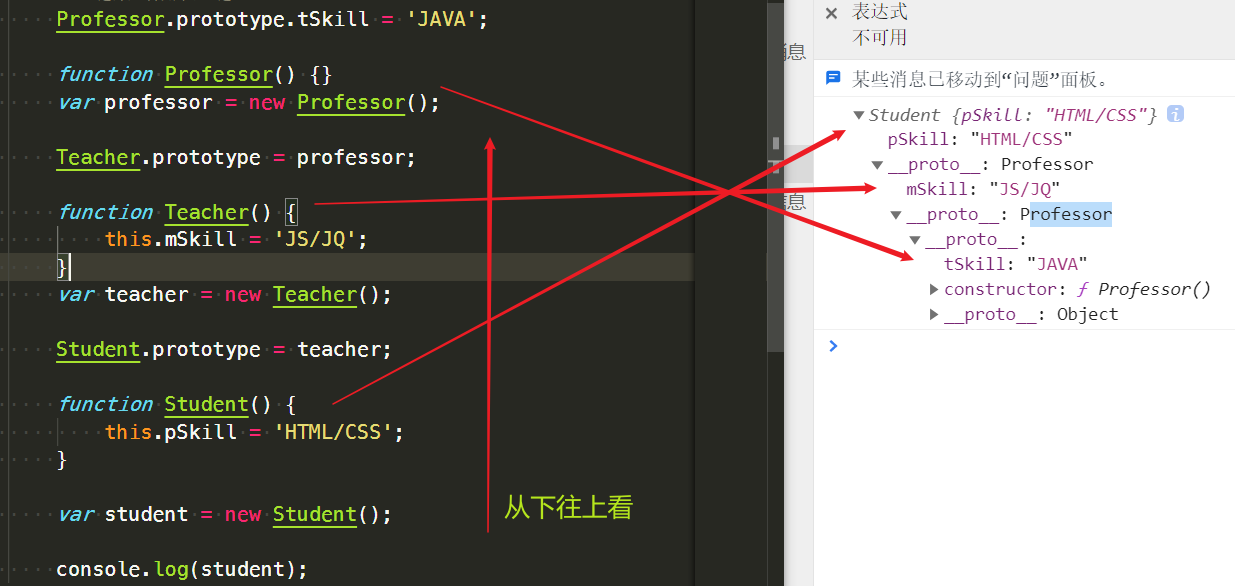
- The top of the prototype chain is Object.prototype
- A toString method is saved in the properties of the Object.prototype prototype
- The original value cannot be modified, and the reference value can be modified
<script>
    var obj1 = {}; //Independent variable construction, direct generation of objects
    console.log(obj1);

    var obj2 = new Object();//Companies generally do not
    console.log(obj2);     //The built-in Object of the system generates objects directly

    function Obj() {}      //Self defined constructor
    var obj3 = new Obj();
    console.log(obj3);
</script>
The above two argument constructs and the built-in Object constructor point to Object
The self-defined constructor points to a custom constructor
The constructor of the prototype must point to the Object constructor of the system
The prototype of the existing prototype is constructed by the system's own Object
create object
Object. Create (object, null) can only be filled in with object or null, and cannot be left blank
You can customize and create prototypes
//Custom create prototype
<script>
        var test = {  //object
            num: 2
        }
          var obj1 = Object.create(test);
    console.log(obj1);
</cript>
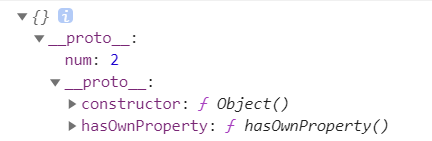
Create an empty object
 <script>
        // Create an empty object
        var obj1 = Object.create(null);
        console.log(obj1);
        obj1.num = 1;
        // Put obj1 into the prototype of obj2
        // obj1 is the prototype of obj2
        var obj2 = Object.create(obj1);
        console.log(obj2);
 </script>
Not all objects inherit from Object.prototype
 <script>
    // Create an empty object
    var obj1 = Object.create(null);
    console.log(obj1);
    obj1.num = 1;
 </script>
The wrapper class is Object create(Object prototype)
toString
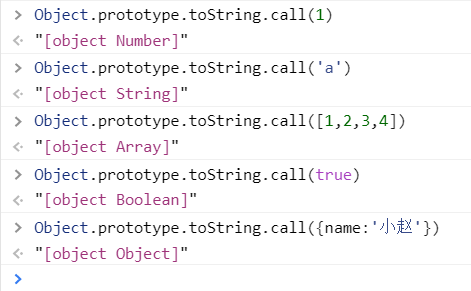
Rewriting of prototype methods
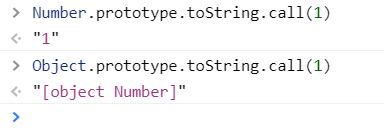
call/apply
Change the direction of this
<script>
        function Car(brand, color) {
            this.brand = brand;
            this.color = color;
        }

        var newCar = {};

        Car.call(newCar, 'Benz', 'red');
        //Car.call() turns function Car(brand,color) {} into
        // newCar.brand = brand;
        // newCar.color = color;
        //Changed the direction of this
        //Borrow the properties and methods in the factory to form the properties and methods of the new object

        console.log(newCar);
    </script>
apply is similar to call, except that it uses an array of arguments
Car.apply(newCar, ['Benz', 'red']);
The return value of the constructor after instantiation is this
When the return value is not written in a normal function, it returns undefined by default
Example: change this point
<script>
//call/apply
function Person() {
this.name = 'Zhang San';
this.age = 18;
}
function Programmer() {
Person.apply(this);
this.work = 'Programming'
}
var p = new Programmer();
console.log(p);
</script>

With parameters:
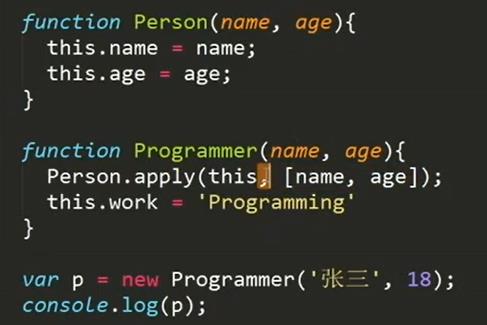
Grail mode
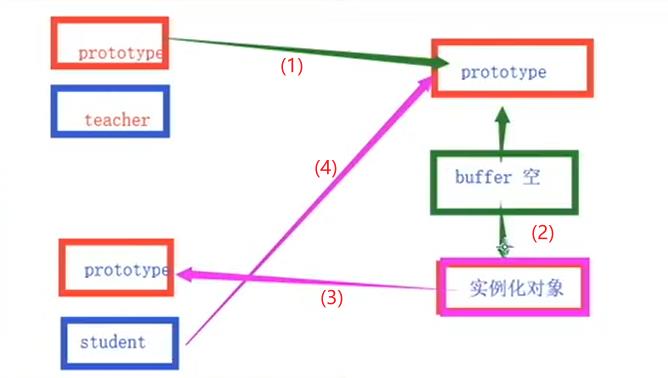
</script>
function Teacher(){
this.name = 'ZMY';
this.tSkill = 'JAVA';
}
Teacher.ptototype = {
pSkill:'JS/SQ'
}
var t = new Teacher();
console.log(t);
function Student(){
this.name = "HFH";
}
function Buffer(){}
//The prototype of Buffer here is equal to the prototype of Teacher
Buffer.prototype = Teacher.prototype;
//Inherited and cannot be modified
var buffer = new Buffer();
//Buffer inherits from Buffer.prototype, and the prototype of buffer is equal to the prototype of Teacher
Student.prototype = buffer;
Student.prototype.age = 18;
var s = new Student();
console.log(s);
</script>
Create a Buffer function, assign the prototype of Teacher to the prototype of Buffer, and then instantiate Buffer
Grail mode of CSS / double wings
Enterprise style
<script>
var inherit = (function(){
var Buffer = function(){}
return function(Target,Origin){
Buffer.prototype = Origin.prototype;
Target.prototype = new Buffer();
Target.prototype.constructor = Target;
Target.prototype.super_class = Origin;
}
})();
Teacher.prototype.name = 'Mr.Zhang';
function Teacher(){}
function Student(){}
function Buffer(){}
inherit(Student,Teacher);
var s = new Student();
var t = new Teacher();
console.log(s);
console.log(t);
</script>
Modular development
-
This method of collaborative module development is generally used in companies. Everyone is responsible for different modules and then needs to implement different methods
-
Put it into function init() {} uniformly, and then use window to execute it globally
-
The function is encapsulated in the self starting function, and then assigned to a variable. This global variable contains all the methods in it,
-
As long as this global variable is executed, the returned methods will be executed
<script>
window.onload = function(){
init();
}
function init(){
initCompute();
console.log('-----------------------');
initFunctions();
}
//Put the module into the immediate execution function (this is an on-demand method)
var initCompute = (function(){
var a =1,
b=2;
function add(){
console.log(a + b);
}
function minus(){
console.log(a - b);
}
return function(){
add();
minus();
}
})();
//This is a module for another person
var initFunctions = (function(){
var a = 2,
b = 4;
function mul(){
console.log(a * b);
}
function div(){
console.log(a / b);
}
return function(){
mul();
div();
}
})();
//Plug in development, execute as soon as possible (rotation diagram)
//This is the way to write plug-ins
;(function(){
var Slider = function(opt){}
Slider.prototype = {
}
window.Slider = Slider;
})();
var slider = new Slider({
});
</script>
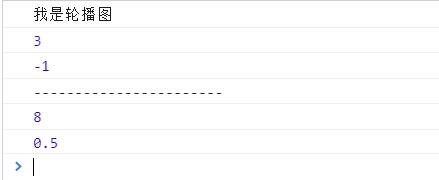
hasOwnProperty
-
JavaScript The hasOwnProperty() method is the prototype method (also known as the instance method) of an Object. It is defined on the Object.prototype Object. All Object instance objects will inherit the hasOwnProperty() method.
-
The hasOwnProperty() method is used to detect whether a property is an object's own property, not inherited from the prototype chain
- If the attribute is self owned, return true; otherwise, return false
-
The hasOwnProperty() method does not detect the prototype chain of the object, but only the current object itself. It returns true only when the property exists in the current object itself
-
Exclude prototypes
The syntax format of hasOwnProperty() is as follows:
object.hasOwnProperty(propertyName);
Parameter Description: the propertyName parameter indicates the name of the property to be detected.
Return value: returns a Boolean value. If propertyName is a self owned property, return true; otherwise, return false.
For example, in the following custom types, this.name represents the object's own attribute, while the name attribute in the prototype object is an inherited attribute.
function F() {
//Custom data type
this.name = "own property ";}
F.prototype.name = "Inheritance properties";
}
//Instantiate the object, and then determine the type of attribute name called by the current object.
var f = new F(); //Instantiate object
console.log(f.hasOwnProperty("name")); //Return to true to indicate that the name currently called is its own property.
console.log(f.name); //Return string "own attribute"
- All the prototype properties of the constructor (properties contained in the prototype object) are inherited properties. When detected with the hasOwnProperty() method, false will be returned. However, for the prototype object itself, these prototype properties are its own properties, so the return value is true.
- The hasOwnProperty() method can only judge whether the specified object contains a property with the specified name. It cannot check whether the object prototype chain contains a property, so the property that can be detected must be an object member.
The range of properties that can be detected by the hasOwnProperty() method.
var o = { //Object direct quantity
o1: { //Sub object direct quantity
o2: { //Grandson object direct quantity
name: 1 //Attribute of direct quantity of grandson object
}
}
};
console.log(o.hasOwnProperty("o1")); //Returns true, indicating that o1 is the own property of o
console.log(o.hasOwnProperty("o2")); //Returns false, indicating that o2 is not the own attribute of o
console.log(o.o1.hasOwnProperty("o2")); //Returns true, indicating that o2 is the own property of o1
console.log(o.o1.hasOwnProperty("name")); //Returns false, indicating that name is not o1's own attribute
console.log(o.o1.o2.hasOwnProperty("name")); //Returns true, indicating that name is not o2's own attribute
example
<script>
var obj = {
name: 'Xiao Zhao',
age: 17
}
function Car() {
this.brand = 'Benz';
this.color = 'red';
}
Car.prototype = {
lang: 5,
width: 2.5
}
Object.prototype.name = 'Object';
var car = new Car();
for (var key in car) {
if (car.hasOwnProperty(key)) {
console.log(car[key]);
}
}
</script>
Determine whether it is an Array
var a = [];
console.log(a.constructor); //First kind
console.log(a instanceof Array);//Second
var str = Object.prototype.toString.call(a); //Third
if (str === '[object Array]') {
console.log('Is an array');
} else {
console.log('Not an array');
}
instanceof
Determines whether it is constructed by the current constructor
<script>
function Car() {}
var car = new Car();
function Person() {}
var p = new Person();
console.log(car instanceof Car); //true
console.log(p instanceof Car); //false
console.log(car instanceof Object); //true
console.log([] instanceof Array); //true
console.log([] instanceof Object); //true
console.log({} instanceof Object); //true
</script>
Interview or written examination will ask
js mechanism
car.key -->car['key']
var car = {
brand: 'Benz',
color: 'red',
displacement: '3.0',
lang: '5',
width: '2.5'
}
//Traversal object
for (var key in car) {
//car.key -->car['key']
console.log(key + ':' + car[key]);
}
//Traversal array
var arr = [1, 2, 3, 4, 5];
for (var i in arr) {
console.log(arr[i]);
}
result:
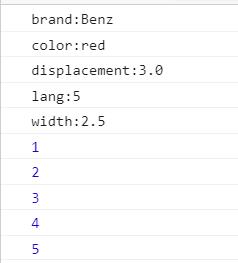
this
- Global this -- > window
- Precompiled function this -- > window
- apply / call change this point
- this of the constructor points to the instantiated object
callee
- callee returns which function in which function
function test1() {
console.log(arguments.callee);
function test2() {
console.log(arguments.callee);
}
test2();
}
test1();
result:
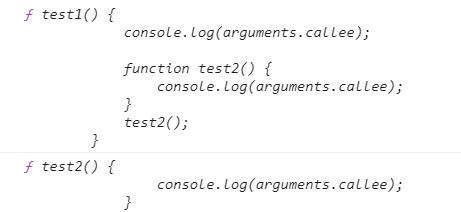
// function sum(n) {
// if (n <= 1) {
// return 1;
// }
// return n + sum(n - 1);
// }
// var res = sum(10);
// console.log(res);
var sum = (function(n) {
if (n <= 1) {
return 1;
}
return n + arguments.callee(n - 1);
})(100);
console.log(sum);
caller
- Whoever calls that function returns the caller function
- Returns the function reference of the currently called function
- caller can only be used when the function is called
test1();
function test1() {
test2();
}
function test2() {
console.log(test2.caller);
}
result:

task
plug-in unit
Requirements: write a plug-in, transfer two numbers arbitrarily, and call the internal method of the plug-in to add, subtract, multiply and divide
//Standard configuration of plug-in: execute function immediately
(function () {
//Constructor
var Compute = function () {}
//Perform addition, subtraction, multiplication and division
//Write dead methods and functions into the prototype
Compute.prototype = {
puls: function (a, b) {
return a + b;
},
minus: function (a, b) {
return a - b;
},
mul: function (a, b) {
return a * b;
},
div: function (a, b) {
return a / b;
}
}
window.Compute = Compute;
})();
var compute = new Compute();
var res = compute.puls(1, 3);
console.log(res);
Standard configuration of plug-ins
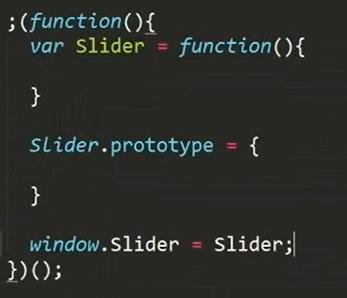
;(function() {
var Tab = function(opt) {
}
// Placement method
Tab.prototype = {
}
// Throw it to the window
window.Tab = Tab;
})();
Requirements: use call or apply to write two constructors, and use the person() function to borrow the properties and methods of the Car() function
Write a "what's the age and name of the person who bought a car of what color and brand"
<script type="text/javascript">
function Car(brand, color) {
this.brand = brand;
this.color = color;
this.info = function () {
return 'People bought one' + color + 'of' + brand + 'vehicle';
}
}
function Person(opt) {
// Borrow the properties and methods of Car to Person
Car.apply(this, [opt.brand, opt.color]);
this.name = opt.name;
this.age = opt.age;
this.say = function () {
console.log('One age is' + this.age + 'year,Name' + this.name +
this.info());
}
}
var person = new Person({
brand: 'Benz',
color: 'gules',
age: 18,
name: 'Jujube'
});
person.say();
</script>
Interview questions
2020 Zhihu front end interview questions
1,
if(1 + 5 * '3' ===16){
console.log('Yes');
}else{
console.log('Fail');
}
Output: passed
2,
console.log(!!' ' + !!'' - !!false || 'Fail'); // 1 0 0 output:1 ' 'It's 1,'' Is 0
3,
window.a || (window.a = '1'); console.log(window.a); output:1 Parentheses have the highest priority, so they are assigned to window.a(1)Do it again||operation
4,
function test() {
var arr = [];
var i = 0;
for (; i < 10;) {
arr[i] = function () {
document.write(i + " ");
}
i++;
}
return arr;
}
var myArr = test();
for (var j = 0; j < 10; j++) {
myArr[j]();
}
Output: 10 10 10 10 10 10 10 10 10
5,
<script>
var fn = (
function test1() {
return 1;
}, //There is a comma here
function test2() {
return '2'; //character string
}
)();
console.log(typeof (fn));
</script>
Output: string
Reason: the comma operation in parentheses returns the last one
fn = (test1(),test2()) ---> fn = (test2())();
6,
<script>
var a = 10;
if (function b() {}) {
a += typeof (b);
}
console.log(a);
</script>
output:10undefined
Cause: Judgment if(function b() {})Is it true,It's down
(function b() {})Is an expression. The expression ignores the function name, so the function b()Does not exist, that is undefined
7,
<script>
var name = 'languiji'; //
name += 10; //languiji10
var type = typeof (name);
'string'
if (type.length === 6) { //true
type.text = 'string'; //new String(type).text = 'string';
//delete
}
console.log(type.text); //undefined
</script>
output:undefined
Solution: put var type = typeof (name);
become var type = new String(typeof (name));
Output: string
8,
<script>
var x = 1,
y = z = 0;
function add(n) {
return n = n + 1;
}
y = add(x);
function add(n) {
return n = n + 3;
}
z = add(x);
console.log(x, y, z); //1,4,4
</script>
Output: 1,4,4
Precompiled: GO {
x=1,
y=0,
z=0,
add:function add(n){return n = n+1}--->{return n = n+3}
}
9,
<script>
function foo(x) {
console.log(arguments);
return x;
}
foo(1, 2, 3, 4, 5);
function foo1(x) {
console.log(arguments);
return x;
}(1, 2, 3, 4, 5);
(function foo2(x) {
console.log(arguments);
return x;
})(1, 2, 3, 4, 5);
</script>
Output: only 1 and 3 can output 1, 2, 3, 4 and 5
2 No, because a function expression cannot be followed by an execution symbol
10,
<script>
function b(x, y, a) {
a = 10;
console.log(arguments[2]);
}
b(1, 2, 3);
</script>
output:10
Reason: mapping relationship, first set the argument a=3 Assign to arguments[2],Then formal parameters a=10 Reassign to arguments
11. What is the top of the prototype chain?
Answer: Object.prototype
12. Method to remove the specified element from the array
- Case 1: if the specified element is removed, it does not appear continuously in the array
For example, array arr = [3,0,11,0,3,0,66];
- Method 1: use the method of adding elements. push();
var arr = [3, 0, 11, 0, 3, 0, 66];
var newArry = [];
for (var i = 0; i < arr.length; i++) {
if (arr[i] != 3) {
newArry.push(arr[i]);
}
}
console.log(newArry);
- Method 2: use. splice();
var arr = [3, 0, 11, 0, 3, 0, 66];
for (var i = 0; i < arr.length; i++) {
if (arr[i] == 0) {
arr.splice(i, 1);
}
}
console.log(arr);
- Case 2: if the specified element is removed and several consecutive elements appear in the array, it will be deleted without processing
Reason: during loop traversal, i is the subscript value of the element. When deleting an element in the array, the value of loop i remains unchanged, but there are fewer elements in it, and the corresponding elements will lean forward, so that the adjacent elements to be deleted will be omitted; This problem can be avoided by using method 2 and method 3. Method 3 is strongly recommended.
For example, array: arr = [3, 7, 11, 0, 0, 0, 3, 0, 55]
- Method 1: use the method of adding elements. push();
var arr = [3, 7, 11, 0, 0, 0, 3, 0, 55];
var newArry = [];
for (var i = 0; i < arr.length; i++) {
if (arr[i] != 0) {
newArry.push(arr[i]);
}
}
console.log(newArry);
- Method 2: use. splice() to traverse in reverse order;
var arr = [3, 7, 11, 0, 0, 0, 3, 0, 55];
for (var i = arr.length-1; i >= 0; i--) {
if (arr[i] == 0) {
arr.splice(i, 1);
}
}
console.log(arr);
- Method 3: strongly recommend this method
var arr = [3, 7, 11, 0, 0, 0, 3, 0, 55]
for (var i = 0; i < arr.length; i++) {
if (arr[i] == 0) {
arr.splice(i, 1);
i--;
}
}
console.log(arr);
13,
Change one-dimensional array into two-dimensional array, [1,2,3,4,5,6,7,8] into [[1,2,3], [4,5,6], [7,8]]
The Math.ceil() function returns the smallest integer greater than or equal to a given number.
<script type="text/javascript">
var num = 3; //Number of elements in each subarray
var arr = [1, 2, 3, 4, 5, 6, 7, 8];
var Arr = new Array(Math.ceil(arr.length / num));
for (var i = 0; i < Arr.length; i++) {
Arr[i] = new Array();
for (var j = 0; j < num; j++) {
Arr[i][j] = '';
}
}
for (var i = 0; i < arr.length; i++) {
Arr[parseInt(i / num)][i % num] = arr[i];
}
console.log(Arr);
</script>
<script type="text/javascript">
let baseArray = [1, 2, 3, 4, 5, 6, 7, 8];
let len = baseArray.length;
let n = 3; //Assume that 3 are displayed per line
let lineNum = len % 3 === 0 ? len / 3 : Math.floor((len / 3) + 1);
let res = [];
for (let i = 0; i < lineNum; i++) {
// The slice() method returns a shallow copy of a selected array from start to end (excluding end) to a new array object. And the original array will not be modified.
let temp = baseArray.slice(i * n, i * n + n);
res.push(temp);
}
console.log(res);
</script>
14,
function foo() {
bar.apply(null, arguments);
//In fact, it is to execute bar(arguments)
}
function bar() {
console.log(arguments);//[] empty array
}
foo(1, 2, 3, 4, 5)
//bar() ->bar.call(arguments) ->bar(arguments);
result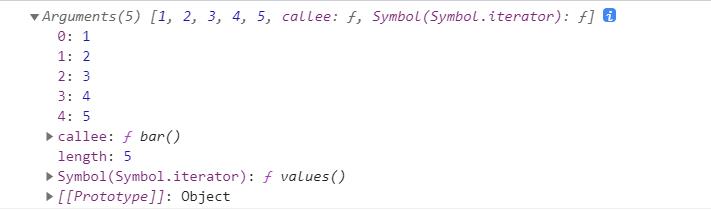 :
:
15. What are the possible returned values of typeof JS?
object(null) / boolean / number /string / undefined / function
16,
console.log(undefined == null);
console.log(undefined === null);
console.log(isNaN('100'));//Judge whether it is a number
console.log(parseInt('1a') == 1);
result:
true
false
false
true
isNaN ---> var num = Number('100');
console.log(isNaN(num)); //false
NaN Not equal to any value, including itself

17,
{} == {}
result: false
Reason: it exists in different spaces with different addresses
-----------------------------
var obj = {}
result: undefined
obj1 = obj
result:{}
obj == obj1
result: true
var a = '1';
function test() {
var a = '2';
this.a = '3';
console.log(a);
}
test(); //2
new test(); //2
console.log(a); //3
var a = 5;
function test() {
a = 0;
console.log(a);
console.log(this.a);
var a;
console.log(a);
}
test();
new test();
result:
0
5
0
0
undefined
0
18,
What will axios interview ask?
(1) Why can axios be used as both a function call and an object
- axios is essentially a function. It assigns some alias methods, such as get and post methods, which can be called
- Object is called because an instance of the Axios class is obtained
- Finally, the Axios.prototype.request function is called.
(2) Briefly describe the axios calling process.
- Create an axios instance
- The Axios.prototype.request method is actually called
- Finally, the promise chain call result is returned
- The request is sent in the dispatchRequest, and the essence of the browser is xhr
(3) Talk about interceptors?
- axios.interceptors.request.use add request success and failure interceptor functions
- axios.interceptors.response.use add response success and failure interceptor functions
- Interceptors.prototype.foreach traverses the request and response interceptors when the promise chain call is composed of Axios.prototype.request function
- unshift and push are added to both ends of the dispatchRequest that actually sends the request, so as to intercept before the request and after the response
- Interceptors can also be removed using the interceptors.protect.eject method.
(4) How is the cancellation request function of axios implemented?
- config configure cancelToken
- An error is thrown in the dispatchRequest of the promise chain call
- In the adapter, request.abort() cancels the request
- Make promise to rejected
- User capture error message
(5) Source compression package
- code
Concept questions
The difference between cookie, SessionStorage and localStorage
common ground:
- They are stored on the browser side and are of the same origin
difference:
1. The cookie data is always carried in the http request of the same origin (even if it is not needed), that is, the cookie is transmitted back and forth between the browser and the server. Cookie data also has the concept of path, which can restrict cookies to only belong to a certain path
sessionStorage and localStorage do not automatically send data to the server, but only save it locally.
2. The storage size limit is also different. cookie data cannot exceed 4K, and sessionStorage and localStorage can reach 5M
3.sessionStorage: valid only before the current browser window is closed;
localStorage: it is always valid and saved when the window or browser is closed. It is stored locally, so it is used as persistent data;
Cookie: valid only before the set cookie expiration time, even if the window or browser is closed
4. sessionStorage with different scopes: it is not shared in different browser windows, even the same page;
Local storage: shared in all homologous windows; That is, as long as the browser is not closed, the data still exists
cookie: it is also shared in all homologous windows. That is, as long as the browser is not closed, the data still exists
The difference between get and post
-
What are GET and POST? Two methods of sending requests in HTTP protocol.
What is HTTP? HTTP is a protocol based on TCP/IP about how data communicates in the world wide web
The bottom layer of HTTP is TCP/IP. Therefore, the bottom layer of GET and POST is also TCP/IP, that is, both GET and POST are TCP links. GET and POST can do the same thing. You need to add request body to GET and url parameter to POST, which is technically feasible.
DOM
concept
- DOM - > Document Object Model
- DOM is an object - > host object
- This set of methods provided by the browser represent or manipulate HTML and XML
Javascript
There are three kinds of objects
- Both local and built-in objects are provided by ECMAScript
- Both local and built-in objects are internal objects of ES
-
Local object: Native Object
Object,Function,Array, String,Number,Boolean((packaging) Error,EvalError,SyntaxError,RangeError,ReferenceError,TypeError,URIError,Date,RegExp
-
Built in object: built in object
Global Math These two ECMA -> isNAN() parseInt() Number decodeURI encodeURI Infinity NAN undefined
-
Host Object: Host Object
- The object provided by the environment in which the JS script is executed (that is, the object provided by the browser, so it is also called browser object)
- Browser objects are divided into window (BOM) and document (DOM)
- BOM > DOM (BOM contains DOM)
Document
- document is an object
document = {
}
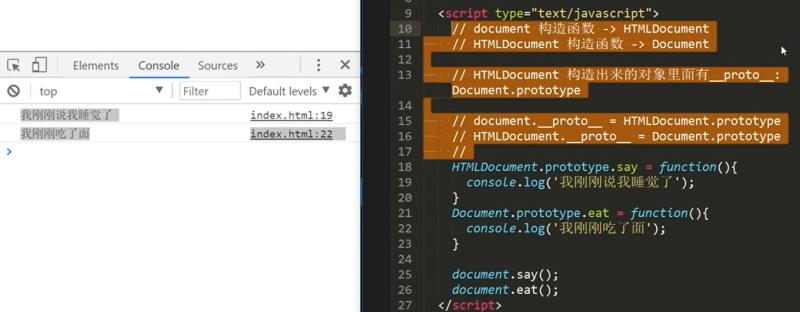
getElementById
getElementsByTagName
<body>
<div>123123</div>
<div>234234</div>
<script>
var box = document.getElementsByTagName('div')[0];
console.log(box);
</script>
</body>
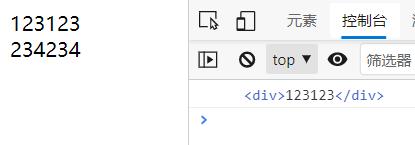
getElementsByClassName
<body>
<div class="box">123123</div>
<div class="box">234234</div>
<script>
var box = document.getElementsByClassName('box');
console.log(box);
</script>
</body>
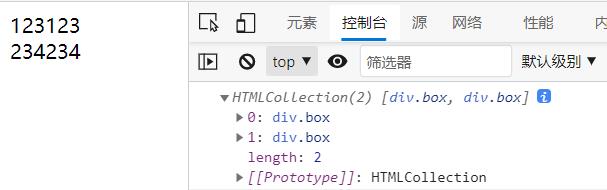
getElementsByName
<body>
<input type="text" name="username" />
<script>
var input = document.getElementsByName('username');
console.log(input);
</script>
</body>
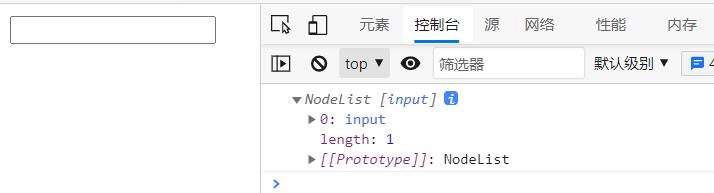
querySelector
- HTML5's new WEB API
- The querySelector() method returns an element in the document that matches the specified CSS selector.
- Only one can be selected. If there are duplicates, only the first one can be selected
- Document object model Document The referenced * * querySelector() * * method returns the first one in the document that matches the specified selector or selector group HTMLElement Object. null if no match is found.
<body>
<div class="text">123</div>
<div>234</div>
<script>
var div1 = document.querySelector('div');
var div2 = document.querySelector('.text');
console.log(div1);
console.log(div2);
</script>
</body>

According to the selector in css, select the desired
<body>
<div>
<h2>
<p>123</p>
</h2>
</div>
<div>
<p>234</p>
</div>
<script>
var p1 = document.querySelector('div p');
var p2 = document.querySelector('div > p');
console.log(p1);
console.log(p2);
</script>
</body>
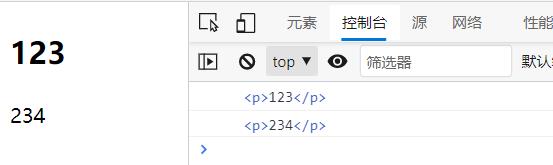
querySelectorAll
- Choose a group
- The querySelectorAll() method returns all elements in the document that match the specified CSS selector, and returns NodeList Object.
- The NodeList object represents a collection of nodes. It can be accessed through the index, and the index value starts from 0.
<body>
<div class="box">123</div>
<div class="box">234</div>
<div class="box">345</div>
<script>
var divs1 = document.querySelectorAll('div');
var divs2 = document.querySelectorAll('.box');
var divs3 = document.querySelectorAll('.box')[1];
console.log(divs1);
console.log(divs2);
console.log(divs3);
</script>
</body>
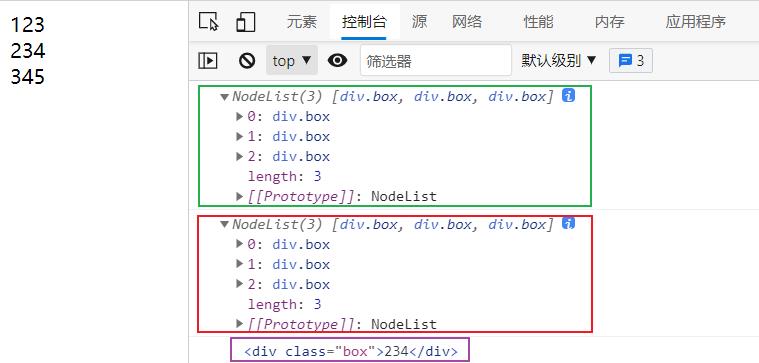
Traversal node tree
- Node contains elements
- Element node = = DOM element
parentNode
- The parentNode property returns the parent Node of the specified Node as a Node object
<body>
<ul>
<li>
<h2>I am h2 label</h2>
<a href="#"> I am a tag</a>
<p>I am p label</p>
</li>
</ul>
<script>
var a = document.getElementsByTagName('a')[0];
// console.log(a);
</script>
</body>
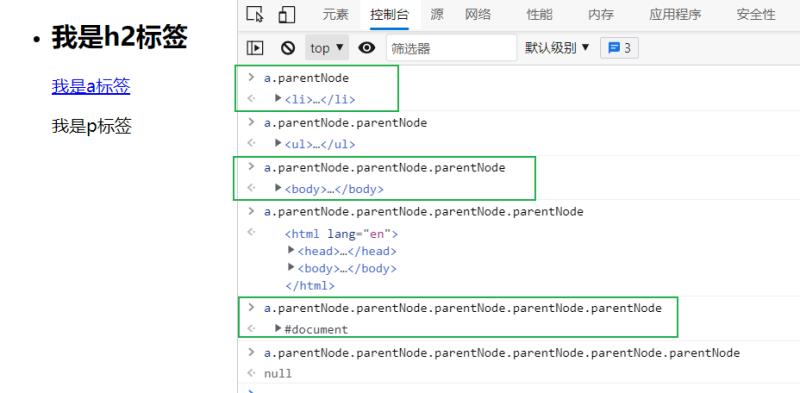
childNodes
- Returns the collection of child nodes of a node to the NodeList object.
- You can use the length attribute to determine the number of child nodes, and then you can traverse all child nodes and extract the information you need.
What are the nodes
- Element node = 1
- Attribute node = 2
- Text node = 3 (text)
- Comment node = 8 (comment)
- document =9
- DocumentFragment =11
<body>
<ul>
<li>
<!-- I'm a comment -->
<h2>I am h2 label</h2>
<a href="#"> I am a tag</a>
<p>I am p label</p>
</li>
</ul>
<script>
var li = document.getElementsByTagName('li')[0];
console.log(li.childNodes);
</script>
</body>
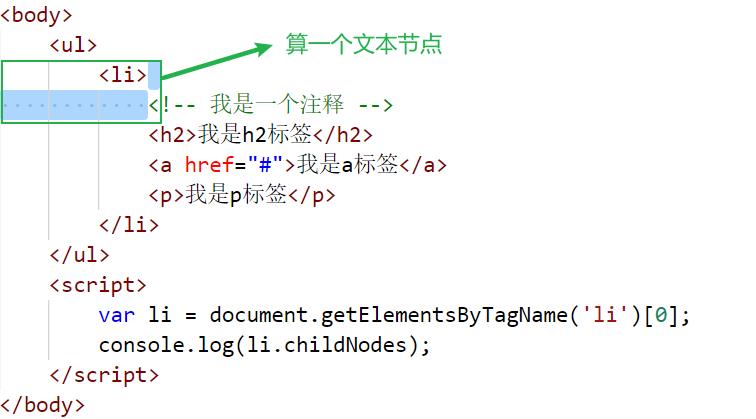
- There are nine nodes
firstChild,lastChild
-
Firstchild ---- > get the first child element of all child elements under the target element node
-
Target element node.childNodes[0] = Target element node.firstChild;
-
Lastchild ---- > get the last child element of all child elements under the target element node
-
Target element node.childNodes[Target element node.childNodes.length-1]=Target element node.lastChild;
-
Note: firstChild and lastChild can only operate on a single node, not on a node array;
<body>
<ul>
<li>123
<!-- I'm a comment -->
<h2>I am h2 label</h2>
<a href="#"> I am a tag</a>
<p>I am p label</p>
234</li>
</ul>
<script>
var li = document.getElementsByTagName('li')[0];
console.log(li.firstChild);
console.log(li.lastChild);
</script>
</body>
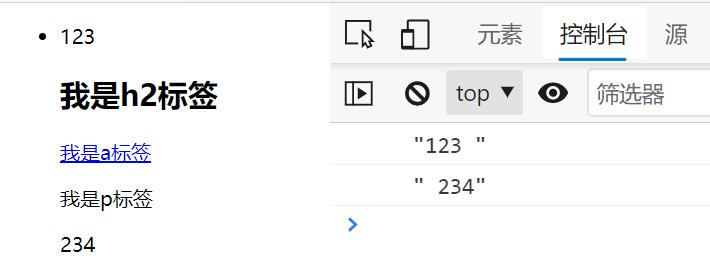
nodeValue
- Get (and set) the value of a text node
<body>
<p id="description">
hello world!
</p>
<script type="text/javascript">
var p = document.getElementById("description");
console.log(p.childNodes[0].nodeValue);
</script>
</body>
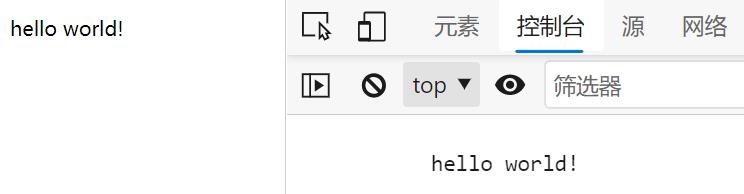
nextSibling
- Sibling node
- Gets the next sibling element. If the next sibling node does not exist, the return value of this property is null
- This attribute represents the next node of the current node (subsequent nodes belong to the same level as the current node); null is returned if there is no node of the same level.
previousSibling
- Sibling node
- This property is the opposite of the nextSibling property
- Get previous sibling element
<body>
<ul>
<li>
<!-- I'm a comment -->
<a href="#"> I'm a tag < / a > 123
<p>I am p label</p>345
<h2>I am h2 label</h2>
</li>
</ul>
<script>
var p = document.getElementsByTagName('p')[0];
console.log(p.previousSibling);
console.log(p.nextSibling);
</script>
</body>
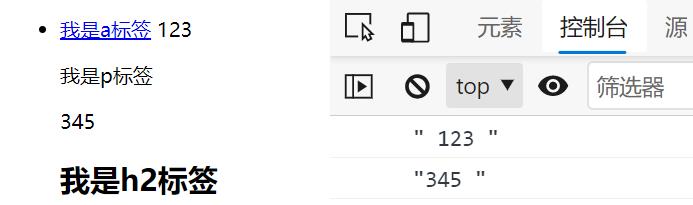
Traversing the element node tree
prarentElement
- The parentElement property returns the parent element of the specified element.
- parentElement and parentNode The difference between is that if the parent node is not an element node, the parentElement returns null
- Not supported for IE9 and below
<body>
<ul>
<li>
<!-- I'm a comment -->
<a href="#"> I am a tag</a>
<p>I am p label</p>
<h2>I am h2 label</h2>
</li>
</ul>
<script>
var li = document.getElementsByTagName('li')[0];
</script>
</body>
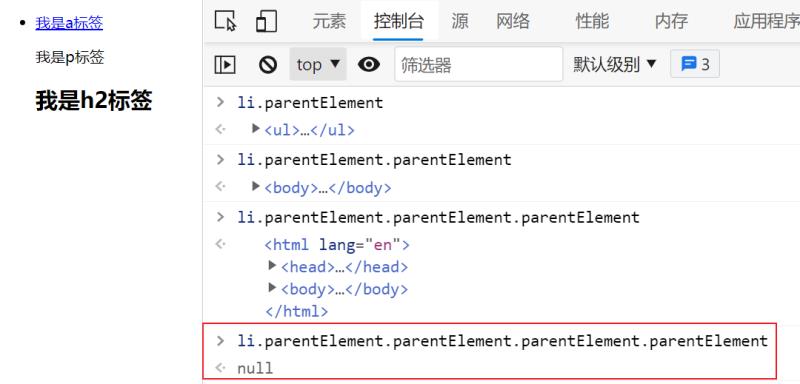
children
- Code above
- Not supported for IE7 and below
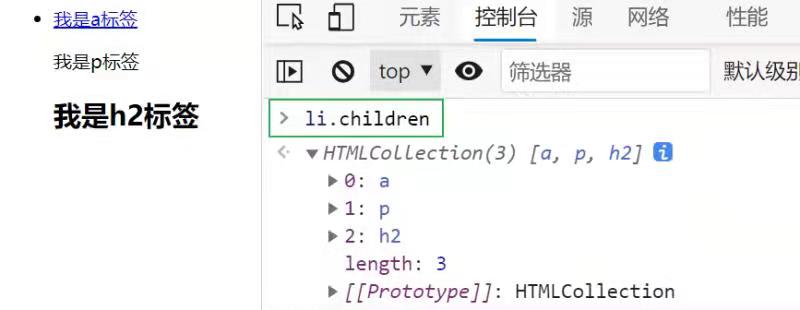
- Note: childElementCount = children.length
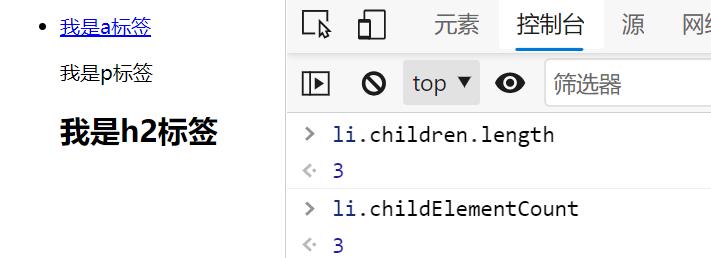
firstElementChild,lastElementChild
- Code above
- Not supported for IE9 and below
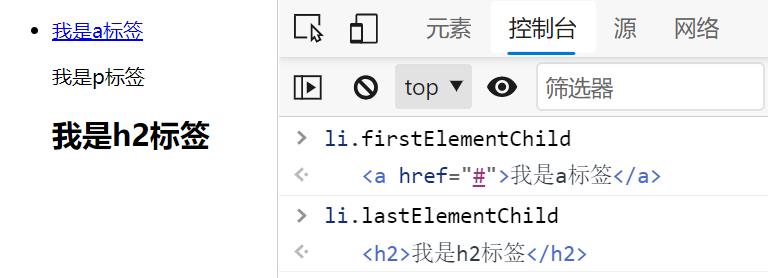
- The firstElementChild property returns the first child element of the specified element.
- The difference between this property and firstChild is
- firstChild returns the first child node as an element node, a text node or a comment node (depending on which is the first), while firstElementChild returns the first child node as an element node (ignoring text and comment nodes)
children[0]first = ElementChild Same result
nextElementSibiling,previousElementSibling
- Not supported for IE9 and below
<body>
<ul>
<li>
<!-- I'm a comment -->
<a href="#"> I am a tag</a>
<p>I am p label</p>
<h2>I am h2 label</h2>
</li>
</ul>
<script>
var p = document.getElementsByTagName('p')[0];
</script>
</body>
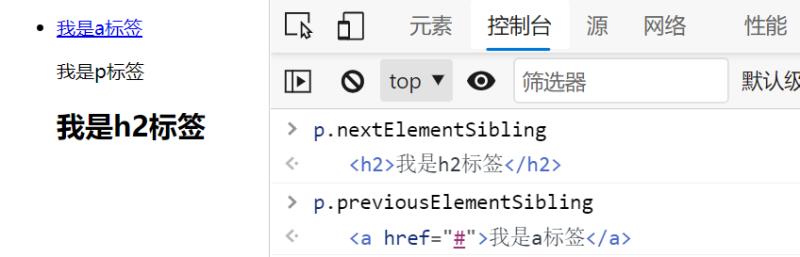
Node attributes
node
- Element node = 1
- Attribute node = 2
- Text node = 3 (text)
- Comment node = 8 (comment)
- document =9
- DocumentFragment =11
nodeName
- nodeName of element node
- Capitalize
- Read only and cannot be modified
<body>
<div class="box" id="box" style="background-color:green">
I am a text node
<!-- I'm a comment -->
<h1>I'm the title tag</h1>
<a href="#"> I'm a hyperlink</a>
<p>I'm a paragraph label</p>
</div>
<script type="text/javascript">
var div = document.getElementsByTagName('div')[0];
</script>
</body>
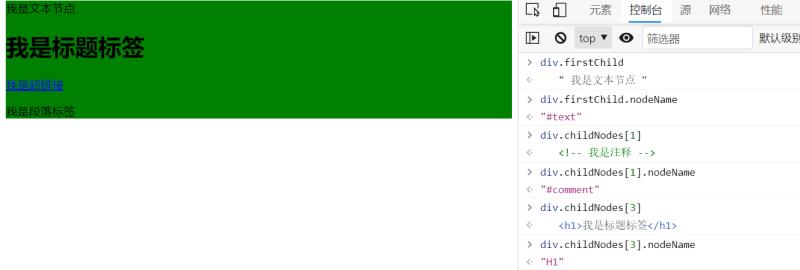
nodeValue
- Element node has no nodeValue
- Attributes, comments and text that can be modified are available
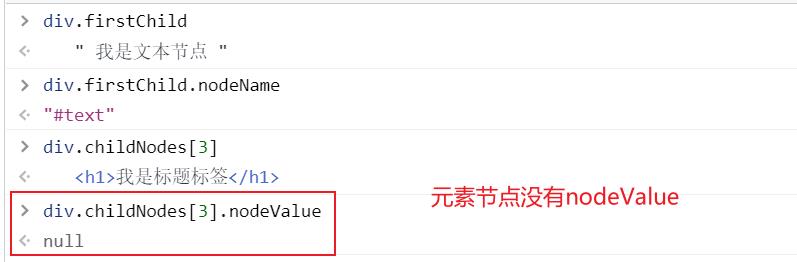
Get attribute node
- getAttributeNode
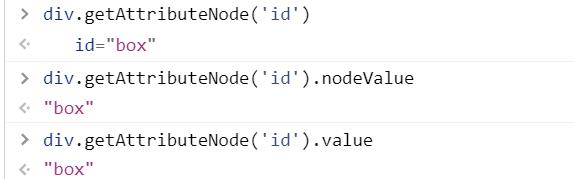
nodeType
- Read only and cannot be modified
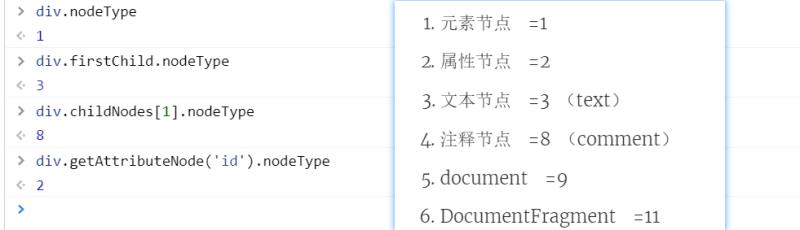
Encapsulates a function that prints the number of nodes (a method for finding a collection of child elements)
<body>
<div class="box" id="box" style="background-color:green">
I am a text node
<!-- I'm a comment -->
<h1>I'm the title tag</h1>
<a href="#"> I'm a hyperlink</a>
<p>I'm a paragraph label</p>
</div>
<script type="text/javascript">
var div = document.getElementsByTagName('div')[0];
function elemChildren(node) {
var arr = [],
children = node.childNodes;
for (var i = 0; i < children.length; i++) {
var childItem = children[i];
if (childItem.nodeType === 1) {
arr.push(childItem);
}
}
return arr;
}
console.log(elemChildren(div));
</script>
</body>

Class array
<body>
<div class="box" id="box" style="background-color:green">
I am a text node
<!-- I'm a comment -->
<h1>I'm the title tag</h1>
<a href="#"> I'm a hyperlink</a>
<p>I'm a paragraph label</p>
</div>
<script type="text/javascript">
var div = document.getElementsByTagName('div')[0];
var arr = [1, 2, 3];
var obj = {
'0': 1,
'1': 2,
'2': 3,
'length': 3,
'push': Array.prototype.push, //Inherit the push method on the Array
'splice': Array.prototype.splice
}
obj.push(4);
</script>
</body>
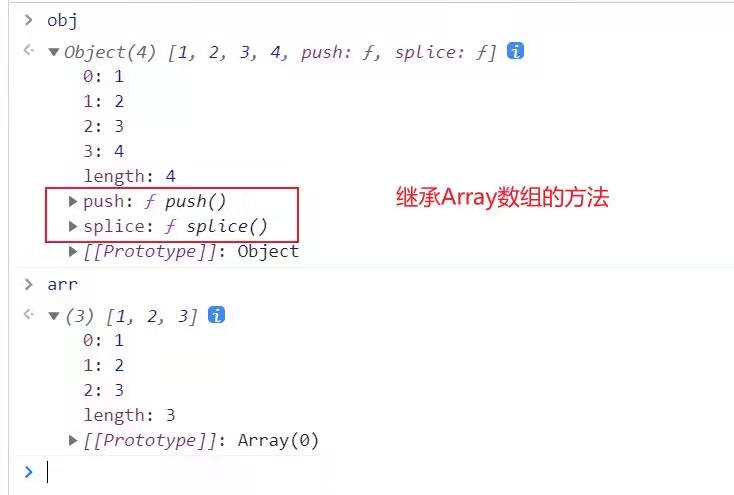
DOM structure
DOM object method
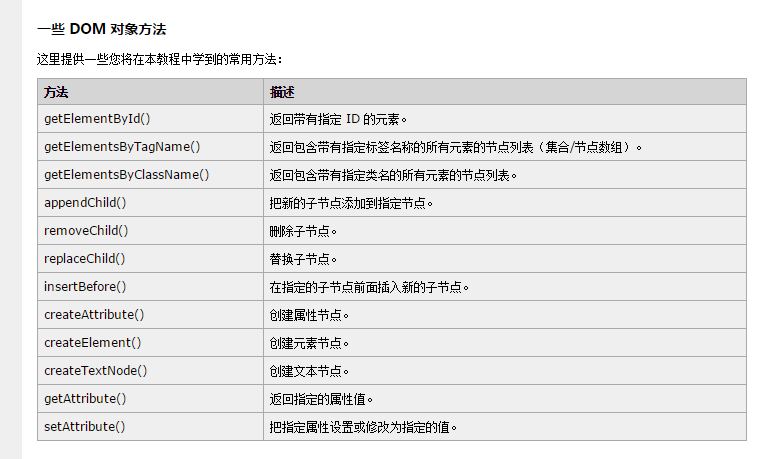
Node operation
Node operations in JS
Write several common API s to operate DOM nodes.
(1)document.getElementById() is the most basic.
(2)object.innerHTML this property sets or returns the HTML between objects
(3)document.createElement() creates a node object.
(4)document.body.appendChild() inserts a node at the end.
(5)object.parentNode.removeChild(oChildNode); Remove node
DOM structure tree
- Only Document.prototype has getElementById()
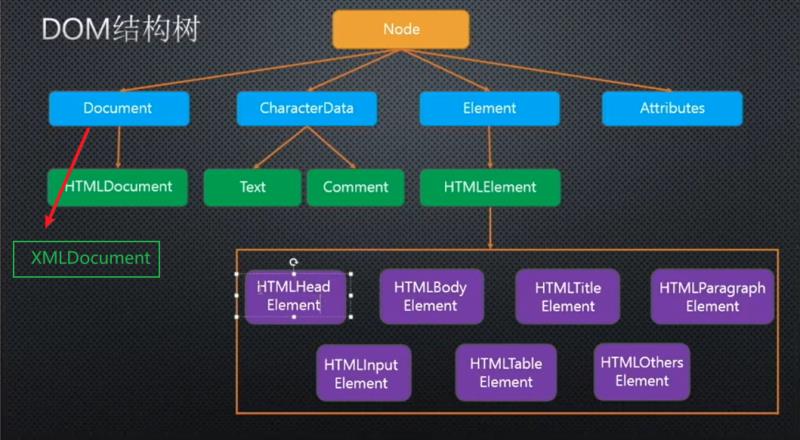
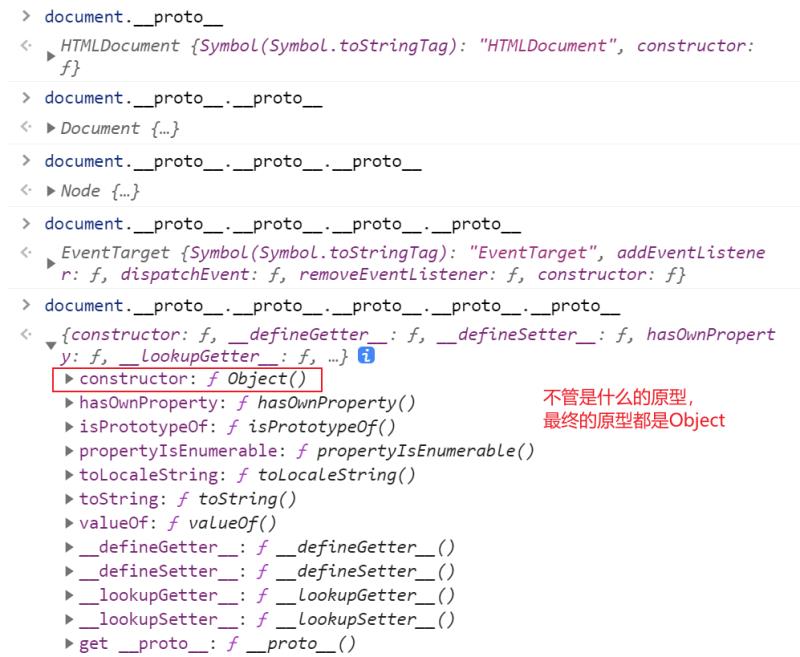
example:
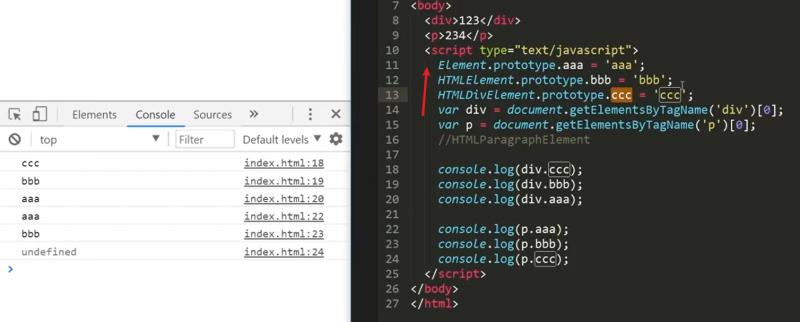
*
- wildcard
- Only getElementsByTagName can be used
- All tag names displayed in the body
var all = document.getElementsByTagName('*');
Get the body and head
example
HTMLDocument.prototype -> body head Document.prototype -> documentElement ->HTML
var p = document.getElementById("description");
console.log(p.childNodes[0].nodeValue);
nextSibling
- Sibling node
- Gets the next sibling element. If the next sibling node does not exist, the return value of this property is null
- This attribute represents the next node of the current node (subsequent nodes belong to the same level as the current node); null is returned if there is no node of the same level.
previousSibling
- Sibling node
- This property is the opposite of the nextSibling property
- Get previous sibling element
<body>
<ul>
<li>
<!-- I'm a comment -->
<a href="#"> I'm a tag < / a > 123
<p>I am p label</p>345
<h2>I am h2 label</h2>
</li>
</ul>
<script>
var p = document.getElementsByTagName('p')[0];
console.log(p.previousSibling);
console.log(p.nextSibling);
</script>
</body>
Traversing the element node tree
prarentElement
- The parentElement property returns the parent element of the specified element.
- parentElement and parentNode The difference between is that if the parent node is not an element node, the parentElement returns null
- Not supported for IE9 and below
<body>
<ul>
<li>
<!-- I'm a comment -->
<a href="#"> I am a tag</a>
<p>I am p label</p>
<h2>I am h2 label</h2>
</li>
</ul>
<script>
var li = document.getElementsByTagName('li')[0];
</script>
</body>
children
- Code above
- Not supported for IE7 and below
- Note: childElementCount = children.length
firstElementChild,lastElementChild
- Code above
- Not supported for IE9 and below
- The firstElementChild property returns the first child element of the specified element.
- The difference between this property and firstChild is
- firstChild returns the first child node as an element node, a text node or a comment node (depending on which is the first), while firstElementChild returns the first child node as an element node (ignoring text and comment nodes)
children[0]first = ElementChild Same result
nextElementSibiling,previousElementSibling
- Not supported for IE9 and below
<body>
<ul>
<li>
<!-- I'm a comment -->
<a href="#"> I am a tag</a>
<p>I am p label</p>
<h2>I am h2 label</h2>
</li>
</ul>
<script>
var p = document.getElementsByTagName('p')[0];
</script>
</body>
Node attributes
node
- Element node = 1
- Attribute node = 2
- Text node = 3 (text)
- Comment node = 8 (comment)
- document =9
- DocumentFragment =11
nodeName
- nodeName of element node
- Capitalize
- Read only and cannot be modified
<body>
<div class="box" id="box" style="background-color:green">
I am a text node
<!-- I'm a comment -->
<h1>I'm the title tag</h1>
<a href="#"> I'm a hyperlink</a>
<p>I'm a paragraph label</p>
</div>
<script type="text/javascript">
var div = document.getElementsByTagName('div')[0];
</script>
</body>
nodeValue
- Element node has no nodeValue
- Attributes, comments and text that can be modified are available
Get attribute node
- getAttributeNode
nodeType
- Read only and cannot be modified
Encapsulates a function that prints the number of nodes (a method for finding a collection of child elements)
<body>
<div class="box" id="box" style="background-color:green">
I am a text node
<!-- I'm a comment -->
<h1>I'm the title tag</h1>
<a href="#"> I'm a hyperlink</a>
<p>I'm a paragraph label</p>
</div>
<script type="text/javascript">
var div = document.getElementsByTagName('div')[0];
function elemChildren(node) {
var arr = [],
children = node.childNodes;
for (var i = 0; i < children.length; i++) {
var childItem = children[i];
if (childItem.nodeType === 1) {
arr.push(childItem);
}
}
return arr;
}
console.log(elemChildren(div));
</script>
</body>
[external chain picture transferring... (img-7X4LjxdU-1630937429118)]
Class array
<body>
<div class="box" id="box" style="background-color:green">
I am a text node
<!-- I'm a comment -->
<h1>I'm the title tag</h1>
<a href="#"> I'm a hyperlink</a>
<p>I'm a paragraph label</p>
</div>
<script type="text/javascript">
var div = document.getElementsByTagName('div')[0];
var arr = [1, 2, 3];
var obj = {
'0': 1,
'1': 2,
'2': 3,
'length': 3,
'push': Array.prototype.push, //Inherit the push method on the Array
'splice': Array.prototype.splice
}
obj.push(4);
</script>
</body>
DOM structure
DOM object method
Node operation
Node operations in JS
Write several common API s to operate DOM nodes.
(1)document.getElementById() is the most basic.
(2)object.innerHTML this property sets or returns the HTML between objects
(3)document.createElement() creates a node object.
(4)document.body.appendChild() inserts a node at the end.
(5)object.parentNode.removeChild(oChildNode); Remove node
DOM structure tree
- Only Document.prototype has getElementById()
example:
*
- wildcard
- Only getElementsByTagName can be used
- All tag names displayed in the body
var all = document.getElementsByTagName('*');
Get the body and head
example
HTMLDocument.prototype -> body head Document.prototype -> documentElement ->HTML
Note: This is what Huang dares to watch the videos of major websites at night. If there are any similarities, please contact me to delete it! Arigado
Also note: I haven't finished my notes yet. Update synchronously