1. Landing page - style adjustment
The overall idea of the landing page is as follows:
-
Form validation (login/index.vue)
-
utils/validate.js ---> validMobile
-
-
Collect user parameters and call actions
-
Call the encapsulated api in api/user.js
-
Find the axios instance: get the axios instance in utils/request.js
-
Set base address from environment variable
-
-
-
Add the request header through the request interceptor (add token, utils/request.js)
-
Proxy forwarding (vue.config.js)
-
Start the back-end server and mongoDB; The back end can receive the request and return data
-
Processed by the response interceptor (utils/request.js)
-
Judge whether the current operation is successful or not, and decide whether axios reports an error
-
Simplify the way to obtain valid data (shelling)
-
-
Get the result after api call (login.vue)
-
Save the token to vuex and call changes (store/modules/user.js)
-
token persistence (utils/auth.js)
1.1 set the logo diagram of the login form
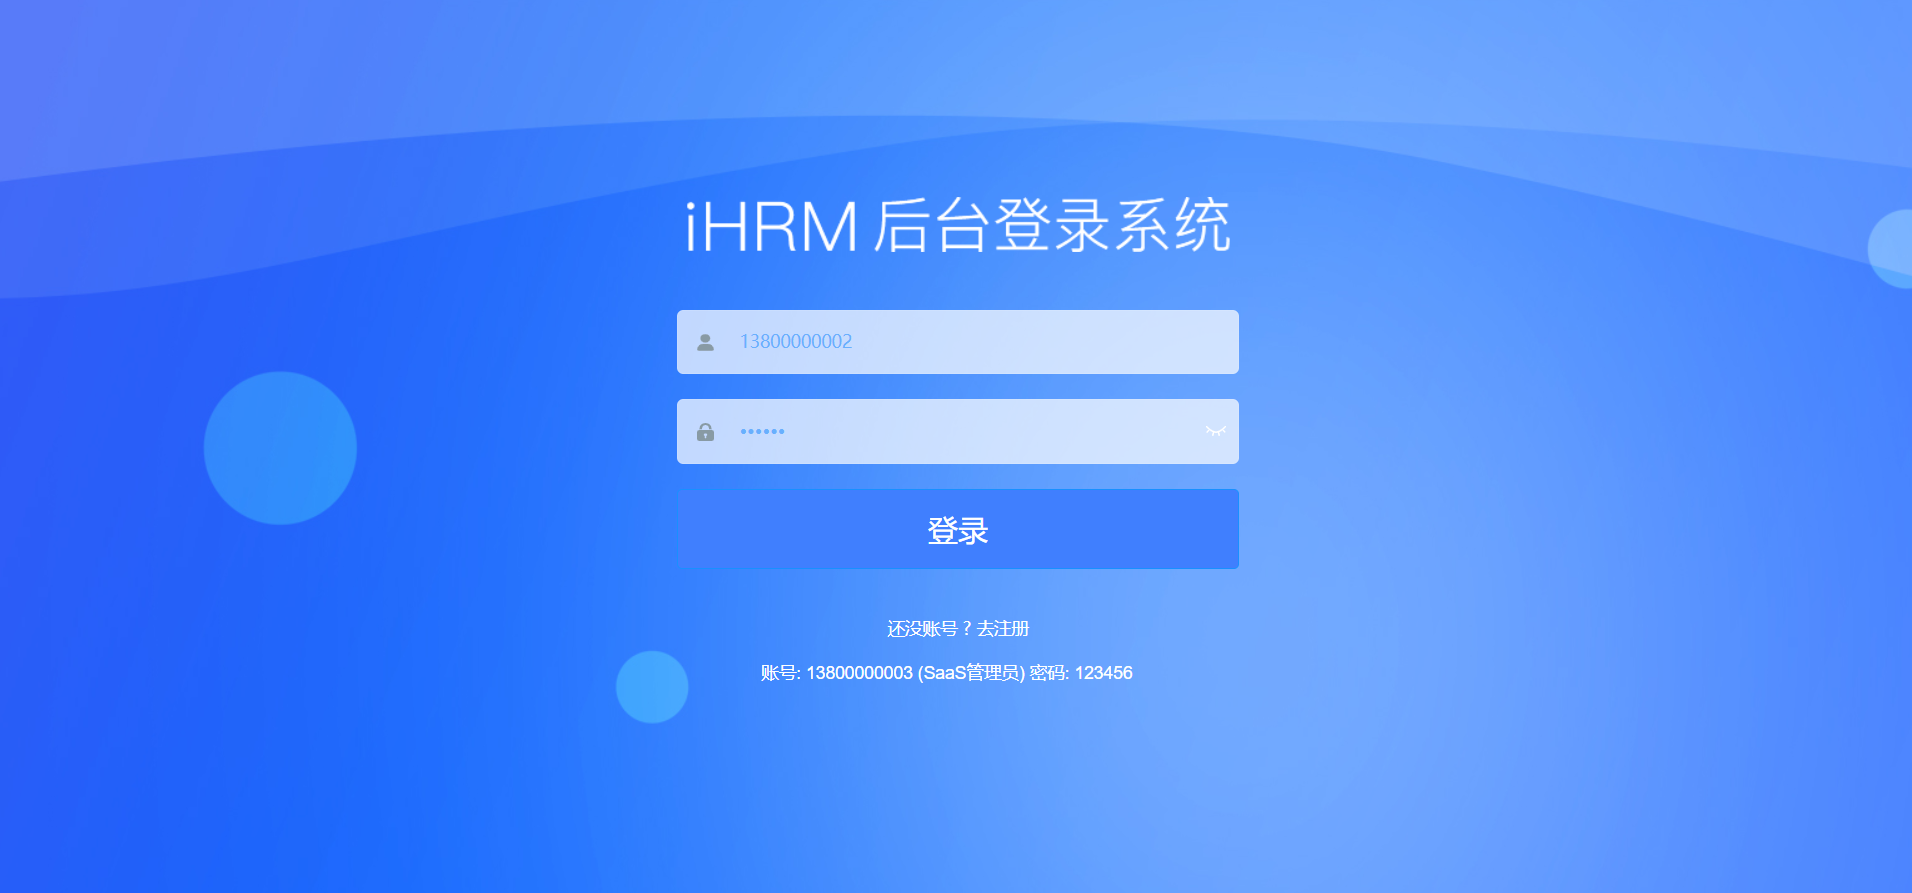
In views/login/index.vue
<!-- Place Title picture @Is the alias of the setting-->
<div class="title-container">
    <h3 class="title">
      <img src="@/assets/common/login-logo.png" alt="">
    </h3>
 </div>
@It is a path alias set in vue.config.js, pointing to the src root directory, which can easily find files
1.2 setting background picture
views/login/index.vue
<style lang="scss">
.login-container {
  background-image: url('~@/assets/common/login.jpg'); // Set background picture
  background-position: center; // Set the picture position to fill the entire screen
}
Explain why ~:
When using the @ alias in the style sheet, you must add ~ this symbol before @ or it will not be recognized. (fixed usage)
1.3 set the font color in the input box
$light_gray: #68b0fe; // Change the input box color to blue
1.4 set the style of login button
Add a loginBtn class on the El button and set the style as follows
.loginBtn {
  background: #407ffe;
  height: 64px;
  line-height: 32px;
  font-size: 24px;
}
1.5 modify the prompt text displayed on the Login page
<div class="tips">
    <span style="margin-right:20px;">account number: 13800000002</span>
    <span> password: 123456</span>
</div>
1.6 set the overall background color of the input form: the background color of the input box
/* reset element-ui css */
.el-form-item {
    border: 1px solid rgba(255, 255, 255, 0.1);
    background: rgba(255, 255, 255, 0.7); // Enter the background color of the login form
    border-radius: 5px;
    color: #454545;
}
1.7 setting the color of error messages**
When the input validation of a form element is wrong, a text description will appear under the corresponding form element.
/* reset element-ui css */
.el-form-item__error {
    color: #fff
}
2. Login page - modify the data items in the login form
1.1 modify the form data binding in the existing code according to the requirements of the interface document
Use the replace function in vscode
In login/index.vue, press shift+f for case sensitivity, and replace all username s with mobile
View the interface document and replace it in the current page.
loginForm: {
        mobile: '13800000002',
        password: '123456'
      },
2.2 user defined verification rules
In utils/validate.js
export function validMobile(str) {
  return /^1[3-9]\d{9}$/.test(str) // Verify mobile phone number
}
Introduced in login/index.vue
// Introduce mobile number verification rules
import { validMobile } from '@/utils/validate'
data() {
// Custom verification rules
const validateMobile = (rule, value, callback) => {
console.log(value)
// If the value of validMobile meets the verification rules, the mobile phone number passes the verification
if (validMobile(value)) {
callback()
} else { // Otherwise, you will be prompted that the mobile phone number format is incorrect
callback(new Error('Mobile phone number format error'))
}
}
return {
loginForm: {
mobile: '13800000002',
password: '123456'
},
loginRules: {
// Verification rules of mobile phone number
mobile: [{ required: true, trigger: 'blur', validator: validateMobile }],
// Password verification rules
password: [
{ required: true, trigger: 'blur', message: 'Password cannot be empty' },
{ min: 6, max: 16, message: 'The length of the password is 6-16 Between bits ', trigger: 'blur' }
]
},
loading: false,
passwordType: 'password',
redirect: undefined
}
},3. Modify the response interceptor of axios
bug: when logging in, fill in the wrong user name and password without error prompt (without entering the catch branch)
resolvent
Add a response interceptor in request.js

// Response interceptor
service.interceptors.response.use(response => {
  console.log('All response results are here:', response)
  // If success is true, the operation is successful
  if (response.data.success) {
    // Operation succeeded
  } else {
    // If success is false, reject will be triggered directly in case of business error
    // Caught by catch branch
    return Promise.reject(new Error('request was aborted'))
  }
}, error => {
  return Promise.reject(error) // An execution error is returned to make the current execution jump out successfully and directly enter the catch
})
4. Solve the problem that res.data.data is required to observe the return value

It only needs one line of code to solve it

5. token processing
Overall thinking
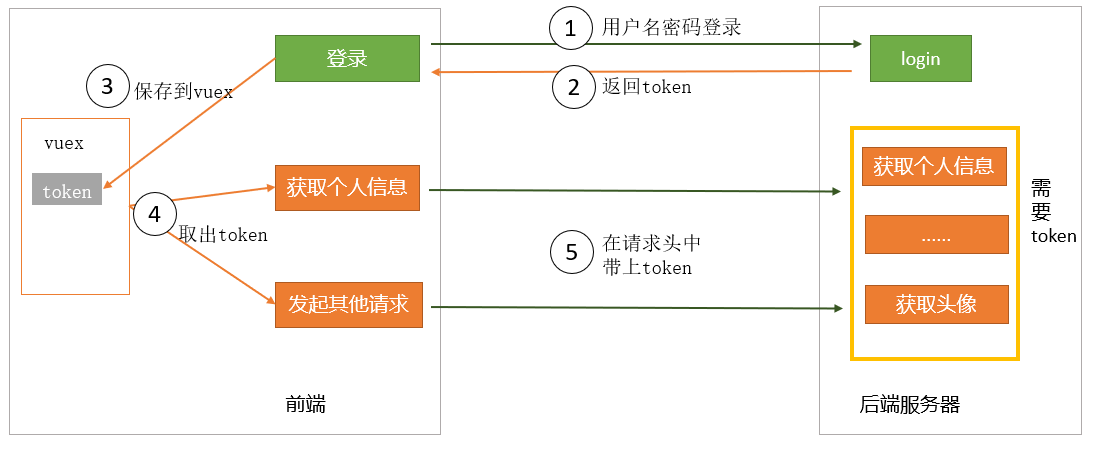
5.1 save token to vuex
In store/user.js
export default {
  namespaced: true,
  state: {
    token: ''
  },
  mutations: {
    setToken(state, newToken) {
      state.token = newToken
    }
  },
  actions: {
  }
}
How to call mutation in login/indexvue
// Log in
async doLogin() {
try {
const res = await login(this.loginForm)
console.log('The result of the logged in interface is:', res)
// Save token to vuex
// Call mutation in component
this.$store.commit('user/setToken', res.data)
} catch (err) {
alert('Login failed')
}
},Configure axios request interceptor
Inject the token obtained by login into the request header of the interface.
Request interceptor code
In the file src/utils/request.js:
-
Introducing store
- import store from '@/store'
-
If there is a token in the current vuex, it is set in the request header.
-
// Request interception: add the request header to carry the token information
service.interceptors.request.use((config) => {
const token = store.state.user.token
if (token) {
config.headers['Authorization'] = `Bearer ${token}`
}
return config
}, error => {
return Promise.reject(error) // Return execution error
})
// Authorization and bear are the writing methods required by the back-end interface of the project.
6. token processing persistence
The current token is saved in vuex. After the page is refreshed, the content of vuex is lost, which will lead to interface access exceptions. Therefore, we need to persist the token: the token will not be lost after refreshing the page.
In utils/auth.js
import Cookies from 'js-cookie'
const TokenKey = 'vue_admin_template_token'
export function getToken() {
return Cookies.get(TokenKey)
}
export function setToken(token) {
return Cookies.set(TokenKey, token)
}
export function removeToken() {
return Cookies.remove(TokenKey)
}Introduce methods in vuex and call
In the store/modules/user.js file,
import { getToken, setToken, removeToken } from '@/utils/auth'
export default {
namespaced: true,
state: {
token: getToken() || null // The default is null
},
// modify state
mutations: {
// Set token
setToken(state, newToken) {
state.token = newToken
// Save it locally
setToken(newToken)
},
// Delete the token of vuex --- for logout
removeToken(state) {
state.token = null
// Delete local token
// Save it locally
removeToken()
}
},7. Send a login request in action in vuex
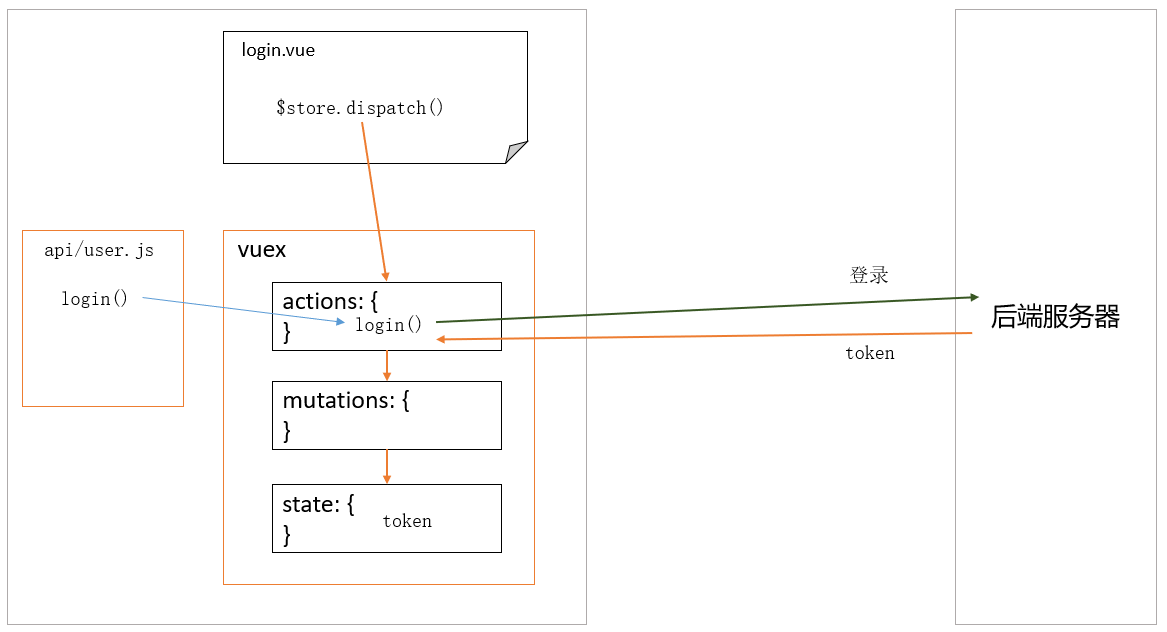
In store/modules/user.js, write actions as follows:
 export default {
  // ... omit other
 actions: {
    // data indicates interface parameters
    async userLogin(context, obj) {
      console.log('action userLogin', context, obj)
      // Call ajax request to log in
      const res = await login(obj)
      // In actions, if you want to modify the state, you still need to call mutaions
      // context.commit('mutation name ', parameter)
      context.commit('setToken', res.data)
    }
  }
 }
7.1 call action in component
async doLogin() {
      try {
        // //1. Save the token to vuex
        // //How to call mutations with namespace in a component
        // //this.$store.commit("namespace / mutations name", payload)
        // this.$store.commit('user/setToken', res.data)
        // Calling action with namespaces in components

        await this.$store.dispatch('user/userLogin', this.loginForm)
        console.log('User login succeeded')
      } catch (err) {
        alert('User login failed')
        console.log('User login failed', err)
      }
    },