Copyright Statement: This is an original blogger's article, reproduced at www.cnblogs.com/gdsblog
Just learned, used Ajax Submit, hesitated before not touching this, so it was a face of confusion at first, and finally through the way of searching for information, to solve this problem is very exciting, so that the page uploaded pictures without refresh, to show my blog Garden friends a sentence: "mountains are artificial peaks, strive to succeed!"
Now let me summarize ajaxSubmit:
1.jQuery is introduced.
2. Download Online jQuery Form plug-in;
(Here's an introduction to the form plug-in, because people who are just beginning to do the front end may not understand it.
jQuery Form plug-in is an excellent Ajax form plug-in that can easily and intrusively upgrade HTML forms to support Ajax. jQuery Form has two core methods -- ajaxForm() and ajaxSubmit(), which combine functions from controlling form elements to deciding how to manage the submission process. In addition, the plug-in includes other methods: formToArray(), formSerialize(), fieldSerialize(), fieldValue(), clearForm(), clearFields(), resetForm(), etc.
Download address: http://malsup.com/jquery/form/#download
Core methods -- ajaxForm() and ajaxSubmit()
)
3. First of all, usage, ajaxForm and ajaxSubmit can receive 0 or 1 parameter, which can be a variable, an object or a callback function. This object has the following parameters:
var object= {
url:url, / form submission address
type:type, / form submission (method:post/get)
Object: target, // the element (Id) number of the response data returned by the server
Before Serialize: function () {}// serializes callback functions before submitting data
beforeSubmit:function() {}, // callback function executed before submission
success:function() {}, / / / callback function executed after successful submission
error:function() {}, / / submit failed function
dataType:null, / / Server returns data type
clearForm:true, / / / Clear the field values in the form after successful submission
restForm:true, / / / Whether to reset the field values in the form after successful submission, that is, to restore to the state at page loading
Timout: 6000 // Set the request time, after that time, automatically exit the request in milliseconds.
}
 1 <!DOCTYPE html>
 2 <html>
 3 <head>
 4     <title>Privilege Information Display
 5     </title>
 6     <link href="~/Content/JqueryEasyUi/themes/default/easyui.css" rel="stylesheet" />
 7     <link href="~/Content/JqueryEasyUi/themes/icon.css" rel="stylesheet" />
 8     <script src="~/Content/JqueryEasyUi/jquery-1.8.3.min.js"></script>
 9     <script src="~/Scripts/myjqueryform.js"></script>//Introduce here
10     <script src="~/Content/JqueryEasyUi/jquery.easyui.min.js"></script>
11     <script src="~/Content/JqueryEasyUi/locale/easyui-lang-zh_CN.js"></script>
12     <script src="~/Scripts/datapattern.js"></script>
13     <script src="~/Scripts/jquery.unobtrusive-ajax.js"></script>
14     <script type="text/javascript">
15         $(function () {
16
17             //Binding Asynchronous Upload Pictures
18             bindUpLoad();
19
20         });
21
22         //Binding Asynchronous Upload Pictures
23         function bindUpLoad() {
24             alert("aaaaa");
25             $("#btnUpLoadFile").click(function () {
26                 alert("bbbbb");
27                 $("#AddDiglogDiv form").ajaxSubmit({
28
29                     url: '/ActionInfo/UploadImg',
30                     type: "Post",
31                     success: function (data) {
32                         alert("ccccc");
33                         //Load the returned data into the hidden domain
34                         $("#IconImg").val(data);
35                         $("#ShowImgDiv").html("<img src='" + data + "' style='width:100px; height:80px'/>");
36
37                     }
38                 });
39
40             });
41         }
The HTML code looks like this:
<body>
    <!-------------add dialog box start--------------------->
    <div id="AddDiglogDiv">
        @using (Ajax.BeginForm("AddActionInfo", "ActionInfo", new AjaxOptions() { OnSuccess = "afterAdd" }))
        {
            <table>
                <tr>
                    <td>Permission name:</td>
                    <td>
                        <input type="text" name="ActionName" /></td>
                </tr>
                <tr>
                    <td>Url: </td>
                    <td>
                        <input type="text" name="Url" /></td>
                </tr>
                <tr>
                    <td>Http Method type:</td>
                    <td>
                        <select name="HttpMethod">
                            <option value="GET">GET</option>
                            <option value="POST">POST</option>
                        </select>

                    </td>
                </tr>
                <tr>
                    <td>Is it a menu:?</td>
                    <td>
                        <input type="checkbox" id="ckbIsMenuShow" value="true" name="IsMenu" /></td>
                </tr>
                <tr id="trMenuAdress">
                    <td>Menu Picture Address:</td>
                    <td>
                        <input type="hidden" id="IconImg" name="IconImg" />
                        <input type="file" id="fileMenuIcon" name="fileMenuIcon" />
                        <input type="button" value="upload" id="btnUpLoadFile" />
                        <div id="ShowImgDiv"></div>
                    </td>
                </tr>
                <tr>
                    <td>Sort:</td>
                    <td>
                        <input type="text" name="Sort" /></td>
                </tr>
                <tr>
                    <td>Remarks:</td>
                    <td>
                        <input type="text" name="Remark" /></td>
                </tr>
            </table>
        }
    </div>
    <!-------------add dialog box end --------------------->


</body>
</html>
The final project to be completed is as follows:
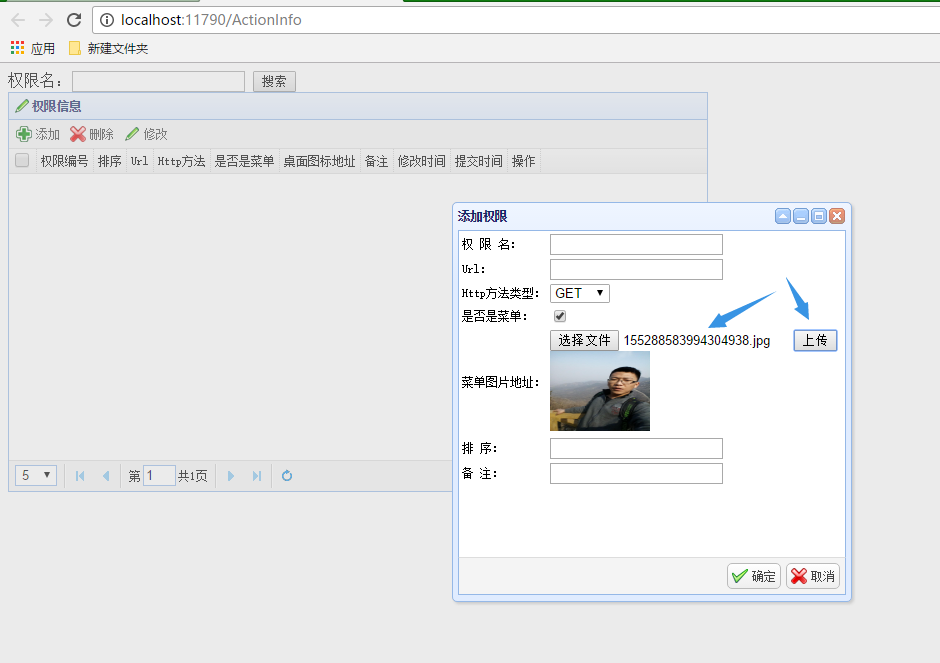
Finally, I successfully realized the function of asynchronous refreshless uploading pictures!
Copyright Statement: This article is an original blogger article, reproduced please note: www.cnblogs.com/gdsblog. If you have the same confusion, welcome to discuss with me!