When you want to monitor a Linux machine, you have many choices. Although there are many product quality monitoring schemes (such as Nagios, Zabbix, Zenoss), they have gorgeous UI s, extensible monitoring, easy-to-understand reports, etc., these schemes are too powerful for most end users. If you just need to check the basic state of the Linux server or desktop (e.g., CPU load, memory usage, active processes), consider this linux-dash.
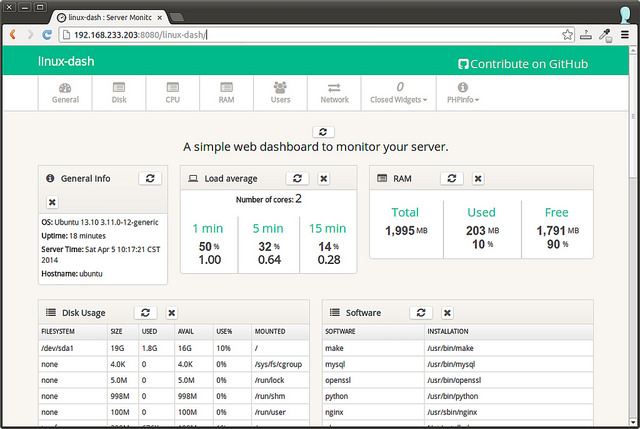
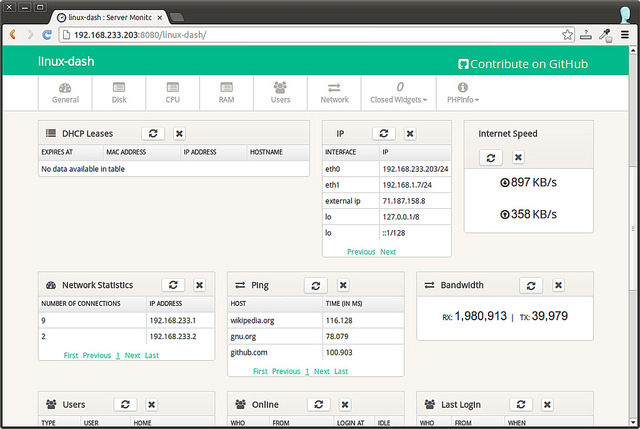
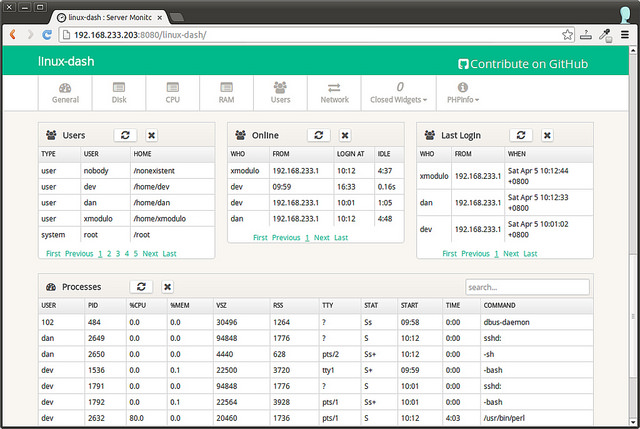
Linux-dash is a lightweight web-based monitoring panel for Linux machines. It can display different system attributes in real time, such as CPU load, memory usage, disk usage, network speed, network connection, upstream and downstream bandwidth, logged-in users, running process, etc. Linux-dash does not have a back-end database library to store long-term statistics. Run linux-dash on any existing web server (such as Apache, Nginx), and you can use it. This is a fast and simple way to monitor personal projects remotely.
In this tutorial, I will describe how to set up linux-dash on Linux's Nginx web server. Nginx is used here, not Apache, because it's lighter.
Setting up linux-dash on Debian, Ubuntu, or Linux Mint
First, install the Nginx web server with php-fpm.
$ sudo apt-get install git nginx php5-json php5-fpm php5-curl
Create the following Nginx configuration file for linux-dash: etc/nginx/conf.d/linuxdash.conf. In this case, we use port 8080.
$ sudo vi /etc/nginx/conf.d/linuxdash.conf
server {
server_name $domain_name;
listen 8080;
root /var/www;
index index.html index.php;
access_log /var/log/nginx/access.log;
error_log /var/log/nginx/error.log;

location ~* \.(?:xml|ogg|mp3|mp4|ogv|svg|svgz|eot|otf|woff|ttf|css|js|jpg|jpeg|gif|png|ico)$ {
try_files $uri =404;
expires max;
access_log off;
add_header Pragma public;
add_header Cache-Control "public, must-revalidate, proxy-revalidate";
}

location /linux-dash {
index index.html index.php;
}

# PHP-FPM via sockets
location ~ \.php(/|$) {
fastcgi_param SCRIPT_FILENAME $document_root$fastcgi_script_name;
fastcgi_split_path_info ^(.+?\.php)(/.*)$;
fastcgi_pass unix:/var/run/php5-fpm.sock;
if (!-f $document_root$fastcgi_script_name) {
return 404;
}
try_files $uri $uri/ /index.php?$args;
include fastcgi_params;
}
}
Disable default site configuration.
$ sudo rm /etc/nginx/sites-enabled/default
Edit/etc/php5/fpm/pool.d/www.conf to configure php-fpm. Make sure to edit the "user", "group" and "listen" instructions as follows. You don't have to change the rest of the configuration.
$ sudo vi /etc/php5/fpm/pool.d/www.conf

user = www-data
group = www-data
listen = /var/run/php5-fpm.sock
Start downloading and installing linux-dash.
$ git clone https://github.com/afaqurk/linux-dash.git
$ sudo cp -r linux-dash/ /var/www/
$ sudo chown -R www-data:www-data /var/www
Restart Nginx and php-fpm to complete the installation.
$ sudo service php5-fpm restart
$ sudo service nginx restart
Setting up linux-dash on CentOS, Fedora, RHEL
On CentOS, you need to start with Enabling EPEL Warehouse
Install Nginx and php-fpm components.
$ sudo yum install git nginx php-common php-fpm
Configure Nginx for the linux-dash program by creating / etc/nginx/conf.d/linuxdash.conf
$ sudo vi /etc/nginx/conf.d/linuxdash.conf
server {
server_name $domain_name;
listen 8080;
root /var/www;
index index.html index.php;
access_log /var/log/nginx/access.log;
error_log /var/log/nginx/error.log;

location ~* \.(?:xml|ogg|mp3|mp4|ogv|svg|svgz|eot|otf|woff|ttf|css|js|jpg|jpeg|gif|png|ico)$ {
try_files $uri =404;
expires max;
access_log off;
add_header Pragma public;
add_header Cache-Control "public, must-revalidate, proxy-revalidate";
}

location /linux-dash {
index index.html index.php;
}

# PHP-FPM via sockets
location ~ \.php(/|$) {
fastcgi_param SCRIPT_FILENAME $document_root$fastcgi_script_name;
fastcgi_split_path_info ^(.+?\.php)(/.*)$;
fastcgi_pass unix:/var/run/php-fpm.sock;
if (!-f $document_root$fastcgi_script_name) {
return 404;
}
try_files $uri $uri/ /index.php?$args;
include fastcgi_params;
}
}
Next, edit/etc/php-fpm.d/www.conf to configure php-fpm. In this file, make sure to edit the fields "user", "group" and "listen" as follows. You don't have to change the rest of the configuration.
$ sudo vi /etc/php-fpm.d/www.conf
listen = /var/run/php-fpm.sock
user = nginx
group = nginx
Download and install linux-dash at / var / wwx.
$ git clone https://github.com/afaqurk/linux-dash.git
$ sudo cp -r linux-dash/ /var/www/
$ sudo chown -R nginx:nginx /var/www
Finally, restart Nginx and php-fpm, and set the boot-up self-start.
$ sudo service php-fpm restart
$ sudo service nginx restart
$ sudo chkconfig nginx on
$ sudo chkconfig php-fpm on
In this case, we have configured linux-dash to use TCP port 8080. So make sure that the firewall does not block TCP 8080 port.
Monitoring Linux Machines with linux-dash
To access linux-dash on a web browser, simply enter http:/<linux IP address>:8080/linux-dash in the web browser/
Below is a screenshot of linux-dash. The web panel contains several widgets, each of which displays the system parameters of the feature. You can customize the appearance of the web panel by rearranging and/or closing some widgets. Here It is a demo site for the founder of linux-dash.