Today, we will work together to develop a fluent application containing RTE (real-time interaction) scenarios.
Project introduction
Developing applications with real-time interactive functions by self-development is very cumbersome. You need to solve problems such as server maintenance and load balancing, and ensure stable low latency.
So, how can we add the real-time interaction function to the fluent application in a short time? You can develop through the voice network Agora SDK. In this tutorial, I will show you how to subscribe to multiple channels using the Agora shutter SDK. (what kind of scene is multichannel? Let's give some examples later.)
development environment
- Visit Agora.io and register an Agora developer account.
- Download the fluent SDK: https://docs.agora.io/cn/All/downloads
- VS Code or Android Studio installed
- Basic understanding of Flutter development
Why join multiple channels?
Before entering the formal development, let's see why people or real-time interactive scenes need to subscribe to multiple channels.
The main reason for joining multiple channels is that you can track the real-time interactive activities of multiple groups at the same time, or interact with each group at the same time. Various use scenarios include online group discussion room, multi meeting scenario, waiting room, activity meeting, etc.
Project settings
Let's create a fluent project first. Open your terminal, find your development folder, and then enter the following content.
flutter create agora_multi_channel_demo
Locate pubspec.yaml and add the following dependencies to the file.
dependencies:
  flutter:
    sdk: flutter


  cupertino_icons: ^1.0.0
  agora_rtc_engine: ^3.2.1
  permission_handler: ^5.1.0+2
Pay attention to the indentation when adding packages, otherwise errors may occur.
In your project folder, run the following command to install all dependencies:
flutter pub get
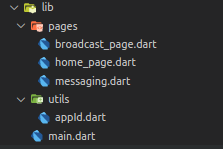
Once we have all the dependencies, we can create the file structure. Find the lib folder and create a file directory structure like this:
Create login page
The login page only needs to read the two channels that the user wants to join. In this tutorial, we only keep two channels, but you can add more channels if you want:
import 'package:agora_multichannel_video/pages/lobby_page.dart';
import 'package:flutter/material.dart';
import 'package:permission_handler/permission_handler.dart';

class LoginPage extends StatefulWidget {
  @override
  _LoginPageState createState() => _LoginPageState();
}

class _LoginPageState extends State<LoginPage> {
  final rteChannelNameController = TextEditingController();
  final rtcChannelNameController = TextEditingController();
  bool _validateError = false;

  @override
  Widget build(BuildContext context) {
    return Scaffold(
      appBar: AppBar(
        centerTitle: true,
        title: Text('Agora Multi-Channel Demo'),
        elevation: 0,
      ),
      body: SafeArea(
        child: SingleChildScrollView(
          clipBehavior: Clip.antiAliasWithSaveLayer,
          physics: BouncingScrollPhysics(),
          child: Column(
            crossAxisAlignment: CrossAxisAlignment.center,
            children: <Widget>[
              SizedBox(
                height: MediaQuery.of(context).size.height * 0.12,
              ),
              Center(
                child: Image(
                  image: NetworkImage(
                      'https://www.agora.io/en/wp-content/uploads/2019/06/agoralightblue-1.png'),
                  height: MediaQuery.of(context).size.height * 0.17,
                ),
              ),
              SizedBox(
                height: MediaQuery.of(context).size.height * 0.1,
              ),
              Container(
                width: MediaQuery.of(context).size.width * 0.8,
                child: TextFormField(
                  controller: rteChannelNameController,
                  decoration: InputDecoration(
                    labelText: 'Broadcast channel Name',
                    labelStyle: TextStyle(color: Colors.black54),
                    errorText:
                        _validateError ? 'Channel name is mandatory' : null,
                    border: OutlineInputBorder(
                      borderSide: BorderSide(color: Colors.blue, width: 2),
                      borderRadius: BorderRadius.circular(20),
                    ),
                    enabledBorder: OutlineInputBorder(
                      borderSide: BorderSide(color: Colors.black, width: 2),
                      borderRadius: BorderRadius.circular(20),
                    ),
                    focusedBorder: OutlineInputBorder(
                      borderSide: BorderSide(color: Colors.blue, width: 2),
                      borderRadius: BorderRadius.circular(20),
                    ),
                  ),
                ),
              ),
              SizedBox(
                height: MediaQuery.of(context).size.height * 0.03,
              ),
              Container(
                width: MediaQuery.of(context).size.width * 0.8,
                child: TextFormField(
                  controller: rtcChannelNameController,
                  decoration: InputDecoration(
                    labelText: 'RTC channel Name',
                    labelStyle: TextStyle(color: Colors.black54),
                    errorText:
                        _validateError ? 'RTC Channel name is mandatory' : null,
                    border: OutlineInputBorder(
                      borderSide: BorderSide(color: Colors.blue, width: 2),
                      borderRadius: BorderRadius.circular(20),
                    ),
                    enabledBorder: OutlineInputBorder(
                      borderSide: BorderSide(color: Colors.black, width: 2),
                      borderRadius: BorderRadius.circular(20),
                    ),
                    focusedBorder: OutlineInputBorder(
                      borderSide: BorderSide(color: Colors.blue, width: 2),
                      borderRadius: BorderRadius.circular(20),
                    ),
                  ),
                ),
              ),
              SizedBox(height: MediaQuery.of(context).size.height * 0.05),
              Container(
                width: MediaQuery.of(context).size.width * 0.35,
                child: MaterialButton(
                  onPressed: onJoin,
                  color: Colors.blueAccent,
                  child: Padding(
                    padding: EdgeInsets.symmetric(
                        horizontal: MediaQuery.of(context).size.width * 0.01,
                        vertical: MediaQuery.of(context).size.height * 0.02),
                    child: Row(
                      mainAxisAlignment: MainAxisAlignment.spaceEvenly,
                      children: <Widget>[
                        Text(
                          'Join',
                          style: TextStyle(
                              color: Colors.white, fontWeight: FontWeight.bold),
                        ),
                        Icon(
                          Icons.arrow_forward,
                          color: Colors.white,
                        ),
                      ],
                    ),
                  ),
                ),
              )
            ],
          ),
        ),
      ),
    );
  }

  Future<void> onJoin() async {
    setState(() {
      rteChannelNameController.text.isEmpty &&
              rtcChannelNameController.text.isEmpty
          ? _validateError = true
          : _validateError = false;
    });

    await _handleCameraAndMic(Permission.camera);
    await _handleCameraAndMic(Permission.microphone);

    Navigator.push(
      context,
      MaterialPageRoute(
        builder: (context) => LobbyPage(
          rtcChannelName: rtcChannelNameController.text,
          rteChannelName: rteChannelNameController.text,
        ),
      ),
    );
  }

  Future<void> _handleCameraAndMic(Permission permission) async {
    final status = await permission.request();
    print(status);
  }
}
When the channel name is submitted successfully, PermissionHandler() will be triggered. This is a class from the external package (permission_handler). We will use this class to obtain the permissions of the user's camera and microphone during the call.
Now, before we start developing our hall that can connect multiple channels, keep the App ID separately in utils.dart under the utils.dart folder.
const appID = '<---Enter your App ID here--->';
Create lobby
If you know too many people talking or interactive live broadcasting, you will find that most of the code we want to write here is similar. The main difference between these two cases is that we used to rely on one channel to connect a group. But now one person can join multiple channels at the same time.
In a single channel video call, we saw how to create an instance of RtcEngine class and add a channel. Here we start with the same process, as follows:
_engine = await RtcEngine.create(appID);
await _engine.enableVideo();
await _engine.setChannelProfile(ChannelProfile.LiveBroadcasting);
_addAgoraEventHandlers();
await _engine.joinChannel(null, widget.rteChannelName, null, 0);
Note: this project is used as a reference in the development environment and is not recommended for the production environment. It is recommended that all RTE apps running in the production environment use Token authentication. For more information about Token based authentication in Agora platform, please refer to the official document of sound network: https://docs.agora.io/cn/.
We can see that after creating an RtcEngine instance, you need to set the Channel Profile to Live Streaming and join the required channels according to user input.
_ The addAgoraEventHandlers() function handles all the major callbacks we need in this project. In the example, I just want to create a list of users in the RTE channel with their uid.
void _addAgoraEventHandlers() {
    _engine.setEventHandler(RtcEngineEventHandler(
      error: (code) {
        setState(() {
          final info = 'onError: $code';
          _infoStrings.add(info);
        });
      },
      joinChannelSuccess: (channel, uid, elapsed) {
        setState(() {
          final info = 'onJoinChannel: $channel, uid: $uid';
          _infoStrings.add(info);
        });
      },
      leaveChannel: (stats) {
        setState(() {
          _infoStrings.add('onLeaveChannel');
          _users.clear();
        });
      },
      userJoined: (uid, elapsed) {
        setState(() {
          final info = 'userJoined: $uid';
          _infoStrings.add(info);
          _users.add(uid);
        });
      },
      userOffline: (uid, reason) {
        setState(() {
          final info = 'userOffline: $uid , reason: $reason';
          _infoStrings.add(info);
          _users.remove(uid);
        });
      },
    ));
  }
The list of UIDs is maintained dynamically because it is updated every time a user joins or leaves a channel.
This sets our main channel or hall, where you can display the live broadcast of the anchor. Now you need an instance of RtcChannel to subscribe to other channels. Only in this way can you join the second channel.
_channel = await RtcChannel.create(widget.rtcChannelName);
_addRtcChannelEventHandlers();
await _engine.setClientRole(ClientRole.Broadcaster);
await _channel.joinChannel(null, null, 0, ChannelMediaOptions(true, true));
await _channel.publish();
RtcChannel is initialized with the channel name, so we use other inputs given by the user to deal with this problem. Once it is initialized, we call the add channel function of the ChannelMediaOptions() class, which looks for two parameters: autoSubscribeAudio and autoSubscribeVideo. Since it expects a Boolean value, you can pass true or false according to your requirements.
For RtcChannel, we see a similar event handler, but we will create another user list for users in that particular channel.
void _addRtcChannelEventHandlers() {
    _channel.setEventHandler(RtcChannelEventHandler(
      error: (code) {
        setState(() {
          _infoStrings.add('Rtc Channel onError: $code');
        });
      },
      joinChannelSuccess: (channel, uid, elapsed) {
        setState(() {
          final info = 'Rtc Channel onJoinChannel: $channel, uid: $uid';
          _infoStrings.add(info);
        });
      },
      leaveChannel: (stats) {
        setState(() {
          _infoStrings.add('Rtc Channel onLeaveChannel');
          _users2.clear();
        });
      },
      userJoined: (uid, elapsed) {
        setState(() {
          final info = 'Rtc Channel userJoined: $uid';
          _infoStrings.add(info);
          _users2.add(uid);
        });
      },
      userOffline: (uid, reason) {
        setState(() {
          final info = 'Rtc Channel userOffline: $uid , reason: $reason';
          _infoStrings.add(info);
          _users2.remove(uid);
        });
      },
    ));
  }
_ The users2 list contains the ID of everyone in the channel created using the RtcChannel class.
With this, you can add multiple channels to your application. Next, let's see how we create widgets so that these videos can be displayed on our screen.
Let's first add the view of RtcEngine. In this example, I will use a grid view that occupies the largest space on the screen.
List<Widget> _getRenderViews() {
    final List<StatefulWidget> list = [];
    list.add(RtcLocalView.SurfaceView());
    return list;
  }

  Widget _videoView(view) {
    return Expanded(child: Container(child: view));
  }

  Widget _expandedVideoRow(List<Widget> views) {
    final wrappedViews = views.map<Widget>(_videoView).toList();
    return Expanded(
      child: Row(
        children: wrappedViews,
      ),
    );
  }

  Widget _viewRows() {
    final views = _getRenderViews();
    switch (views.length) {
      case 1:
        return Container(
            child: Column(
          children: <Widget>[_videoView(views[0])],
        ));
      case 2:
        return Container(
            child: Column(
          children: <Widget>[
            _expandedVideoRow([views[0]]),
            _expandedVideoRow([views[1]])
          ],
        ));
      case 3:
        return Container(
            child: Column(
          children: <Widget>[
            _expandedVideoRow(views.sublist(0, 2)),
            _expandedVideoRow(views.sublist(2, 3))
          ],
        ));
      case 4:
        return Container(
            child: Column(
          children: <Widget>[
            _expandedVideoRow(views.sublist(0, 2)),
            _expandedVideoRow(views.sublist(2, 4))
          ],
        ));
      default:
    }
    return Container();
  }
For RtcChannel, I'll use a scrollable ListView at the bottom of the screen. In this way, users can scroll through the list to see all users appearing in the channel.
List<Widget> _getRenderRtcChannelViews() {
    final List<StatefulWidget> list = [];
    _users2.forEach(
      (int uid) => list.add(
        RtcRemoteView.SurfaceView(
          uid: uid,
          channelId: widget.rtcChannelName,
          renderMode: VideoRenderMode.FILL,
        ),
      ),
    );
    return list;
  }

  Widget _viewRtcRows() {
    final views = _getRenderRtcChannelViews();
    if (views.length > 0) {
      print("NUMBER OF VIEWS : ${views.length}");
      return ListView.builder(
        scrollDirection: Axis.horizontal,
        itemCount: views.length,
        itemBuilder: (BuildContext context, int index) {
          return Align(
            alignment: Alignment.bottomCenter,
            child: Container(
              height: 200,
              width: MediaQuery.of(context).size.width * 0.25,
              child: _videoView(views[index])),
          );
        },
      );
    } else {
      return Align(
        alignment: Alignment.bottomCenter,
        child: Container(),
      );
    }
  }
In the call, the style of your application or the way you align the user's video is entirely up to you. The key elements or widgets to look for are_ getRenderViews() and_ getRenderRtcChannelViews(), which return a list of user videos. Using this list, you can locate your users and their videos according to your choice, similar to_ viewRows() and_ viewRtcRows() widget.
Using these widgets, we can add them to our bracket. Here, I'll use a stack_ viewRows() on_ viewRtcRows.
Widg et build(BuildContext context) {
    return Scaffold(
      appBar: AppBar(
        title: Text('Lobby'),
      ),
      body: Stack(
        children: <Widget>[
          _viewRows(),
          _viewRtcRows(),
          _panel()
        ],
      ),
    );
  }
I've added another name to our stack_ panel widget. We use this widget to display all events that occur on our channel.
Widget _panel() {
    return Container(
      padding: const EdgeInsets.symmetric(vertical: 48),
      alignment: Alignment.topLeft,
      child: FractionallySizedBox(
        heightFactor: 0.5,
        child: Container(
          padding: const EdgeInsets.symmetric(vertical: 48),
          child: ListView.builder(
            reverse: true,
            itemCount: _infoStrings.length,
            itemBuilder: (BuildContext context, int index) {
              if (_infoStrings.isEmpty) {
                return null;
              }
              return Padding(
                padding: const EdgeInsets.symmetric(
                  vertical: 3,
                  horizontal: 10,
                ),
                child: Row(
                  mainAxisSize: MainAxisSize.min,
                  children: [
                    Flexible(
                      child: Container(
                        padding: const EdgeInsets.symmetric(
                          vertical: 2,
                          horizontal: 5,
                        ),
                        decoration: BoxDecoration(
                          color: Colors.yellowAccent,
                          borderRadius: BorderRadius.circular(5),
                        ),
                        child: Text(
                          _infoStrings[index],
                          style: TextStyle(color: Colors.blueGrey),
                        ),
                      ),
                    )
                  ],
                ),
              );
            },
          ),
        ),
      ),
    );
  }
In this way, users can add two channels and view them at the same time. But let's consider an example where you need to add more than two channels to interact in real time. In this case, you can simply create more instances of the RtcChannel class with a unique channel name. Using the same instance, you can join multiple channels.
Finally, you need to create a dispose() method to clear the user list of the two channels and call the leaveChannel() method for all the channels we subscribe to.
@override
   void dispose() {
    // clear users
    _users.clear();
    _users2.clear();
    // leave channel
    _engine.leaveChannel();
    _engine.destroy();
    _channel.unpublish();
    _channel .leaveChannel();
    _channel.destroy();
    super.dispose();
  }
test
After the application is developed, you can use the voice network Agora SDK to add multiple channels. You can run the application and test it on the device. Navigate to the project directory in your terminal and run this command.
flutter run
conclusion
You have implemented your own live App through the Agora fluent SDK, a sound network that can join multiple channels at the same time.
Get this article Demo: https://github.com/Meherdeep/agora-flutter-multi-channel
For more tutorials, demos and technical help, please click "Read the original text" Visit the sound web developer community.
