Yesterday, when I attended an online Yoga course, I realized that I used so many live video apps in my daily activities - from business meetings to yoga courses, as well as improvisation and movie nights. For most people isolated at home, live video is the best way to get close to the world. The viewing and live broadcasting of a large number of users also makes the "perfect streaming media App" a new market demand.
In this article, I will guide you to develop your own live App using the voice network Agora fluent SDK. You can customize your application interface according to your needs, while maintaining the highest video quality and almost imperceptible delay.
development environment
If you are new to Flutter, please visit the official website of Flutter to install Flutter.
- stay https://pub.dev/ Search for "Agora" and download the audio network Agora shutter SDK v3.2.1
- stay https://pub.dev/ Search for "Agora", audio network Agora fluent RTM SDK v0.9.14
- VS Code or other IDE
- For the voice network Agora developer account, please visit Agora.io to register
Project settings
Let's create a fluent project first. Open your terminal, navigate to your development folder, and then enter the following.
flutter create agora_live_streaming
Navigate to your pubspec.yaml file, where you add the following dependencies:
dependencies:
  flutter:
    sdk: flutter
  cupertino_icons: ^1.0.0
  permission_handler: ^5.1.0+2
  agora_rtc_engine: ^3.2.1
  agora_rtm: ^0.9.14
When adding a compressed file package, pay attention to indentation to avoid errors.
In your project folder, run the following command to install all dependencies:
flutter pub get
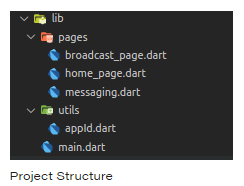
Once we have all the dependencies, we can create the file structure. Navigate to the lib folder and create a file structure like this.
Create master page
First, I created a simple login form that requires three inputs: user name, channel name, and user role (audience or anchor). You can customize this interface according to your needs.
class MyHomePage extends StatefulWidget {
  @override
  _MyHomePageState createState() => _MyHomePageState();
}

class _MyHomePageState extends State<MyHomePage> {
  final _username = TextEditingController();
  final _channelName = TextEditingController();
  bool _isBroadcaster = false;
  String check = '';

  @override
  Widget build(BuildContext context) {
    return Scaffold(
        resizeToAvoidBottomInset: true,
        body: Center(
          child: SingleChildScrollView(
            physics: NeverScrollableScrollPhysics(),
            child: Stack(
              children: <Widget>[
                Center(
                  child: Column(
                    mainAxisAlignment: MainAxisAlignment.center,
                    children: <Widget>[
                      Padding(
                        padding: const EdgeInsets.all(30.0),
                        child: Image.network(
                          'https://www.agora.io/en/wp-content/uploads/2019/06/agoralightblue-1.png',
                          scale: 1.5,
                        ),
                      ),
                      Container(
                        width: MediaQuery.of(context).size.width * 0.85,
                        height: MediaQuery.of(context).size.height * 0.2,
                        child: Column(
                          mainAxisAlignment: MainAxisAlignment.spaceBetween,
                          children: <Widget>[
                            TextFormField(
                              controller: _username,
                              decoration: InputDecoration(
                                border: OutlineInputBorder(
                                  borderRadius: BorderRadius.circular(20),
                                  borderSide: BorderSide(color: Colors.grey),
                                ),
                                hintText: 'Username',
                              ),
                            ),
                            TextFormField(
                              controller: _channelName,
                              decoration: InputDecoration(
                                border: OutlineInputBorder(
                                  borderRadius: BorderRadius.circular(20),
                                  borderSide: BorderSide(color: Colors.grey),
                                ),
                                hintText: 'Channel Name',
                              ),
                            ),
                          ],
                        ),
                      ),
                      Container(
                        width: MediaQuery.of(context).size.width * 0.65,
                        padding: EdgeInsets.symmetric(vertical: 10),
                        child: SwitchListTile(
                            title: _isBroadcaster
                                ? Text('Broadcaster')
                                : Text('Audience'),
                            value: _isBroadcaster,
                            activeColor: Color.fromRGBO(45, 156, 215, 1),
                            secondary: _isBroadcaster
                                ? Icon(
                                    Icons.account_circle,
                                    color: Color.fromRGBO(45, 156, 215, 1),
                                  )
                                : Icon(Icons.account_circle),
                            onChanged: (value) {
                              setState(() {
                                _isBroadcaster = value;
                                print(_isBroadcaster);
                              });
                            }),
                      ),
                      Padding(
                        padding: const EdgeInsets.symmetric(vertical: 25),
                        child: Container(
                          width: MediaQuery.of(context).size.width * 0.85,
                          decoration: BoxDecoration(
                              color: Colors.blue,
                              borderRadius: BorderRadius.circular(20)),
                          child: MaterialButton(
                            onPressed: onJoin,
                            child: Row(
                              mainAxisAlignment: MainAxisAlignment.center,
                              children: <Widget>[
                                Text(
                                  'Join ',
                                  style: TextStyle(
                                      color: Colors.white,
                                      letterSpacing: 1,
                                      fontWeight: FontWeight.bold,
                                      fontSize: 20),
                                ),
                                Icon(
                                  Icons.arrow_forward,
                                  color: Colors.white,
                                )
                              ],
                            ),
                          ),
                        ),
                      ),
                      Text(
                        check,
                        style: TextStyle(color: Colors.red),
                      )
                    ],
                  ),
                ),
              ],
            ),
          ),
        ));
  }
}
This will create a user interface similar to:
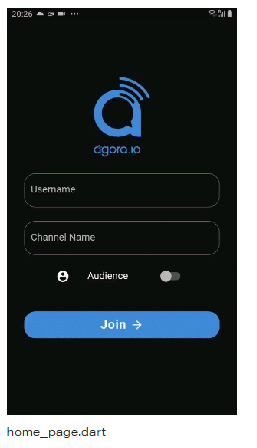
Whenever the "Join" button is pressed, it calls the onJoin function, which first obtains the user's access to his camera and microphone during a call. Once the user grants these permissions, we go to the next page, broadcast_page.dart .
Future<void> onJoin() async {
    if (_username.text.isEmpty || _channelName.text.isEmpty) {
      setState(() {
        check = 'Username and Channel Name are required fields';
      });
    } else {
      setState(() {
        check = '';
      });
      await _handleCameraAndMic(Permission.camera);
      await _handleCameraAndMic(Permission.microphone);
      Navigator.of(context).push(
        MaterialPageRoute(
          builder: (context) => BroadcastPage(
            userName: _username.text,
            channelName: _channelName.text,
            isBroadcaster: _isBroadcaster,
          ),
        ),
      );
    }
  }
To require users to access the camera and microphone, we use a program called permission_handler package. Here I declare a name_ handleCameraAndMic(), which I will refer to in the onJoin() function.
Future<void> onJoin() async {
    if (_username.text.isEmpty || _channelName.text.isEmpty) {
      setState(() {
        check = 'Username and Channel Name are required fields';
      });
    } else {
      setState(() {
        check = '';
      });
      await _handleCameraAndMic(Permission.camera);
      await _handleCameraAndMic(Permission.microphone);
      Navigator.of(context).push(
        MaterialPageRoute(
          builder: (context) => BroadcastPage(
            userName: _username.text,
            channelName: _channelName.text,
            isBroadcaster: _isBroadcaster,
          ),
        ),
      );
    }
  }
Create our streaming page
By default, the viewer's camera is disabled and the microphone is muted, but the anchor should provide access to both. Therefore, when creating the interface, we will design the corresponding style according to the role of the client.
Whenever users select the audience role, they will call this page, where they can watch the live broadcast of the anchor and choose to chat with the anchor.
However, when users choose to join as the anchor role, they can see the streams of other anchors in the channel and choose to interact with everyone in the channel (anchor and audience).
Let's start creating the interface.
class BroadcastPage extends StatefulWidget {
  final String channelName;
  final String userName;
  final bool isBroadcaster;

  const BroadcastPage({Key key, this.channelName, this.userName, this.isBroadcaster}) : super(key: key);

  @override
  _BroadcastPageState createState() => _BroadcastPageState();
}

class _BroadcastPageState extends State<BroadcastPage> {
  final _users = <int>[];
  final _infoStrings = <String>[];
  RtcEngine _engine;
  bool muted = false;

  @override
  void dispose() {
    // clear users
    _users.clear();
    // destroy sdk and leave channel
    _engine.destroy();
    super.dispose();
  }

  @override
  void initState() {
    super.initState();
    // initialize agora sdk
    initialize();
  }

  Future<void> initialize() async {


  }


  @override
  Widget build(BuildContext context) {
    return Scaffold(
      body: Center(
        child: Stack(
          children: <Widget>[
            _viewRows(),
            _toolbar(),
          ],
        ),
      ),
    );
  }
}
Here, I created a StatefulWidget named BroadcastPage. Its constructor includes the channel name, user name and isBroadcaster (Boolean value).
In our BroadcastPage class, we declare an object of RtcEngine class. To initialize this object, we create an initState() method in which we call the initialization function.
The initialize() function not only initializes the Agora SDK of the sound network, but also calls other main functions, such as_ initAgoraRtcEngine(),_addAgoraEventHandlers() and joinChannel().
Future<void> initialize() async {
    print('Client Role: ${widget.isBroadcaster}');
    if (appId.isEmpty) {
      setState(() {
        _infoStrings.add(
          'APP_ID missing, please provide your APP_ID in settings.dart',
        );
        _infoStrings.add('Agora Engine is not starting');
      });
      return;
    }
    await _initAgoraRtcEngine();
    _addAgoraEventHandlers();
    await _engine.joinChannel(null, widget.channelName, null, 0);
  }
Now let's take a look at the meaning of these three functions that we call in initialize().
- _ initAgoraRtcEngine() is used to create an instance of the audio network Agora SDK. Use the project App ID you get from the voice network Agora developer background to initialize it. Here, we use the enableVideo() function to enable the video module. To change the channel profile from video call (default) to live broadcast, we call the setChannelProfile() method and set the user role.
Future<void> _initAgoraRtcEngine() async {
    _engine = await RtcEngine.create(appId);
    await _engine.enableVideo();
    await _engine.setChannelProfile(ChannelProfile.LiveBroadcasting);
    if (widget.isBroadcaster) {
      await _engine.setClientRole(ClientRole.Broadcaster);
    } else {
      await _engine.setClientRole(ClientRole.Audience);
    }
}- _ addAgoraEventHandlers() is a function that handles all major callback functions. We start with setEventHandler(), which listens to engine events and receives statistics of the corresponding rtcene.
Some important callbacks include:
- joinChannelSuccess() is triggered when a local user joins a specified channel. It returns the channel name, the user's uid, and the time (in milliseconds) required for the local user to join the channel.
- leaveChannel() is the opposite of joinChannelSuccess() because it is triggered when the user leaves the channel. Whenever the user leaves the channel, it returns the statistics of the call. These statistics include latency, CPU utilization, duration, and so on.
- userJoined() is a method that is triggered when a remote user joins a particular channel. A successful callback will return the id of the remote user and the elapsed time.
- userOffline() is the opposite of userJoined() because it occurs when the user leaves the channel. A successful callback will return uid and offline reasons, including dropping the line, exiting, etc.
- firstRemoteVideoFrame() is a method called when the first video frame of a remote video is rendered. It can help you return uid, width, height and elapsed time.
void _addAgoraEventHandlers() {
    _engine.setEventHandler(RtcEngineEventHandler(error: (code) {
      setState(() {
        final info = 'onError: $code';
        _infoStrings.add(info);
      });
    }, joinChannelSuccess: (channel, uid, elapsed) {
      setState(() {
        final info = 'onJoinChannel: $channel, uid: $uid';
        _infoStrings.add(info);
      });
    }, leaveChannel: (stats) {
      setState(() {
        _infoStrings.add('onLeaveChannel');
        _users.clear();
      });
    }, userJoined: (uid, elapsed) {
      setState(() {
        final info = 'userJoined: $uid';
        _infoStrings.add(info);
        _users.add(uid);
      });
    }, userOffline: (uid, elapsed) {
      setState(() {
        final info = 'userOffline: $uid';
        _infoStrings.add(info);
        _users.remove(uid);
      });
    },
   ));
}- joinChannel() a channel is a room in a video call. A joinchannel () function can help users subscribe to a specific channel. This can be declared using our RtcEngine object:
await _engine.joinChannel(token, "channel-name", "Optional Info", uid);
Note: this project is a development environment and is for reference only. It should not be directly used in the production environment. It is recommended that all RTE apps running in the production environment use Token authentication. For more information about Token based authentication in the voice network Agora platform, please refer to the voice network document center: https://docs.agora.io/cn.
The above summarizes all the functions and methods required to make this real-time interactive video live broadcast. Now we can make our component, which will be responsible for the complete user interface of our application.
In my method, I declare two widgets (_viewRows() and _toolbar()), which are responsible for displaying the grid of the anchor and a toolbar composed of disconnect, mute, switch camera and message buttons.
We start with _viewRows(). To do this, we need to know the anchor and their UIDs to display their videos. We need a common list of local and remote users with their UIDs. To do this, we create a widget called _getRendererViews(), where we use rtcalview and RtcRemoteView.
List<Widget> _getRenderViews() {
    final List<StatefulWidget> list = [];
    if(widget.isBroadcaster) {
      list.add(RtcLocalView.SurfaceView());
    }
    _users.forEach((int uid) => list.add(RtcRemoteView.SurfaceView(uid: uid)));
    return list;
  }

  /// Video view wrapper
  Widget _videoView(view) {
    return Expanded(child: Container(child: view));
  }

  /// Video view row wrapper
  Widget _expandedVideoRow(List<Widget> views) {
    final wrappedViews = views.map<Widget>(_videoView).toList();
    return Expanded(
      child: Row(
        children: wrappedViews,
      ),
    );
  }

  /// Video layout wrapper
  Widget _viewRows() {
    final views = _getRenderViews();
    switch (views.length) {
      case 1:
        return Container(
            child: Column(
          children: <Widget>[_videoView(views[0])],
        ));
      case 2:
        return Container(
            child: Column(
          children: <Widget>[
            _expandedVideoRow([views[0]]),
            _expandedVideoRow([views[1]])
          ],
        ));
      case 3:
        return Container(
            child: Column(
          children: <Widget>[
            _expandedVideoRow(views.sublist(0, 2)),
            _expandedVideoRow(views.sublist(2, 3))
          ],
        ));
      case 4:
        return Container(
            child: Column(
          children: <Widget>[
            _expandedVideoRow(views.sublist(0, 2)),
            _expandedVideoRow(views.sublist(2, 4))
          ],
        ));
      default:
    }
    return Container();
  }
With it, you can implement a complete video call app. In order to add functions such as disconnecting calls, muting, switching cameras and messages, we will create a__ toolbar() is a basic widget with four buttons. Then style these buttons according to the user role, so that the audience can only chat, while the anchor can use all functions:
Widget _toolbar() {
    return widget.isBroadcaster
        ? Container(
            alignment: Alignment.bottomCenter,
            padding: const EdgeInsets.symmetric(vertical: 48),
            child: Row(
              mainAxisAlignment: MainAxisAlignment.center,
              children: <Widget>[
                RawMaterialButton(
                  onPressed: _onToggleMute,
                  child: Icon(
                    muted ? Icons.mic_off : Icons.mic,
                    color: muted ? Colors.white : Colors.blueAccent,
                    size: 20.0,
                  ),
                  shape: CircleBorder(),
                  elevation: 2.0,
                  fillColor: muted ? Colors.blueAccent : Colors.white,
                  padding: const EdgeInsets.all(12.0),
                ),
                RawMaterialButton(
                  onPressed: () => _onCallEnd(context),
                  child: Icon(
                    Icons.call_end,
                    color: Colors.white,
                    size: 35.0,
                  ),
                  shape: CircleBorder(),
                  elevation: 2.0,
                  fillColor: Colors.redAccent,
                  padding: const EdgeInsets.all(15.0),
                ),
                RawMaterialButton(
                  onPressed: _onSwitchCamera,
                  child: Icon(
                    Icons.switch_camera,
                    color: Colors.blueAccent,
                    size: 20.0,
                  ),
                  shape: CircleBorder(),
                  elevation: 2.0,
                  fillColor: Colors.white,
                  padding: const EdgeInsets.all(12.0),
                ),
                RawMaterialButton(
                  onPressed: _goToChatPage,
                  child: Icon(
                    Icons.message_rounded,
                    color: Colors.blueAccent,
                    size: 20.0,
                  ),
                  shape: CircleBorder(),
                  elevation: 2.0,
                  fillColor: Colors.white,
                  padding: const EdgeInsets.all(12.0),
                ),
              ],
            ),
          )
        : Container(
            alignment: Alignment.bottomCenter,
            padding: EdgeInsets.only(bottom: 48),
            child: RawMaterialButton(
              onPressed: _goToChatPage,
              child: Icon(
                Icons.message_rounded,
                color: Colors.blueAccent,
                size: 20.0,
              ),
              shape: CircleBorder(),
              elevation: 2.0,
              fillColor: Colors.white,
              padding: const EdgeInsets.all(12.0),
            ),
          );
  }
Let's take a look at the four functions we declare:
- _ Ontoglemute() can mute or unmute your data stream. Here, we use the muteLocalAudioStream() method, which uses a Boolean input to mute or unmute the data stream.
void _onToggleMute() {
    setState(() {
      muted = !muted;
    });
    _engine.muteLocalAudioStream(muted);
}- _ onSwitchCamera() allows you to switch between the front camera and the rear camera. Here, we use the switchCamera() method, which can help you achieve the required functions.
void _onSwitchCamera() {
    _engine.switchCamera();
}- _ onCallEnd() disconnects the call and returns to the home page.
void _onCallEnd(BuildContext context) {
    Navigator.pop(context);
}- _ goToChatPage() navigates to the chat interface.
void _goToChatPage() {
    Navigator.of(context).push(
      MaterialPageRoute(
        builder: (context) => RealTimeMessaging(
          channelName: widget.channelName,
          userName: widget.userName,
          isBroadcaster: widget.isBroadcaster,
        ),)
    );
  }
Create our chat screen
In order to expand the interaction between the audience and the anchor, we have added a chat page where anyone can send messages. To do this, we use the voice network Agora fluent RTM package, which provides the option to send messages to specific peers or broadcast messages to channels. In this tutorial, we will broadcast messages to channels.
We first create a stateful widget whose constructor has all the input values: channel name, user name and isBroadcaster. We will use these values in our logic and in our page design.
To initialize our SDK, we declare the initState() method, where I declare_ createClient(), which is responsible for initialization.
class RealTimeMessaging extends StatefulWidget {
  final String channelName;
  final String userName;
  final bool isBroadcaster;

  const RealTimeMessaging(
      {Key key, this.channelName, this.userName, this.isBroadcaster})
      : super(key: key);

  @override
  _RealTimeMessagingState createState() => _RealTimeMessagingState();
}

class _RealTimeMessagingState extends State<RealTimeMessaging> {
  bool _isLogin = false;
  bool _isInChannel = false;

  final _channelMessageController = TextEditingController();

  final _infoStrings = <String>[];

  AgoraRtmClient _client;
  AgoraRtmChannel _channel;

  @override
  void initState() {
    super.initState();
    _createClient();
  }

  @override
  Widget build(BuildContext context) {
    return MaterialApp(
      home: Scaffold(
          body: Container(
            padding: const EdgeInsets.all(16),
            child: Column(
              children: [
                _buildInfoList(),
                Container(
                  width: double.infinity,
                  alignment: Alignment.bottomCenter,
                  child: _buildSendChannelMessage(),
                ),
              ],
            ),
          )),
    );
  }
}
In our_ In the createClient() function, we create an AgoraRtmClient object. This object will be used to log in and out of a specific channel.
void _createClient() async {
    _client = await AgoraRtmClient.createInstance(appId);
    _client.onMessageReceived = (AgoraRtmMessage message, String peerId) {
      _logPeer(message.text);
    };
    _client.onConnectionStateChanged = (int state, int reason) {
      print('Connection state changed: ' +
          state.toString() +
          ', reason: ' +
          reason.toString());
      if (state == 5) {
        _client.logout();
        print('Logout.');
        setState(() {
          _isLogin = false;
        });
      }
    };

    _toggleLogin();
    _toggleJoinChannel();
  }
In my_ In the createClient() function, I refer to two other functions:
- _ toggleLogin() uses the AgoraRtmClient object to log in and out of a channel. It requires a Token and a user ID as parameters. Here, I use the user name as the user ID.
void _toggleLogin() async {
    if (!_isLogin) {
      try {
        await _client.login(null, widget.userName);
        print('Login success: ' + widget.userName);
        setState(() {
          _isLogin = true;
        });
      } catch (errorCode) {
        print('Login error: ' + errorCode.toString());
      }
    }
}- _ toggleJoinChannel() creates an AgoraRtmChannel object and uses it to subscribe to a specific channel. This object will be used for all callbacks. When a member joins, a member leaves, or a user receives a message, the callback will be triggered.
void _toggleJoinChannel() async {
    try {
      _channel = await _createChannel(widget.channelName);
      await _channel.join();
      print('Join channel success.');

      setState(() {
        _isInChannel = true;
      });
    } catch (errorCode) {
      print('Join channel error: ' + errorCode.toString());
    }
  }
Here, you will have a fully functional chat application. Now we can make the widget, which will be responsible for the complete user interface of our application.
Here, I declare two widgets:_ buildSendChannelMessage() and_ buildInfoList().
- _ buildSendChannelMessage() creates an input field and triggers a function to send the message.
- _ Buildinflist () styles messages and puts them in a unique container. You can customize these widgets according to design requirements.
There are two small components:
- _ buildSendChannelMessage() I have declared a Row that adds a text input field and a button that is called when pressed_ toggleSendChannelMessage.
Widget _buildSendChannelMessage() {
    if (!_isLogin || !_isInChannel) {
      return Container();
    }
    return Row(
      mainAxisAlignment: MainAxisAlignment.spaceEvenly,
      children: <Widget>[
        Container(
          width: MediaQuery.of(context).size.width * 0.75,
          child: TextFormField(
            showCursor: true,
            enableSuggestions: true,
            textCapitalization: TextCapitalization.sentences,
            controller: _channelMessageController,
            decoration: InputDecoration(
              hintText: 'Comment...',
              border: OutlineInputBorder(
                borderRadius: BorderRadius.circular(20),
                borderSide: BorderSide(color: Colors.grey, width: 2),
              ),
              enabledBorder: OutlineInputBorder(
                borderRadius: BorderRadius.circular(20),
                borderSide: BorderSide(color: Colors.grey, width: 2),
              ),
            ),
          ),
        ),
        Container(
          decoration: BoxDecoration(
              borderRadius: BorderRadius.all(Radius.circular(40)),
              border: Border.all(
                color: Colors.blue,
                width: 2,
              )),
          child: IconButton(
            icon: Icon(Icons.send, color: Colors.blue),
            onPressed: _toggleSendChannelMessage,
          ),
        )
      ],
    );
  }
This function calls the sendMessage() method in the AgoraRtmChannel class used by the object we declared earlier. This uses an input of type agorartmessage.
void _toggleSendChannelMessage() async {
    String text = _channelMessageController.text;
    if (text.isEmpty) {
      print('Please input text to send.');
      return;
    }
    try {
      await _channel.sendMessage(AgoraRtmMessage.fromText(text));
      _log(text);
      _channelMessageController.clear();
    } catch (errorCode) {
      print('Send channel message error: ' + errorCode.toString());
    }
  }
_ Buildinflist () arranges all local messages on the right, while all messages received by the user are on the left. Then, the text message is wrapped in a container and styled according to your needs.
Widget _buildInfoList() {
    return Expanded(
        child: Container(
            child: _infoStrings.length > 0
                ? ListView.builder(
                    reverse: true,
                    itemBuilder: (context, i) {
                      return Container(
                        child: ListTile(
                          title: Align(
                            alignment: _infoStrings[i].startsWith('%')
                                ? Alignment.bottomLeft
                                : Alignment.bottomRight,
                            child: Container(
                              padding: EdgeInsets.symmetric(horizontal: 6, vertical: 3),
                              color: Colors.grey,
                              child: Column(
                                crossAxisAlignment: _infoStrings[i].startsWith('%') ?  CrossAxisAlignment.start : CrossAxisAlignment.end,
                                children: [
                                  _infoStrings[i].startsWith('%')
                                  ? Text(
                                      _infoStrings[i].substring(1),
                                      maxLines: 10,
                                      overflow: TextOverflow.ellipsis,
                                      textAlign: TextAlign.right,
                                      style: TextStyle(color: Colors.black),
                                    )
                                  : Text(
                                      _infoStrings[i],
                                      maxLines: 10,
                                      overflow: TextOverflow.ellipsis,
                                      textAlign: TextAlign.right,
                                      style: TextStyle(color: Colors.black),
                                    ),
                                  Text(
                                    widget.userName,
                                    textAlign: TextAlign.right,
                                    style: TextStyle(
                                      fontSize: 10,
                                    ),
                                  )
                                ],
                              ),
                            ),
                          ),
                        ),
                      );
                    },
                    itemCount: _infoStrings.length,
                  )
                : Container()));
  }
test
Once we have completed the development of real-time live broadcast application, we can test it on our equipment. Find your project directory in the terminal and run this command.
flutter run
conclusion
Congratulations, you have completed your own real-time interactive live video application. You have developed this application using the voice network Agora fleet SDK and realized interaction through the voice network Agora fleet RTM SDK.
Get the Demo for this article: https://github.com/Meherdeep/Interactive-Broadcasting
For more tutorials, demos and technical help, please click "Read the original text" Visit the sound web developer community.
