1. k8s Authentication
We know that apiserver has the following authentication methods:
- X509 Client Certs
- Static Token File
- Bootstrap Tokens
- Static Password File
- Service Account Tokens
- OpenID Connect Tokens
- Webhook Token Authentication
- Authenticating Proxy
Typically, we use a binary self-built k8s cluster, or a kubeadm-created cluster, the administrator of the cluster, that is, the user in k8s, to authenticate. If it is issued by the same CA, the user is recognized.
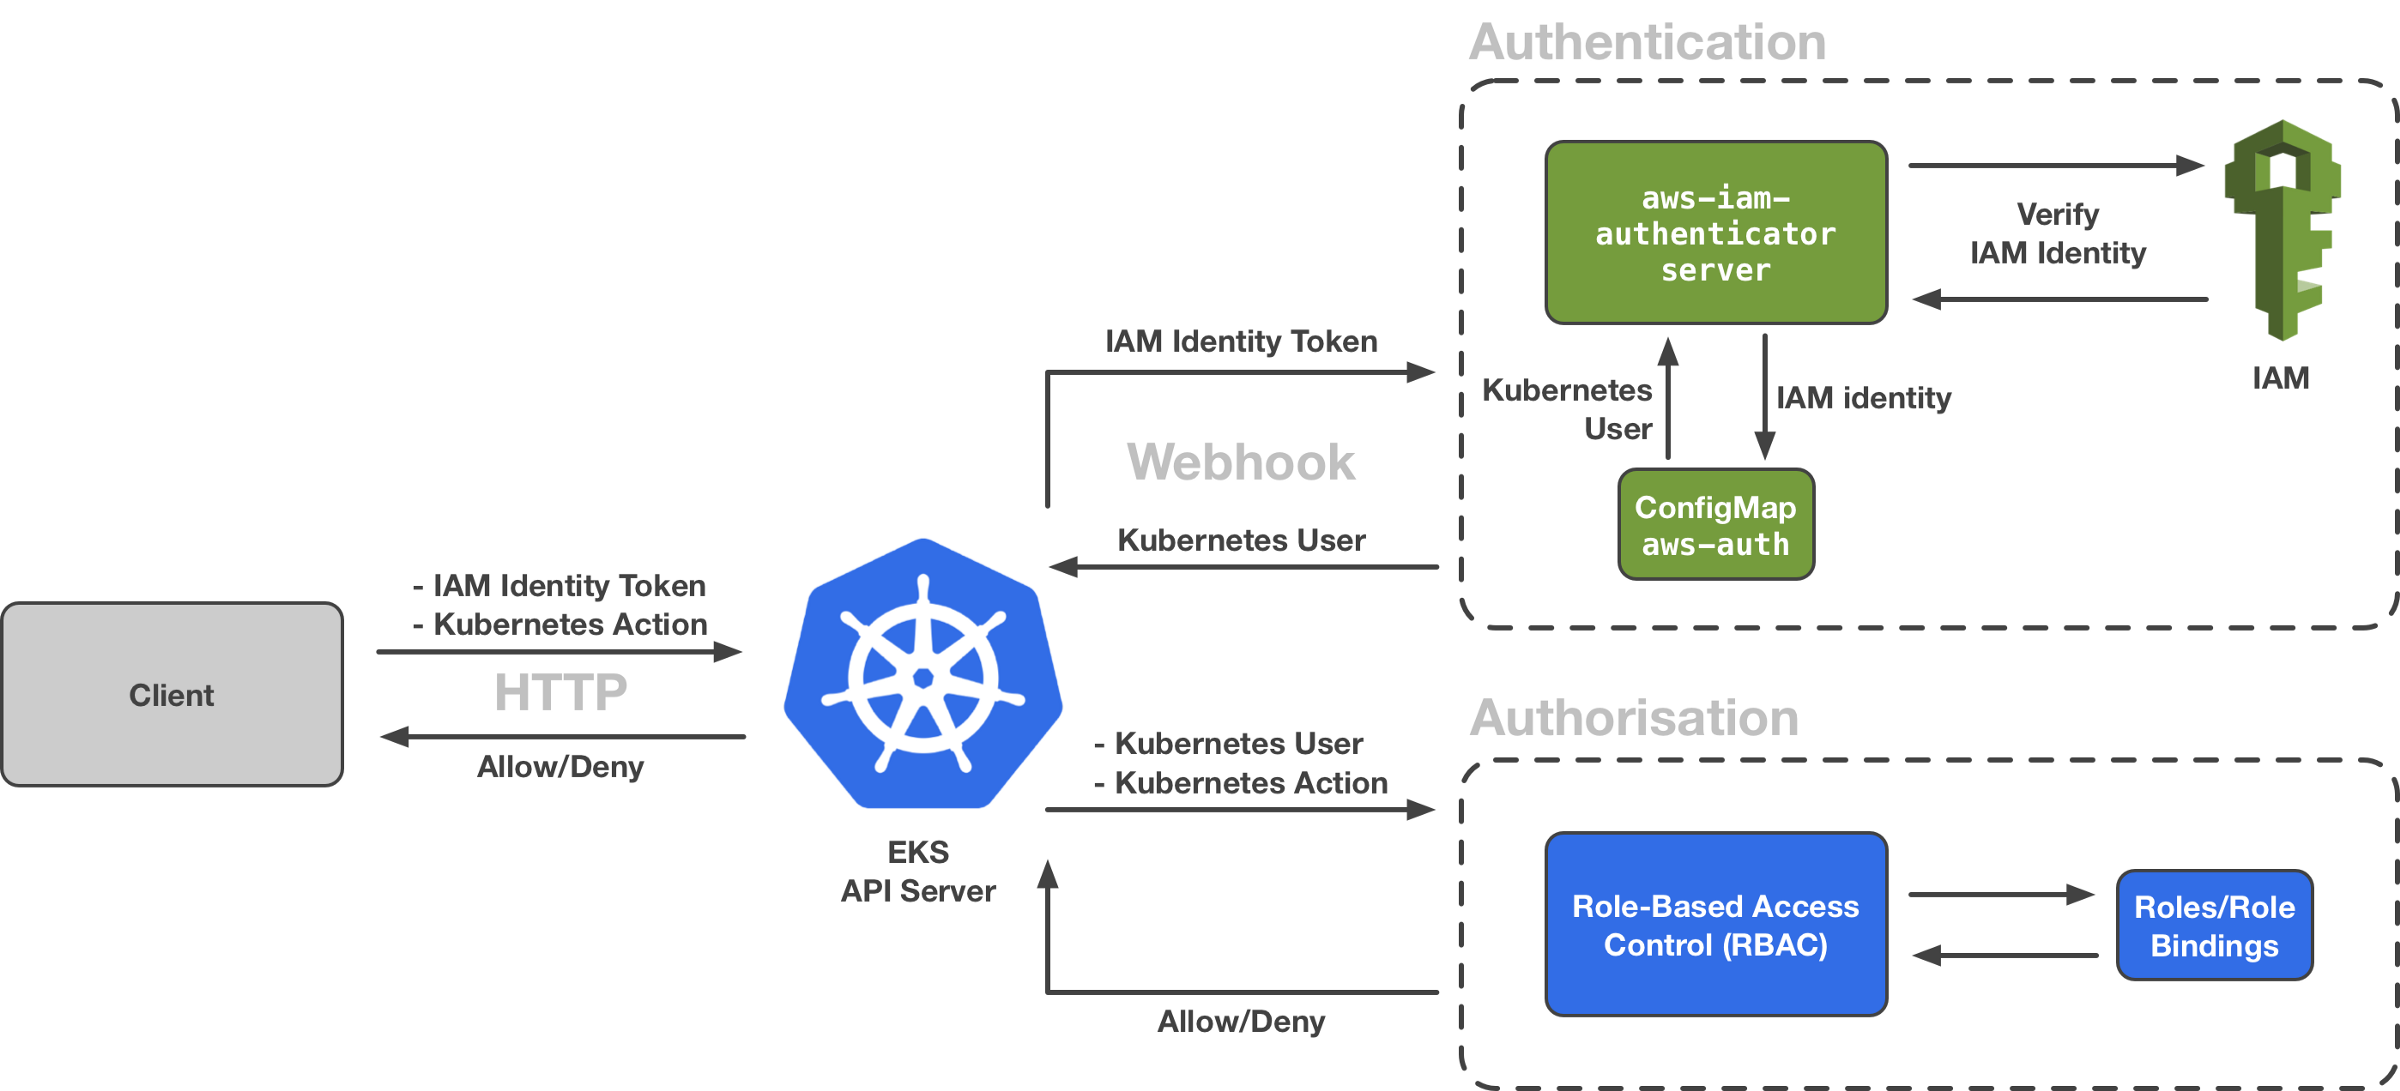
Enterprises need to find ways to integrate IAM users into EKS clusters in order to reduce the complexity of user management so that we don't have to delay creating users for EKS and reduce the maintenance of a set of users. How is this integrated? It is through k8s. Webhook Token Authentication And its authentication process schematic diagram is as follows:

We can see the Authentication section in the diagram, which is aws-iam-authenticator , we know that this is a set of DaemonSet Pod s running in the EKS Control Plane to receive authentication requests from apiserver.
2. Anatomical EKS
2.1, Create EKS
We use the eksctl command to create EKS clusters. The default eksctl calls awscli's config, so we need to configure awscli first. The related users or roles have the right to create eks clusters:
eksctl create cluster --name eks --region us-east-1 \
--node-type=t2.small --nodes 1 --ssh-public-key .ssh/id_rsa.pub \
--managed --zones us-east-1f,us-east-1c --vpc-nat-mode Disable
Once the cluster is created, the configuration files needed by kubeclt are automatically configured for us, and the creator of the cluster automatically gets the role of cluster-admin with the highest privileges.
2.2. Introducing aws-iam-authenticator
First, we can look at the start parameters of kube-apiserver through CloudWatch Logs, and we can see that there is such a set of start parameters:
--authentication-token-webhook-config-file="/etc/kubernetes/authenticator/apiserver-webhook-kubeconfig.yaml"
Explain that we have started webhook authentication, what is inside the yaml file after the parameter, as we can see from the github document of aws-iam-authenticator, we use the following command to generate it:
wangzan:~/k8s $ aws-iam-authenticator init -i `openssl rand 16 -hex`
INFO[2020-01-07T07:50:54Z] generated a new private key and certificate   certBytes=804 keyBytes=1192
INFO[2020-01-07T07:50:54Z] saving new key and certificate                certPath=cert.pem keyPath=key.pem
INFO[2020-01-07T07:50:54Z] loaded existing keypair                       certPath=cert.pem keyPath=key.pem
INFO[2020-01-07T07:50:54Z] writing webhook kubeconfig file               kubeconfigPath=aws-iam-authenticator.kubeconfig
INFO[2020-01-07T07:50:54Z] copy cert.pem to /var/aws-iam-authenticator/cert.pem on kubernetes master node(s)
INFO[2020-01-07T07:50:54Z] copy key.pem to /var/aws-iam-authenticator/key.pem on kubernetes master node(s)
INFO[2020-01-07T07:50:54Z] copy aws-iam-authenticator.kubeconfig to /etc/kubernetes/aws-iam-authenticator/kubeconfig.yaml on kubernetes master node(s)
INFO[2020-01-07T07:50:54Z] configure your apiserver with `--authentication-token-webhook-config-file=/etc/kubernetes/aws-iam-authenticator/kubeconfig.yaml` to enable authentication with aws-iam-authenticator
View the generated configuration file aws-iam-authenticator.kubeconfig
wangzan:~/k8s $ cat aws-iam-authenticator.kubeconfig

# clusters refers to the remote service.
clusters:
  - name: aws-iam-authenticator
    cluster:
      certificate-authority-data: LS0tLS1CRUdJTiBDRVJUSUZJQ0FURS0tLS0tCk1JSURJRENDQWdpZ0F3SUJBZ0lRVDRmUllwRy9uSlE0UURmSHUwb2M3ekFOQmdrcWhraUc5dzBCQVFzRkFEQWcKTVI0d0hBWURWUVFERXhWaGQzTXRhV0Z0TFdGMWRHaGxiblJwWTJGMGIzSXdJQmNOTWpBd01UQTNNRGMxTURVMApXaGdQTWpFeE9URXlNVFF3TnpVd05UUmFNQ0F4SGpBY0JnTlZCQU1URldGM2N5MXBZVzB0WVhWMGFHVnVkR2xqCllYUnZjakNDQVNJd0RRWUpLb1pJaHZjTkFRRUJCUUFEZ2dFUEFEQ0NBUW9DZ2dFQkFLRkhTU3ZjWGZFNVZrN3UKejBRNjFGVE1LQS9PeE5HaVlOa05iS0ZzSW9pdW5VejBLdUI4aFBReitEOGxpNnpYZUozWDdNNVNyaG1hYjRBMgowWXJNZEVlcSthYVR5aVhFV2QrREFlUU9HcFFRQm0ya2hvdEgzS2Vrd2dlTjlwbzFUUjBHQVgrbFBQWWloOHNBCml6ZWxBRENLZUMrUS8yWnVZYkttaUFiSm1MNDdqc09nd0pXYldQV0JOdm54VDkrL0wwTHphN1c3MVdieCszaWsKQUdUT2xDWm5tZjY0b0sxQWw4eDNxUktnSXp0bnFBMWRFeEMwS2ZzR1dRRy9Xb00rbnRXZW40QmJEOW1XakF4Zgo0Yk9CaXBOcDMrMlFJOU5LL1pUOTYyaDFZbE8yUWdiYVMrSTZtR2o5WXhwamFXdXgyWGNUd2N0MTFjODFMNWcxCmNaVjZJZ2tDQXdFQUFhTlVNRkl3RGdZRFZSMFBBUUgvQkFRREFnS2tNQk1HQTFVZEpRUU1NQW9HQ0NzR0FRVUYKQndNQk1BOEdBMVVkRXdFQi93UUZNQU1CQWY4d0dnWURWUjBSQkJNd0VZSUpiRzlqWVd4b2IzTjBod1IvQUFBQgpNQTBHQ1NxR1NJYjNEUUVCQ3dVQUE0SUJBUUIyaE1wYm5kTDhVa3VRNVVuZzNkWTh5Y0RQZ2JvbU9Mb0t5dUlzCnVoNkljMUtaMUFiNmVoVDg2bzN2bzJzbnVoNkhibU13NjhvNE9SSllLdTB4RXB3RDR0YUlSVEN1bk9KVHFUeHoKZDZsN2xqdGtBMWZnUktpUHF1SjlyUmxqYXVTMGMxU05lWTVmR2hhUEh3UFBBMHoxN3orMWdiVzNiUjFEckxHQwp6WHVCNStFM0xSVHJCck53aHlZOUtIcVB4Vy9PL1M2V2FZbUR4R3Y4bklNNUUrTzltRFBPWGZpWFJDRFFkb2R5ClRadnU1VDR5ZVhQaEQwRmJKdjg4OSsxZnR4TGlSaUdTQ29lRTNEMUdiYSswZXFMT0hidExUY29VZ25WTGVlMTAKclZDOWRiOU05ckxDZnU1aUEvcGdORm80VTF1ejAvbFUyV0RnYSthUWNNeC9iaHZJCi0tLS0tRU5EIENFUlRJRklDQVRFLS0tLS0K
      server: https://localhost:21362/authenticate
# users refers to the API Server's webhook configuration
# (we don't need to authenticate the API server).
users:
  - name: apiserver
# kubeconfig files require a context. Provide one for the API Server.
current-context: webhook
contexts:
- name: webhook
  context:
    cluster: aws-iam-authenticator
    user: apiserver
2.3. Whole IAM Certification Process
First, let's look at the configuration file information for kubectl:
apiVersion: v1
clusters:
- cluster:
    certificate-authority-data: DATA+OMITTED
    server: https://93BEE997ED0F1C1BA3BD6C8395BE0756.sk1.us-east-1.eks.amazonaws.com
  name: eks.us-east-1.eksctl.io
contexts:
- context:
    cluster: eks.us-east-1.eksctl.io
    user: wangzan@eks.us-east-1.eksctl.io
  name: wangzan@eks.us-east-1.eksctl.io
current-context: wangzan@eks.us-east-1.eksctl.io
kind: Config
preferences: {}
users:
- name: wangzan@eks.us-east-1.eksctl.io
  user:
    exec:
      apiVersion: client.authentication.k8s.io/v1alpha1
      args:
      - token
      - -i
      - eks
      command: aws-iam-authenticator
      env: null
We can see that the user field, instead of using a certificate for authentication, uses the aws-iam-authenticator client with the following commands:
wangzan:~ $ aws-iam-authenticator token -i eks
{"kind":"ExecCredential","apiVersion":"client.authentication.k8s.io/v1alpha1","spec":{},"status":{"expirationTimestamp":"2020-01-07T08:23:23Z","token":"k8s-aws-v1.aHR0cHM6Ly9zdHMuYW1hem9uYXdzLmNvbS8_QWN0aW9uPUdldENhbGxlcklkZW50aXR5JlZlcnNpb249MjAxMS0wNi0xNSZYLUFtei1BbGdvcml0aG09QVdTNC1ITUFDLVNIQTI1NiZYLUFtei1DcmVkZW50aWFsPUFLSUE1TkFHSEY2TllYU01DTEhPJTJGMjAyMDAxMDclMkZ1cy1lYXN0LTElMkZzdHMlMkZhd3M0X3JlcXVlc3QmWC1BbXotRGF0ZT0yMDIwMDEwN1QwODA5MjNaJlgtQW16LUV4cGlyZXM9MCZYLUFtei1TaWduZWRIZWFkZXJzPWhvc3QlM0J4LWs4cy1hd3MtaWQmWC1BbXotU2lnbmF0dXJlPTU2MjA5OTZhY2MzZGE3OWI3OGI0NDVjOTVkMTMyNmU0NjZmNTUyZTMzNDdkN2Y5MmExNGUwMzcwOTJiMzdmMDY"}}
This is actually to get a temporary token from sts to use as an identity credential, which is the same as the following command:
wangzan:~ $ aws eks get-token --cluster-name eks
{"status": {"expirationTimestamp": "2020-01-07T08:25:38Z", "token": "k8s-aws-v1.aHR0cHM6Ly9zdHMuYW1hem9uYXdzLmNvbS8_QWN0aW9uPUdldENhbGxlcklkZW50aXR5JlZlcnNpb249MjAxMS0wNi0xNSZYLUFtei1BbGdvcml0aG09QVdTNC1ITUFDLVNIQTI1NiZYLUFtei1FeHBpcmVzPTYwJlgtQW16LURhdGU9MjAyMDAxMDdUMDgxMTM4WiZYLUFtei1TaWduZWRIZWFkZXJzPWhvc3QlM0J4LWs4cy1hd3MtaWQmWC1BbXotU2VjdXJpdHktVG9rZW49JlgtQW16LUNyZWRlbnRpYWw9QUtJQTVOQUdIRjZOWVhTTUNMSE8lMkYyMDIwMDEwNyUyRnVzLWVhc3QtMSUyRnN0cyUyRmF3czRfcmVxdWVzdCZYLUFtei1TaWduYXR1cmU9NDUyYzA5ZTIwMzg2YjFmODU0NTU4YjhjNzBkNDA2MzdkYzM2Y2ExNzA5YWIxODQzNzE3NDdhY2IwYTUyNGIzYw"}, "kind": "ExecCredential", "spec": {}, "apiVersion": "client.authentication.k8s.io/v1alpha1"}
Let's go back to the schema diagram above, and kubectl will put this acquired token in Authorization, the request header for http, and send it to apiserver. When apiserver receives it, it will go back to the webhook server that has been configured for the request, which is what we mentioned earlier as daemonset pod (aws-iam-authenticator server), which aws-iam-authenticator server will hold tokenTo request the sts service, the sts Service verifies the validity of its token and returns the ARN (IAM Identity) of the IAM user;
When aws-iam-authenticator server gets the returned ARN, go back and compare it with a configmap aws-auth in k8s.
2.4,configmap aws-auth
Let's take a look at the machine we just created. What's in aws-auth, the configmap?
wangzan:~ $ kubectl get cm aws-auth -nkube-system -oyaml
apiVersion: v1
data:
  mapRoles: |
    - groups:
      - system:bootstrappers
      - system:nodes
      rolearn: arn:aws:iam::921283538843:role/eksctl-eks-nodegroup-ng-5a1b33b9-NodeInstanceRole-1B757SI5DCABJ
      username: system:node:{{EC2PrivateDNSName}}
    - groups:
      - system:bootstrappers
      - system:nodes
      - system:node-proxier
      rolearn: arn:aws:iam::921283538843:role/eksctl-eks-cluster-FargatePodExecutionRole-DEAGGBFGQ9YB
      username: system:node:{{SessionName}}
kind: ConfigMap
metadata:
  creationTimestamp: "2019-12-30T07:57:47Z"
  name: aws-auth
  namespace: kube-system
  resourceVersion: "529891"
  selfLink: /api/v1/namespaces/kube-system/configmaps/aws-auth
  uid: 117c0e14-2ada-11ea-8820-0a64f353aa45
This defines the mapping relationship between the user or group in IAM Identity and k8s. The default administrator for cluster creation is not there, which may be a security consideration because this file can be edited and modified.
From the previous step, we know that by comparing aws-auth, apiserver gets the username or group of the requesting user, and then grants IAM the appropriate permissions through its authorization authorization. Our cluster generally uses RBAC.
For more configuration information, refer to the official documentation:
https://github.com/kubernetes-sigs/aws-iam-authenticator
https://docs.aws.amazon.com/zh_cn/eks/latest/userguide/add-user-role.html