Article directory
- Preface
- I. environment
- 2: Experimental process
- 2.1: deployment of Redis from master-slave server
- 2.2: master-slave server configuration file modification
- 2.3: install rvm and RUBY control cluster software on the main server
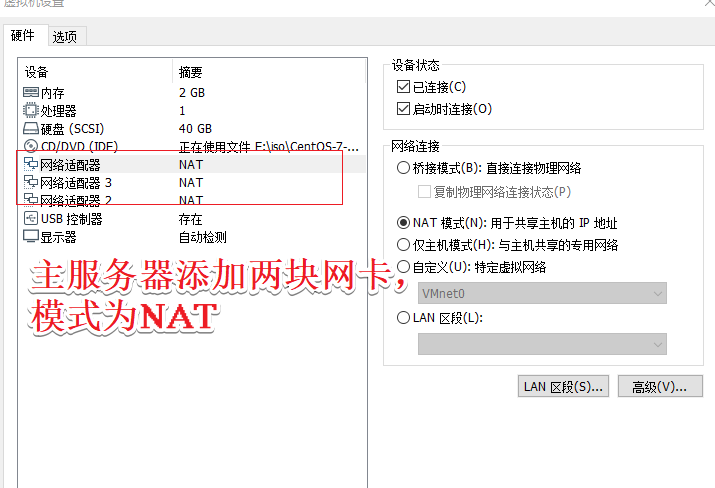
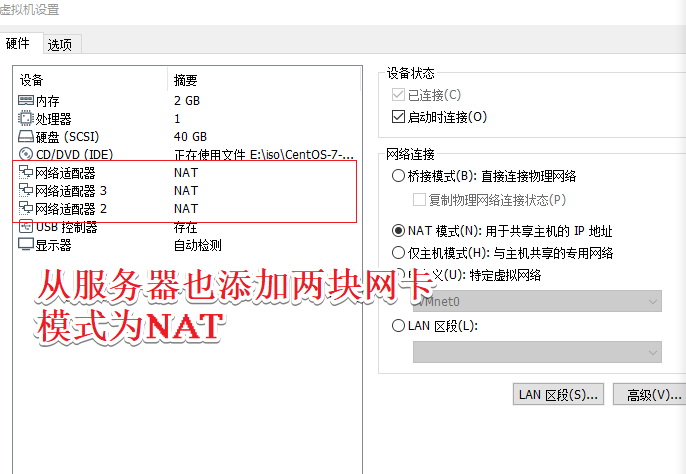
- 2.4: the master and slave servers add two network cards respectively
- 2.5: create cluster on primary server
- 2.6: cluster verification
Preface
I. environment
1.1: Environment
- VMware software
- It is recommended to build a cluster with 6 servers, 3 master servers and 3 slave servers on the Redis official website
- We use two servers to simulate six servers, and add network card to the rest
- Master server master1: IP address: 192.168.79.133
- Master server master2: IP address: 192.168.79.129
- Master server master3: IP address: 192.168.79.130
- Slave server slave1: IP address: 192.168.79.134
- Slave server slave 2: IP address: 192.168.79.131
- Slave server slave3: IP address: 192.168.79.132
- The Redis master server needs to install rvm and Ruby control cluster software
1.2: purpose of the experiment
- The following goals are achieved through experiments
- Deploy Redis service
- Building Redis cluster
- Verify Redis cluster function
2: Experimental process
2.1: deployment of Redis from master-slave server
-
'//The deployment of primary and secondary servers is the same. Only the deployment of primary server is shown here
[root@master1 ~]# yum install gcc gcc-c++ make -y	'//Install environment component compiler '
[root@master1 ~]# mount.cifs //192.168.23.1/ccc /mnt	'//Mount host directory '

Password for root@//192.168.23.1/ccc:
[root@master1 ~]# cd /mnt/redis/
[root@master1 redis]# tar zxvf redis-5.0.7.tar.gz -C /opt	'//redis source package can be downloaded directly to the official website
[root@master1 redis]# cd /opt/redis-5.0.7/
[root@master1 redis-5.0.7]# make	'//make 'directly
[root@master1 redis-5.0.7]# make PREFIX=/usr/local/redis/ install	'//Specify the redis directory and install '
[root@master1 redis-5.0.7]# cd utils/'//Return to the redis source package decompression directory '
[root@master1 utils]# ./install_server.sh 	'//Execute script to configure '
Welcome to the redis service installer
This script will help you easily set up a running redis server

Please select the redis port for this instance: [6379] 	'//Select the redis default interface and enter directly "
Selecting default: 6379
Please select the redis config file name [/etc/redis/6379.conf] 	'//Select the redis default profile name and enter directly "
Selected default - /etc/redis/6379.conf
Please select the redis log file name [/var/log/redis_6379.log] 	'//Select the default redis log file name and enter directly "
Selected default - /var/log/redis_6379.log
Please select the data directory for this instance [/var/lib/redis/6379] 	'//Select the default data file of the default interface and enter directly "
Selected default - /var/lib/redis/6379
Please select the redis executable path [] /usr/local/redis/bin/redis-server	'//Select the redis executable path, which needs to be entered manually: / usr / local / redis / bin / redis server '
Selected config:	'//Selected configuration list display '
Port           : 6379
Config file    : /etc/redis/6379.conf
Log file       : /var/log/redis_6379.log
Data dir       : /var/lib/redis/6379
Executable     : /usr/local/redis/bin/redis-server
Cli Executable : /usr/local/redis/bin/redis-cli
Is this ok? Then press ENTER to go on or Ctrl-C to abort.	'//Direct return to complete configuration '
Copied /tmp/6379.conf => /etc/init.d/redis_6379
Installing service...
Successfully added to chkconfig!
Successfully added to runlevels 345!
Starting Redis server...
Installation successful!
[root@master1 utils]# ln -s /usr/local/redis/bin/* /usr/local/bin	'//Create a soft connection with the redis command for system identification "
[root@master1 utils]# netstat -ntap |grep 6379
tcp        0      0 127.0.0.1:6379          0.0.0.0:*               LISTEN
2.2: master-slave server configuration file modification
-
[root@master1 utils]# vim /etc/redis/6379.conf 	'//Modify master profile '
#bind 127.0.0.1	'//Note: the listening 127 address on line 70 means listening to all addresses
protected-mode no	'//Remove comment on line 89 to turn off security "
port 6379	'//Remove the comment on line 93 and open port 6379 '
daemonize yes	'//Remove comment on line 137 to start as a stand-alone process'
cluster-enabled yes	'//Remove the comment on line 833 and turn on the clustering function "
cluster-config-file nodes-6379.conf	'//Remove line 841 comment, cluster name file settings'
cluster-node-timeout 15000	'//Remove line 847 comment, cluster timeout setting '
appendonly yes	'//Remove the comment on line 700 and enable aof persistence "
[root@master1 utils]# cd /var/lib/redis/6379/
[root@master1 6379]# /etc/init.d/redis_6379 restart	'//Restart redis service '
[root@master1 6379]# ls
appendonly.aof  dump.rdb  nodes-6379.conf	'//Three files are generated. appendonly.aof is the AOF persistence file, dump.rdb is the RDB snapshot file, and nodes-6379.conf is the configuration file generated by the node's first startup. "
2.3: install rvm and RUBY control cluster software on the main server
-
[root@master1 6379]# gpg --keyserver hkp://keys.gnupg.net --recv-keys 409B6B1796C275462A1703113804BB82D39DC0E3	'//Import the key file. If there is an error, import it again. "
[root@master1 6379]# curl -sSL https://get.rvm.io | bash -s stable	'//Install rvm'
[root@master1 rvm-1.29.9]# cd /mnt/redis/
[root@master1 redis]# tar zxvf rvm-master.tar.gz -C /opt
[root@master1 redis]# cd /opt/rvm-master/
[root@master1 rvm-master]# ./install
[root@master1 rvm-master]# source /etc/profile.d/rvm.sh	'//Execute environment variable '
[root@master1 rvm-master]# rvm list known	'//List versions ruby can install '
[root@master1 rvm-master]# rvm install 2.4.1	'//Install ruby2.4.1, and the events will be long "
[root@master1 rvm-master]# ruby -v '//View current ruby Version '
[root@master1 rvm-master]# gem install redis '//Re install redis'
2.4: the master and slave servers add two network cards respectively
-
-
[root@master1 rvm-master]# systemctl restart network	'//Restart network card '
[root@master1 rvm-master]# systemctl stop firewalld.service 	'//Turn off firewall '
[root@master1 rvm-master]# setenforce 0
-
-
[root@slave1 6379]# systemctl restart network
[root@slave1 6379]# systemctl stop firewalld.service
[root@slave1 6379]# setenforce 0
2.5: create cluster on primary server
-
[root@master1 rvm-master]# redis-cli --cluster create 192.168.79.133:6379 192.168.79.129:6379 192.168.79.130:6379 192.168.79.134:6379 192.168.79.131:6379 192.168.79.132:6379 --cluster-replicas 1
'//The feedback information can be inputted into yes, and the following is the feedback information "
>>> Performing hash slots allocation on 6 nodes...
Master[0] -> Slots 0 - 5460
Master[1] -> Slots 5461 - 10922
Master[2] -> Slots 10923 - 16383
Adding replica 192.168.79.131:6379 to 192.168.79.133:6379
Adding replica 192.168.79.132:6379 to 192.168.79.129:6379
Adding replica 192.168.79.134:6379 to 192.168.79.130:6379
M: dacbafd23b78accca1ecb7a37a926dd7c711af0d 192.168.79.133:6379	'//133129130 masters'
   slots:[0-5460] (5461 slots) master
M: dacbafd23b78accca1ecb7a37a926dd7c711af0d 192.168.79.129:6379
   slots:[5461-10922] (5462 slots) master
M: dacbafd23b78accca1ecb7a37a926dd7c711af0d 192.168.79.130:6379
   slots:[10923-16383] (5461 slots) master
S: f3a25427b5b2bd0af5b194d0d90c87882a09e4cd 192.168.79.134:6379	'//134131132 is from "
   replicates dacbafd23b78accca1ecb7a37a926dd7c711af0d
S: f3a25427b5b2bd0af5b194d0d90c87882a09e4cd 192.168.79.131:6379
   replicates dacbafd23b78accca1ecb7a37a926dd7c711af0d
S: f3a25427b5b2bd0af5b194d0d90c87882a09e4cd 192.168.79.132:6379
   replicates dacbafd23b78accca1ecb7a37a926dd7c711af0d
Can I set the above configuration? (type 'yes' to accept): yes
>>> Nodes configuration updated
>>> Assign a different config epoch to each node
>>> Sending CLUSTER MEET messages to join the cluster
Waiting for the cluster to join

>>> Performing Cluster Check (using node 192.168.79.133:6379)
M: dacbafd23b78accca1ecb7a37a926dd7c711af0d 192.168.79.133:6379
   slots:[0-16383] (16384 slots) master
   1 additional replica(s)
S: f3a25427b5b2bd0af5b194d0d90c87882a09e4cd 192.168.79.131:6379
   slots: (0 slots) slave
   replicates dacbafd23b78accca1ecb7a37a926dd7c711af0d
[OK] All nodes agree about slots configuration.
>>> Check for open slots...
>>> Check slots coverage...
[OK] All 16384 slots covered.
'//The binding relationship of one master and one slave is random
2.6: cluster verification
-
Master slave data validation
-
[root@master1 rvm-master]# redis-cli -h 192.168.79.133 -p 6379	'//Log in to 133 server database '
192.168.79.133:6379> keys *
(empty list or set)
192.168.79.133:6379> set user lisi	'//Create a key value '
OK
192.168.79.133:6379> keys *	'//View all keys'
1) "user"
192.168.79.133:6379> get user	'//View value of user key '
"lisi"
192.168.79.133:6379> exit	'//Exit '
[root@master1 rvm-master]# redis-cli -h 192.168.79.131 -p 6379	'//Log in to 131 server database '
192.168.79.131:6379> keys *
1) "user"
192.168.79.131:6379> get user	'//View value of user key '
(error) MOVED 5474 192.168.79.129:6379	'//Prompt to move to node 129 '
192.168.79.131:6379> exit
[root@master1 rvm-master]# redis-cli -h 192.168.79.129 -p 6379	'//Log in to database of server 129 '
192.168.79.129:6379> keys *
1) "user"
192.168.79.129:6379> get user
"lisi"
192.168.79.129:6379> exit
-
Verification of value stored in hash mode and automatic deletion time of setting key
-
[root@master1 rvm-master]# redis-cli -h 192.168.79.133 -p 6379
192.168.79.133:6379> hset person name zhangsan	'//Use hash method to create key value pair '
(integer) 1
192.168.79.133:6379> keys *
1) "person"
2) "user"
192.168.79.133:6379> hget person name
"zhangsan"
192.168.79.133:6379> expire user 10	'//Set the automatic deletion time of user key for 10 seconds "
(integer) 1
'//Wait 10 seconds.
192.168.79.133:6379> keys *
1) "person"	'//Auto delete succeeded '
192.168.79.133:6379> exit
[root@master1 rvm-master]#

