I. overview
JWT, which is called JSON Web Token in full, is an open-source standard protocol. It defines a JSON based, lightweight and secure data transmission method.
Two, details
Each JWT is composed of three parts: Header, Payload and signature. At the same time, the JWT is spliced with dots in the form of:
Header.Payload.Signature
Header
The Header part is a Base64 encoded JSON object. The content of an object usually consists of two fields in the form of:
{
  "typ": "JWT",
  "alg": "HS256"
}
Where, typ (full name is type) indicates that the current Token type is JWT, and alg (full name is algorithm) indicates that the current signature algorithm is HS256.
Payload
The Payload part is also a JSON object encoded by Base64. The properties of the object can be divided into three parts: reserved field, public field and private field.
Reserved fields are JWT internal declarations and have special functions, including
- iss (full name issuer), indicating who issued JWT
- Subject (full name subject), indicating the subject of JWT (also understood as user oriented type)
- aud (full name: audience), indicating who JWT wants to sign in
- exp (full name: expiration time), indicating the expiration time of JWT, which should be greater than the issuing time
- nbf (full name is not before time), indicating when JWT will take effect
- iat (full name issued at time), indicating the issuing time of JWT
- jti (full name: JWT ID), indicating the unique ID of JWT to avoid replay attack
Public fields and private fields are fields that users can add at will. The difference is that public fields are conventional and commonly used fields, while private fields are more suitable for practical application scenarios.
Currently existing public fields can be accessed from the JSON Web Token Claims Found in.
The structure of Payload is as follows:
{
  "sub": "1234567890",
  "name": "John Doe",
  "iat": 1516239022
}
Signature
The Signature part is generated by JWT according to the existing fields. Its calculation method is to use the algorithm defined in the Header and the user-defined key to encrypt the string composed of the Base64 encoded Header and Payload. The form is as follows:
HMACSHA256(base64(header) + '.' + base64(payload))
3, Application scenario
Generally accepted application scenarios in the industry are as follows:
Prevent transmission data tampering
Data tampering refers to the behavior that data is intercepted and modified in the process of transmission.
JWT itself can use encryption algorithm to sign the transmission content. Even if the data is intercepted, it is difficult to tamper with the signature and the transmission content at the same time.
authentication
Authentication refers to verifying whether users have access to the system.
Some people use JWT to replace the traditional Session + Cookie for the following reasons:
- Small server overhead. Using Session + Cookie requires the server to cache the user data. Using JWT, the user data is directly distributed to the client and sent to the server with each request.
- Good expansibility. The advantage of server not caching user data is that it can be easily expanded horizontally
- For single sign on. JWT is very suitable for single sign on in cross domain situation
- It is suitable for use with RESTFul API. The API based on RESTFul architecture design needs to follow the stateless principle of RESTFul, and JWT based authentication just transfers the state to the client
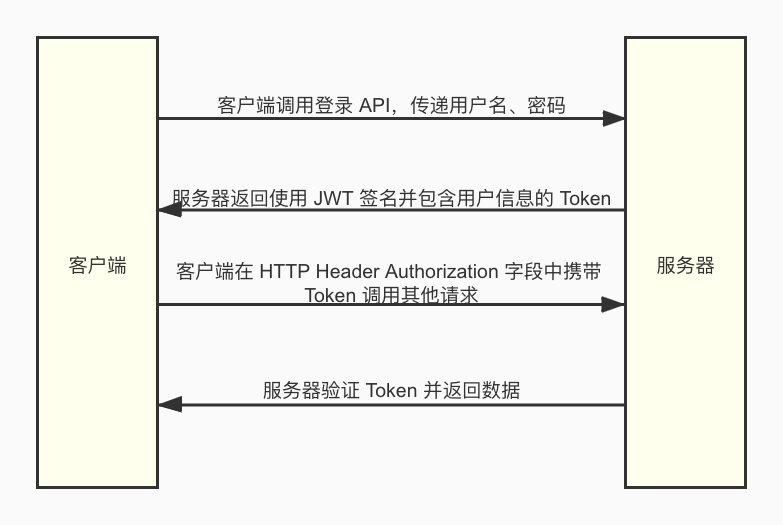
The general processing logic of authentication based on JWT is as follows:
There are also some disputes on the authentication scheme based on JWT:
- After the server issues JWT, it can't log off actively. If there is malicious request, it is difficult to stop it. In fact, it can be solved by Token blacklist.
- JWT reduces the cost of the server, but increases the cost of the bandwidth. The Token generated by JWT is much larger than the SessionID in volume, which means that each request carries more data than before. This is true, so try to put only the necessary data in JWT.
- JWT is not completely superior to session cookie in authentication. For example, session ID can also be signed to prevent tampering.
Four, use
The following uses Node.js and JavaScript to demonstrate the application of JWT in authentication. The libraries involved are:
How to generate Token
The generation of Token is generally that the client sends the login request, and the server uses the key to generate Token and put it into the response body. The following is the Token generation logic of the server.
// File location: controller/v1/token.js
const config = require('config') // Load server configuration
const jwt = require('jsonwebtoken') // Implementation of loading jwt Node.js

/**
 * Create Token controller
 * @param {Object} ctx Request context
 */
async function create(ctx) {
  const username = ctx.request.body.username
  const password = ctx.request.body.password

  if (!username || !password) {
    ctx.throw(400, 'Parameter error')
    return
  }

  // Omitted: user name password database verification
  const user = { id: '5e54c02a2b073de564fe8034' } // User information
  const secret = config.get('secret') // Get the key saved in the configuration
  const opt = { expiresIn: '2d' } // Set Token expiration time to 2 days

  ctx.body = jwt.sign(user, secret, opt) // Generate and return token
}

module.exports = {
  create,
}
Client carries Token for request
In general, the client places the Token in the Authorization of Http Header and sends it to the server along with the request.
// File location: views/index.pug
var request = axios.create({ baseURL: '/api/v1' }) // Create request instance
var token // In order to facilitate the use of global variables here, it should normally be placed in other storage media, such as localStorage, where the acquisition logic is omitted

// Listen to the normal request button click event to initiate a request
document.querySelector('#normal').addEventListener('click', function() {
  if (!token) {
    alert('Please login')
    return
  }

  request.get('/users', {
    headers: {
      Authorization: 'Bearer ' + token, // Bind token to header
    },
  }).then(function({ data }) {
    document.querySelector('#response').innerHTML = JSON.stringify(data)
  }).catch(function(err) {
    console.log('Request Error: ', err)
  })
})
How to verify Token by server
The verification operation is generally placed in the middleware of the server.
const config = require('config') // Load server configuration
const jwt = require('jsonwebtoken') // Implementation of loading jwt Node.js

// Define middleware functions
module.exports = async (ctx, next) => {
  const path = ctx.url // Get request URL
  const method = ctx.method.toLowerCase() // Get request method

  // Request white list. The requests in the white list do not go through middleware token verification
  const whiteList = [
    { path: /^\/api\/v[1-9]\/tokens/, method: 'post' },
    { path: /^\/api/, reverse: true }, // Resources that do not start with the / api do not need to be verified by the request
  ]

  // Request whitelist check function
  const checker = (i) => {
    const matchPath = i.path.test(path)
    const matchMethod = i.method ? i.method === method : true
    return (i.reverse ? !matchPath : matchPath) && matchMethod
  }

  // Logical judgment of white list
  if (whiteList.some(checker)) {
    await next()
    return
  }

  // Get token in http header
  const token = (ctx.header.authorization || '').replace('Bearer ', '')

  // token validation
  try {
    const data = jwt.verify(token, config.secret)
    ctx.userInfo = data
  } catch (e) {
    ctx.throw(400, 'Token error')
  }

  await next()
}
For complete code, please go to GitHub to search for user yo squirrel
If you feel good, you can focus on the official account of WeChat public squirrel column.